
Chapter 4
Managing Information with Lists and Tables
In This Chapter
![]() Understanding basic lists
Understanding basic lists
![]() Creating unordered, ordered, and nested lists
Creating unordered, ordered, and nested lists
![]() Building definition lists
Building definition lists
![]() Building basic tables
Building basic tables
![]() Using rowspan and colspan attributes
Using rowspan and colspan attributes
You'll often need to present large amounts of organized information, and HTML has some wonderful tools to manage this task. HTML has three kinds of lists and a powerful table structure for organizing the content of your page. Figure out how these tools work, and you can manage complex information with ease.
Making a List and Checking It Twice
HTML supports three types of lists. Unordered lists generally contain bullet points. They're used when the order of elements in the list isn't important. Ordered lists usually have some kind of numeric counter preceding each list item. Definition lists contain terms and their definitions.
Creating an unordered list
All the list types in HTML are closely related. The simplest and most common kind of list is an unordered list.
Looking at an unordered list
Look at the simple page shown in Figure 4-1. In addition to a couple of headers, it has a list of information.

Figure 4-1: An unordered list of web browsers.
This list of browsers has some interesting visual characteristics:
- The items are indented. There's some extra space between the left margin and the beginning of each list item.
- The list elements have bullets. That little dot in front of each item is a bullet. Bullets are commonly used in unordered lists like this one.
- Each item begins a new line. When a list item is displayed, it's shown on a new line.
These characteristics help you see that you have a list, but they're just default behaviors. Defining something as a list doesn't force it to look a particular way; the defaults just help you see that these items are indeed part of a list.
 Remember the core idea of HTML here. You aren't really describing how things look, but what they mean. You can change the appearance later when you figure out CSS, so don't get too tied up in the particular appearance of things. For now, just recognize that HTML can build lists, and make sure you know how to use the various types.
Building an unordered list
Lists are made with two kinds of tags. One tag surrounds the entire list and indicates the general type of list. This first example demonstrates an unordered list, which is surrounded by the <ul></ul> pair.
Note: Indenting all the code inside the <ul> set is common. The unordered list can go in the main body.
Inside the <ul></ul> set is a number of list items. Each element of the list is stored between a <li> (list item) and a </li> tag. Normally, each <li></li> pair goes on its own line of the source code, although you can make a list item as long as you want.
Look to Book II, Chapter 4 for information on how to change the bullet to all kinds of other images, including circles, squares, and even custom images.
The code for the unordered list is pretty straightforward:
<!doctype html>
<html lang="en">
<head>
<meta charset="UTF-8">
<title>basicUL.html</title>
</head>
<body>
<h1>Basic Lists</h1>
<h2>Common Web Browsers</h2>
<ul>
<li>Firefox</li>
<li>Chrome</li>
<li>Internet Explorer</li>
<li>Opera</li>
<li>Safari</li>
</ul>
</body>
</html>
Creating ordered lists
Ordered lists are almost exactly like unordered lists. Ordered lists traditionally have numbers rather than bullets (although you can change this through CSS if you want; see Book II, Chapter 4).
Viewing an ordered list
Figure 4-2 demonstrates a page with a basic ordered list — basicOL.html.

Figure 4-2: A simple ordered list.
Figure 4-2 shows a list where the items are numbered. When your data is a list of steps or information with some type of numerical values, an ordered list is a good choice.
Building the ordered list
The code for basicOL.html is remarkably similar to the previous unordered list:
<!doctype html>
<html lang="en">
<head>
<meta charset="UTF-8">
<title>basicOL.html</title>
</head>
<body>
<h1>Basic Ordered List</h1>
<h2>Top ten dog names in the USA</h2>
<ol>
<li>Max</li>
<li>Jake</li>
<li>Buddy</li>
<li>Maggie</li>
<li>Bear</li>
<li>Molly</li>
<li>Bailey</li>
<li>Shadow</li>
<li>Sam</li>
<li>Lady</li>
</ol>
<p>
data from http://www.bowwow.com.au
</p>
</body>
</html>
The only change is the list tag itself. Rather than the <ul> tag, the ordered list uses the <ol> indicator. The list items are the same <li></li> pairs used in the unordered list.
You don't indicate the item number anywhere; it generates automatically based on the position of each item within the list. Therefore, you can change the order of the items, and the numbers are still correct.
 This is where it's great that HTML is about meaning, not layout. If you specified the actual numbers, it'd be a mess to move things around. All that really matters is that the element is inside an ordered list.
Making nested lists
Sometimes, you'll want to create outlines or other kinds of complex data in your pages. You can easily nest lists inside each other, if you want. Figure 4-3 shows a more complex list describing popular cat names in the U.S. and Australia.

Figure 4-3: An ordered list inside an unordered list!
Figure 4-3 uses a combination of lists to do its work. This figure contains a list of two countries: the U.S. and Australia. Each country has an H3 heading and another (ordered) list inside it. You can nest various elements inside a list, but you have to do it carefully if you want the page to validate.
In this example, there's an unordered list with only two elements. Each of these elements contains an <h3> heading and an ordered list. The page handles all this data in a relatively clean way and validates correctly.
Examining the nested list example
The entire code for nestedList.html is reproduced here:
<!doctype html>
<html lang="en">
<head>
<meta charset="UTF-8">
<title>nestedList.html</title>
</head>
<body>
<h1>Nested Lists</h1>
<h2>Popular Cat Names</h2>
<ul>
<li>
<h3>USA</h3>
<ol>
<li>Tigger</li>
<li>Tiger</li>
<li>Max</li>
<li>Smokey</li>
<li>Sam</li>
</ol>
</li>
<li>
<h3>Australia</h3>
<ol>
<li>Oscar</li>
<li>Max</li>
<li>Tiger</li>
<li>Sam</li>
<li>Misty</li>
</ol>
</li>
</ul>
</body>
</html>
Here are a few things you might notice in this code listing:
- There's a large <ul> set surrounding the entire main list.
- The main list has only two list items.
- Each of these items represents a country.
- Each country has an <h3> element, describing the country name inside the <li>.
- Each country also has an <ol> set with a list of names.
- The indentation really helps you see how things are connected.
Indenting your code
You might have noticed that I indent all the HTML code in this book. The browsers ignore all indentation, but it's still an important coding habit.
There are many opinions about how code should be formatted, but the standard format I use in this book will serve you well until you develop your own style.
Generally, I use the following rules to indent HTML code:
- Indent each nested element. Because the <head> tag is inside the <html> element, I indent to indicate this. Likewise, the <li> elements are always indented inside <ul> or <ol> pairs.
- Line up your elements. If an element takes up more than one line, line up the ending tag with the beginning tag. This way, you know what ends what.
- Use spaces, not tabs. The tab character often causes problems in source code. Different editors format tabs differently, and a mixture of tabs and spaces can make your carefully formatted page look awful when you view it in another editor.
Most editors have the ability to interpret the tab key as spaces. It's a great idea to find this feature on your editor and turn it on, so any time you hit the tab key, it's interpreted as spaces. In Komodo Edit, you do this in Edit ⇒ Preferences ⇒ Editor ⇒ Indentation.
Use two spaces. Most coders use two or four spaces per indentation level. HTML elements can be nested pretty deeply. Going seven or eight layers deep is common. If you use tabs or too many spaces, you'll have so much white space that you can't see the code.
- End at the left margin. If you finish the page and you're not back at the left margin, you've forgotten to end something. Proper indentation makes seeing your page organization easy. Each element should line up with its closing tag.
Building a nested list
When you look over the code for the nested list, it can look intimidating, but it isn't really that hard. The secret is to build the list outside in:
- Create the outer list first. Build the primary list (whether it's ordered or unordered). In my example, I began with just the unordered list with the two countries in it.
- Add list items to the outer list. If you want text or headlines in the larger list (as I did), you can put them here. If you're putting nothing but a list inside your primary list, you may want to put some placeholder <li> tags in there just so you can be sure everything's working.
- Validate before adding the next list level. Nested lists can confuse the validator (and you). Validate your code with the outer list to make sure there are no problems before you add inner lists.
- Add the first inner list. After you know the basic structure is okay, add the first interior list. For my example, this was the ordered list of cat names in the U.S.
- Repeat until finished. Keep adding lists until your page looks right.
- Validate frequently. It's much better to validate as you go than to wait until everything's finished. Catch your mistakes early so you don't replicate them.
Building the definition list
One more type of list — the definition list — is very useful, even if it's used infrequently. The definition list was originally designed to format dictionary-style definitions, but it's really useful any time you have name and value pairs. Figure 4-4 shows a sample definition list in action.

Figure 4-4: A basic definition list.
Definition lists don't use bullets or numbers. Instead, they have two elements. Definition terms are usually words or short phrases. In Figure 4-4, the browser names are defined as definition terms. Definition descriptions are the extended text blocks that contain the actual definition.
The standard layout of definition lists indents each definition description. Of course, you can change the layout to what you want after you understand the CSS in Books II and III.
You can use definition lists any time you want a list marked by key terms, rather than bullets or numbers. The definition list can also be useful in other situations, such as forms, figures with captions, and so on.
Here's the code for basicDL.html:
<!DOCTYPE HTML>
<html lang="en-US">
<head>
<meta charset="UTF-8">
<title>BasicDL.html</title>
</head>
<body>
<h1>Basic Definition List</h1>
<h2>Common Web Browsers</h2>
<dl>
<dt>Mosaic</dt>
<dd>
The mother of all modern browsers. The first widely used
visual browser.
</dd>
<dt>Netscape</dt>
<dd>
The commercial successor to Mosaic. Widely popular, but
eventually eclipsed by Internet Explorer
</dd>
<dt>IE</dt>
<dd>
Microsoft's entry into the browser market, and a dominant
player.
</dd>
<dt>Firefox</dt>
<dd>
An open-source browser that has shaken up the world.
</dd>
</dl>
</body>
</html>
As you can see, the definition list uses three tag pairs:
- <dl></dl> defines the entire list.
- <dt></dt> defines each definition term.
- <dd></dd> defines the definition data.
Definition lists aren't used often, but they can be extremely useful. Any time you have a list that will be a combination of terms and values, a definition list is a good choice.
Building Tables
Sometimes, you'll encounter data that fits best in a tabular format. HTML supports several table tags for this kind of work. Figure 4-5 illustrates a very basic table.
Sometimes, the best way to show data in a meaningful way is to organize it in a table. HTML defines a table with the (cleverly named) <table> tag. The table contains a number of table rows (defined with the <tr> tag). Each table row can consist of a number of table data (<td>) or table header (<th>) tags.
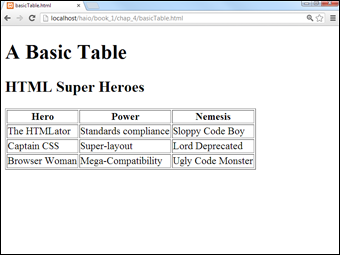
Figure 4-5: Tables are useful for certain kinds of data representation.
Compare the output in Figure 4-5 with the code for basicTable.html that creates it:
<!doctype html>
<html lang="en">
<head>
<meta charset="UTF-8">
<title>basicTable.html</title>
</head>
<body>
<h1>A Basic Table</h1>
<h2>HTML Super Heroes</h2>
<table border = "1">
<tr>
<th>Hero</th>
<th>Power</th>
<th>Nemesis</th>
</tr>
<tr>
<td>The HTMLator</td>
<td>Standards compliance</td>
<td>Sloppy Code Boy</td>
</tr>
<tr>
<td>Captain CSS</td>
<td>Super-layout</td>
<td>Lord Deprecated</td>
</tr>
<tr>
<td>Browser Woman</td>
<td>Mega-Compatibility</td>
<td>Ugly Code Monster</td>
</tr>
</table>
</body>
</html>
Defining the table
The HTML table is defined with the <table></table> pair. It makes a lot of sense to indent and space your code carefully so you can see the structure of the table in the code. Just by glancing at the code, you can guess that the table consists of three rows and each row consists of three elements.
In a word processor, you typically create a blank table by defining the number of rows and columns, and then fill it in. In HTML, you define the table row by row, and the elements in each row determine the number of columns. It's up to you to make sure each row has the same number of elements.
By default (in most browsers, anyway), tables don't show their borders. If you want to see basic table borders, you can turn on the table's border attribute. (An attribute is a special modifier you can attach to some tags.)
<table border = "1">
This tag creates a table and specifies that it will have a border of size 1. If you leave out the border = “1” business, some browsers display a border and some don't. You can set the border value to 0 or to a larger number. The larger number makes a bigger border, as shown in Figure 4-6.

Figure 4-6: I set the border attribute to 10.
Although this method of making table borders is perfectly fine, I show a much more flexible and powerful technique in Book II, Chapter 4.
Setting a table border is a good idea because you can't count on browsers to have the same default. Additionally, the border value is always in quotes. When you read about CSS in Book II (are you getting tired of hearing that yet?), you discover how to add more complex and interesting borders than this simple attribute allows.
Adding your first row
After you define a table, you need to add some rows. Each row is indicated by a <tr></tr> pair.
Inside the <tr></tr> set, you need some table data. The first row often consists of table headers. These special cells are formatted differently to indicate that they're labels, rather than data.
 Table headers have some default formatting to help you remember they're headers, but you can change the way they look. You can change the table header's appearance in all kinds of great ways in Books II and III. Define the table header so when you discover formatting and decide to make all your table headers chartreuse, you'll know where in the HTML code all the table headers are.
Indent your headers inside the <tr> set. If your table contains three columns, your first row might begin like this:
<tr>
<th></th>
<th></th>
<th></th>
</tr>
Place the text you want shown in the table headers between the <th> and </th> elements. The contents appear in the order they're defined.
Headings don't have to be on the top row. If you want headings on the left, just put a <th></th> pair as the first element of each row. You can have headings at both the top and the left, if you want. In fact, you can have headings anywhere, but it usually makes sense to put headings only at the top or left.
Making your data rows
The next step is to create another row. The data rows are just like the heading row, except they use <td></td> pairs, rather than <th></th> pairs, to contain the data elements. Typically, a three-column table has blank rows that look like this:
<tr>
<td></td>
<td></td>
<td></td>
</tr>
Place the data elements inside the <td></td> segments and you're ready to go.
Building tables in the text editor
Some people think that tables are a good reason to use WYSIWYG (what you see is what you get) editors because they think it's hard to create tables in text mode. You have to plan a little, but it's really quite quick and easy to build an HTML table without graphical tools if you follow this plan:
- Plan ahead. Know how many rows and columns will be in the table. Sketching it on paper first might be helpful. Changing the number of rows later is easy, but changing the number of columns can be a real pain after some of the code has been written.
- Create the headings. If you're going to start with a standard headings-on-top table, begin by creating the heading row. Save, check, and validate. You don't want mistakes to multiply when you add more complexity. This heading row tells how many columns you'll need.
- Build a sample empty row. Make a sample row with the correct number of td elements with one <td></td> pair per line. Build one td set and use copy and paste to copy this data cell as many times as you need. Make sure the number of <td> pairs equals the number of <th> sets in the heading row.
- Copy and paste the empty row to make as many rows as you need.
- Save, view, and validate. Be sure everything looks right and validates properly before you put a lot of effort into adding data.
- Populate the table with the data you need. Go row by row, adding the data between the <td></td> pairs.
- Test and validate again to make sure you didn't accidentally break something.
Spanning rows and columns
Sometimes, you need a little more flexibility in your table design. Figure 4-7 shows a page from an evil overlord's daily planner.

Figure 4-7: Some of these activities take up more than one cell.
Being an evil overlord is clearly a complex business. From a code standpoint, the items that take up more than one cell are the most interesting. Designing traps takes two mornings, and improving the hideout takes three. All Friday afternoon and evening are spent on world domination. Take a look at the code, and you'll see how it works:
<!doctype html>
<html lang="en">
<head>
<meta charset="UTF-8">
<title>tableSpan.html</title>
</head>
<body>
<h1>Using colspan and rowspan</h1>
<table border = "1">
<caption><p>My Schedule</p></caption>
<tr>
<th></th>
<th>Monday</th>
<th>Tuesday</th>
<th>Wednesday</th>
<th>Thursday</th>
<th>Friday</th>
</tr>
<tr>
<th>Breakfast</th>
<td>In lair</td>
<td>with cronies</td>
<td>In lair</td>
<td>in lair</td>
<td>in lair</td>
</tr>
<tr>
<th>Morning</th>
<td colspan = "2">Design traps</td>
<td colspan = "3">Improve Hideout</td>
</tr>
<tr>
<th>Afternoon</th>
<td>train minions</td>
<td>train minions</td>
<td>train minions</td>
<td>train minions</td>
<td rowspan = "2">world domination</td>
</tr>
<tr>
<th>Evening</th>
<td>manaical laughter</td>
<td>manaical laughter</td>
<td>manaical laughter</td>
<td>manaical laughter</td>
</tr>
</table>
</body>
</html>
The secret to making cells larger than the default is two special attributes: rowspan and colspan.
Spanning multiple columns
The morning activities tend to happen over several days. Designing traps will take both Monday and Tuesday morning, and improving the hideout will occupy the remaining three mornings. Take another look at the Morning row; here's how this is done:
<tr>
<th>Morning</th>
<td colspan = "2">Design traps</td>
<td colspan = "3">Improve Hideout</td>
</tr>
The Design Traps cell spans over two normal columns. The colspan attribute tells how many columns this cell will take. The Improve Hideout cell has a colspan of 3.
The Morning row still takes up six columns. The <th> is one column wide, like normal, but the Design Traps cell spans two columns and the Improve Hideout cell takes three, which totals six columns wide. If you increase the width of a cell, you need to eliminate some other cells in the row to compensate.
Spanning multiple rows
A related property — rowspan — allows a cell to take up more than one row of a table. Look back at the Friday column in Figure 4-7, and you'll see the World Domination cell takes up two time slots. (If world domination was easy, everybody would do it.) Here's the relevant code:
<tr>
<th>Afternoon</th>
<td>train minions</td>
<td>train minions</td>
<td>train minions</td>
<td>train minions</td>
<td rowspan = "2">world domination</td>
</tr>
<tr>
<th>Evening</th>
<td>maniacal laughter</td>
<td>maniacal laughter</td>
<td>maniacal laughter</td>
<td>maniacal laughter</td>
</tr>
The Evening row has only five entries because the World Domination cell extends into the space that would normally be occupied by a <td> pair.
If you want to use rowspan and colspan, don't just hammer away at the page in your editor. Sketch out what you want to accomplish first. I'm pretty good at this stuff, and I still needed a sketch before I was able to create the tableSpan.html code.
Avoiding the table-based layout trap
Tables are pretty great. They're a terrific way to present certain kinds of data. When you add the colspan and rowspan concepts, you can use tables to create some pretty interesting layouts. In fact, because old-school HTML didn't really have any sort of layout technology, a lot of developers came up with some pretty amazing layouts based on tables. You still see a lot of web pages today designed with tables as the primary layout mechanism.
Using tables for layout causes some problems though, such as
- Tables aren't meant for layout. Tables are designed for data presentation, not layout. To make tables work for layout, you have to do a lot of sneaky hacks, such as tables nested inside other tables or invisible images for spacing.
- The code becomes complicated fast. Tables involve a lot of HTML markup. If the code involves tables nested inside each other, it's very difficult to remember which <td> element is related to which row of which table. Table-based layouts are very difficult to modify by hand.
- Formatting is done cell by cell. A web page could be composed of hundreds of table cells. Making a change in the font or color often involves making changes in hundreds of cells throughout the page. This makes your page less flexible and harder to update.
- Presentation is tied tightly to data. A table-based layout tightly intertwines the data and its presentation. This runs counter to a primary goal of web design — separation of data from its presentation.
- Table-based layouts are hard to change. After you create a layout based on tables, it's very difficult to make modifications because all the table cells have a potential effect on other cells.
- Table-based layouts cause problems for screen-readers. People with visual disabilities use special software to read web pages. These screen-readers are well adapted to read tables as they were intended (to manage tabular data), but the screen-readers have no way of knowing when the table is being used as a layout technique rather than a data presentation tool. This makes table-based layouts less compliant to accessibility standards.
- Table-based layouts do not adapt well. Modern users expect to run pages on cell phones and tablets as well as desktop machines. Table-based designs do not easily scale to these smaller form-factors.
Resist the temptation to use tables for layout. Use tables to do what they're designed for: data presentation. Book III is entirely about how to use CSS to generate any kind of visual layout you might want. The CSS-based approaches are easier, more dependable, and much more flexible.