
Chapter 1
Getting Started with Data
In This Chapter
![]() Understanding databases, tables, records, and fields
Understanding databases, tables, records, and fields
![]() Introducing the relational data model
Introducing the relational data model
![]() Introducing a three-tier model
Introducing a three-tier model
![]() Understanding MySQL data types
Understanding MySQL data types
![]() Getting started with MySQL and phpMyAdmin
Getting started with MySQL and phpMyAdmin
![]() Adding a password to your MySQL root account
Adding a password to your MySQL root account
![]() Creating new MySQL users
Creating new MySQL users
![]() Designing a simple table
Designing a simple table
![]() Adding data to the table
Adding data to the table
Most programs and websites are really about data. Data drives the Internet, so you really need to understand how data works and how to manage it well if you want to build high-powered, modern websites.
The trend in web development is to have a bunch of specialized languages that work together. HTML describes page content, CSS manages visual layout, JavaScript adds client-side interactivity, and PHP adds server-side capabilities. You're probably not surprised when I tell you that yet another language, SQL (Structured Query Language), specializes in working with data.
In this minibook, you discover how to manage data. Specifically, you find out how to create databases, add data, create queries to retrieve data, and create complex data models to solve real-world problems. In this chapter, I show you some tools that automate the process of creating a data structure and adding data to it. In later chapters in this minibook, I show how to control the process directly through SQL and PHP code.
Examining the Basic Structure of Data
Data has been an important part of programming since computing began. Many languages have special features for working with data, but through the years, a few key ideas have evolved. A system called relational data modeling has become the primary method for data management, and a standard language for this model, called SQL (Structured Query Language), has been developed.
SQL has two major components:
- Data Definition Language (DDL) is a subset of SQL that helps you create and maintain databases. You use DDL to build your databases and add data to them.
- Data Query Language (DQL) is used to pull data out of a database after it's been placed there. Generally, your user input is converted to queries to get information from an existing database.
The easiest way to understand data is to simply look at some. The following table contains some basic contact information:
|
Name |
Company |
|
|
Bill Gates |
Microsoft | |
|
Steve Jobs |
Apple | |
|
Linus Torvalds |
Linux Foundation | |
|
Andy Harris |
John Wiley & Sons |
Note: All these e-mail addresses are completely made up (except mine). Bill Gates hasn't given me his actual e-mail address. He doesn't answer my calls, either . . . (sniff).
It's very common to think of data in the form of tables. In fact, the fancy official database programmer name for this structure is table. A table (in database terms) is just a two-dimensional representation of data. Of course, some fancy computer-science words describe what's in a table:
- Each row is a record. A record describes a discrete entity. In this table, each record is a person in an e-mail directory.
- A record is made of fields. All the records in this table have three fields: name, company, and e-mail. Fields are a lot like variables in programming languages; they can have a type and a value. Sometimes, fields are also called columns.
- A collection of records is a table. All records in a table have the same field definitions but can have different values in the fields.
- A bunch of tables makes a database. Real-world data doesn't usually fit well in one table. Often, you'll make several different tables that work together to describe complex information. The database is an aggregate of a bunch of tables. Normally, you restrict access to a database through a user and password system.
Determining the fields in a record
If you want to create a database, you need to think about what entity you're describing and what fields that entity contains. In the table in the preceding section, I'm describing e-mail contacts. Each contact requires three pieces of information:
- Name: Gives the name of the contact, in 50 characters or less
- Company: Describes which company the contact is associated with, in 30 characters or less
- E-mail: Lists the e-mail address of the contact, in 50 characters or less
Whenever you define a record, begin by thinking about what the table represents and then think of the details associated with that entity. The topic of the table (the kind of thing the table represents) is the record. The fields are the details of that record.
 Before you send me e-mails about my horrible data design, know that I'm deliberately simplifying this first example. Sure, it should have separate fields for first and last name, and it should also have a primary key. I talk about these items later in this minibook, as well as in the section “Defining a primary key,” later in this chapter. If you know about these items already, you probably don't need to read this section. For the rest of you, you should start with a simple data model, and I promise to add all those goodies soon.
Introducing SQL data types
Each record contains a number of fields, which are much like variables in ordinary languages. Unlike scripting languages, such as JavaScript and PHP (which tend to be freewheeling about data types), databases are particular about the type of data that goes in a record.
Table 1-1 illustrates several key data types in MySQL (the variant of SQL used in this book).
Table 1-1 MySQL Data Types
|
Data Type |
Description |
Notes |
|
INT (INTEGER) |
Positive or negative integer (no decimal point) |
Ranges from about –2 billion to 2 billion. Use BIGINT for larger integers. |
|
DOUBLE |
Double-precision floating point |
Holds decimal numbers in scientific notation. Use for extremely large or extremely small values. |
|
DATE |
Date stored in YYYY-MM-DD format |
Can be displayed in various formats. |
|
TIME |
Time stored in HH:MM:SS format |
Can be displayed in various formats. |
|
CHAR(length) |
Fixed-length text |
Always same length. Shorter text is padded with spaces. Longer text is truncated. |
|
VARCHAR(length) |
Variable-length text |
Still fixed length, but trailing spaces are trimmed. Limit 256 characters. |
|
TEXT |
Longer text |
Up to 64,000 (roughly) characters. Use LONGTEXT for more space. |
|
BLOB |
Binary data |
Up to 64K of binary data. Use LONGBLOB for more space. |
I list only the most commonly used data types in Table 1-1. These data types handle most situations, but check the documentation of your database package if you need some other type of data.
Specifying the length of a record
Data types are especially important when you're defining a database. Relational databases have an important structural rule: Each record in a table must take up the same amount of memory. This rule seems arbitrary, but it's actually very useful.
Imagine that you're looking up somebody's name in a phone book, but you're required to go one entry at a time. If you're looking for Aaron Adams, things will be pretty good, but what if you're looking for Zebulon Zoom? This sequential search would be really slow because you'd have to go all the way through the phone book to find Zebulon. Even knowing that Zeb was in record number 5,379 wouldn't help much because you don't know exactly when one record ends and another begins.
 If your name is really Zebulon Zoom, you have a very cool name — a good sign in the open-source world, where names like Linus and Guido are really popular. I figure the only reason I'm not famous is my name is too boring. I'm thinking about switching to a dolphin name or something. (Hi, my name is “Andy Squeeeeeeek! Click Click Harris.”)
Relational databases solve this problem by forcing each record to be the same length. Just for the sake of argument, imagine that every record takes exactly 100 bytes. You would then be able to figure out where each record is on the disk by multiplying the length of each record by the desired record's index. (Record 0 would be at byte 0, record 1 is at 100, record 342 is at 34200, and so on.) This mechanism allows the computer to keep track of where all the records are and jump immediately to a specific record, even if hundreds or thousands of records are in the system.
My description here is actually a major simplification of what's going on, but the foundation is correct. You should really investigate more sophisticated database and data structures classes or books if you want more information. It's pretty cool stuff.
The length of the record is important because the data types of a record's fields determine its size. Numeric data (integers and floating-point values) have a fixed size in the computer's memory. Strings (as used in other programming languages) typically have dynamic length. That is, the amount of memory used depends on the length of the text. In a database application, you rarely have dynamic length text. Instead, you generally determine the number of characters for each text field.
Defining a primary key
When you turn the contact data into an actual database, you generally add one more important field. Each table should have one field that acts as a primary key. A primary key is a special field that's
- Unique: You can't have two records in a table with the same primary key.
- Guaranteed: Every record in the table has a value in the primary key.
Primary key fields are often (though not always) integers because you can easily build a system for generating a new unique value. (Find the largest key in the current database and add one.)
In this book, each table has a primary key. They are usually numeric and are usually the first field in a record definition. I also end each key field with the letters ID to help me remember it's a primary key.
Primary keys are useful because they allow the database system to keep a Table of Contents for quick access to the table. When you build multitable data structures, you can see how you can use keys to link tables together.
Defining the table structure
When you want to build a table, you begin with a definition of the structure of the table. What are the field names? What is each field's type? If it's text, how many characters will you specify?
The definition for the e-mail contacts table may look like this:
|
Field Name |
Type |
Length (Bytes) |
|
ContactID |
INTEGER |
11 |
|
Name |
VARCHAR |
50 |
|
Company |
VARCHAR |
30 |
|
|
VARCHAR |
50 |
Look over the table definition, and you'll notice some important ideas:
- There's now a contactID field. This field serves as the primary key. It's an INTEGER field.
- INTEGERs are automatically assigned a length. It isn't necessary to specify the size of an INTEGER field (as all INTEGERs are exactly 11 bytes long in MySQL).
- The text fields are all VARCHARs. This particular table consists of a lot of text. The text fields are all stored as VARCHAR types.
- Each VARCHAR has a specified length. Figuring out the best length can be something of an art form. If you make the field too short, you aren't able to squeeze in all the data you want. If you make it too long, you waste space.
 VARCHAR isn't quite variable length. The length is fixed, but extra spaces are added. Imagine that I had a VARCHAR(10) field called userName. If I enter the name 'Andy', the field contains 'Andy' (that is, 'Andy' followed by six spaces). If I enter the value 'Rumplestiltskin', the field contains the value 'Rumplestil' (the first 10 characters of 'Rumplestiltskin').
The difference between CHAR and VARCHAR is what happens to shorter words. When you return the value of a CHAR field, all the padding spaces are included. A VARCHAR automatically lops off any trailing spaces.
In practice, programmers rarely use CHAR because VARCHAR provides the behavior you almost always want.
Introducing MySQL
Programs that work with SQL are usually called relational database management systems (RDBMS). A number of popular RDBMSs are available:
- Oracle is the big player. Many high-end commercial applications use the advanced features of Oracle. It's powerful, but the price tag makes it primarily useful for large organizations.
- MS SQL Server is Microsoft's entry in the high-end database market. It's usually featured in Microsoft-based systems integrated with .NET programming languages and the Microsoft IIS server. It can also be quite expensive.
- MS Access is the entry-level database system installed with most versions of Microsoft Office. Although Access is a good tool for playing with data design, it has some well-documented problems handling the large number of requests typical of a web-based data tool.
- MySQL is an open-source database that has made a big splash in the open-source world. While it's not quite as robust as Oracle or SQL Server, it's getting closer all the time. The latest version has features and capabilities that once belonged only to expensive proprietary systems.
- SQLite is another open-source database that's really showing some promise. This program is very small and fast, so it works well in places you wouldn't expect to see a full-fledged database (think cellphones and tablets).
The great news is that almost all of these databases work in the same general way. They all read fairly similar dialects of the SQL language. No matter which database you choose, the basic operation is roughly the same.
Why use MySQL?
This book focuses on MySQL because this program is
- Very accessible: If you've already installed XAMPP (see Book VIII), you already have access to MySQL. Many hosting accounts also have MySQL access built in.
- Easy to use: You can use MySQL from the command line or from a special program. Most people manipulate SQL through a program called phpMyAdmin (introduced in the section “Setting Up phpMyAdmin,” later in this chapter). This program provides a graphical interface to do most of the critical tasks.
- Reasonably typical: MySQL supports all the basic SQL features and a few enhancements. If you understand MySQL, you'll be able to switch to another RDBMS pretty easily.
- Very powerful: MySQL is powerful enough to handle typical web server data processing for a small to mid-size company. Some extremely large corporations even use it.
- Integrated with XAMPP and PHP: PHP has built-in support for MySQL, so you can easily write PHP programs that work with MySQL databases.
- Free and open source: MySQL is available at no cost, which makes it quite an attractive alternative. MySQL offers other advantages of open-source software. Because the code is freely available, you can learn exactly how it works. The open-source nature of the tool also means there are likely to be add-ons or variations because it's easy for developers to modify open-source tools.
Understanding the three-tier architecture
Modern web programming often uses what's called the three-tiered architecture, as shown in Table 1-2.

The user talks to the system through a web browser, which manages HTML code. CSS and JavaScript may also be at the user tier, but everything is handled through the browser. The user then makes a request of the server, which is sometimes passed through a server-side language like PHP. This program then receives a request and processes it, returning HTML back to the client. Many requests involve data, which brings the third (data) tier into play. The web server can package up a request to the data server through SQL. The data server manages the data and prepares a response to the web server, which then makes HTML output back for the user.
Figure 1-1 provides an overview of the three-tier system.

Figure 1-1: An overview of the three-tier data model.
Practicing with MySQL
MySQL is a server, so it must be installed on a computer in order to work. To practice with MySQL, you have a few options:
- Run your own copy of MySQL from the command line. If you have MySQL installed on your own machine, you can go to the command line and execute the program directly. This task isn't difficult, but it is tedious.
- Use phpMyAdmin to interact with your own copy of MySQL. This solution is often the best. phpMyAdmin is a set of PHP programs that allows you to access and manipulate your database through your web browser. If you've set up XAMPP, you've got everything you need. (See Book VIII for more information about XAMPP.) You can also install MySQL and phpMyAdmin without XAMPP, but you should really avoid the headaches of manual configuration, if you can. In this chapter, I do all MySQL through phpMyAdmin, but I show other alternatives in Chapters 2 and 5 of this minibook.
- Run MySQL from your hosting site. If you're using Freehostia or some other hosting service, you generally access MySQL through phpMyAdmin.
Setting Up phpMyAdmin
By far the most common way to interact with MySQL is through phpMyAdmin. If you've installed XAMPP, you already have phpMyAdmin. Here's how you use it to get to MySQL:
- Turn on MySQL with the XAMPP Control Panel, shown in Figure 1-2.
You also need Apache running (because XAMPP runs through the server). You don't need to run MySQL or Apache as a service, but you must have them both running. (Turn on both programs by clicking the start button next to the name of the program.)

Figure 1-2: I've turned on Apache and MySQL in the XAMPP control panel using the buttons.
- Go to the XAMPP main directory in your browser.
If you used the default installation, you can just point your browser to http://localhost/xampp. It should look like Figure 1-3.

Figure 1-3: Locating the XAMPP subdirectory through localhost.
 Don't just go through the regular file system to find the XAMPP directory. You must use the localhost mechanism so that the PHP code in phpMyAdmin is activated.
 - Find phpMyAdmin in the Tools section of the menu.
The phpMyAdmin page looks like Figure 1-4.

Figure 1-4: The phpMyAdmin main page.
- Create a new database.
Type the name for your database in the indicated text field. I call my database haio. (HTML All in One — get it?)
Changing the root password
MySQL is a powerful system, which means it can cause a lot of damage in the wrong hands. Unfortunately, the default installation of MySQL has a security loophole you could drive an aircraft carrier through. The default user is called root and has no password whatsoever. Although you don't have to worry about any pesky passwords, the KGB can also get to your data without passwords.
This section is a bit technical, and it's pretty important if you're running your own data server with XAMPP. But if you're using an online hosting service, you won't have to worry about the data security problems described in this section. You can skip on to the section called “Using phpMyAdmin on a remote server.” Still, you'll eventually need this stuff, so don't tear these pages out of the book or anything.
Believe me, the bad guys know that root is the most powerful account on MySQL and that it has no password by default. They're glad to use that information to do you harm (or worse, to do harm in your name). Obviously, giving the root account a password is a very good idea. Fortunately, it's not difficult to do:
- Log into phpMyAdmin as normal.
The main screen looks like Figure 1-5. Your copy might have a scary warning of gloom at the bottom. You're about to fix that problem.

Figure 1-5: Here's the main phpMyAdmin screen.
- Click the Privileges link to modify user privileges.
The privileges tab along the top gives you access to change user privileges. The new screen looks something like Figure 1-6.

Figure 1-6: The various users are stored in a table.
- Edit the root user.
Chances are good that you have only one user, called root (and maybe another called pma which is the phpMyAdmin user). The root account's Password field says No. You'll be adding a password to the root user. The icon at the right allows you to edit this record. (Hover your mouse over the small icon to see ToolTips if you can't find it.) The edit screen looks like Figure 1-7.

Figure 1-7: You can use this tool to modify the root user's permissions.
- Examine the awesome power of the root administrator.
Even if you don't know what all these things are, root can clearly do lots of things, and you shouldn't let this power go unchecked. (Consult any James Bond movie for more information on what happens with unfettered power.) You're still going to let root do all these things, but you're going to set a password so that only you can be root on this system. Scroll down a bit on the page until you see the segment that looks like Figure 1-8.

Figure 1-8: This area is where you add the password.
- Assign a password.
Simply enter the password in the Password box, and then reenter it in the next box. Be sure that you type the same password twice. Follow all your typical password rules (six or more characters long, no spaces, case-sensitive).
- Hit the Go button.
If all went well, the password changes.
- Recoil in horror.
Try to go back to the phpMyAdmin home (with the little house icon), and something awful happens, as shown in Figure 1-9.

Figure 1-9: That message can't be good. Maybe I should have left it vulnerable.
Don't panic about the error in Figure 1-9. Believe it or not, this error is good. Up to now, phpMyAdmin was logging into your database as root without a password (just like the baddies were going to do). Now, phpMyAdmin is trying to do the same thing (log in as root without a password), but it can't because now root has a password.
What you have to do is tell phpMyAdmin that you just locked the door, and give it the key. (Well, the password, but I was enjoying my metaphor.)
- Find the phpMyAdmin configuration file.
You have to let phpMyAdmin know that you've changed the password. Look for a file in your phpMyAdmin directory called config.inc.php. (If you used the default XAMPP installation under Windows, the file is in C:Program FilesxamppphpMyAdminconfig.inc.php.)
- Find the root password setting.
Using the text editor's search function, I found it on line 70, but it may be someplace else in your editor. In Notepad++, it looks like Figure 1-10.
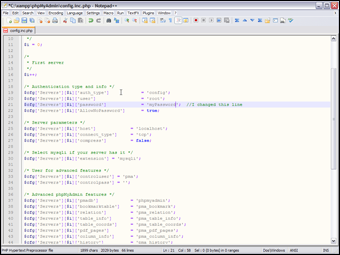
Figure 1-10: Here's the username and configuration information.
- Change the root setting to reflect your password.
Enter your root password. For example, if your new password is myPassword, change the line so that it looks like
$cfg['Servers'][$i]['password'] = 'myPassword'; // MySQL password
Of course, myPassword is just an example. It's really a bad password. Put your actual password in its place. - Save the config.inc.php file.
Save the configuration file and return to phpMyAdmin. You may need to set the file's permissions to 644 if you're on a Mac or Linux machine.
- Try getting into phpMyAdmin again.
This time, you don't get the error, and nobody is able to get into your database without your password. You shouldn't have to worry about this issue again, but whenever you connect to this database, you do need to supply the username and password.
Adding a user
Changing the root password is the absolute minimum security measure, but it's not the only one. You can add various virtual users to your system to protect it further.
You're able to log into your own copy of MySQL (and phpMyAdmin) as root because you're the root owner. (If not, then refer to the preceding section.) It's your database, so you should be allowed to do anything with it.
You probably don't want your programs logging in as root because that can allow malicious code to sneak into your system and do mischief. You're better off setting up a different user for each database and allowing that user access only to the tables within that database.
I'm really not kidding about the danger here. A user with root access can get into your database and do anything, including creating more users or changing the root password so that you can no longer get into your own database! You generally shouldn't write any PHP programs that use root. Instead, have a special user for that database. If the bad guys get in as anything but root, they can't blow up everything.
Fortunately, creating new users with phpMyAdmin isn't a difficult procedure:
- Log into phpMyAdmin with root access.
If you're running XAMPP on your own server, you'll automatically log in as root.
- Activate the Privileges tab to view user privileges.
- Add a new user using the Add a New User link on the Privileges page.
- Fill in user information on the new user page (see Figure 1-11).

Figure 1-11: Here's the new haio user being created.
Be sure to add a username and password. Typically, you use localhost as the host.
- Create a database, if it doesn't already exist.
If you haven't already made a database for this project, you can do so automatically with the Create Database Automatically radio button.
- Do not assign global privileges.
Only the root user should have global privileges. You want this user to have the ability to work only within a specific database.
- Create the user by clicking the Go button.
You see a new screen like Figure 1-12 (you need to scroll down a bit to see this part of the page).
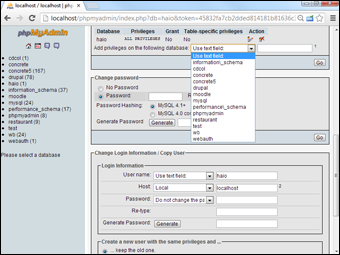
Figure 1-12: You can specify a specific database for this user.
- Specify the user's database.
Select the database in the drop-down list. This user (haio) will have access only to tables in the haio database. Note that you probably don't have many databases on your system when you start out.
- Apply most privileges.
You generally want your programs to do nearly everything within their own database so that you can apply almost all privileges (for now, anyway). I typically select all privileges except Grant, which lets the user allow access to other users. Figure 1-13 shows the Privileges page.

Figure 1-13: The haio user can do everything but grant other privileges on this database.
As you're starting out, your programs have access to one database and are able to do plenty with it. As your data gets more critical, you'll probably want to create more restrictive user accounts so that those programs that should only be reading your data don't have the ability to modify or delete records. This change makes it more difficult for the bad guys to mess up your day.
Your database users won't usually be people. This idea is hard, particularly if you haven't used PHP or another server-side language yet. The database users are usually programs you have written that access the database in your name.
Using phpMyAdmin on a remote server
If you're working on some remote system with your service provider, the mechanism for managing and creating your databases may be a bit different. Each host has its own quirks, but they're all pretty similar. As an example, here's how I connect to the system on Freehostia at http://freehostia.com (where I post the example pages for this book):
- Log onto your service provider using the server login.
You usually see some sort of control panel with the various tools you have as an administrator. These tools often look like Figure 1-14.
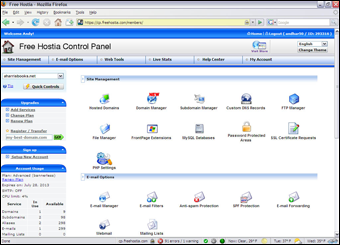
Figure 1-14: The Free Hostia site shows a number of useful adminis-tration tools.
- Locate your database settings.
Not all free hosting services provide database access, but most do have free MySQL access. You usually can access some sort of tool for managing your databases. (You'll probably have a limited number of databases available on free servers, but more with commercial accounts.) Figure 1-15 shows the database administration tool in Free Hostia.

Figure 1-15: The database adminis-tration tool lets me create or edit databases.
- Create a database according to the rules enforced by your system.
Sometimes, you can create the database within phpMyAdmin (as I did in the last section), but more often, you need to use a special tool like the one shown in Figure 1-15 to create your databases. Free Hostia imposes a couple of limits: The database name begins with the system username, and it can't be more than 16 characters long.
Don't freak out if your screen looks a little different than Figure 1-15. Different hosting companies have slightly different rules and systems, so things won't be just like this, but they'll probably be similar. If you get stuck, be sure to look at the hosting service's Help system. You can also contact the support system. They're usually glad to help, but they're (understandably) much more helpful if you've paid for the hosting service. Even the free hosting systems offer some online support, but if you're going to be serious, paying for online support is a good deal. - Create a password for this database.
You probably need a password (and sometimes another username) for your databases to prevent unauthorized access to your data. Because the database is a different server than the web server, it has its own security system. On many hosting services, you must enter a password, and the system automatically creates a MySQL username with the same name as the database. Keep track of this information because you need it later when you write a program to work with this data.
- Use phpMyAdmin to add tables to your database.
After you've defined the database, you can usually use phpMyAdmin to manipulate the data. With Free Hostia, you can simply click a database name to log into phpMyAdmin as the administrator of that database. Figure 1-16 shows the new database in phpMyAdmin, ready for action.
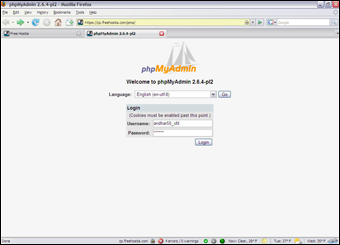
Figure 1-16: Now I can access the database in phpMy-Admin.
Typically, a remote server doesn't give you root access, so you don't have to mess around with the whole root password mess described in the “Changing the root password” section of this chapter. Instead, you often either have one password you always use in phpMyAdmin or you have a different user and password for each database.
Implementing a Database with phpMyAdmin
When you've got a database, you can build a table. When you've defined a table, you can add data. When you've got data, you can look at it. Begin by building a table to handle the contact data described in the first section of this chapter, “Examining the Basic Structure of Data”:
- Be sure you're logged into phpMyAdmin.
The phpMyAdmin page should look something like Figure 1-17, with your database name available in the left column.
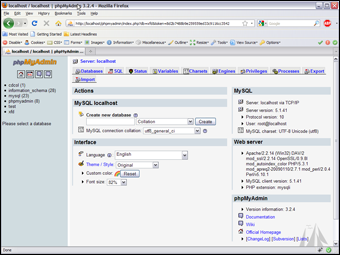
Figure 1-17: The main screen of the phpMy-Admin system.
- Activate the database by clicking the database name in the left column.
If the database is empty, an Add Table page, shown in Figure 1-18, appears.

Figure 1-18: Type a table name to begin adding a table.
- Create a new table using the phpMyAdmin tool.
Now that you have a database, add the contacts table to it. The contacts database has four fields, so type a 4 into the box and let ’er rip. A form like Figure 1-19 appears.
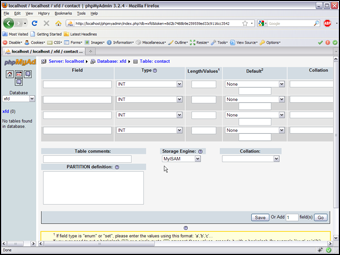
Figure 1-19: Creating the contacts table.
- Enter the field information.
Type the field names into the grid to create the table. It should look like Figure 1-20.

Figure 1-20: Enter field data on this form.
In Figure 1-20, you can't see it, but you can select the index of contactID as a primary key. Be sure to add this indicator. Also set the collation of the entire table to ascii_general_ci.
- Click the Save button and watch the results.
phpMyAdmin automatically writes some SQL code for you and executes it. Figure 1-21 shows the code and the new table.

Figure 1-21: phpMy-Admin created this mysterious code and built a table.
Now, the left panel indicates that you're in the xfd database, which has a table called Contact.
After you define a table, you can add data. Click Contact in the left column, and you see the screen for managing the contact table, as shown in Figure 1-22.

Figure 1-22: I've added the fields.
You can add data with the Insert tab, which gives a form like Figure 1-23, based on your table design.

Figure 1-23: Adding a record to the table.
After you add the record, choose Insert Another Row and click the Go button. Repeat until you've added all the contacts you want in your database.
After you add all the records you want to the database, you can use the Browse tab to see all the data in the table. Figure 1-24 shows my table after I added all my contacts to it and browsed.

Figure 1-24: Viewing the table data in phpMy-Admin.