
22. Creating Output: Sharing and Exporting
In This Chapter
Sending Projects to the Media Browser
Export Project for Playback on Another Apple Device
Sharing Your Projects on the Web
Exporting Projects in a QuickTime Media Format
Sending Projects to Compressor
XML Export for Use in Third-Party Applications
You’ve come this far. Now it’s time to send your masterpiece out into the world.
Final Cut Pro has a variety of output options. This chapter walks you through FCP’s output options and helps you decide which one will deliver what you need.
You’ll learn how to use the Share window. With a few clicks you can set up automated export and delivery operations. FCP’s Share feature can produce finished Blu-ray Discs and upload your day’s work to YouTube. You can also use the movie export options to convert an FCP project or clip to another digital format for use in computer-based media.
You’ll also learn how to amplify your output options by adding Apple’s companion utility Compressor to your editing suite. Compressor is designed to offer more control and batch export options to FCP’s feature set.
About the Share Window
Final Cut Pro’s exporting options (called sharing in Final Cut Pro-speak) offer a variety of streamlined, automated ways to create and deliver output media files in a single operation. Some output options go further: The YouTube option, for example, generates a media file in the correct output format and then automatically logs into your YouTube account and uploads the file.
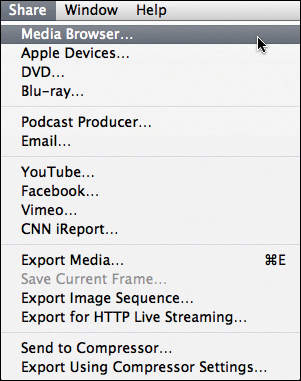
You access the Final Cut Pro exporting options using the Share menu. Selecting an output option opens the Share window. Share window options vary depending on which output option you select ![]() .
.
![]() Select the project, and choose Share > Media Browser.
Select the project, and choose Share > Media Browser.
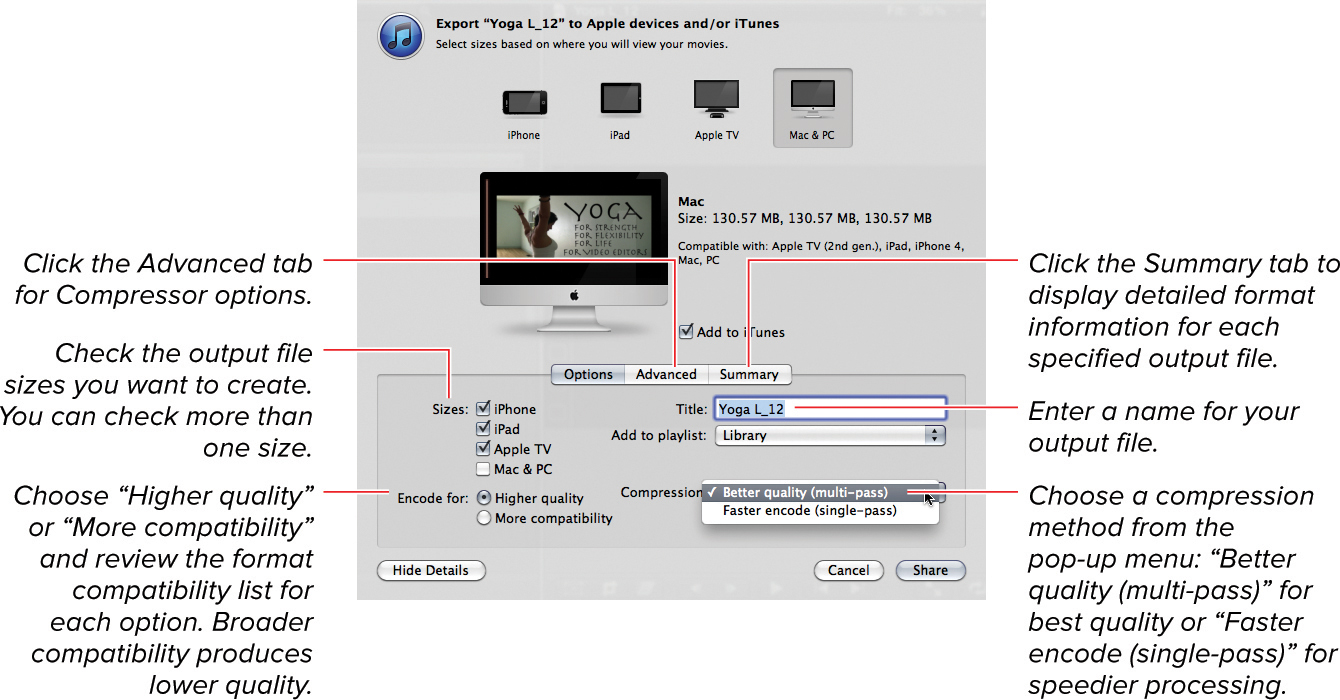
The Share window offers streamlined output options in the upper part of the window; click the Show Details button to reveal a broader array of options.
You can use the Share menu options to export a complete project only. To export a portion of your project, you could use Final Cut Pro’s Send to Compressor option and set In and Out points in Compressor’s Preview window. If you don’t want to shell out $49.95 for a copy of Compressor 4, here’s a workaround: Copy just the selected portion of your project into a new separate project and export that using the standard Share menu options.
As part of its general streamlining and simplification trend, Final Cut Pro X restricts sharing output to one project at a time; Batch Export is no longer available. You’ll need a copy of Compressor 4 ($49.95 at the Apple App Store) to output multiple files in a single operation. For more information, see “Sending to Compressor” later in this chapter.
Sending Projects to the Media Browser
Choosing Share > Media Browser is the correct export choice when you want to access a finished Final Cut Pro project in an Apple iLife or iWork app, such as Keynote or GarageBand. Once you’ve exported it, your Final Cut Pro project appears on the Media Browser tab that appears in all iLife and iWork applications.
To send a project to the Media Browser tab
1. In the Project Library, select the project’s icon, and choose Share > Media Browser ![]() .
.
![]() Share window features and output options
Share window features and output options
The Share window appears.
2. In the Share window, choose the destination Apple device where you’re going to be using the exported movie. Click Show Details for more specific information on the size and quality of each export option ![]() . See “About the Share Window,” earlier in this chapter, for details on your export options.
. See “About the Share Window,” earlier in this chapter, for details on your export options.
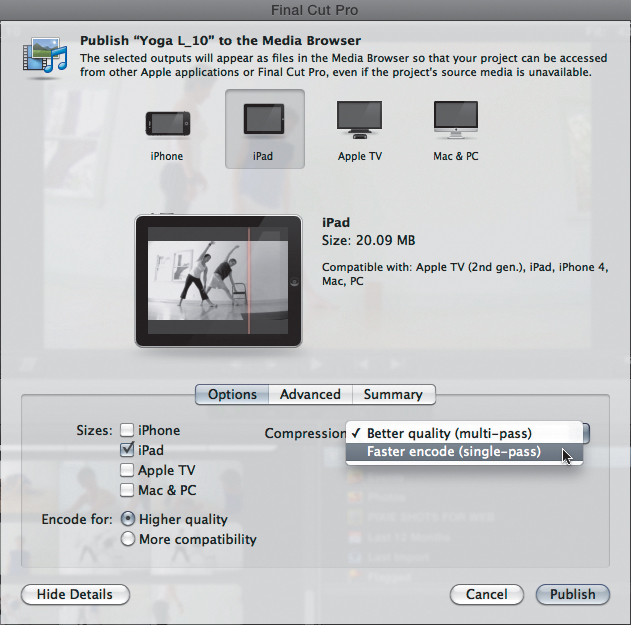
![]() The Share window displays your output options. Click Show Details to open the bottom pane and view more-specific information on the size and quality of each export option.
The Share window displays your output options. Click Show Details to open the bottom pane and view more-specific information on the size and quality of each export option.
3. When you’ve set up your export options, click Publish ![]() .
.
![]() Click Publish to generate your exported movie file.
Click Publish to generate your exported movie file.
Final Cut Pro generates a movie file to your specifications. The exported movie will appear in the Media Browser tab of compatible Apple applications ![]() .
.
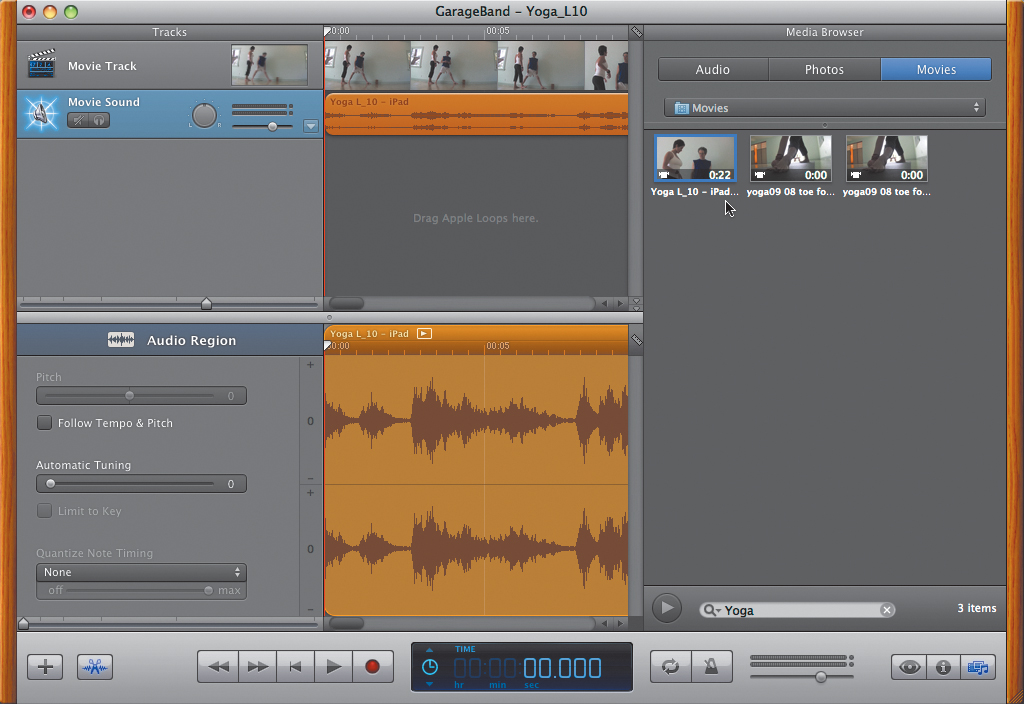
![]() The exported Final Cut Pro movie as it appears in GarageBand’s Media Browser tab
The exported Final Cut Pro movie as it appears in GarageBand’s Media Browser tab
Export Project for Playback on Another Apple Device
Choose Share > Apple Devices to generate a movie you can play back on an iPhone, iPad, iPod, or Apple TV. Choose Share > Apple Devices to export your Final Cut Pro movie to Apple’s iTunes application. Use iTunes to transfer the exported movie file to your selected Apple device.
To export a project for playback on an Apple device
1. In the Project Library, select the project’s icon, and choose Share > Apple Devices.
The Share window appears.
2. In the Share window, choose the Apple device where you’re going to be playing the exported movie. Click Show Details for more-specific information on the size and quality of each export option ![]() .
.
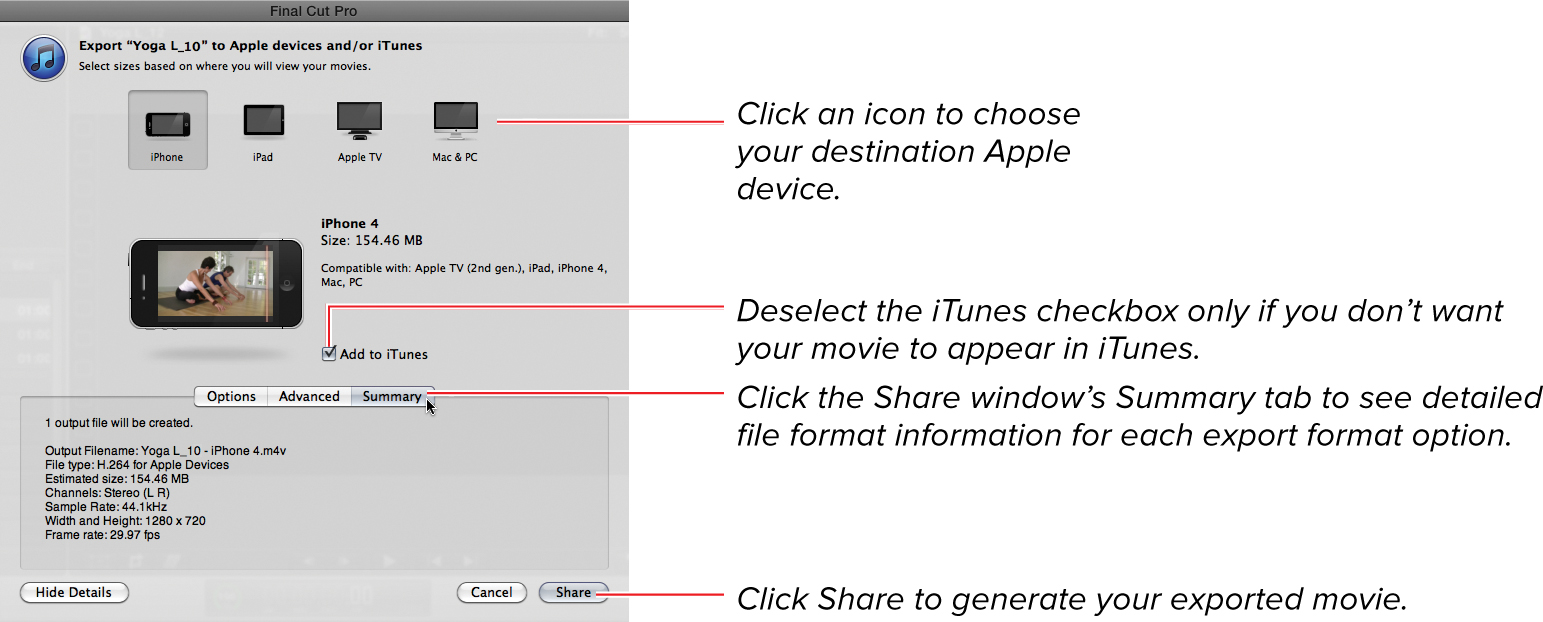
![]() The Share window displays little photos representing your output options. Click Show Details to reveal the bottom pane and view more-specific information on the size and quality of each export option.
The Share window displays little photos representing your output options. Click Show Details to reveal the bottom pane and view more-specific information on the size and quality of each export option.
3. When you’ve set up your export options, click Share.
Final Cut Pro generates a movie file to your specifications.
4. Click the Share Monitor button and open the Share Monitor utility to monitor your export’s progress ![]() .
.
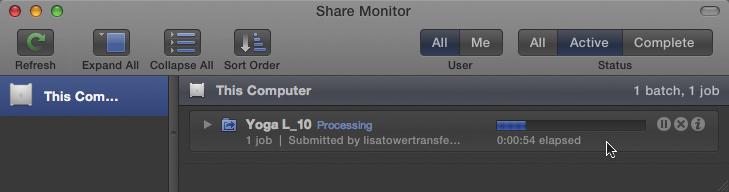
![]() Click the Share Monitor button to open the Share Monitor utility and monitor your export’s progress.
Click the Share Monitor button to open the Share Monitor utility and monitor your export’s progress.
The exported movie appears in iTunes’ Movie tab ![]() .
.
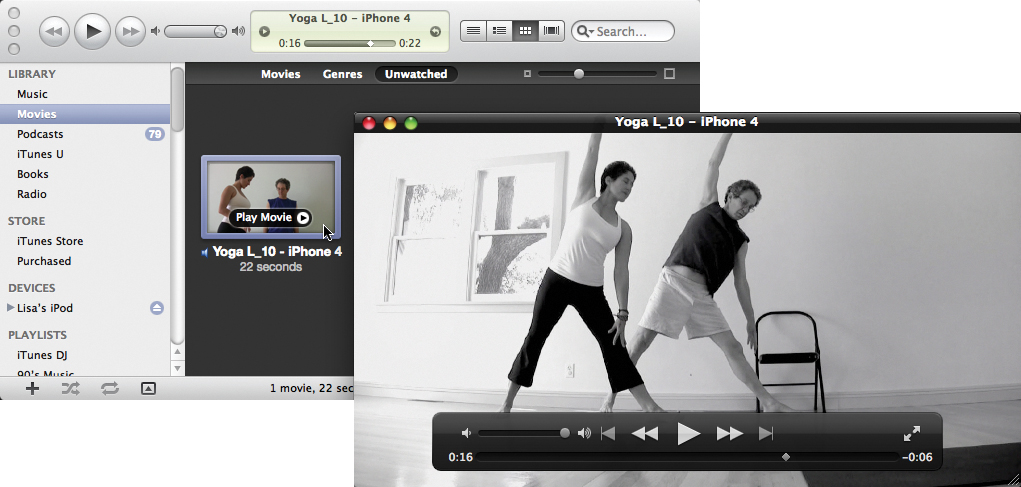
![]() The exported Final Cut Pro movie as it appears in iTunes’ Movie tab
The exported Final Cut Pro movie as it appears in iTunes’ Movie tab
Creating DVDs
Final Cut Pro’s Share menu features two disc output options—standard-definition DVD and high-definition Blu-ray Disc—plus the option to save either format as a disc image. A disc image is a computer file that can be burned as a disc or will behave like a DVD when mounted on your computer.
To export a project as a standard-definition DVD or disc image
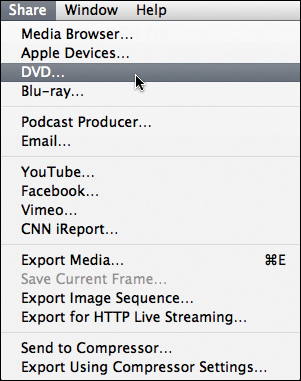
1. In the Project Library, select the project’s icon, and choose Share > DVD ![]() .
.
![]() Select the project, and choose Share > DVD.
Select the project, and choose Share > DVD.
The Share window appears.
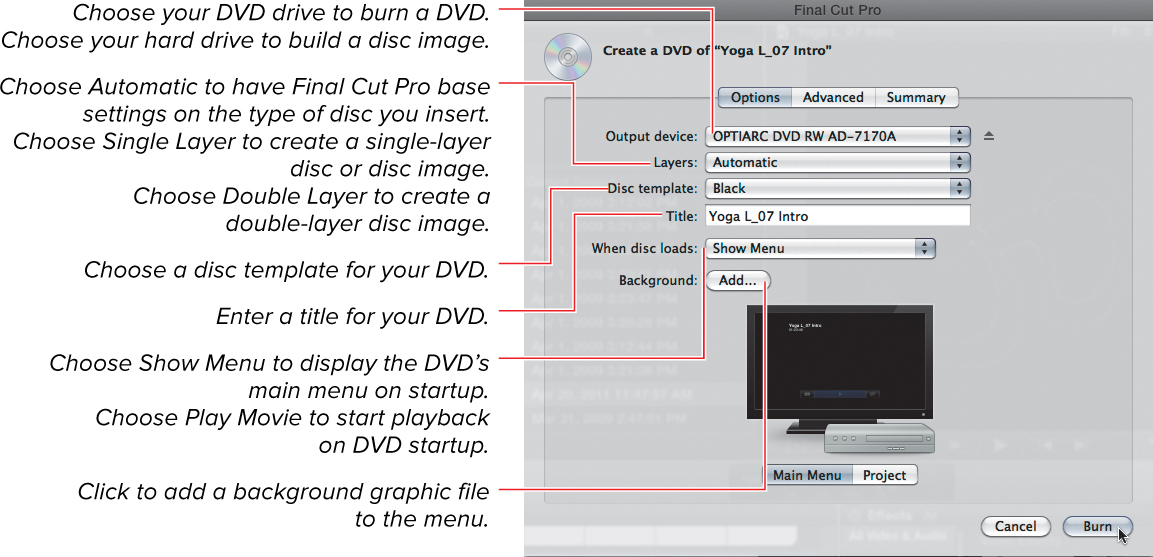
2. In the Share window, choose a destination drive for your DVD or disc image from the pop-up menu. Use the Share window options to set up your DVD export preferences. Click the Summary tab to display more-specific information on the size and quality of your export settings ![]() .
.
![]() Use the Share window options to set up your DVD export preferences.
Use the Share window options to set up your DVD export preferences.
3. When you’ve set up your DVD export options, click Burn.
Final Cut Pro processes your project’s video and audio as a DVD and prompts you to insert blank DVD media ![]() . Once complete, the DVD will appear on the Share tab of the project’s Inspector window
. Once complete, the DVD will appear on the Share tab of the project’s Inspector window ![]() . For details on how to display a project’s Inspector window, see Chapter 5.
. For details on how to display a project’s Inspector window, see Chapter 5.
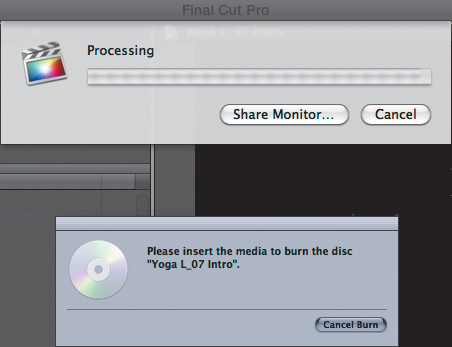
![]() Insert a DVD when this prompt appears.
Insert a DVD when this prompt appears.
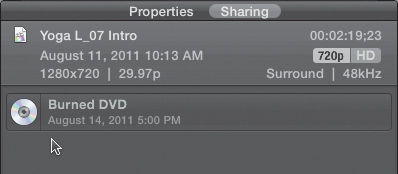
![]() The exported Final Cut Pro movie is burned to a DVD and appears on the Share tab of the project’s Inspector window.
The exported Final Cut Pro movie is burned to a DVD and appears on the Share tab of the project’s Inspector window.
To export a project as a high-definition Blu-ray Disc or disc image
1. In the Project Library, select the project’s icon, and choose Share > Blu-ray ![]() .
.
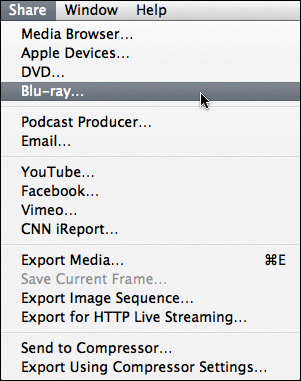
![]() Select the project, and choose Share > Blu-ray.
Select the project, and choose Share > Blu-ray.
The Share window appears.
2. In the Share window, choose a destination drive for your Blu-ray Disc or disc image from the pop-up menu. Each connected drive in the Output Device menu lists its output capabilities ![]() .
.
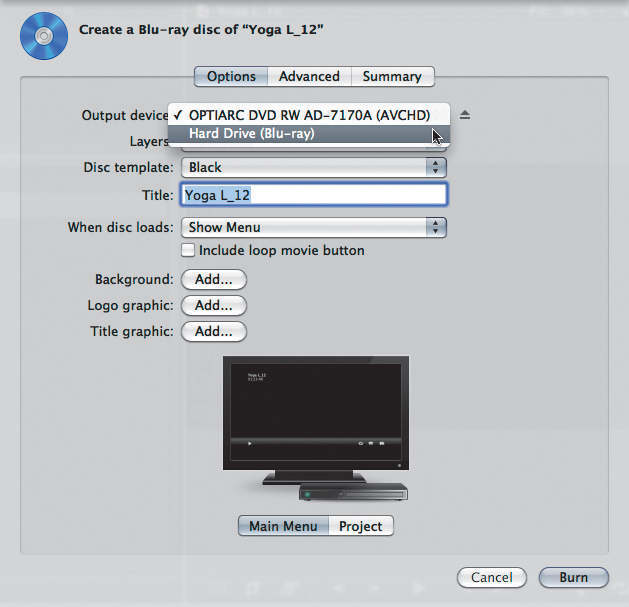
![]() The Share window displays your Blu-ray output options. The Output Device menu lists format capabilities of each connected drive. In this example, you’d need to generate a Blu-ray Disc image on the hard drive and transfer it to a drive capable of burning a Blu-ray Disc at a later date.
The Share window displays your Blu-ray output options. The Output Device menu lists format capabilities of each connected drive. In this example, you’d need to generate a Blu-ray Disc image on the hard drive and transfer it to a drive capable of burning a Blu-ray Disc at a later date.
3. Use the Share window options to set up your Blu-ray export preferences. See the previous task, “To export a project as a standard-definition DVD disc or disk image,” for details on your output options.
4. When you’ve set up your Blu-ray Disc export options, click Next.
Final Cut Pro asks you to select a destination for your disc image (if you’ve elected to create a Blu-ray disc image) and then processes your project’s video and audio as a Blu-ray Disc or disc image ![]() .
.
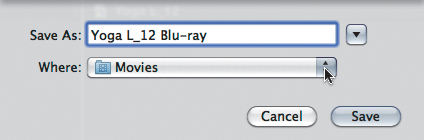
![]() If you’re creating a Blu-ray disc image on your hard drive, Final Cut Pro will ask you to name the disc image file and select a location for saving it.
If you’re creating a Blu-ray disc image on your hard drive, Final Cut Pro will ask you to name the disc image file and select a location for saving it.
Sharing Your Projects on the Web
Final Cut Pro’s Share menu offers a set of output options you can use to post your latest project on the Web in record time. The YouTube option, for example, generates a media file in the correct output format, automatically logs into your YouTube account, and uploads the file in a single operation.
The following task uses Vimeo, but all four of the third-party output options—YouTube, Facebook, Vimeo, and CNN iReport—operate in basically the same way.
Posting your movie on the Web is so easy, you might be tempted to upload your latest without viewing it first, but please—patience, Grasshopper.
To post a project directly to Vimeo
1. In the Project Library, select the project’s icon, and choose Share > Vimeo ![]() .
.

![]() Select the project, and choose Share > Vimeo.
Select the project, and choose Share > Vimeo.
The Share window appears.
2. In the Share window, enter your Vimeo username and password, and then enter the title of the movie you’re uploading plus any comments and tags. Click Show Details for more specific information on the size and quality of each export option ![]() . See “About the Share Window” earlier in this chapter for details on your export options.
. See “About the Share Window” earlier in this chapter for details on your export options.
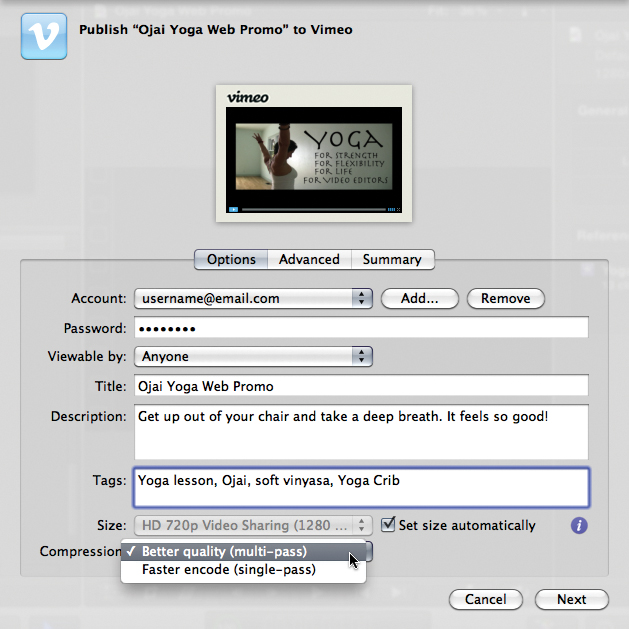
![]() Enter your Vimeo username and password and then title the movie you’re uploading and add any comments and tags. Click Show Details to open the bottom pane and view more-specific information on the size and quality of each export option.
Enter your Vimeo username and password and then title the movie you’re uploading and add any comments and tags. Click Show Details to open the bottom pane and view more-specific information on the size and quality of each export option.
3. When you’ve set your export options, click Next.
Final Cut Pro generates a movie file to your specifications. Log in to your Vimeo account, and you’ll see your uploaded movie posted ![]() .
.

![]() The exported Final Cut Pro movie as it appears in Vimeo. Sometimes there’s a short delay in posting unless you have a Plus or Pro (paid) Vimeo account.
The exported Final Cut Pro movie as it appears in Vimeo. Sometimes there’s a short delay in posting unless you have a Plus or Pro (paid) Vimeo account.
Exporting Projects in a QuickTime Media Format
Choosing Share > Export Media gives you access to a broad selection of QuickTime-supported audio and video export file formats.
You can generate a QuickTime movie version of your project with video and audio.
You can export a movie file with video only (no audio) or as an audio file (with no video).
The Export Media feature can read FCP’s roles data—tags you can attach to a clip to define its “role” (get it?) in your project. You can use the default roles to ID your audio clips as Dialogue, Effects, or Music and then use Export Media to organize and export your project dialogue, music, and effects tracks as separate files, also known as media stems. For more information, see “Export Project Audio” later in this chapter. You can also assign roles to video clips.
To export project video and/or audio in a QuickTime media format
1. In the Project Library, select the project’s icon ![]() and choose Share > Export Media; or press Command-E.
and choose Share > Export Media; or press Command-E.
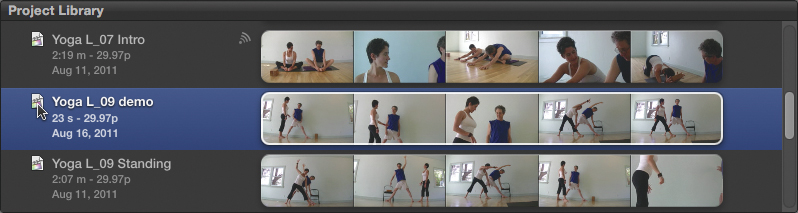
![]() Select the project in the Project Library, and choose Share > Export Media.
Select the project in the Project Library, and choose Share > Export Media.
The Share window appears. This is your opportunity to review and confirm the export format settings.
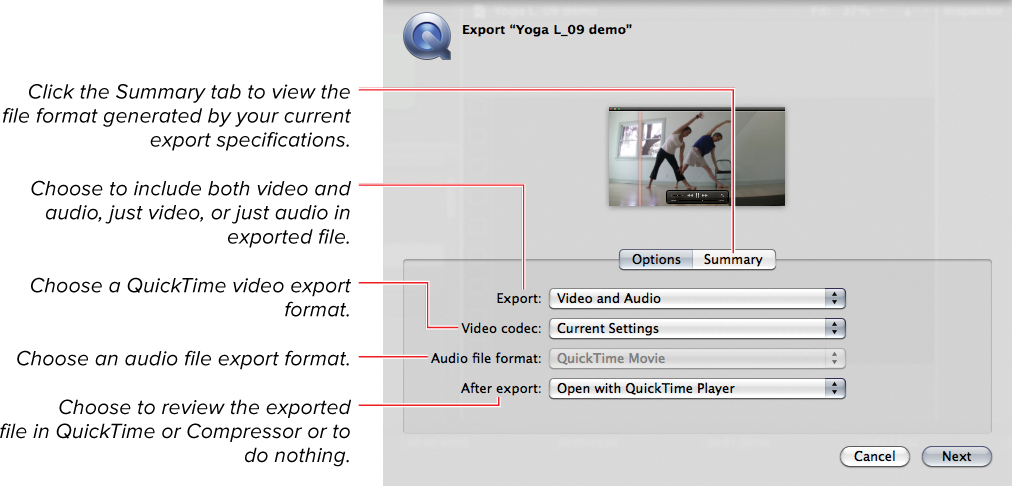
2. In the Share window, specify any of the following export settings from the popup menus ![]() :
:
![]() Specify export settings from the pop-up menus in the Share window.
Specify export settings from the pop-up menus in the Share window.
• Export: Choose to include video and audio, video only, or audio only in your exported file. The Export pop-up menu also includes four roles export options. For details on using roles to sort and export your audio media, see “Export Project Audio” later in this chapter.
• Video Codec: Current Settings is the default setting, or choose a different export codec for your exported video. You can choose from a list of common FCP production video codecs including Apple ProRes.
• Audio File Format: Selecting Audio Only from the Export pop-up menu activates this pop-up menu. Choose an export file format for your project audio.
• After Export: Choose to review the exported file in QuickTime or Compressor or to do nothing.
3. When you’ve set up your movie export options, click Next.
FCP asks you to select a destination for your exported movie ![]() and then processes your project’s video and audio as a QuickTime movie
and then processes your project’s video and audio as a QuickTime movie ![]() .
.
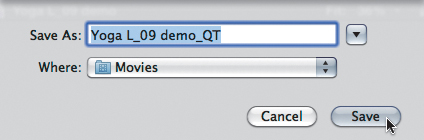
![]() Enter a name and select a destination for your exported movie file.
Enter a name and select a destination for your exported movie file.

![]() The exported FCP movie as it appears in QuickTime.
The exported FCP movie as it appears in QuickTime.
Export Project Audio
Use Share > Export Media to export just the audio from your project. Export Media offers a selection of high-quality and compressed audio file formats. If you need to work on your project audio outside FCP in a more professional and robust audio application, exporting your project audio is a good first step.
To export a project’s audio
1. In the Project Library, select the project’s icon, and choose Share > Export Media.
The Share window appears.
2. In the Share window’s Export pop-up menu, choose Audio Only ![]() .
.
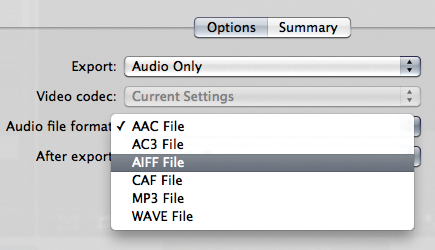
![]() Choose an audio file format from the Share window’s “Audio file format” menu.
Choose an audio file format from the Share window’s “Audio file format” menu.
The “Audio file format” pop-up menu is activated.
3. Choose an audio file format from the “Audio file format” pop-up menu.
4. When you’ve set up your audio export options, click Next.
FCP asks you to select a destination for your exported audio and then processes your project’s audio and creates files in your specified format.
Exporting Project Audio as Media Stems
The latest version of FCP X offers roles, a clip-tagging scheme that makes it possible to sort the audio clips used in your project into dialogue, effects, and music tracks, or assign custom role name you can use to organize your production audio. Assigning role tags to your clips is covered in “About Roles” in Chapter 8.
In this section, you’ll learn how to use Share > Export Media to export your Dialogue, Effects, or Music Role–tagged project audio clips as separate dialogue, music, and effects tracks files, also known as media stems. You can export stems in one multitrack QuickTime file or as separate audio files.
To export a project’s audio as audio stems
1. In the Project Library, select the project’s icon, and choose Share > Export Media.
The Share window appears.
2. In the Share window’s Export pop-up menu, choose from the following media stem output presets:
• Roles Multitrack QuickTime Movie: Export all role-tagged clips in your project as one multitrack QuickTime movie file containing all roles, with each role segregated on a separate track.
• Audio Roles Only As Separate Files ![]() : Export a separate audio file for each role type you select. For example, if you selected only audio clips tagged as Effects for export, this option would generate a single track the same duration as your project containing all clips marked Effects.
: Export a separate audio file for each role type you select. For example, if you selected only audio clips tagged as Effects for export, this option would generate a single track the same duration as your project containing all clips marked Effects.
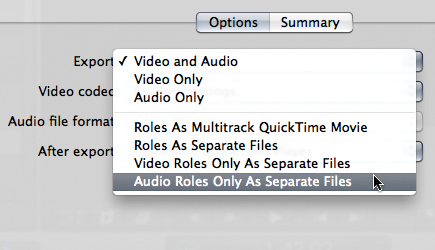
![]() Choose an audio stem export option from the Share window’s Export pop-up menu. Choosing Audio Roles Only As Separate Files will generate a separate track for each audio role you specify. The track will contain all project audio clips with a matching role tag. The exported file will be the same duration as your project.
Choose an audio stem export option from the Share window’s Export pop-up menu. Choosing Audio Roles Only As Separate Files will generate a separate track for each audio role you specify. The track will contain all project audio clips with a matching role tag. The exported file will be the same duration as your project.
The following output presets apply only if you’re exporting role-tagged video clips along with your audio, such as when you’ve role-tagged all your project’s subtitle clips as Title and want to export them all in a single video file.
• All Roles As Separate Files: Export each video or audio role in your project as a separate video or audio file.
• Video Roles Only As Separate Files: Export each of the video roles in your project as a separate file.
The “Audio file format” pop-up menu is deactivated and the Roles button appears above the Export pop-up menu.
3. Specify AIFF or WAV as your export audio file format from the “Audio file format” pop-up menu.
4. Click the Roles button to confirm which role-tagged audio clips will be exported.
5. On the Roles tab, do any of the following:
• Click Add Audio File, and choose a role from the pop-up menu to add another role to your export operation.
• Click the Minus button next to a role to exclude it from your export operation.
• Specify Mono, Stereo, or Surround output for each audio stem ![]() .
.
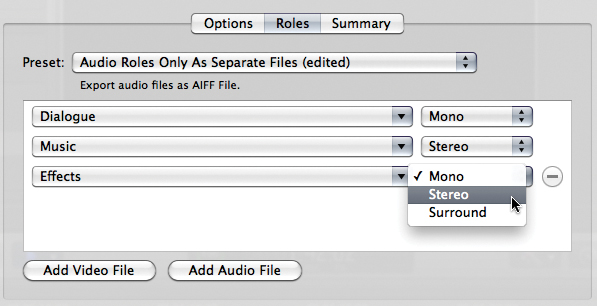
![]() On the Roles tab, specify Mono, Stereo, or Surround output for each audio stem.
On the Roles tab, specify Mono, Stereo, or Surround output for each audio stem.
4. When you’ve set up your audio export options, click Next.
FCP asks you to select a destination for your exported audio stems and then processes your project’s audio and creates files in your specified format.
To check your audio stems, you can reimport them into your project and sync them up with your original project clips ![]() . The Dialogue stem should contain just dialogue, the Music stem only music, and the Effects stem just effects. Of course, the accuracy of your stems’ contents depends on the accuracy of your role tags. It’s a good idea to check your exported audio stems before you hand them off to your post-audio specialist.
. The Dialogue stem should contain just dialogue, the Music stem only music, and the Effects stem just effects. Of course, the accuracy of your stems’ contents depends on the accuracy of your role tags. It’s a good idea to check your exported audio stems before you hand them off to your post-audio specialist.
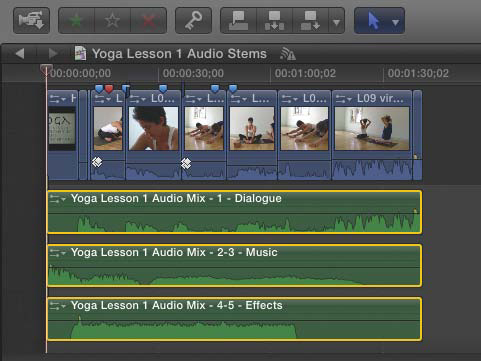
![]() To check your audio stems, you can reimport them into your project and sync them up with your original project clips. Each audio stem is a single clip the same duration as your original project.
To check your audio stems, you can reimport them into your project and sync them up with your original project clips. Each audio stem is a single clip the same duration as your original project.
Export a Still Frame
Choose Share > Save Current Frame to export a still frame from your project.
To export a still frame
1. In the Timeline, position the playhead on the frame you want to export as a still, and choose Share > Save Current Frame ![]() .
.
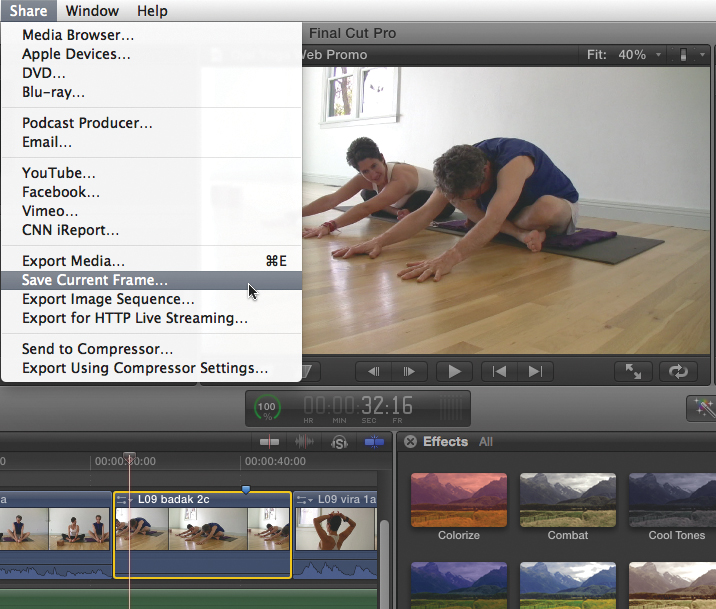
![]() Position the Timeline playhead on the frame you want to export as a still, and choose Share > Save Current Frame.
Position the Timeline playhead on the frame you want to export as a still, and choose Share > Save Current Frame.
The Share window appears.
2. In the Share window, choose a graphic file format from the Export menu. Click the Summary tab for more specific information on the size and quality of each export option ![]() .
.
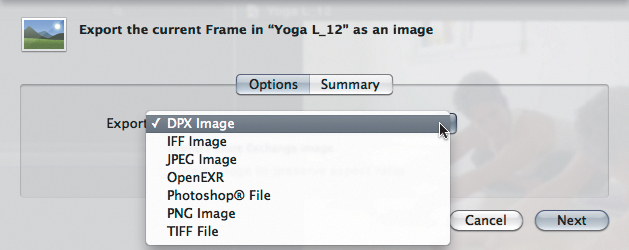
![]() Choose a graphic file format from the Share window’s Export menu.
Choose a graphic file format from the Share window’s Export menu.
3. When you’ve set up your graphic export options, click Next.
Final Cut Pro asks you to select a destination for your exported still frame and then creates a file in your specified format ![]() .
.
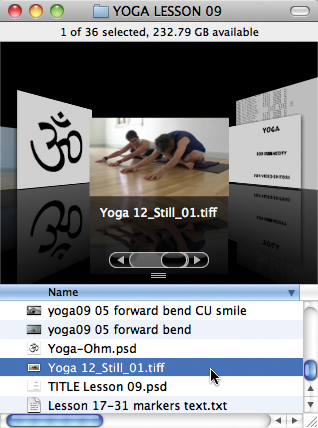
![]() The exported Final Cut Pro still frame as it appears in the Finder
The exported Final Cut Pro still frame as it appears in the Finder
Sending Projects to Compressor
Final Cut Pro offers you the option of choosing the Share > Send to Compressor command to send your sequence directly to Compressor, skipping the rendering and exporting reference movie steps, because Compressor works directly with your source media files. The Send to Compressor route can produce a marginally cleaner encoded output file but takes much longer to compress. To save time, render your sequence first, and then export a reference movie that you can open and encode in Compressor.
Compressor is no longer included with Final Cut Pro; to use Compressor with Final Cut Pro X, you’ll have to purchase a $49.95 copy of Compressor 4 from the Apple App Store. That said, there are a few other advantages to using Compressor with FCP:
• If you have a stack of different project files to export, Compressor allows you to queue multiple projects and process them in one operation.
• Send to Compressor allows you to change your project’s frame size or specify custom dimensions on export ![]() .
.
![]() Compressor allows you to change your exported project’s frame size and specify custom dimensions.
Compressor allows you to change your exported project’s frame size and specify custom dimensions.
• Exporting your project to Compressor is the only official way to export just a portion of your project; you mark In and Out points in Compressor before you process. Be sure to clear In and Out points after you export if you want to export the entire clip later.
You can also use the Compressor options located on the Share window’s Advanced tab to set up background rendering or queue up multiple export operations.
A complete list of QuickTime formats and codecs, plus a summary of format uses and characteristics, is available at the Apple Support site, at http://support.apple.com/kb/HT3775.
To use Send to Compressor to export a project
1. In the Project Library, select the project’s icon, and choose Share > Send to Compressor ![]() .
.
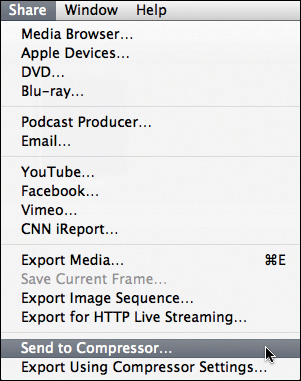
![]() Select the project in the Project Library, and choose Share > Send to Compressor.
Select the project in the Project Library, and choose Share > Send to Compressor.
If Compressor is present on your computer, the application launches, and your project appears in the Job window.
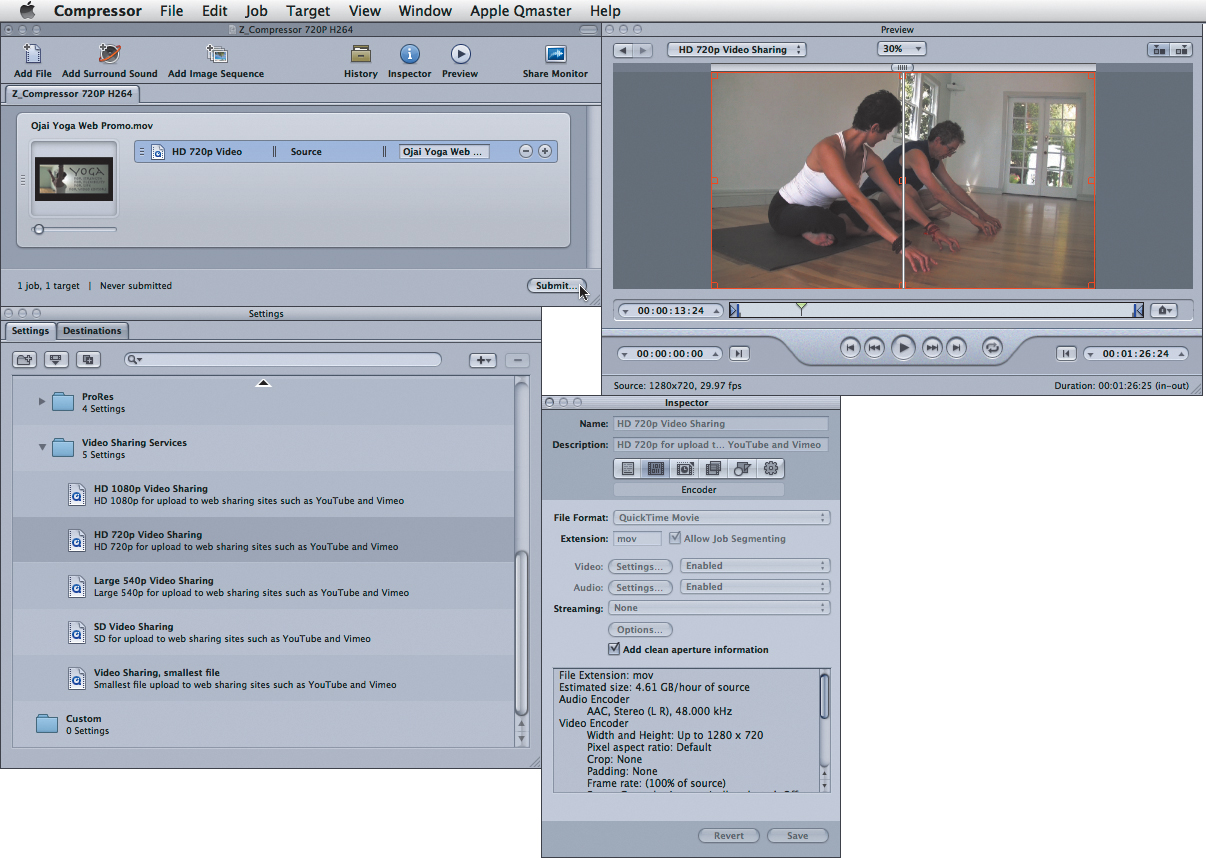
2. In the Compressor window, select or customize your export options, and then click Submit ![]() .
.
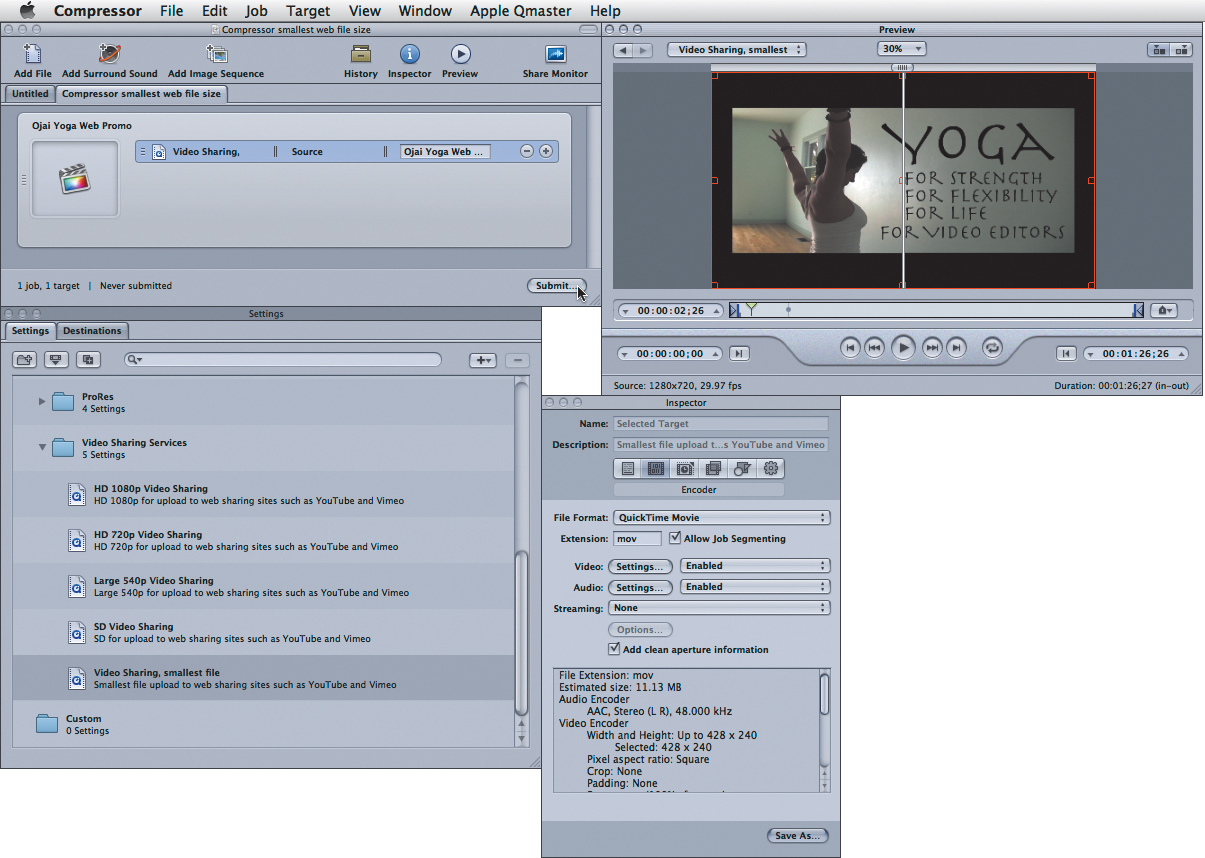
![]() In the Compressor window, select or customize your export options, and then click Submit.
In the Compressor window, select or customize your export options, and then click Submit.
Your exported project is processed in Compressor, and the finished file appears in the Finder ![]() .
.
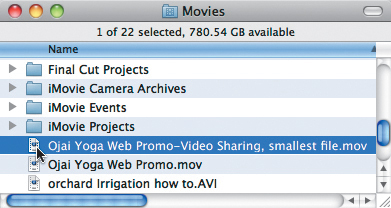
![]() The processed file appears in the Finder
The processed file appears in the Finder
To export just a portion of your project, mark In and Out points in Compressor’s Preview window before you process the file.
To use Share window Compressor options to export a project
1. In the Project Library, select the project’s icon, and then choose a Share menu option ![]() .
.

![]() Select the project in the Project Library, and choose a Share menu option.
Select the project in the Project Library, and choose a Share menu option.
The Share window appears.
2. In the Share window, click the Advanced tab. On the Advanced tab, set the rendering options, and click Send to Compressor ![]() .
.
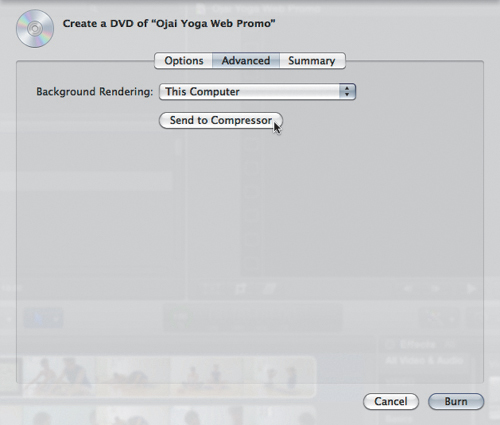
![]() In the Share window’s Advanced tab, set rendering options, and click Send to Compressor.
In the Share window’s Advanced tab, set rendering options, and click Send to Compressor.
If Compressor is present on your computer, the application launches, and your project appears in the job window.
3. In the Compressor window, select or customize your export options, and then click Submit ![]() .
.
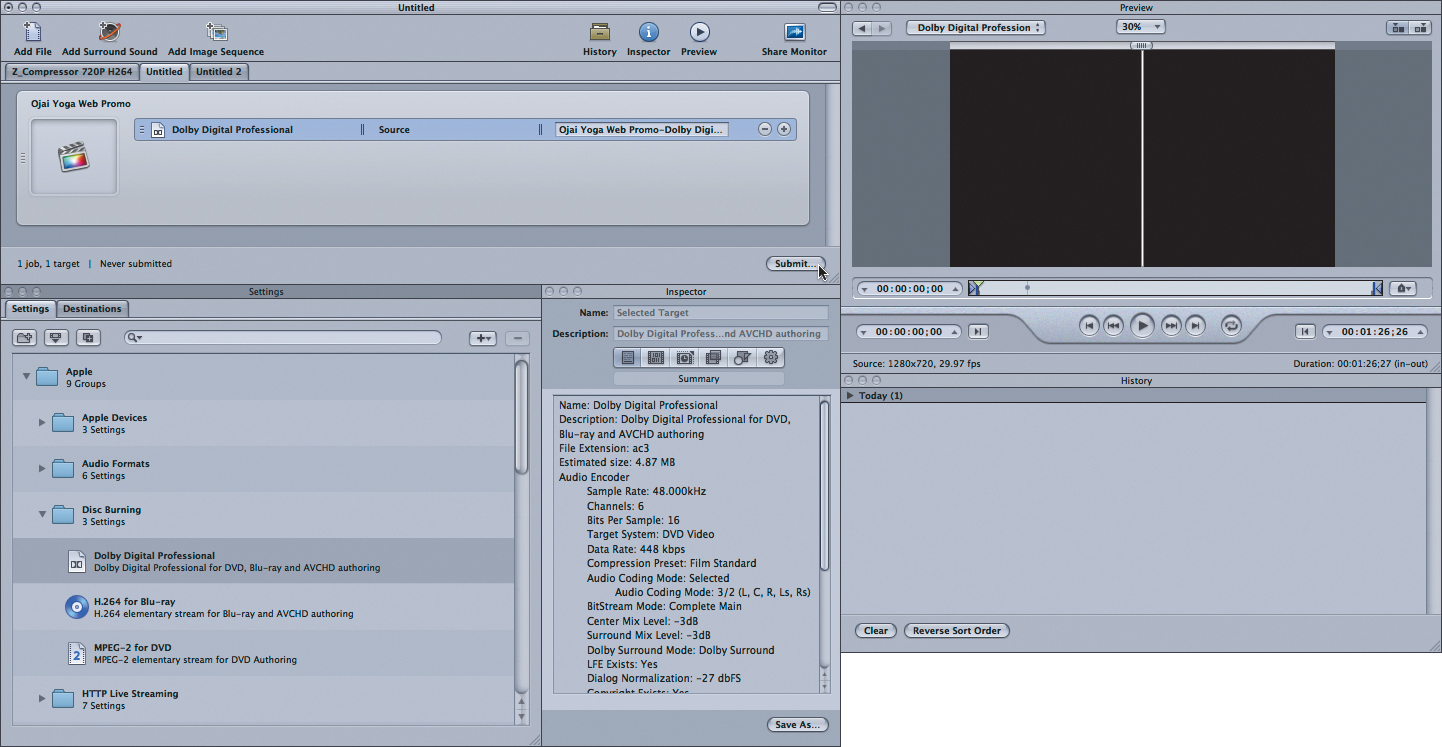
![]() In the Compressor window, select or customize your export options, and then click Submit.
In the Compressor window, select or customize your export options, and then click Submit.
Your exported project is processed in Compressor, and the finished file appears in the Finder.
You can use these Share window Compressor options to export a project, but you might prefer to use the Compressor pathway available in the Share > Export Media option—processing is usually faster. See “Exporting Projects in a QuickTime Media Format,” earlier in this chapter, for details.
XML Export for Use in Third-Party Applications
For years, independent software developers have used FCP’s XML and OMF “hooks” to develop custom interchange applications that make it possible to transfer a surprising amount of project data between FCP and other programs such as the Avid NLEs, Pro Tools, and After Effects.
FCP X introduced a completely new project structure, and its “flavor” of XML (called Rich XML) is not as interchangeable as you would hope for from an interchange application.
As we go to press, we’re waiting on someone from the independent developer community to step up with an XML solution that will allow FCP 7 projects to be opened in FCP.
On the export side: At this time, there’s no OMF/AAF export application capable of exporting FCP X project audio as discrete clips sorted into proper tracks—the kind of production audio export that postproduction audio professionals expect to receive.
The best place to check for updates on the XML exchange frontier is Apple’s Final Cut Pro Resources page: www.apple.com/finalcutpro/resources/.
To export XML from Final Cut Pro
1. In the Project Library, select the projects you want to export as XML files.
2. Choose File > Export XML.
3. In the file dialog, choose the destination folder where you want save these XML files, and then click Save.