
21. Animating Effects
In This Chapter
There is an incredible wealth of video, audio, color correction, cropping, and other effects you can perform in FCP. But the real power of all these effects lies in the power to change them over time.
By animating effects, you can fly a title onto the screen, zoom in on a photograph, slowly fill a black-and-white image with color, subtly add reverb to the audio as a character walks deeper into a virtual cave, and perform many other cool effects.
Keyframing is the technique you use to animate effects in FCP. Keyframing simply means assigning a particular parameter value at a specific frame in time. A basic fade-in is a simple example. You specify on frame 1 that the picture will be at 0 percent opacity and that at frame 30 it will be at 100 percent. The software interpolates the difference (creates the in-between frames), and the result is an animated effect.
Keyframing in the Viewer
You can do keyframing in three parts of the FCP interface: the Viewer, the Inspector, and the Timeline.
In the Viewer, you can keyframe transformations (scale, rotation, position, and so on), cropping effects, and distortion effects. All three work the same way, utilizing onscreen keyframing controls that appear when you enable any of the three clip effects modes.
Note that the Ken Burns effect is a special case, in that it doesn’t allow you to manually set specific keyframes. In Ken Burns mode, there are only two keyframes: one at the beginning of the shot and one at the end of the shot. Using the on-screen controls, you assign the beginning crop settings and the ending crop settings, and FCP automatically animates the clip accordingly.
To animate a transformation, crop, or distort effect
1. Select a clip in the Timeline, and in the Viewer, click the Apply Transformation, Apply Crop, or Apply Distortion button ![]() .
.
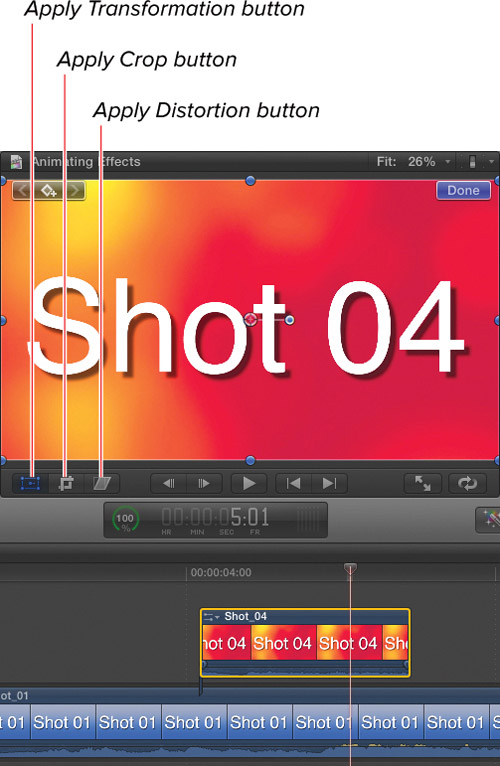
![]() Click one of the buttons to apply transformations, crops, or distortions. In this example, the Apply Transformations button has been clicked.
Click one of the buttons to apply transformations, crops, or distortions. In this example, the Apply Transformations button has been clicked.
The on-screen controls for the selected mode appear.
2. Position the playhead in the Timeline to the frame at which you want the animation to begin ![]() .
.
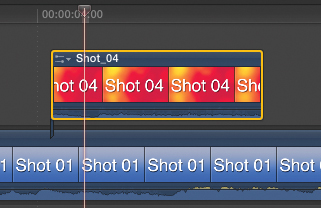
![]() Begin by placing the playhead on the frame where you want the effect to begin.
Begin by placing the playhead on the frame where you want the effect to begin.
3. In the Viewer, click the Add Keyframe button ![]() .
.
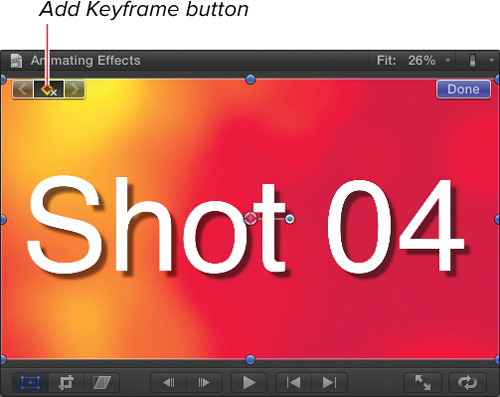
![]() Click the Add Keyframe button in the upper-left corner of the Viewer.
Click the Add Keyframe button in the upper-left corner of the Viewer.
A keyframe is added at the current playhead position.
4. Adjust the clip in the Viewer using the Transformation, Crop, or Distort tool ![]() .
.
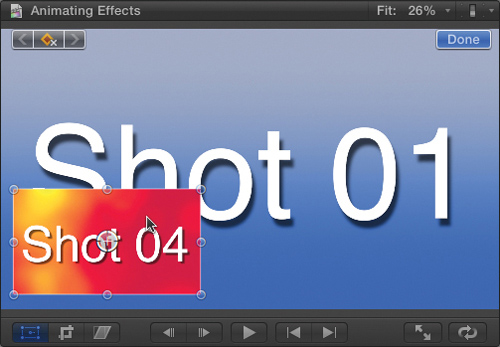
![]() Adjust the clip in the Viewer to the starting position for the animation.
Adjust the clip in the Viewer to the starting position for the animation.
It’s important to understand that setting a single keyframe does not create an animation. It’s not until you set a second keyframe that any animation occurs.
5. In the Timeline, move the playhead to the frame where you want the animation to end (or change) ![]() .
.
![]() Move the playhead to a different position.
Move the playhead to a different position.
6. Click the Add Keyframe button in the upper-left corner of the Viewer.
A keyframe is added at the current playhead position.
Keyframing in FCP X works differently from previous versions of Final Cut Pro: In FCP X, you must click the Add Keyframe button prior to adjusting the parameter settings.
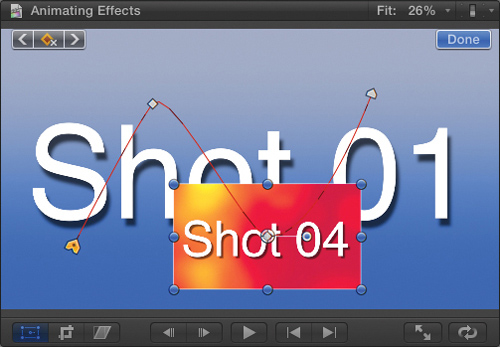
7. In the Viewer, adjust the Transformation, Crop, or Distort settings as desired ![]() .
.

![]() Set the clip in the Viewer to the second position. In this case, because the center point has been changed, a motion path appears showing the movement the clip will make over time.
Set the clip in the Viewer to the second position. In this case, because the center point has been changed, a motion path appears showing the movement the clip will make over time.
8. Repeat steps 5–7 as many times as necessary to achieve the animation you desire.
You can create as many keyframes as there are frames in your clip. But for the smoothest animation, set as few keyframes as you can, and spread them as far apart in time as possible.
9. Press / (Forward Slash) to play the clip and see the results of your work.
10. When you’re happy with the results, click the Done button ![]() .
.
![]() When you’re done adding keyframes, click the Done button.
When you’re done adding keyframes, click the Done button.
Your animation is complete.
Changing Existing Animations
Once you create an animation, you can easily go back and adjust, remove, or add keyframes to finesse or otherwise modify the overall effect.
To navigate between keyframes
1. Select a clip in the Timeline, and in the Viewer, click the Apply Transform, Apply Crop, or Apply Distort button.
A single clip can have separate Transform, Crop, and Distort animation settings. Be sure to enable the animation mode in which you want to modify the existing keyframes.
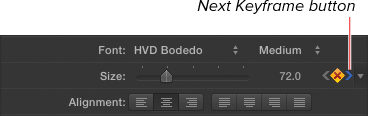
2. Click the Next Keyframe button to navigate to the next keyframe to the right of the current playhead position.
The playhead moves to the frame containing the next keyframe ![]() .
.
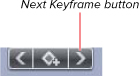
![]() Click the Next Keyframe button to navigate to the next keyframe to the right of the current playhead position.
Click the Next Keyframe button to navigate to the next keyframe to the right of the current playhead position.
If there are no more keyframes to the right, the Previous Keyframe button will be dimmed, and clicking it will have no effect ![]() .
.
![]() If there are no more keyframes in one direction, the navigation buttons are dimmed.
If there are no more keyframes in one direction, the navigation buttons are dimmed.
3. If desired, make any adjustments to the Transformation, Crop, or Distort settings.
The keyframe is updated to store the new settings.
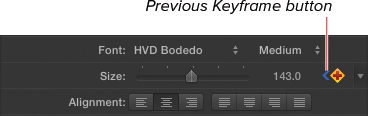
4. Click the Previous Keyframe button to navigate to the next keyframe to the left of the current playhead position ![]() .
.
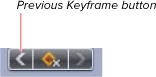
![]() Click the Previous Keyframe button to navigate to the next keyframe to the left of the current playhead position.
Click the Previous Keyframe button to navigate to the next keyframe to the left of the current playhead position.
The playhead moves to the frame containing the previous keyframe.
If there are no more keyframes to the left, the Previous Keyframe button will be dimmed, and clicking it will have no effect.
To add a new keyframe to an existing animation
1. Select a clip in the Timeline, and in the Viewer, click the Apply Transform, Apply Crop, or Apply Distort button ![]() .
.

![]() Animations can be stored in all three modes, Transform, Crop, and Distort. In this example, the Apply Distort button has been clicked.
Animations can be stored in all three modes, Transform, Crop, and Distort. In this example, the Apply Distort button has been clicked.
2. Move the playhead in the Timeline to a frame that doesn’t contain an existing keyframe ![]() .
.

![]() Park on a frame where you want to add a new keyframe, and click the Add Keyframe button.
Park on a frame where you want to add a new keyframe, and click the Add Keyframe button.
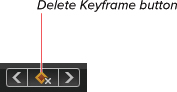
If you’re parked on a frame that already contains a keyframe, the Add Keyframe button turns into the orange Delete Keyframe button (see again ![]() ).
).
3. Click the Add Keyframe button.
A new keyframe is added to the animation.
4. Make adjustments to the on-screen controls in the Viewer.
5. Repeat steps 2–4 as desired to add more keyframes.
6. When you’re satisfied with your animation, click Done.
To remove a keyframe
1. Select a clip in the Timeline, and in the Viewer, click the Apply Transform, Apply Crop, or Apply Distort button.
2. Use the Previous Keyframe or Next Keyframe button to navigate to the keyframe you want to remove.
The Add Keyframe button turns orange to indicate you are currently parked on a keyframe ![]() .
.
![]() When the playhead is on a frame where a keyframe exists, the Add Keyframe button turns into the orange Remove Keyframe button. Clicking it removes the keyframe.
When the playhead is on a frame where a keyframe exists, the Add Keyframe button turns into the orange Remove Keyframe button. Clicking it removes the keyframe.
3. Click the Delete Keyframe button.
The keyframe is deleted.
Resetting Clip Effects
You cannot reset the Transformation, Crop, or Distort effects in the Viewer to remove all keyframes. You must use the corresponding controls in the Inspector.
To remove all keyframes
1. Select the clip you want to modify, and open the Video Inspector ![]() .
.

![]() Open the Video Inspector for the clip you want to reset.
Open the Video Inspector for the clip you want to reset.
2. Click the Reset button for the category of effects for which you want to remove all keyframes (Transform, Crop, or Distort) ![]() .
.
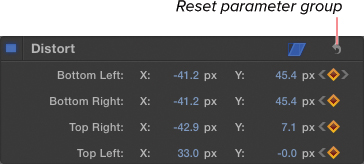
![]() Click the Reset button for the parameter set you want to reset. In this example, the Transform settings are being reset.
Click the Reset button for the parameter set you want to reset. In this example, the Transform settings are being reset.
All keyframes within that control set are removed, and the parameters are reset to their default values.
Keyframing in the Inspector
Nearly every single parameter displayed in the Inspector can be animated. This includes built-in clip effects such as position, scale, opacity, and so on, as well as parameters for any filters or effects you add to a clip.
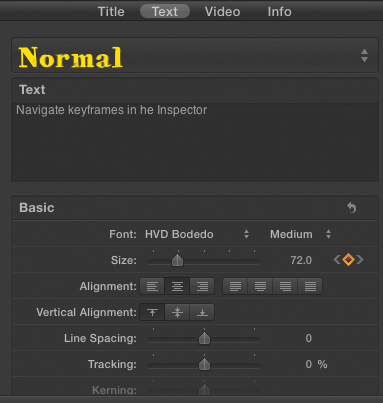
You can also keyframe parameters in the Audio Inspector, the Generator Inspector, the Title and Text Inspectors, and so on.
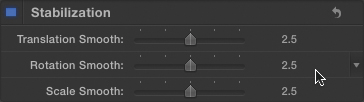
Pop-up menu and checkbox parameters cannot be keyframed (because it’s often impossible to interpolate between fixed states), and there are certain other parameters that also can’t be animated (such as the sliders that control image stabilization).
To identify whether a parameter can be animated
• Move your pointer over the parameter in the Inspector.
If an Add Keyframe button appears, the parameter can be animated ![]() .
.
![]() If you roll your mouse over a parameter and an Add Keyframe button appears, the parameter can be animated.
If you roll your mouse over a parameter and an Add Keyframe button appears, the parameter can be animated.
If no Add Keyframe button appears, the parameter cannot be animated ![]() .
.
![]() If no Add Keyframe button appears, the parameter cannot be animated.
If no Add Keyframe button appears, the parameter cannot be animated.
To animate a parameter in the Inspector
1. Select a clip, and open the Inspector ![]() .
.
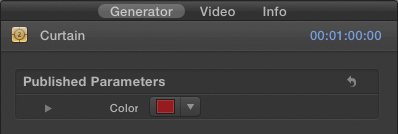
![]() Open the Inspector in which you want to animate a parameter. In this example, the Generator Inspector has been opened.
Open the Inspector in which you want to animate a parameter. In this example, the Generator Inspector has been opened.
2. In the Timeline, position the playhead over the frame where you want the first keyframe to be added ![]() .
.
![]() Always start by positioning the playhead on the frame where you want the animation to begin.
Always start by positioning the playhead on the frame where you want the animation to begin.
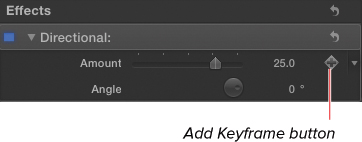
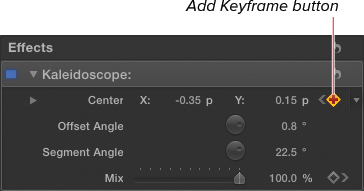
3. In the Inspector, click the Add Keyframe button for the parameter you want to animate ![]() .
.
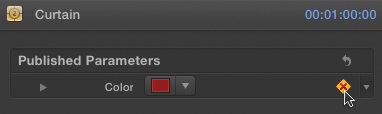
![]() Click the Add Keyframe button in the Inspector for the parameter you want to animate.
Click the Add Keyframe button in the Inspector for the parameter you want to animate.
A keyframe is added at the current playhead position.
4. Adjust the slider, dial, color well, or other parameter control ![]() .
.

![]() Then, adjust the parameter control to the starting setting.
Then, adjust the parameter control to the starting setting.
5. Move the Timeline playhead to a new frame ![]() .
.

![]() Then, move the playhead to a new position in time.
Then, move the playhead to a new position in time.
6. In the Inspector, click the Add Keyframe button for the parameter you are animating ![]() .
.
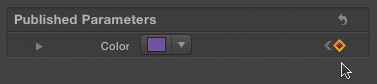
![]() Click the Add Keyframe button again.
Click the Add Keyframe button again.
A keyframe is added at the current playhead position.
7. Adjust the parameter control to the new setting.
8. Repeat steps 5–7 as needed to create the desired effect.
9. Press / (Forward Slash) to play the clip and see the results of your work ![]() .
.

![]() The parameter changes from one setting to the next over time.
The parameter changes from one setting to the next over time.
Adjusting Existing Animations
Once a parameter has been animated, you can continue to modify the animation by changing keyframe values or by adding and removing keyframes.
To navigate between keyframes
1. Select a clip in the Timeline, and open the Inspector containing the animated parameter ![]() .
.
![]() Open the Inspector containing the parameter you want to modify.
Open the Inspector containing the parameter you want to modify.
2. Click the Next Keyframe button to navigate to the next keyframe to the right of the current playhead position ![]() .
.
![]() Click the Next Keyframe button to move the playhead to the keyframe to the right of the current position.
Click the Next Keyframe button to move the playhead to the keyframe to the right of the current position.
The playhead moves to the frame containing the next keyframe.
If there are no more keyframes to the right, the Previous Keyframe button disappears ![]() .
.
![]() In no further keyframes exist to the right of the current playhead position, the Next Keyframe button appears dimmed.
In no further keyframes exist to the right of the current playhead position, the Next Keyframe button appears dimmed.
3. If desired, make any additional adjustments to the parameter control.
The keyframe is updated to store the new settings.
4. Click the Previous Keyframe button to navigate to the next keyframe to the left of the current playhead position ![]() .
.
![]() Click the Previous Keyframe button to move the playhead to the keyframe to the left of its current position.
Click the Previous Keyframe button to move the playhead to the keyframe to the left of its current position.
The playhead moves to the frame containing the previous keyframe.
To add a new keyframe to an existing animation
1. Select a clip in the Timeline, and open the Inspector containing the animated parameter.
2. Move the playhead in the Timeline to a frame that doesn’t contain an existing keyframe.
3. Click the Add Keyframe button ![]() .
.
![]() In the Inspector, click the Add Keyframe button to add a new keyframe at the current playhead position.
In the Inspector, click the Add Keyframe button to add a new keyframe at the current playhead position.
A new keyframe is added to the animation.
4. Make adjustments to the parameter control.
5. Repeat steps 2–4 as desired.
To remove a keyframe
1. Select a clip in the Timeline, and open the Inspector that contains your existing animation.
2. Use the Previous Keyframe or Next Keyframe button to navigate to the keyframe you want to remove.
The Add Keyframe button turns into the Delete Keyframe button to indicate that you are currently parked on a keyframe.
3. Click the Delete Keyframe button ![]() .
.

![]() When the playhead parked on an existing keyframe, the Add Keyframe button appears orange. Click it to delete the keyframe.
When the playhead parked on an existing keyframe, the Add Keyframe button appears orange. Click it to delete the keyframe.
The keyframe is deleted.
To remove all keyframes
1. Select the clip you want to modify, and open the Video Inspector.
2. Click the Parameter Menu button (the tiny arrow that appears at the right edge or the parameter bar when you mouse over a parameter).
3. Choose Reset Parameter from the pop-up menu ![]() .
.
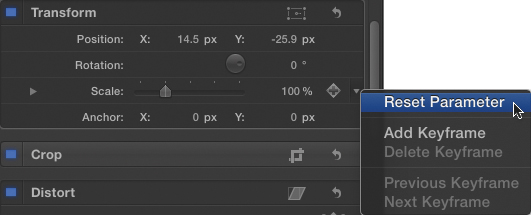
![]() Click the Parameter menu and choose Reset Parameter to remove all the keyframes and return the parameter to its default value.
Click the Parameter menu and choose Reset Parameter to remove all the keyframes and return the parameter to its default value.
The parameter is reset to its default values.
Keyframing in the Timeline
Although keyframing in the Viewer and the Inspector is easy to do, neither window allows you to observe an overview of your keyframes, seeing where they appear in time. By displaying keyframes in the Timeline, not only can you see such an overview, but you can also modify your keyframes’ locations in time, thus speeding up or slowing down the speed at which effects animate.
Keyframes in the Timeline are displayed in a special animation editor that can be shown or hidden for each clip individually. Video keyframes are displayed in the Video Animation Editor, and audio keyframes are displayed in the Audio Animation Editor.
To show the Video Animation Editor
• Select a clip in the Timeline, and do one of the following:
• Choose Clip > Show Video Animation ![]() .
.
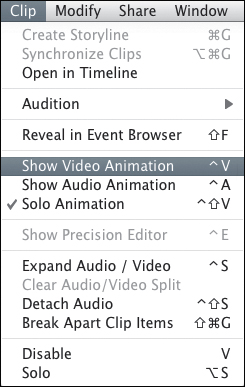
![]() Choose Show Video Animation from the Clip menu.
Choose Show Video Animation from the Clip menu.
• Open the Clip Action menu, and choose Show Video Animation ![]() .
.

![]() Choose Show Video Animation from the Clip Action menu.
Choose Show Video Animation from the Clip Action menu.
• Press Control-V.
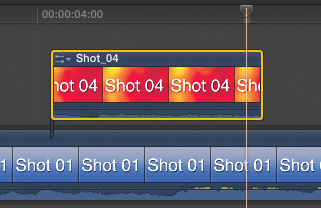
The Video Animation Editor appears above the selected clip ![]() .
.
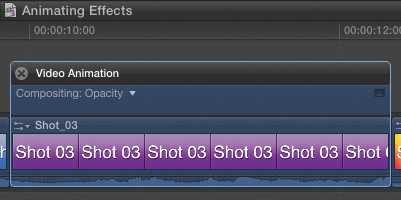
![]() The Video Animation Editor appears in the Timeline.
The Video Animation Editor appears in the Timeline.
To show the Audio Animation Editor
• Select a clip in the Timeline, and do one of the following:
• Choose Clip > Show Audio Animation.
• Open the Clip Action menu, and choose Show Audio Animation.
• Press Control-A ![]() .
.

![]() The Audio Animation Editor appears in the Timeline.
The Audio Animation Editor appears in the Timeline.
The Audio Animation Editor appears on the selected clip. The header appears above the clip, and the keyframe graphs appear below the clip.
Because audio levels are keyframed directly on the audio waveform area of clips in the Timeline, the Audio Animation Editor displays keyframe graphs only when pan or audio effects settings have been applied to the selected clip.
Note that you can show only one animation editor—audio or video—at once. Showing the Audio Animation Editor while the Video Animation Editor is open automatically replaces the video editor with the audio editor, and vice versa.
To hide the animation editor
• Do one of the following:
• Click the Close button on the animation editor in the Timeline ![]() .
.
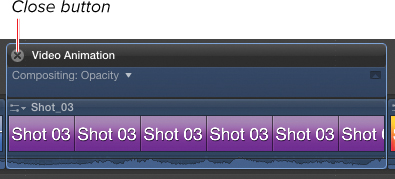
![]() Click the Close button to hide the animation editor.
Click the Close button to hide the animation editor.
• Choose Clip > Hide Video Animation Editor (to close the Video Animation Editor) or Hide Audio Animation Editor (to close the Audio Animation Editor).
The animation editor is hidden. Any existing keyframes remain applied to the clip.
Controlling the Animation Editor View
The animation editors can display parameter graphs in a collapsed or an expanded view. When collapsed, you can see (and modify) where keyframes exist in time, but you can’t see (or change) the parameter values.
In the expanded view, you can see both the keyframes’ location in time as well as the relative parameter value, displayed as a two-dimensional graph.
Furthermore, in the Timeline you can optionally see the keyframes for multiple effects simultaneously. This allows you to coordinate the timing of complex effects requiring keyframes in two or more parameters.
When only one graph is showing, it’s called Solo Animation mode, and you can select which parameter graph is displayed at any one time.
To expand or collapse keyframe graphs
• Click the Expand/Collapse Graph button ![]() .
.
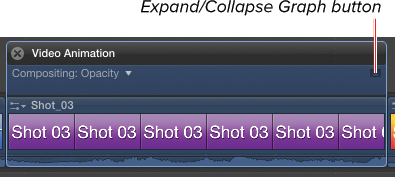
![]() Click the Expand/Collapse Graph button to expand the graph.
Click the Expand/Collapse Graph button to expand the graph.
The graph is expanded (if it was previously collapsed) ![]() or collapsed (if it was previously expanded).
or collapsed (if it was previously expanded).
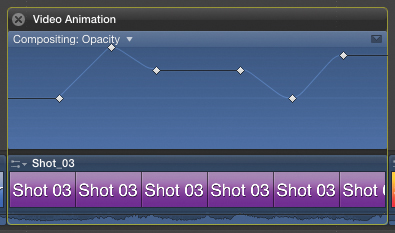
![]() When the graph is expanded, you can manipulate the keyframes more completely.
When the graph is expanded, you can manipulate the keyframes more completely.
Some graphs cannot be expanded. Usually these are graphs that refer to a parameter displayed in the Viewer, such as an effect’s center point or a clip’s Distort parameters.
To solo a parameter
• Select the clip, and choose Clip > Solo Animation; or press Shift-Control-V ![]() .
.
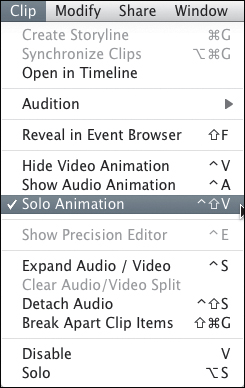
![]() When Solo Animation is enabled, a check mark appears next to it in the Clip menu.
When Solo Animation is enabled, a check mark appears next to it in the Clip menu.
The animation editor is limited to display only one parameter at a time ![]() . Also, a check mark appears in the Clip menu next to the Solo Animation menu item.
. Also, a check mark appears in the Clip menu next to the Solo Animation menu item.
![]() Solo Animation restricts the view in the animation editor to a single parameter at a time.
Solo Animation restricts the view in the animation editor to a single parameter at a time.
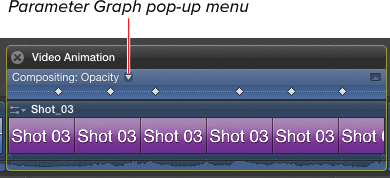
To switch between soloed parameters
1. Click the Parameter Graph pop-up menu to the right of the parameter name in the graph ![]() .
.
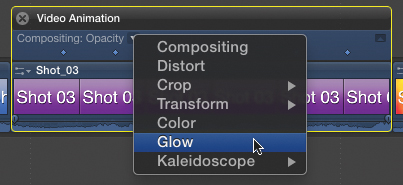
![]() When Solo Animation is enabled, you can click the Parameter Graph pop-up menu to choose which parameter to display.
When Solo Animation is enabled, you can click the Parameter Graph pop-up menu to choose which parameter to display.
A pop-up menu appears showing the names of all parameters that can be displayed.
2. Select one parameter from the pop-up menu.
The selected parameter’s graph replaces the current graph ![]() .
.

![]() The new parameter replaces the old one in the animation editor.
The new parameter replaces the old one in the animation editor.
To show all parameter graphs
• Select the clip, and choose Clip > Solo Animation; or press Shift-Control-V.
The check mark is removed from the menu item, and the animation editor displays all parameter graphs simultaneously ![]() .
.
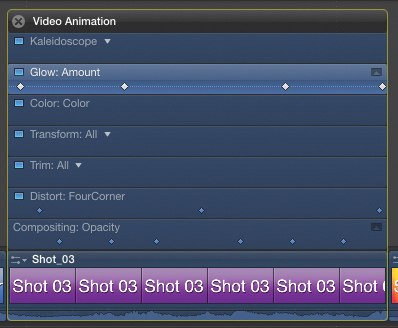
![]() When Solo Animation is disabled, all active parameters are displayed simultaneously.
When Solo Animation is disabled, all active parameters are displayed simultaneously.
Adjusting Keyframes in the Animation Editor
Whether or not you’re displaying one or more graph, you can modify the keyframes directly in the animation editor.
When a graph is collapsed, you can modify existing keyframes’ positions in time, but you cannot add keyframes unless a keyframe is already present, and you cannot modify the parameter value or the interpolation method.
When a graph is expanded, you can add and remove keyframes, as well as modify their positions in time and the parameter value.
To modify keyframes
1. Expand the keyframe graph in the animation editor ![]() .
.
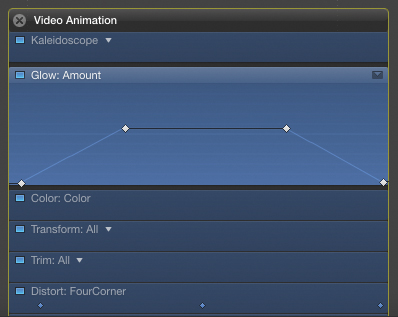
![]() To manipulate individual keyframes, begin by expanding the graph.
To manipulate individual keyframes, begin by expanding the graph.
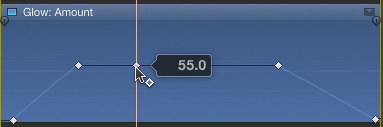
2. Click an individual keyframe, and drag horizontally to reposition the keyframe in time or vertically to change the keyframe’s parameter value ![]() .
.
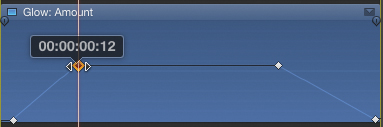
![]() Drag a keyframe horizontally to change its position in time or vertically to change the parameter value.
Drag a keyframe horizontally to change its position in time or vertically to change the parameter value.
Note that you cannot change a keyframe’s position in time and its parameter value simultaneously. You can do only one at a time. Once you begin to drag, you establish whether you are making a horizontal, time-based adjustment or a vertical, parameter value-based adjustment.
Moving keyframes closer together speeds up the timing of the animation between those keyframes. Moving them farther apart from one another slows down the animated effect.
To add keyframes
1. Expand the keyframe graph in the animation editor.
2. Option-click the parameter graph line ![]() .
.
![]() Option-click the parameter graph line to add a new keyframe.
Option-click the parameter graph line to add a new keyframe.
A new keyframe is added at the frame where you clicked.
3. Adjust the keyframe’s value and position in time as desired ![]() .
.

![]() Drag the new keyframe to your desired location.
Drag the new keyframe to your desired location.
Many parameters also have built-in Fade In/Fade Out controls ![]() . Simply drag the fade control from the beginning or end of the graph to add a fade. For more detailed instructions, see Chapter 13, “Basic Compositing.”
. Simply drag the fade control from the beginning or end of the graph to add a fade. For more detailed instructions, see Chapter 13, “Basic Compositing.”
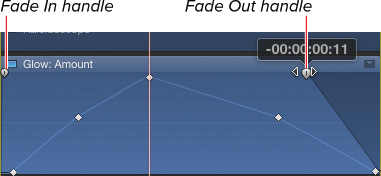
![]() Drag the fade handles to create fade-in and fade-out effects for the selected parameter.
Drag the fade handles to create fade-in and fade-out effects for the selected parameter.
You can also drag a line segment vertically to simultaneously increase or decrease the relative values of the two keyframes connected to that segment.
Controlling Keyframe Interpolation
You can control how FCP interpolates the values between keyframes, optionally creating a more organic-feeling change that simulates inertial forces in the real world. You can set different interpolation methods for the area between any two keyframes.
Choose from one of four interpolation methods:
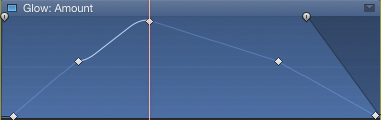
• Linear: Parameter values shift abruptly from one value to the next.
• Ease: Values begin changing gradually and end changing gradually.
• Ease In: Values begin changing abruptly but end changing gradually.
• Ease Out: Values begin changing gradually but end changing abruptly.
By default, all parameters are set to Linear interpolation.
To choose the interpolation method
1. Expand a graph containing two or more keyframes.
2. Right-click the line connecting any two keyframes.
The Interpolation Method pop-up appears ![]() .
.
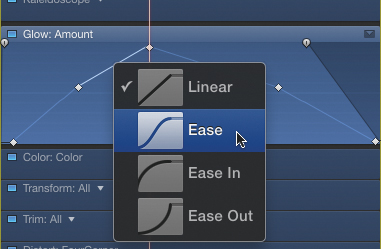
![]() Right-click any line segment, and select from one of the four interpolation methods.
Right-click any line segment, and select from one of the four interpolation methods.
3. Choose one of the four interpolation methods.
The interpolation method is set for the specific graph line ![]() .
.
![]() The interpolation method is assigned to the line segment.
The interpolation method is assigned to the line segment.
You can also add an ease effect to a line segment by dragging the curve horizontally. The pointer becomes the Adjust Curve pointer; dragging left makes the curve more linear, and dragging right makes the curve more “easy” ![]() .
.
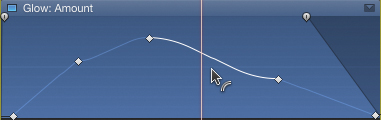
![]() Manually control a line segment’s “ease” settings by dragging the segment left or right.
Manually control a line segment’s “ease” settings by dragging the segment left or right.