
7. Basic Editing
In This Chapter
Editing tasks can be divided into two main categories: creating a rough assembly of your story and refining and fine-tuning those edits to create a finished product. This chapter will focus primarily on the first stage, that is, getting stuff into (and out of) the Timeline.
Final Cut Pro offers at least five ways to add a clip to your project, with multiple options within each. We’ll start by showing you a couple of the most commonly used methods and then elaborate on the remaining methods, identifying when and why you might choose one over another.
We’ll also explore ways to limit those edits, such as making an audio-only or video-only edit.
Next, you’ll learn various ways of removing clips from a project. FCP offers a variety of options here too.
Finally, we’ll get into the basics of moving objects around and making simple modifications to clips once they’re in the project.
Anatomy of the Timeline
The Timeline displays audio and video clips as colored bars. The horizontal position of a bar indicates the clip’s position in time, and the width of a bar represents the clip’s duration ![]() . The bars can display video thumbnails, audio waveforms, or both. At the top of the window the ruler displays frame numbers, providing a reference for where each item exists in time.
. The bars can display video thumbnails, audio waveforms, or both. At the top of the window the ruler displays frame numbers, providing a reference for where each item exists in time.

![]() The FCP Timeline
The FCP Timeline
The middle row (or track) contains your primary storyline, where you place most of the clips that make up your movie. These clips can contain both audio and video. Clips that came directly from your camera will likely contain both. Video-only or clips with both video and audio appear in blue. Audio-only clips appear in green.
You can connect additional clips above or below the primary storyline to synchronize them with a particular frame in one of the primary clips.
In the Timeline, a connected clip is indicated by a connection line that extends from the first frame of the connected clip to the sync point in the primary storyline ![]() .
.
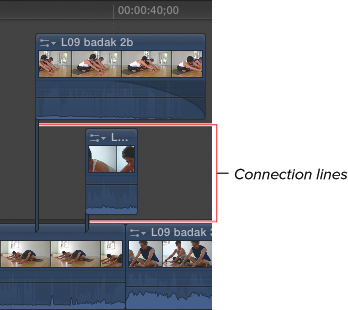
![]() Connection lines show the frame to which the connected clip is synced.
Connection lines show the frame to which the connected clip is synced.
Once you’ve connected a clip, it’s attached to that point in the primary storyline and will move any time that primary storyline clip is moved ![]() .
.
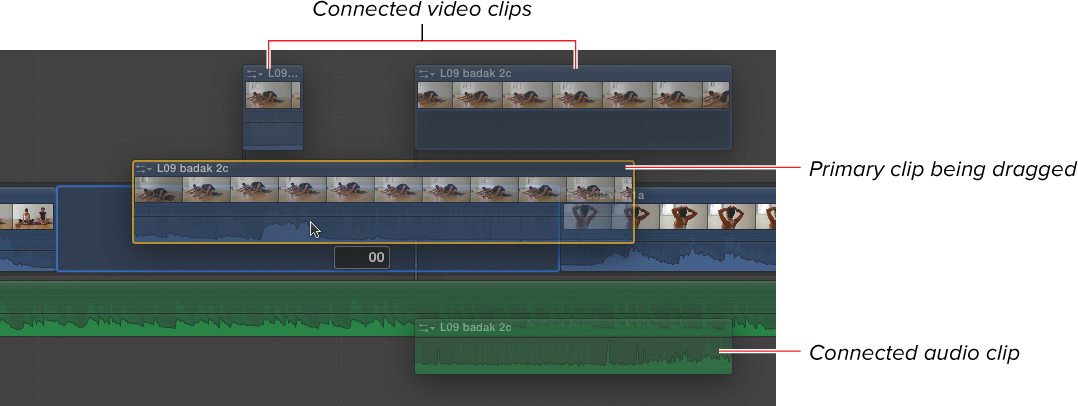
![]() Dragging a clip moves any connected clips along with it.
Dragging a clip moves any connected clips along with it.
Video clips obscure the contents of any tracks below them. So, attaching a full-size video clip on top of your primary storyline effectively replaces the underlying image when the video is played back. If the object on the higher track is partially transparent (such as a logo or a title) or if its size is reduced, the underlying video will show through, creating a composition.
Audio that overlaps in time is mixed together based on the relative volume and fade settings of each object.
Timeline View Options
You can customize clip height as well as clip appearance; specifically, you can choose how much of the clip area displays the thumbnails and how much displays the audio waveforms. Changing these settings applies to all clips in the Timeline.
Click the Show Connections checkbox to show (or hide) the connection lines that indicate where each connect clip is linked to the primary storyline (see again ![]() ).
).
Connection lines are always visible when a connected clip is selected. The Show Connections checkbox controls whether the lines appear even when connected clips are unselected.
To change clip appearance and height
1. Click the Clip Appearance button that is beneath the Timeline and to the right of the Timeline Zoom slider ![]() .
.
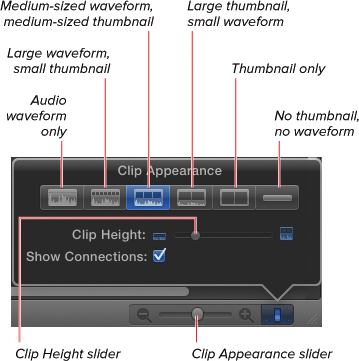
![]() Choose a clip style from the row at the top, and use the slider beneath to control the track height.
Choose a clip style from the row at the top, and use the slider beneath to control the track height.
The Clip Appearance controls appear.
2. Click one of the six Clip Appearance icons (see again ![]() ).
).
The icons on the left display larger audio waveforms, and the icons on the right display larger video thumbnails.
The rightmost icon displays a simplified track view, with neither audio waveforms nor video thumbnails and a fixed clip height.
3. Drag the Clip Height slider to the left for shorter clips and to the right for taller clips.
4. Once you have made your selections, click anywhere outside the Clip Appearance panel to close it.
The clips in the Timeline change to reflect the style and height you selected.
Adding Clips to a Project
To get started editing, begin by adding your first clip to your project. Then, you can add additional clips using a variety of methods.
To add your first clip to a project
1. If you haven’t yet created a project, click the Create New Project icon in the Timeline area ![]() .
.
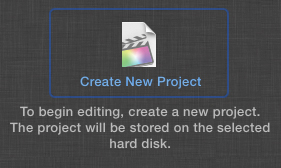
![]() The first time you create a project, click the icon in the middle of the Timeline area.
The first time you create a project, click the icon in the middle of the Timeline area.
The New Project dialog appears ![]() .
.
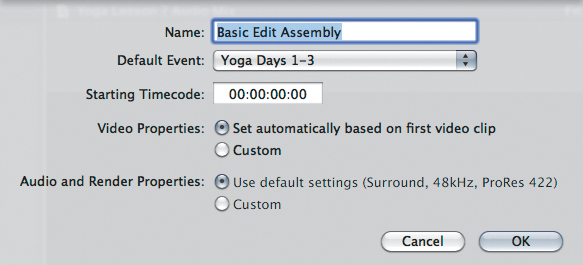
![]() Name the project, and leave the rest of the settings at their defaults.
Name the project, and leave the rest of the settings at their defaults.
2. Enter a name for the project, specify a default event, and click OK.
A new project is added, and an empty Timeline appears ![]() .
.
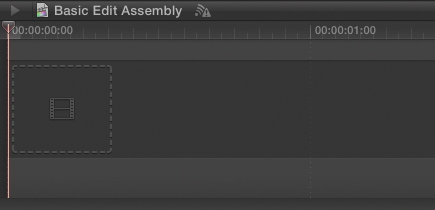
![]() The dotted clip outline indicates that the project is empty.
The dotted clip outline indicates that the project is empty.
3. In the Event Browser, select the clip you want to edit, and select the portion of the clip you want to edit ![]() .
.
![]() Press I to set the In point and press O to set the Out point to mark the section of the clip you want to include.
Press I to set the In point and press O to set the Out point to mark the section of the clip you want to include.
4. Click the Append button, or press E.
The clip is added to the project and appears in the Timeline ![]() .
.

![]() Click the Append Edit button or press E to add the first clip to the project.
Click the Append Edit button or press E to add the first clip to the project.
To add additional clips
1. In the Event Browser, mark the section of the clip you want to edit ![]() .
.
![]() For best results, play the video clip, and then press I and O on-the-fly to mark the selection.
For best results, play the video clip, and then press I and O on-the-fly to mark the selection.
2. Click the Append Edit button or press E to add the clip the end of the project ![]() .
.
![]() Append is only one way to add a clip to the project. See the next section for more edit types.
Append is only one way to add a clip to the project. See the next section for more edit types.
The clip is added to the project after the other clips.
Which Edit Type Should You Use?
Different situations call for different edit types. Traditional editing technique often involves inserting a master shot and then going back and overwriting bits and pieces of it with other shots until your whole scene is assembled. In other cases, you may want to insert a clip between two existing ones, or you may want to append a new clip to the end of the movie.
FCP offers five ways to add a clip to a project: inserting, appending, overwriting, connecting, and replacing ![]() . The Replace function (which works entirely differently from the Replace Edit function in previous versions of FCP) can be employed in four ways, bringing the total number of editing options up to eight.
. The Replace function (which works entirely differently from the Replace Edit function in previous versions of FCP) can be employed in four ways, bringing the total number of editing options up to eight.
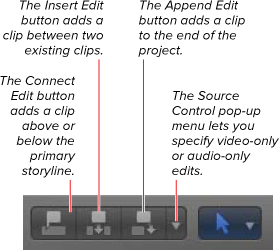
![]() The toolbar contains one-click buttons for performing three of the five types of edits.
The toolbar contains one-click buttons for performing three of the five types of edits.
Each of these edits can be performed in multiple ways including clicking on-screen buttons, pressing keyboard shortcuts, choosing menu items, and using drag and drop.
The following are the three most common edit types you’ll use for assembling your clips:
• Appending adds the selected clip to the end of the active storyline.
• Inserting adds the selected clip to the active storyline, beginning at the playhead (or skimmer) position and pushing any existing clips downstream (to the right) to make room for the new clip.
• Overwriting adds the selected clip to the active storyline, beginning at the playhead (or skimmer) position and deleting any existing frames for the duration of the source clip.
The first time you add a clip to your project, you can perform an append, insert, or overwrite edit and get identical results: The clip will be added to the beginning of the project.
Append Edits
Appending adds the selected clip to the end of the active storyline. Appending a clip always makes your project longer.
To append a clip
1. In the Event Browser, select the clip you want to add to the project.
2. Play the clip, and press I to set the In point and press O to set the Out point to identify the specific range of the source clip you want to use ![]() .
.
![]() Mark the area of the clip you want to select.
Mark the area of the clip you want to select.
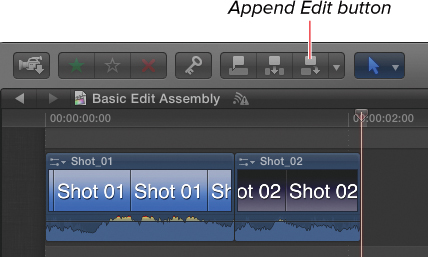
3. Click the Append Edit button in the toolbar, or press E ![]() .
.
![]() Click the Append Edit button or press E to add the clip to the end of the project.
Click the Append Edit button or press E to add the clip to the end of the project.
The clip is appended to the end of the storyline ![]() .
.
![]() Append edits add the new clip to the end of the project, regardless of where the Timeline playhead is.
Append edits add the new clip to the end of the project, regardless of where the Timeline playhead is.
Insert Edits
Insert edits add the selected clip to the active storyline, beginning at the playhead (or skimmer) position and pushing any existing clips downstream (to the right) to make room for the new clip.
You can also use three-point editing to perform an insert edit. For more on three-point editing, see “Three-Point Editing” later in this chapter.
Inserting clips always makes your project longer.
To insert a clip
1. In the Event Browser, select the clip you want to edit into the project.
2. Play the clip, and press I to set the In point and press O to set the Out point to identify the specific range of the clip you want to use ![]() .
.

![]() Mark the range of the clip you want to edit.
Mark the range of the clip you want to edit.
3. In the Timeline, position the playhead where you want the clip to be inserted ![]() .
.

![]() The bottom image shows a new clip inserted into the project between the last two clips. Notice that the marker (the cyan diamond) is pushed to the right.
The bottom image shows a new clip inserted into the project between the last two clips. Notice that the marker (the cyan diamond) is pushed to the right.
4. Click the Insert Edit button in the toolbar, or press W ![]() .
.
![]() Click the Insert button or press W to insert the clip into the Timeline at the playhead position.
Click the Insert button or press W to insert the clip into the Timeline at the playhead position.
The clip is inserted in the storyline at the designated location ![]() .
.
![]() The clip is inserted, splitting clips if necessary. In this example, Shot_01 has been split into two pieces.
The clip is inserted, splitting clips if necessary. In this example, Shot_01 has been split into two pieces.
Alternatively, you can drag the clip to the Timeline and drop it between any two clips in the storyline ![]() .
.
![]() When you drag and drop, a blue outline appears to show you where the new clip will be added to the project.
When you drag and drop, a blue outline appears to show you where the new clip will be added to the project.
The existing clips will move out of the way to make room for the new clip.
Overwrite Edits
Overwriting adds the selected clip to the active storyline, beginning at the playhead (or skimmer) position and deleting any existing frames for the duration of the source clip.
You can also use three-point editing to perform an overwrite edit. For more on three-point editing, see “Three-Point Editing” later in this chapter.
To overwrite a clip
1. In the Event Browser, select the clip you want to edit into the project.
2. Play the clip, and press I to set the In point and press O to set the Out point to identify the specific range of the clip you want to use.
3. In the Timeline, position the playhead at the first frame you want the clip to be overwritten ![]() .
.
![]() Note the playhead position prior to the edit.
Note the playhead position prior to the edit.
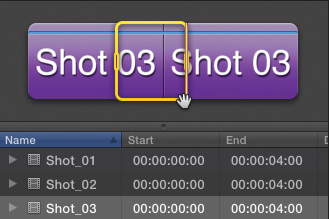
4. Choose Edit > Overwrite, or press D ![]() .
.
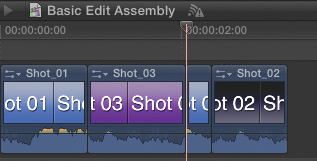
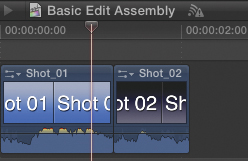
![]() The new clip (Shot_03) overwrites the end of Shot_01 and all of Shot_02.
The new clip (Shot_03) overwrites the end of Shot_01 and all of Shot_02.
The clip is overwritten in the storyline beginning at the designated location.
You can also overwrite a clip by pressing P to select the Position tool and then dragging the selection from the Event Browser to the Timeline and dropping it anywhere in the Timeline.
Connect Edits
Connect edits add a selected clip to a project by attaching it to the primary storyline beginning at the playhead (or skimmer) position. Rather than deleting the underlying clips, as with an overwrite edit, a connect edit composites the clip above the storyline.
You can also use three-point editing to perform a connect edit. For more on three-point editing, see “Three-Point Editing” later in this chapter.
To connect a clip
1. In the Event Browser, select the clip you want to edit into the project.
2. Play the clip, and press I to set the In point and press O to set the Out point to identify the specific range of the clip you want to use.
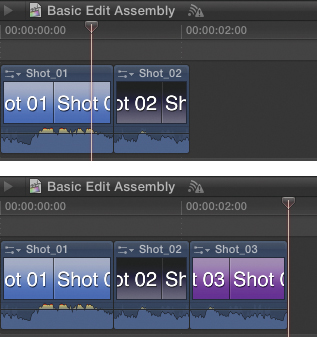
3. In the Timeline, position the playhead where you want the clip to be connected ![]() .
.
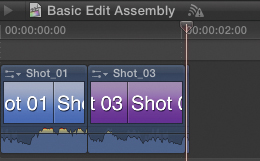
![]() Prior to the edit, the playhead is positioned near the end of Shot_01.
Prior to the edit, the playhead is positioned near the end of Shot_01.
4. Click the Connect Edit button in the toolbar, or press Q ![]() .
.
![]() Click the Connect Edit button or press Q to add the clip to the project as a connected clip.
Click the Connect Edit button or press Q to add the clip to the project as a connected clip.
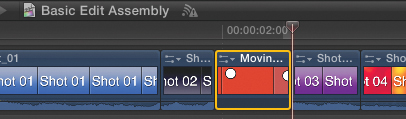
The clip is added to the Timeline ![]() .
.
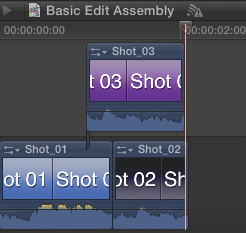
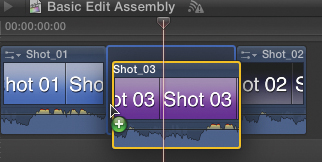
![]() Shot_03 is added as a connected clip, linked in time to the frame in Shot_01 where the playhead was when the edit was performed.
Shot_03 is added as a connected clip, linked in time to the frame in Shot_01 where the playhead was when the edit was performed.
The clip is connected to the storyline at the designated location.
Alternatively, you can drag the clip to the Timeline and drop it in the area above the storyline and to the position in time where you want the clip to be connected.
Replace Edits
Replace edits add a selected clip to a project by exchanging it with a clip that currently exists in the project (the target clip). The target clip is always completely removed (unlike an overwrite edit, where only the section beneath the source clip is removed).
When performing a replace edit, you must choose from one of the following options: Replace, Replace from Start, Replace from End, and Replace and Add to Audition. That last option will be covered in Chapter 10, “Auditioning Clips.” The other three are described next.
Replacing a clip may or may not change the overall duration of the project depending on the situation.
Types of Replace Edits
The following are types of replace edits:
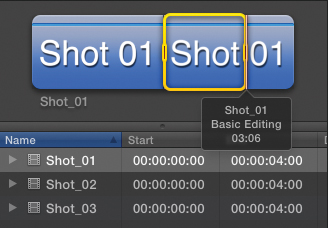
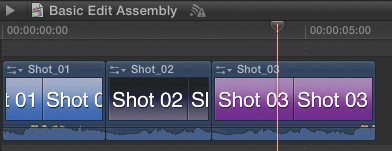
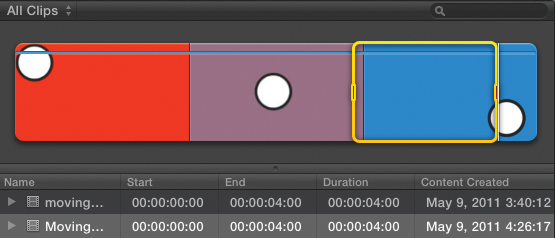
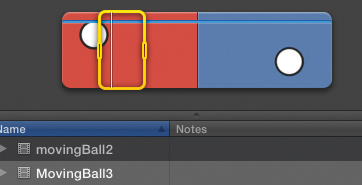
• Replace: The target clip is entirely replaced by the source clip selection. If the source clip is shorter than the target clip, the overall sequence will be shortened. If the source clip is longer, the overall sequence will be lengthened ![]() .
.
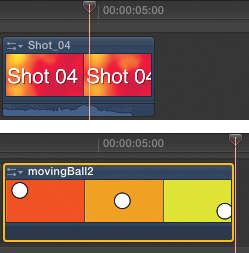
![]() In this figure, movingBall2 has replaced Shot_04. Because movingBall2 is longer, the resulting clip in the project is longer.
In this figure, movingBall2 has replaced Shot_04. Because movingBall2 is longer, the resulting clip in the project is longer.
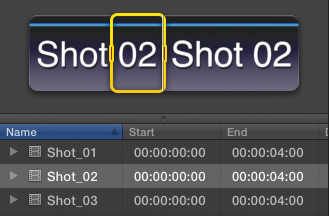
• Replace from Start: The target clip is replaced with the source clip. The first frame of the source clip is aligned with the first frame in the target clip, and the rest of the footage is added to fill the remaining duration of the target clip ![]() . If there are not enough frames after the source In point to fill the remaining duration, FCP will display a warning, and the resulting clip will be only as long as is possible based on the source footage.
. If there are not enough frames after the source In point to fill the remaining duration, FCP will display a warning, and the resulting clip will be only as long as is possible based on the source footage.

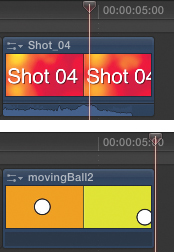
![]() Replace from Start replaces Shot_04 with the beginning frames of movingBall2 (where the ball is in the upper left and the background is orange). The resulting clip in the project is limited to the original length of Shot_04.
Replace from Start replaces Shot_04 with the beginning frames of movingBall2 (where the ball is in the upper left and the background is orange). The resulting clip in the project is limited to the original length of Shot_04.
• Replace from End: The target clip is replaced with the source clip. The last frame of the source clip is aligned with the last frame in the target clip, and the rest of the footage is backtimed to fill the remaining duration of the target clip ![]() . For more about backtiming, see the “Backtiming Edits” section of this chapter.
. For more about backtiming, see the “Backtiming Edits” section of this chapter.
![]() Replace from End replaces Shot_04 with the last frames of movingBall2 (where the ball is in the lower right and the background is yellow). The resulting clip in the project is limited to the original length of Shot_04.
Replace from End replaces Shot_04 with the last frames of movingBall2 (where the ball is in the lower right and the background is yellow). The resulting clip in the project is limited to the original length of Shot_04.
If there are not enough frames before the source Out point to fill the remaining duration, FCP will display a warning, and the resulting clip will be only as long as is possible based on the source footage.
Note there are additional options in the Replace drop menu regarding auditions. For more information, see “Creating Auditions in the Timeline” in Chapter 10.
To replace a clip
1. In the Event Browser, select the clip you want to edit into the project.
2. Play the clip, and press I to set the In point and press O to set the Out point to identify the specific range of the clip you want to use.
3. Drag the clip to the Timeline over an existing clip (making the clip turn white), and drop it.
The Replace options drop menu appears ![]() .
.
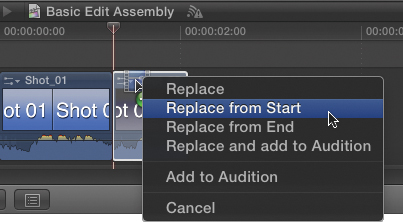
![]() The white highlight is the clue you are entering Replace mode. The pop-up menu allows you to choose the type of replace edit you want to perform.
The white highlight is the clue you are entering Replace mode. The pop-up menu allows you to choose the type of replace edit you want to perform.
4. Choose the type of replace edit you want to make.
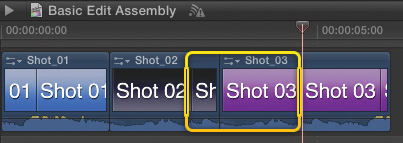
The target clip is replaced by the source clip in the manner you chose ![]() .
.
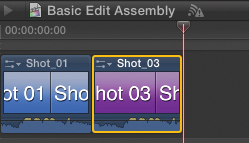
![]() Shot_03 replaces Shot_02. Notice that the resulting edit is longer, because the selected area of Shot_03 was longer than Shot_02.
Shot_03 replaces Shot_02. Notice that the resulting edit is longer, because the selected area of Shot_03 was longer than Shot_02.
You can also select a clip in the Timeline and press Shift-R to replace it with the currently selected clip in the Event Browser or press Option-R to invoke a Replace from Start command.
Controlling Edits
You can use additional tools and techniques to further customize and control how your edits are performed.
Backtiming Edits
In most of the edits described so far, the In point in the source footage is aligned with the playhead (or skimmer) position in the Timeline. However, sometimes it’s more important to align the end of the clip with the Timeline playhead position.
In such cases, rather than performing a regular edit, you can perform a backtimed edit. In a backtimed edit, it is the Out point of the source clip that is aligned with the playhead (or skimmer).
To overwrite a clip (backtimed)
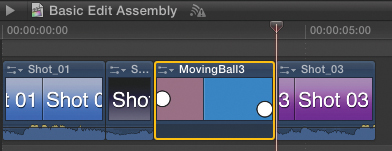
1. In the Event Browser, select the range of the clip you want to edit into the project ![]() .
.

![]() MovingBall3 begins with a red background and a ball in the upper left and ends with a blue background and the ball in the lower right. In this case, the end of the clip is selected.
MovingBall3 begins with a red background and a ball in the upper left and ends with a blue background and the ball in the lower right. In this case, the end of the clip is selected.
2. In the Timeline, position the playhead at the last frame where you want the clip to be overwritten ![]() .
.
![]() With a regular edit, the playhead indicates where the first frame of the new clip will go.
With a regular edit, the playhead indicates where the first frame of the new clip will go.
3. Press Shift-D ![]() .
.
![]() With backtiming, the playhead indicates where the last frame of the new clip goes. The rest of the selected frames from the new clip are added prior to the playhead position.
With backtiming, the playhead indicates where the last frame of the new clip goes. The rest of the selected frames from the new clip are added prior to the playhead position.
The clip is overwritten in the storyline ending at the designated location with the last frame lined up with the playhead (or skimmer) position.
To connect a clip (backtimed)
1. In the Event Browser, select the range of the clip you want to edit into the project ![]() .
.
![]() Again, a section near the end of the clip is selected.
Again, a section near the end of the clip is selected.
2. In the Timeline, position the playhead at the last frame you want the clip to be connected ![]() .
.

![]() The playhead is used to define where the new clip will end.
The playhead is used to define where the new clip will end.
3. Press Shift-Q.
The clip is attached to the storyline at the designated location with the last frame lined up with the playhead (or skimmer) position ![]() .
.

![]() The new clip is connected, ending at the playhead position. Notice that despite the backtimed edit, the connection line is still aligned with the first frame of the connected clip.
The new clip is connected, ending at the playhead position. Notice that despite the backtimed edit, the connection line is still aligned with the first frame of the connected clip.
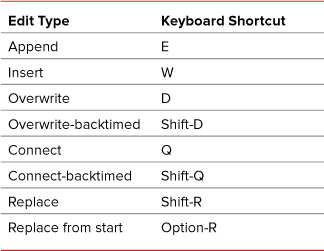
Table 7.1 lists shortcuts for append, insert, overwrite, connect, replace, and backtimed edits.
Table 7.1. Basic Editing Shortcuts
Performing Audio-Only or Video-Only Edits
By default, FCP will edit all your tracks (video and audio) into a project whenever you make an edit, but oftentimes you want to edit just the audio or just the video tracks from the source clip.
For example, you may be adding a shot where the picture was great but the audio was no good, or you may be stealing the dialogue from one angle to be used for another.
FCP allows you to limit edits to video-only or audio-only. This limit affects all types of edits.
You cannot specify individual tracks during the edit process as you could in previous editions of FCP. However, you can choose which tracks are active for any specific shot in the Info window for that shot.
To perform a video-only edit
1. Click the Source Media button in the toolbar, and choose Video Only or press Option-2 ![]() .
.
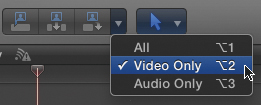
![]() Click the small arrow to the right of the edit buttons to access the Source Media controls. The selected option displays a check mark, and the adjacent edit buttons turn blue for video-only (as shown) or green for audio-only.
Click the small arrow to the right of the edit buttons to access the Source Media controls. The selected option displays a check mark, and the adjacent edit buttons turn blue for video-only (as shown) or green for audio-only.
2. In the Event Browser, select the range of the clip you want to edit ![]() .
.
![]() The selected clip has both audio and video.
The selected clip has both audio and video.
3. Perform any one of the edits described in the previous section ![]() .
.

![]() A video-only append edit. Notice the waveform area (the bottom half of the clip) is empty.
A video-only append edit. Notice the waveform area (the bottom half of the clip) is empty.
To perform an audio-only edit
1. Click the Source Media button in the toolbar, and choose Audio Only or press Option-3 ![]() .
.
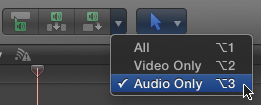
![]() Select Audio Only from the Source Media pop-up menu, or press Option-3.
Select Audio Only from the Source Media pop-up menu, or press Option-3.
2. In the Event Browser, select the range of the clip you want to edit ![]() .
.
![]() The selected clip has both audio and video.
The selected clip has both audio and video.
3. Perform any one of the edits described in the previous section ![]() .
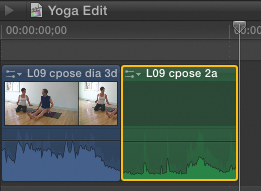
.

![]() An audio-only append edit. Audio-only clips appear in green, even in the primary storyline.
An audio-only append edit. Audio-only clips appear in green, even in the primary storyline.
To perform a video-plus-audio edit
1. Click the Source Media button in the toolbar, and choose All or press Option-1 ![]() .
.
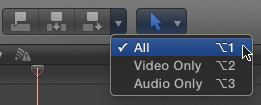
![]() Select All from the Source Media pop-up menu, or press Option-1.
Select All from the Source Media pop-up menu, or press Option-1.
2. In the Event Browser, select the range of the clip you want to edit ![]() .
.

![]() The selected clip has both audio and video.
The selected clip has both audio and video.
3. Perform any one of the edits described in the previous section ![]() .
.
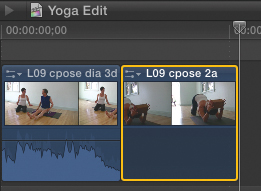
![]() A video plus audio append edit. The new clip contains both video and audio.
A video plus audio append edit. The new clip contains both video and audio.
Three-Point Editing
Often you want to use specific frames in the project to determine where an edit should occur. For example, you may want to ensure that a cutaway covers a section where the microphone dipped into the frame. Or you may want to replace a wide shot with a close-up and control precisely where in the sequence the new shot should begin and end.
FCP allows such edits by permitting you to identify a range in the project (using In and Out points) and limit the edit to occur only inside that range.
Note that when you press I to set an In point in the Timeline, FCP automatically adds a corresponding Out point at the end of the clip under the playhead. If you set an Out point first, it will automatically add a corresponding In point. Just ignore them and manually set your own specific Out or In points exactly where you want them! The Current Frame indicator can display the duration of your selected range ![]() .
.
![]() The Current Frame indicator can display the exact duration of your selected range. When viewing the current duration, the numbers turn blue, and the icon on the right side changes to the duration icon.
The Current Frame indicator can display the exact duration of your selected range. When viewing the current duration, the numbers turn blue, and the icon on the right side changes to the duration icon.
When you set a range in the Timeline, you can run into a potentially confusing situation where you have a certain duration selected in the project and a selection in the source clip of a different duration ![]() . In such cases, the Out point of the source clip is never used to determine the position or duration of the edit.
. In such cases, the Out point of the source clip is never used to determine the position or duration of the edit.
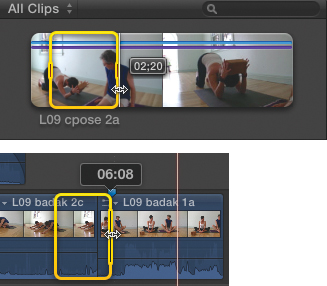
![]() The selection in the Event Browser (top) is 2:20, and the selection in the project (bottom) is 6:08. How do you fit one into the other?
The selection in the Event Browser (top) is 2:20, and the selection in the project (bottom) is 6:08. How do you fit one into the other?
If the selected source clip is longer than the selected range in the Timeline, the extra frames will not be included in the edit.
For a normal edit, that means the frames at the end of the clip will be ignored. For a backtimed edit, it means the frames at the beginning of the clip will be ignored.
If the selected source clip is shorter than the selected range in the Timeline, additional frames from the source clip will be included in the edit (even though they were outside the marked selection).
If there is not enough footage after the In point in the source clip to fill the selected range in the Timeline, FCP will warn you that the resulting edit will be shorter than expected ![]() .
.

![]() FCP will warn you if you don’t have enough frames in the source clip. You can still make the edit, but it’s going to come out shorter than what you requested.
FCP will warn you if you don’t have enough frames in the source clip. You can still make the edit, but it’s going to come out shorter than what you requested.
If you proceed, all the frames from the marked In point to the last frame of the media in the source clip will be edited into the project.
To perform a three-point edit
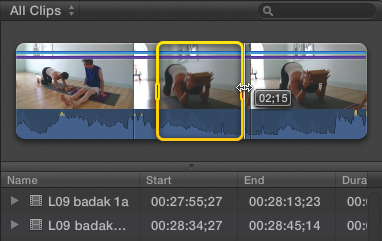
1. In the Timeline, identify the area you want to affect by playing the project and pressing I to mark an In point and pressing O to mark an Out point ![]() .
.

![]() Select the range of the project you want to edit into using In and Out points.
Select the range of the project you want to edit into using In and Out points.
2. In the Event Browser, select the clip you want to edit, and mark an In point where you want the edit to begin ![]() .
.
![]() Set an In point where you want the source clip to start. Ignore the Out point that FCP automatically creates.
Set an In point where you want the source clip to start. Ignore the Out point that FCP automatically creates.
3. Perform an insert, overwrite, or connect edit to add the clip to the project ![]() .
.
![]() In this case, an overwrite edit was used to add the new shot to the project. The new clip is overwritten precisely within the selection you marked in step 1.
In this case, an overwrite edit was used to add the new shot to the project. The new clip is overwritten precisely within the selection you marked in step 1.
The clip is edited into the project, beginning at the In point marked in the Event Browser and extending until the Out point marked in the Timeline.
For more information about specific edit types, see “Which Edit Type Should You Use?” later in this chapter.
You can also perform a backtimed edit using three-point editing. In that case, the Out point in the Event Browser would be observed, and the In point would be ignored. For more about backtiming, see “Backtiming Edits” earlier in this chapter.
Removing Clips from a Project
Someone once described the process of editing as the job of “removing the bad bits,” and, indeed, often the choice of what to remove is just as important as what to add. In this way, editing is often compared to sculpting: The goal is to chip away at the overall mass to reveal the movie hiding within it, just as a sculptor chips away at a mass of marble to uncover the figure within it.
FCP has two primary ways to remove footage from a project: deleting clips and replacing clips with gaps.
Deleting Clips
The default function for removing footage is Delete. It was called Ripple Delete in previous versions of FCP (and Extract in Avid parlance). Delete removes the selected range and closes the gap so no black frames are left behind.
To delete footage from the Timeline
1. Select the range you want to delete in the Timeline by doing one of the following:
• Click a clip to select the entire clip.
• Use the I and O keys to mark a selection.
• Choose the Range Select tool from the Tools pop-up menu in the toolbar (or press R), and drag in the Timeline to select a range ![]() .
.
![]() Selections can span multiple clips.
Selections can span multiple clips.
2. Choose Edit > Delete, or press Delete.
The footage is deleted, and the gap is closed ![]() .
.
![]() The selected region is removed from the project, and no gap is left behind.
The selected region is removed from the project, and no gap is left behind.
To select more than one item with the Select tool, press Command and click additional objects; alternatively, press Shift and click additional objects to create a contiguous selection.
Replacing Clips with a Gap
Replace with Gap removes the selection and leaves a gap in its place. This function was simply called Lift in previous versions of FCP and was the default behavior when you pressed the Delete key.
To replace footage from the Timeline with a gap
1. Select the range you want to delete in the Timeline by doing one of the following:
• Click a clip to select the entire clip.
• Use the I and O keys to mark a selection.
• Choose the Range Select tool from the Tools pop-up menu in the toolbar (or press R), and drag in the Timeline to select a range ![]() .
.
![]() Select the area you want to replace with a gap.
Select the area you want to replace with a gap.
2. Choose Edit > Replace with Gap, or press Shift-Delete (or Forward-Delete).
The footage is removed, and a gap is left in its place ![]() .
.
![]() The selected region is removed, and no automatic rippling occurs. This used to be called Lift and was the default behavior when you pressed Delete.
The selected region is removed, and no automatic rippling occurs. This used to be called Lift and was the default behavior when you pressed Delete.
Moving Clips in the Timeline
One of the most discussed aspects of FCP X is the cleverly named Magnetic Timeline. This is an innovative feature that allows you to move complex clip selections around in the Timeline without overwriting any objects.
Clips that are connected to a shot on the primary storyline automatically move when you move the primary clip.
The software automatically moves neighboring objects out of the way so everything can fit together nicely, overlapping all the objects ![]() .
.

![]() The connected clips above and below the second clip automatically get out of the way to make room for the new clip.
The connected clips above and below the second clip automatically get out of the way to make room for the new clip.
Gapless Editing
By default, the FCP Timeline is designed to never create gaps (which would play back as black flashes between edits) and to never allow you to accidentally overwrite any existing footage.
When you move objects, they automatically align themselves to the edges of existing objects. So, for example, if you move a clip anywhere past the last clip in the project, when you release your mouse, the clip will automatically move itself snugly up against the end of that last clip.
Similarly, if you move a clip over an existing clip (or gap), that existing object will automatically move out of the way to make room for your new clip.
To deliberately overwrite an object, you must use the Position tool (see the upcoming “Positioning Clips” section).
Inserting Space into the Timeline
If you deliberately want to leave a gap between two clips, you can either insert a gap or insert a placeholder.
Insert a gap when you want actual black frames to play, such as you might after a fade-to-black effect or in a place where you want audio to be heard over a blank screen. Use a placeholder when you want to leave room for a missing shot that you intend to drop in later.
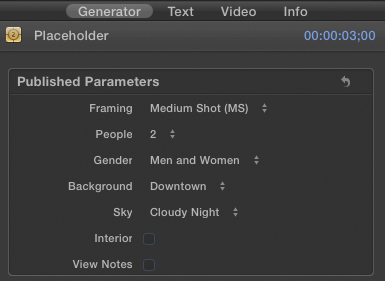
Gaps and placeholders are generators—that is, content automatically generated by the software. A gap is simply black video, and placeholders display customizable generic images to represent a specific type of shot, such as a close-up of a man and a woman in a city on a cloudy night ![]() .
.
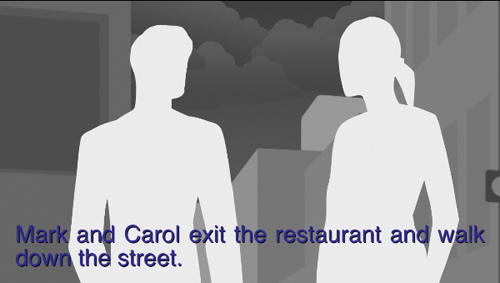
![]() Placeholders are highly customizable and can optionally contain descriptive notes. You can customize the framing, number of people, gender, background environment, sky type, interior or exterior, and whether to display on-screen text notes.
Placeholders are highly customizable and can optionally contain descriptive notes. You can customize the framing, number of people, gender, background environment, sky type, interior or exterior, and whether to display on-screen text notes.
When inserted from the Edit menu, gaps and placeholders default to a duration of three seconds. After you’ve added either to your project, you can use any of the editing tools to change the duration as needed.
If you use the replace edit to substitute the actual footage for a gap or placeholder, the new shot’s duration will override the placeholder’s, so it may not be critical to ensure the placeholder has the “correct” duration at the time you add it.
To insert a gap in the Timeline
1. In the Timeline, position the playhead (or skimmer) where you want the gap inserted ![]() .
.

![]() Place the playhead wherever you want the gap added. If you’re not positioned precisely on an edit point, inserting a gap will split the clip under the playhead.
Place the playhead wherever you want the gap added. If you’re not positioned precisely on an edit point, inserting a gap will split the clip under the playhead.
2. Choose Edit > Insert Gap, or press Option-W.
A three-second gap object is added to the project ![]() .
.
![]() The default gap is three seconds long. Simply drag the right edge of the gap to make it longer or shorter.
The default gap is three seconds long. Simply drag the right edge of the gap to make it longer or shorter.
To insert a placeholder in the Timeline
1. In the Timeline, position the playhead (or skimmer) where you want the gap inserted ![]() .
.
![]() Place the playhead where you want the placeholder to be inserted.
Place the playhead where you want the placeholder to be inserted.
2. Choose Edit > Insert Placeholder, or press Command-Option-W.
A three-second placeholder is added to the project ![]() .
.
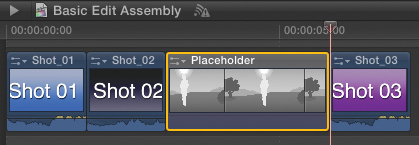
![]() The placeholder is added just like any other clip. Later drag a clip to the placeholder, and choose Replace.
The placeholder is added just like any other clip. Later drag a clip to the placeholder, and choose Replace.
3. If you have enabled the placeholder’s View Notes option, you can double-click the “enter notes here” text object in the Viewer, and type a note ![]() .
.
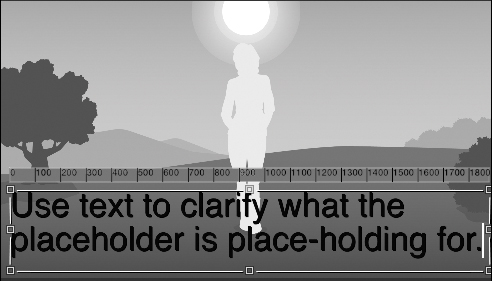
![]() Customize the text in the placeholder to make the clip more useful for yourself and your clients.
Customize the text in the placeholder to make the clip more useful for yourself and your clients.
4. Customize the placeholder by opening the Info window, clicking the Generator pane, and modifying the Published Parameters settings ![]() .
.
![]() Create the placeholder image of your dreams with all the controls in the Info window’s Generator pane. You can also customize the format and style of the note text by clicking the Text pane at the top of the Info window.
Create the placeholder image of your dreams with all the controls in the Info window’s Generator pane. You can also customize the format and style of the note text by clicking the Text pane at the top of the Info window.
A placeholder’s notes field for entering text is hidden by default. To display a placeholder’s notes field, select the placeholder and then check the View Notes checkbox on the Generator tab of the placeholder’s Inspector window.
Moving Primary Storyline Clips
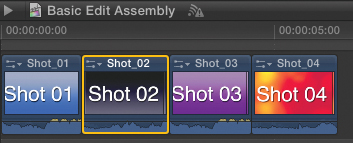
You can easily change the order of existing objects in the Timeline’s primary storyline, rearranging scenes without changing any of the specific clips’ durations.
You can move one primary shot at a time or select multiple clips and move them all together. Any connected clips will automatically move along with their primary clips, maintaining their relative positions. As discussed earlier, should there be an overlap at the destination location, FCP will simply move the conflicting clips onto new tracks so all the objects can coexist peacefully.
To rearrange shots in the Timeline
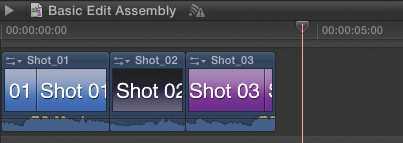
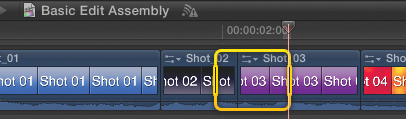
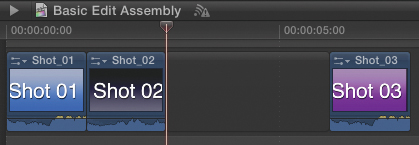
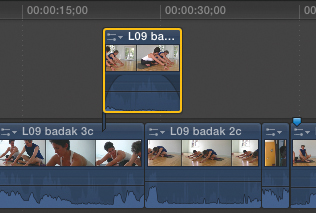
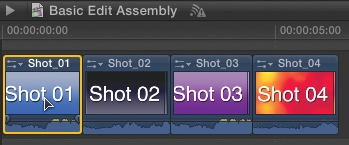
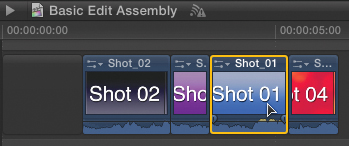
1. Click the clip or clips you want to move ![]() .
.
![]() Selected clips are highlighted in yellow.
Selected clips are highlighted in yellow.
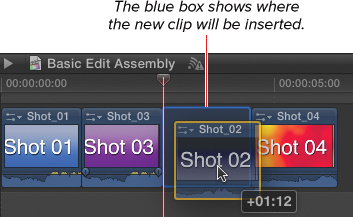
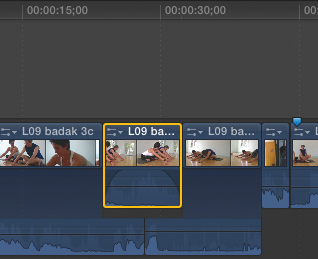
2. Drag the object to a new position in the Timeline, and pause ![]() .
.

![]() The blue insertion bar helps you see where the edit can occur.
The blue insertion bar helps you see where the edit can occur.
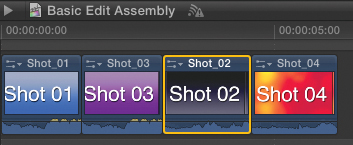
Once you pause at an insertion point, the other clips move out of the way to show what the new edit will look like once you release your mouse button ![]() .
.
![]() The clips automatically move out of the way to show you what your new edit will look like.
The clips automatically move out of the way to show you what your new edit will look like.
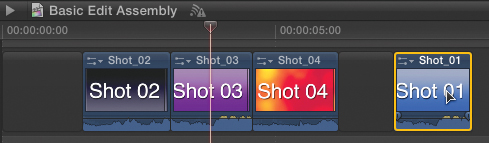
3. When the insertion bar is at the desired position, release the mouse button ![]() .
.
![]() Using the Select tool, you can never overwrite other clips.
Using the Select tool, you can never overwrite other clips.
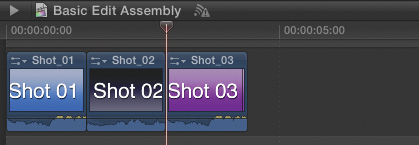
The order of the clips is rearranged.
Moving Connected Clips
Although connected clips move around automatically when you drag the primary shots they’re attached to, you can also reposition the connected clips, separate from the primary shots. You can adjust the connection point (the frame where the connected clip begins) or even move the clip to connect it to a different primary clip.
To move connected clips
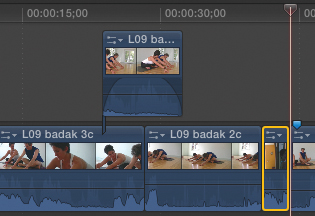
1. Click the connected clip you want to move ![]() .
.
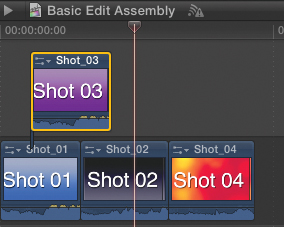
![]() Click the connected clip you want to move. Command-click to select more than one connected clip.
Click the connected clip you want to move. Command-click to select more than one connected clip.
2. Drag the selected clips to a new position ![]() .
.
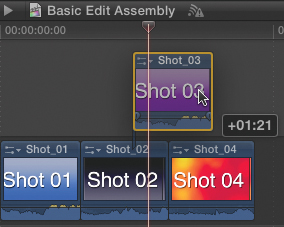
![]() Connected clips can be aligned with any frame in the primary storyline.
Connected clips can be aligned with any frame in the primary storyline.
The clips are moved to the new location. Any existing connected clips that might overlap the moved clips will automatically move out of the way.
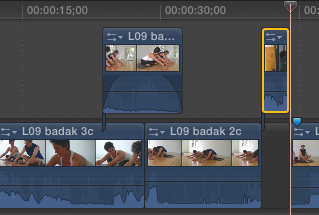
If you move a connected clip into an overlapping position with another connected clip, the one you’re moving will go below the static clip if you deliberately drag it to the lower half of the static clip clip in the Timeline. Drag to the static clip’s upper half and the new clip will be placed above the static clip ![]() .
.

![]() Make sure you know which clip you want on top.
Make sure you know which clip you want on top.
Moving Connected Clips into and out of the Primary Storyline
Often you will connect a clip rather than overwriting it because you’re not entirely sure if it’s the right shot or if it’s in the right position. Once you’ve committed to the clip’s placement, you may want to overwrite it into the primary storyline to simplify your Timeline view.
Conversely, you may find that a clip or group of clips in the primary storyline is mispositioned, or you want to remove a clip from the primary storyline because you’re no longer sure you want to use it.
FCP has some specific commands to address these situations.
To overwrite a connected clip into the primary storyline
1. Select the connected clip (or clips) in the Timeline ![]() .
.
![]() Commit your edits by collapsing connected clips into the primary storyline.
Commit your edits by collapsing connected clips into the primary storyline.
2. Choose Edit > Overwrite to Primary Storyline, or press Command-Option-Down Arrow.
The connected clip is overwritten into the primary storyline ![]() .
.
![]() The connected clip is overwritten into the primary storyline. Note that the audio in the clips underneath were automatically moved out of the way to make room for the audio in the new clip.
The connected clip is overwritten into the primary storyline. Note that the audio in the clips underneath were automatically moved out of the way to make room for the audio in the new clip.
To lift a clip out of the primary storyline
1. Select the clip (or clips) in the primary storyline ![]() .
.
![]() Hedge your bets by moving clips out of the primary storyline and converting them into connected clips.
Hedge your bets by moving clips out of the primary storyline and converting them into connected clips.
2. Choose Edit > Lift From Primary Story-line, or press Command-Option-Up Arrow.
The clip is removed from the primary storyline, leaving a gap ![]() .
.
![]() Even though there’s now a gap in the primary storyline, you won’t see any black frames because the connected clip covers the empty space.
Even though there’s now a gap in the primary storyline, you won’t see any black frames because the connected clip covers the empty space.
Positioning Clips
Although there are advantages to the way FCP prevents you from ever overwriting clips, oftentimes overwriting is exactly what you want to do.
This allows you to add one clip in the middle of another while keeping everything in the primary storyline. You can also use this technique to cover up duplicate action at an edit point, or even to simply replace one clip with another that is already in the Timeline.
FCP calls this type of moving positioning since it allows you to chose a precise position for your new clip without the software shifting other clips around to make room for it. To position a clip, you must select the Position tool.
Positioning works only on clips in the primary storyline.
To overwrite clips in the Timeline using drag and drop
1. Choose the Position tool from the Tools pop-up menu in the toolbar, or press P ![]() .
.
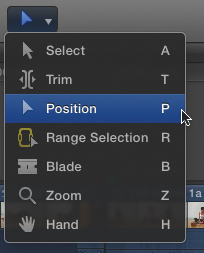
![]() Press P to activate the Position tool.
Press P to activate the Position tool.
2. Select the clip (or clips) in the Timeline you want to move ![]() .
.
![]() The Position tool selects only whole clips.
The Position tool selects only whole clips.
3. Drag the clip to a new position in time ![]() .
.
![]() Pick up clips and put them exactly where you want them with the Position tool (P).
Pick up clips and put them exactly where you want them with the Position tool (P).
The clip will overwrite whatever is in the destination location.
You can also use positioning to deliberately add a clip at a point beyond the end of the current project. If you drag a clip to a point past the last clip, FCP automatically adds a gap between the last clip and the newly positioned one ![]() .
.
![]() You can even deliberately leave some gap after the last clip.
You can even deliberately leave some gap after the last clip.
Snapping
When dragging objects in the Timeline, it’s important to be able to position them precisely so they go exactly where you intend. Often, you want to ensure that objects align with existing edit points, with other objects in the project, with markers, and so on. When you enable snapping, dragging a tool or an object near one of those common targets will cause your pointer to automatically align, or snap, to the target.
In addition to dragging objects, snapping affects the playhead and the skimmer, as well as tools such as the Select tool, the Position tool, the Trim tool, the Range Selection tool, and the Blade tool.
When snapping is enabled, the following objects act as snap points:
• Edit points
• Existing clip boundaries
• The playhead
• Markers
• Keyframes
Snapping is especially useful when using the Position tool, which allows you to move objects freely or when moving connected clips.
When snapping is enabled and you drag an object near a snap point, yellow vertical lines appear to indicate the precise snap point ![]() .
.

![]() Yellow vertical lines indicate exactly to which point you’re snapping.
Yellow vertical lines indicate exactly to which point you’re snapping.
Although snapping can be of great benefit, preventing you from accidentally positioning an object near to, but not exactly on, your desired target, sometimes snapping can prevent you from placing your object where you want it to go. For example, if you are zoomed out or have a project with many small edits close together, snapping will force your drags to align with the various objects and prevent you from positioning with frame-accurate precision.
Fortunately, you can enable and disable snapping quickly, and you can even turn it on or off temporarily during a dragging operation (which is often when you realize you need to change it).
To enable or disable snapping
• Do one of the following:
• Choose View > Snapping ![]() .
.
![]() A check mark in the menu indicates whether snapping is currently enabled.
A check mark in the menu indicates whether snapping is currently enabled.
• Press N.
• Click the Snapping button in the upper right of the Timeline ![]() .
.
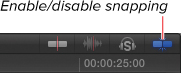
![]() When snapping is enabled, the button turns blue. When disabled, it is gray.
When snapping is enabled, the button turns blue. When disabled, it is gray.