
5. Projects
In This Chapter
Anatomy of the Project Library
Consolidate Your Project’s Media Files
A project is an edited assembly of audio and video clips. In Final Cut Pro X, projects are stored in a separate file from FCP clip information, and you can have only one project open at a time.
Once you’ve assembled a project, you can manipulate that project as if it were a single clip by creating a compound clip. You can open a project and play it in the Viewer, mark In and Out points, and insert all or part of that project into another project. Inserting a project into another project creates what’s known as a compound clip.
In this chapter, you’ll learn about creating and managing your projects.
All of your editing genius—all of the time and inspiration you invest in assembling and refining your finished movie—is stored in this modest data file, so you should treat project files with respect.
One final note, and it’s important: FCP automatically saves your work as you go. If you’re interested in experimenting with your edit, you should read up on your options for duplicating and saving project versions. (See “To duplicate a project” later in this chapter.)
Anatomy of the Project Library
FCP’s Project Library displays all projects on any connected hard drive. When your project list gets too lengthy for easy access to your current work, it’s time to create some folders to organize your library.
To display the Project Library
• Click the Project Library button in the lower-left corner of the main window ![]() .
.

![]() Project management options in the Project Library
Project management options in the Project Library
Creating a New Project
A new project created in FCP automatically generates a new, untitled project in your default project format. Note that you probably won’t need to change project settings unless you change your media format.
To create a new project
1. Do one of the following:
• Choose File > New > Project, or press Command-N.
• Open the Project Library, and then click the New Project button ![]() .
.
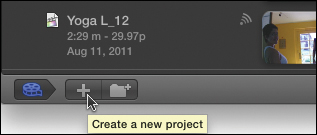
![]() Open the Project Library, and then click the New Project button. The Project Library buttons are visible only when the Project Library is open.
Open the Project Library, and then click the New Project button. The Project Library buttons are visible only when the Project Library is open.
FCP’s New Project window appears, displaying a default, highlighted name.
2. In the New Project window, type a new name for the project ![]() .
.
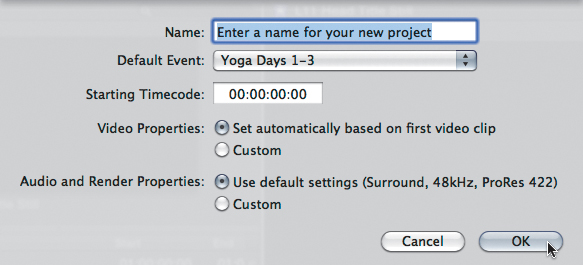
![]() Type a new name for the project, choose a default event folder, and don’t change the default properties settings in the New Project window unless you have a solid reason to customize your settings.
Type a new name for the project, choose a default event folder, and don’t change the default properties settings in the New Project window unless you have a solid reason to customize your settings.
3. Choose the event folder that contains the clips you want to work with from the Default Event drop-down menu.
4. Unless you have a special need to do so, leave Starting Timecode, Video Properties and Audio and Render Properties on their default (automatic) settings, and then click OK.
The Timeline opens with your new, empty project displayed ![]() .
.
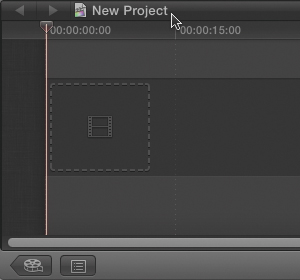
![]() The Timeline opens, displaying your new, empty project.
The Timeline opens, displaying your new, empty project.
To open a project for editing
• Do one of the following:
• Double-click the project’s icon or filmstrip in the Project Library ![]() .
.
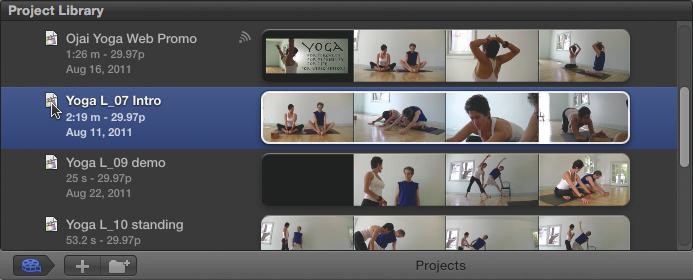
![]() Double-click the project’s icon in the Project Library to open it for editing.
Double-click the project’s icon in the Project Library to open it for editing.
The project opens in both the Viewer and the Timeline.
If you are editing a long program in multiple segments, you might want to set the starting timecode to reflect each segment’s start time in the master program. You can do that by entering the start time in the New Project window’s Starting Timecode field. To modify the starting timecode of an existing project, see “Changing Project Properties” later in this chapter.
Managing Projects
As they shape the final version of their movie, editors frequently cut, copy, and paste together partial sequences to assemble the full program. This section offers tips on duplicating projects, switching between projects, copying clips from one project into another, and organizing your Project Library with folders.
It’s a wondrous thing to be able to e-mail an FCP project file to a friend or colleague who can then open and edit it—assuming you both have the same media files on disk. To share or archive a project file, you first need to know its default location on your hard drive. FCP’s default location for project files is inside your Home folder’s Movies folder ![]() .
.
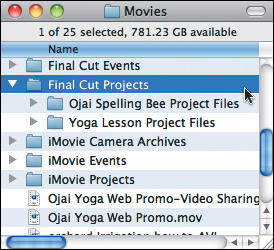
![]() The Final Cut Projects folder is FCP’s default location for project files is inside your Home folder’s Movies folder. See the Final Cut Events folder just above the Projects folder? That’s the default location for your event folders—the folders holding your projects’ media files. It’s also located in the Movies folder.
The Final Cut Projects folder is FCP’s default location for project files is inside your Home folder’s Movies folder. See the Final Cut Events folder just above the Projects folder? That’s the default location for your event folders—the folders holding your projects’ media files. It’s also located in the Movies folder.
To duplicate a project
1. Right-click the project in the Project Library, and then choose Duplicate Project ![]() ; or press Command-D.
; or press Command-D.
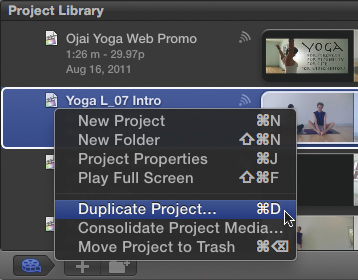
![]() Right-click the project in the Project Library, and then choose Duplicate Project; or press Command-D.
Right-click the project in the Project Library, and then choose Duplicate Project; or press Command-D.
2. In the Duplicate Project window, choose a disk location to store your duplicate project file.
3. Specify which project elements you want to duplicate, and then click OK ![]() . Your duplication options are as follows:
. Your duplication options are as follows:
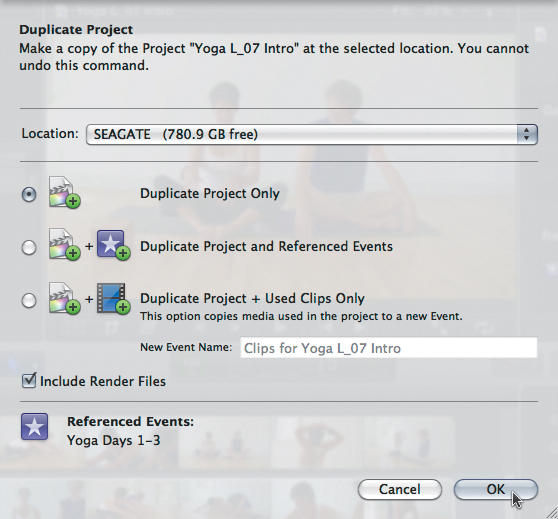
![]() Specify your Duplicate Project selection in this window.
Specify your Duplicate Project selection in this window.
• Duplicate Project Only: Duplicates only the project file ![]() .
.
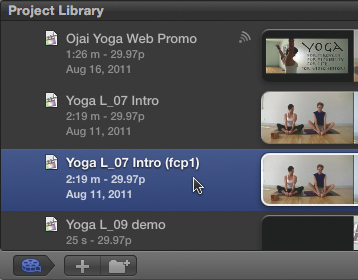
![]() Your duplicated project in the Project Library.
Your duplicated project in the Project Library.
• Duplicate Project and Referenced Events: Duplicates the project file, any events referred to by the project file, and all of the media in the referenced events.
• Duplicate Project + Used Clips Only: Duplicates the project file and the media files for any clips used in the project.
• Include Render Files: Duplicates the project’s render files.
To copy multiple clips from one project to another
1. Open the source project in the Timeline.
2. In the Timeline, select the clips you want to copy, and then press Command-C ![]() .
.
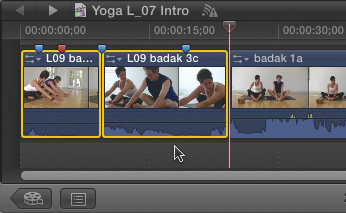
![]() Open the first project in the Timeline, select the clips you want to copy, and then press Command-C.
Open the first project in the Timeline, select the clips you want to copy, and then press Command-C.
3. Click the Project Library button to return to the Project Library.
4. Double-click the project’s icon to open it as a second project in the Timeline ![]() .
.
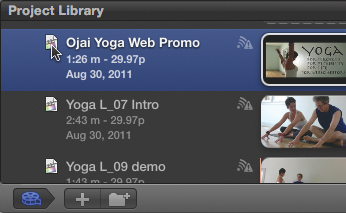
![]() Double-click a project’s icon in the Project Library to open it as a second project in the Timeline.
Double-click a project’s icon in the Project Library to open it as a second project in the Timeline.
5. Position the playhead where you want to paste the clips, and then choose Edit > Paste; or press Command-V ![]() .
.

![]() In the second project, position the playhead where you want to paste the clips, and then choose Edit > Paste; or press Command-V.
In the second project, position the playhead where you want to paste the clips, and then choose Edit > Paste; or press Command-V.
The clips now appear in both projects and reference the same source media files on disk, but you’ll need to rerender any previously rendered project material in the new project location ![]() .
.
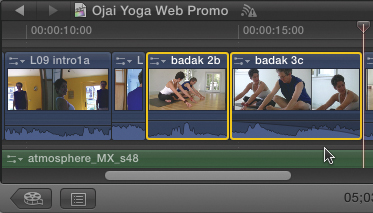
![]() The clip copies are pasted into the second project and reference the same source media files on disk.
The clip copies are pasted into the second project and reference the same source media files on disk.
To move a project to another hard drive
1. Select the project in the Project Library, and then do one of the following:
• Choose File > Move Project ![]() .
.
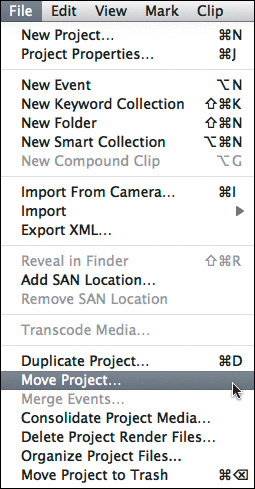
![]() Select the project in the Project Library, and then choose File > Move Project.
Select the project in the Project Library, and then choose File > Move Project.
• Command-drag the project to the destination hard drive’s icon in the Project Library.
2. In the Move Project window, choose a destination for your project from the Location pop-up menu.
3. Specify which project elements you want to move, choosing from the following ![]() :
:
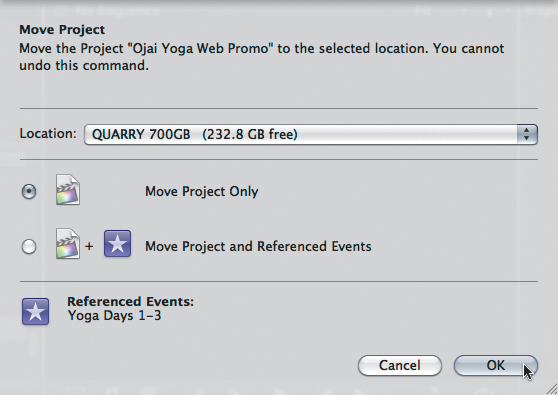
![]() Specify which project elements you want to move in the Move Project window, and then click OK.
Specify which project elements you want to move in the Move Project window, and then click OK.
• Move Project Only: Select to move just the project file and no events (media files).
• Move Project and Referenced Events: Select to move the project file plus all events (media files) to which the project file refers.
4. Click OK.
FCP moves your project and any events you specify to the new location you selected ![]() .
.
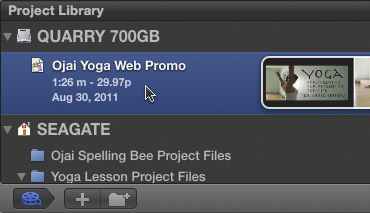
![]() The project you moved appears in its new hard drive location.
The project you moved appears in its new hard drive location.
You can’t undo a project move operation. To return the project to its original disk location, you’ll need to perform another project move operation.
To delete a project
• Select the project in the Project Library, and then do one of the following:
• Choose File > Move Project to Trash.
• Right-click the project, and then choose Move Project to Trash from the shortcut menu ![]() .
.
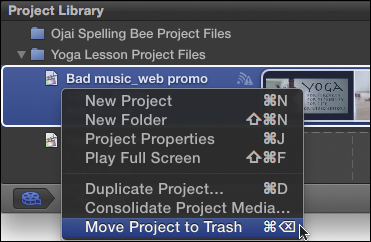
![]() Right-click the project in the Project Library, and then choose Move Project to Trash from the shortcut menu.
Right-click the project in the Project Library, and then choose Move Project to Trash from the shortcut menu.
The project is moved to the Finder’s Trash and disappears from the Project Library. To permanently delete the project, empty the Finder Trash.
By selecting a Project Library folder containing multiple projects, you can transfer them all to the Trash in a single operation. Gutsy move.
Switching Between Projects
You can have only one FCP project open in the Timeline at any one time. You can use FCP’s Timeline History feature, however, to make switching between projects fast. Timeline History is designed to operate like your web browser’s History list: Your last open project is at the top of the list.
To switch between projects using the Timeline History feature
• Do one of the following:
• Click and hold the Timeline History’s Back button to switch to a project you opened earlier.
• Click and hold the Timeline History’s Forward button to switch to a project you opened later than the currently displayed project.
A drop-down list appears below the button; select the project you want to switch to from the list ![]() .
.
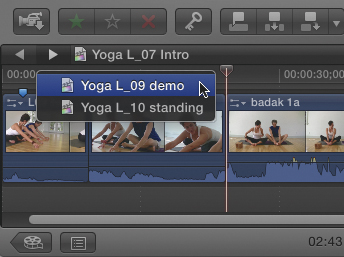
![]() Click and hold the Timeline History feature’s Forward button to switch to a project you opened later than the currently displayed project.
Click and hold the Timeline History feature’s Forward button to switch to a project you opened later than the currently displayed project.
Timeline History buttons also allow you to navigate up and down compound clip levels. What is a compound clip? It’s a way to nest projects within other projects. See Chapter 16, “Compound Clips,” for the full rundown.
Using Folders to Organize Your Project Library
If you’ve been using FCP long enough to generate a lengthy list of projects and project versions, Project Library folders can be an enormous help. FCP’s compact Project Library interface works a whole lot better when you’ve hidden old and irrelevant projects away from view in a well-labeled folder.
To create a new folder in the Project Library
1. Open the Project Library.
2. Select the hard disk, folder, or project level where you want to add a new folder, and then do one of the following:
• Click the New Folder button.
• Right-click its icon, and choose New Folder from the shortcut menu ![]() .
.
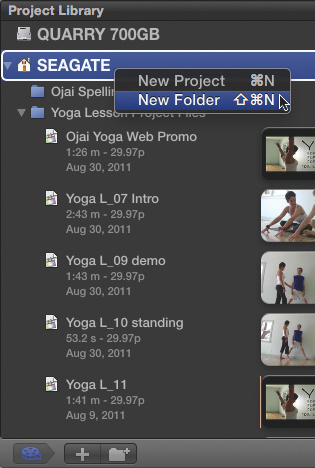
![]() In the Project Library, select the hard disk, folder, or project level where you want to add a new folder; then right-click its icon and choose New Folder from the shortcut menu.
In the Project Library, select the hard disk, folder, or project level where you want to add a new folder; then right-click its icon and choose New Folder from the shortcut menu.
A new folder appears on the disk or in the folder you selected, at the same level as the selected disk, folder, or project ![]() .
.

![]() A new folder appears on the disk or folder you selected, at the same level as the selected disk, folder, or project.
A new folder appears on the disk or folder you selected, at the same level as the selected disk, folder, or project.
3. Select the folder, click the folder name, and type a new name.
4. Drag a project you want to group into the folder. You can select only one project at a time.
Changing Project Properties
Most project settings are determined by the video and audio of your project’s source media; your project settings should almost always match your source media’s format settings. Final Cut Pro does a fine job of automatically assigning the best settings to your project, but occasionally you need to make a change. Here’s how:
1. In the Project Library, click the project’s icon to select it.
2. Choose File > Project Properties, or press Command-J.
The Inspector window displaying the project’s default property settings appears in the upper-right corner of the interface.
3. In the project’s Inspector window, click the Properties button at the top of the pane ![]() .
.
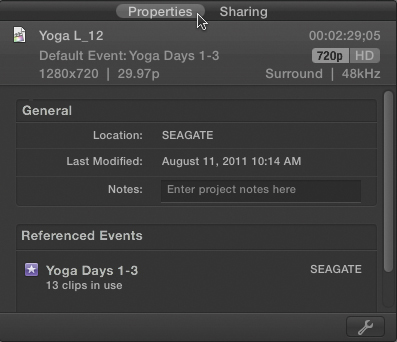
![]() In the project’s Inspector window, click the Properties button at the top of the pane.
In the project’s Inspector window, click the Properties button at the top of the pane.
4. Click the “Modify project properties” button at the bottom of the project’s Inspector window.
The project’s Properties window appears ![]() .
.
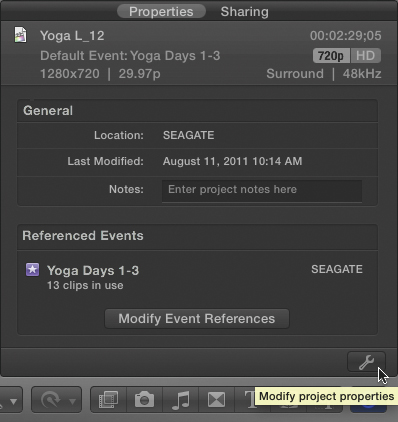
![]() Click the “Modify project properties” button (that’s a wrench icon on the button) at the bottom of the project’s Inspector window.
Click the “Modify project properties” button (that’s a wrench icon on the button) at the bottom of the project’s Inspector window.
5. In the project’s Properties window, modify any of the settings listed next ![]() .
.
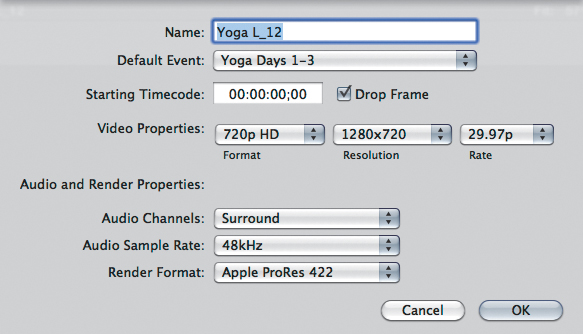
![]() In the project’s Properties window, modify the format, timecode display, audio output, or render format settings, and then click OK. You should leave the project’s default settings as they are unless you have a specific reason to modify them.
In the project’s Properties window, modify the format, timecode display, audio output, or render format settings, and then click OK. You should leave the project’s default settings as they are unless you have a specific reason to modify them.
• Name: Rename the project.
• Default Event: Specify the default event folder and disk location for any media dragged directly to this project’s Timeline from the Finder or the FCP Media Browser.
• Starting Timecode: Enter a value to modify the starting timecode for your project.
• Video Properties: Modify the project’s frame size, resolution, or frame rate.
• Timecode Display: Specify the timecode display options. Available frame rate options depend on the project’s source media format.
• Audio Channels: Specify surround sound or stereo for the project’s audio output format.
• Audio Sample Rate: Specify a sample rate for the project’s audio.
• Render Format: Specify a codec to use for the project’s rendered material.
6. Click OK.
Consolidate Your Project’s Media Files
You’ve been working on your project for a while—perhaps you changed cameras or computers during production—and now your project’s media files are scattered across multiple external drives and your internal hard drive. Relax, it’s not hard to clean up. FCP’s Consolidate Project Media feature can automatically consolidate all the media used in the project on the same hard disk as the project.
To consolidate a project’s media clips at a single disk location
1. In the Project Library, right-click the project’s icon, and then choose Consolidate Project Media from the shortcut menu ![]() .
.
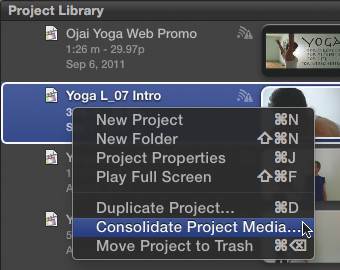
![]() Right-click the project’s icon, and then choose Consolidate Project Media from the shortcut menu.
Right-click the project’s icon, and then choose Consolidate Project Media from the shortcut menu.
The Consolidate Project Media window appears.
2. In the Consolidate Project Media window ![]() , select a consolidation method from the following options:
, select a consolidation method from the following options:
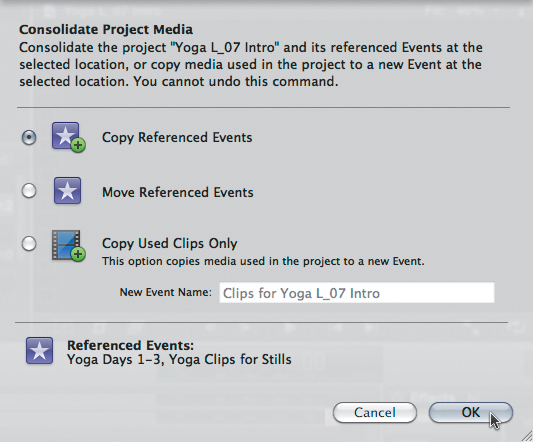
![]() Select a consolidation method in the Consolidate Project Media window, and then click OK.
Select a consolidation method in the Consolidate Project Media window, and then click OK.
• Copy Referenced Events: Select this option to copy all events (media files) referenced in the project file to a single disk location.
• Move Referenced Events: Select this to move all events (media files) referenced in the project file to a single disk location.
• Copy Used Clips Only: Select this option to copy only media files used in the project. This creates a new event folder for storing your consolidated media clips.
• New Event Name field: Select this option to create a new event folder to hold the consolidated media. This choice is available only if you choose Copy Used Clips Only.
3. Click OK.
Final Cut Pro consolidates the media using the method you selected. The consolidated event folder or folders appear on the same hard disk as the project.