CHAPTER 1
Design and implement Azure App Service Web Apps
Microsoft Azure Web Apps is a fully managed Platform as a Service (PaaS) that enables you to build, deploy, and scale enterprise-grade web applications in seconds. Whether your organization requires a global web presence for the organization’s .com site, a solution to a line-of-business intranet application that is secure and highly available, or a site for a digital marketing campaign, Web Apps is the fastest way to create these web applications in Azure. Of all the Azure compute options, Web Apps is among the simplest to implement for scalability and manageability, and for capitalizing on the elasticity of cloud computing.
IMPORTANT: Have you read page xvii?
It contains valuable information regarding the skills you need to pass the exam.
MORE INFO COMPARING AZURE COMPUTE CHOICES
A feature comparison between the different Azure compute choices is available at https://docs.microsoft.com/en-us/azure/app-service-web/choose-web-site-cloud-service-vm.
This chapter covers Azure Web Apps through the lens of an IT professional responsible for deploying, configuring, monitoring, and managing Web Apps. As such, the tools that will be used to demonstrate these functions will be as follows:
Azure Portal
Azure PowerShell Cmdlets, v4.2.1
Azure CLI 2.0, v2.0.12
MORE INFO AZURE POWERSHELL CMDLETS AND CLI TOOLS
The Azure PowerShell Cmdlets and CLI tools can be downloaded and installed at: https://azure.microsoft.com/en-us/downloads/. Scroll down to the command-line tools section for installation links and documentation.
Skills covered in this chapter
Skill 1.1: Deploy web apps
As an IT professional, you need to understand how to create the infrastructure to host a web application. At a minimum, this means creating two resources: a web app and an App Service plan. The web app is the resource for which an application runs in. The App Service plan is the resource that defines the location, size, capacity, and features for which the web app will run on.
You will often need to create additional resources the application requires. For example, the application may require a SQL Database for storing data, a Redis cache for caching, a storage account for storing metadata, and perhaps a Contend Delivery Network (CDN) for serving static data to end users. Understanding the resource requirements for the application will help you determine the infrastructure you need to deploy to support it.
This skill covers how to:
Create an App Service Plan
Create a web app
Create deployment slots
Swap deployment slots
Deploy an application
Migrate a web app to a different App Service Plan
Create an App Service Plan
Azure Web Apps use App Service plans to group features and capacity settings that can be shared across one or more web apps. This enables you to more easily manage costs and resources for your web apps. App service plans are available in the following pricing tiers:
Free
Shared
Basic
Standard
Premium
Isolated
 EXAM TIP
The Basic, Standard, Premium, and Isolated tiers offer you dedicated compute resources. The Free and Shared tiers use shared compute resources with other Azure tenants. Furthermore, with Free and Shared, you are throttled to not exceed certain limits, such as CPU time, RAM consumption, and network bandwidth. More information on limits, quotas and constraints is available at https://docs.microsoft.com/en-us/azure/azure-subscription-service-limits.
Within the Basic, Standard, Premium, and Isolated tiers, you have three types of plans to choose from that vary only in their capacity, such as the number of cores and amount of RAM. As an example, the three types of plans in the Premium tier are shown in Figure 1-1.
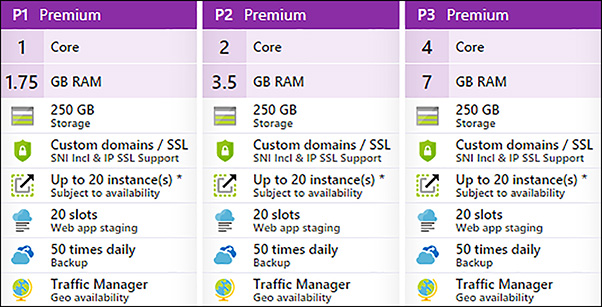
FIGURE 1-1 Premium tier options for web apps as shown in the Azure portal
You can create a new app service plan when you create a new web app using the Azure portal. Or, you can create an app service plan first and then use it later when creating one or more web apps.
 EXAM TIP
The Isolated pricing tier is only available for App Service Environments (ASE). ASE’s is a feature of Azure App Service that provides a dedicated and fully isolated environment for running app service apps (web apps, API apps, and mobile apps). Because ASE’s provide dedicated resources, they are ideal for scenarios where you have very high scale and/or memory requirements.
A unique feature of ASE’s is that they are deployed inside a subnet in a virtual network. This is how isolation is achieved. Being contained within a virtual network, ASE’s can be protected using network security controls such as Network Security Groups (NSGs) with inbound and outbound traffic rules. Because ASE’s are always deployed in a virtual network, they are ideal for scenarios where you have increased security requirements or when you want to use a virtual appliance for packet inspection, firewall protection, and other network security controls.
ASE’s can be internet-facing through one or more public IP addresses. These are called External ASE’s. An example where you may have multiple IP addresses is when your app service is hosting multiple web apps, and you need separate public IP addresses for each.
ASE’s can be strictly internal (not internet-facing), where web apps are deployed behind an internal load balancer (ILB). These are called ILB ASE’s and generally intended for scenarios where your virtual network is connected to an on-premises environment using either a site-to-site or ExpressRoute VPN.
Finally, because ASE’s are bound to a virtual network, there are some things you need to consider regarding your virtual network configuration, inbound and outbound traffic rules, and portal dependencies. Information on these additional considerations are available at: https://docs.microsoft.com/en-us/azure/app-service/app-service-environment/network-info.
Create an app service plan (Azure portal)
In the Azure portal, search the Marketplace for App Service Plan and open the New App Service Plan blade. Specify a name, location, operating system type (Windows or Linux), and the pricing tier as shown in Figure 1-2.

FIGURE 1-2 New App Service Plan blade in the Azure portal
Create an app service plan (PowerShell)
Use the New-AzureRmAppServicePlan cmdlet to create a new app service plan.
# Define properties for the app service plan
$resourceGroupName = "contoso"
$appServicePlanName = "contoso"
$location = "West US"
$tier = "Premium"
$workerSize = "small"

# Create a new resource group
New-AzureRmResourceGroup -Name $resourceGroupName -Location $location

# Create a new app service plan
New-AzureRmAppServicePlan -ResourceGroupName $resourceGroupName `
 -Name $appServicePlanName -Location $location -Tier $tier -WorkerSize $workerSize
Create an app service plan (CLI)
Use the App Service plan create command to create a new app service plan.
#!/bin/bash

# Define properties for the app service plan
resourceGroupName="contoso"
appServicePlanName="contoso"
location="westus"
sku="P1"

# Create a new resource group.
az group create --location $location --name $resourceGroupName

# Create a new app service plan
az appservice plan create --resource-group $resourceGroupName
 --name $appServicePlanName --location $location --sku $sku
Create a web app
When you create an Azure Web App, you create a unique DNS name, select an app service plan (or create a new one), and select an operating system type (Windows or Linux).
 EXAM TIP
Docker containers are used to support Linux on web apps. There are built-in Docker images to support various versions of Node.js, PHP, .Net Core, and Ruby runtime stacks. You can also choose to use runtime stacks from Docker Hub or a private registry of images, if your organization has one.
If you select Linux for your operating system type, you must select an app service plan that was configured for Linux, or create a new app service plan with Linux support.
It is common when creating a web app environment to create additional resources to support things like caching, storage, monitoring, and diagnostics. When you create a web app environment, you are essentially defining the infrastructure for the web application to run in. In an on-premises environment, a similar analogy creates a website on Windows Server using IIS Manager. When you do this, you simply create the site without any code. Later, application code is published to the site that users can reach through their browser. That is the same for web apps. Creating a web app doesn’t mean you have a working web application. It means you have the infrastructure in place to host a web application.
Create a web app (Azure portal)
In the Azure portal, search the Marketplace for web app and open the New Web App blade. Specify a name, operating system type (Windows or Linux), select an app service plan (or create a new one), and optionally choose to add Application Insights as shown in Figure 1-3. Application Insights is a resource that collects telemetry data about your application running in the web app, which can be useful for troubleshooting performance issues, application errors, and even insights into how end users are using the application.
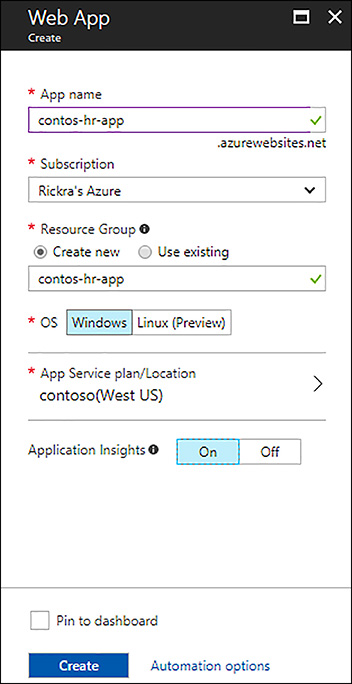
FIGURE 1-3 New Web App blade in the Azure portal
Create a web app (PowerShell)
Use the New-AzureRmWebApp cmdlet to create a new web app.
# Define properties for the web app
$resourceGroupName = "contoso"
$appServicePlanName = "contoso"
$location = "West US"
$webAppName = "contoso-hr-app"

# Create a new web app using an existing app service plan
New-AzureRmWebApp -ResourceGroupName $resourceGroupName -Location $location `
 -AppServicePlan $appServicePlanName -Name $webAppName
Create a web app (CLI)
Use the webapp create command to create a new web app.
# Define properties for the web app
resourceGroupName="contoso"
appServicePlanName="contoso"
webAppName="contoso-hr-app"

# Create a new web app using an existing app service plan
az webapp create --resource-group $resourceGroupName
 --name $webAppName --plan $appServicePlanName
Define deployment slots
Every Azure web app, by default, includes one deployment slot, referred to as the production deployment slot, and is where the production version of your application will be deployed. You can add additional deployment slots as needed. When you have two or more deployment slots, you can swap the contents of the deployment slots as new versions of your application are being developed. An example of how the deployment slots for a web app might be configured is shown in Figure 1-4.

FIGURE 1-4 Example of how deployment slots can be used for different environments
 EXAM TIP
Adding additional deployment slots to an Azure Web App requires that the App Service Plan it is running on be configured for Standard or Premium pricing tier. You can add up to 10 deployment slots in Standard. You can add up to 20 deployment slots in Premium.
Create a deployment slot (Azure portal)
In the Azure portal, click on Deployment Slots in the web app blade. This will open the deployment slots blade showing all your deployment slots. Click the +Add Slot button at the top of the blade. In the add a slot blade, provide a Name for the deployment slot and select Configuration Source as shown in Figure 1-5.

FIGURE 1-5 Adding a deployment slot named Staging using the Azure portal
NOTE CLONING AN EXISTING DEPLOYMENT SLOT
When you create a deployment slot, you can choose to clone an existing deployment slot’s configuration settings. For example, if you have a database connection string setting in a ‘Dev’ deployment slot and you want to use the same setting in new deployment slot called ‘Test’, you can choose to clone the ‘Dev’ deployment slot settings.
Create a deployment slot (PowerShell)
Use the New-AzureRmWebAppSlot cmdlet to create a new deployment slot. The code below creates a deployment slot with default configuration settings.
$resourceGroupName = "contoso"
$webAppName = "contoso-hr-app"
$stagingSlotName = "Staging"

# Create a new web app deployment slot
New-AzureRmWebAppSlot -ResourceGroupName $resourceGroupName `
    -Name $webAppName -Slot $stagingSlotName
To create new deployment slot that clones an existing deployment slot, use the Get-AzureRmWebAppSlot cmdlet to get a reference to the slot you want to clone. Then, pass it in using the SourceWebApp parameter of the New-AzureRmWebAppSlot cmdlet. The code below creates a new deployment slot that clones the production deployment slot.
$resourceGroupName = "contoso"
$appServicePlanName = "contoso"
$webAppName = "contoso-hr-app"
$stagingSlotName = "Staging"
$productionSlotName = "Production"

# Get a reference to the production deployment slot
$productionSite = Get-AzureRmWebAppSlot -ResourceGroupName $resourceGroupName `
    -Name $webAppName -Slot $productionSlotName

# Create a deployment slot that clones the production deployment slot settings
New-AzureRmWebAppSlot -ResourceGroupName $resourceGroupName `
    -Name $webAppName -Slot $stagingSlotName `
    -AppServicePlan $appServicePlanName -SourceWebApp $productionSite
Create a deployment slot (CLI)
Use the webapp deployment slot create command to create a new deployment slot with default settings.
#!/bin/bash

resourceGroupName="contoso"
webAppName="contoso-hr-app"
stagingSlotName="Staging"

az webapp deployment slot create --resource-group $resourceGroupName
    --name $webAppName --slot $stagingSlotName
 EXAM TIP
A deployment slot is actually a completely separate Azure web app linked to your production slot website. For example, if you create your web app using the name contoso-web and then later add a deployment slot named staging, then the web app name for the staging slot would be called contoso-web-staging. Each website would be reachable from its unique URL. For example: http://contoso-web.azurewebsites.net/ and http://contoso-web-staging.azurewebsites.net/.
Swap deployment slots
When swapping deployment slots, you are swapping the contents of one slot with another. For example, you may have version 2.0 of an application in your staging slot and version 1.0 of the application in the production slot. Using deployment slots gives you the flexibility to test your version 2.0 application before pushing it to production. It also gives you a way to roll back (swap back) to the version 1.0 application if necessary. Figure 1-6 illustrates swapping between a staging and production environment.

FIGURE 1-6 Swapping between production and staging deployment slots
Deployment slot swaps can be executed as an immediate swap as explained above. Or, you can perform a multi-phase swap, also known as Swap with preview. In the latter case, your destination slot (for example, production) settings are first applied to your source slot (for example, staging) without making any changes to your destination slot. This gives you the opportunity to test the source slot using the settings from the destination slot. After verifying the application is working as expected in the source slot, you can perform the second phase by completing the swap. If the application is not working as expected, you can cancel the swap in the second phase.
 EXAM TIP
Multi-phase deployment swaps are recommended for mission critical workloads. To learn more see: https://docs.microsoft.com/en-us/azure/app-service-web/web-sites-staged-publishing#swap-with-preview-multi-phase-swap.
Swap deployment slots (Azure Portal)
In the Azure portal, click on Deployment Slots in the web app blade for your source web app (for example, the Staging web app). Click the Swap button at the top of the Deployment Slots blade.
In the Swap blade, choose a Swap type, which can be either Swap or Swap With Preview. Set the Destination to the deployment slot you want to swap into. If there are configuration setting differences between the two slots, you can review those by clicking on Preview Changes as shown in Figure 1-7.

FIGURE 1-7 Swapping deployment slots and reviewing warnings in the Azure portal
When you are ready to proceed with the swap, click the Ok button at the bottom of the Swap blade. Since this is a multi-phase swap, the configuration settings have been updated in the source (Staging) slot. Now, you should do some final testing and validation of the application before proceeding to the second phase.
After validating the application, you need to complete the swap. To do so, open the Deployment slots blade and click the Complete swap button at the top of the blade. In the Swap blade, set the Swap action to Complete swap if you want to proceed with the swap. Or, set it to Cancel Swap if you want to cancel. Finally, click OK to complete the second phase, as shown in Figure 1-8.
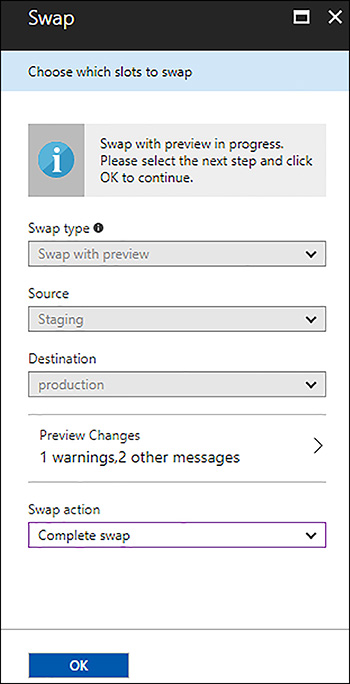
FIGURE 1-8 Completing a multi-phase deployment swap in the Azure portal
Swap deployment slots (PowerShell)
Use the Swap-AzureRmWebAppSlot cmdlet to swap deployment slots. If you want to initiate a multi-phase swap, include the SwapWithPreviewAction parameter with a value of ApplySlotConfig. The following code shows a simple single-phase swap.
$resourceGroupName = "contoso"
$webAppName = "contoso-hr-app"
$stagingSlotName = "Staging"
$productionSlotName = "Production"

# Swap staging and production deployment slots (single phase)
Swap-AzureRmWebAppSlot -ResourceGroupName $resourceGroupName -Name $webAppName `
    -SourceSlotName $stagingSlotName -DestinationSlotName $productionSlotName
Swap deployment slots (CLI)
Use the webapp deployment slot swap command to swap deployment lots. If you want to initiate multi-phase swap, set the action parameter to preview. The following code shows a simple single-phase swap.
#!/bin/bash

resourceGroupName="contoso"
webAppName="contoso-hr-app"
stagingSlotName="Staging"
productionSlotName="Production"
swapAction="swap"

# Swap staging and production deployment slots (single phase)
az webapp deployment slot swap --resource-group $resourceGroupName --name $webAppName
    --slot $stagingSlotName --target-slot $productionSlotName --action $swapAction
Deploy an application
Deploying an application to an Azure web app is the process by which the web application (or code) is copied to one of the deployment slots, usually a test or staging slot. A web app can be published using a variety of tools, such as the following:
Source control systems are often used in a continuous delivery (or deployment) model where the applicate is deployed as code changes are checked into the source control system
FTP clients, such as FileZilla
Azure PowerShell
Web Deploy
Visual Studio
Local Git
GitHub
Visual Studio Team Services
Azure Resource Manager Template (using the MSDeploy web app extension)
More…
MORE INFO DEPLOYING APPLICATION CODE TO AZURE WEB APPS
For a complete list of deployment options and guides on how to deploy application code see: https://docs.microsoft.com/en-us/azure/app-service-web/web-sites-deploy.
Fore more information on available deployment options and guides on how to deploy application code to Azure Web Apps, see:
Deploy ZIP file at https://docs.microsoft.com/en-us/azure/app-service/app-service-deploy-zip
Deploy via FTP at https://docs.microsoft.com/en-us/azure/app-service/app-service-deploy-ftp
Deploy via cloud sync at https://docs.microsoft.com/en-us/azure/app-service/app-service-deploy-content-sync
Deploy continuously at https://docs.microsoft.com/en-us/azure/app-service/app-service-continuous-deployment
Deploy from local git at https://docs.microsoft.com/en-us/azure/app-service/app-service-deploy-local-git
Deploy with template at https://docs.microsoft.com/en-us/azure/app-service/app-service-deploy-complex-application-predictably
Migrate a web app to separate App Service Plan
A web app may be moved to a different App Service Plan. This may be necessary if you need to isolate resources for a single web app or set of web apps. For example, you may have internal applications that consume high amounts of memory and external customer facing applications that need to be able to scale out at time to meet demand spikes. In situations like this, it is recommended to create separate app service plans that are configured appropriately for each workload. Also, by having separate app service plans, the web apps in each App Service Plan are isolated from web apps in other App Service Plans.
MORE INFO APP SERVICE PLANS IN DEPTH
An in-depth overview of App Service Plans is available at: https://docs.microsoft.com/en-us/azure/app-service/azure-web-sites-web-hosting-plans-in-depth-overview.
Migrate a web app to a separate App Service Plan (Azure portal)
In the Azure portal, click on Change App Service Plan under the App Service Plan section of the web app blade. In the App Service Plan blade, click on the App Service Plan you want to move the web app to. Figure 1-9 shows a choice of two App Service Plans available to migrate the web app to. The web app will be moved when you click on an available App Service Plan.
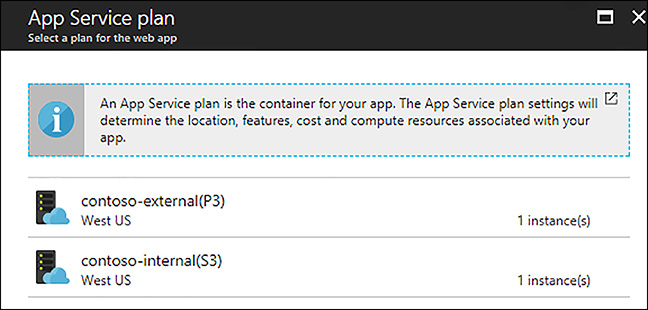
FIGURE 1-9 Migrating a web app to a separate App Service Plan in the Azure portal
 EXAM TIP
If you have multiple deployment slots defined for your web app, then you must migrate each slot separately to a different App Service Plan. Migrating one deployment slot to a separate App Service Plan does not automatically migrate all of the deployment slots.
 EXAM TIP
A web app can be migrated to an App Service Plan in the same resource group and region as the existing App Service Plan it is linked to. If you need to move a web app to an App Service Plan in a different region and/or resource group, then you can choose the Clone App option under the Development tools section. The Clone App feature is only available on the Premium pricing tier.
Skill 1.2: Configure web apps
Every web app has unique characteristics that need to be taken into consideration when configuring the infrastructure that the application will run in. With Azure web apps, you have many choices when it comes to configuration settings and the tools you use to configure the web app.
This skill covers how to:
Configure application settings
Configure custom domains
Configure SSL certificates
Configure handler mappings
Configure virtual applications and directories
Configuring application settings
An application targeting a web app in Azure will usually have some configuration settings it depends on to run properly. For example, you may need to configure the infrastructure for a specific version of the .NET Framework, PHP, or Java. Or, you may need to define a connection string to a database. The application settings section of Azure Web Apps is where these, and many more, configuration settings will be made. Table 1-1 shows some common settings and their possible values.
 EXAM TIP
Configuring application settings for a web app differs depending on your OS type (Windows or Linux). For this section of the text, the only application settings applicable to web apps running on Linux are Always On, ARR Affinity, app settings, and connection strings.
TABLE 1-1 Application settings for Azure Web Apps
SETTING |
VALUES |
.NET Framework Version |
V3.5, V4.7 (default) |
PHP Version |
OFF, 5.5 (default), 5.6, 7.0, 7.1 |
Java Version |
OFF (default), Java 7, Java 8 |
Python Version |
OFF (default), 2.7, 3.4 |
Platform |
32-bit (default), 64-bit |
Web Sockets |
OFF (default), ON |
Always On |
OFF (default), ON |
ARR Affinity |
OFF, ON (default) |
MORE INFO APPLICATION SETTINGS FOR AZURE WEB APPS
For a complete overview of application settings and configuration options is available at: https://docs.microsoft.com/en-us/azure/app-service-web/web-sites-configure.
Connection strings and application settings
Just about any web application will have a database for storing data. Azure Web Apps has a unique way of configuring connection strings to databases by enabling you to provide a connection string setting as part of the web app environment. By storing a connection string as a site setting, the application can retrieve the connection string at runtime as an environment variable rather than storing it in a configuration file, such as a web.config or php.ini file. This approach is more secure because it avoids storing sensitive information, such as user id and password, in the configuration files for the application. Azure Web Apps support the following types of database connection strings:
SQL Database
SQL Server
MySQL
PostgreSQL
Notification Hub
Service Bus
Event Hub
API Hub
Document DB
Redis Cache
Custom
Azure Web Apps use this same technique for application settings that a web application may depend on. Application settings can be anything, such as a URL to a third party web service or a custom runtime setting that the application code understands.
Application settings for connection strings and application settings are defined as key/value pairs. The key can be any name you want. The name you choose for a setting is how you and your developers will reference the setting in code. For example, the following is a sample of how a key/value pair could be defined for a connection string to a SQL database.
Key = "ContosoDBConnStr"
Value = "Server=tcp:contosodbsrv01.database.windows.net,1433;Database=contoso-database;
User ID=AdminUser@contosodbsrv01;Password={your_password_here};Trusted_Connection=False;
Encrypt=True;Connection Timeout=30;"
The value for a connection string defined as a site setting can be retrieved at runtime by referencing the name of the environment variable for the setting. The name of the environment variable is a combination of a constant string based on the type of database connection string plus the name of the key. The constant strings are as follows:
SQLAZURECONNSTR_
SQLCONNSTR_
MYSQLCONNSTR_
CUSTOMCONNSTR_
Using the example from earlier, the environment variable name for the ContosoDBConnStr connection string is SQLAZURECONNSTR_ContosoDBConnStr.
Similarly, the value for an application setting defined as a site setting can also be retrieved at runtime by referencing the name of the environment variable for the setting. The constant string for application settings is APPSETTING_. As an example, if an application setting key is defined as ContosoHRWebServiceURL, then the environment variable name for the setting is APPSETTING_ ContosoHRWebServiceURL.
MORE INFO CONNECTION STRINGS AND APPLICATION SETTINGS
Although it’s not a requirement to store connection strings and application settings as site settings for an Azure web app, it’s generally recommended to do so. Application developers still have the option of storing these settings in application configuration files such as Web.config or php.ini files.
When it comes to storing secrets, an even better option would be to store the secret in Azure Key Vault and store the secret URI to the setting in Key Vault as an app setting. For an example on this scenario see: https://docs.microsoft.com/en-us/azure/key-vault/key-vault-use-from-web-application.
 EXAM TIP
If an app setting or connection string is defined in both an application configuration file and as a site setting in the Azure website, the site setting value takes precedence over the setting in the application configuration file.
By default, app settings and connection strings are swapped when performing a deployment swap. However, there may be cases where you want a setting to stick to the deployment slot it is defined in and not be swapped. This is achieved by marking an app setting or connection string as a slot setting, as shown in Figure 1-10. In this example, SettingX will not be swapped to another deployment slot during a swap operation because it has been marked as a slot setting.

FIGURE 1-10 Slot settings for a web app in the Azure portal
Configure application settings (PowerShell)
Use the Set-AzureRmWebApp cmdlet to set application settings such as Always On, ARR Affinity, app settings, connection strings and more. When setting app settings and connection strings, use Get-AzureRmWebApp first to get the current settings, append/modify the settings, and then apply the settings. The following code demonstrates adding new settings to existing app settings for a web app.
$resourceGroupName = "contoso"
$webAppName = "contoso-hr-app"

# Get current app settings
$webApp = Get-AzureRmWebApp -ResourceGroupName $resourceGroupName -Name $webAppName
$settings = $webApp.SiteConfig.AppSettings

# Add new settings to the current set of settings
$newSettings = New-Object Hashtable
$newSettings["setting1"] = "value-1"
$newSettings["setting2"] = "value-2"
foreach ($setting in $settings) {
    $newSettings.Add($setting.Name, $setting.Value)
}

# Apply the new app settings to the web app
Set-AzureRmWebApp -ResourceGroupName $resourceGroupName -Name $webAppName -AppSettings $newSettings
Configure application settings (CLI)
Use the webapp config appsettings set command to set application settings.
#!/bin/bash

resourceGroupName="contoso"
webAppName="contoso-hr-app"

# Add a new app setting to a web app
az webapp config appsettings set –resource-group $resourceGroupName --name $webAppName
    --settings setting3=value-3
Configure a custom domain for a web app
Azure Web Apps are assigned to the azurewebsites.net domain. So, if your site name is contoso-web, then it is reachable at the URL contoso-web.azurewebsites.net. During development and testing this may be acceptable. However, as you approach the release of your web app, you will generally want to configure a custom domain for the site, such as contoso.com.
Configuring a custom domain name requires the following steps:
Obtain a custom domain from a domain registrar of your choice.
Add DNS records for your domain using your domain registrar.
Associate the custom domain with your Azure web app.
Adding DNS records
The DNS records you add with your domain registrar can be either an A record or CNAME record. An A record resolves a domain to a specific IP address. For Azure Web Apps, that IP address is the IP address of the cluster of servers your website is running in. It is not the IP address of a specific virtual machine. You can obtain the IP address you should use for your A record from the Azure portal by clicking on Custom domains in the web app blade, as shown in Figure 1-11.

FIGURE 1-11 Locating the IP address to use for A records in the Azure portal
If you use an A record, then Azure requires that you first add a TXT record mapped to the web app’s hostname to verify that you own the domain. Table 1-2 illustrates how the A record and TXT record are defined for the custom domain contoso.com.
TABLE 1-2 Example DNS records when using A records to configure a custom domain
RECORD TYPE |
NAME |
VALUE |
A |
@ |
13.85.15.194 |
TXT |
@ |
Contos0-web.azurewebsites.net |
 EXAM TIP
The TXT record is only used when using an A record to configure a custom domain. This record can be deleted after you have finished configuring your custom domain.
If you use CNAME records, then your DNS records only indicate the custom domain and the Azure Web App URL (or hostname) it maps to. It is also possible to map subdomains. Table 1-3 shows an example of how a CNAME record is defined for a custom domain contoso.com.
TABLE 1-3 Example DNS record when using CNAME records to configure a custom domain
RECORD TYPE |
NAME |
VALUE |
CNAME |
contoso.com |
Contos0-web.azurewebsites.net |
Associating the custom domain with the web app
After the CNAME records have been verified, the last step is to associate your custom domain with your Azure Web App. This can be done using the Azure portal as shown previously.
NOTE MODE SETTING REQUIREMENTS FOR CUSTOM DOMAINS
Custom domains are not supported in the free tier for an app service plan.
MORE INFO CUSTOM DOMAINS AND AZURE WEB APPS
More information and detailed steps on how to configure custom domains is available at https://docs.microsoft.com/en-us/azure/app-service-web/app-service-web-tutorial-custom-domain#map-a-cname-record.
Configure SSL certificates
Azure Web Apps provide SSL support for every site by default. If your website is named contoso-web, you can open a browser and access it using http or https. However, the azurewebsites.net domain is a shared domain and therefore the wildcard certificate providing SSL is also shared, making it less secure than if you had a custom domain and your own SSL certificate for the custom domain.
Most sites will have a custom domain and therefore will need to configure SSL with this in mind. The site must also be in Standard mode to support this configuration. Configuring SSL for an Azure Web App with a custom domain requires the following steps:
Obtain an SSL certificate.
Upload the SSL certificate to Azure.
Configure the SSL bindings.
 EXAM TIP
SSL support for an Azure Web App with a custom domain is not provided in the Free and Shared pricing tiers of App Service Plans.
A certificate authority must sign your SSL certificate, and the certificate must adhere to the following requirements:
The certificate contains a private key.
The certificate must be created for key exchange that can be exported to a Personal Information Exchange (.pfx) file.
The certificate’s subject name must match the custom domain. If you have multiple custom domains for your website, the certificate will need to be either a wildcard certificate or have a subject alternative name (SAN).
The certificate should use 2048-bit (or higher) encryption.
There are two methods for configuring an SSL certificate. One option is to create an App Service Certificate. Another is to obtain an SSL certificate from a third party.
 EXAM TIP
Regardless of which method you choose to configure an SSL certificate, be advised that neither forces HTTPS only traffic to the application running in the web app. This means users can still access the application using HTTP. To enforce HTTPS, a rewrite rule must be defined in the application configuration files to redirect HTTP requests to HTTPS. More information is available at: https://docs.microsoft.com/en-us/azure/app-service-web/app-service-web-tutorial-custom-ssl#enforce-https.
Configure an SSL certificate using an App Service Certificate
In the Azure portal, search for App Service Certificate in the marketplace. Provide a resource name, host name, and select a certificate SKU. The certificate SKU can be a standard certificate or a wildcard certificate. Figure 1-12 illustrates creating a new App Service Certificate in the Azure portal.
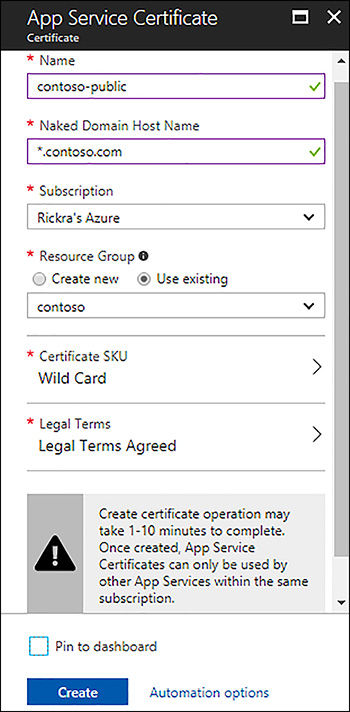
FIGURE 1-12 Creating a new app service certificate in the Azure portal
After creating the app service certificate, you must perform the following three steps:
Store the certificate in Azure Key Vault.
Verify domain ownership. This refers to ownership of the host name you specified when creating the app service certificate.
Import the certificate into your web app and add SSL bindings, which can be SNI SSL or IP-based SSL.
MORE INFO CONFIGURE SSL USING AN APP SERVICE CERTIFICATE
For additional information and detailed steps on how to configure an SSL certificate using an App Service Certificate, see https://docs.microsoft.com/en-us/azure/app-service-web/web-sites-purchase-ssl-web-site.
 EXAM TIP
An app service certificate can only be used with other app services (web apps, API apps, mobile apps) in the same subscription. It also must be stored in an Azure Key Vault instance.
Configure a third party SSL certificate
After obtaining an SSL certificate from a third party, you must perform the following two steps:
Upload the SSL certificate to Azure.
Configure the SSL bindings in your web app.
You can upload your SSL certificate to Azure using the Azure portal. Open the web app blade and click on SSL certificates under the Settings section. This will open a blade where you can upload the certificate and configure SSL bindings as shown in Figure 1-13.
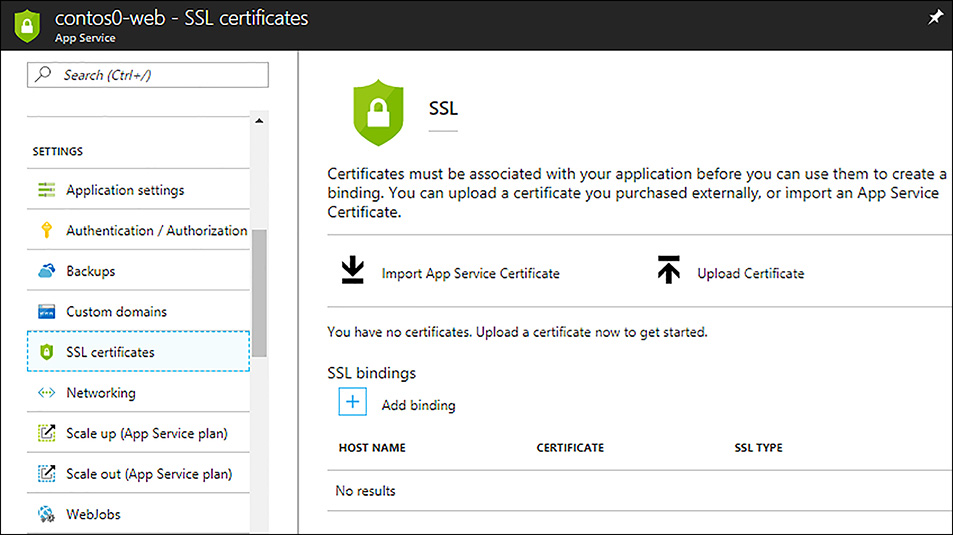
FIGURE 1-13 SSL certificate configuration in the Azure portal
After the SSL certificate has been uploaded, the last step in the process is to configure the SSL bindings. Azure Web Apps support Server Name Indication (SNI) SSL and the traditional IP-based SSL. You can configure the SSL bindings in the Azure portal in the SSL Certificates blade referenced earlier in Figure 1-13. For each binding you must specify the following:
The custom domain name
The SSL certificate to use for the custom domain
Select either SNI SSL or IP-based SSL
 EXAM TIP
If you choose IP-based SSL for your SSL binding and your custom domain is configured using an A record, Azure will assign a new dedicated IP address to your website. This is a different IP address than what you previously used to configure the A record. Therefore, you must update the A record with your DNS registrar using the new virtual IP address. The virtual IP address can be found in the management portal by clicking the Properties part of the Website blade.
Configuring handler mappings
Depending on the tools and language used to build a web application, it may be necessary for you to configure additional handlers (or interpreters) to support the web app’s code. To configure a handler mapping for an Azure Web App requires the following settings:
Extension The file extension that you want to be handled by the script processor. This can be a wildcard, a specific file extension, or even a specific file. For example, *, *.php, and Handler.fcgi. The script processor defined in the script processor path will process requests that match this pattern.
Script Processor Path The absolute path to the script processor that will process requests for files matching the pattern in the extension property.
Optional Arguments This can be a path to a script for the script processor to process or any other argument that you may need to define when invoking the script processor.
Configuring handler mappings using the management portal
In the Azure portal, you can add handler mappings by opening the Application Settings blade for your web app. Scroll down towards the bottom of the blade until you find the Handler Mappings section, as shown in Figure 1-14.

FIGURE 1-14 Handler mappings in Azure portal
Configuring virtual applications and directories
Some web applications require virtual applications or directories be added as part of the web app configuration. Azure Web Apps supports these configuration requirements. Configuring a virtual application or directory for an Azure Web App requires the following settings:
Virtual Directory The path that users will use to access the directory or application.
Physical Path The path to the physical directory or application.
Application If selected, the virtual directory is configured as a web application. If the checkbox is clear, it will be a virtual directory.
In the Azure portal, you can add virtual applications and directories by opening the Configuration Settings blade for your web app. Scroll down towards the bottom of the blade until you find the Virtual Applications And Directories section, as shown previously in Figure 1-14.
Skill 1.3: Configure diagnostics, monitoring, and analytics
Monitoring web apps to identify failures, potential performance issues, or metrics used to determine application health is a necessary function for IT. Azure Web Apps provides a rich set of monitoring and diagnostic features that you can use to easily monitor the application and quickly retrieve diagnostic data when you need to probe deeper into how the site is performing.
This skill covers how to:
Enable application and site diagnostics
Retrieve diagnostic logs
View streaming logs
Monitor web app resources
Monitor App Service Plan resources
Monitor availability, performance, and usage
Monitor Azure services
Configure backup
Enabling application and web server diagnostics
Diagnostic logging is not enabled by default. It is up to you to enable and configure logging in a way that provides the information you need to troubleshoot issues. There are two categories of Azure Web App Diagnostic logs:
Application diagnostic logs
Web server diagnostic logs
Application diagnostic logs contain information produced by the application code. This can be tracing that the developers instrumented when writing the code, or exceptions that were raised by the application. When you enable application logs, you must specify the logging level, which can be one of the following:
Error
Warning
Information
Verbose
Web server diagnostic logs contain information produced by the web server that the web application is running on. Three types of web server diagnostic logs can be enabled:
Web Server Logging Contains all HTTP events on a website and is formatted using the W3C extended log file format.
Detailed Error Messages Contains information on requests that resulted in a HTTP status code of 400 or higher.
Failed Request Tracing Contains detailed traces for any failed requests. This log also contains traces for all the IIS components that were involved in processing the request. This can be useful when trying to isolate where in the system a failure is occurring.
Enabling diagnostics logs (Azure portal)
In the Azure portal, enable application and web server diagnostic logs by opening the web app blade and clicking Diagnostics Logs under the Monitoring section. This will open the Diagnostic Logs blade, where you can enable the logs and configure the logging level, as shown in Figure 1-15.

FIGURE 1-15 Diagnostic logs blade in the Azure portal
Enabling diagnostics logs (PowerShell)
Use the Set-AzureRmWebApp cmdlet to configure diagnostic logs. For example, the code shown here enables the web server logging and the failed request tracing.
$resourceGroupName = "contoso"
$webAppName = "contos0-web"

# Get a reference to an existing web app
$webApp = Get-AzureRmWebApp -ResourceGroupName $resourceGroupName -Name $webAppName

# Configure diagnostic logging
Set-AzureRmWebApp -ResourceGroupName $resourceGroupName -Name $webAppName `
    -RequestTracingEnabled $true -HttpLoggingEnabled $true
Enabling diagnostic logs (CLI)
Use the webapp log config command to configure diagnostic logs. For example, the code shown here enables application logging and disables failed request tracing.
#!/bin/bash

resourceGroupName="contoso"
webAppName="contos0-web"

# Configure diagnostic logging
az webapp log config --resource-group $resourceGroupName --name $webAppName
    --application-logging true --failed-request-tracing false
MORE INFO DIAGNOSTIC LOGGING FOR AZURE WEB APPS
Additional information about the diagnostic logging options, what is logged, and how to configure the logs is available at: https://docs.microsoft.com/en-us/azure/app-service-web/web-sites-enable-diagnostic-log.
Retrieving diagnostic logs
You have many choices when it comes to retrieving diagnostic logs or just viewing the contents of the logs. Regardless of how you choose to retrieve diagnostic logs, it’s helpful to understand where the logs are stored on the web app’s file system. Table 1-4 lists the different logs and their location in the file system.
TABLE 1-4 Diagnostic log file locations on the file system for an Azure website
LOG FILE TYPE |
LOCATION |
Application Diagnostics |
D:HomeLogFilesApplication |
SITE DIAGNOSTICS (WEB SERVER) |
D:HOMELOGFILESHTTPRAWLOGS |
Site Diagnostics (Detailed Errors) |
D:HomeLogFilesDetailedErrors |
SITE DIAGNOSTICS (FAILED REQUEST TRACES) |
D:HOMELOGFILESW3SVC<RANDOM#> |
NOTE FAILED REQUEST LOGS STYLE SHEET FILE
When failed request logging is enabled, the folder where the logs are stored contains an .xml file and a file named Freb.xsl file. The .xml file contains the log data generated by the server. The Freb.xsl file is a style sheet document that enhances viewing the .xml file in your browser. When downloading failed request logs to your local computer, save the Freb.xsl in the same folder with a .xml file. Then, open the .xml file using your browser for an enhanced viewing experience. This makes identifying errors and warnings in the log much easier.
Using FTP to retrieve log files
In the Diagnostic logs blade of the Azure portal are settings identifying the FTP user and a URL that you can use to access the web app’s file system. Using this information, you can connect using any FTP client you choose, navigate the file system, and download diagnostic logs.
Using Site Control Manager (Kudu) to retrieve log files
Site Control Manager, often referred to as “Kudu”, is a web app extension that you can use to retrieve log files, browse the file system, edit files, delete files, view environment variables, and even capture process dump files.
To access the Site Control Manager, open your browser and navigate to: https://<your site name>.scm.azurewebsites.net.
 EXAM TIP
Every Azure web app gets the Site Control Manager site extension installed by default. There is nothing you have to do to enable it.
The URL is the same as the URL for your web app, with the added scm immediately after the website name. Figure 1-16 is an example of what the Site Control Manager (SCM) home page looks like for a web app running on a Windows App Service Plan. For a web app running on a Linux app service plan, the SCM features are not as rich.

FIGURE 1-16 The home page of the site control manager “Kudu” extension
Using Site Control Manager, select the Debug Console and then select the CMD option. This opens a debug console (Bash or SSH for Linux App Service Plans) that you can type directly into or use the navigation above. As you click the navigation links, the console will update to your current directory. Figure 1-17 shows the contents of the LogFiles folder.
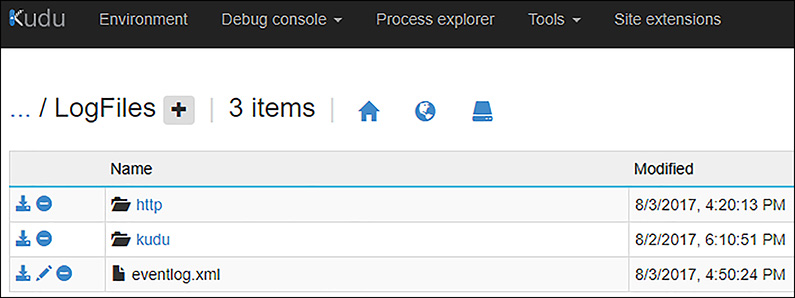
FIGURE 1-17 The debug console in Site Control Manager and viewing the LogFiles folder
Using Site Control Manager, you can download an entire folder or individual files by clicking the download link to the left of the directory or file name.
Retrieve diagnostic logs (PowerShell)
Use the Save-AzureWebsiteLog cmdlet to download diagnostic logs. This code will download the log files and store them in E:Weblogs.zip on the client computer.
$wsName = "contoso-web"
Save-AzureWebsiteLog -Name $wsName -Output e:weblogs.zip
Retrieve diagnostic logs (CLI)
Use the webapp log download command to download diagnostic logs.
#!/bin/bash

resourceGroupName="contoso"
webAppName="contos0-web"

# Configure diagnostic logging
az webapp log download --resource-group $resourceGroupName --name $webAppName
    --log-file ./webapplogs.zip
Viewing streaming logs
Sometimes it is preferable to view log data as it is being collected (almost real-time). Azure Websites provides a feature to enable streaming of log data via the log-streaming service. You can connect to the log-streaming service using the following methods:
Management portal
Azure PowerShell Cmdlets
Command-Line Tools
Site Control Manager (Kudu)
Visual Studio
 EXAM TIP
The streaming log service is available for application diagnostic logs and web server logs only. Failed request logs and detailed error messages are not available via the log-streaming service.
Viewing streaming logs (Azure portal)
The streaming log service is accessible from the web app blade. Scroll down to the Monitoring section and click on Log stream. In the Log stream blade, you can toggle between application and web server logs, pause and start the log-streaming service, and clear the logs in the console. Figure 1-18 shows example output for the web server logs in the Log stream blade.

FIGURE 1-18 The Logs stream blade in the Azure portal showing web server logs
Viewing streaming logs (PowerShell)
Use the Get-AzureWebsiteLog cmdlet to stream logs directly in the Azure PowerShell console window. The code shown here connects to the log-streaming service to start streaming the web server logs.
Get-AzureWebsiteLog -Name "contoso-web-west" -Tail -Path http
The Get-AzureWebsiteLog also supports a Message parameter that you can use to filter the output when streaming application logs. For example, the code shown here filters the log-streaming output to just application logs that are categorized as errors.
Get-AzureWebsiteLog -Name "contoso-web-west" -Tail -Message Error
Viewing streaming logs (CLI)
Use the web app log tail command to view logs directly in a bash shell.
az webapp log tail –resource-group "contoso" –name "contos0-web"
Monitor web app resources
The Azure portal provides rich and visually appealing screens to monitor your web app. The web app blade is where you can quickly and easily get access to information, click through metrics, parts and graphs, and in some cases just hover over part items to drill deeper into the data.
The web app blade displays web parts for five categories of metrics as follows:
Number of requests
HTTP server errors
Data in
Data out
Average response time
The graphs in these web parts are useful to get a quick all up view of how things are performing. However, you can also click into these web parts to get a deeper look into the data, change the chart type, go back further in history, and view any alerts you may have for a particular metric. Figure 1-19 shows the Average Response Time metric (after clicking on the web part in the web app blade) with the CPU Time metric added to the graph.
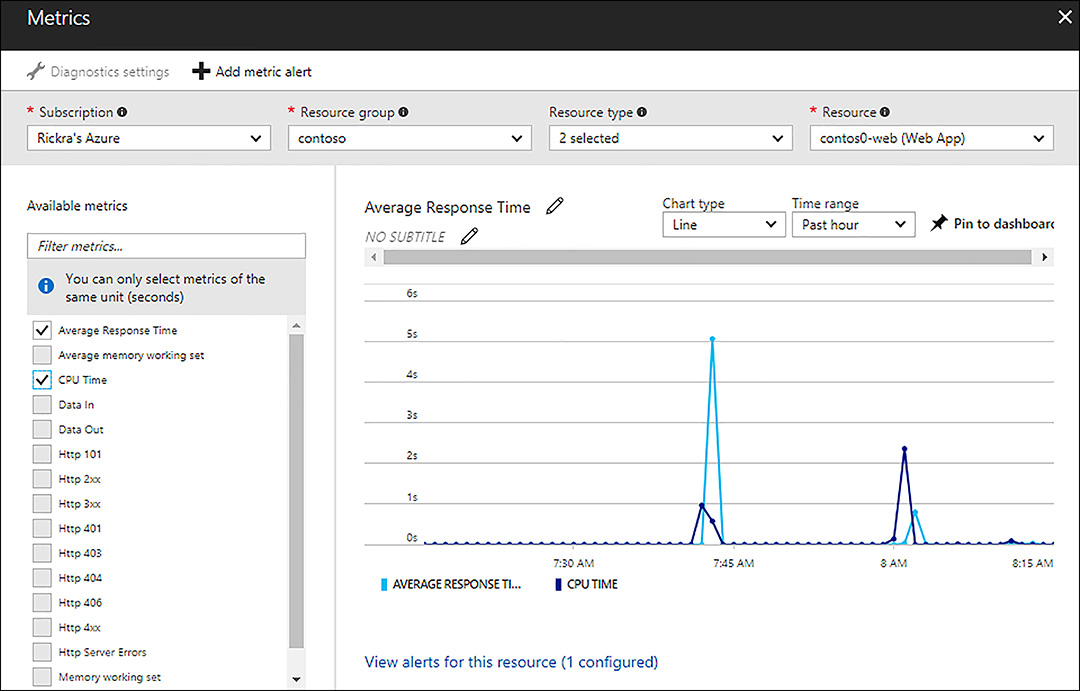
FIGURE 1-19 Average Response Time metric with CPU Time added to the graph in the Azure portal
Monitor App Service Plan resources
The App Service Plan your web app is running on should also be monitored to insure you are properly sized to support the app services (web apps, API apps, mobile apps) running on the App Service Plan. The App Service Plan metrics provide insight on how resources such as CPU, memory, HTTP queue length, and others are consumed across all instances. For example, if memory is sustaining a value of 85% or more, then you may want to consider scaling up the plan to the next pricing tier or increasing the number of instances.
The app service plan blade displays a monitoring web part showing CPU Percentage and Memory Percentage. You can click into the web part and explore the data further as shown in Figure 1-20.
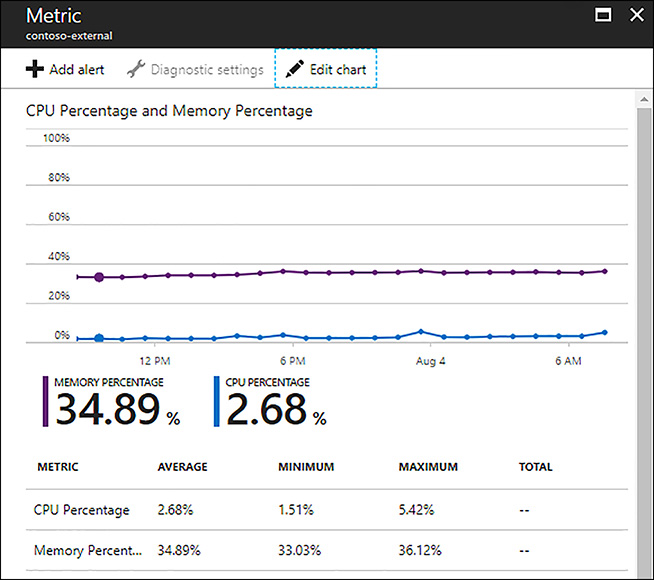
FIGURE 1-20 App Service Plan CPU and memory percentage metrics in the Azure portal
MORE INFO AZURE WEB APP AND APP SERVICE PLAN METRICS
For a complete list of metrics available for web apps and app service plans see: https://docs.microsoft.com/en-us/azure/app-service-web/web-sites-monitor/.
Monitor availability, performance, and usage
Application Insights provides deeper monitoring of your web app, enabling you to monitor application performance, availability for end users, and even provide insight into how your users are using the application.
MORE INFO APPLICATION INSIGHTS OVERVIEW
Application Insights is an extremely powerful feature that captures massive amounts of telemetry data from your web application. It can take a considerable amount of time to learn everything it is capable of and how to get the most out of it. The reader is encouraged to learn more about Application Insights at: https://docs.microsoft.com/en-us/azure/application-insights/app-insights-overview.
To get started, create a new Application Insights resource in the Azure portal. Search for Application Insights in the Azure Marketplace. Provide a friendly name for the application Insight resource and select an application type. If your application developer included the Application Insights SDK in the application code, then you can get deeper insights by selecting an application type matching the framework/code that the developer used. If you don’t have this information, you can select a General application type. Figure 1-21 illustrates creating a new application insight resource in the Azure portal.
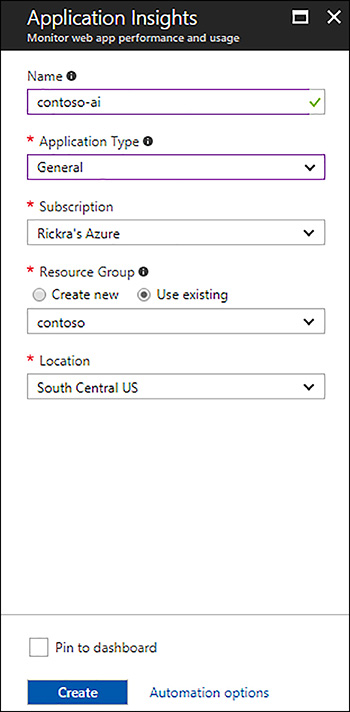
FIGURE 1-21 Creating a new Application Insights resource in the Azure portal
A common monitoring task is to setup availability tests to monitor your web application from several locations around the world. This gives you data on the availability and responsiveness of your application from the perspective of users in different regions of the world.
There are two types of availability tests you can configure. The simplest is the URL Ping test whereby Azure will simply ping your web app URL using an HTTP GET request. To create an availability test, scroll down on the Application Insights blade and click on Availability Tests. In the Availability Tests blade, click Add Test at the top. Even a simple URL Ping test has many properties to configure, such as parsing dependent links, retries, test locations, HTTP success criteria, setup alerts, and more as shown in Figure 1-22.

FIGURE 1-22 Create a new application insights availability test in the Azure portal
The other type of availability test is a Multi-step web test. This type of test requires that you create a Web Performance and Load Test Project in Visual Studio, configure the tests, and then upload the test file to Azure.
MORE INFO AVAILABILITY TESTS USING APPLICATION INSIGHTS
Additional information and step-by-step configuration of URL Ping Tests and multi-step web tests is available at: https://docs.microsoft.com/en-us/azure/application-insights/app-insights-monitor-web-app-availability.
You can also use Application Insights to monitor applications that may be behind a firewall running on-premises. In these cases, you may need to authorize IP’s and ports that Application Insights uses to monitor the endpoint. Information on the IP addresses and ports used by Application Insights is available at: https://docs.microsoft.com/en-us/azure/application-insights/app-insights-ip-addresses.
If you use System Center Operations Manager (SCOM), then you can monitor performance and troubleshoot issues using Application Insights. For more information on this monitoring scenario see: https://docs.microsoft.com/en-us/azure/application-insights/app-insights-scom.
Availability tests run at configured intervals (default is five mins) across all of the test locations you configured. As a result, it will take several minutes before you start to see data from your availability test. Figure 1-23 shows the availability blade for a simple URL Ping Test. Each green dot represents a successful test from a test location. You can also click on the green dots to see details about that specific test.
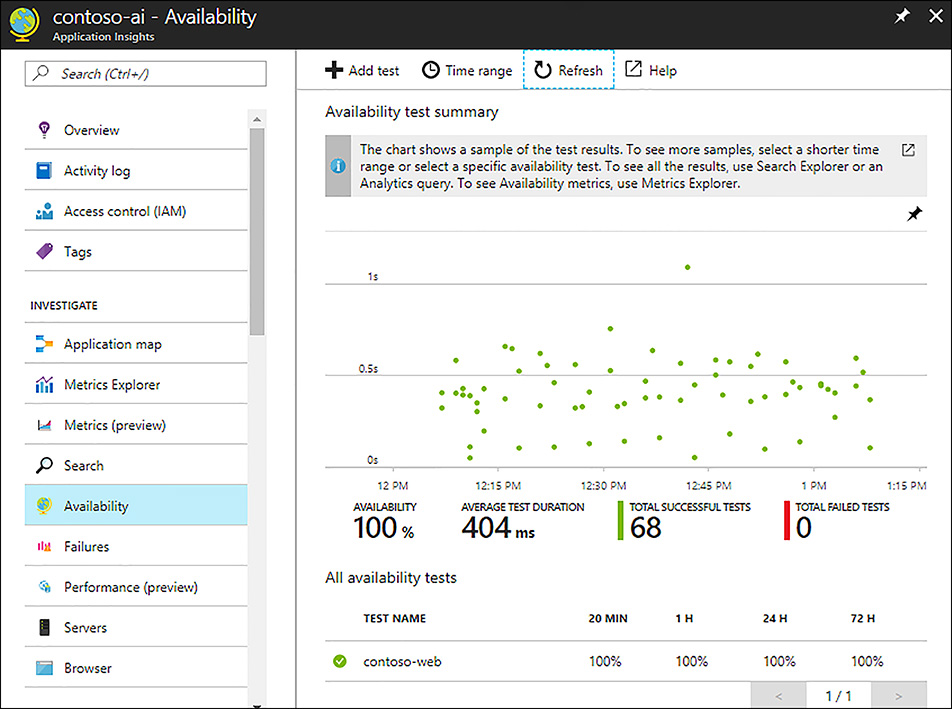
FIGURE 1-23 Availability test summary for a web app configured with a URL Ping Test
When you create an availability test you can also create an alert. The default alert for the URL Ping Test triggers an alert if three of the test locations fail within a five minute window. If this happens, then subscription administrators get an automated email about the alert.
Three types of alerts are available as follows:
Metric Alert Triggered when some metric crosses a threshold value for a sustained period of time.
Web Tests Alert Triggered when a site becomes unavailable or has response times exceeding a threshold value.
Proactive Diagnostic Alert Warns you of potential application failure, application performance, and app service issues.
You can add new alerts from the Application Insights blade. Scroll down to the Configure section and click Alerts to open the Alerts blade.
MORE INFO CONFIGURING ALERTS IN APPLICATION INSIGHTS
Further guidance on the types of alerts, how to configure them, and when to use them is available at: https://docs.microsoft.com/en-us/azure/application-insights/app-insights-alerts.
Application Insights can also be used to capture client-side telemetry data. This enables you to get metrics such as page load time, out-bound AJAX call durations, browser errors, and more. To enable this, you (or your developer) will need to add a small amount of JavaScript to the pages you want to capture client-side telemetry data on. Application Insights provides the JavaScript for you with full integration with your storage account where the telemetry data is stored. All you have to do is cut/paste it into your code.
MORE INFO APPLICATION INSIGHTS FOR CLIENT-SIDE TELEMETRY DATA
Information and guidance on how to capture and analyze client-side telemetry data is available at: https://docs.microsoft.com/en-us/azure/application-insights/app-insights-javascript.
Monitor Azure services
To effectively monitor web apps that you are responsible for means you also need monitor the Azure services your web app depends on. The Microsoft Azure platform is very transparent when it comes to service availability and places a Service Health (in preview at the time of this writing) web part on dashboard of the Azure portal. In the Service Health blade, you can get a global map view of regions with service issues, review planned maintenance, be informed of health advisories, and see health history. Figure 1-24 shows a heal history report where you can review the issue, download an issue summary and learn if there are mitigation steps you need to take.
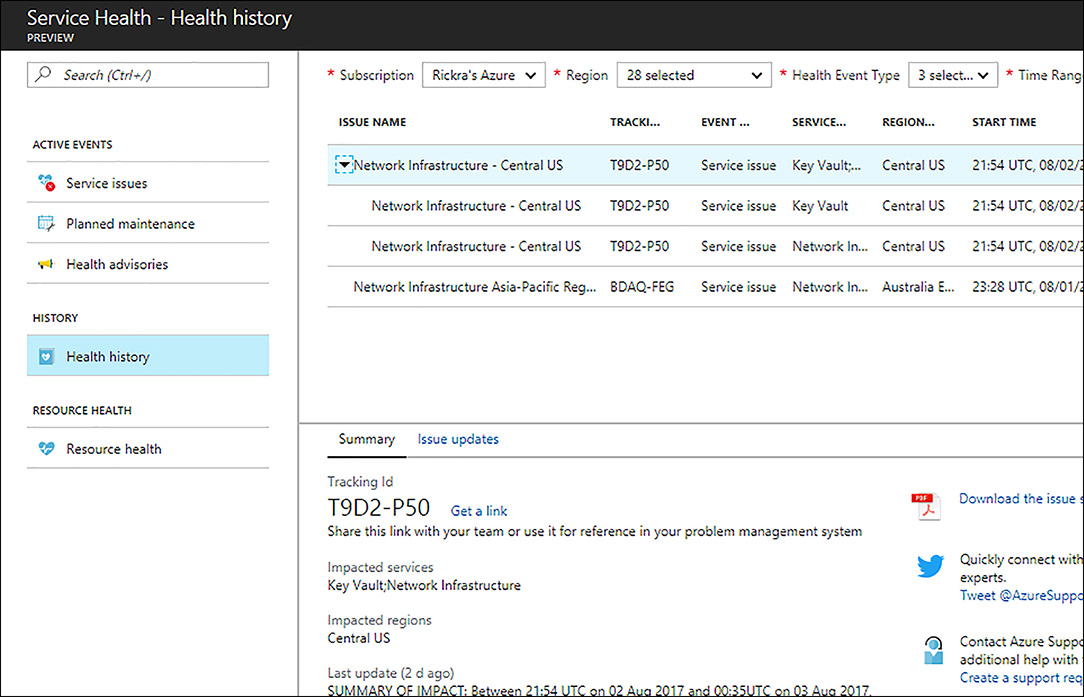
FIGURE 1-24 Service health blade in the Azure portal
MORE INFO AZURE SERVICES STATUS
You can view Azure service status information on the Azure website without signing into your Azure subscription. The public Azure service status page is available at: https://azure.microsoft.com/en-us/status/.
Configure backup
Having a solid backup plan is a best practice for any application running on-premises or in the cloud. Azure Web Apps offer an easy and effective backup service that can be used to back up your web app configuration, file content, and even databases that your application has a dependency on.
To configure backup for a web app, you must have an Azure Storage account and a container where you want the backups stored. Open the web app blade and click on Backups under the Settings section.
Backups can be invoked on-demand or based on a schedule that you define when configuring the backup. When configuring a backup schedule you can also specify retention period for the backup.
 EXAM TIP
The storage account used to back up Azure Websites must belong to the same Azure subscription that the Azure website belongs to.
Restore an Azure web app backup
At some point, it may be necessary to restore a web app from a backup. The Azure portal provides an intuitive interface to guide you through the process. As you start the restore process, you can select which backup to restore from and where to restore to, such as overwriting the existing web app or to a new web app environment as shown in Figure 1-25.
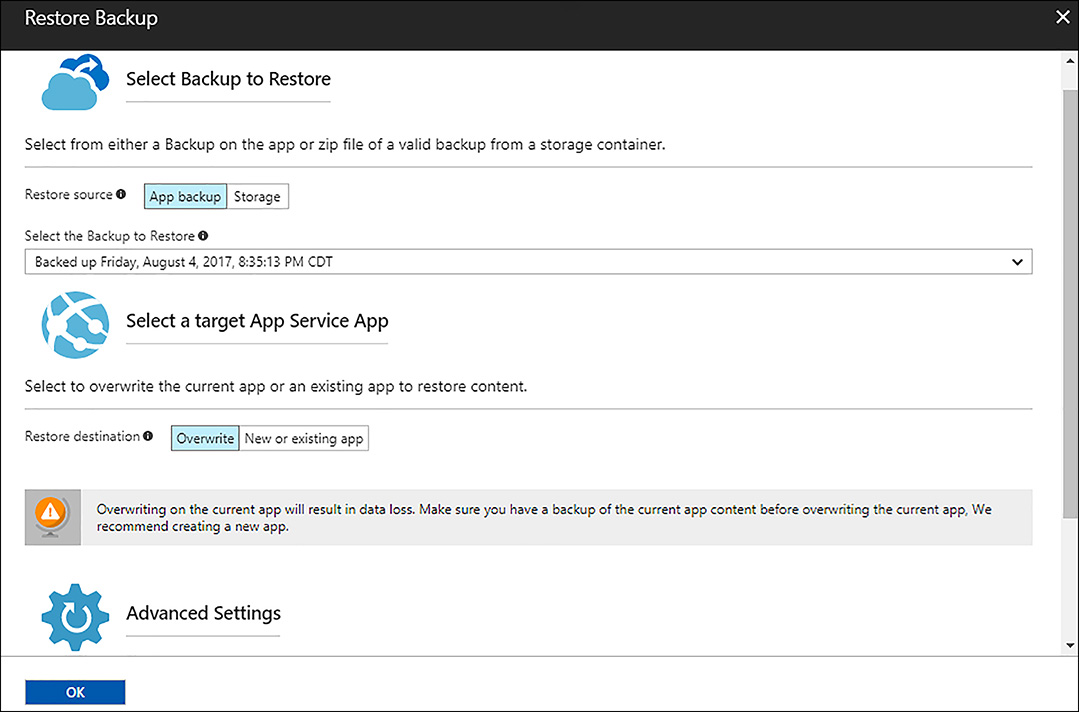
FIGURE 1-25 Restore web app from backup in the Azure portal
MORE INFO BACKUPS
Guidance on how to configure backups for your web app, invoke a backup manually, and how to restore from a backup is available at: https://docs.microsoft.com/en-us/azure/app-service-web/web-sites-backup.
Skill 1.4: Configure web apps for scale and resilience
The Microsoft Azure platform is an extremely resilient platform. By leveraging the services and features available, you can implement highly available solutions to meet demand from users in a way that is cost effective for the business. The notion of elastic scale is a key driver for moving to the cloud, and Azure App Service Plans deliver this through a rich set of scalability features in the platform.
Using the Autoscale feature, you can scale out and in the number of instances of your app service plan based on schedules you set or metrics you define. You can also manually scale the number of instances in situations where you want a constant number of instances to host your app services.
This skill covers how to:
Scale up or down an app service plan
Scale app service instances manually
Scale app service instances using Autoscale
Configure Azure Traffic Manager
Scale up or down an app service plan
The decision to scale up or down an app service plan is driven by the resource needs of the app services running on the plan. As the resource needs increase or decrease you may find that you need to scale up or down your App Service Plan. When you scale up or down an app service plan, the only properties that change are the number of cores and the amount of RAM. For example, if you have an S1 App Service Plan, scaling it up to an S3 simply increases the number of cores from 1 to 4 and the amount of RAM from 1.75 GB to 7 GB. The features, such as amount of storage, maximum number of instances, maximum number of slots, custom domain support, and more remain the same.
To scale up or down an App Service Plan, open the app service plan blade and click on Scale up (App Service Plan) as shown in Figure 1-26.
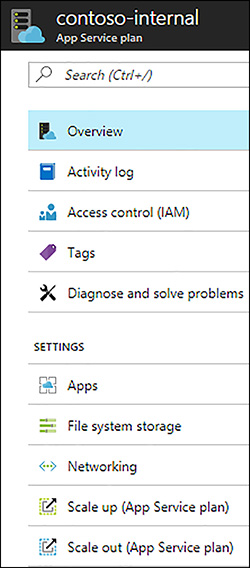
FIGURE 1-26 Scale up option under Settings in the App service plan blade
Selecting this option opens up the pricing tier blade, where you can scale up or down your App Service Plan. It is also possible to choose an entirely different pricing tier, such as changing from a Standard tier to a Premium tier.
Scale app service instances manually
The maximum number of instances you can scale out an App Service Plan to is defined by the pricing tier of the app service plan as follows:
3 instances in Basic
10 instances in Standard
20 instances in Premium (subject to availability)
100 instances in Isolated (used with App Service Environment)
These limits apply whether you scale out manually or using Autoscale, which will be discussed in the next section.
To scale in or out the number of instances in an app service plan, open the App Service Plan blade and click on Scale out (App service plan) as shown above in Figure 1-26. In the Scale out blade, adjust the Instance count slider to the desired number of instances as shown in Figure 1-27.
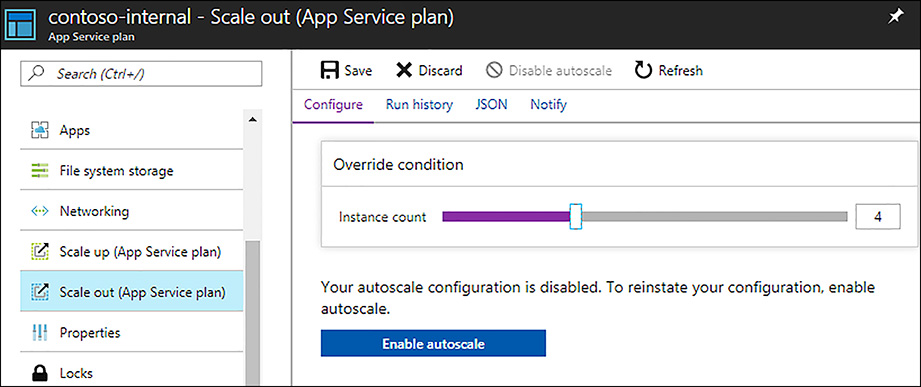
FIGURE 1-27 Manually scaling out app service plan instances
Scale app service instances using Autoscale
Azure’s Autoscale feature enables you to define scale conditions that contain rules and configuration settings that are used to rigger scale out actions. Autoscale conditions can be based on a metric, such as CPU, or based on a schedule. An App Service Plan can have multiple scale conditions defined, meaning you can combine different metric conditions and schedule conditions simultaneously.
To get started, you first have to enable Autoscale for an app service plan. To enable this, click the Enable Autoscale button in the Scale out blade as shown above in Figure 1-27.
Create a metric-based scale condition
Open the Scale Out Blade for the App Service Plan. In the scale condition web part, set the Scale mode to Scale based on a metric. Define the Minimum, Maximum and Default Instance limits for the scale condition. Figure 1-28 illustrates a scale condition that will scale in and out instances within a range of 1 to 5.

FIGURE 1-28 Scale by metric condition in the Azure portal
Next, click the +Add a rule link to define a new scale rule. The first property in a scale rule you need to set is the Metric Source, which defaults to the App Service Plan resource. This means the metrics you can base your scale rule on are those provided by the App Service Plan, such as CPU Percentage. However, you can choose a different metric source that will provide different metrics to base your rule on. For example, you may want to define a rule based on a metric in an Application Insights resource, such as Server response time.
Next, choose the metric to base your rule on, configure the criteria for the metric, and the scale action to execute when the criteria is met. Figure 1-29 shows a scale rule based on CPU Percentage, whereby the instance count will increase by one when the CPU percentage across all instances exceeds 70% for a period of 10 minutes or more.

FIGURE 1-29 Scale rule based on CPU Percentage
Create a schedule-based scale condition
Sometimes you may want to scale out your app service plan instances when you can predict increased demand. For example, an organization needs additional resources during the day to support business demand but in the evening hours can get by with a minimum set of resources when there are significantly fewer users of the system. This situation is easily addressed by creating a schedule-based scale condition that increases app service plan instances early in the morning and then decreases them in the evening.
To create a schedule-based scale condition using the example above, open the Scale out blade for the app service plan. In the scale condition web part, set the Scale mode to Scale to a specific instance count. Set the instance count to the number of instances needed during working hours. Figure 1-30 shows a scale condition that sets the instance count to 3 between the hours of 6AM and 6PM for working for workdays.

FIGURE 1-30 Scale by schedule condition in the Azure portal
When the schedule criteria is not met, such as in the evenings and on weekends, the default scale condition created in the previous section is applied. This would have the effect of scaling back down to one instance if the CPU percentage stays below 70%.
MORE INFO AUTOSCALE BEST PRACTICES
Additional information on Autoscale concept and guidance on best practices is available at: https://docs.microsoft.com/en-us/azure/monitoring-and-diagnostics/insights-autoscale-best-practices.
Configure Azure Traffic Manager
Azure Traffic Manager is a network service that you can use to route users to web app endpoints (deployments) in potentially different datacenters around the world. It provides services and settings that you can use to improve availability, performance for users, or load-balance traffic. It works by applying a policy engine to DNS queries for the domain names of your web app.
MORE INFO AZURE TRAFFIC MANAGER OVERVIEW
For more information on when Traffic Manager is, how it works, and scenarios it is intended for, see: https://docs.microsoft.com/en-us/azure/traffic-manager/traffic-manager-overview.
To leverage the features of Azure Traffic Manager, you should have two or more deployments of your web app. The deployments can be in the same region or spread across multiple regions around the world.
NOTE MULTIPLE DEPLOYMENTS FOR THE SAME WEB APP
The implementation of an application will greatly influence how Azure Traffic Manager can be used for that application. As simple as it may be to deploy the web app to multiple locations, careful consideration should be given to whether or not the application was designed for multiple deployments. How data is managed and accessed by the web app, whether or not application state is a factor, and other important application design aspects need to be reviewed. Traffic Manager is a powerful service in the Azure platform that should be reviewed with application owners before configuring Traffic Manager for the application.
Configuring Azure Traffic Manager entails the following steps:
Create an Azure Traffic Manager profile
Add endpoints to the profile
Update DNS records for your custom domain
Create an Azure Traffic Manager profile
To create an Azure Traffic Manager profile, you must select a unique DNS name for your profile. All Azure Traffic Manager profiles use the shared domain *.trafficmanager.net. Therefore, your DNS name must be unique because it will form the Azure Traffic Manager domain name that you will use when updating your DNS records. As an example, a DNS name for Contoso might be contoso-web-tm.trafficmanager.net.
Related to the DNS name setting is the DNS Time-To-Live (TTL), which tells DNS clients and resolvers on DNS servers how long to cache the name resolved by Azure Traffic Manager. The default value for this setting is five minutes.
You must select a routing method. The routing method options are as follows:
Performance Choose this option when your web app is deployed in different regions and you want users to be routed to the deployment closest to them.
Weighted Choose this option when you want to distribute the load across multiple deployments. If you set the weights of each endpoint to the same value, then this would achieve round-robin routing. Increasing the weight of one endpoint increases the frequency users are routed to it over lower weighted endpoints.
Priority Choose this option when you want one deployment to be the primary for all traffic and the others to be available as backup if the primary becomes unavailable. If you have more than two deployments, then you can prioritize the order of the endpoints that you want Traffic Manager to failover to.
MORE INFO TRAFFIC MANAGER ROUTING METHODS
For further information on each of the routing methods and detailed walkthroughs of how DNS queries are resolved, see: https://docs.microsoft.com/en-us/azure/traffic-manager/traffic-manager-routing-methods.
For Azure Traffic Manager to determine the health of your web app endpoints (deployments) you need to provide configuration settings so Azure Traffic Manager can query your endpoints to determine if an endpoint should be taken out of the rotation. The configuration settings consist of the following:
Protocol This can be HTTP, HTTPS, or TCP.
Port Defaults to standard HTTP and HTTPS ports, such as 80 or 443. You may choose to use a different port to separate normal web traffic from endpoint monitoring traffic.
Path This is the path in the application that the monitoring service will perform an HTTP GET request against (if using HTTP/S). This can be the root of the application, such as “/”. Or, it could be a specific health check page the application may make available, such as /Healthcheck.aspx.
Probing interval Determines how frequent Azure probes your endpoint.
Tolerated number of failures Nmber of times a health probe can fail before the endpoint is considered to be down/unavailable.
Probe timeout Timeout period for a probe request. Must be smaller than the probing interval setting.
NOTE USING HEALTH CHECK PAGES TO DETERMINE ENDPOINT HEALTH
Some web applications provide a health check page as part of the application and may name the page Healthcheck.aspx. The advantage of having a health check page is that the page can check the health of other services the application depends on, such as SQL Database connections, web service availability, or internal metrics the application developers have added as part of the health monitoring of the application. Just because a request for a page such as the root at “/” may return an HTTP 200 (OK), doesn’t necessarily mean the application is healthy. By using a custom health check page, applications can more accurately determine the health of the application instance and return an error code, such as HTTP 503 (Service Unavailable). As a result, Azure Traffic Manager will remove the endpoint from the rotation until the application instance returns HTTP 200 (OK).
To create an Azure Traffic Manager profile using the management portal, specify the unique DNS name and the load balancing method. Next, configure the settings for the profile. Figure 1-31 shows the Configure page for an Azure Traffic Manager profile.

FIGURE 1-31 Configuring a traffic manager profile in the Azure portal
To create a Traffic Manager profile using Azure PowerShell, use the New-AzureRmTrafficManagerProfile cmdlet. For example, the code below creates a profile named contoso-public with a domain name of contoso-public-tm.trafficmanager.net, Performance routing method, and TCP monitoring on port 8082.
# Properties for the traffic manager profile
$tmName = "contoso-public"
$tmDnsName = "contoso-public-tm"
$ttl = 300
$monitorProtocol = "TCP"
$monitorPort = 8082

# Create the traffic manager profile
New-AzureRmTrafficManagerProfile -ResourceGroupName $resourceGroupName -Name $tmName `
    -RelativeDnsName $tmDnsName -Ttl $ttl -TrafficRoutingMethod Performance `
    -MonitorProtocol $monitorProtocol -MonitorPort $monitorPort
Add endpoints to an Azure Traffic Manager profile
The endpoints are where Azure Traffic Manager will resolve DNS queries to for your domain. After creating the Azure Traffic Manager profile, you must add the endpoints to the profile that you want Azure Traffic Manager to resolve DNS queries to. In the Azure portal, you can add, delete, and disable endpoints on the Endpoints page of the Azure Traffic Manager profile, as shown in Figure 1-32.
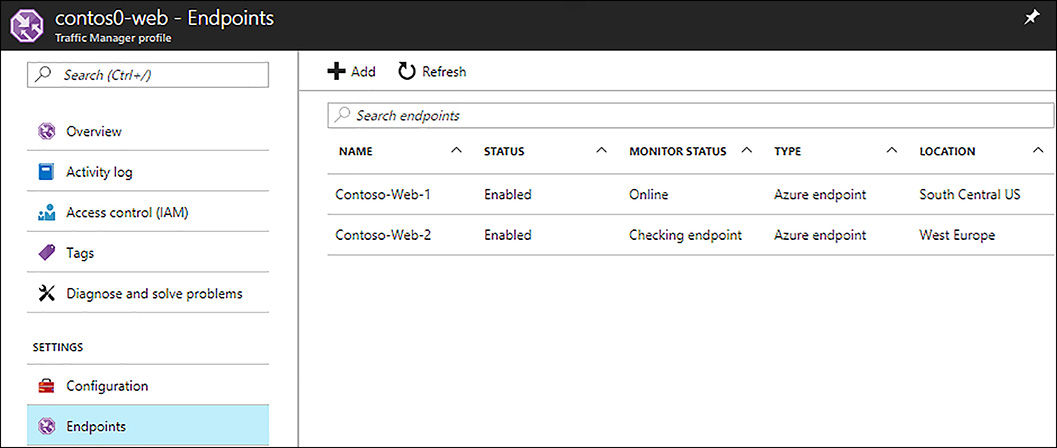
FIGURE 1-32 Traffic manager endpoints in the Azure portal
You can use PowerShell to add an endpoint by using the Get-AzureRmTrafficManagerProfile and New-AzureRmTrafficManagerEndpoint. The code below demonstrates adding an existing web app as an endpoint to a traffic manager profile.
$resourceGroupName = "contoso"
$webAppName = "contos0-web"
$newTmEndpointName = "Contoso-Web-1"
$newTmEndpointTarget = "contos0-web.azurewebsites.net"

# Get the current traffic manager profile
$tmProfile = Get-AzureRmTrafficManagerProfile -ResourceGroupName $resourceGroupName -Name $tmName

# Get a reference to an existing web app
$webApp = Get-AzureRmWebApp -ResourceGroupName $resourceGroupName -Name $webAppName

# Add the web app endpoint to the traffic manager profile
New-AzureRmTrafficManagerEndpoint -ResourceGroupName $resourceGroupName -ProfileName $tmProfile.Name `
    -Name $newTmEndpointName -Type AzureEndpoints -EndpointStatus Enabled `
    -TargetResourceId $webApp.Id
To remove an endpoint, use the Remove-AzureRmTrafficManagerEndpoint cmdlet as shown here.
# Get the current traffic manager profile
$tmProfile = Get-AzureRmTrafficManagerProfile -ResourceGroupName $resourceGroupName
 -Name $tmName

Remove-AzureRmTrafficManagerEndpoint -ResourceGroupName $resourceGroupName
-ProfileName $tmProfile.Name `
    -Name $newTmEndpointName -Type AzureEndpoints -Force
To disable an endpoint, use the Disable-AzureRmTrafficManagerEndpoint cmdlet as shown here.
# Get the current traffic manager profile
$tmProfile = Get-AzureRmTrafficManagerProfile -ResourceGroupName $resourceGroupName
 -Name $tmName

Disable-AzureRmTrafficManagerEndpoint -ResourceGroupName $resourceGroupName -ProfileName
 $tmProfile.Name `
    -Name $newTmEndpointName -Type AzureEndpoints -Force
Update DNS records for your custom domain
The last step to configuring Azure Traffic Manager is to update your custom domain to point to the Azure Traffic Manager DNS name using a CNAME record. As an example, assume your custom domain is contoso.com and your Azure Traffic Manager DNS name is contoso-web-tm.trafficmanager.net. Table 1-5 shows how the CNAME record should be configured in this scenario.
TABLE 1-5 Example DNS record for a custom domain and an Azure Traffic Manager DNS name
RECORD TYPE |
NAME |
VALUE |
CNAME |
contoso-web-tm.trafficmanager.net |
 EXAM TIP
As users navigate to an application configured with Azure Traffic Manager, there is not any actual traffic routed through Traffic Manager. When a user browses to a website configured with Azure Traffic Manager, such as www.contoso.com, the user’s DNS server will send a new DNS query to the DNS name for the Traffic Manager profile, such as contoso-web-tm.trafficmanager.net. The Traffic Manager DNS name servers receive this query. Based on the load balancing method in the Azure Traffic Manager profile, Traffic Manager will select an endpoint from the profile, and return a CNAME record mapping contoso-web-tm.trafficmanager.net to the DNS name for the selected endpoint, such as contoso-web-east.azurewebsites.net. The user’s DNS server will then resolve the endpoint DNS name to an IP address and return it to the user. The user’s browser then calls the selected website using the IP address. The domain and IP address are cached on the client machine, so subsequent requests to the website are sent directly to the website until the local DNS cache expires.
Thought experiment
In this thought experiment, apply what you have learned about this chapter. You can find answers to these questions in the next section.
You are the IT Administrator for Contoso and responsible for managing the Contoso website. The public-facing website today is running in a Shared mode hosting plan. The development team is about to release a new version of the web app that will require 3.5 GB of memory to perform as designed.
As part of this new release, the marketing team is planning to run some television commercials and radio ads to notify new and existing customers of the new features and services offered by Contoso. The expectation is that these ads will generate large demand spikes as they are run during the campaign.
Due to the frequency of changes, the business has indicated that the web application should be backed up 3 times per day (once every 8 hours).
You need to provide a solution to meet the resource requirements for the new website version and to support the traffic spikes expected during the marketing campaign.
How will you scale the app service plan to meet the new resource requirements?
How will you configure the web app to support the traffic spikes during the marketing campaign?
Thought experiment answers
This section contains the solution to the thought experiment.
The best pricing tier SKU for the app service plan to meet these requirements would be the Premium (P2) SKU. It meets the memory requirement of 3.5 GB. It also supports Autoscale which will be needed to support demand spikes. Finally, the requirement to backup multiple times per day is also met in the Premium tier. If the business only required daily backups, then the Standard (S2) SKU would be more cost effective. However, supporting multiple backups per day pushes this into the Premium tier.
You should use Azure Autoscale to sale out and in the number of instances to support the marketing campaign. You can create a metric-based autoscale condition and scale based on the number of requests, CPU, http queue length, or another metric that is useful for measuring load on the app service plan. Another option is to use a schedule-based autoscale condition, whereby you scale out the number of instances during the campaign and scale in the number of instances afterwards. Without additional information, it’s not possible to determine what the right number of instances should be before, during, and after the campaign. So, a combination of metric-based and scheduled-based autoscale conditions would be best.
Chapter summary
Azure web apps are created under the *.azurewebsites.net shared domain.
Adding deployment slots to a web app requires that the app service plan it runs on be in the Standard, Premium, or Isolated pricing tier.
App Service Environment is a feature of App Service that provides a virtual network for your app service application (web app for example) to run in. This allows you to use virtual network security controls such as network security groups, virtual appliances, user defined routes, etc. to protect the web app.
A web app has an implied production deployment slot by default. You can add additional deployment slots if your app service plan is standard, premium, or isolated.
When creating new deployment slots, you can clone the configuration settings from another deployment slot or create a new deployment slot with empty settings.
When swapping deployment slots, you can perform a single-phase swap or a multi-phase swap. The latter is recommended for mission critical workloads.
An app service plan defines the capacity (cores, memory, or storage) and features available to the web apps running on it.
Migrating web apps to a different app service plan requires that the target app service plan be in the same region and resource group as the source app service plan.
Web App Application Settings is where you can configure language versions for .NET Framework, PHP, Java, and Python. This is also where you can set the site to run in 32-bit or 64-bit mode, enable web sockets and the Always-On feature, and configure handler mappings.
Application settings and connection strings can be defined in the web app infrastructure and retrieved at application runtime using environment variables.
To configure a custom domain, you must first add an A record and/or CNAME record using your DNS registrar. For A records, you must also add a TXT record to verify domain ownership.
Azure Web Apps support Server Name Indication (SNI) SSL and IP-based SSL for web apps with a custom domain.
App Service Certificate SKU can be either Standard or Wild Card.
You can obtain an SSL certificate using App Service Certificate or separately through a 3rd party.
An App Service Certificate can only be used by other app services in the same subscription.
When you configure a SSL certificate for a web app, users can still access the web app using HTTP. To force HTTPS only traffic, a rewrite rule must be defined in the applications configuration file (or code).
Azure Web Apps provides two categories of diagnostic logs: application diagnostics and web server diagnostics. There are three web server diagnostic log files available: Web Server, Detailed Errors, and Failed Request.
When enabling application diagnostic logging, you must specify the logging level, which can be Error, Warning, Information, or Verbose.
Monitor web app resources when you need to monitor just the web app.
Monitor app service plan resources when you need to monitor metrics such as compute and memory that your web apps are running on.
Site Control Manager (Kudu) is a web app extension and is installed by default for every web app. It is accessible at https://<your site name>.scm.azurewebsites.net. To authenticate, sign-in using the same credentials you use to sign-in to the Azure portal.
Use Application Insights to monitor performance metrics, availability, and how users are using the application.
Use Application Insights and client-side JavaScript to capture client-side telemetry data such as page load times, outbound AJAX call duration, and browser exceptions.
Availability tests enable you to test the availability of your web app from multiple regions and monitor the duration of the tests.
Use alerts to notify subscription administrators or others of potential performance, availability, or Azure service issues.
Azure Web App backups can be used to back up web app configuration, file content, and databases.
Azure Web App backups can be performed on-demand or on a schedule.
Azure Web App backups can be restored over the existing web app or to a different web app environment.
Scaling up an app service plan within a pricing tier increases the number of cores and RAM.
Scaling out an app service plan increases the number in instances.
Autoscale can be configured to scale on a schedule or based on a metric.
The metric source of a metric-based scale rule determines the metrics available.
Traffic Manager provides support for the following routing methods: Performance, Weighted, Priority, and Geographic.
Traffic Manager is not a load balancer. It is an advanced DNS query resolver that resolves DNS queries based on the traffic manager profile settings.
