CHAPTER 3
Design and implement a storage strategy
Implementing storage is one of the most important aspects of building or deploying a new solution using Azure. There are several services and features available for use, and each has their own place. Azure Storage is the underlying storage for most of the services in Azure. It provides service for storage and retrieval of files and also has services that are available for storing large volumes of data through tables, and a fast-reliable messaging service for application developers with queues. In this chapter we’ll review how to design a storage strategy with an emphasis on Azure Storage blobs and files as well as introducing Azure Data Lake store, emphasizing how to protect the data you store in it.
Skills covered in this chapter
Skill 3.1: Implement Azure Storage blobs and files
Azure Storage accounts expose two services for storing files blobs and files. The blob storage service allows application developers and tools that use the Azure Storage API to store files directly in storage. The second service, Azure files, allows for file access through the Server Message Block (SMB) protocol. This allows you to access files in an Azure Storage account as you would a traditional file share through a mapped drive or a UNC path.
This skill covers how to:
Manage blob storage
Use the async blob copy service
Manage SMB File Storage
Configure the Content Delivery Network (CDN)
Configure custom domains for storage and CDN
Manage blob storage
Azure blob storage is a service for storing unstructured data such as text files, videos, or as we saw in Chapter 2, “Create and manage compute resources,” virtual hard disk files for virtual machines. A storage account exposes multiple endpoints, one for each of the services it exposes:
https://[account name].blob.core.windows.net (blob)
https://[account name].table.core.windows.net (table)
https://[account name].queue.core.windows.net (queue)
https://[account name].file.core.windows.net (file)
NOTE SSL JUST WORKS
Each Azure storage endpoint can be accessed via HTTP or HTTPS (SSL) by default. No additional configuration is needed to access blobs through the HTTPS endpoint.
Figure 3-1 shows some of the concepts of a storage account. Each blob storage account can have one or more containers and all blobs must be uploaded to a container. Containers are similar in concept to a folder on your computer, in that they are used to group blobs within a storage account. There can be a container at the base of the storage account, appropriately named root, and there can be containers one level down from the root container.

FIGURE 3-1 Azure Storage account entities and hierarchy relationships
NOTE CREATING BLOB HIERARCHIES WITH FOLDERS
The blob service in Azure Storage is based on a flat storage scheme. Creating a container one level below the root is the only true level of a container. You can specify a delimiter as part of the blob name to create your own virtual hierarchy. For example, you can create a blob named /January/Reports.txt and /February/Reports.txt, and a filter based on /January or /February in most tools that support Azure Storage. Most storage tools, such as the portal and storage explorer, allow you to create folders within a container, but they are actually being clever with the name of the blob itself.
The root container
To create a container at the root of the storage account, specify the special name $root for the container name. This allows you to store blobs in the root of the storage account and reference them with URLs such as: https://[account name].blob.core.windows.net/fileinroot.txt.
Storage account types
A storage account can be created as a general purpose or a blob storage account. A general-purpose account can be created as standard or premium and supports all Azure Storage Services. The blob storage account is a specialized storage account used to store block blobs and append blobs. You can’t store page blobs in these accounts, therefore you can’t store VHD files. These accounts allow you to set an access tier to hot or cool; the tier can be changed at any time.
The hot access tier is used for files that are accessed frequently, so you pay a higher cost for storage, but the cost of accessing blobs is much lower. You pay a higher cost for accessing blobs stored in the cool access tier, but the cost of actual storage is much lower. Table 3-1 shows which services are supported with each type of storage account.
TABLE 3-1 Storage account types and their supported blob types
Storage account type |
General-purpose Standard |
General-purpose Premium |
Blob storage, hot and cool access tiers |
Services |
Blob, File, Queue Services |
Blob Service |
Blob Service |
Types of blobs |
Block blobs, page blobs, and append blobs |
Page blobs |
Block blobs and |
Understanding blob types
Blobs come in three types, and it is important to understand when each type of blob should be used and what the limitations are for each.
Page blobs are a collection of 512-byte pages optimized for random read and write operations. The maximum size for a page blob is eight terabytes TB. Virtual machine hard disks are created as page blobs, which can be stored in a standard or premium storage account.
Block blobs are designed for efficient uploading. Block blobs are comprised of blocks that can be written to and committed as a set. The maximum size for a block blob is slightly more than 4.75 TB. They are used for files such as videos, images, and text.
Append blobs are comprised of blocks and are optimized for append operations. This is useful for operations that only require writing to the end of the file such as a logging system. When you modify an append blob, blocks are added to the end of the blob only, using the append block operation. Updating or deleting existing blocks is not supported. Unlike a block blob, an append blob does not expose its block IDs.
 EXAM TIP
The type of the blob is set at creation and cannot be changed after the fact. A common problem that may show up on the exam is if a .vhd file was accidently uploaded as a block blob instead of a page blob. The blob would have to be deleted first and reuploaded as a page blob before it could be mounted as an OS or Data Disk to an Azure VM.
MORE INFO BLOB TYPES
You can learn more about the intricacies of each blob type here: https://docs.microsoft.com/en-us/rest/api/storageservices/understanding-block-blobs--append-blobs--and-page-blobs.
Setting metadata with storage
Within Azure Storage, blobs and containers support setting additional metadata properties for both system and user purposes. For instance, a system purpose is the last modified date of an object, whereas a user-defined metadata property may be storing the name or IP address of the server that stored the blob for later lookup.
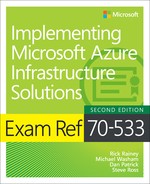
You can set and retrieve the metadata on both containers and blobs through the Azure SDK or the REST API. Azure Storage Explorer supports setting metadata at the blob level. Figure 3-2 shows using Storage Explorer to add a custom metadata property named Author with a value of Michael Washam.
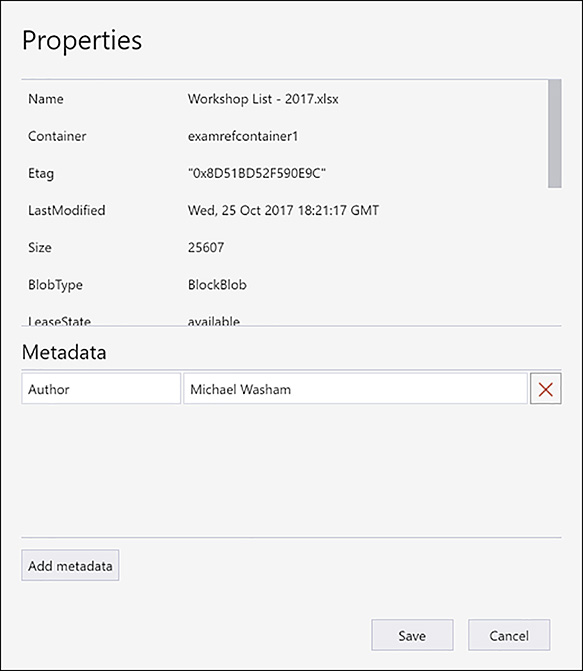
FIGURE 3-2 Setting metadata on a blob using Azure Storage Explorer
MORE INFO AZURE STORAGE EXPLORER
Azure Storage Explorer is a GUI based tool that runs on Windows, Mac and Linux. It provides capabilities to manage blobs and files as well as tables and queues on your storage account. You can download Azure Storage Explorer and learn more about its feature set here: https://azure.microsoft.com/en-us/features/storage-explorer/.
MORE INFO SETTING CONTAINER METADATA
There are currently no tools from Microsoft that allow you to set metadata directly on a container. There are REST APIs that support this, and you can also set them using the .NET SDK for Azure Storage. See the following for an example of setting metadata using the REST API: https://docs.microsoft.com/en-us/rest/api/storageservices/set-container-metadata.
Managing blobs and containers (Azure Portal)
You can create a container through the Azure Management Portal, Azure Storage Explorer, third-party storage tools, or through the command line tools. To create a container in the Azure Management Portal, open a storage account by clicking Browse > Storage Accounts, and then type the name of your storage account. Within the storage account blade, click the Containers tile, and then click the + Container button, as shown in Figure 3-3. The access level can be changed later, and will be discussed in more detail in Skill 3.2.

FIGURE 3-3 Creating a container using the Azure Management Portal
After a container is created, you can also use the portal to upload blobs to the container as demonstrated in Figure 3-4. Click the Upload button in the container and then browse to the blob to upload. If you click the Advanced button you can select the blob type (blob, page or append), the block size, and optionally a folder to upload the blob to.
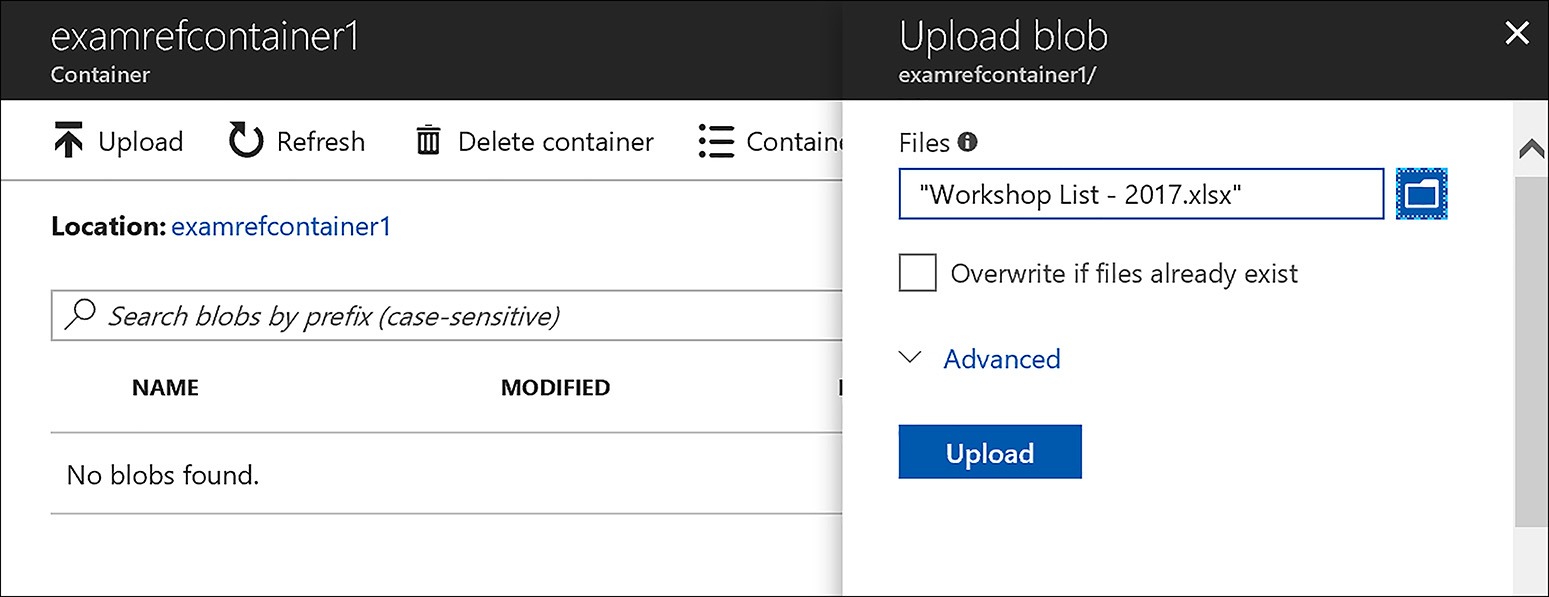
FIGURE 3-4 The Azure Management Portal uploads a blob to a storage account container
Managing blobs and containers (PowerShell)
To create a container using the Azure PowerShell cmdlets, use the New-AzureStorageContainer cmdlet, as shown in the following example. This cmdlet uses a storage context object that contains the name of the storage account and the storage account key to authenticate to Azure. To specify the Private access type, specify the value Off to the Permission parameter. Blob and Container, other access types, are the same using PowerShell.
$storageAccount = "[storage account name]"
$resourceGroup = "[resource group name]"
$storageKey = Get-AzureRmStorageAccountKey -ResourceGroupName $resourceGroup `
                                           -StorageAccountName $storageAccount
$context = New-AzureStorageContext -StorageAccountName $storageAccount `
                                      -StorageAccountKey $storageKey.Value[0]
New-AzureStorageContainer -Context $context `
                          -Name "examrefcontainer1" `
                          -Permission Off
You can use the PowerShell cmdlets to upload a file as well using the Set-AzureStorageBlobContent cmdlet as shown in the following example.
$containerName = "[storage account container]"$blobName = "[blob name]"
$localFileDirectory = "C:SourceFolder"
$localFile = Join-Path $localFileDirectory $BlobName
Set-AzureStorageBlobContent -File $localFile `
                            -Container $ContainerName `
                            -Blob $blobName `
                            -Context $context
MORE INFO MANAGING BLOB STORAGE WITH POWERSHELL
The Azure PowerShell cmdlets offer a rich set of capabilities for managing blobs in storage. You can learn more about their capabilities here: https://docs.microsoft.com/en-us/azure/storage/blobs/storage-how-to-use-blobs-powershell.
Managing blobs and containers (CLI)
The Azure CLI tools can also be used to create a storage account container with the az storage container create command. The public-access parameter is used to set the permissions. The supported values are off, blob, and container.
storageaccount = "[storage account name]"
containername = "[storage account container]"
az storage container create --account-name $storageaccount --name $containername --public-access off
You can use the Azure CLI to upload a file as well using the az storage blob upload command as shown in the following example.
container_name="[storage account container]"
file_to_upload="C:SourceFolder[blob name]"
blob_name="[blob name]"
az storage blob upload --container-name $container_name --file $file_to_upload
--name $blob_name
MORE INFO MANAGING BLOB STORAGE WITH THE AZURE CLI
The Azure CLI also offers a rich set of capabilities for managing blobs in storage. You can learn more about their capabilities here: https://docs.microsoft.com/en-us/azure/storage/common/storage-azure-cli.
Managing blobs and containers (Storage Explorer)
Azure Storage Explorer is a cross platform application that allows you to manage storage accounts, including copying data between storage accounts and uploading and downloading data. It also allows you to create and manage permissions on a storage account container. To create a container, expand the Storage Accounts node, and expand the storage account you want to use, right-clicking on the Blob Containers node. This will open a new menu item where you can create a blob container as shown in Figure 3-5.

FIGURE 3-5 Creating a container using the Azure Storage Explorer
Azure Storage Explorer provides the ability to upload a single file or multiple files at once. The Upload Folder feature provides the ability to upload all of the files and folders, recreating the hierarchy in the Azure Storage Account. Figure 3-6 shows the two upload options.

FIGURE 3-6 Uploading files and folders using Azure Storage Explorer
Managing blobs and containers (AzCopy)
AzCopy is a command line utility that can be used to copy data to and from blob, file, and table storage, and also provides support for copying data between storage accounts. AzCopy is designed for optimal performance, so it is commonly used to automate large transfers of files and folders. There are two versions of AzCopy: one for Windows and one for Linux.
The following example shows how you can use AzCopy to download a single blob from a container to a local folder. In this example, key would need to be replaced with the actual storage account key for the command to complete.
AzCopy /Source:https://[source storage].blob.core.windows.net/[source container]
 /Dest:C:destFolder /SourceKey:key /Pattern:"Workshop List - 2017.xlsx"
This example shows how you can switch the /Dest and /Source parameters to upload the file instead.
AzCopy /Source:C:sourceFolder /Dest:https://[dest storage].blob.core.windows.net/
[dest container] /DestKey:key /Pattern:"Workshop List - 2017.xlsx"
MORE INFO AZCOPY EXAMPLES
AzCopy provides many capabilities beyond simple uploading and downloading of files. For more information see the following: https://docs.microsoft.com/en-us/azure/storage/common/storage-use-azcopy.
Understanding storage account replication options
You can set an Azure Storage account to one of the types shown in Table 3-2.
TABLE 3-2 Storage account replication options
Account Type |
Description |
Standard_LRS (Locally redundant storage) |
Makes three synchronous copies of your data within a single data center. Applicable to general purpose or blob storage accounts. |
Standard_ZRS (Zone redundant storage) |
Stores three copies of data across multiple datacenters within or across regions. For block blobs only. Applicable to general purpose storage accounts. |
Standard_GRS (Geographically redundant storage) |
Same as LRS (three copies local), plus three additional asynchronous copies to a second data center hundreds of miles away. Applicable to general purpose or blob storage accounts. |
Standard_RAGRS (Read-access geographically redundant storage) |
Same capabilities as GRS, plus you have read access to the data in the secondary data center. Applicable to general purpose or blob storage accounts. |
Premium_LRS (Locally redundant storage) |
Same as Standard_LRS, but is for a Premium storage account. This is currently the only replication option available for a Premium storage account and is only available on general purpose storage accounts. Only page blobs are supported in a Premium storage account. |
You can set the replication type for a storage account after it is created through the Azure portal by clicking the Configuration link on the storage account and selecting the replication type. It can also be set during the creation of a storage account as shown in Figure 3-8. A Premium storage account can only be set to Premium_LRS and a Zone Redundant Storage account can only be set to Standard_ZRS.
To set the value using the Azure PowerShell cmdlets, use the Type parameter of New-AzureStorageAccount (at creation) or the Set-AzureStorageAccount cmdlets (after creation), as shown in the following example.
$accountName = "[storage account name]"
$location    = "West US"
$type        = "Standard_LRS"
New-AzureStorageAccount -StorageAccountName $accountName `
                        -Location $location `
                        -Type $type
$type        = "Standard_RAGRS"
Set-AzureStorageAccount -StorageAccountName $accountName `
                        -Type $type
NOTE STANDARD_ZRS AND BLOCK BLOBS
You cannot change the Standard ZRS (zone replicated) to any other storage account type and vice versa. Zone replicated storage accounts only support block blobs.
Using the async blob copy service
The async blob copy service is a server-side based service that can copy files you specify from a source location to a destination in an Azure Storage account. The source blob can be located in another Azure Storage account, or it can even be outside of Azure, as long as the storage service can access the blob directly for it to copy. This service uses excess bandwidth and does not offer an SLA on when the copy will complete. There are several ways to initiate a blob copy using the async blob copy service.
Async blob copy (PowerShell)
Use the Start-AzureStorageBlobCopy cmdlet to copy a file using PowerShell. This cmdlet accepts either the source URI (if it is external), or as the example below shows, the blob name, container, and storage context to access the source blob in an Azure Storage account. The destination requires the container name, blob name, and a storage context for the destination storage account.
$blobCopyState = Start-AzureStorageBlobCopy -SrcBlob $blobName `
                                            -SrcContainer $srcContainer `
                                            -Context $srcContext `
                                            -DestContainer $destContainer `
                                            -DestBlob $vhdName `
                                            -DestContext $destContext
Let’s review the parameters in the preceding example:
SrcBlob expects the file name of source file to start copying.
SrcContainer is the container the source file resides in.
Context accepts a context object created by the New-AzureStorageContext cmdlet. The context has the storage account name and key for the source storage account and is used for authentication.
DestContainer is the destination container to copy the blob to. The call will fail if this container does not exist on the destination storage account.
DestBlob is the filename of the blob on the destination storage account. The destination blob name does not have to be the same as the source.
DestContext also accepts a context object created with the details of the destination storage account including the authentication key.
Here is a complete example of how to use the Start-AzureStorageBlob copy cmdlet to copy a blob between two storage accounts.
$blobName            = "[file name]"
$srcContainer       = "[source container]"
$destContainer      = "[destination container]"
$srcStorageAccount  = "[source storage]"
$destStorageAccount = "[dest storage]"
$sourceRGName       = "[source resource group name]"
$destRGName          = "[destination resource group name]"
$srcStorageKey = Get-AzureRmStorageAccountKey -ResourceGroupName $sourceRGName
-Name $srcStorageAccount
$destStorageKey = Get-AzureRmStorageAccountKey -ResourceGroupName $destRGName
 -Name $destStorageAccount
$srcContext = New-AzureStorageContext -StorageAccountName $srcStorageAccount `
                                      -StorageAccountKey $srcStorageKey.Value[0]
$destContext = New-AzureStorageContext -StorageAccountName $destStorageAccount `
                                      -StorageAccountKey $destStorageKey.Value[0]
New-AzureStorageContainer -Name $destContainer `
                          -Context $destContext
$copiedBlob = Start-AzureStorageBlobCopy -SrcBlob $blobName `
                                         -SrcContainer $srcContainer `
                                         -Context $srcContext `
                                         -DestContainer $destContainer `
                                         -DestBlob $blobName `
                                         -DestContext $destContext
There are several cmdlets in this example. The Get-AzureRmStorageKey cmdlet accepts the name of a storage account and the resource group it resides in. The return value contains the storage account’s primary and secondary authentication keys in the .Value array of the returned object. These values are passed to the New-AzureStorageContext cmdlet, including the storage account name, and the creation of the context object. The New-AzureStorageContainer cmdlet is used to create the storage container on the destination storage account. The cmdlet is passed the destination storage account’s context object ($destContext) for authentication.
The final call in the example is the call to Start-AzureStorageBlobCopy. To initiate the copy this cmdlet uses the source (Context) and destination context objects (DestContext) for authentication. The return value is a reference to the new blob object on the destination storage account.
Pipe the copied blob information to the Get-AzureStorageBlobCopyState cmdlet to monitor the progress of the copy as shown in the following example.
$copiedBlob | Get-AzureStorageBlobCopyState
The return value of Get-AzureStorageBlobCopyState contains the CopyId, Status, Source, BytesCopied, CompletionTime, StatusDescription, and TotalBytes properties. Use these properties to write logic to monitor the status of the copy operation.
MORE INFO MORE EXAMPLES WITH POWERSHELL
There are many variations for using the async copy service with PowerShell. For more information see the following: https://docs.microsoft.com/en-us/powershell/module/azure.storage/start-azurestorageblobcopy.
Async blob copy (CLI)
The Azure CLI tools support copying data to storage accounts using the async blob copy service. The following example uses the az storage blob copy start command to copy a blob from one storage account to another. This example is very similar to the PowerShell example in the previous section. For authentication the command requires the storage account name and key for the source (if the blob is not available via public access) and the destination. The storage account key is retrieved using the az storage account keys list command.
blobName="[file name]"
srcContainer="[source container]"
destContainer="[destination container]"
srcStorageAccount="[source storage]"
destStorageAccount="[destination storage]"
az storage blob copy start
   --account-name "$destStorageAccount"
   --account-key "$destStorageKey"
   --destination-blob "$blobName"
   --destination-container "$destContainer"
   --source-account-name "$srcStorageAccount"
   --source-container "$srcContainer"
   --source-blob "$blobName"
     --source-account-key "$srcStorageKey"
After the copy is started, you can monitor the status using the az storage blob show command as shown in the following example.
az storage blob show
   --account-name "$destStorageAccount"
   --account-key "$destStorageKey"
   --container-name "$destContainer"
    --name "$blobName"
MORE INFO MORE EXAMPLES WITH CLI
There are many variations for using the async copy service with the Azure CLI. For more information see the following: https://docs.microsoft.com/en-us/cli/azure/storage/blob/copy.
Async blob copy (AzCopy)
The AzCopy application can also be used to copy between storage accounts. The following example shows how to specify the source storage account using the /source parameter and/sourcekey, and the destination storage account and container using the /dest parameter and/DestKey.
AzCopy /Source:https://[source storage].blob.core.windows.net/[source container]/
 /Dest:https://[destination storage].blob.core.windows.net/[destination container]/
 /SourceKey:[source key] /DestKey:[destination key] /Pattern:*.vhd
AzCopy offers a feature to mitigate the lack of SLA with the async copy service. The /SyncCopy parameter ensures that the copy operation gets consistent speed during a copy. AzCopy performs the synchronous copy by downloading the blobs to copy from the specified source to local memory, and then uploading them to the Blob storage destination.
AzCopy /Source:https://[source storage].blob.core.windows.net/[source container]/
 /Dest:https://[destination storage].blob.core.windows.net/[destination container]/
 /SourceKey:[source key] /DestKey:[destination key] /Pattern:*.vhd /SyncCopy
Async blob copy (Storage Explorer)
The Azure Storage Explorer application can also take advantage of the async blob copy service. To copy between storage accounts, navigate to the source storage account, select one or more files and click the copy button on the tool bar. Then navigate to the destination storage account, expand the container to copy to, and click Paste from the toolbar. In Figure 3-7, the Workshop List – 2017.xlsx blob was copied from examrefstorageexamrefcontainer1 to examrefstorage2examrefdestation using this technique.

FIGURE 3-7 Using the async blob copy service with StorageExplorer
Manage SMB File Storage
The Microsoft Azure file service offers the ability to create file shares (up to 5 TB) that use the SMB version 3.0 protocol directly in an Azure Storage account. The shares can be accessed using regular file share methods, such as a mapped drive or file I/O APIs and commands. Figure 3-8 shows the hierarchy of files stored in Azure files.
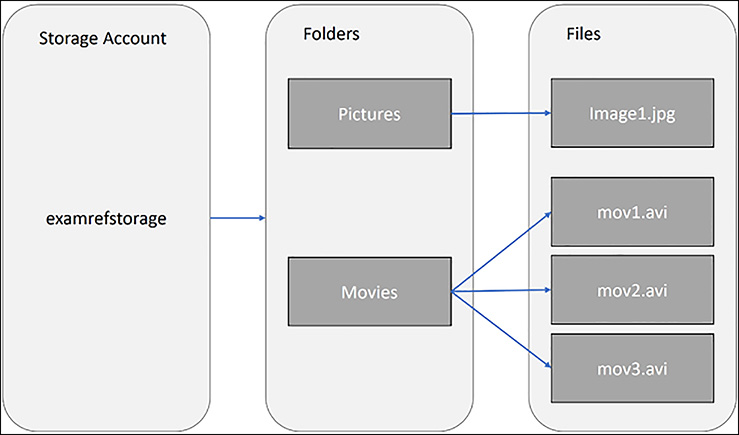
FIGURE 3-8 Azure files entities and relationship hierarchy
There are several common use cases for using Azure files. A few examples include the following:
Migration of existing applications that require a file share for storage.
Shared storage of files such as web content, log files, application configuration files, or even installation media.
To create a new file share using the Azure portal, open the blade for a storage account, click the Files tile, and then click the + File Share button, as shown in Figure 3-9.

FIGURE 3-9 Adding a new share with Azure files
To create a share using the Azure PowerShell cmdlets, use the following code:
$storageAccount = "[storage account]"
$rgName = "[resource group name]"
$shareName = "contosoweb"
$storageKey = Get-AzureRmStorageAccountKey -ResourceGroupName $rgName -Name
 $storageAccount
$ctx = New-AzureStorageContext -StorageAccountName $storageAccount `
                               -StorageAccountKey $storageKey.Value[0]
New-AzureStorageShare -Name $shareName -Context $ctx
The Azure CLI tools can also be used to create a file share as the following example demonstrates:
rgName="[resource group name]"
storageAccountName="[storage account]"
shareName="contosoweb"
constring=$(az storage account show-connection-string -n $storageAccountName -g
$rgName --query 'connectionString' -o tsv)
az storage share create --name $shareName --quota 2048 --connection-string $constring
To access a share created in Azure files from a Windows machine, you should store the storage account name and key using the Cmdkey.exe utility. This allows you to associate the credentials with the URI to the Azure files share. The syntax for using Cmdkey.exe is shown in the following example.
cmdkey.exe /add:[storage account name].file.core.windows.net /user:[storage account
 name] /pass:[storage account key]
After the credentials are stored, use the net use command to map a drive to the file share, as shown in the following example.
net use z: \examrefstorage.file.core.windows.netcontosoweb
To access an Azure File share from a Linux machine you need to install the cifs-utils package from the Samba project.
On Ubuntu and Debian-based distributions, use the apt-get package manager to install the package as the following example shows:
sudo apt-get update
sudo apt-get install cifs-utils
On RHEL and CentOS, use the yum package manager:
sudo yum install samba-client samba-common cifs-utils
On openSUSE, use the zypper package manager:
sudo zypper install samba*
After the cifs-utils package is installed create a mount point for the share:
mkdir mymountpoint
Next, you will mount the Azure File Share to the mount point.
sudo mount -t cifs //[storage account name].file.core.windows.net/[share name]
 ./mymountpoint -o vers=2.1,username=[storage account name],password=
[storage account key],dir_mode=0777,file_mode=0777,serverino
MORE INFO PORT 445
Azure files use the SMB protocol. SMB communicates over TCP port 445; check to see if your firewall is not blocking TCP ports 445 from a client machine or that your ISP doesn’t block this port if you are trying to connect to the file share over the internet.
Configuring the Content Delivery Network
Use the Azure Content Delivery Network (CDN) to deliver static content such as images, text, or media closer to your users. To store content in a CDN endpoint you first create a new CDN endpoint. To do this using the Azure portal click New, Web + Mobile, CDN and then provide a name for the CDN Profile, the name of the resource group, as well as the region and pricing tier. Figure 3-10 shows the creation dialog.
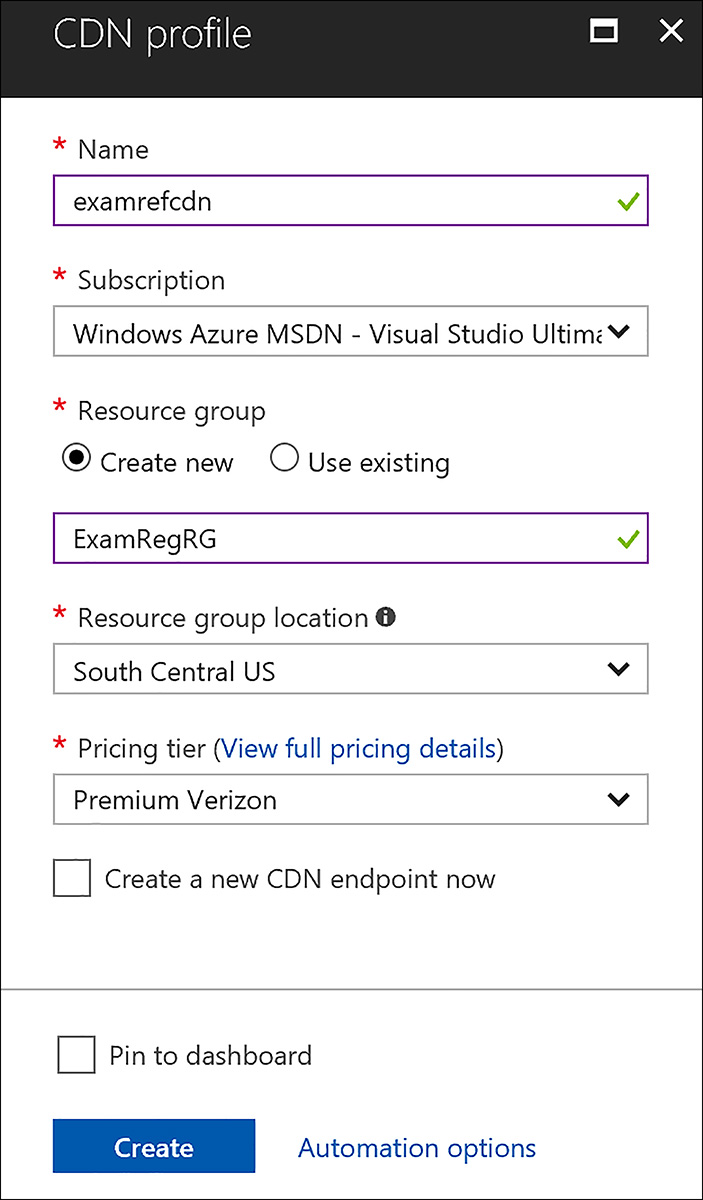
FIGURE 3-10 Creating a CDN profile using the Azure portal
MORE INFO AZURE CDN PRICING TIERS
Currently, there are three pricing tiers: Standard Akamai, Standard Verizon, and Premium Verizon. The Azure CDN overview page has a comprehensive list of the different features and capabilities of the tiers: https://docs.microsoft.com/en-us/azure/cdn/cdn-overview.
After the CDN profile is created, you next add an endpoint to the profile. Add an Endpoint by opening the CDN profile in the portal and click the + Endpoint button. On the creation dialog, specify a unique name for the CDN endpoint, and the configuration for the origin such as the type (Storage, Web App, Cloud Service, or Custom), the host header and the origin port for HTTP and HTTPS), and then click the Add button. Figure 3-11 shows an endpoint using an Azure Storage account as the origin type.
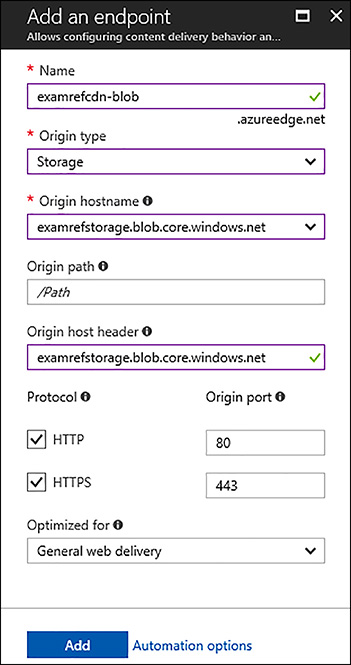
FIGURE 3-11 Creating a CDN endpoint using the Azure portal
Blobs stored in public access enabled containers are replicated to the CDN edge endpoints. To access the content within the CDN, instead of your storage account, change the URL for the blob to reference the absolute path of the created CDN endpoint combined with the relative path of the original file, as shown in the following:
Original URL within storage
New URL accessed through CDN
Figure 3-12 shows how this process works at a high level. For example, a file named Logo.png that was originally in the imgs public container in Azure Storage can be accessed through the created CDN endpoint. Figure 3-12 also shows the benefits of a user accessing the file from the United Kingdom to the storage account in the West US versus accessing the same file through a CDN endpoint, which will resolve much closer to the user.

FIGURE 3-12 Accessing content from a CDN instead of a storage account
The additional benefit of using a CDN goes beyond deploying your content closer to users. A typical public-facing web page contains several images and may contain additional media such as .pdf files. Each request that is served from the Azure CDN means it is not served from your website, which can remove a significant amount of load.
Managing how long content stays in the CDN is different depending on if your origin domain is from an Azure storage account, or an Azure cloud service, or an Azure web app.
For content served from a web site, set the CacheControl HTTP header. This setting can be set programmatically when serving up the content, or by setting the configuration of the web app.
Manage the content expiration through storage by setting the time-to-live (TTL) period of the blob itself. Figure 3-13 demonstrates how using Storage Explorer you can set the CacheControl property on the blob files directly. You can also set the property using Windows PowerShell or the CLI tools when uploading to storage.

FIGURE 3-13 Setting the CacheControl property of a blob using Azure Storage Explorer
EXAM TIP
You can control the expiration of blob data in the CDN by setting the CacheControl metadata property of blobs. If you do not explicitly set this property the default value is seven days before the data is refreshed or purged if the original content is deleted.
MORE INFO MANAGING THE TIME-TO-LIVE (TTL) OF CDN CONTENT
You can learn more about how to programmatically set the CacheControl HTTP header for web apps here: https://docs.microsoft.com/en-us/azure/cdn/cdn-manage-expiration-of-cloud-service-content. And learn about using PowerShell and the CLI tools here https://docs.microsoft.com/en-us/azure/cdn/cdn-manage-expiration-of-blob-content.
Versioning assets with Azure CDN
To remove content from the CDN altogether, there are three approaches, depending on how the content has been added. If the content is stored in storage, you can set the container to private, or delete the content from the container, or even delete the container itself. If the content is in a cloud service or an Azure web app, you can modify the application to no longer serve the content. You can also purge the content directly from the CDN endpoint. Keep in mind that even if the content is deleted from storage, or no longer accessible from your web application, it will remain in the CDN endpoint until its TTL has expired. To immediately remove it from the CDN, you should purge the content as shown in Figure 3-14.
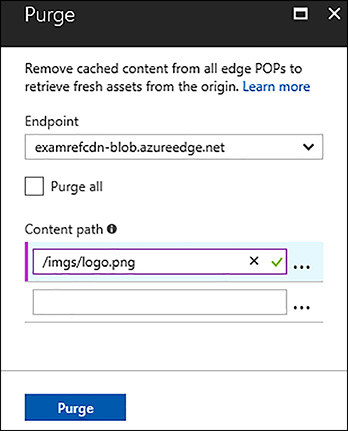
FIGURE 3-14 Purging a file from the Azure CDN
EXAM TIP
The Content path of the CDN purge dialog supports specifying regular expressions and wildcards to purge multiple items at once. Purge all and Wildcard purge are not currently supported by Azure CDN from Akamai. You can see examples of expressions here: https://docs.microsoft.com/en-us/azure/cdn/cdn-purge-endpoint.
Using query strips is another technique for controlling information cached in the CDN. For instance, if your application hosted in Azure cloud services or Azure web apps has a page that generates content dynamically, such as: http://[CDN Endpoint].azureedge.net/chart.aspx. You can configure query string handling to cache multiple versions, depending on the query string passed in. The Azure CDN supports three different modes of query string caching configuration:
Ignore query strings This is the default mode. The CDN edge node will pass the query string from the requestor to the origin on the first request and cache the asset. All subsequent requests for that asset that are served from the edge node will ignore the query string until the cached asset expires.
Bypass caching for URL with query strings In this mode, requests with query strings are not cached at the CDN edge node. The edge node retrieves the asset directly from the origin and passes it to the requestor with each request.
Cache every unique URL This mode treats each request with a query string as a unique asset with its own cache. For example, the response from the origin for a request for foo.ashx?q=bar is cached at the edge node and returned for subsequent caches with that same query string. A request for foo.ashx?q=somethingelse is cached as a separate asset with its own time to live.
EXAM TIP
By default, assets are first cached as they are requested. This means that the first request from each region may take longer, since the edge servers will not have the content cached and will need to forward the request to the origin server. Pre-loading content avoids this first hit latency. If you are using Azure CDN from Verizon you can pre-load assets to mitigate this initial lag.
Configuring custom domains for storage and CDN
Both an Azure storage account and an Azure CDN endpoint allow you to specify a custom domain for accessing blob content instead of using the Azure URLs (blob.core.windows.net and azureedge.net). To configure either service, you must create a new CNAME record with the DNS provider that is hosting your DNS records.
For example, to enable a custom domain for the blobs.contoso.com sub domain to an Azure storage account, create a CNAME record that points from blobs.contoso.com to the Azure storage account [storage account].blob.core.windows.net. Table 3-3 shows an example mapping in DNS.
TABLE 3-3 Mapping a domain to an Azure Storage account in DNS
CNAME RECORD |
TARGET |
blobs.contoso.com |
contosoblobs.blob.core.windows.net |
Mapping a domain that is already in use within Azure may result in minor downtime as the domain is updated. If you have an application with an SLA, by using the domain you can avoid the downtime by using a second option to validate the domain. Essentially, you use an intermediary domain to validate to Azure that you own the domain by performing the same process as before, but instead you add an intermediary step of using the asverify subdomain. The asverify subdomain is a special subdomain recognized by Azure. By prepending asverify to your own subdomain, you permit Azure to recognize your custom domain without modifying the DNS record for the domain. After you modify the DNS record for the domain, it will be mapped to the blob endpoint with no downtime.
After the asverify records are verified in the Azure portal, you then add the correct DNS records. You can then delete the asverify records, because they are no longer used. Table 3-4 shows the example DNS records created when using the asverify method.
TABLE 3-4 Mapping a domain to an Azure Storage account in DNS with the asverify intermediary domain
CNAME RECORD |
TARGET |
asverify.blobs.contoso.com |
asverify.contosoblobs.blob.core.windows.net |
blobs.contoso.com |
contosoblobs.blob.core.windows.net |
To enable a custom domain for an Azure CDN endpoint, the process is almost identical. Create a CNAME record that points from cdn.contoso.com to the Azure CDN endpoint [CDN endpoint].azureedge.net. Table 3-5 shows mapping a custom CNAME DNS record to the CDN endpoint.
TABLE 3-5 Mapping a domain to an Azure CDN endpoint in DNS
CNAME RECORD |
TARGET |
cdncontent.contoso.com |
examrefcdn.azureedge.net |
The cdnverify intermediate domain can be used just like asverify for storage. Use this intermediate validation if you’re already using the domain with an application because updating the DNS directly can result in downtime. Table 3-6 shows the CNAME DNS records needed for verifying your domain using the cdnverify subdomain.
TABLE 3-6 Mapping a domain to an Azure CDN endpoint in DNS with the cdn intermediary domain
CNAME RECORD |
TARGET |
cdnverify.cdncontent.contoso.com |
cdnverify.examrefcdn.azureedge.net |
cdncontent.contoso.com |
examrefcdn.azureedge.net |
After the DNS records are created and verified you then associate the custom domain with your CDN endpoint or blob storage account.
EXAM TIP
Azure Storage does not yet natively support HTTPS with custom domains. You can currently use the Azure CDN to access blobs with custom domains over HTTPS.
MORE INFO CONFIGURING CUSTOM DOMAINS FOR STORAGE AND CDN
You can learn more about configuring custom domains for storage here :https://docs.microsoft.com/en-us/azure/storage/blobs/storage-custom-domain-name. And you can learn more about the Azure CDN here: https://docs.microsoft.com/en-us/azure/cdn/cdn-map-content-to-custom-domain.
Skill 3.2: Manage access
There are several techniques for controlling access to objects within an Azure storage account. Using the authentication key and storage account name is one technique. Granting access using a shared access signature or via a policy to allow granular access with an expiration is another technique. A new capability called Virtual Network Service Endpoints provides the ability to restrict access to storage accounts only from specific networks in your virtual network or from your on-premises network. In addition to granting access, understanding how to update (rollover) storage keys for security purposes and revoking access is of vital importance, and is the focus of Skill 3.2.
This skill covers how to:
Manage storage account keys
Create and use shared access signatures
Use a stored access policy
Configure Virtual Network Service Endpoints
Manage storage account keys
By default, every request to an Azure storage account requires authentication. The only exception was briefly mentioned in Skill 3.1, which discussed how by setting the security policy, you can optionally enable anonymous access at the container level for blob storage. The available options for this security policy are described in Table 3-7.
TABLE 3-7 Container permissions and resulting access
Access Type |
Resulting access |
Private/Off |
No anonymous access (default) |
Blob |
Access blobs via anonymous requests |
Container |
List and access blobs via anonymous requests |
There are several options available for authenticating users, which provide various levels of access. The first type of authentication is by using the Azure storage account name and authentication key. With the storage account name and key, you have full access to everything within the storage account. You can create, read, update, and delete containers, blobs, tables, queues, and file shares. You have full administrative access to everything other than the storage account itself (you cannot delete the storage account or change settings on the storage account, such as its type).
To access the storage account name and key, open the storage account from within the Azure portal and click the Keys tile. Figure 3-15 shows the primary and secondary access keys for the Examrefstorage Storage Account. With this information, you can use storage management tools like Storage Explorer, or command-line tools like Windows PowerShell, CLI, and AzCopy.exe to manage content in the storage account.
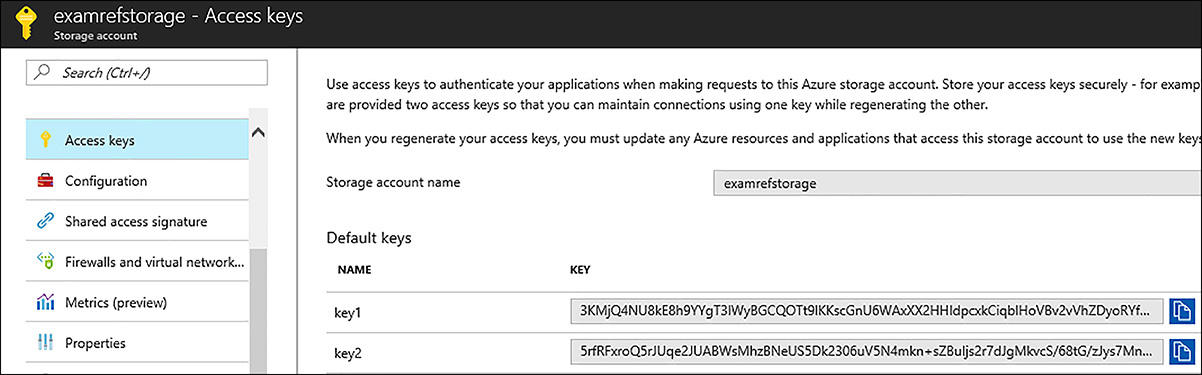
FIGURE 3-15 Access keys for an Azure storage account
Each storage account has a primary and a secondary key. The reason there are two keys is to allow you to modify applications to use the secondary key instead of the first, and then regenerate the first key using the Azure portal or the command line tools. In PowerShell, this is accomplished with the New-AzureRmStorageAccountKey cmdlet and for the Azure CLI you will use the az storage account keys renew command. This technique is known as key rolling, and it allows you to reset the primary key with no downtime for applications that access storage using the authentication key directly.
Applications will often use the storage account name and key for access to Azure storage. Sometimes this is to grant access by generating a Shared Access Signature token and sometimes for direct access with the name and key. It is important to protect these keys because they provide full access to the storage account.
Azure Key Vault helps safeguard cryptographic keys and secrets used by cloud applications and services. By using Key Vault, you can encrypt keys and secrets (such as authentication keys, storage account keys, data encryption keys, .PFX files, and passwords) by using keys that are protected by hardware security modules (HSMs).
The following example shows how to create an Azure Key Vault and then securely store the key in Azure Key Vault (software protected keys) using PowerShell.
$vaultName = "[key vault name]"
$rgName = "[resource group name]"
$location = "[location]"
$keyName = "[key name]"
$secretName = "[secret name]"
$storageAccount = "[storage account]"
# create the key vault
New-AzureRmKeyVault -VaultName $vaultName -ResourceGroupName $rgName -Location $location
# create a software managed key
$key = Add-AzureKeyVaultKey -VaultName $vaultName -Name $keyName -Destination 'Software'
# retrieve the storage account key (the secret)
$storageKey = Get-AzureRmStorageAccountKey -ResourceGroupName $rgName -Name
 $storageAccount

# convert the secret to a secure string
$secretvalue = ConvertTo-SecureString $storageKey[0].Value -AsPlainText -Force

# set the secret value
$secret = Set-AzureKeyVaultSecret -VaultName $vaultName -Name $secretName -SecretValue
 $secretvalue
The same capabilities exist with the Azure CLI tools.
vaultName="[key vault name]"
rgName="[resource group name]"
location="[location]"
keyName="[key name]"
secretName="[secret name]"
storageAccount="[storage account]"
secretValue="[storage account key]"

# create the key vault
azure keyvault create --vault-name "$vaultName" --resource-group "$rgName"
 --location "$location"

# create a software managed key
azure keyvault key create --vault-name "$vaultName" --key-name $keyName
 --destination software

# set the secret value
azure keyvault secret set --vault-name "$vaultName" --secret-name "$secretName"
 --value "$secretValue"
In addition to supporting software protected keys, for added assurance, when you use Azure Key Vault, you can import or generate keys in hardware security modules (HSMs) that never leave the HSM boundary. This scenario is often referred to as bring your own key, or BYOK. The HSMs are FIPS 140-2 Level 2 validated. Azure Key Vault uses Thales nShield family of HSMs to protect your keys.
MORE INFO GENERATE AND TRANSFER HSM-PROTECTED KEYS FOR AZURE KEY VAULT
You can learn more about the bring your own key (BYOK) scenario here: https://docs.microsoft.com/en-us/azure/key-vault/key-vault-hsm-protected-keys.
Accessing and unencrypting the stored keys is typically done by a developer, although keys from Key Vault can also be accessed from ARM templates during deployment.
MORE INFO ACCESSING ENCRYPTED KEYS FROM AZURE KEY VAULT
You can learn more about how developers securely retrieve and use secrets from Azure Key Vault here: https://docs.microsoft.com/en-us/azure/storage/blobs/storage-encrypt-decrypt-blobs-key-vault.
Creating, and using, shared access signatures
A Shared Access Signature (SAS) is a URI that grants access to specific containers, blob, queues, and tables. Use a SAS to grant access to a client that should not have access to the entire contents of the storage account, but that still require secure authentication. By distributing a SAS URI to these clients, you can grant them access to a resource for a specified period of time, with a specified set of permissions.
You can create SAS tokens using Storage Explorer or the command line tools (or programmatically using the REST APIs/SDK. Figure 3-16 demonstrates how to create a SAS token using Azure Storage Explorer.

FIGURE 3-16 Creating a Shared Access Signature using Azure Storage Explorer
The following example shows how to create a SAS URI using the Azure PowerShell cmdlets. The example creates a storage context using the storage account name and key that is used for authentication, and to specify the storage account to use. The context is passed the New-AzureStorageBlobSASToken cmdlet, which is also passed the container, blob, and permissions (read, write, and delete), along with the start and end time that the SAS URI is valid for.
$storageAccount = "[storage account]"
$rgName = "[resource group name]"
$container = "[storage container name]"
$storageKey = Get-AzureRmStorageAccountKey -ResourceGroupName $rgName
 -Name $storageAccount
$context = New-AzureStorageContext -StorageAccountName $storageAccount `
                                   -StorageAccountKey $storageKey[0].Value
$startTime = Get-Date
$endTime = $startTime.AddHours(4)
New-AzureStorageBlobSASToken -Container $container `
                             -Blob "Workshop List - 2017.xlsx" `
                             -Permission "rwd" `
                             -StartTime $startTime `
                             -ExpiryTime $endTime `
                             -Context $context
Figure 3-17 shows the output of the script. After the script executes, notice the SAS token output to the screen.
FIGURE 3-17 Creating a Shared Access Token
This is a query string that can be appended to the full URI of the blob or container the SAS URI was created with, and passed to a client (programmatically or manually). Use the SAS URI by combining the full URI to the secure blob or container and appending the generated SAS token. The following example shows the combination in more detail.
The full URI to the blob in storage.
https://examrefstorage.blob.core.windows.net/examrefcontainer1/Workshop%20
List%20-%202017.xlsx
The combined URI with the generated SAS token.
https://examrefstorage.blob.core.windows.net/examrefcontainer1/Workshop%20
List%20-%202017.xlsx?sv=2016-05-31&sr=b&sig=jFnSNYWvxt6
Miy6Lc5xvT0Y1IOwerdWcFvwba065fws%3D&st=2017-10-26T14%3A55%3A44Z&se=
2017-10-26T18%3A55%3A44Z&sp=rwd
The Azure CLI tools can also be used to create SAS tokens using the az storage blob generate-sas command.
storageAccount="[storage account name]"
container="[storage container name]"
storageAccountKey="[storage account key]"
blobName="[blob name]"
az storage blob generate-sas
    --account-name "$storageAccount"
    --account-key "$storageAccountKey"
    --container-name "$container"
    --name "$blobName"
    --permissions r
    --expiry "2018-05-31"
Using a stored access policy
Creating a shared access signature is fine for many operations, but in some cases, you may want to create a SAS token based off of a predefined policy instead of creating the token using ad-hoc permissions and expiration periods. A stored access policy allows you to define the permissions, start, and end date for access to the container. Figure 3-18 shows using the Azure Storage Explorer to create two stored access policies.

FIGURE 3-18 Creating stored access policies using Azure Storage Explorer
To use the created policies, reference them by name during creation of a SAS token using storage explorer, or when creating a SAS token using PowerShell or the CLI tools.
Virtual Network Service Endpoints
Configuring Virtual Network Service Endpoints (VSPE) for your Azure storage accounts allows you to remove access from the public internet, and allowing only traffic from your virtual network.
Another benefit of using VSPE is optimized routing. Without VSPE, any routes in your virtual network that force internet traffic to your premises and/or virtual appliances, known as forced-tunneling, also force Azure service traffic to take the same route as the internet traffic. Service endpoints provide optimal routing for Azure traffic. Endpoints always take service traffic directly from your virtual network to the service on the Microsoft Azure backbone network. Keeping traffic on the Azure backbone network allows you to continue auditing and monitoring outbound internet traffic from your virtual networks, through forced-tunneling, without impacting service traffic.
To configure a VSPE first enable the virtual network by specifying which services can connect to the virtual network. At the time of this writing only Azure SQL Database and Azure Storage are allowed as enabled for VSPE. Figure 3-19 shows enabling service endpoints for Azure Storage for the Apps subnet of a virtual network.

FIGURE 3-19 Adding a Service endpoint to a virtual network for Azure Storage
After the virtual network is enabled, you can open the storage account and specify its connectivity options. One or more virtual networks can be selected and the subnet to allow traffic from. You can also specify IP ranges from an on-premises network that can access data in the storage account. Figure 3-20 shows how to enable Virtual Service Endpoints on a storage account.
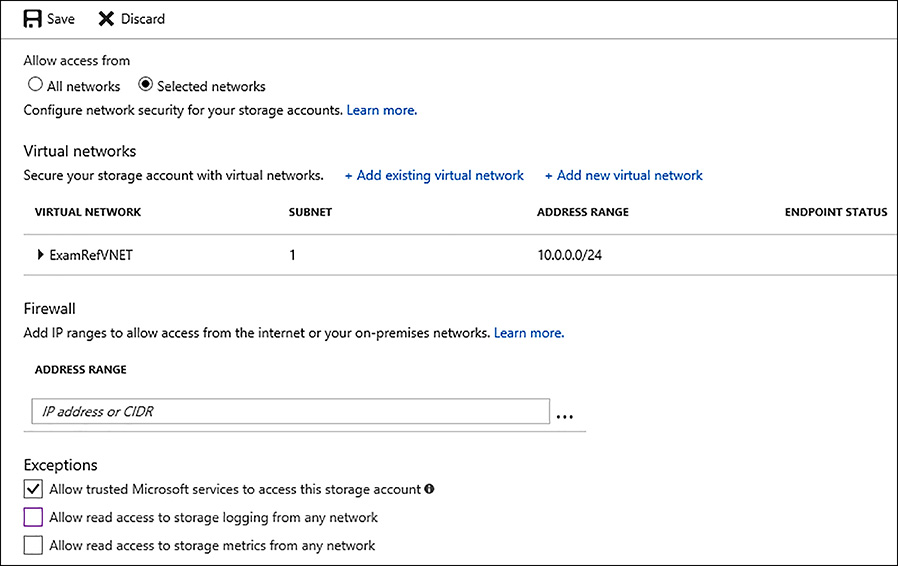
FIGURE 3-20 Configuring a Storage account for virtual network service endpoint access
Skill 3.3: Configure diagnostics, monitoring, and analytics
For any application that is deployed in the cloud that has a dependency on storage, understanding how to enable Azure Storage Diagnostics is critical to ongoing operations. Azure Storage Diagnostics provides the ability to capture metrics and log data. You can use this information to analyze storage service usage, diagnose issues with requests made against the storage account, and to improve the performance of applications that use a service. Diagnostics also allows for a configurable retention period to automatically manage the storage of the data generated. Like other services in Azure, the Azure storage service also provides built-in monitoring and alerting capabilities to provide alerts on configurable thresholds.
This skill covers how to:
Configure Azure Storage Diagnostics
Analyze diagnostic data
Enabling monitoring and alerts
Configuring Azure Storage Diagnostics
The first step to enable diagnostics on an Azure Storage account is to open the storage account properties and click on the Diagnostics link on the left under monitoring. In the new blade that opens, set Status to On. From here, you can select the metrics you wish to capture, as well as the logging and retention settings. Figure 3-21 shows the Azure portal configuration for enabling storage diagnostics on the storage account.

FIGURE 3-21 Enabling diagnostics for an Azure Storage account
You can also enable and configure storage diagnostics by using the Set-AzureStorageServiceLoggingProperty and Set-AzureStorageServiceMetricsProperty Azure PowerShell cmdlets.
In the following example, the Set-AzureStorageMetricsProperty cmdlet enables hourly storage metrics on the blob service with a retention period of 30 days and at the ServiceAndApi level. The next call is to the Set-AzureStorageServiceLoggingProperty cmdlet, which is also configuring the blob service and a 30-day retention period but is only logging delete operations.
$storageAccount = "[storage account name]"
$rgName  = "[resource group name]"
$storageKey = Get-AzureRmStorageAccountKey -ResourceGroupName $rgName
 -Name $storageAccount
$context = New-AzureStorageContext -StorageAccountName $storageAccount `
                                   -StorageAccountKey $storageKey[0].Value
Set-AzureStorageServiceMetricsProperty -ServiceType Blob `
                                       -MetricsType Hour `
                                       -RetentionDays 30 `
                                       -MetricsLevel ServiceAndApi `
                                       -Context $context
Set-AzureStorageServiceLoggingProperty -ServiceType Blob `
                                       -RetentionDays 30 `
                                       -LoggingOperations Delete `
                                       -Context $context
Metrics data is recorded at the service level and at the service and API level. At the service level, a basic set of metrics such as ingress and egress, availability, latency, and success percentages, which are aggregated for the Blob, Table, and Queue services, is collected. At the service and API level, a full set of metrics that includes the same metrics for each storage API operation, in addition to the service-level metrics, is collected. Statistics are written to a table entity every minute or hourly depending on the value passed to the MetricsType parameter (the Azure portal only supports using hour).
Logging data is persisted to Azure blob storage. As part of configuration, you can specify which types of operations should be captured. The operations supported are: All, None, Read, Write, and Delete.
Analyzing diagnostic data
After you have enabled and configured diagnostics for capture, the next step is to understand how to retrieve the data and understand what it means. Metrics data is captured in several tables in the storage account being monitored. Table 3-9 lists the names of the tables created, and where the data for hourly and minute metrics is created per service.
TABLE 3-9 Container permissions and resulting access
Metrics type |
Table names |
Hourly |
$MetricsHourPrimaryTransactionsBlob |
Hourly |
$MetricsHourPrimaryTransactionsTable |
Hourly |
$MetricsHourPrimaryTransactionsQueue |
Minute |
$MetricsMinutePrimaryTransactionsBlob |
Minute |
$MetricsMinutePrimaryTransactionsTable |
Minute |
$MetricsMinutePrimaryTransactionsQueue |
Capacity |
$MetricsCapacityBlob (blob service only) |
To view the data, you can programmatically access table storage, or use a tool such as Storage Explorer or Visual Studio as demonstrated in Figure 3-22.
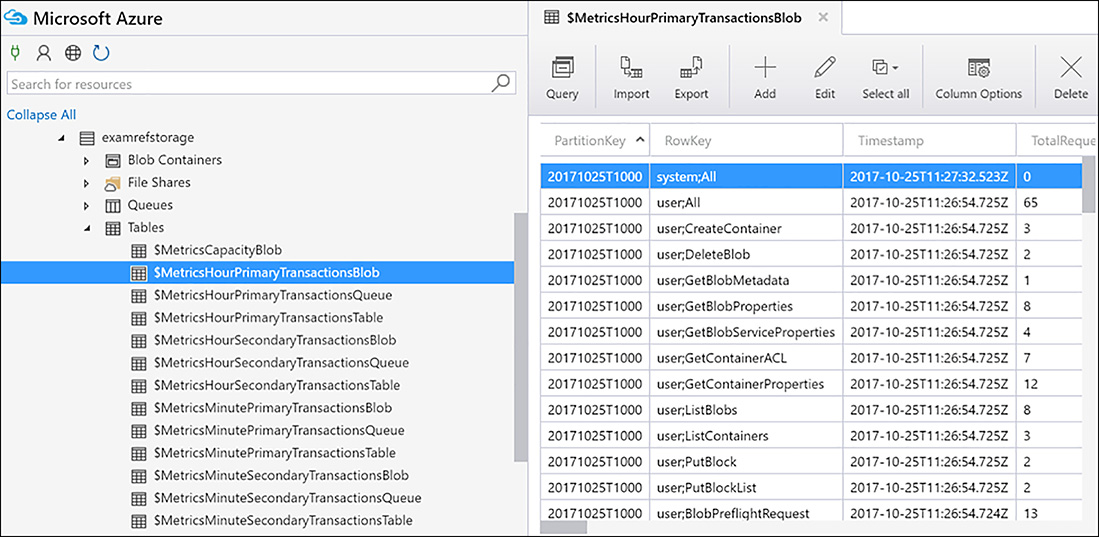
FIGURE 3-22 Viewing Diagnostics Data using Azure Storage Explorer
MORE INFO AZURE STORAGE METRICS SCHEMA
You can read the full schema for captured metrics here: https://docs.microsoft.com/en-us/rest/api/storageservices/Storage-Analytics-Metrics-Table-Schema.
Logging data is stored in blob storage within the storage account in a container named $logs that is also accessible from Azure Storage Explorer. Each blob stored in the container starts with the service name (Blob, Table, and Queue). Each file within the container has a list of the operations performed on the storage account. The operation types logged depend on what setting was specified when configuring logging such as (All, Reads, Writes or Deletes).
MORE INFO STORAGE ANALYTICS LOG FORMAT
For more details about the storage analytics log format see the following: https://docs.microsoft.com/en-us/rest/api/storageservices/Storage-Analytics-Log-Format.
Enabling monitoring and alerts
Enabling monitoring on Azure Storage is a similar experience to other services such as virtual machines. The first step is to enable diagnostics to capture data that can be monitored. The second step is to configure charts in the Azure portal and enable alerts for the criteria you are interested in. Figure 3-23 shows some of the default metrics for the storage account. To enable other metrics, open the storage account properties in the Azure portal. Click one of the default monitoring metrics, such as Total requests, and then select a check mark by each metric you are interested in monitoring.
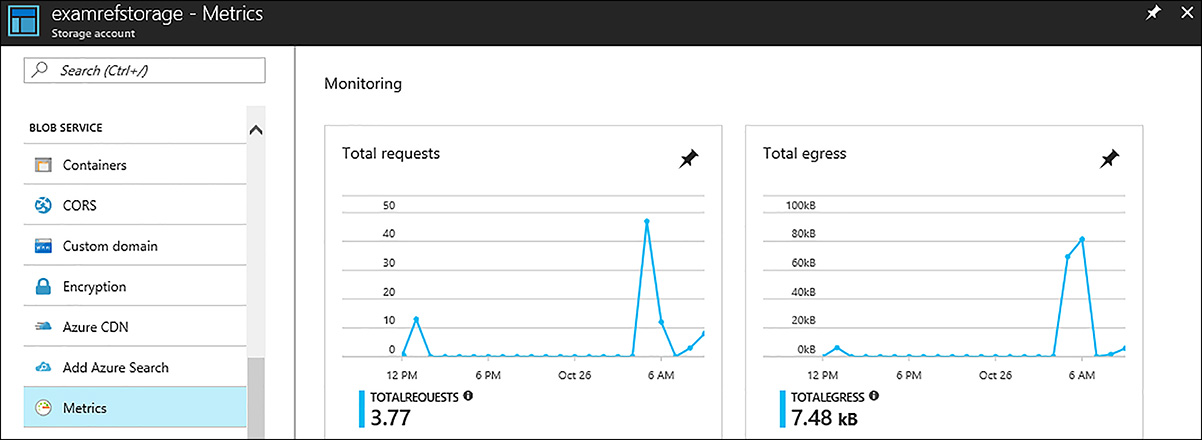
FIGURE 3-23 Monitoring metrics for an Azure Storage account
Add an alert by clicking the Alerts Rules link on the storage account. Then click Add Alert. Figure 3-24 shows the Alert Rules page in the Azure portal, where you can select the Resource (blob, queue, or table), and specify the alert name and description, along with the actual metric to alert on. In this example, the value in the Metric drop-down is set to capacity and (not shown) is the threshold and condition. The Condition is set to Greater Than, and the Threshold is set to 5497558138880 (5 TB in bytes). Each alert can be configured to email members of the owners, contributors, and reader roles, or a specific email address.

FIGURE 3-24 Adding an alert rule in the Azure portal
Skill 3.4: Implement storage encryption
In this skill, we’ll discuss how to implement encryption of data using Azure Storage Service encryption as well as how to encrypt and protect data managed by Azure Data Lake Store.
This skill covers how to:
Encrypt data using Azure Storage Service Encryption (SSE)
Implement encryption and role based access control with Azure Data Lake Store
Encrypt data using Azure Storage Service Encryption (SSE)
Encrypting data is one of the most important aspects of any security strategy whether the data is in transit or at rest. There are many ways to encrypt data, such as programmatically encrypting it in your own application and storing the encryption keys in Azure Key Vault, encrypting VM disks, or in the case of Azure Storage taking advantage of the Azure Storage Service Encryption feature.
The Azure Storage Service encryption feature helps you protect and safeguard your data by automatically encrypting and decrypting data using 256-bit AES encryption as it is written in an Azure Storage Account for blobs and files. The service works with the following storage account configurations:
Standard Storage: General purpose storage accounts for Blobs and File storage and Blob storage accounts
Premium storage
All redundancy levels (LRS, ZRS, GRS, RA-GRS)
Azure Resource Manager storage accounts (but not classic)
All regions
To enable SSE, open the storage account in the Azure portal, click on Encryption under Blobs or Files, and click Enabled under Storage service encryption and then click save. Figure 3-25 shows the option for enabling Storage service encryption.

FIGURE 3-25 Enabling encryption on Azure blob storage
EXAM TIP
Storage service encryption only encrypts newly created data after encryption is enabled. For example, if you create a new Resource Manager storage account but don’t turn on encryption, and then you upload blobs or archived VHDs to that storage account and then turn on SSE, those blobs will not be encrypted unless they are rewritten or copied.
Implement encryption and role based access control with Azure Data Lake Store
Azure Data Lake is a data repository designed for big data analytic workloads. Azure Data Lake enables you to capture data of any size, type, and ingestion speed in one single place for operational and exploratory analytics. For this skill, it is important to understand how to encrypt the data in an Azure Data Lake as well as control access to it using role based access control (RBAC).
Azure Data Lake store supports encryption in transit and at rest. Data in transit is always encrypted and transmitted using HTTPS. For encryption at rest, you can enable transparent encryption that is on by default. When you create the data lake store you can choose to not enable encryption, or to enable encryption where the keys are managed by the Data Lake Store, or where the keys are managed by you in your own Azure Key Vault. Figure 3-26, shows the creation process where the encryption type is specified as key managed by Data Lake Store.
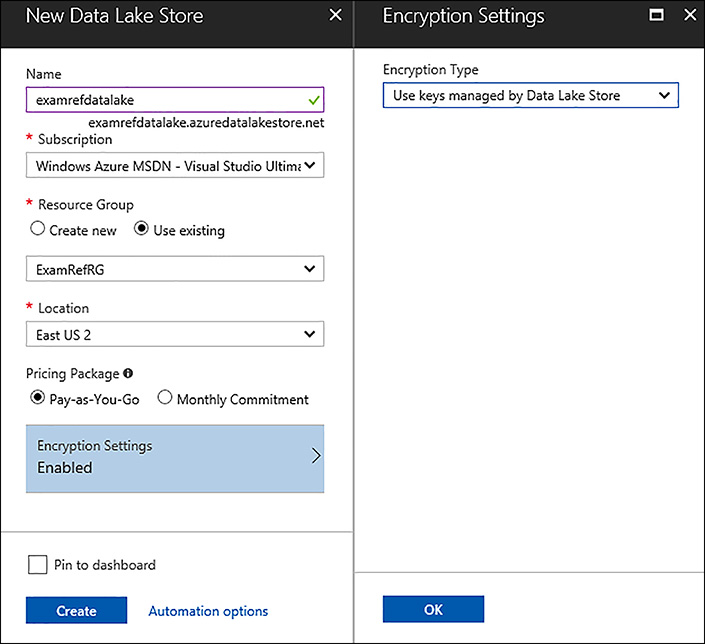
FIGURE 3-26 Creating an Azure Data Lake Store and configuring encryption
Access to the Azure Data Lake store is over a public IP address. You can enable the firewall to only allow in certain source IP addresses such as a client application from in Azure or from on-premises. Figure 3-27 demonstrates how to configure the firewall rules to allow in one or more IP addresses by specifying the start IP and end IP range.
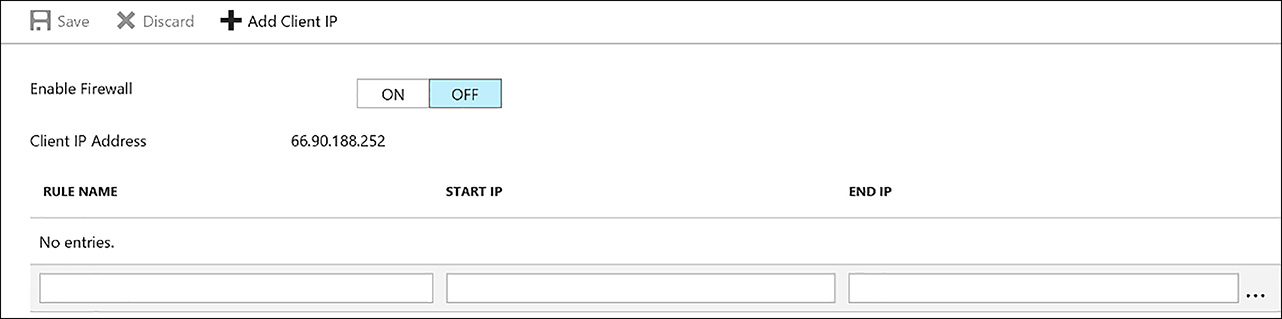
FIGURE 3-27 Configuring the firewall rules for an Azure Data Lake Store
Azure Data Lake Store implements an access control model that derives from HDFS, which in turn derives from the POSIX access control model. This allows you to specify file and folder access control lists (ACLs) on data in your data lake using users or groups from your Azure AD tenant.
There are two kinds of access control lists (ACLs): Access ACLs and Default ACLs.
Access ACLs These control access to an object. Files and folders both have Access ACLs.
Default ACLs A “template” of ACLs associated with a folder that determine the Access ACLs for any child items that are created under that folder. Files do not have Default ACLs.
The permissions on a filesystem object are Read, Write, and Execute, and they can be used on files and folders as shown in Table 3-10.
TABLE 3-10 File system permissions for Azure Data Lake Store
Permission |
File |
File |
Read (R) |
Can read the contents of a file |
Requires Read and Execute to list the contents of the folder |
Write (W) |
Can write or append to a file |
Requires Write and Execute to create child items in a folder |
Execute (X) |
Does not mean anything in the context of Data Lake Store |
Required to traverse the child items of a folder |
To configure permissions on a data item in your data lake, open the Data Lake Store in the Azure portal and click Data Lake Explorer. From there, right click the data file you wish to secure and click Access as shown in Figure 3-28.

FIGURE 3-28 Controlling access on data in an Azure Data Lake Store
The next screen will display the current users that have access to the file and what their permissions are. You can add additional users by clicking the Add button, then selecting the User or Group, and then specifying the permissions (Read, Write or Execute) as shown in Figure 3-29.

FIGURE 3-29 Adding a new user to an Azure Data Lake Store file
There are several user and group concepts to understand at a basic level.
Super User A super-user has the most rights of all the users in the Data Lake Store. A super-user has the following permissions:
Has read, write, and execute permissions to all files and folders.
Can change the permissions on any file or folder.
Can change the owning user or owning group of any file or folder.
Everyone in theAzure Ownersrole (role based access control) for a Data Lake Store account is automatically a super-user for that account.
Owning User The user who created the item is automatically the owning user of the item. The owner of an item can do the following:
Change the permissions of a file that is owned.
Change the owning group of a file that is owned, if the owning user is also a member of the target group.
Owning Group Every user is associated with a “primary group.” For example, user “alice” might belong to the “finance” group. Alice might also belong to multiple groups, but one group is always designated as her primary group. In POSIX, when Alice creates a file, the owning group of that file is set to her primary group, which in this case is “finance.”
MORE INFO SECURING DATA IN AZURE DATA LAKE
Going in-depth into POSIX security is beyond the scope of this chapter, but it is certainly a worthwhile task to read and understand to not only prepare you for the exam but to also ensure your data lake data is secure. You can learn more about securing data here: https://docs.microsoft.com/en-us/azure/data-lake-store/data-lake-store-access-control.
Thought experiment
In this thought experiment, apply what you have learned about this objective. You can find answers to these questions in the “Answers” section at the end of this chapter.
You are the web administrator for www.contoso.com which is hosted in virtual machines in the West US Azure region. Several customers from England and China complain that the PDF files for your product brochures take too long time to download. Currently, the PDF files are served from the /brochures folder of your website.
What steps should you take to mitigate the download time for your PDFs?
What changes need to happen on the www.contoso.com web site?
Thought experiment answers
This section contains the solution to the thought experiment for the chapter.
To mitigate this problem, move the PDF files closer to the customer locations. This can be solved by moving the PDF files to Azure Storage and then enabling them for CDN.
Create an Azure Storage account and move the pdf files to a container named brochures and enable public access (blob) on the container. Next, you should create a new CDN profile and an endpoint that originates from the blob storage account. From there, pre-load the PDF files into CDN to minimize the content being delayed when the first user requests it.
The website pages would will need to change to refer to the URL of the CDN endpoint. For example, if the PDF was previously referenced by www.contoso.com/brochures/product1.pdf it would now be referenced by contosocdn.azureedge.net/brochures/product1.pdf unless the CDN endpoint was configured for custom domains.
Chapter summary
This chapter covered a broad range of topics focused on Azure Storage, CDN, and security related to Azure Data Lake Store.
Below are some of the key takeaways from this chapter:
Azure storage can be managed through several tools directly from Microsoft. The Azure portal, PowerShell, CLI, Storage Explorer, and AzCopy. It’s important to know when to use each tool.
Access to blobs can be controlled using several techniques. Among them are: storage account name and key, shared access signature (SAS), public access level of the container they reside in, and using firewall/virtual network service endpoints.
Use the async blob copy service to copy files between storage accounts or from outside publicly accessible locations to your Azure storage account.
Storage accounts and CDN both support custom domains. Enabling SSL is only supported on custom domains when the blob is accessed via CDN.
Enable diagnostics and alerts to monitor the status of your storage accounts.
Storage Explorer and Visual Studio have capabilities for browsing blob and table storage to download and review diagnostic data.
Storage service encryption automatically encrypts and decrypts data added or updated in your storage account. If the data already existed in the storage account prior to enabling SSE it will not be encrypted.
Azure Data Lake store will be default support encryption at rest and always in transit.
You can choose to have Azure Data Lake store manage your encryption keys, or reference keys out of an existing Azure Key Vault.
The security for Azure Data Lake store is based on POSIX permissions. You can assign users / groups from Azure AD access with read, write, and execute permissions per item.
Users that are in the role based access control Owners role will automatically be added as Super User.