CHAPTER 6
Manage Azure Security and Recovery Services
Microsoft Azure provides many features that help customers secure their deployments as well as protect and recover their data or services should the need arise. The first section of this chapter focuses on security and reviews several related capabilities, including the use of Key Vault to securely store cryptographic keys and other secrets, Azure Security Center to help prevent, detect, and respond to threats, and several others. Even with proper precautions taken, the need eventually arises to recover data or a critical workload. The second section covers recovery-related services, including the use of snapshots and platform replication, and Azure Backup and Site Recovery to quickly restore access to data and services.
Skills covered in this chapter
Skill 6.1: Manage data protection and security compliance
The unfortunate reality of the IT landscape is there are many threats to every organization’s digital assets. Many are of a malicious nature, but others come in the form of human error or impersonal, catastrophic forces, such as hurricanes, earthquakes, or other natural disasters. Regardless of where an organization’s digital assets are deployed, one of the first planning steps must be to determine how to protect these assets. To assist in this planning, this section reviews the data protection and security compliance capabilities of the Azure platform.
This skill covers how to:
Create and import encryption keys with Key Vault
Automate tasks for SSL/TLS certificates
Prevent and respond to security threats with Azure Security Center
Configure single sign-on with SaaS applications using federation and
password basedAdd users and groups to applications
Revoke access to SaaS applications
Configure federation with public consumer identity providers such as
Facebook and Google
Create and import encryption keys with Key Vault
Azure Key Vault allows for the secure storage of cryptographic keys and other secrets, using FIPS 140-2 Level 2 validated hardware security modules (HSMs). These keys and secrets can then be accessed by Azure Active Directory authenticated requests so that developers do not need to store credentials in their source code. Key Vault is available in two pricing tiers, as shown in Figure 6-1:
A1 Standard
P1 Premium
 EXAM TIP
The key difference between the A1 and P1 pricing tiers is the A1 tier only allows for software-protected keys, whereas the P1 tier allows for keys to be protected by Hardware Security Modules (HSMs). If the workload requires keys be stored in HSMs, be sure to select the Premium tier.
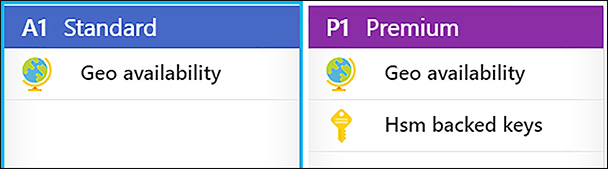
FIGURE 6-1 Pricing tier options for Key Vault as shown in the Azure portal
To begin using Key Vault, create a vault by using the Azure portal, PowerShell, or the Azure CLI.
Create a Key Vault (Azure portal) In the Azure portal, search the Marketplace for Key Vault and open the Create key vault blade. Specify the name, resource group, location, and pricing tier (shown in Figure 6-2). Note that the name must be unique and follow these rules:
Must only contain alphanumeric characters and hyphens
Must start with a letter and end with a letter or digit
Must be between 3-24 characters in length
Cannot contain consecutive hyphens
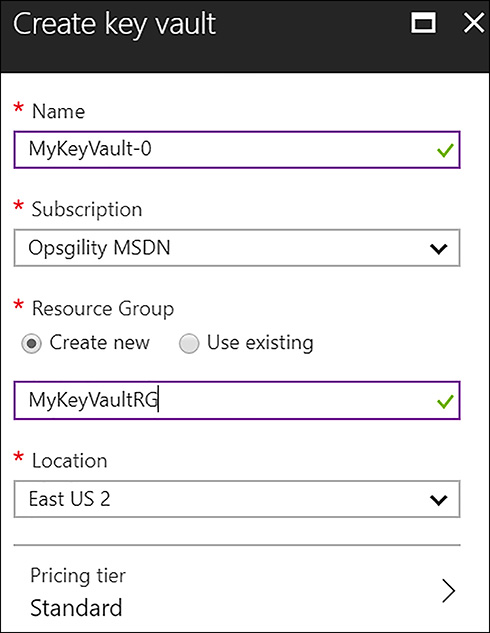
FIGURE 6-2 Create key vault blade in the Azure portal
This blade also allows the creator to specify an Azure Active Directory user or group and the permissions they have. These are defined within an Access policy, and the permissions apply to the data within the key vault, such as keys, secrets, and certificates, as shown in Figure 6-3.

FIGURE 6-3 Define the initial Access policy
Finally, this creation blade allows you to set advanced access policies, which govern the access of Azure resources (virtual machines, Resource Manager template deployments, and disk encryption) to retrieve key vault data (shown in Figure 6-4).

FIGURE 6-4 Set Advanced access policy
Create a Key Vault (PowerShell) To create an Azure key vault with PowerShell, begin by creating a resource group. Use the New-AzureRmResourceGroup cmdlet for this task.
$rg = New-AzureRmResourceGroup -Name "MyKeyVaultRG" -Location "South Central US"
Next, use the New-AzureRmKeyVault to create the vault.
New-AzureRmKeyVault -VaultName "MyKeyVault-0" -ResourceGroupName $rg.ResourceGroupName -Location "South Central US"
Create a Key Vault (CLI) To create an Azure key vault with the CLI, begin by creating a resource group.
az group create --name "MyKeyVaultRG" --location "South Central US"
Next, create the key vault.
az keyvault create --name "MyKeyVault-0" --resource-group "MyKeyVaultRG" --location "South Central US"
Once the key vault is created, it is ready to securely store keys, secrets and certificates. This section shows how to create keys using the Azure portal, PowerShell and the CLI.
Create a Key (Azure portal) After the key vault is created, you can create keys used for encrypting and decrypting data within the vault. Also, secrets such as passwords can be added to the key vault. Lastly, you can create or import certificates (*.PFX or *.PEM file format) into the vault. Once a key, secret or certificate exists in the vault, it can be referenced by URI, and each URI request is authenticated by Azure AD.
To create a key in the Azure portal, open the Key Vault created in the previous section and under Settings, click Keys (shown in Figure 6-5).
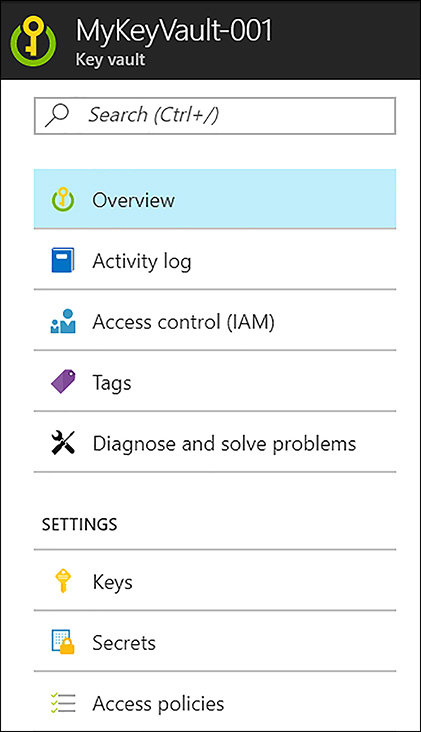
FIGURE 6-5 CREATE A NEW KEY IN THE AZURE PORTAL
Next, select Add, and enter in a name. If this is a P1 Premium key vault, an HSM protected key can be selected. Otherwise it is software-protected. The key can also be given activation and expiration dates in this interface. These options are shown in Figure 6-6.
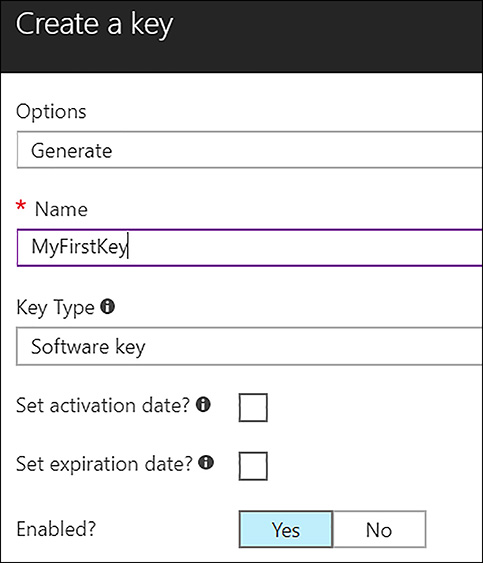
FIGURE 6-6 Specify the parameters for creating a new key
Create a Key (PowerShell) To create a key with PowerShell, use the Add-AzureKeyVaultKey cmdlet.
Add-AzureKeyVaultKey -VaultName "MyKeyVault-001" -Name "MyFirstKey" -Destination "Software"
Create a Key (CLI) To create a key with the CLI, use this syntax.
az keyvault key create --vault-name ‘MyKeyVault-001’ --name ‘MyThirdKey’ --protection ‘software’
This section demonstrates the process to create secrets using the Azure portal, PowerShell and the CLI.
Add a Secret (Azure portal) To create a secret in the vault such as a password, from within the Azure portal, click Secrets under Settings, and then click Add (shown in Figure 6-7).
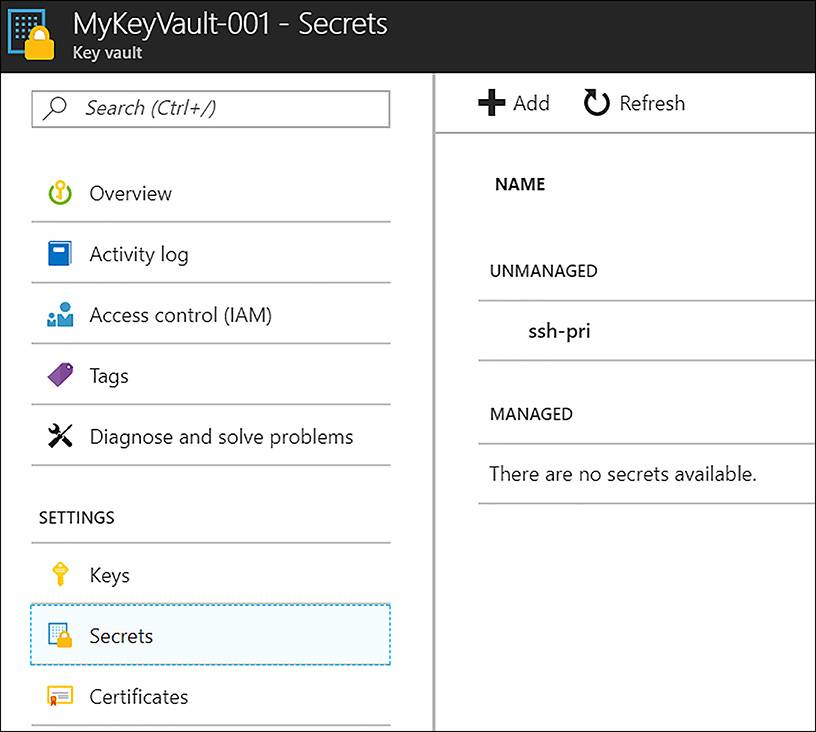
FIGURE 6-7 Dialog for adding a Key Vault secret
Set the Upload options to Manual, and enter the secret name and value. You can add a Content type (optionally), which is a good place to store a password reminder. You can also enter an activation and expiration date as well. Finally, the secret can either be enabled (meaning it is useable) or not enabled. These options are shown in Figure 6-8.
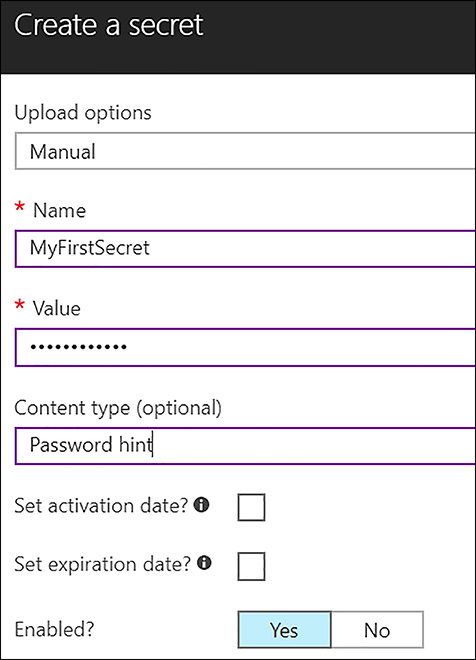
FIGURE 6-8 COMPLETE THE CREATION OF THE SECRET
Add a Secret (PowerShell) To create a secret with PowerShell, first convert the secret to a secure string with the ConvertTo-SecureString cmdlet, and store the output in a variable.
$mySecret = ConvertTo-SecureString -String ‘P@ssword1233’ -Force -AsPlainText
Next, add the secret to the vault by using the Set-AzureKeyVaultSecret cmdlet.
Set-AzureKeyVaultSecret -VaultName ‘MyKeyVault-001’ -Name ‘MyFirstSecret’ -SecretValue $mySecret
Add a Secret (CLI) Use this syntax to add a secret to the key vault with the CLI.
az keyvault secret set --vault-name ‘MyKeyVault-001’ --name ‘MySecondSecret’ --value ‘P@ssword321’
Automate tasks for SSL/TLS Certificates
A foundational capability enabling data protection and security compliance is data encryption. Encrypting data at rest and in transit keeps sensitive information private, helping to prevent data leakage. In modern websites and applications, utilizing Transport Layer Security (TLS) has become the baseline in the industry to protect data in transit. TLS utilizes certificates to encrypt and decrypt data. Certificates are resources that have a lifecycle that must be managed. Managing this lifecycle can be manual and error-prone, making organizations vulnerable to customer-impacting issues. Fortunately, Azure has technologies that can assist in the lifecycle management of SSL/TLS certificates. This section covers the certificate management features of Azure Key Vault, along with another Azure solution called App Service Certificate.
Azure Key Vault Certificate Management
Azure Key Vault provides management capabilities for x509 certificates and brings the following features to the task of certificate lifecycle management:
Segregation of duties, so that a certificate owner (a user or group in Azure Active Directory) can handle the secure storage and management of x509 certificates without allowing application owners to access private key material
The use of policies that dictate the life-cycle management of certificates
Setting of contacts to be notified when certificate life-cycle events occur, including expiration or renewals
Automatic enrollment and renewal of certificates with certain certificate issuers
The first certificate management activity to cover is importing certificates. The creating certificates will be considered.
Importing Certificates Currently, it is not possible to create or import a certificate to the key vault in the Azure portal, although this capability is likely to be added soon. To import a certificate with PowerShell, it must be in the .PFX or .PEM format. These steps assume you have exported your certificate with the password-protected private key to your hard drive. First, convert the private key password to a secure string.
$CertPwd = ConvertTo-SecureString -String "demo@pass123" -Force -AsPlainText
Next, use the Import-AzureKeyVaultCertificate cmdlet to import the certificate.
Import-AzureKeyVaultCertificate -VaultName ‘MyKeyVault-001’ -Name ‘MyFirstCert’ -FilePath ‘C:sshMyCert.pfx’ -Password $CertPwd
If you look in the Azure portal after this operation, notice that in addition to the certificate, a managed key and secret are added to the vault. The certificate and its corresponding key and secret together represent the certificate in key vault.
Creating Certificates To create a certificate with Key Vault, start by defining a Key Vault certificate policy. This is defined with the New-AzureKeyVaultCertificatePolicy cmdlet. Note, this cmdlet creates an in-memory structure, rather than a permanent policy. Populate a variable with this structure and pass this variable during certificate creation. This command defines a policy that is used to create a self-signed certificate.
$Policy = New-AzureKeyVaultCertificatePolicy -SecretContentType "application/x-
pkcs12" -SubjectN ame "CN=steverlabs.com" -IssuerName "Self" -ValidityInMonths
6 -ReuseKeyOnRenewal
Now, create the certificate.
Add-AzureKeyVaultCertificate -VaultName ‘MyKeyVault-001’ -Name "TestCert01"
-CertificatePolicy $ Policy
Creating a certificate in this way submits a job, and the status of this job can be checked with the Get-AzureKeyVaultCertificateOperation cmdlet, passing the Key Vault name and the certificate name.
Get-AzureKeyVaultCertificateOperation -VaultName ‘MyKeyVault-001’ -Name "TestCert01"
It is also possible to enroll a certificate from a public certificate authority (CA). Currently, DigiCert and GlobalSign are the only supported CAs. The requestor must already have an account created with the CA and must already have proven ownership of the domains they are generating a certificate for. More details for leveraging DigiCert can be found here: https://www.digicert.com/azure-key-vault.
The following PowerShell instructions assume the Key Vault is already created. Start by creating an organization with the New-AzureKeyVaultCertificateOrganizationDetails cmdlet.
$org = New-AzureKeyVaultCertificateOrganizationDetails -Id
<OrganizationIDfromDigiCertAccount>
Next, store the DigiCert API Key in a variable as a secure string.
$secureApiKey = ConvertTo-SecureString <DigiCertCertCentralAPIKey> -AsPlainText –Force
Next, create an issuer.
$accountId = "<DigiCertCertCentralAccountID>"
$issuerName = "digiCert01"
Now, set the Key Vault certificate issuer with the Set-AzureKeyVaultCertificateIssuer cmdlet, passing the variables you previously populated.
Set-AzureKeyVaultCertificateIssuer -VaultName ‘MyKeyVault-001’ -IssuerName $issuerName -IssuerProvider DigiCert -AccountId $accountId -ApiKey $secureApiKey -OrganizationDetails $org
Next, create the in-memory policy to be used in certificate creation.
$certificatePolicy = New-AzureKeyVaultCertificatePolicy -SecretContentType application/x-pkcs12 -SubjectName "CN=myCommonName.com" -ValidityInMonths 12 -IssuerName $issuerName -RenewAtNumberOfDaysBeforeExpiry 60
Notice the
-RenewAtNumberOfDaysDeforeExpiryparameter. When this is set, Key Vault automatically renews the certificate that is requested by using this policy. This automatic renewal feature of Key Vault prevents the certificate from expiring and relieves administrators from the tedious burden of manual renewals.Finally, submit the certificate creation request.
Add-AzureKeyVaultCertificate -VaultName ‘MyKeyVault-001’ -CertificateName ‘MyDigiCertCertificate’ -CertificatePolicy $certificatePolicy
Remember that this command submits a job. To review the status, use the Get-AzureKeyVaultCertificateOperation cmdlet, passing the vault name and the certificate name.
Get-AzureKeyVaultCertificateOperation -VaultName ‘MyKeyVault-001’ -CertificateName ‘MyDigiCertCertificate’
Azure App Service Certificate
Another solution in Azure that helps organizations manage their SSL/TLS certificates is App Service Certificate. This service is specifically for use with App Service options, such as Web Apps, and it offloads much of the complexity for obtaining and managing SSL/TLS certificates. It utilizes Azure Key Vault for certificate storage. There are two certificate SKUs to choose from. The S1 Standard procures a certificate that allows SSL bindings for the root and www subdomain. If you need to create SSL bindings for the root domain and any first level subdomain, choose the W1 Wildcard option. These choices are shown in Figure 6-9.

FIGURE 6-9 Certificate options with Azure App Service Certificate
After creating the App Service Certificate, the first configuration step is to select an existing Key Vault or to create one for use with this service. Next, you must verify ownership for the domain that you entered during the service creation. After you verify ownership, the certificate can be imported into an App Service. These choices are shown in Figure 6-10.
FIGURE 6-10 Importing an App Service Certificate into a Web App
With the App Service Certificate solution, you can easily rekey the certificate with one click and sync this update with the services that use the certificate. This feature eliminates human error and reduces the time normally required to accomplish this task manually. The certificate can also be configured to automatically renew, relieving administrators from another task that sometimes is forgotten. These settings are shown in Figure 6-11.
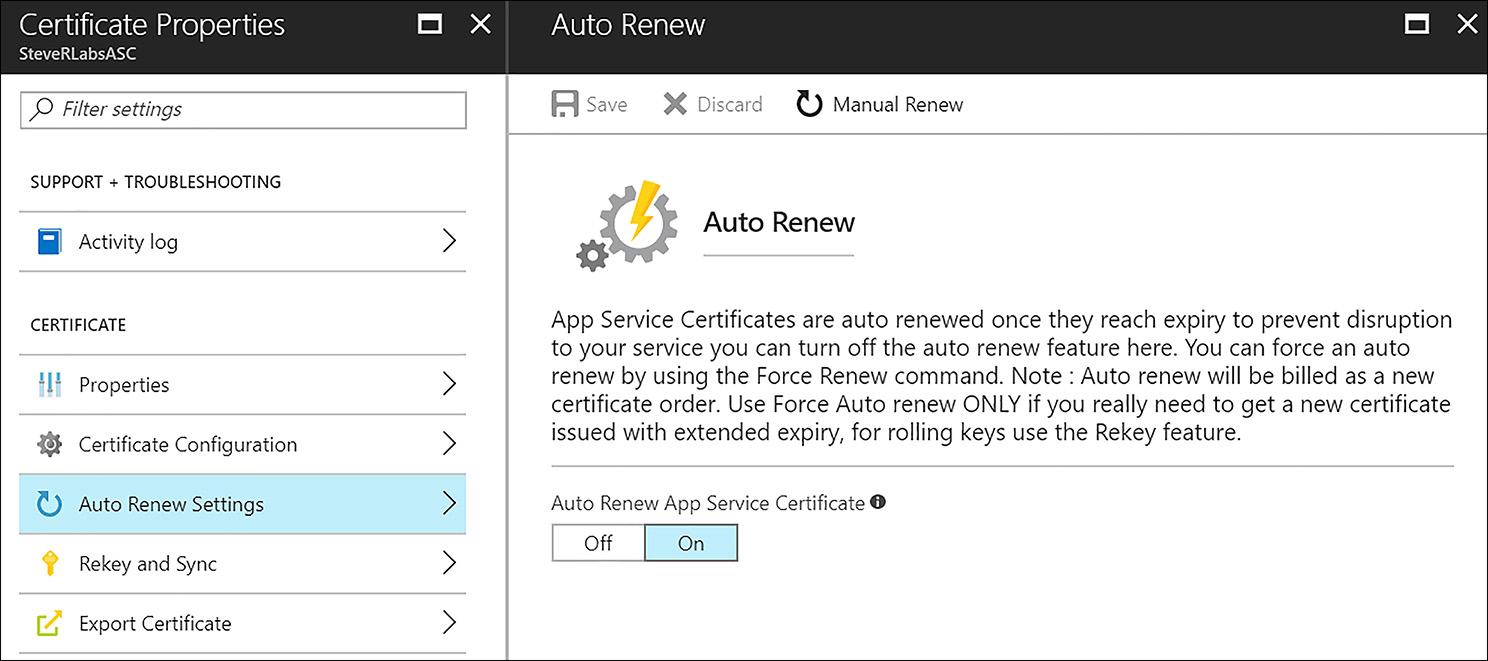
FIGURE 6-11 App Service Certificate Auto Renew settings
Prevent and respond to security threats with Azure Security Center
As organizations begin to deploy workloads into Azure, or any public cloud environment, a common challenge they face is to minimize threats by ensuring security best practices are followed. This is a difficult obstacle because of the learning curve required to understand these best practices. Azure Security Center (ASC) is a tremendous help in this situation because it evaluates deployments and offers recommendations for hardening existing configurations. In many cases, recommendations can be accomplished within the context of ASC. This ASC capability represents the prevention aspect of the solution. ASC also provides active monitoring of Azure deployments and surfacing of potentially malicious activity, which enables organizations to respond to threats.
Enabling Azure Security Center
Azure Security Center’s Free tier is enabled by default on all Azure subscriptions. Within the Azure portal, ASC is pinned by default to the services menu on the far left, as shown in Figure 6-12.
FIGURE 6-12 Selecting the Azure Security Center service
Opening Azure Security Center reveals four sections of tiles including Overview, Prevention, Detection, and Advanced cloud defense. To configure ASC, begin by clicking the Security policy menu item followed by the subscription name (Figure 6-13).

FIGURE 6-13 Opening the Azure Security Center Security policy
This reveals the four sections of the security policy, namely Data collection, Security policy, Email notifications, and Pricing tier.
Data Collection Azure Security Center can deduce many valuable security findings from your Azure deployments without collecting data from any virtual machines. However, the advanced features of ASC, including daily security monitoring and event analysis with threat detection, are not possible without this data collection. It is recommended that data collection be enabled, which involves an automatic installation of the Microsoft Monitoring Agent. This agent can be configured to collect and store data in a default Azure Log Analytics workspace, automatically created by ASC, or you can choose an existing workspace. Be sure to save any changes made in this dialog box, as shown in Figure 6-14. Note that data collection is enabled or disabled at the subscription level.
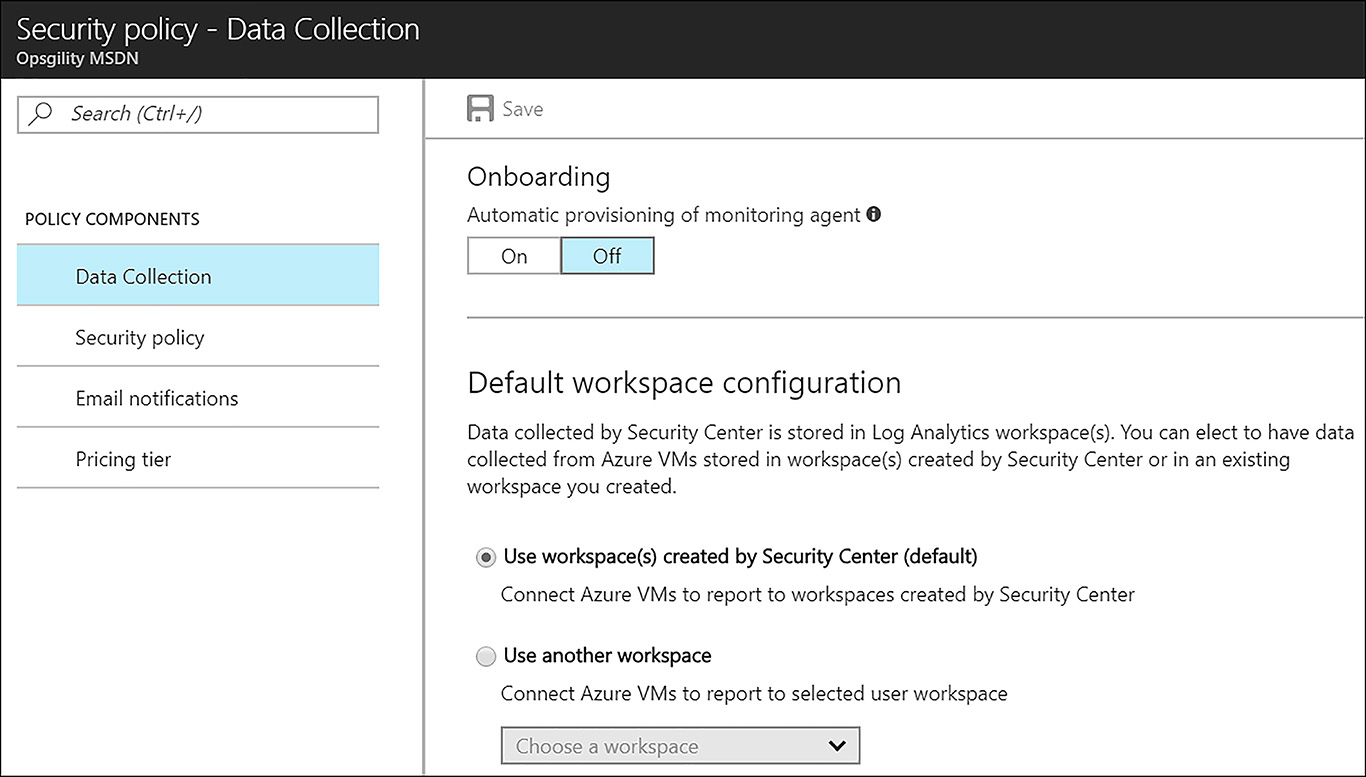
FIGURE 6-14 Enabling data collection
Security Policy The security policy allows users to choose the specific recommendations that ASC surfaces, shown below in Figure 6-15. These settings can be adjusted at the subscription level and at the resource group level. This can be useful because an organization might not want to see certain recommendations on resources that are designated as development or test. Notice that the first three options in this dialog box only produce recommendations if data collection is enabled.
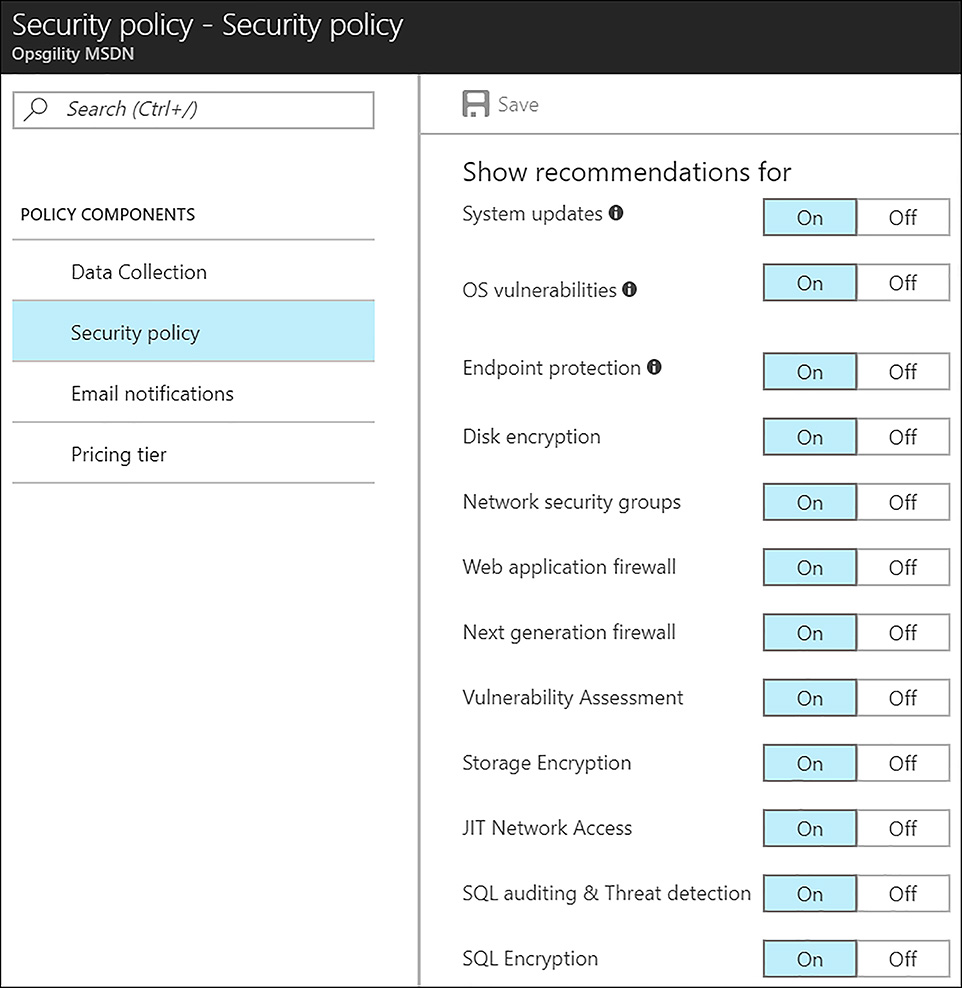
FIGURE 6-15 Setting the Azure Security Center security policy
Email Notifications The email notifications dialog box allows administrators to specify what email address and/or phone number should be used for notifications in the case where a compromise is detected. By default, the subscription owner’s email address is populated here, but it is a good idea to change this to an email distribution list so that multiple people can be notified. It is also possible to opt in to emails about alerts and to send emails to all subscriptions owners. These options are shown in Figure 6-16.
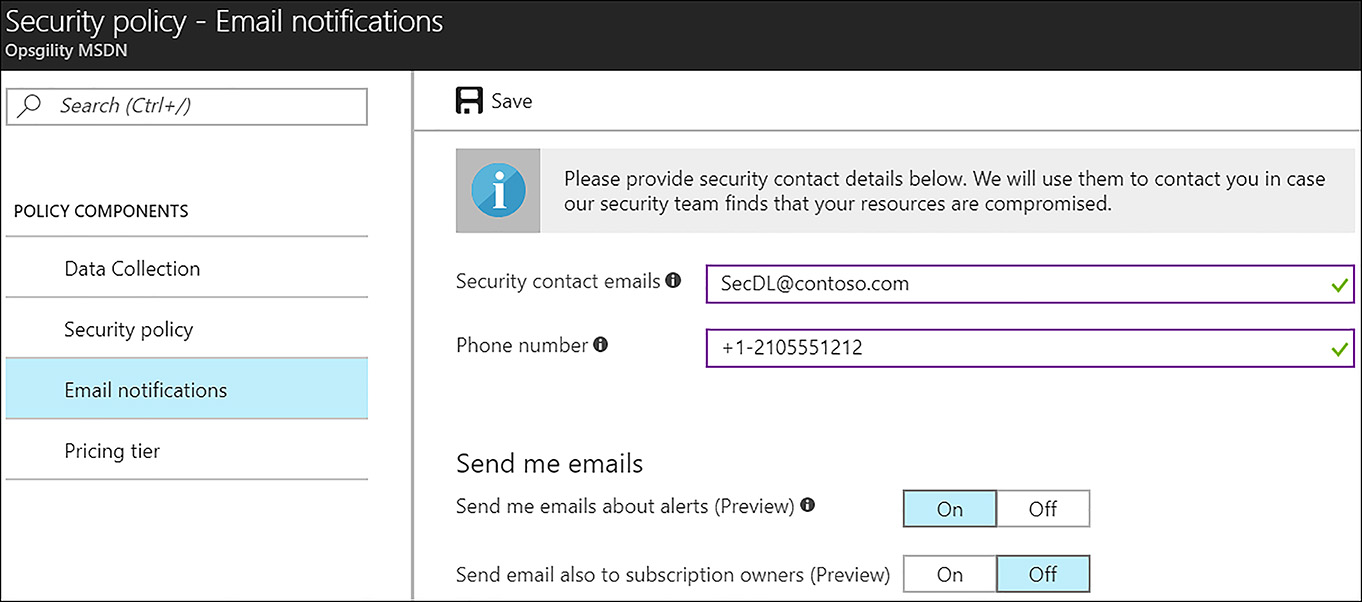
FIGURE 6-16 Setting the Azure Security Center email notifications
Pricing Tier The last section of the security policy is the pricing tier, as shown in Figure 6-17. There are two pricing tiers available for ASC. The free tier is enabled by default and offers continuous security assessment and actionable recommendations for Azure deployments. The standard tier brings many other capabilities to bear, such as advanced threat detection and extended security monitoring to resources on-premises and in other clouds. The pricing tier can be set at the subscription level, which is then inherited by all resource groups in that subscription, or it can be set per resource group. This enables an organization to lower costs by only enabling the standard pricing tier on selected resources.
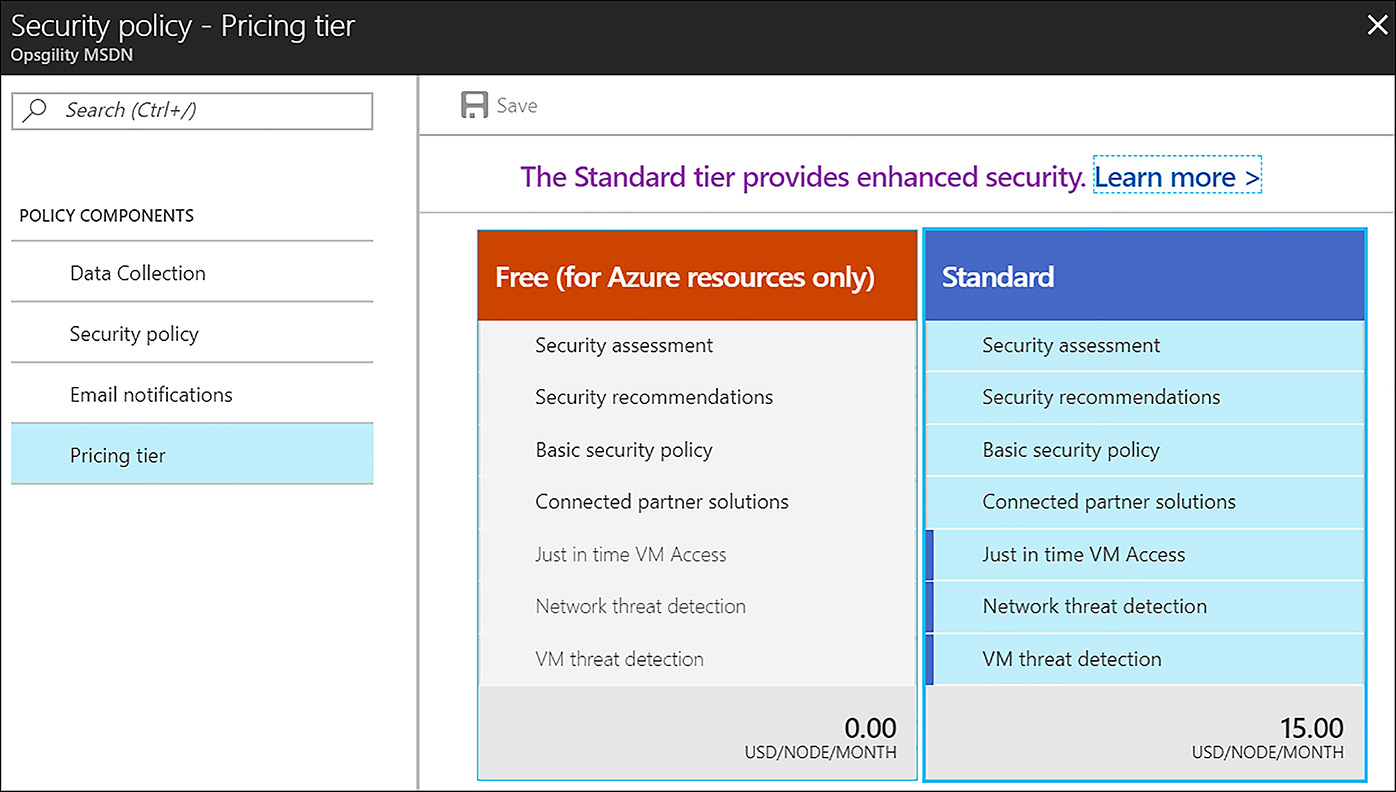
FIGURE 6-17 Choosing the Azure Security Center pricing tier
Enabling protection for non-Azure Computers If using the standard tier of ASC, organizations can also add non-Azure machines to their ASC workspace for security monitoring. These can be machines on-premises or in other public clouds. This means that ASC is truly a hybrid security solution. To enable protection for other machines, a manual installation of the Microsoft Monitoring Agent must be performed, with the subsequent configuration of that agent to report in to the ASC workspace. To do this, under the General heading, click Onboarding to advanced security. From there, click Do you want to add non-Azure computers? Finally, click Add computers to download the Windows or Linux agent installation (see Figure 6-18). Be certain to take note of the Workspace ID and Key. These are provided during agent installation and are required to allow the agent to authenticate and report in to the ASC workspace.
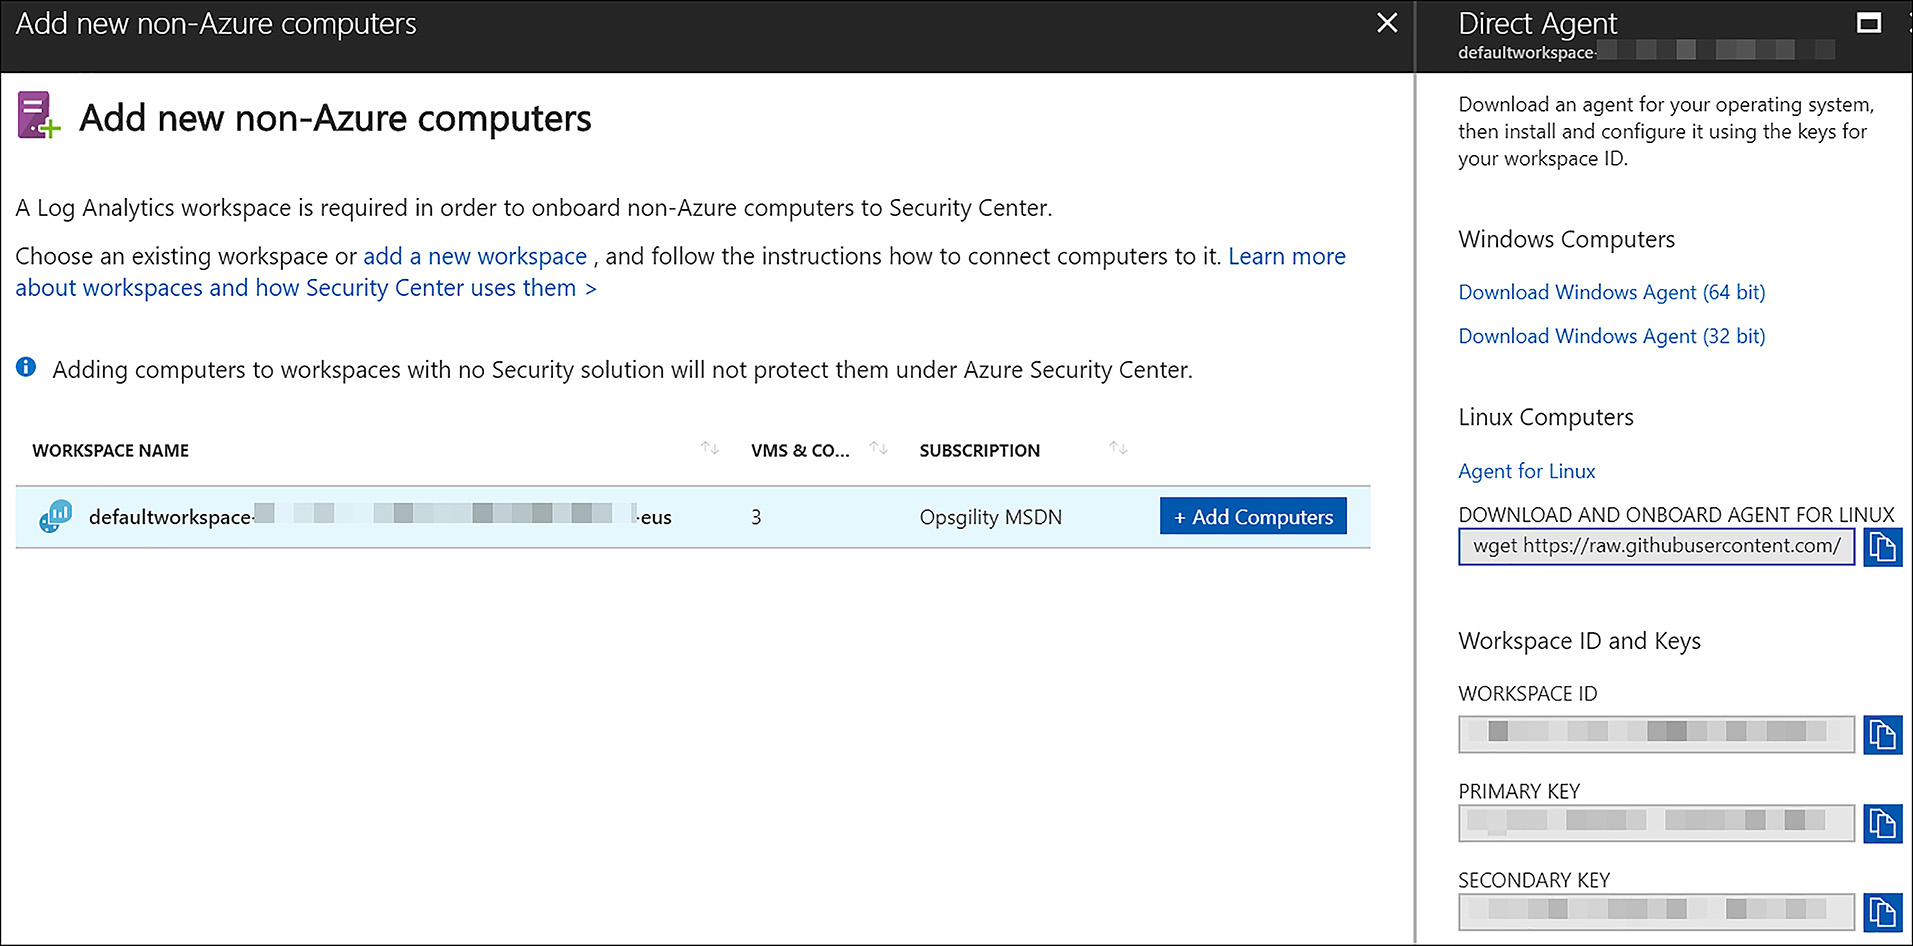
FIGURE 6-18 Adding non-Azure computers to Azure Security Center
Preventing Security Threats with Azure Security Center
One of the key pillars of Azure Security Center is helping organizations prevent security threats from happening in the first place. ASC accomplishes this goal by scanning your Azure deployments for sub-optimal security configurations, and then surfacing recommendations on how to remediate those problematic configurations. In many cases, these recommendations can be implemented within the ASC interface and many of the potential mitigations are from Microsoft partners. This integration with partner-provided solutions is another key value of ASC. If the recommendations made by Azure Security Center are all followed, the exposure to security threats is greatly minimized (Figure 6-19).
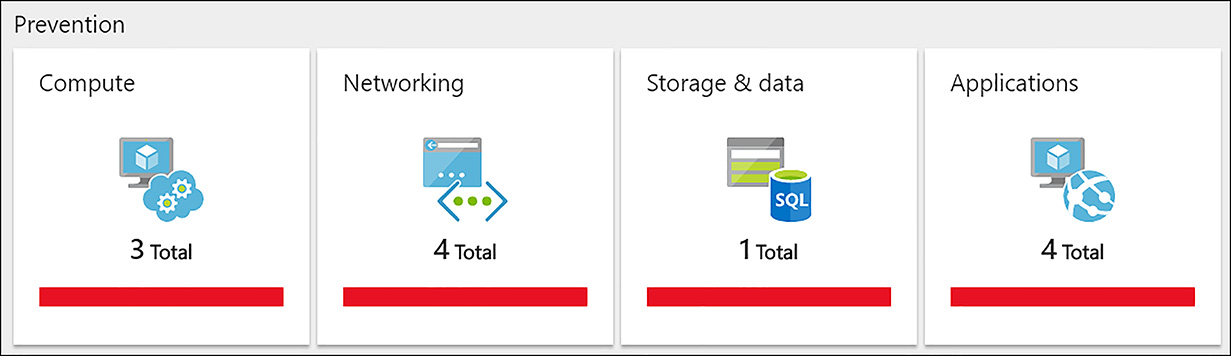
FIGURE 6-19 Azure Security Center’s prevention tiles
There are four areas of recommendations available, including Compute, Networking, Storage and Data, and Applications, as shown in Figure 6-19.
Compute Azure Security Center can monitor the configuration of both Infrastructure as a Service (IaaS) virtual machines and Cloud services. Within the compute blade, you can review a high-level view of findings. Examples of configuration items that are reviewed include endpoint protection and disk encryption status. Clicking a recommendation gives additional information and in many cases, allows for the remediation of the finding within the Azure Security Center dialog box. In the following example (Figure 6-20), three virtual machines are missing endpoint protection. By clicking this recommendation, you can install endpoint protection on all of them at once. This recommendation is one that is integrated with partner-provided security solutions. Trend Micro’s Deep Security Agent is one of the antimalware solutions available to install automatically and within the recommendation context.

FIGURE 6-20 Remediating a security recommendation from Azure Security Center
An additional capability in Azure Security Center that relates to prevention is called Just in time (JIT) VM access. Enabling JIT VM access on one more VMs blocks inbound network traffic by default, using a network security group. When a person with write access for the VM requests access, the request is allowed temporarily based on the access policy in ASC. To enable Just in time VM access, click this option under the Advanced Cloud Defense section of ASC’s menu options. Under Virtual machines, click the Recommended tab. Next, click the checkbox beside the VM that JIT should be enabled for and click Enable JIT on 1 VM. These selections are shown in Figure 6-21.
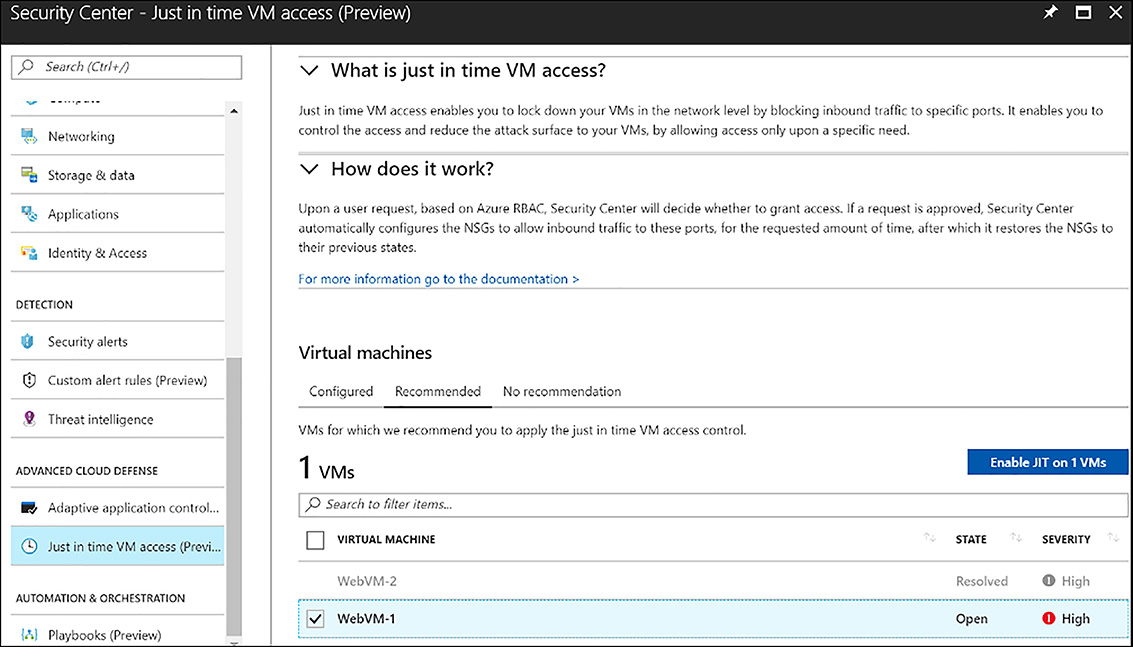
FIGURE 6-21 Enable Just in time VM access on a single VM
This opens the JIT VM access configuration blade, where any ports not required can be deleted and any ports not pre-configured can be added. Also the maximum request time is set here, which defaults to three hours. These configurations are shown in Figure 6-22.

FIGURE 6-22 Adding or removing ports
Temporary network access is granted from the Just in time VM access interface on the Configured tab. Click the checkbox near the VM that access should be enabled for, and then click Request Access. In the Request Access blade, click On for each port that should be opened and then click Open ports (Figure 6-23).
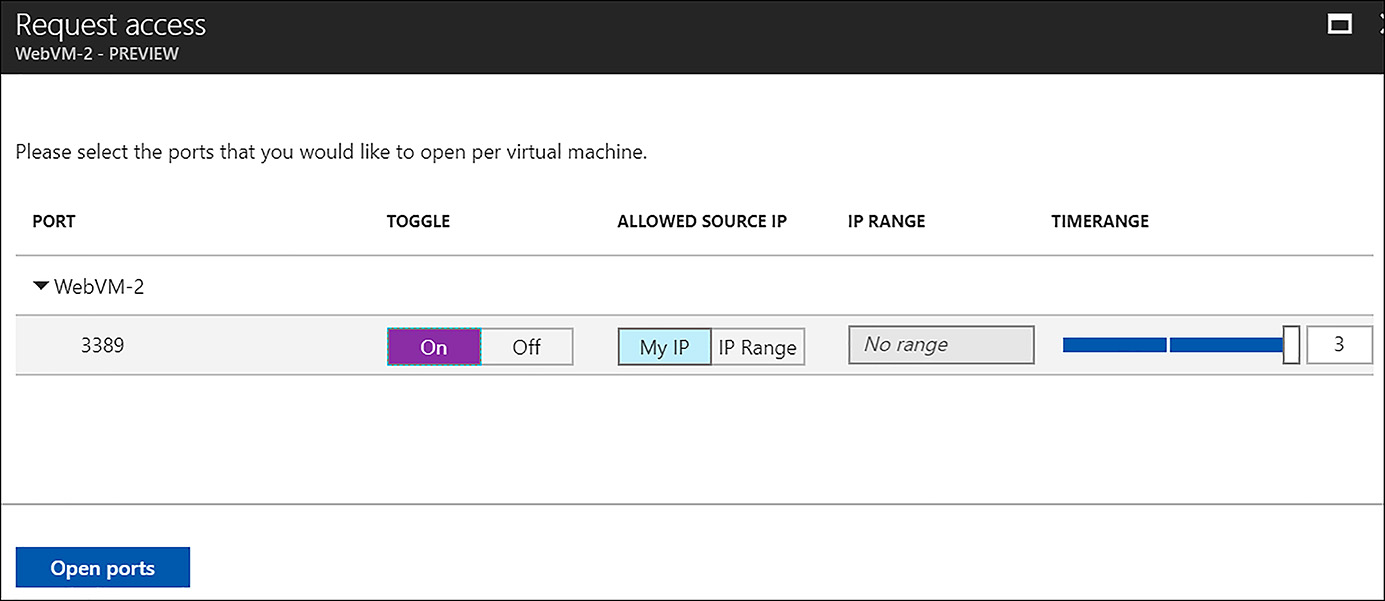
FIGURE 6-23 Requesting network access
Networking The networking node of Azure Security Center evaluates the accessibility of external facing resources (those with public IP addresses) and the use of traffic blocking/inspection technologies, such as network security groups (NSGs), network firewalls, and web application firewalls. Many types of recommendations are made, such as to further restrict traffic flow on existing network security groups, or to highlight VMs that are not protected at all by network security groups. As with the compute node, recommendations in the network node are actionable. They can be remediated from within the ASC interface. In the following example (Figure 6-24), the NSG protecting a subnet has a rule that is potentially too liberal. The rule allows RDP access from the source address of INTERNET, which is a tag that means any address on the public internet. It is likely that this should be constrained to only the source IP addresses where administration of the VM is likely to come from. The NSG rule can be edited by clicking Edit inbound rule within the recommendation.
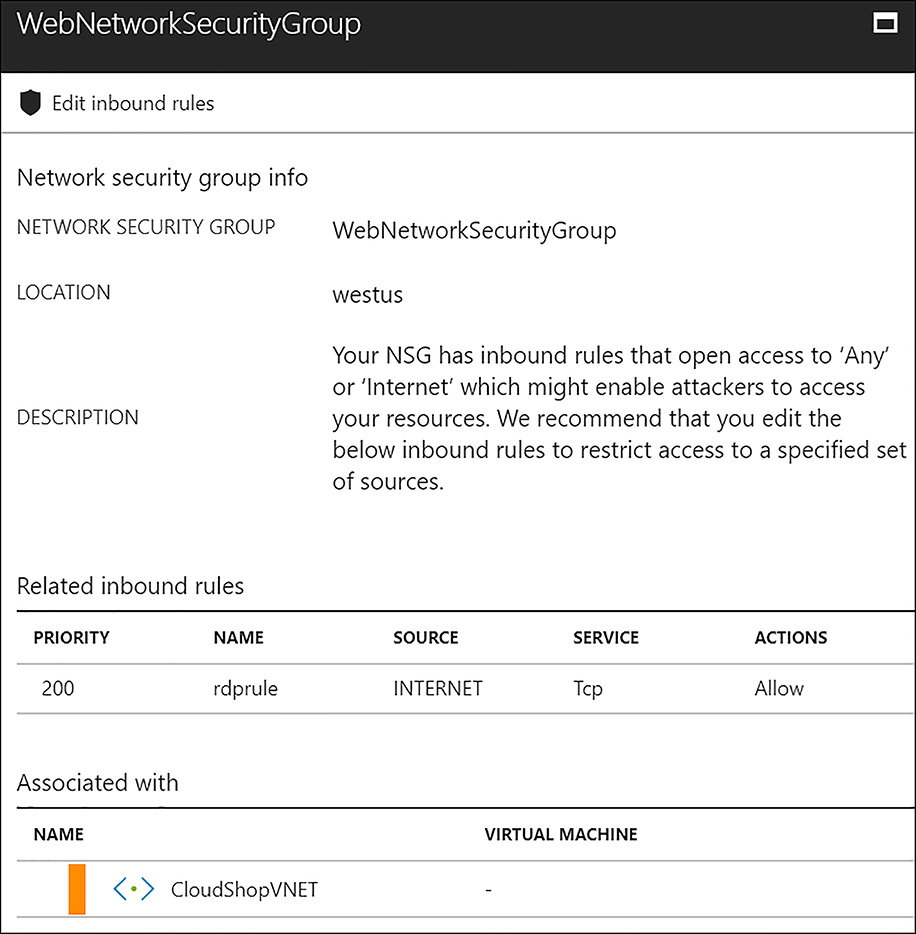
FIGURE 6-24 Responding to a ASC network recommendation
Storage and data The Storage and Data node expands outside of pure IaaS, to surface recommendations surrounding platform as a service (PaaS) offerings. Azure Storage is Azure’s robust cloud storage service, providing blob, disk, file, queue, and table storage types. Azure SQL database is Azure’s database as a service (DBaaS) offering providing SQL databases without the server to manage. Example recommendations under storage and data include enabling encryption for Azure Storage (using Storage Service Encryption) and enabling transparent data encryption on SQL databases, as shown in Figure 6-25.
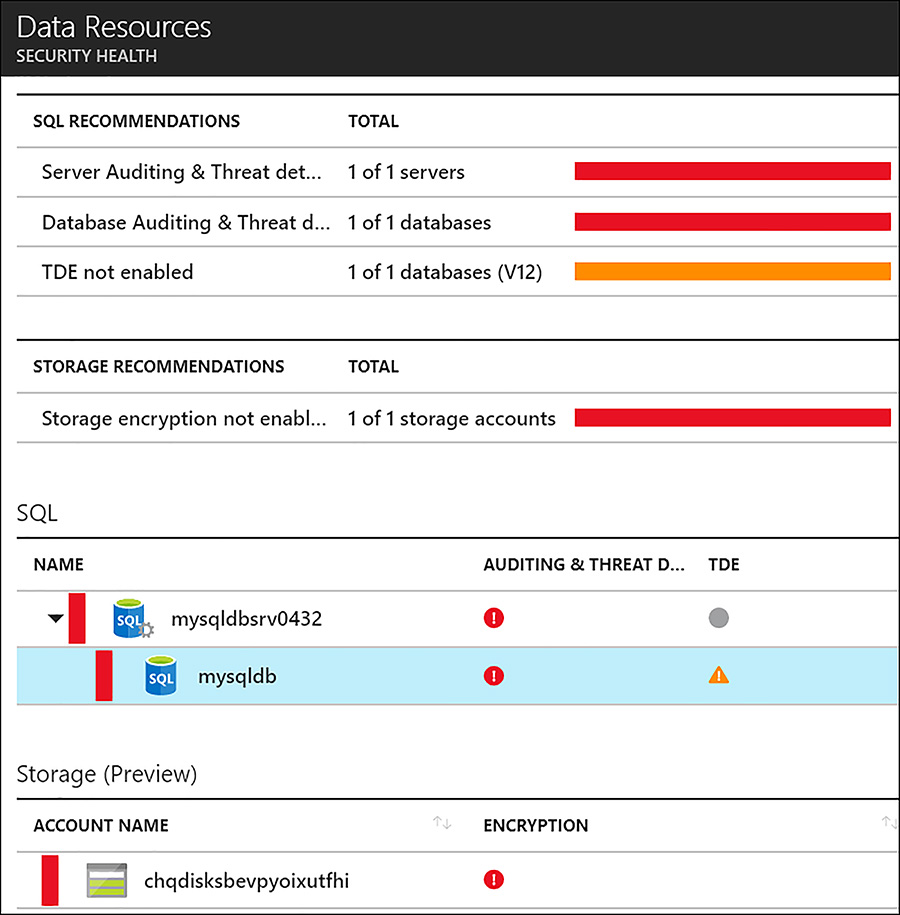
FIGURE 6-25 Storage and data recommendations
Applications The applications node within Azure Security Center evaluates public-facing services, such as websites, and makes recommendations, such as using a web application firewall (WAF) in front of web applications. This recommendation is another example of tight partner integration. Web application firewalls from several partners are available for automatic deployment, including Barracuda, F5, and Fortinet.
Figure 6-26 shows a cloudshopip web application that does not have a WAF deployed in front of it. ‘In front’ of the application implies all inbound network traffic should be directed to the WAF so that it can be inspected for known attack patterns.

FIGURE 6-26 Web applications without Web Application Firewall protection
To implement a WAF to protect cloudshopip, click the web application and then click the recommendation Add a web application firewall. Either click Create New to begin the process of creating a new WAF, or choose an existing WAF. If you are creating a new WAF, choose the Microsoft or partner-provided option you want. These selections are shown in Figure 6-27.
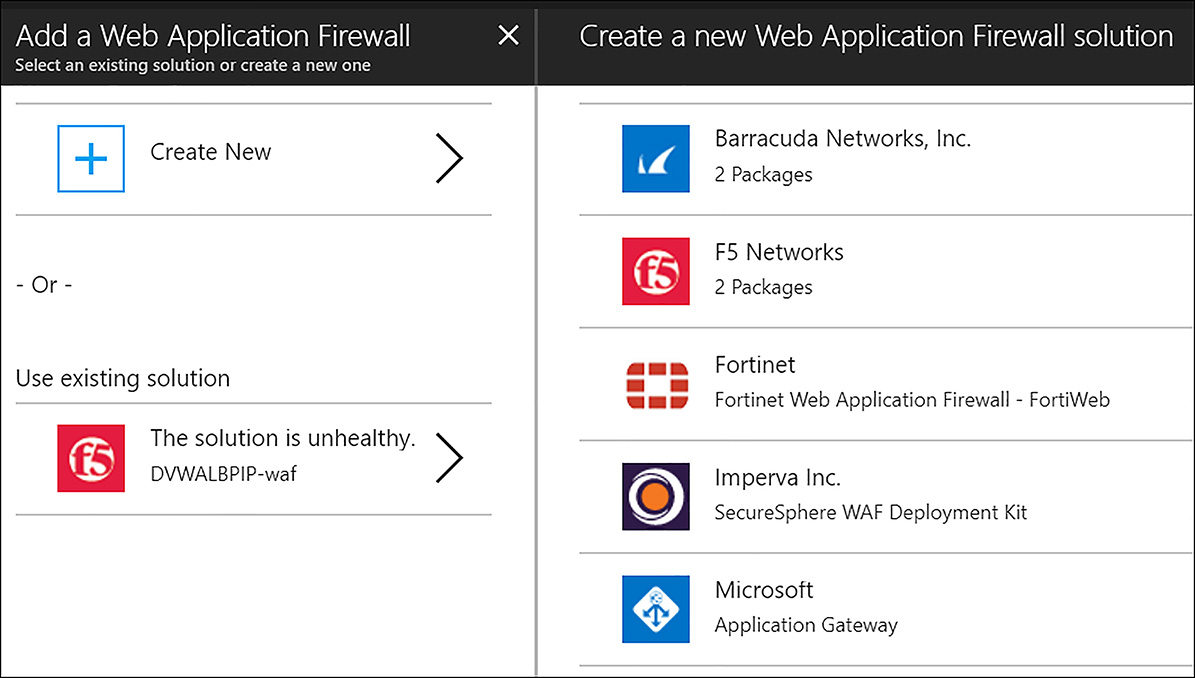
FIGURE 6-27 Adding a new Web Application Firewall
Walk through the guided steps to deploy the WAF. Most of the partner-provided options are automatically provisioned with no additional configuration required. Also, the WAF is a new source of security telemetry, which Azure Security Center evaluates and surfaces where appropriate.
Another prevention capability related to applications is called Adaptive application controls. This feature of ASC allows administrators to whitelist applications that are allowed to run on Windows machines running in Azure. By only allowing approved applications to run, protected machines are prevented from executing malware or other unwanted applications. Traditionally it has been difficult to determine which applications to include in a whitelist approach, because leaving any off the list can mean a non-functional application or machine. ASC helps solve this problem by analyzing the applications running on each server and helping the administrator develop an accurate whitelist.
To configure Adaptive application controls, click this option under Advanced Cloud Defense within the ASC menu options. Under Resource groups, click the Recommended tab. Select a resource group, which opens the Create application control rules dialog box, as shown in Figure 6-28.
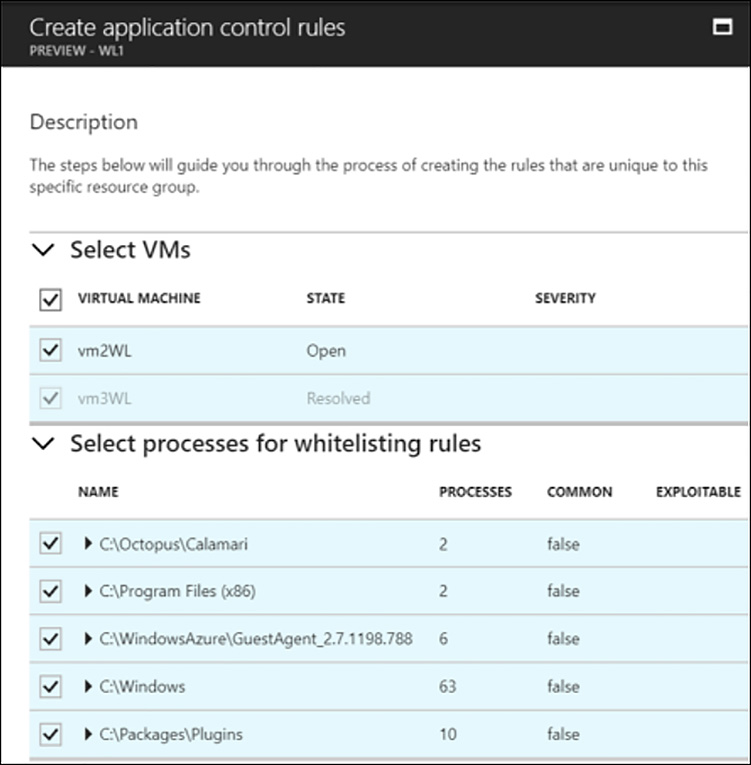
FIGURE 6-28 Create application control rules dialog box
Select the VMs that application control should apply to. This reveals a list of processes that can be added or removed from application control.
NOTE EXPLOITABLE PROCESSES
Any processes marked as exploitable should be reviewed carefully. These processes likely represent malware.
After you select the processes, click Create. Application control is enabled in audit mode. After you validate that the whitelist does not adversely affect the workload, Application control can be changed to enforce mode. At this point, only approved processes are allowed to execute.
Other Prevention Areas The Recommendations blade, accessed from the tile of the same name, is one place to view all the recommendations that ASC suggests. The recommendations are ordered by severity, with the highest severity at the top. Clicking any recommendation gives you more information and in many cases, allows immediate remediation. It is also possible to dismiss recommendations, as shown in Figure 6-29, which can be useful when an organization decides to not act upon certain findings.
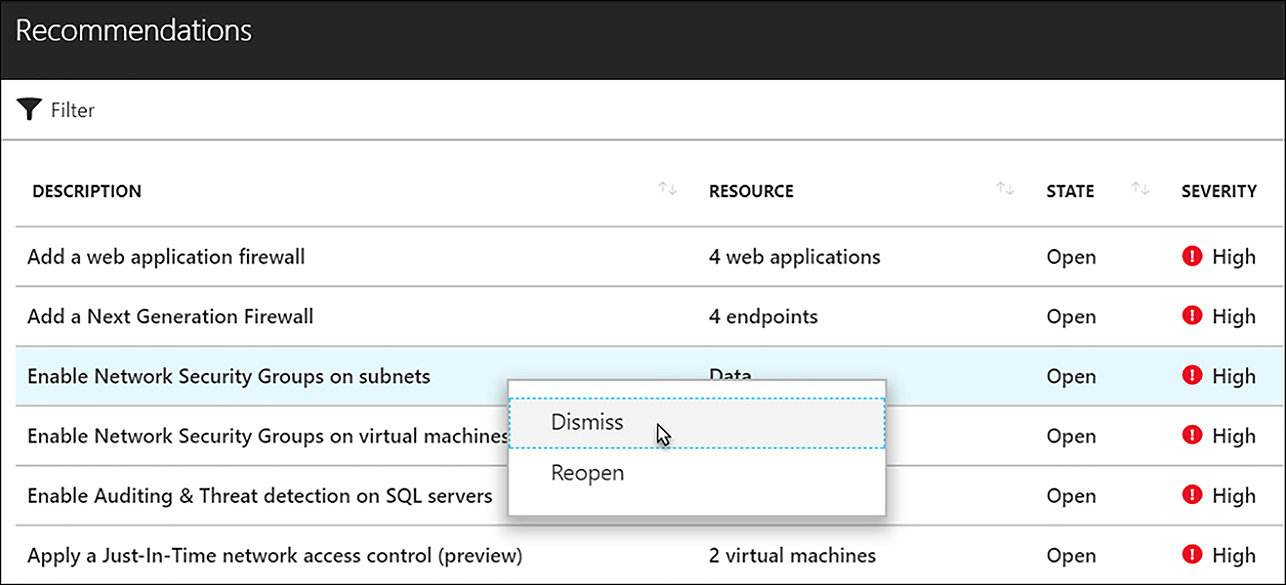
FIGURE 6-29 Dismiss recommendations
Another prevention area with ASC is the Identity and Access solution. Within this solution, customers can see visualizations created from the security logging that is collected from monitored machines. This includes information about logons that are occurring (both successful and failed), a list of the accounts that are being used to attempt logons, and accounts with changed or reset passwords, as shown in Figure 6-30.
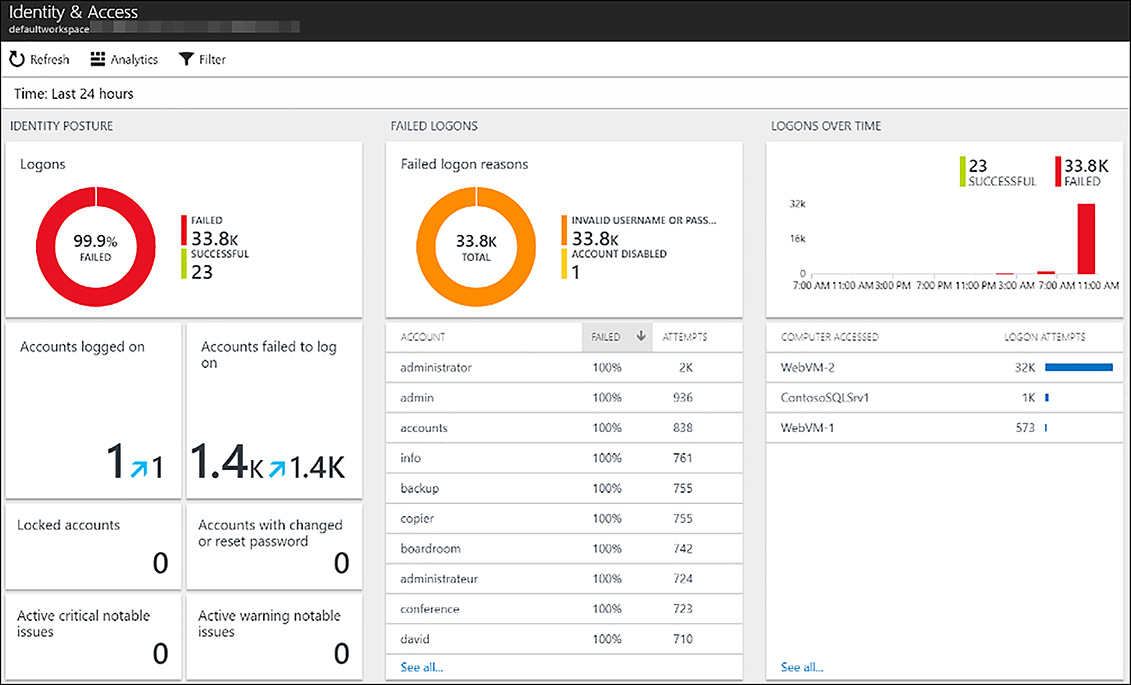
FIGURE 6-30 The Identity and Access tiles within Azure Security Center
Responding to security threats with Azure Security Center
Beyond prevention, Azure Security Center also detects probable malicious activity and gives actionable guidance on how to respond to threats. ASC accomplishes this by collecting and analyzing security data from a customer’s Azure deployments, their virtual networks, and from any partner solutions they have deployed, such as anti-malware or web application firewalls. This security information is analyzed and correlated with global threat intelligence, by using machine learning models, to detect threats that would be impossible to identify with traditional, manual approaches. The best part of this approach for customers is that all of this platform-provided data analysis and correlation enables them to benefit without requiring them to maintain vast teams of data scientists and security experts within their company.
The detection tiles include the Security alerts and Most attached resources. Security alerts show events that are deemed as potentially malicious. In the following example, a remote desktop protocol (RDP) brute-force attack is underway against an Azure virtual machine. Clicking the alert gives a wealth of information, including the source IP address and how many logon attempts have failed as shown in Figure 6-31.
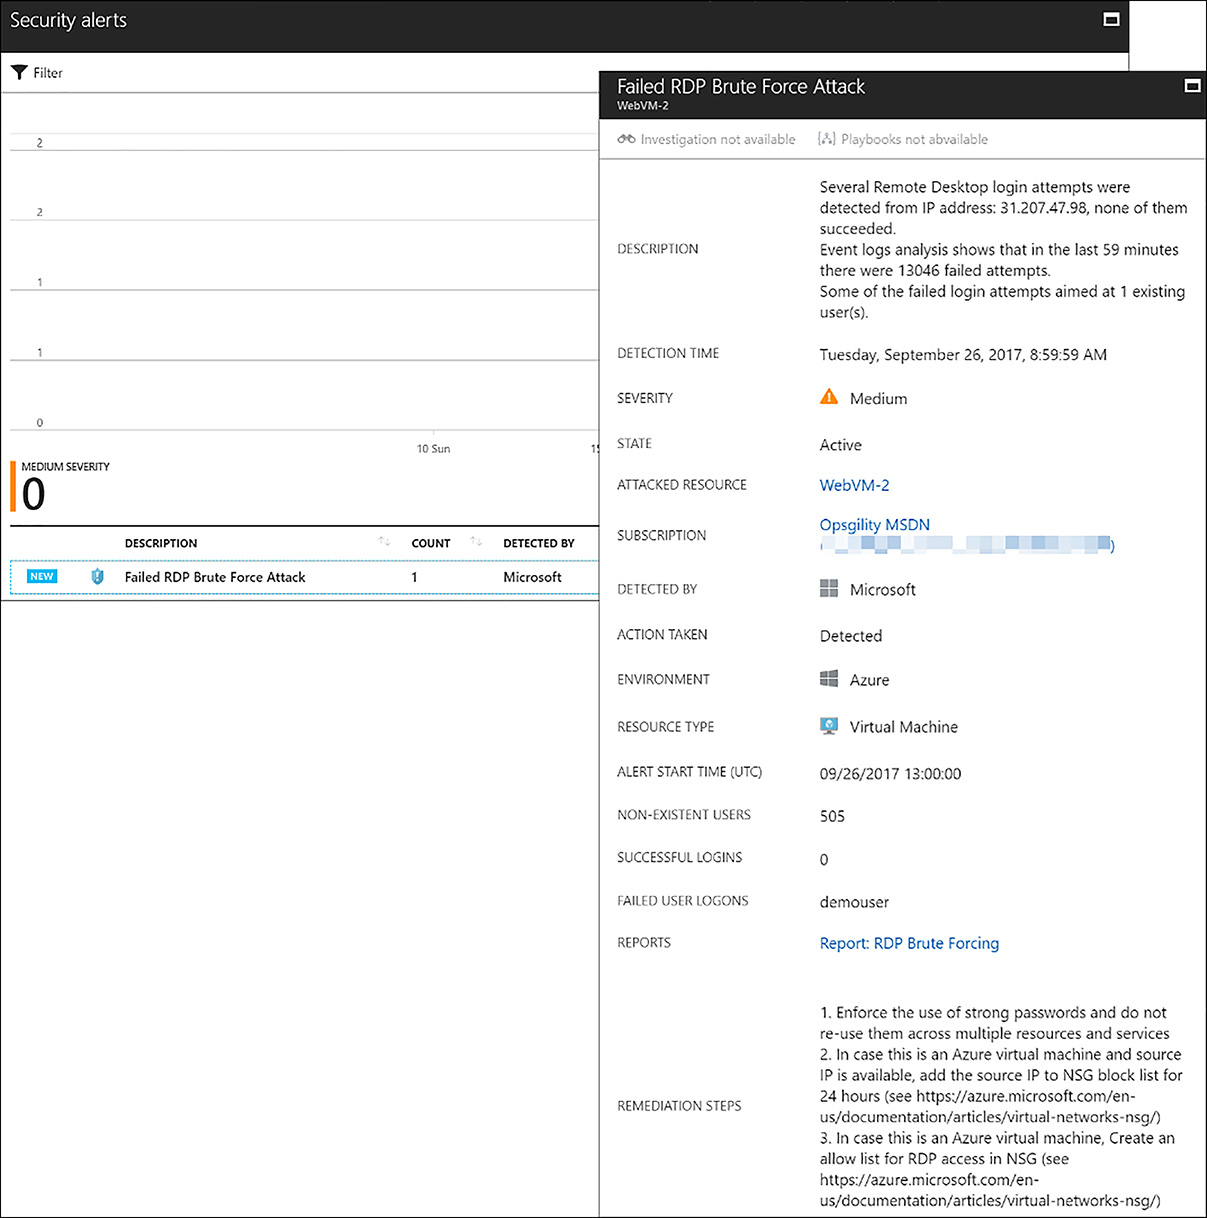
FIGURE 6-31 Security Alert in Azure Security Center
It is also possible to create custom alerts. This feature is in preview as of this writing. To do so, select Custom alert rules under the Detection heading. Then, select New custom alert rule and complete the form. When custom alerts are triggered, they are shown on the Security alerts tile, as shown in Figure 6-32.

FIGURE 6-32 Creating a custom alert in Azure Security Center
The following query finds failed logon attempts on Windows computers.
SecurityEvent | where EventID == 4625 and AccountType == 'User' | extend
LowerAccount=tolower(Account) | summarize Failed = count() by LowerAccount
NOTE LOG ANALYTICS QUERY LANGUAGE
The above query is written using the new Log Analytics query language. Log Analytics workspaces created prior to October 2017 may still use the older query language, but all workspaces will be migrated to the new language by the end of 2017. See the article describing the new query language here: https://docs.microsoft.com/en-us/azure/log-analytics/log-analytics-log-search-upgrade
Using this query in conjunction with the settings in a custom alert, allows an organization to be alerted when this condition occurs over a certain number of times. The configuration of the custom alert is shown in Figure 6-33.
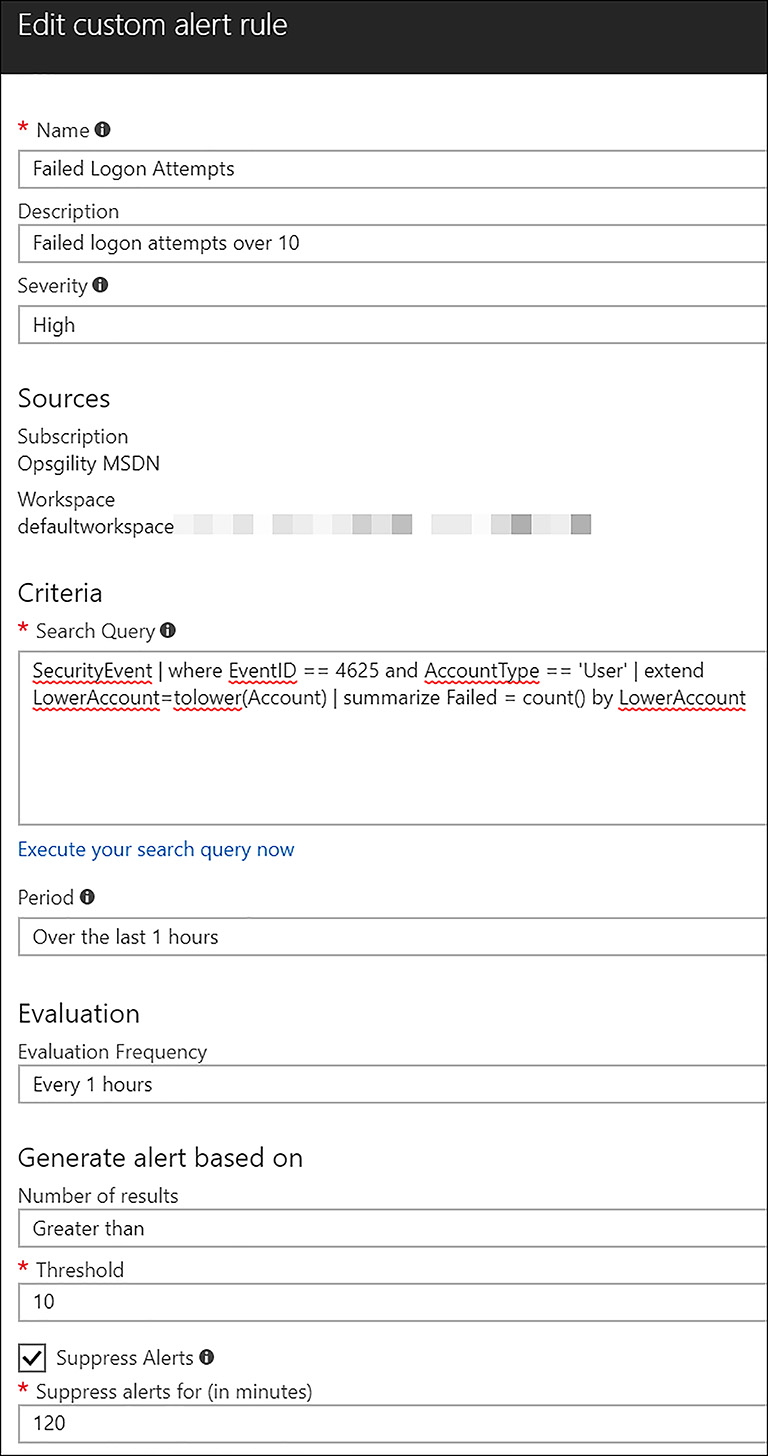
FIGURE 6-33 Creating a custom alert in Azure Security Center
Finally, there is the Threat intelligence detection capability, which is also dependent on the standard tier of ASC. Threat intelligence is presented as a dashboard with four types of tracked information: Threat types, which gives a summary of the types of detected threats; Origin country, which shows an aggregate of malicious traffic by source country; Threat location, which shows both incoming and outgoing malicious traffic on a map of the world; Threat details, which gives additional information. These information sections are shown in Figure 6-34.

FIGURE 6-34 Azure Security Center Threat intelligence dashboard
Configure single sign-on with SaaS applications using federation and password based
One of the most compelling features of Azure Active Directory (Azure AD) is the ability to solve the problem of authenticating to software as a service (SaaS) applications. Organizations are using an ever-increasing number of SaaS applications to accomplish their core business. However today, users must remember a separate username and password for each application used. Azure AD allows users to sign in with their corporate account, called an organizational account, and they access the SaaS applications with a consistent logon experience. The actual logon is federated, or password-based. These logon types and the steps to configure them are discussed further in the following sections.
Federated Single Sign-On
With Federation-based single sign-on (SSO), SaaS applications redirect authentication requests to Azure AD, rather than prompting the user for credentials that the application maintains. Within the application, the authenticated user must have an account that designates the permissions they have within the application (authorization). Accounts with SaaS applications can either be automatically provisioned through integration with Azure AD, or manually provisioned. Federated SSO is available for applications that support SAML 2.0, WS-Federation, or OpenID Connect protocols.
EXAM TIP
Be certain to know the protocols that are supported for use with federated single sign-on, namely SAML 2.0, WS-Federation, or OpenID Connect
The first step in configuring federated single sign-on is to add the application in Azure Active Directory. To do this within the Azure AD blade, click Enterprise applications, and then click New application, as shown in Figure 6-35.

FIGURE 6-35 Adding an application to Azure Active Directory
Within the search dialog box enter the application name to add one from the gallery. There are over 2,800 SaaS applications listed there. Click the application you want and select Add. After the application is added, select it to open its properties, and then select Single sign-on. Next, set the Single Sign-on Mode to SAML-based Sign-On. In the following example (figure 6-36), the SaaS application Aha! has been added. This application supports SAML 2.0 and is pre-integrated with Azure Active Directory.
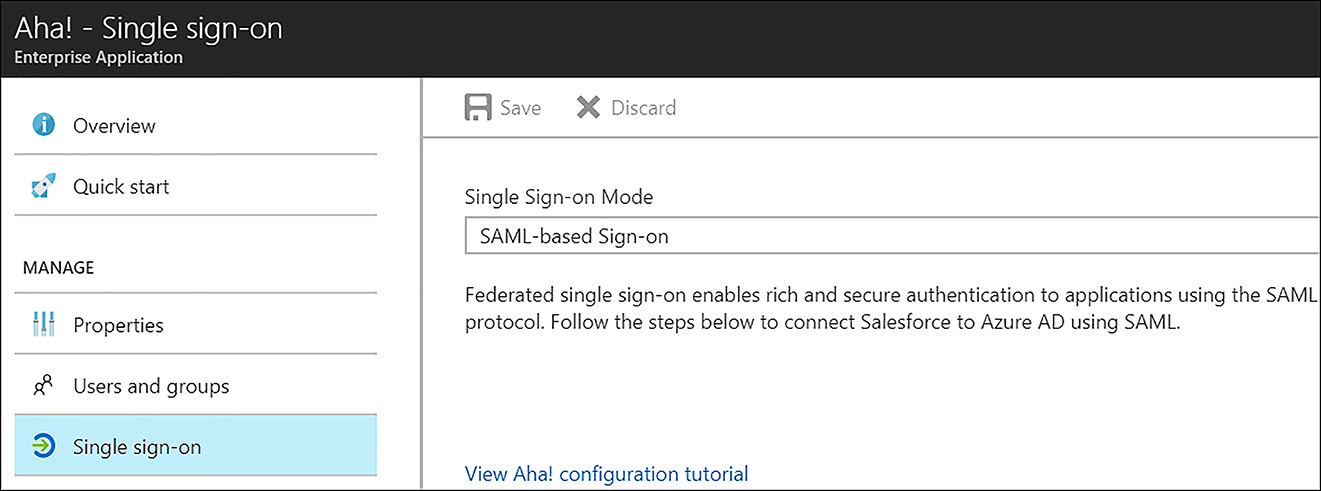
FIGURE 6-36 Enabling SAML-based Single Sign-on
There are several sections to complete to finish enabling SAML-based sign-on. The first is the SaaS application’s sign-on and identifier URLs. These represent the sign on URLs for the application and are provided by the application provider. There is also the user attributes section where the user identifier attribute is specified. This is the attribute the SaaS application expects when linking a user defined in its user database with an Azure AD user. These two sections with example answers are shown in Figure 6-37.
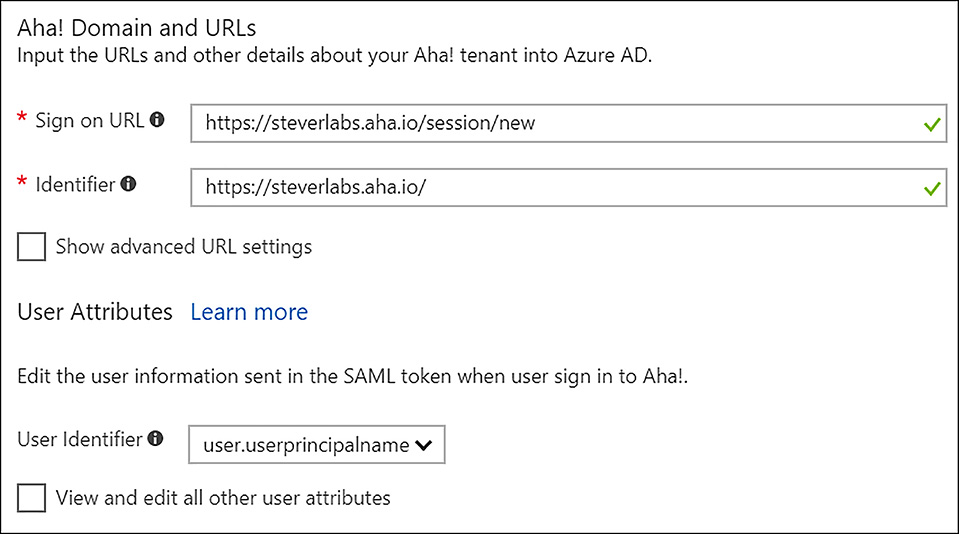
FIGURE 6-37 Application Sign-on URLs and User Attributes
The remaining configuration section is for the SAML signing certificate. Azure AD generates this certificate and it is used to sign the SAML token used in authentication. The metadata file from this certificate can be downloaded as a file and used to set up the SAML configuration within supported SaaS applications. Alternately, you can manually enter this information to configure the application. Figure 6-38 shows the SAML signing certificate dialog for the Aha! application.
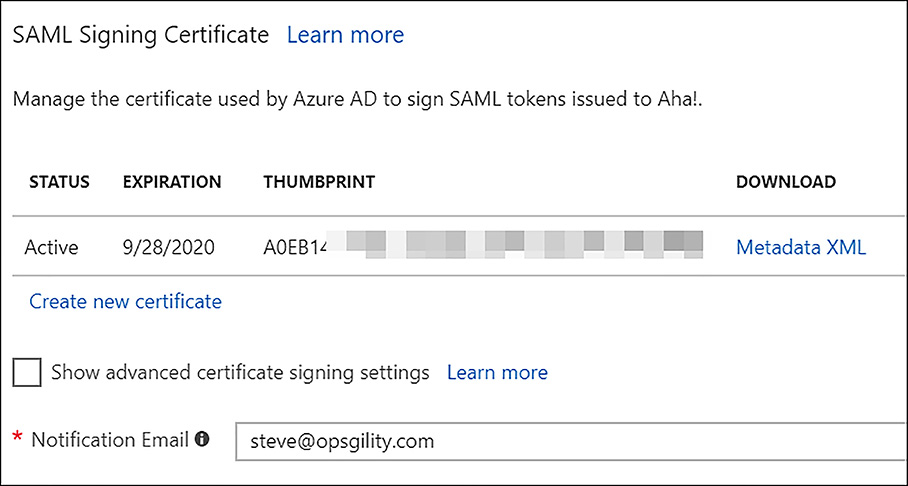
FIGURE 6-38 SAML Signing Certificate information
With this information in place, click Save at the top of the page. This completes the federated single sign-on configuration on the Azure side. Now the SaaS application must be configured to use Azure AD as the SAML identity provider. This can be as simple as uploading the certificate metadata file previously discussed, or the certificate and other information might need to be entered manually. The steps to enable each application vary, so Microsoft has provided tutorials for hundreds of SaaS applications at this URL: https://docs.microsoft.com/en-us/azure/active-directory/active-directory-saas-tutorial-list. In the case of the application Aha!, which is used as an example here, the configuration involves uploading the metadata XML file. This populates all the required fields to configure Azure AD as the SAML identity provider, as shown in Figure 6-39.
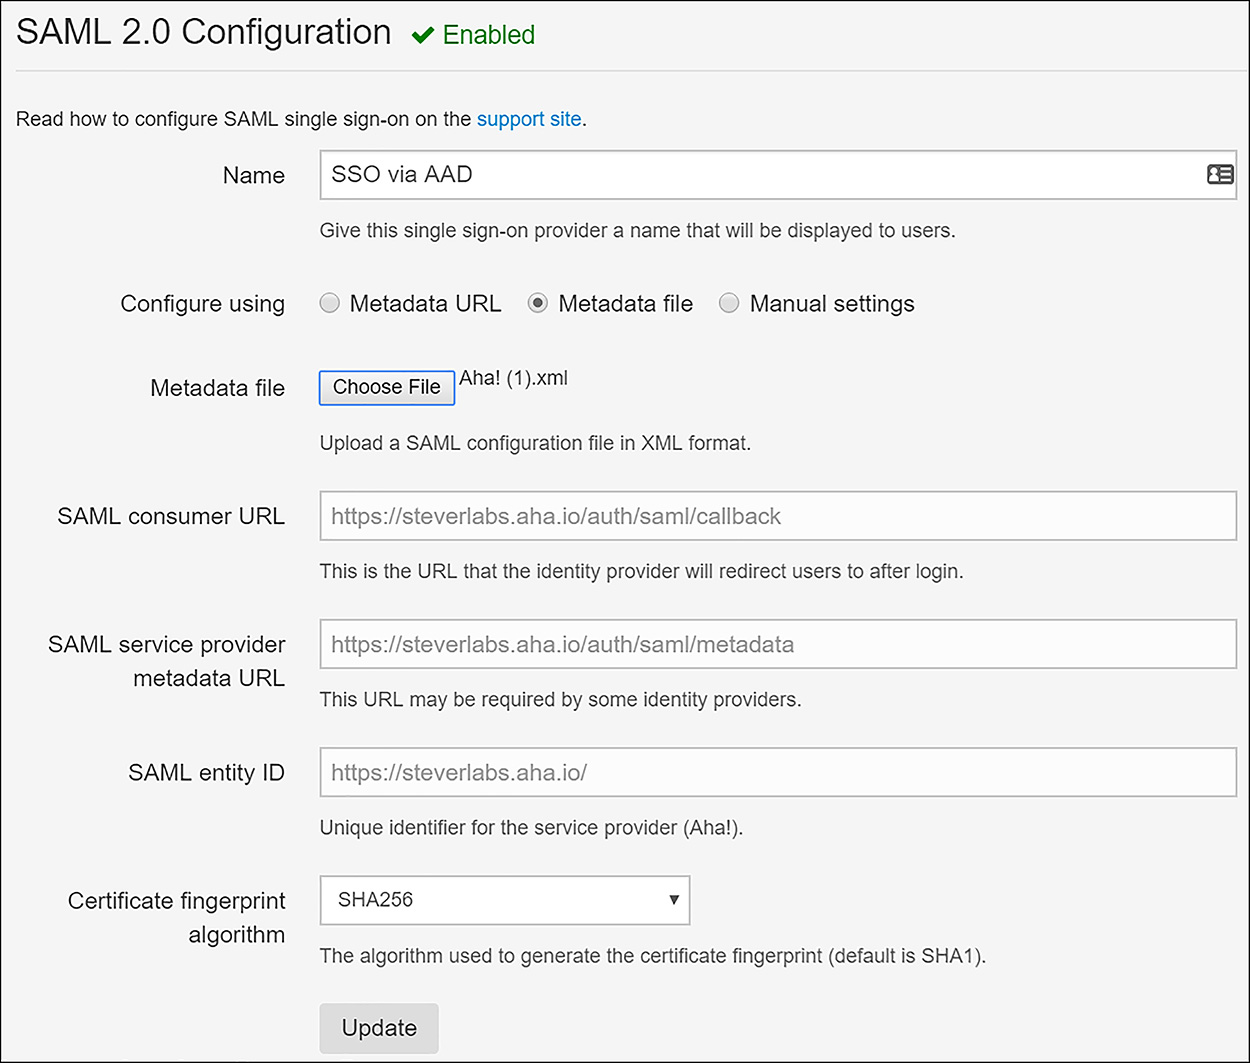
FIGURE 6-39 Aha! SaaS application SAML identity provider configuration
Password-based Single Sign-on
Some SaaS applications require the use of their own identity and present an HTML-based sign in page. Azure AD can also enable single sign-on for these applications through password-based single sign-on. This feature works by securely storing user account information and password and presenting these on behalf of the user. This occurs when the user accesses the application from the access panel (https://myapps.microsoft.com).
There are two methods of configuring password-based SSO. The first involves an administrator managing the credentials for access. In this case, an administrator enters a set of credentials when the application is added within Azure Active Directory. After users are granted access to this application, they open it and are authenticated automatically without knowing the sign on credentials. This can be useful in scenarios such as granting marketing resources access to a corporation’s Twitter account. They can tweet on behalf of the corporation, but their access can be revoked at any time and they never have access to the credentials. The second method of enabling password-based SSO is where the user manages the credentials. This method works by allowing the user to enter their credentials upon first accessing the application from the access panel. The credentials are stored securely and are presented on behalf of the user during subsequent application accesses.
To configure password-based SSO, add an application within Azure AD by using the same process previously described. Figure 6-40 shows Twitter being added.
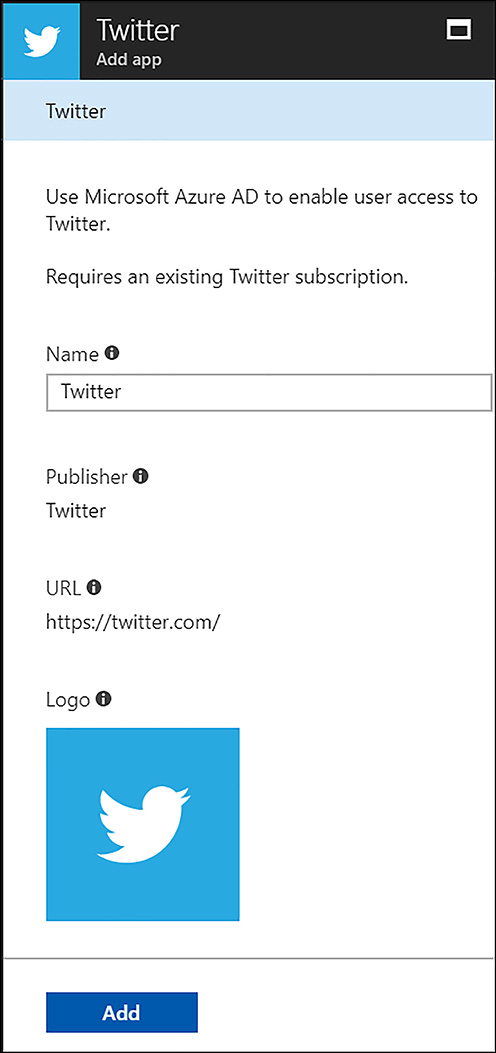
FIGURE 6-40 Adding Twitter to Azure AD
After the application is added, click Single sign-on, choose Password-based Sign-on as the Single Sign-on Mode, and click Save (shown in Figure 6-41).
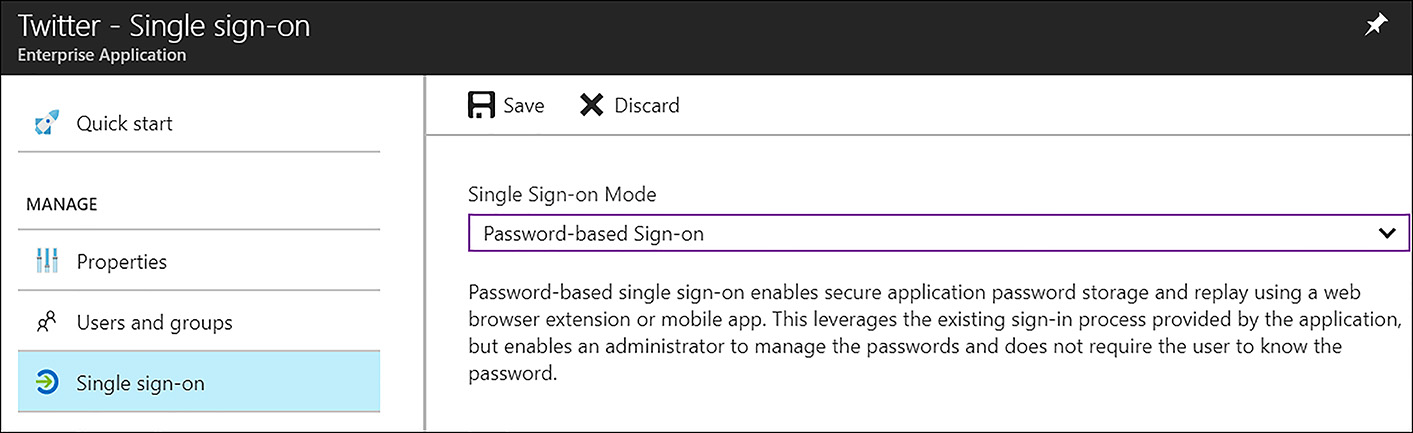
FIGURE 6-41 Configuring the Single Sign-on Mode
When you assign a user to this application, choose whether to use administrator managed or user managed credentials. To use administrator managed credentials, choose Yes at the prompt, Assign credentials on behalf of the user. If the user manages the credentials, choose No at this prompt. As shown in Figure 6-42, the administrator has entered credentials on behalf of the user.
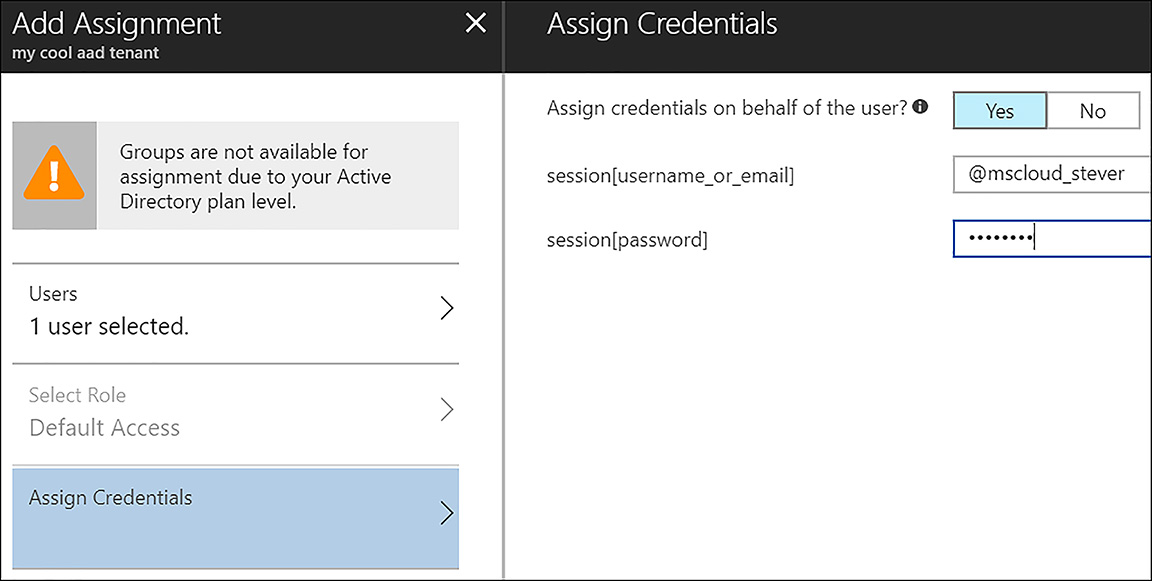
FIGURE 6-42 Choosing administrator or user managed credentials
It’s important to note that password-based SSO requires the installation of a web browser extension or plugin. It is this extension that securely accesses the credentials from Azure AD and passes them to the application on behalf of the user. Upon first access of the application from the access panel, the extension downloads and the user installs it. This operation only occurs once. Figure 6-43 shows the extension installation dialog.
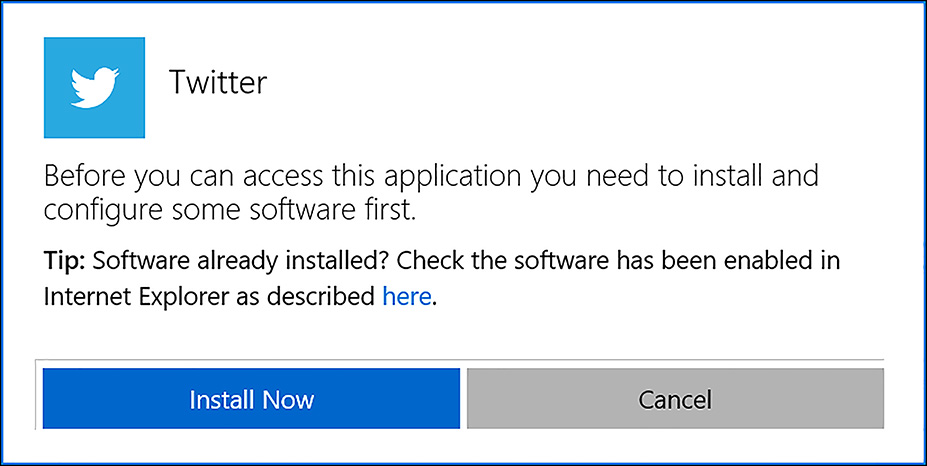
FIGURE 6-43 Installing the access panel extension
Add users and groups to applications
After you add applications to Azure Active Directory, you can grant access to these applications to either users or groups. Note that granting access to applications via group membership requires Azure Active Directory Premium (at least the P1 edition). Table 6-1 provides a non-exhaustive list of the differences between the Azure Active Directory Editions.
TABLE 6-1 Comparing Azure Active Directory Editions
Features |
Free |
Basic |
Premium P1 |
Premium P2 |
Directory Objects |
500k |
No Limit |
No Limit |
No Limit |
Self-Service Password Change for cloud users |
Included |
Included |
Included |
Included |
Company Branding (Logon Pages/Access Panel customization) |
Not Included |
Included |
Included |
Included |
Group-based access management/provisioning |
Not Included |
Included |
Included |
Included |
Multi-Factor Authentication |
Not Included |
Not Included |
Included |
Included |
Identity Protection |
Not Included |
Not Included |
Not Included |
Included |
Privileged Identity Management |
Included |
Included |
Included |
Included |
NOTE USING GROUPS FOR APPLICATION ACCESS
Groups can be used for granting access to applications only when Azure AD Basic or Premium (P1 or P2) is licensed.
To grant access to an application, navigate to Enterprise applications within the Azure AD blade and click All applications. Here you see a list of the applications that are integrated with Azure Active Directory, as shown in Figure 6-44.

FIGURE 6-44 Navigating to the integrated applications
Click the application you want to grant access to, and then click Users and groups. Next, click Add user, which allows either users or groups to be assigned to an application. Clearly, assigning individual users is not feasible at scale, so group-based assignment is preferred in this case. As shown in Figure 6-45, a group and a user have been granted access to the Aha! SaaS application.
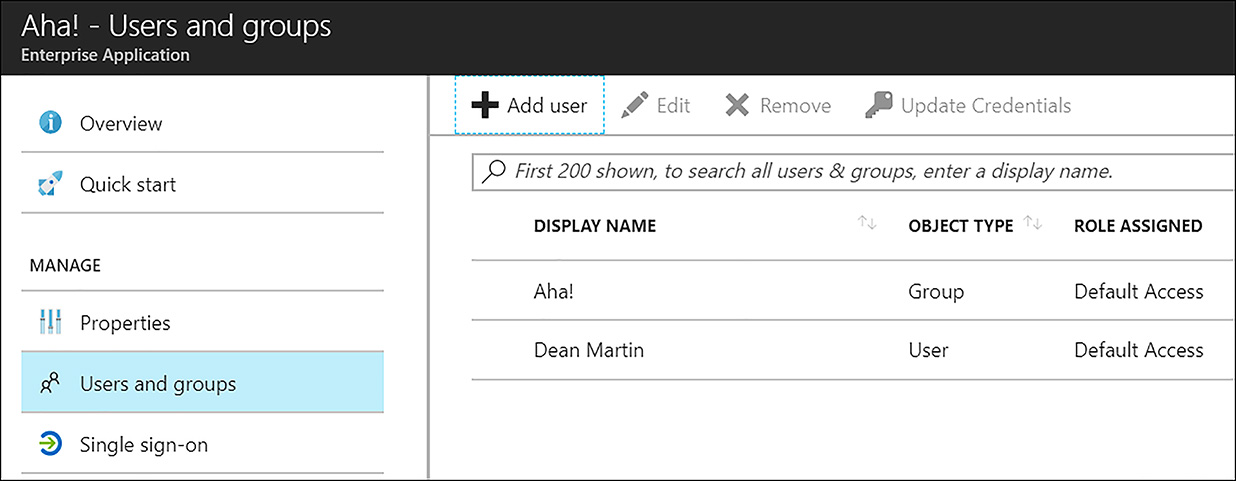
FIGURE 6-45 A group and user provided with access to Aha!
After a user or a group of users has been assigned an application, they gain access to it via the access panel, also called the MyApps portal. This portal is an SSL-encrypted site that allows users defined in Azure AD to see and alter their information, such as phone number, and to see the applications that they have been provisioned access for, as shown in Figure 6-46.
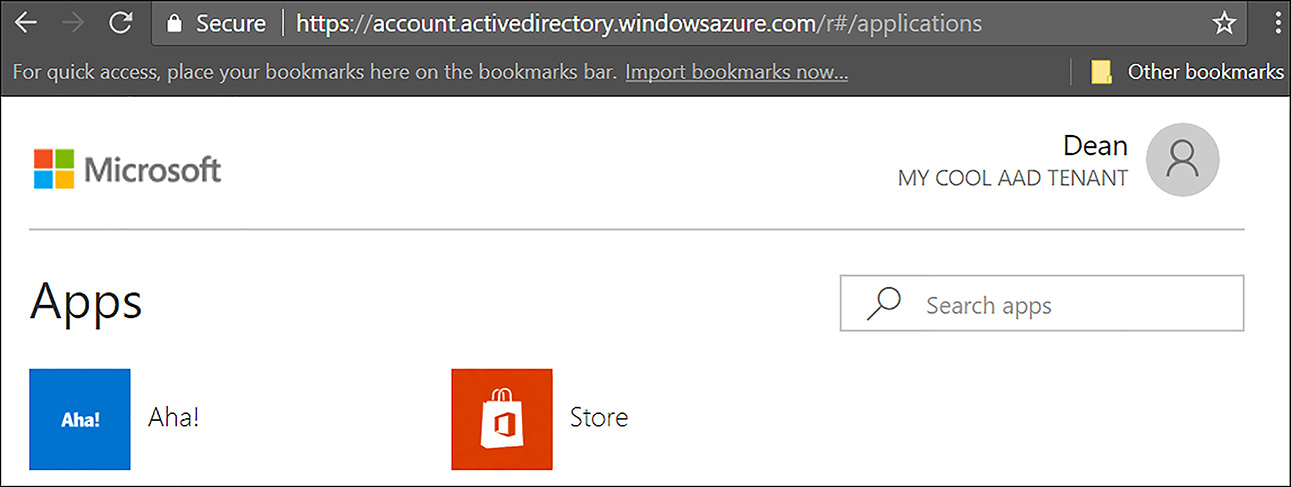
FIGURE 6-46 The MyApps portal, aka the access panel
Revoke access to SaaS applications
Revoking access to assigned SaaS applications is a simple operation. At scale, the best way to accomplish this is to remove a user from a group that was assigned an application. This use case does not involve the Enterprise applications section of Azure Active Directory. It is simply removing a user from a group.
NOTE SOURCE OF AUTHORITY FOR USERS AND GROUPS
When an organization is synchronizing their users and groups from an on-premises Active Directory, you need to perform membership changes in that on-premises directory. It is the source of authority, and changes made there synchronize into Azure Active Directory.
To revoke access to an individual user, navigate to Enterprise applications within the Azure AD blade. From there, click All applications, and then click the specific application you want to adjust access to. Next, click Users and groups. This shows you the users and groups that have been assigned access to the application. Click the name of the user you want to remove and then click Remove, as shown in Figure 6-47.

FIGURE 6-47 Steps for un-assigning a user from an application
To remove access for a user in a group that was granted access to an application, remove the user from the group at the source of authority. If the group is sourced from Azure AD (meaning it was created and is managed there), remove the user from within Azure Active Directory. If the group is sourced from an on-premises Active Directory, make the membership change there.
Configure federation with public consumer identity providers such as Facebook and Google
When web or mobile application developers are creating the next big app, a very common feature to add is authentication. However, building in authentication can be difficult and if not done well, can result in the application being exploited. This is where Azure AD B2C (business to consumer) fits in. Azure AD B2C allows developers to provide a reliable, scalable authentication experience that allows users to sign in with their existing social accounts (Facebook, Google, and others) or with their personal email address. The first step in enabling these features is to create an Azure AD B2C tenant.
Click New and in the search dialog box, enter Azure AD B2C. Click the returned result, as shown in Figure 6-48.
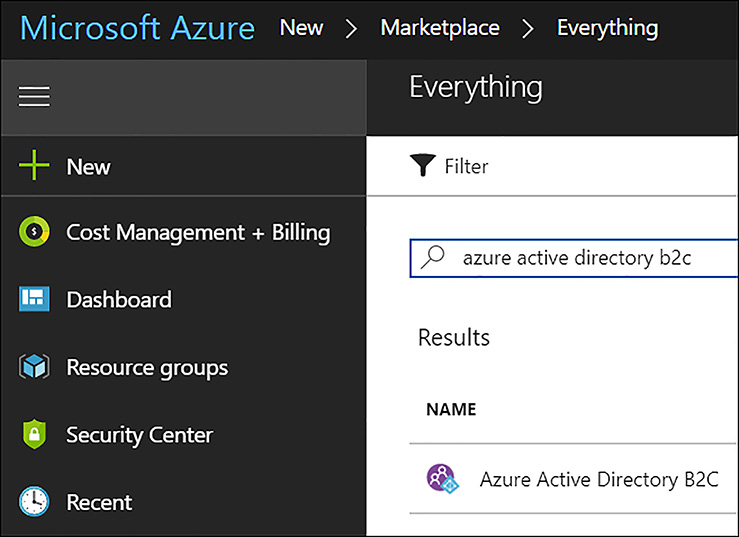
FIGURE 6-48 Searching the Azure Marketplace for Azure AD B2C
On the marketplace page, click Create. Choose whether to create a new tenant or link a tenant to an existing Azure subscription. As shown in Figure 6-49, a new tenant is being created.

FIGURE 6-49 Creating a new Azure AD B2C Tenant
Next enter the Organization name, Initial domain name, and choose the Country or region (Figure 6-50) and then click Create.
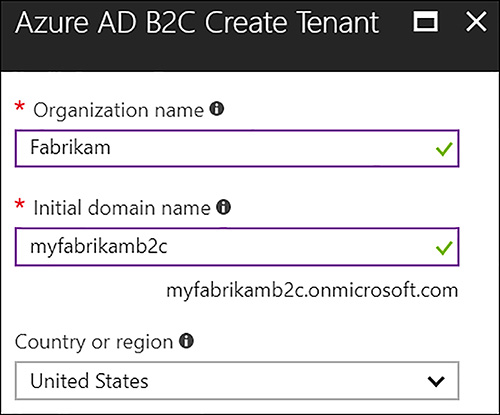
FIGURE 6-50 Enter the required information
After the Azure AD B2C tenant is created, it must be linked to an Azure subscription. To do this, go through the same steps you used to create the B2C tenant up to the point where you are asked whether you want to create a new tenant or link an existing tenant to your subscription. This time, choose Link an existing Azure AD B2C Tenant to my Azure subscription. You need to complete the information in the Azure AD B2C Resource blade, shown in Figure 6-51, and then click Create.
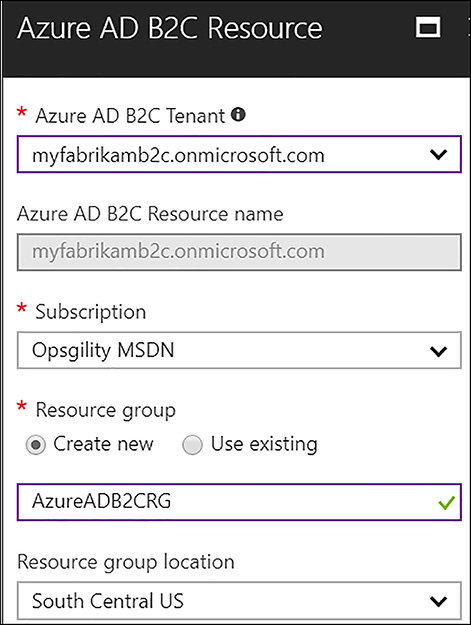
FIGURE 6-51 Linking the Azure AD B2C tenant to your subscription
After the operation is complete, the resource that represents the B2C tenant can be viewed in the resource group chosen during the linking step, as shown in Figure 6-52.
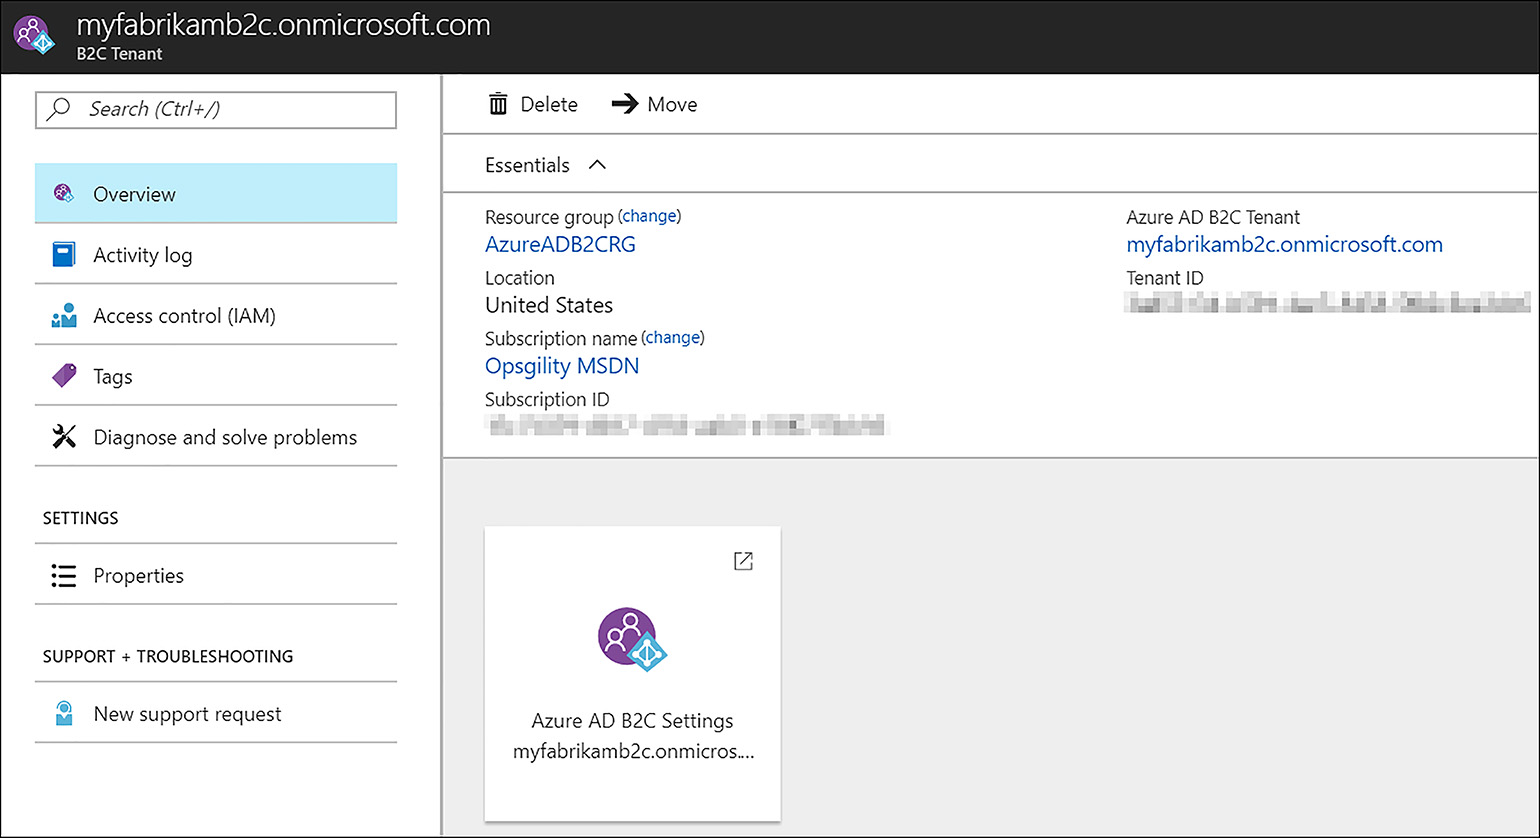
FIGURE 6-52 Azure AD B2C Resource in the linked subscription
Clicking the tile opens a new browser tab focused on the Azure AD B2C tenant. Within the B2C tenant, you can register the applications you want so that they can use the tenant for authentication. As mentioned earlier, Azure AD B2C can be used with several types of applications, including web, mobile, and API apps. For example purposes, the next section focuses on web applications to demonstrate how to register an application.
Registering a web application
To register a web application, while focused on the Azure AD B2C tenant, click Azure AD B2C, Applications, and finally, click Add, as shown in Figure 6-53.
FIGURE 6-53 Registering an application with Azure AD B2C
Next, enter the name of the application and select yes to indicate it is a web application. Also select Yes under ‘Allow implicit flow’ if the application uses Open ID Connect for sign-in. Next enter the reply URL, which represents endpoints where Azure AD B2C returns any authentication tokens the application requests. Finally, click Create. These configuration options are displayed in Figure 6-54.

FIGURE 6-54 Entering the information to register an application
The application is displayed after the creation process completes. Click the application to display its properties. Take special note of the Application ID because this is a globally unique representation of the application within Azure AD B2C. This is used in the web application code during authentication operations.
The web application being referred in this example might also need to make calls to a web API secured by Azure AD B2C. If this is the case, the web application needs a client secret. The secret functions as a security credential, and therefore should be secured appropriately. To create the web app client secret, while within the properties blade of the newly created web application, click Keys. Next, click Generate key and then click Save to view the key. This key value is used as the application secret in the web application’s code.
Configuring Social Identity Providers
After the web application has been registered in Azure AD B2C, identity providers can be added. These can include local identities, where a user logs on with their email address and a password they set, or social identity providers, such as Facebook, Google, Amazon, or LinkedIn. There are two sets of steps needed to enable authentication with an identity provider. The first is to configure the Identity provider side. This process varies for each provider, but generally involves:
Creating a representation of the application within their system
Providing the web application ID and secret, created earlier in this section
Providing the login URL, which is where the authentication request is sent.
The process for adding the identity provider side is beyond the scope of this book, but the process for adding the Facebook identity provider within Azure AD B2C is explained in the next section.
ADDING FACEBOOK AS AN IDENTITY PROVIDER
After the Identity provider side (Facebook, in this example) is configured, the next step is to add the Identity provider in the Azure AD B2C tenant. While focused on the web application that was added earlier in this section, click Identity providers, and then click Add. Supply a descriptive name for the provider, select the identity provider, and click OK. These configurations are shown in Figure 6-55.
FIGURE 6-55 Selecting the identity provider
Next, click Set up this identity provider, and enter the Client ID and Client Secret that were provided when the Facebook identity provider configuration was accomplished. Next, click OK and then click Create on the Add social identity provider blade, as shown in Figure 6-56.
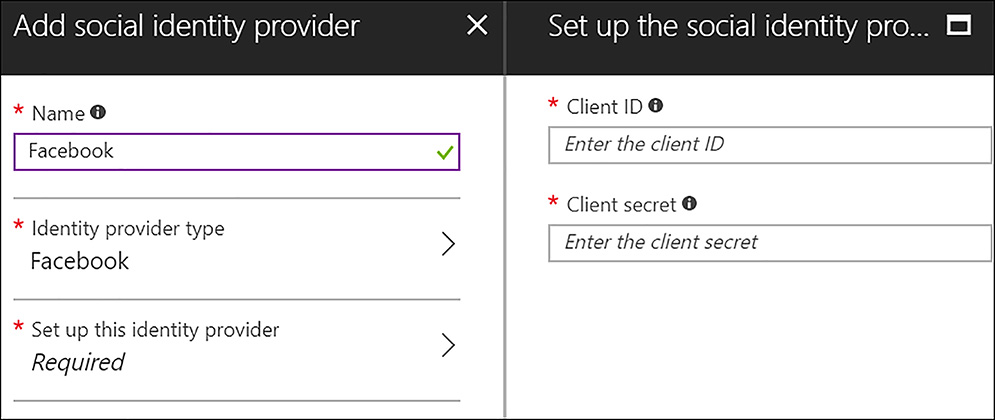
FIGURE 6-56 Entering the social identity provider client ID and secret
NOTE ENTER THE CORRECT CLIENT ID AND SECRET
The client ID and Secret being asked for in this step is NOT the Application ID and Secret provided during the initial registration of the web application within Azure AD B2C. Supply instead the Client ID and secret that were provided during the configuration of the identity provider side (in this case, Facebook).
Assuming all is configured properly within the web application, on the social identity provider, and within Azure AD B2C, the web application now allows users to authenticate via their existing Facebook credentials.
NOTE AZURE AD BUSINESS TO BUSINESS (B2B)
Azure Active Directory also can allow users within an Azure AD tenant to grant access to documents, resources, and applications to users from another organization. External users (partners) are invited to access resources from the source Azure AD tenant, which means the inviting organization does not need to manage any partner identities. The inviting organization can terminate this access at any time. These features are enabled through Azure AD B2B.
Skill 6.2: Implement recovery services
This skill covers how to:
Create a backup vault
Deploy a backup agent
Backup and restore data, use of snapshots and Geo-replication for recovery
Implement DR as a service, Deploy ASR agent, ASR configuration and best practices
Create a Recovery Services vault
Within Azure, a single resource is provisioned for either Azure Backup or Azure Site Recovery. This resource is called a Recovery Services vault. It is also the resource that is used for configuration and management of both Backup and Site Recovery.
Create a Recovery Services vault (Azure Portal)
To create a Recovery Services vault from the Azure portal, click New, and in the marketplace search dialog box enter Backup and Site Recovery, and click the Backup and Site Recovery (OMS) option, as shown in Figure 6-57.

FIGURE 6-57 Creating a Recovery Services vault
Within the marketplace page for Backup and Site Recovery (OMS), click Create. Enter the name of the vault and choose or create the resource group where it resides. Next, choose the region where you want to create the resource, and click Create (see Figure 6-58).
NOTE OPERATIONS MANAGEMENT SUITE (OMS)
Operations Management Suite is a collection of features that are licensed together as a unit, including Azure Monitoring and Log Analytics, Azure Automation, Azure Security Center, Azure Backup and Azure Site Recovery.
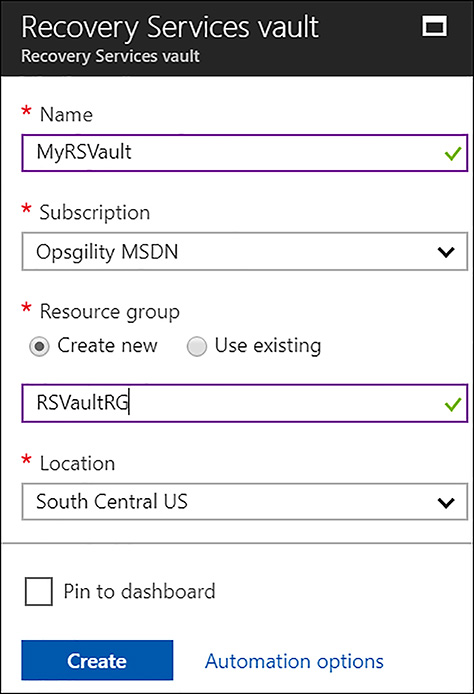
FIGURE 6-58 Completing the creation of the vault
Create a Recovery Services vault (PowerShell)
To create a Recovery Services vault with PowerShell, start by creating the resource group it should reside in.
New-AzureRmResourceGroup -Name 'RSVaultRG' -Location 'South Central US'
Next, create the vault.
New-AzureRmRecoveryServicesVault -Name 'MyRSVault' -ResourceGroupName 'RSVaultRG' -Location 'South Central US'
The storage redundancy type should be set at this point. The options are Locally Redundant Storage or Geo Redundant Storage. It is a good idea to use Geo Redundant Storage when protecting IaaS virtual machines. This is because the vault must be in the same region as the VM being backed up. Having the only backup copy in the same region as the item being protected is not wise, so Geo Redundant storage gives you three additional copies of the backed-up data in the sister (paired) region.
$vault1 = Get-AzureRmRecoveryServicesVault –Name 'MyRSVault'
Set-AzureRmRecoveryServicesBackupProperties -Vault $vault1 -BackupStorageRedundancy
 GeoRedundant
Deploy a Backup Agent
There are different types of backup agents you can use with Azure Backup. There is the Microsoft Azure Recovery Services (MARS) agent, which is a stand-alone agent used to protect files and folders. There is also the DPM protection agent that is used with Microsoft Azure Backup Server and with System Center Data Protection Manager. Finally, there is the VMSnapshot extension that is installed on Azure VMs to allow snapshots to be taken for full VM backups. The deployment of the DPM protection agent can be automated with either the use of System Center Data Protection Manager or Azure Backup Server. The VMSnapshot or VMSnapshotLinux extensions are also automatically deployed by the Azure fabric controller. The remainder of this section focuses on deploying the MARS agent.
The MARS agent is available for install from within the Recovery Services vault. Click Backup under Getting Started. Under the Where Is Your Workload Running drop-down menu, select On-Premises, and under What Do You Want To Backup, choose Files And Folders. Next, click Prepare Infrastructure, and the Recovery Services agent is made available, as shown in Figure 6-59.

FIGURE 6-59 Downloading the MARS agent
Notice there is only a Windows agent because the backup of files and folders is only supported on Windows computers. Click the link to download the agent. Before initiating the installation of the MARS agent, also download the vault credentials file, which is right under the download links for the Recovery Services agent. The vault credentials file is needed during the installation of the MARS agent.
NOTE VAULT CREDENTIALS EXPIRATION
The vault credentials are only valid for 48 hours from the time of download, so be sure to obtain them only when you are ready to install the MARS agent.
During the MARS agent installation, a cache location must be specified. There must be free disk space within this cache location that is equal to or greater than five percent of the total amount of data to be protected. These configuration options are shown in Figure 6-60.
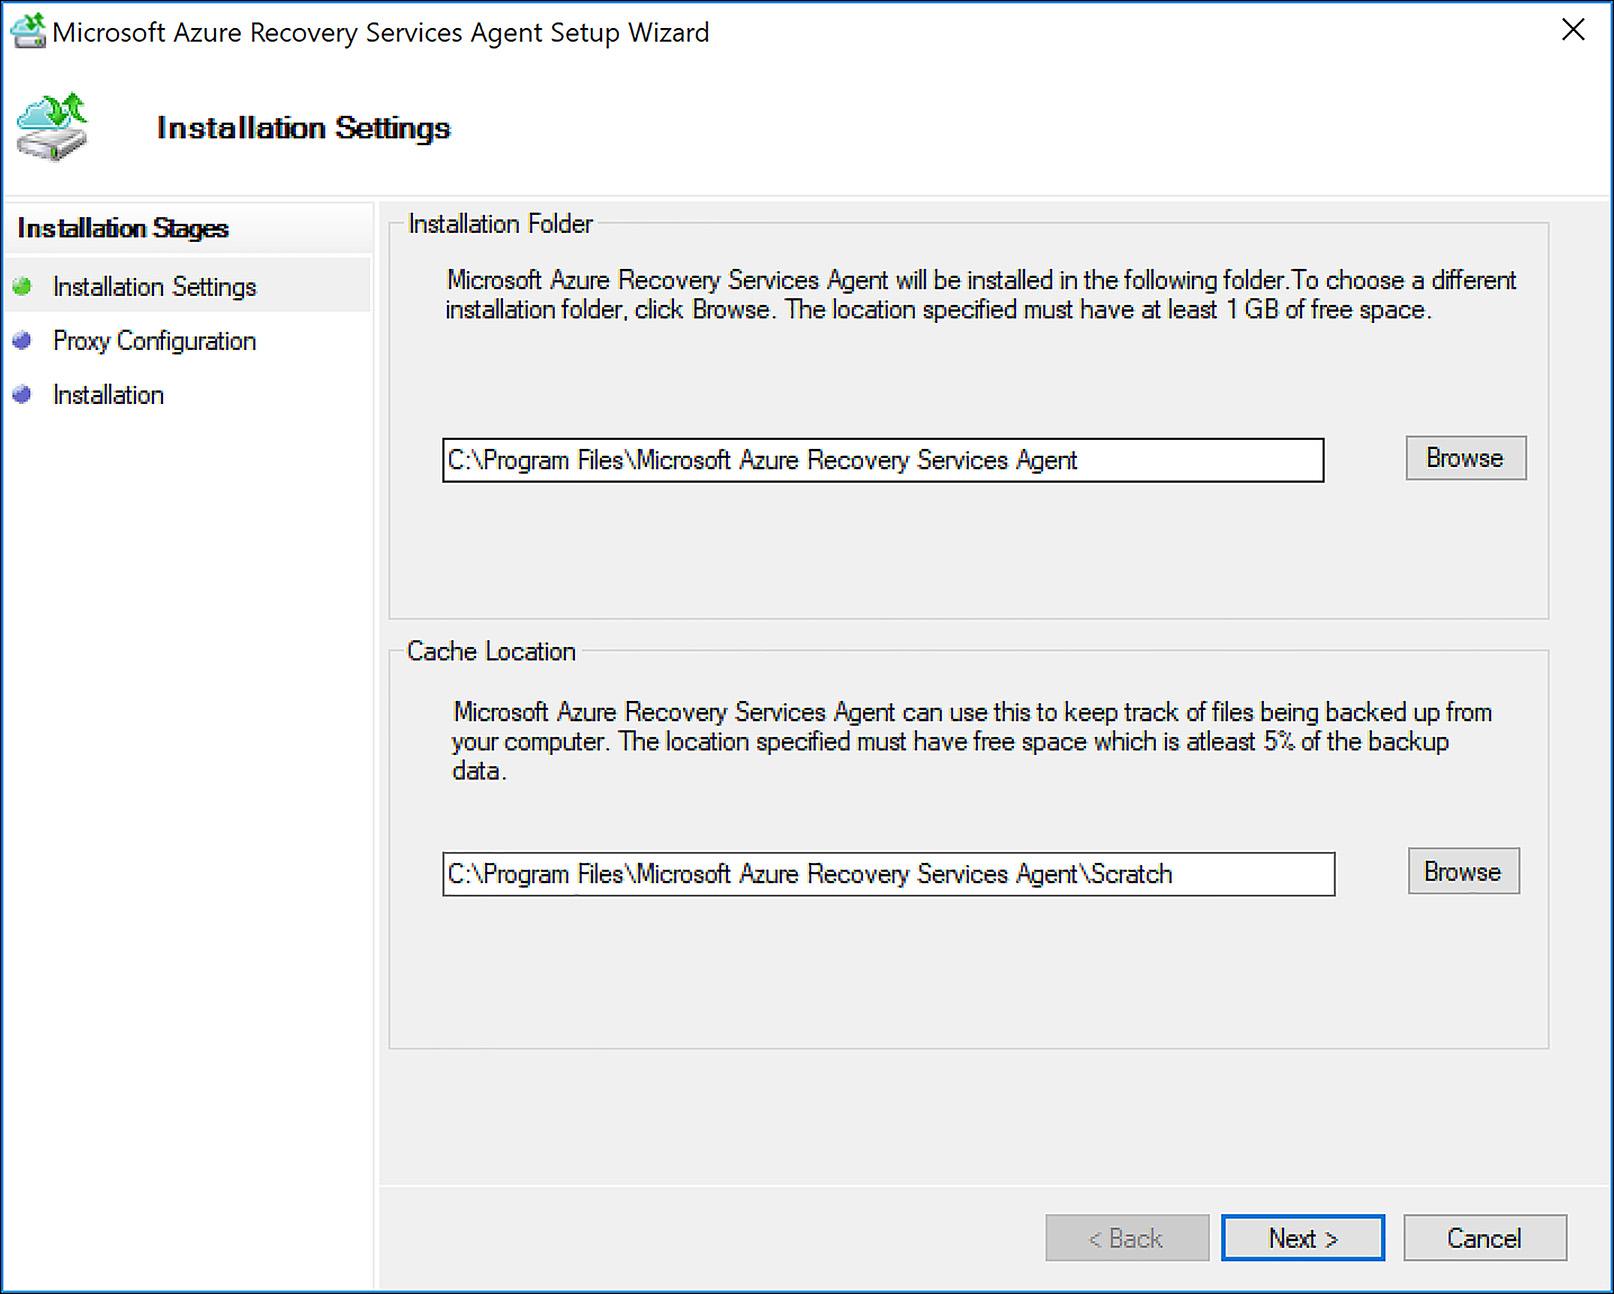
FIGURE 6-60 Installing the MARS agent
The agent needs to communicate to the Azure Backup service on the internet, so on the next setup screen, configure any required proxy settings. On the last installation screen, any required Windows features are added to the system where the agent is being installed. After it is complete, the installation prompts you to Proceed to Registration, as shown in Figure 6-61.

FIGURE 6-61 Final screen of the MARS agent installation
Click Proceed to Registration to open the agent registration dialog box. Within this dialog box the vault credentials must be provided by browsing to the path of the downloaded file. The next dialog box is one of the most important ones. On the Encryption Settings screen, either specify a passphrase or allow the installation program to generate one. Enter this in twice, and then specify where the passphrase file should be saved. The passphrase file is a text file that contains the passphrase, so stored this file securely.
NOTE AZURE BACKUP ENCRYPTION PASSPHRASE
Data protected by Azure Backup is encrypted using the supplied passphrase. If the passphrase is lost or forgotten, any data protected by Azure Backup is not able to be recovered and is lost.
After the agent is registered with the Azure Backup service, it can then be configured to begin protecting data.
Backup and restore data
In the last section, the MARS agent was installed and registered with the Azure Backup vault. Before data can be protected with the agent, it must be configured with settings such as, when the backups occur, how often they occur, how long the data is retained, and what data is protected. Within the MARS agent interface, click Schedule Backup to begin this configuration process.
Click to move past the Getting Started screen, and click Add items to add files and folders. Exclusions can also be set so that certain file types are not protected, as shown in Figure 6-62.
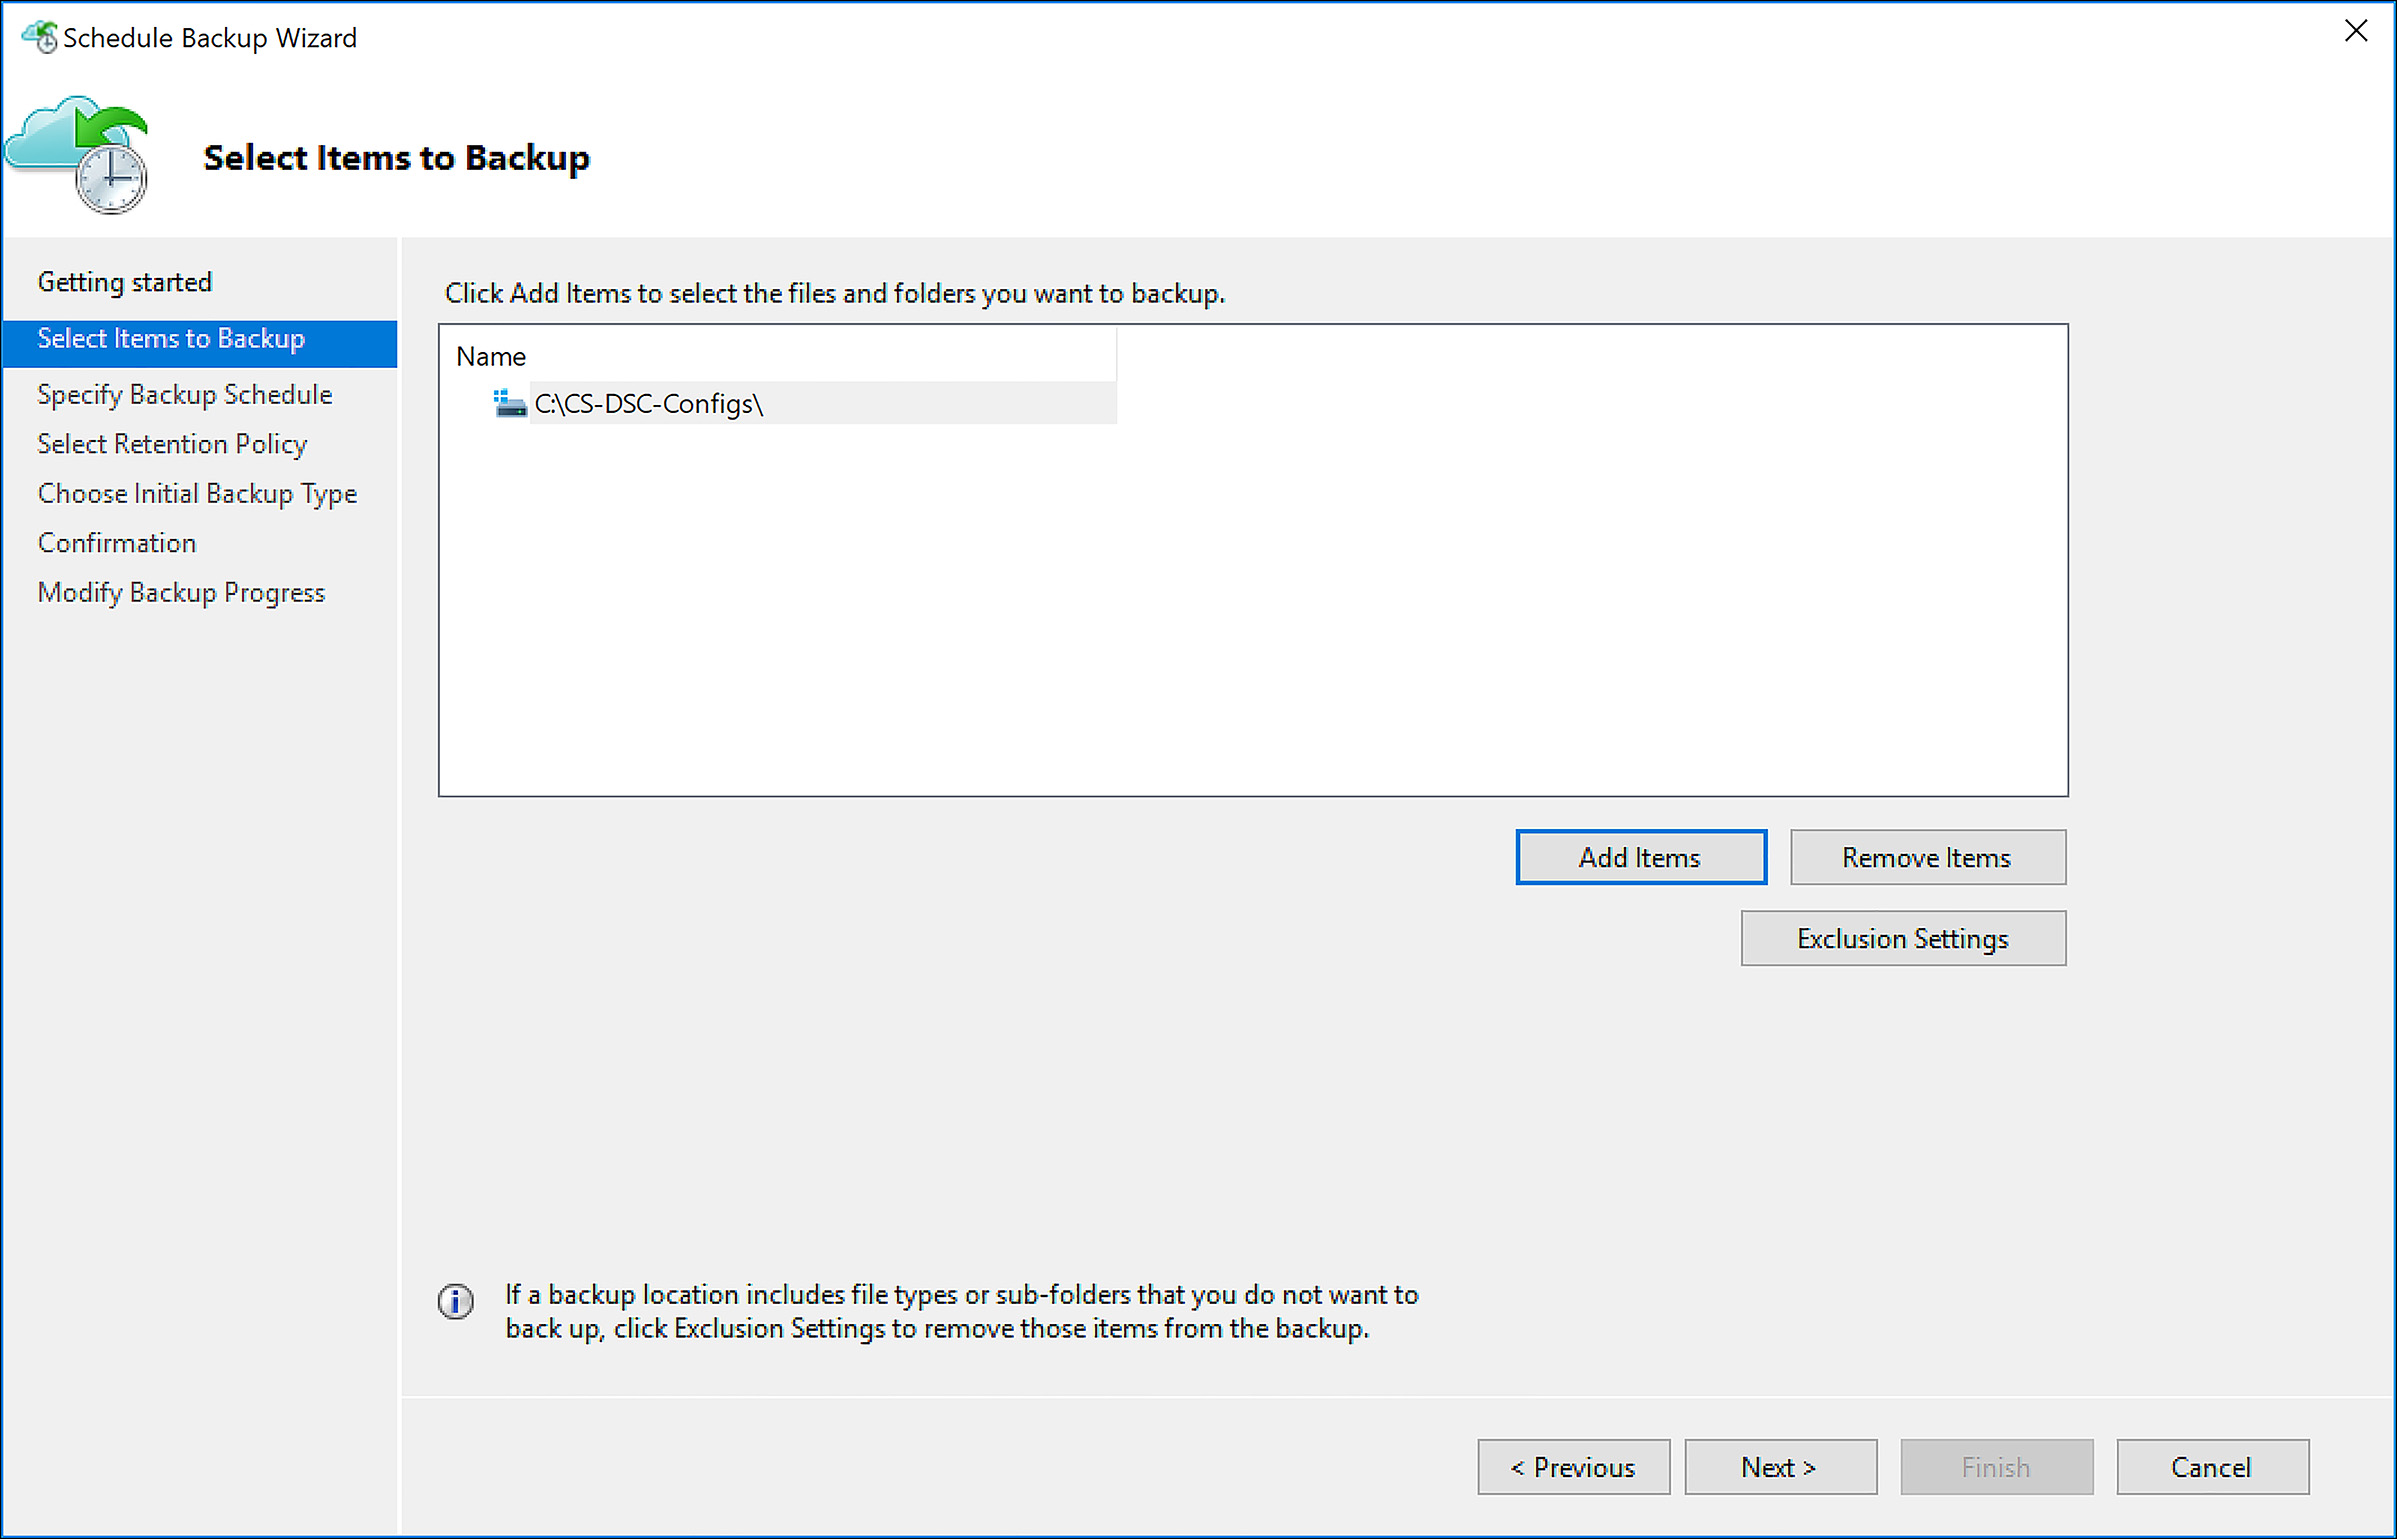
FIGURE 6-62 Configuring the MARS agent to protect data
Next, schedule how often backups should occur. The agent can be configured to back up daily or weekly, with a maximum of three backups taken per day. Specify the retention you want, and the initial backup type (Over the network or Offline). Confirm the settings to complete the wizard. Backups are now scheduled to occur, but they can also be initiated at any time by clicking Back up now on the main screen of the agent. The dialog showing an active backup is shown in Figure 6-63.
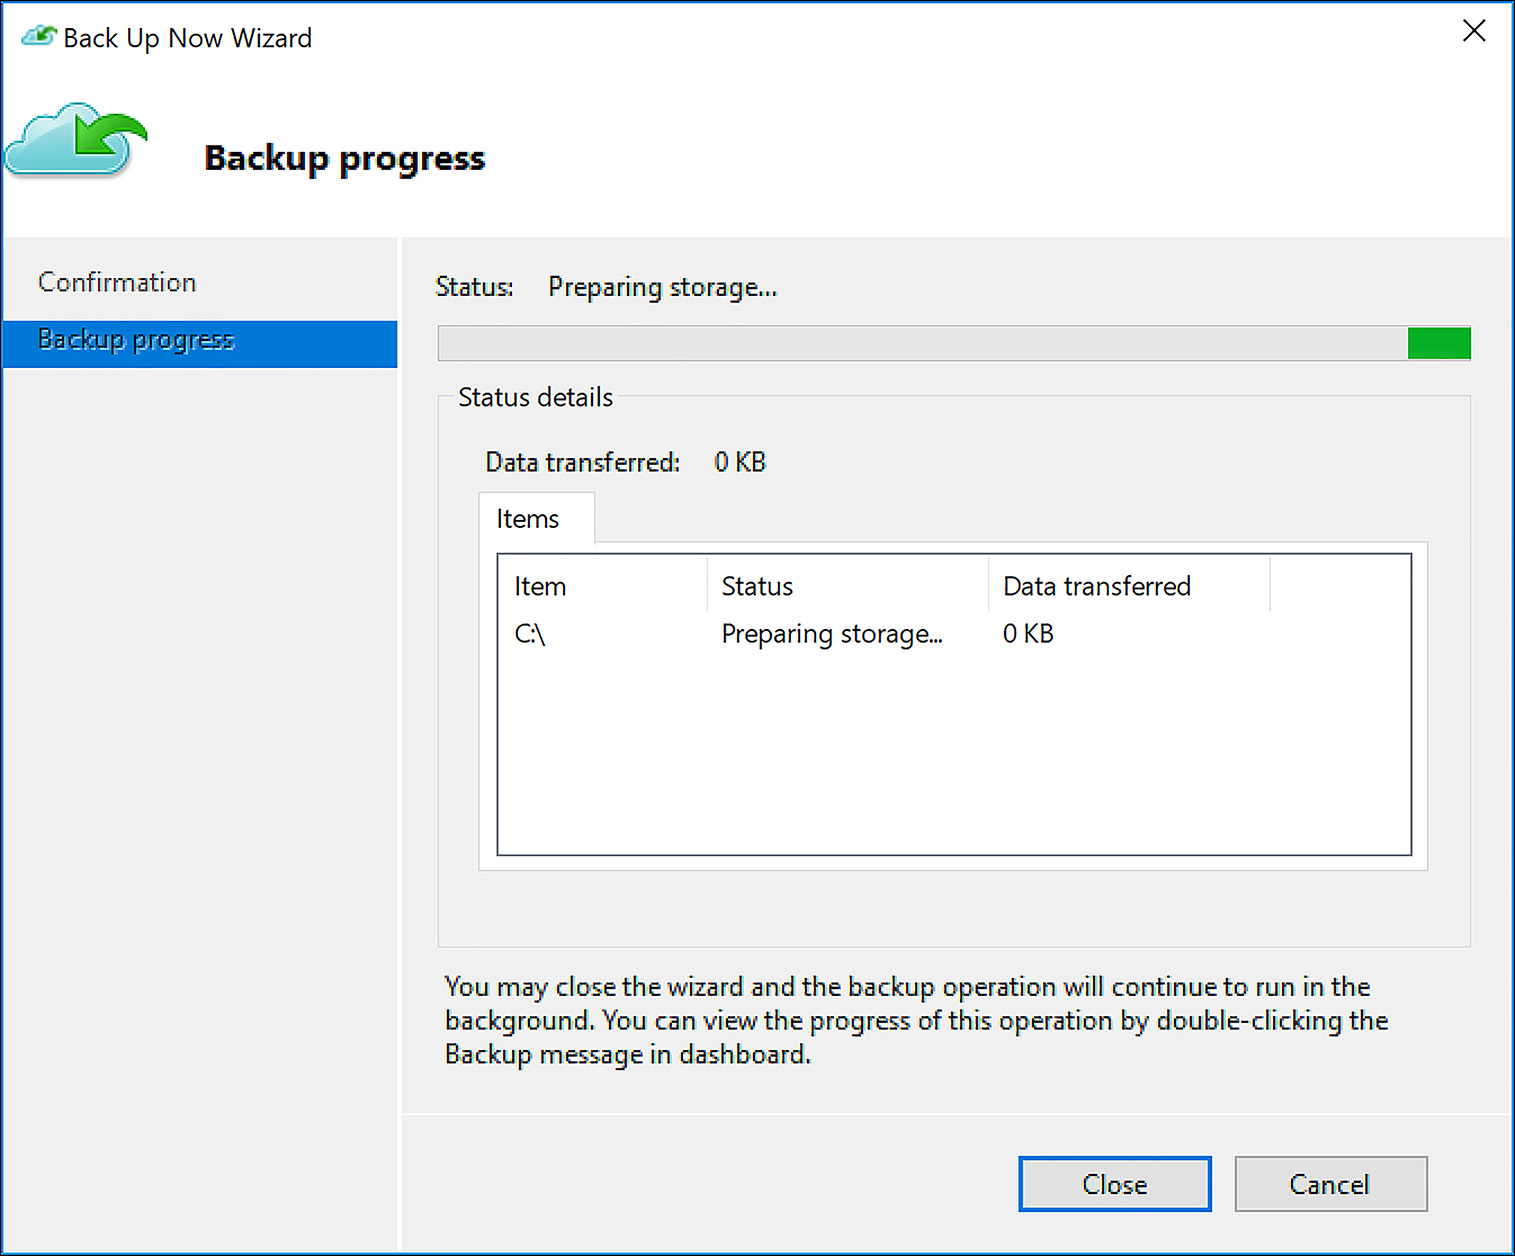
FIGURE 6-63 Backup Now Wizard
To recover data, click the Recover Data option on the main screen of the MARS agent. This initiates the Recover Data Wizard. Choose which computer to restore the data to. Generally, this is the same computer the data was backed up from. Next, choose the data to recover, the date on which the backup took place, and the time the backup occurred. These choices comprise the recovery point to restore. Click Mount to mount the selected recovery point as a volume, and then choose the location to recover the data. Confirm the options selected and the recovery begins.
In addition to the MARS agent and protecting files and folders with Azure Backup, it is also possible to back up IaaS virtual machines in Azure. This solution provides a way to restore an entire virtual machine, or individual files from the virtual machine, and it is quite easy to set up. To back up an IaaS VM in Azure with Azure backup, navigate to the Recovery Service vault and under Getting Started, click Backup. Select Azure as the location where the workload is running, and Virtual machine as the workload to backup and click Backup, as shown in Figure 6-64.

FIGURE 6-64 Configuring Azure Backup to protect IaaS VMs
The next item to configure is the Backup policy. This policy defines how often backups occur and how long the backups are retained. The default policy accomplishes a daily backup at 06:00am and retains backups for 30 days. It is also possible to configure custom Backup policies. In this example, a custom Backup policy is configured that includes daily, weekly, monthly, and yearly backups, each with their own retention values. Figure 6-65 shows the creation of a custom backup policy.

FIGURE 6-65 Configuring a custom backup policy
Next, choose the VMs to back up. Only VMs within the same region as the Recovery Services vault are available for backup.
NOTE AZURE IAAS VM PROTECTION AND VAULT STORAGE REDUNDANCY TYPE
When protecting IaaS VMs by using Azure Backup, only VMs in the same region as the vault are available for backup. Because of this, it is a best practice to choose Geo-Redundant storage or Read Access Geo-Redundant storage to be associated with the vault. This ensures that, in the case of a regional outage affecting VM access, there is a replicated copy of backups in another region that can be used to restore from.
After the VMs are selected, click Enable Backup, as shown in Figure 6-66.

FIGURE 6-66 Enabling VM backups
When you click the Enable Backup button, behind the scenes the VMSnapshot (for Windows) or VMSnapshotLinux (for Linux) extension is automatically deployed by the Azure fabric controller to the VMs. This allows for snapshot-based backups to occur, meaning that first a snapshot of the VM is taken, and then this snapshot is streamed to the Azure storage associated with the Recovery Services vault. The initial backup is not taken until the day/time configured in the backup policy, however an ad-hock backup can be initiated at any time. To do so, navigate to the Protected Items section of the vault properties, and click Backup items. Then, click Azure Virtual Machine under Backup Management type. The VMs that are enabled for backup are listed here. To begin an ad-hock backup, right-click on a VM and select Backup now, as shown in Figure 6-67.
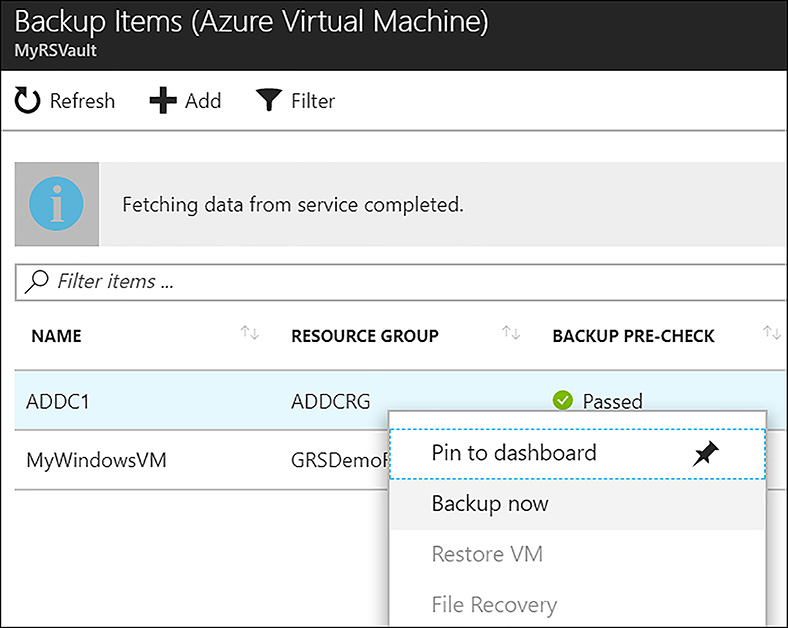
FIGURE 6-67 Starting an ad-hock backup
Use of snapshots
Many organizations choose to use Azure Backup to protect their IaaS virtual machines. For those that elect not to use Azure Backup, another strategy is to use blob snapshots to protect virtual machines. Unmanaged VM disks are actually page blobs that are stored within the customer’s storage account. A snapshot of these page blobs can be taken, which can then be copied to a storage account in the same or a different Azure Region. If the need arises to recover the virtual machine, it can be recreated from the blob snapshot. To walk through these steps, begin by creating a destination storage account. In this example, the virtual machine to be protected is in West US 2. To ensure the snapshot survives a region-wide outage, it is copied to a destination storage account in a different region. To begin, create a resource group and the destination storage account. The storage account is created and a reference to it is stored in the variable $destStorageAcct. This variable is used later.
New-AzureRmResourceGroup -Name MyRecoveryStorageRG -Location eastus2
$destStorageAcct = New-AzureRmStorageAccount -ResourceGroupName MyRecoveryStorageRG
-Name recoverysa0434 -SkuName Standard_LRS -Location eastus2 -Kind Storage
Next, create a blob container for the snapshot to exist in. To do this, first set the storage account context.
Set-AzureRmCurrentStorageAccount -ResourceGroupName MyRecoveryStorageRG
-Name recoverysa0434
Next, create the container.
New-AzureStorageContainer -Name recovery -Permission Off
Now, create a snapshot configuration. To do this, populate a variable with the URI of the storage account that contains the VHD to collect a snapshot from. Next, populate another variable with the Resource ID of the same storage account. Finally, set the snapshot context.
$sourceVHDURI = https://criticalserverrgdisks810.blob.core.windows.net/vhds/
CriticalServer20171005195926.vhd
$storageAccountId = "/subscriptions/<SubscriptionID>/resourceGroups/criticalserverrg/
providers/Microsoft.Storage/storageAccounts/criticalserverrgdisks810"
$snapshotConfig = New-AzureRmSnapshotConfig -AccountType StandardLRS -Location
westus2 -CreateOption Import -StorageAccountId $storageAccountId -SourceUri
 $sourceVHDURI
With all these steps in place, create the snapshot.
New-AzureRmSnapshot -Snapshot $snapshotConfig -ResourceGroupName CriticalServerRG
-SnapshotName MyCriticalServerDiskSnapshot
The snapshot is created in the same resource group as the source storage account (the one containing the VHD from the virtual machine to be protected), as shown in Figure 6-68.
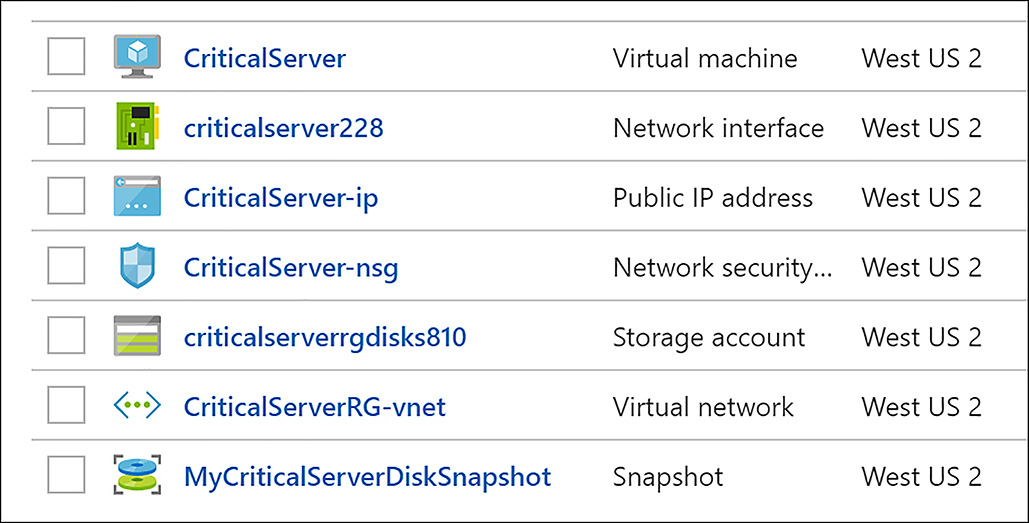
FIGURE 6-68 New VHD snapshot
Before the snapshot can be copied, the destination storage account key is needed. Obtain this within the Azure portal from the properties of the storage account, as shown in Figure 6-69.

FIGURE 6-69 Copying the storage key form the destination storage account
Populate the key value into a variable.
$storageAccountKey = "<StorageAccountKey>"
Several other variables need to be populated to be used in the blob copy command. First populate a variable with the name of the source resource group (where the snapshot exists) and then populate a variable with the name of the snapshot:
$resourceGroupName ="CriticalServerRG"
$snapshotName = "MyCriticalServerDiskSnapshot"
A shared access signature is created to grant access to the snapshot. Set the duration for the shared access signature (how long it functions).
$sasExpiryDuration = "3600"
A variable was already populated with the destination storage account earlier in these steps. This serves as the destination storage account name. Now, run the cmdlet to create the shared access signature.
$sas = Grant-AzureRmSnapshotAccess -ResourceGroupName $resourceGroupName -SnapshotName
 $SnapshotName -DurationInSecond $sasExpiryDuration -Access Read
Now create the destination storage context to use in the snapshot copy.
$destinationContext = New-AzureStorageContext –StorageAccountName
$storageAcct.StorageAccountName -StorageAccountKey $storageAccountKey
Finally, begin the copy operation. Notice that the snapshot is converted to a VHD in the destination storage account.
Start-AzureStorageBlobCopy -AbsoluteUri $sas.AccessSAS -DestContainer "recovery"
 -DestContext $destinationContext -DestBlob "recoveredcriticalserveros.vhd"
When complete, the copied VHD is visible in the destination storage account container, as shown in Figure 6-70.
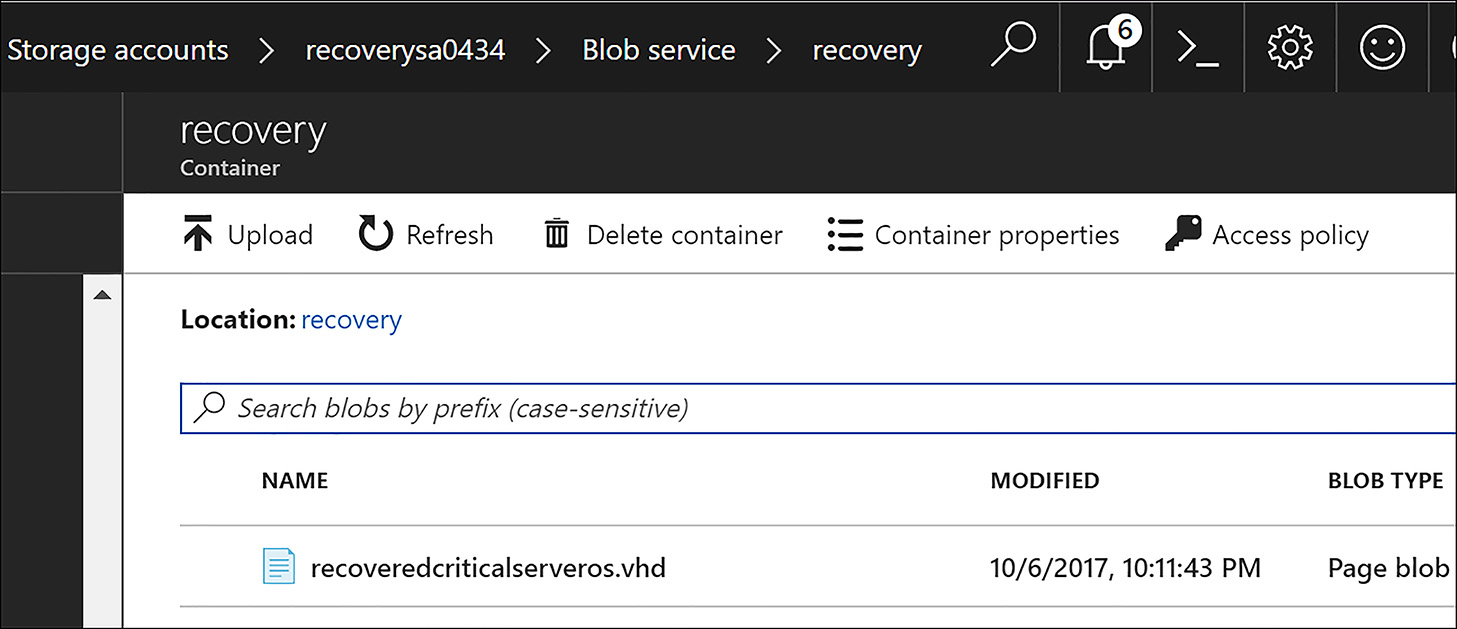
FIGURE 6-70 Copied VHD blob originating from a blob snapshot
To recover from a VM issue by using the copied VHD in the destination region, create a new resource group for the recovered VM to be created in, convert the VHD to a managed disk, and provision a virtual machine from the managed disk.
New-AzureRmResourceGroup -Name RecoveredCriticalServerRG -Location eastus2
$sourceUri =
https://recoverysa0434.blob.core.windows.net/recovery/recoveredcriticalserveros.vhd
$osDiskName = 'myOsDisk'
$osDisk = New-AzureRmDisk -DiskName $osDiskName -Disk (New-AzureRmDiskConfig
-AccountType StandardLRS  -Location eastus2 -CreateOption Import -SourceUri
$sourceUri) -ResourceGroupName RecoveredCriticalServerRG
Next, create a virtual network for the VM to exist in.
$subnetName = 'mySubNet'
$singleSubnet = New-AzureRmVirtualNetworkSubnetConfig -Name $subnetName
-AddressPrefix 10.0.0.0/24
$vnetName = "myVnetName"
$vnet = New-AzureRmVirtualNetwork -Name $vnetName -ResourceGroupName
 RecoveredCriticalServerRG -Location eastus2 -AddressPrefix 10.0.0.0/16
 -Subnet $singleSubnet
Now, create the network security group that only allows the required network traffic.
$nsgName = "myNsg"
$rdpRule = New-AzureRmNetworkSecurityRuleConfig -Name myRdpRule -Description "Allow RDP"
 -Access Allow -Protocol Tcp -Direction Inbound -Priority 110 -SourceAddressPrefix
 internet -SourcePortRange * -DestinationAddressPrefix * -DestinationPortRange 3389
$nsg = New-AzureRmNetworkSecurityGroup -ResourceGroupName RecoveredCriticalServerRG
-Location eastus2 -Name $nsgName -SecurityRules $rdpRule
Next, create a public IP address and network interface card for the VM.
$ipName = "myIP"
$pip = New-AzureRmPublicIpAddress -Name $ipName -ResourceGroupName
 RecoveredCriticalServerRG -Location eastus2 -AllocationMethod Dynamic
$nicName = "myNicName"
$nic = New-AzureRmNetworkInterface -Name $nicName -ResourceGroupName
 RecoveredCriticalServerRG -Location eastus2 -SubnetId $vnet.Subnets[0].Id
-PublicIpAddressId $pip.Id -NetworkSecurityGroupId $nsg.Id
Next, specify the VM name, series, and size, and assign the network interface to the VM configuration.
$vmName = "RecoveredCriticalVM"
$vmConfig = New-AzureRmVMConfig -VMName $vmName -VMSize "Standard_D1_V2"
$vm = Add-AzureRmVMNetworkInterface -VM $vmConfig -Id $nic.Id
Next, add the OS disk that was created from the snapshot.
$vm = Set-AzureRmVMOSDisk -VM $vm -ManagedDiskId $osDisk.Id -StorageAccountType
 StandardLRS -DiskSizeInGB 128 -CreateOption Attach -Windows
Finally, create the VM.
New-AzureRmVM -ResourceGroupName RecoveredCriticalServerRG -Location eastus2 -VM $vm
This final step results in a virtual machine that is created from the copied snapshot. As such, it is an exact replica (from a disk contents perspective) of the source virtual machine that the original snapshot was taken from. If the source VM was shut down prior to the collection of the VM snapshot, the recovered VM would be in an application-consistent state, meaning a state similar to that of a cleanly shut down machine. If the snapshot was collected from a running VM, the recovered VM would be in a crash-consistent state. This means the VM is in a state similar to if the machine was powered off without a clean shut down. In this case the VM will show an unplanned shutdown on the first boot after recovery, as shown in Figure 6-71.
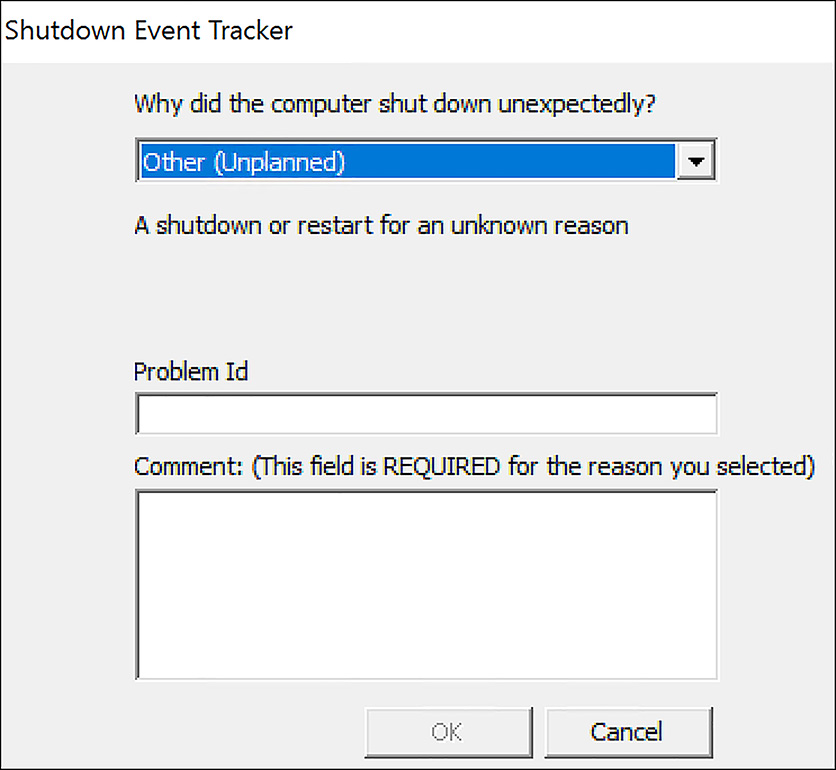
FIGURE 6-71 Indication of a crash-consistent recovered VM
Geo-replication for recovery
Azure Storage has several platform-level replication capabilities to help ensure the availability of customer data. One of these replication options is Geo-Redundant storage (GRS). With this option, the Azure platform replicates the customer’s data to a paired region hundreds of miles away from the primary copy. This enables recovery of access to data, should the primary region become unavailable. Customers have no access to this second copy of their data until Microsoft declares a persistent outage and accomplishes a geo-failover. This redundancy option is shown in Figure 6-72.
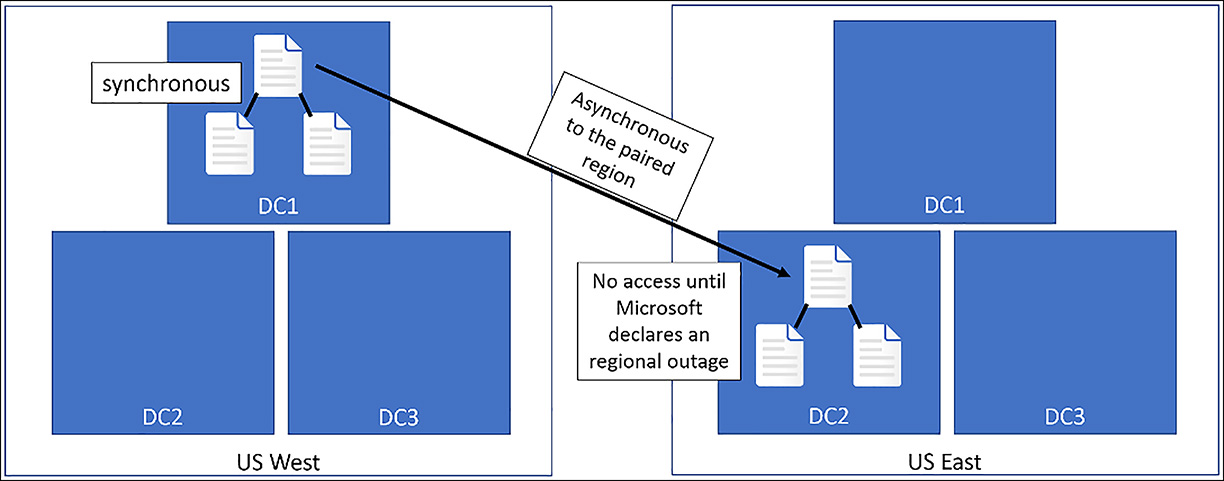
FIGURE 6-72 Geo-Redundant Storage
Another option for platform-replicated storage is called Read Access-Geo Redundant Storage (RA-GRS). With this option, customers have read-only access to their replicated data. As it pertains to IaaS, unmanaged standard VM disks can be provisioned from storage accounts with GRS or RA-GRS enabled. Keep in mind, that with either GRS and RA-GRS, replication is asynchronous to the paired region. This means the copies in the paired region are behind by a certain number of write operations. Just how far behind is difficult to estimate given that it depends on the data change rate on the replicated disk and the latency/bandwidth between Azure regions.
If an outage of the Azure Storage service occurs that affects a customer’s primary data, and if the only strategy for data protection being used is GRS or RA-GRS, there are two potential responses. First, the customer can wait for recovery. Microsoft diligently works to recover access to storage, and customers can monitor the status via the Azure Service Health Dashboard. The second option is valid only if the customer has RA-GRS configured on their storage account. With read access, the customer can create read/write copies of the storage blobs that represent their VM disks. With a read/write copy, they can manually recreate their VMs by using the replicated blobs. This recovery process would be similar to the process described in the Use of snapshots section, earlier in this chapter.
There are two important caveats about VMs recovered in this way. First, the VMs are in a crash-consistent state. Second, because of the asynchronous nature of replication, some recently-changed data on the primary side might be lost.
Because of the caveats mentioned, relying on Geo-Redundant storage is not an effective way to prepare for regional outages. A better strategy is to leverage Azure Backup (backed by a Geo-Redundant storage account) to back up IaaS VMs. Also, for business-critical VMs, use Azure Site Recovery to enable fast failover from the primary to secondary Azure region.
Implement DR as service, Deploy ASR agent, ASR Configuration & best practices
Azure Site Recovery (ASR) is a disaster recovery service that can protect server workloads from one on-premises datacenter to another on-premises datacenter (D2D), from an on-premises datacenter into Azure (D2A), or from one Azure region to another (A2A). Considering workloads on-premises, ASR can protect physical machines, VMware-based virtual machines, or Hyper-V-based virtual machines. Within Azure, ASR can protect IaaS virtual machines. Because this book is focused on Azure Infrastructure as a Service, this section focuses on the on-premises to Azure (D2A) and Azure to Azure (A2A) scenarios.
As a first step in implementing Azure Site Recovery in any scenario, first create a Recovery Services vault. This vault is the management and configuration resource used with Azure Backup or Azure Site Recovery. Its creation was previously covered in the Create a Recovery Services vault section earlier in this chapter.
Implementing ASR VMWARE and PHYSICAL Machine Protection
There are several types of information needed to help ensure a successful implementation of Site Recovery. These include the number of servers to protect. It’s helpful to break these out by application, so the server count is being based on the needs and dependencies of each application. Also, the number of disks attached to each protected server and an estimate of storage consumed is required information. Another aspect to consider is the daily change rate. This is often called data churn and it represents how much data per disk changes daily. The last consideration is what recovery point objectives are required. This determines how much data is eventually stored in Azure.
The reason for gathering the data points discussed is to arrive at conclusions about how much network bandwidth is required from on-premises to Azure, how much Azure storage will be consumed, what the Azure disk performance requirements are (inputs/outputs per second, or IOPS), how much infrastructure is needed on premises to support replication, and whether the servers to protect are compatible with ASR.
There are tools that can be used to help collect this information. The first is called the Site Recovery Deployment Planner (SRDP). As of this writing, the SRDP only works with VMware-based workloads and is in a public preview status. This planning tool runs within the source datacenter, collecting data about the workloads to protect, including the required bandwidth, Azure storage, and Azure processor cores. Ideally the toolset should run for several weeks to a month so that an accurate representation of performance is collected. A dialog of an SRDP instance collecting data is shown in Figure 6-73.
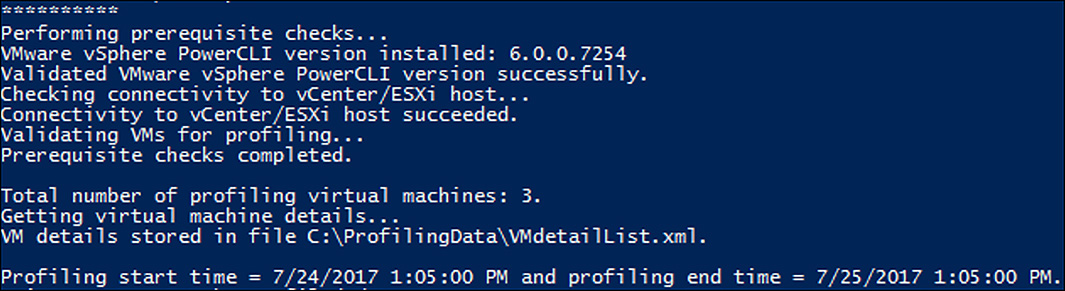
FIGURE 6-73 Site Recovery Deployment Planner collecting data
After the data has been collected, visualizations are created that provide information critical to the planning phase, as shown in Figure 6-74.
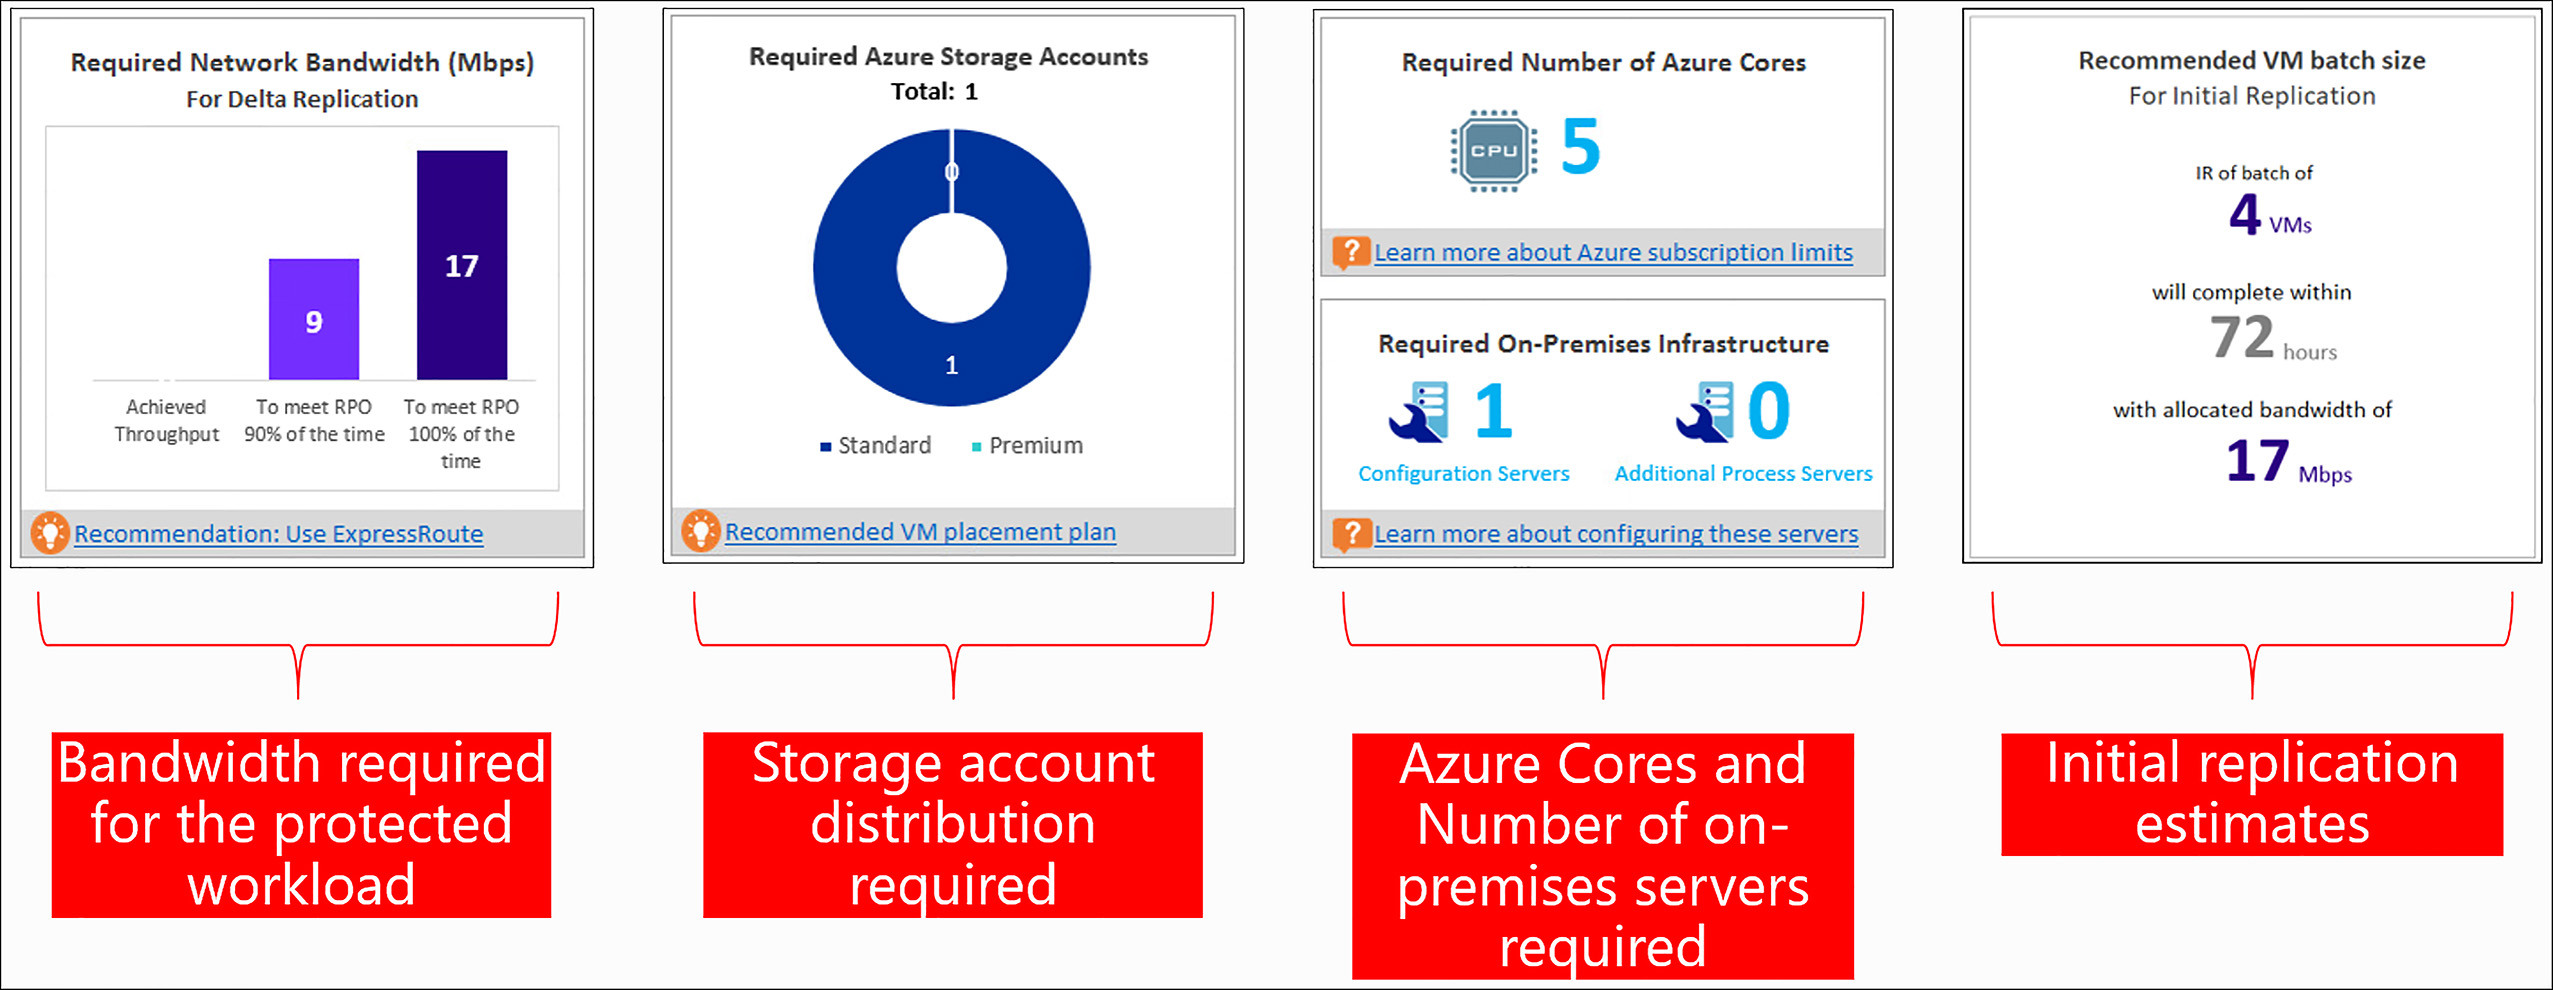
FIGURE 6-74 Output from the Site Recovery Deployment Planner
Another toolset that is valuable during Site Recovery planning is the ASR Capacity Planner. This is a spreadsheet that allows customers to enter information about their workloads and key planning information is calculated. Figure 6-75 shows a screenshot of the capacity planner spreadsheet.

FIGURE 6-75 ASR Capacity Planner
Commonly, the use of these planning tools reveals a need for more network bandwidth. Depending on the number of machines being protected, their amount of storage, and the data change rate, ASR might be replicating a tremendous amount of data into Azure. Organizations can either increase their outbound internet connection bandwidth or consider implementing ExpressRoute. Refer to Chapter four for more details on ExpressRoute.
There are on-premises components required for the VMware scenario of ASR. These components support the replication of data from on-premises to Azure. They include:
The Configuration Server Generally a VMware vm which coordinates communications between on-premises and Azure, and manages data replication.
The Process Server Serves as a replication gateway, receiving replicated data from the mobility service, caches, compresses, encrypts, and transfers this data to Azure. Performs auto-discovery of new VMs and performs push installation of mobility service. Can scale out as needed.
Master Target Server Handles replication data during failback from Azure. Can scale out as needed.
Mobility Service Installed on all protected VMs. Intercepts and replicates disk writes to Process Server.
Figure 6-76 shows these on-premise components.
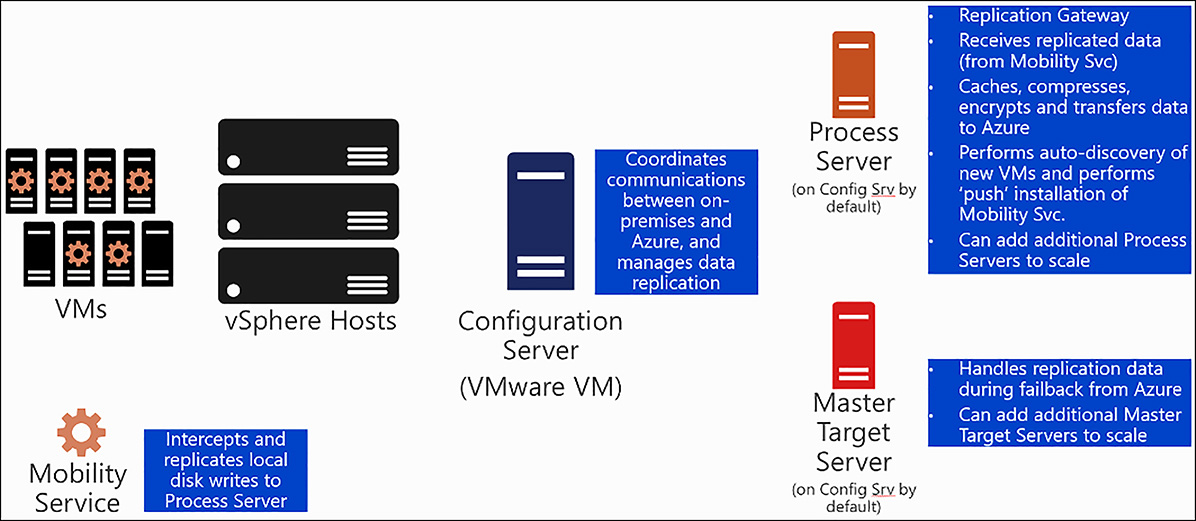
FIGURE 6-76 ASR VMware scenario on-premises components
By default, all the on-premises server roles are provisioned on a single VMware VM, but the Process Server and Master Target Server can be scaled out as requirements dictate. Table 6-2 gives the server specifications for the Configuration Server (hosting all roles) based on the number of servers that are protected from on-premises.
TABLE 6-2 Performance requirements for on-premises Configuration Server
CPU |
Memory |
Cache disk size |
Data change rate |
Protected machines |
8 vCPUs (2 sockets * 4 cores @ 2.5GHz) |
16 GB |
300 GB |
500 GB or less |
Replicate < 100 machines |
12 vCPUs (2 sockets * 6 cores @ 2.5GHz) |
18 GB |
500 GB |
500 GB to 1 TB |
Replicate between 100-150 machines |
16 VCPUS (2 SOCKETS * 8 CORES @ 2.5GHZ) |
32 GB |
1 TB |
1 TB to 2 TB |
Replicate between 150-250 machines |
Deploy another process server (scale out) |
|
|
> 2 TB |
Deploy additional process servers if you’re replicating more than 200 machines, or if the daily data change rate exceeds 2 TB |
The Configuration server also has network requirements. Remember that ASR is a PaaS service and so it is accessible over the public internet. As such, the configuration server must have direct or proxy-based access to the following URLs:Ports
*.hypervrecoverymanager.windowsazure.com:443
*.accesscontrol.windows.net:443
*.backup.windowsazure.com:443
*.blob.core.windows.net:443
*.store.core.windows.net:443
https://dev.mysql.com/get/archives/mysql-5.5/mysql-5.5.37-win32.msi (for MySQL download)
time.windows.com:123
time.nist.gov:123
ASR is ready to be implemented after the planning tools have produced output, any bandwidth increases have been procured, the on-premises infrastructure (Configuration server) is appropriately sized and ready, and the required URLs and ports are allowed from the Configuration server.
To implement the VMware scenario of ASR, start by preparing the VMware environment. This involves preparing for automatic discovery of new VMs for protection and failover of those protected VMs. Both capabilities require a read-only user defined on each vSphere host or on the vCenter server that manages the hosts, as shown in Figure 6-77.

FIGURE 6-77 vSphere user with Read-Only access
If both failover and failback are features you want, the vSphere or vCenter user requires additional permissions, as shown in Table 6-3. Ideally, a role should be created with the following permissions, and this role should be assigned to a user or group.
TABLE 6-3 VMware permissions required for Azure Site Recovery integration
Task |
Role/Permission |
Details |
VM Discovery |
Data Center object –> Propagate to Child Object, role=Read-only |
At least a read-only user. User assigned at datacenter level, and has access to all the objects in the datacenter. To restrict access, assign the No access role with the Propagate to child object, to the child objects (vSphere hosts, datastores, VMs and networks). |
Full replication, failover, failback |
Data Center object –> Propagate to Child Object, role=Azure_Site_Recovery Datastore > Allocate space, browse datastore, low-level file operations, remove file, update virtual machine files Network > Network assign Resource > Assign VM to resource pool, migrate powered off VM, migrate powered on VM Tasks > Create task, update task Virtual machine > Configuration Virtual machine > Interact > answer question, device connection, configure CD media, configure floppy media, power off, power on, VMware tools install Virtual machine > Inventory > Create, register, unregister Virtual machine > Provisioning > Allow virtual machine download, allow virtual machine files upload Virtual machine > Snapshots > Remove snapshots |
User assigned at datacenter level, and has access to all the objects in the datacenter. To restrict access, assign the No access role with the Propagate to child object, to the child objects (vSphere hosts, datastores, VMs and networks). |
If you want Push installation of the mobility service, an account needs to be provisioned with administrator rights on Windows and/or root access on Linux. The Process server performs the installation of the Mobility service under the context of one of these users.
The next step in implementing ASR is to create the Recovery Services vault in Azure. It is a best practice to create this vault a significant distance from the workload being protected. This helps to ensure that a regional catastrophe does not impact the primary and replicated workload.
After this step, download and install the Unified Setup and vault credentials. These are both available from the properties of the Recovery Services vault, as shown in Figure 6-78.
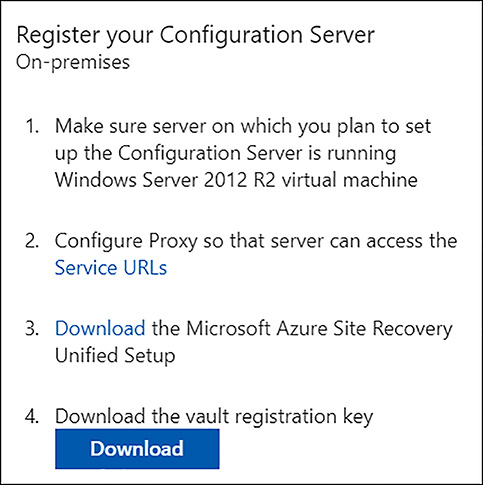
FIGURE 6-78 Download the ASR Unified Setup and the vault credentials
After the installation completes, the Microsoft Azure Site Recovery Configuration Server program that is used to register the configuration server with the Site Recovery service automatically starts. In this interface specify an account that has admin rights on the Windows systems where the mobility service is installed. Also add a vSphere or vCenter account with appropriate rights in the Vmware infrastructure as discussed previously in this section. This dialog is shown in Figure 6-79.
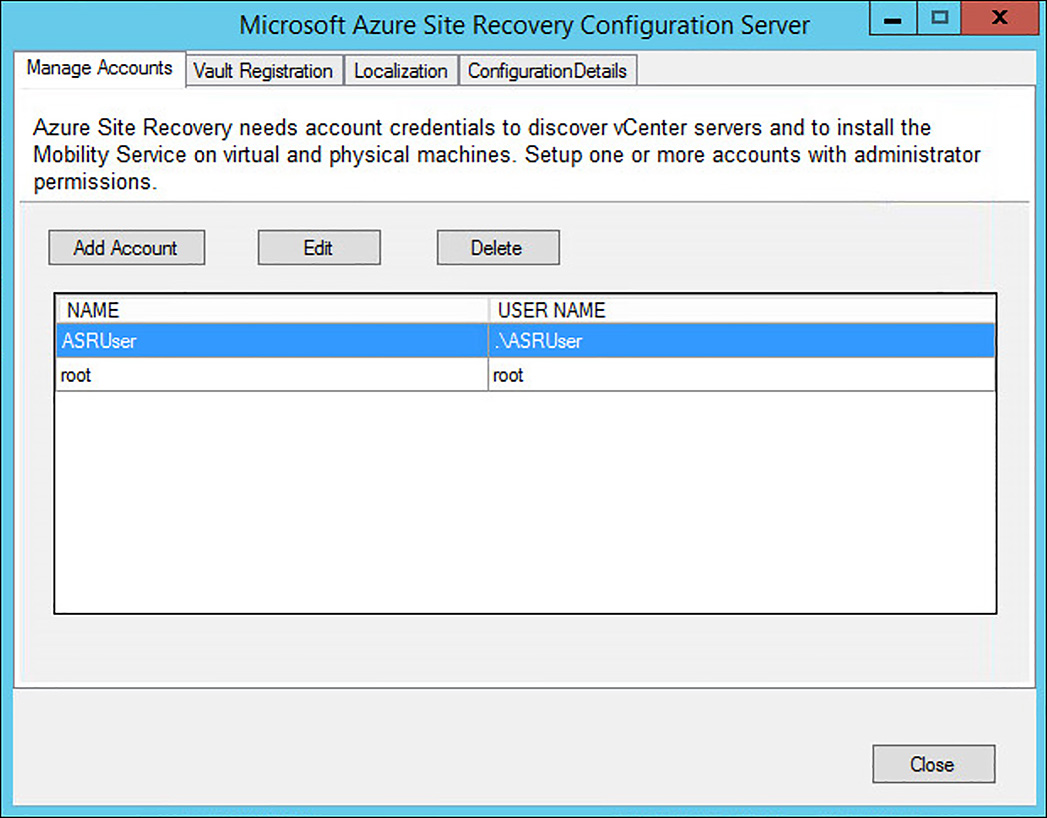
FIGURE 6-79 Registering the Configuration server and accounts
Add the required accounts and within 10 to 15 minutes, the Configuration Server is registered within the Prepare source blade in the ASR section of the Recovery Services vault. Next, within the same blade click to add the vCenter/vSphere server and specify the account provided earlier with VMware access. Within a few minutes, the vCenter or vSphere server is added as well, as shown in Figure 6-80.
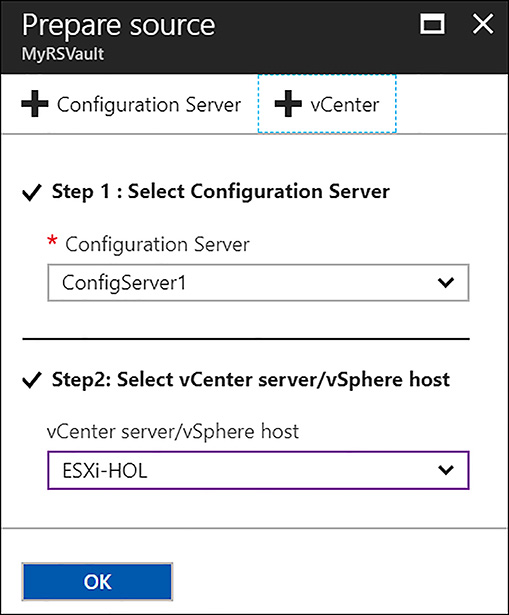
FIGURE 6-80 Configuration and vSphere server registered
The next configuration step is to set up the target environment in Azure. This includes provisioning or choosing an existing storage account and virtual network. The storage account holds replicated data from the on-premises environment to be used for building virtual machines during a failover. The virtual network provides failed-over VMs with a network context so they can continue to provide the services they did when on-premises.
Following the target environment set up, the next item to configure is the replication policy. This policy defines how long recovery points and application-consistent snapshots should be retained. The replication policy is created and associated with the Configuration server in this step.
The next step is to enable replication. In this interface, the source and target infrastructures are selected. The VMs to protect and which disks per VM to protect are also chosen in this step. Also in this step, the replication policy that was created in the previous step (or a pre-existing replication policy) is selected.
After these steps are complete, replication begins immediately. The initial replication can take many hours, depending on the amount of data, the churn of the data, available bandwidth, and other factors. A fairly accurate estimation of this timeframe should have been an output of the planning phase. Failover is not possible until the replicated VMs show as Protected. In Figure 6-81, the status of the initial replication is seen for two protected VMs.

FIGURE 6-81 Protected VMs replicating to Azure
The final item to create when implementing ASR is the Recovery Plan. This is an important construct in Site Recovery because it defines the orchestration of how workloads fail over and are powered on. Some applications need changes to be made via script, such as a connection string change and some applications require certain machines to power on before the others. All of these orchestrations are set up in the recovery plan. A screen shot of a recovery plan is shown in Figure 6-82.

FIGURE 6-82 ASR Recovery Plan
After the Recovery Plan is completed, ASR is configured and is ready to protect workloads. However, no disaster recovery solution is truly ready until a failover test is accomplished. To perform a test failover, navigate to the Recovery Plan, right-click it and choose Test Failover, as shown in Figure 6-83. Choose the recovery point and the virtual network, and then click OK. Monitor the progress in the Site Recovery Jobs view.
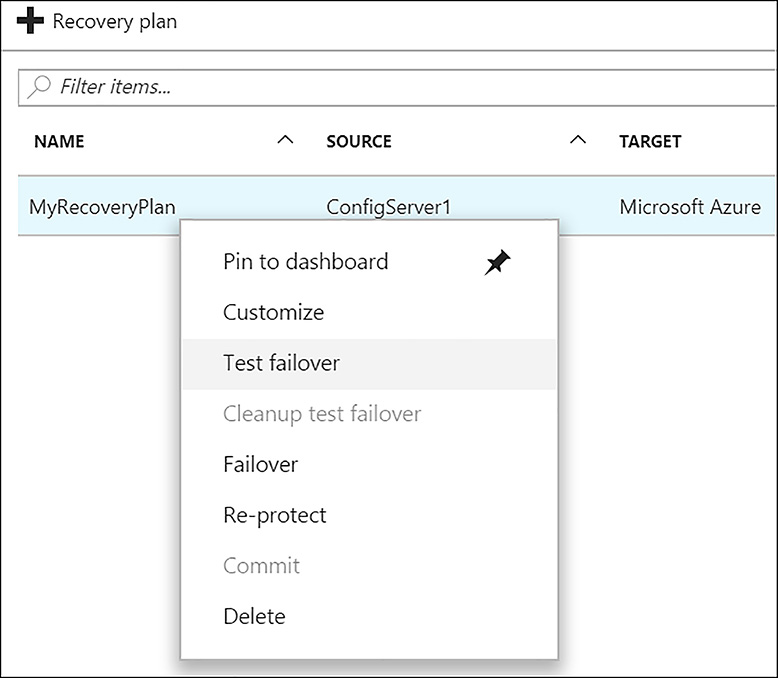
FIGURE 6-83 Testing the failover
After the test failover has completed, validate that the application is functional. If it is not functional, this is a good opportunity to troubleshoot the issue and learn what is required for a functional failover of the protected application. You can add adjustments to the Recovery Plan to ensure future failovers produce a working instance of the protected application. As a final step, right-click the recovery plan and choose Cleanup test failover. This deletes the resources created during the test failover.
Implementing ASR Hyper-V virtual machine protection
Protecting Hyper-V-based workloads with ASR requires careful planning, with some of the key considerations being the number of VMs to protect, the number, size, and utilization of disks per protected VM, the data change rate, and the recovery point objectives. The outputs from this planning effort should produce:
The required network bandwidth for replication
The required number of storage accounts, Azure CPU cores, and memory
The on-premises requirements for this ASR scenario
Whether the VMs to be protected are compatible for ASR protection
The tools that can be used to assist in the planning effort include the Capacity Planner for Hyper-V Workloads and the ASR Capacity Planner. The ASR Capacity Planner was covered in the last section of this chapter, and its use for planning Hyper-V protection is not substantively different from the VMware scenario. As such, only the Capacity Planner for Hyper-V Replica is covered in this section.
The Capacity Planner for Hyper-V Replica can help when planning for either the datacenter to datacenter or the datacenter to Azure ASR scenario. The main data points that help plan the on-premises to Azure scenario include the impact of replication on the primary host’s compute, memory, storage disk space, and IOPS. The tool also provides the total bandwidth required for delta replication, which is generated based on the change rate of your data. The recommended approach is to leverage the outputs of this tool to use as inputs in the ASR Capacity Planner. A running instance of the ASR Capacity Planner is shown in Figure 6-84.

FIGURE 6-84 The Capacity Planner for Hyper-V Replica
As with the VMware scenario, protecting Hyper-V workloads can require a tremendous amount of bandwidth. An increase of outbound internet bandwidth or ExpressRoute can be considered to address this need.
The on-premises components required for the Hyper-V scenario include two agents: The Site Recovery Provider and the Recovery Services Agent. These are installed differently depending on the Hyper-V infrastructure. If there are only individual or clustered Hyper-V hosts, both agents are installed on all hosts, as shown in Figure 6-85.
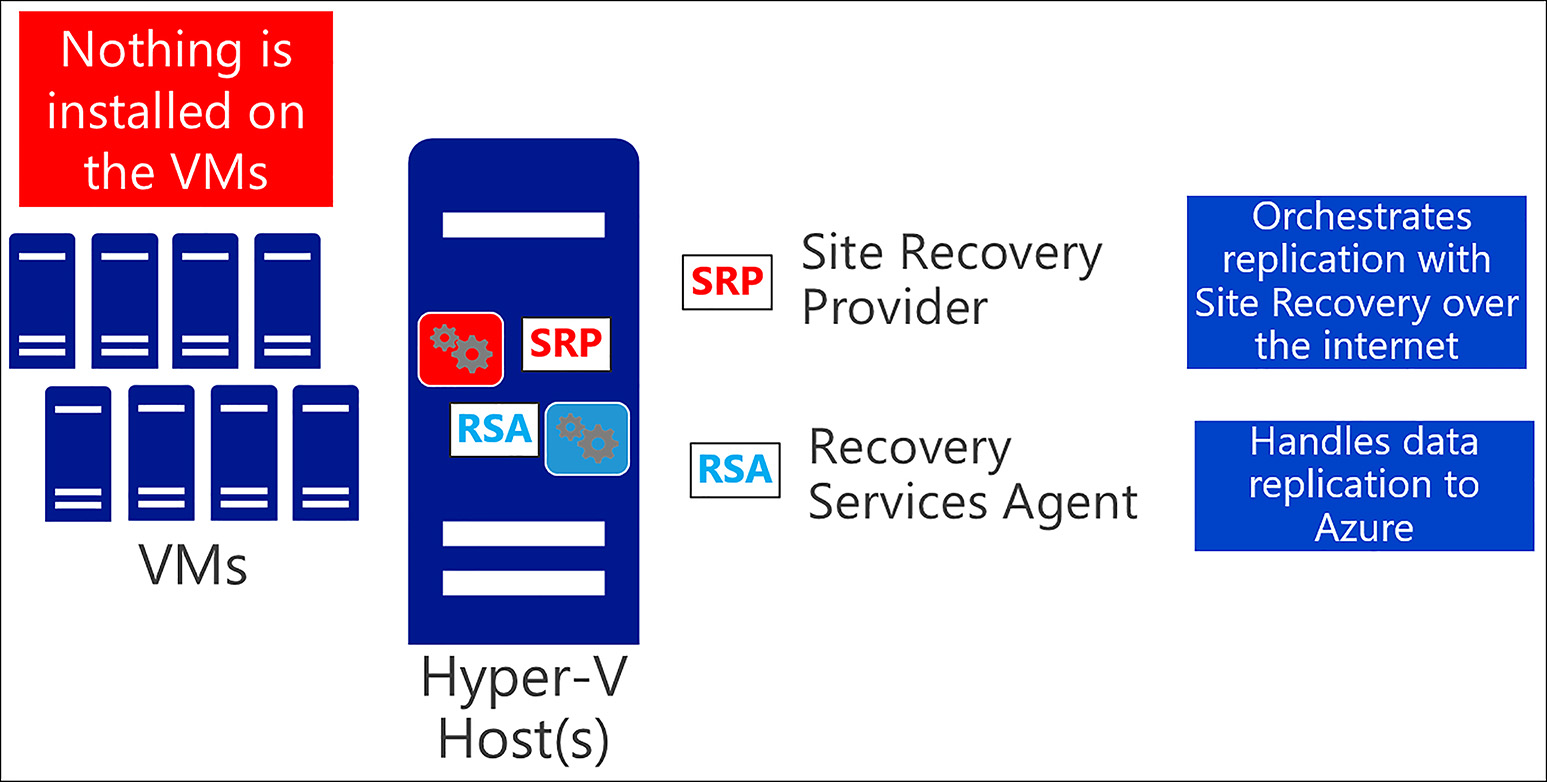
FIGURE 6-85 ASR agent architecture with only Hyper-V hosts
If System Center Virtual Machine Manager (SCVMM) is being used to manage the Hyper-V hosts, the agent architecture is slightly different. In this case, the Site Recovery Provider agent is installed on the SCVMM server(s) and the Recovery Services Agent is installed on all Hyper-V hosts, as shown in Figure 6-86. Notice that in either case, no agents are installed on the protected VMs.

FIGURE 6-86 ASR agent architecture with SCVMM host management
There are networking requirements for the Hyper-V scenario to consider. Both the Hyper-V hosts and SCVMM (if used) must have direct or proxy-based access to the following URLs:Ports in the internet.
*.hypervrecoverymanager.windowsazure.com:443
*.accesscontrol.windows.net:443
*.backup.windowsazure.com:443
*.blob.core.windows.net:443
*.store.core.windows.net:443
time.windows.com:123
time.nist.gov:123
After the planning effort is complete, bandwidth upgrades (if required) have been procured, and the networking requirements for internet access from SCVMM and the hosts are met, the implementation steps can begin.
First, create a Recovery Services vault as described in an earlier section of this chapter. Be certain to choose a region that is a significant distance from the primary site. Within the vault, create what is called a Hyper-V site by clicking Site Recovery Infrastructure and then Hyper-V Sites. A Hyper-V site is a management construct that surfaces the Azure Site Recovery Provider and the vault registration downloads, as shown in Figure 6-87. When these are installed on a Hyper-V host, it is associated with the Hyper-V site. Later, the replication policy is also associated with this Hyper-V site.
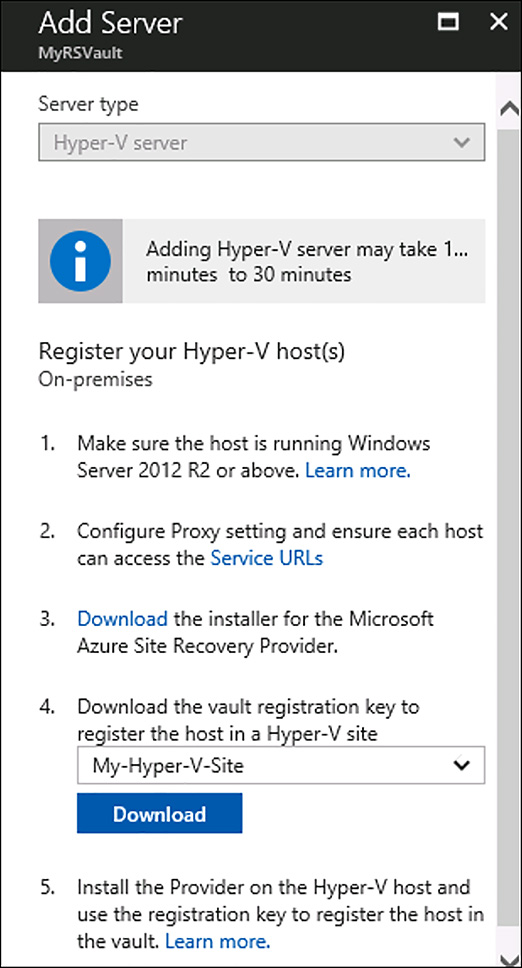
FIGURE 6-87 Adding a Hyper-V server to a Hyper-V Site
If the Site Recovery Provider is being installed on Hyper-V, it also downloads and installs the Recovery Services Agent, as shown in the progress indication dialog in Figure 6-88.

FIGURE 6-88 Installing the Azure Site Recovery Provider on Hyper-V hosts
After these installations, a dialog box open, allowing the Hyper-V host to be registered with the ASR Hyper-V Site. In the Hyper-V only scenario (no SCVMM) all hosts must be registered.
If the Site Recovery Provider is being installed on SCVMM, it alone is installed and then the SCVMM server alone is registered with the Hyper-V Site, as shown in Figure 6-89.

FIGURE 6-89 Installation of the Site Recovery Provider on SCVMM
A subsequent install of only the Recovery Services Agent occurs on the Hyper-V hosts. Note that when SCVMM is managing Hyper-V hosts you do not register the Hyper-V hosts with the Hyper-V site. Notice in Figure 6-90 the dialog shows Proceed to registration, but the setup should be closed at this point.
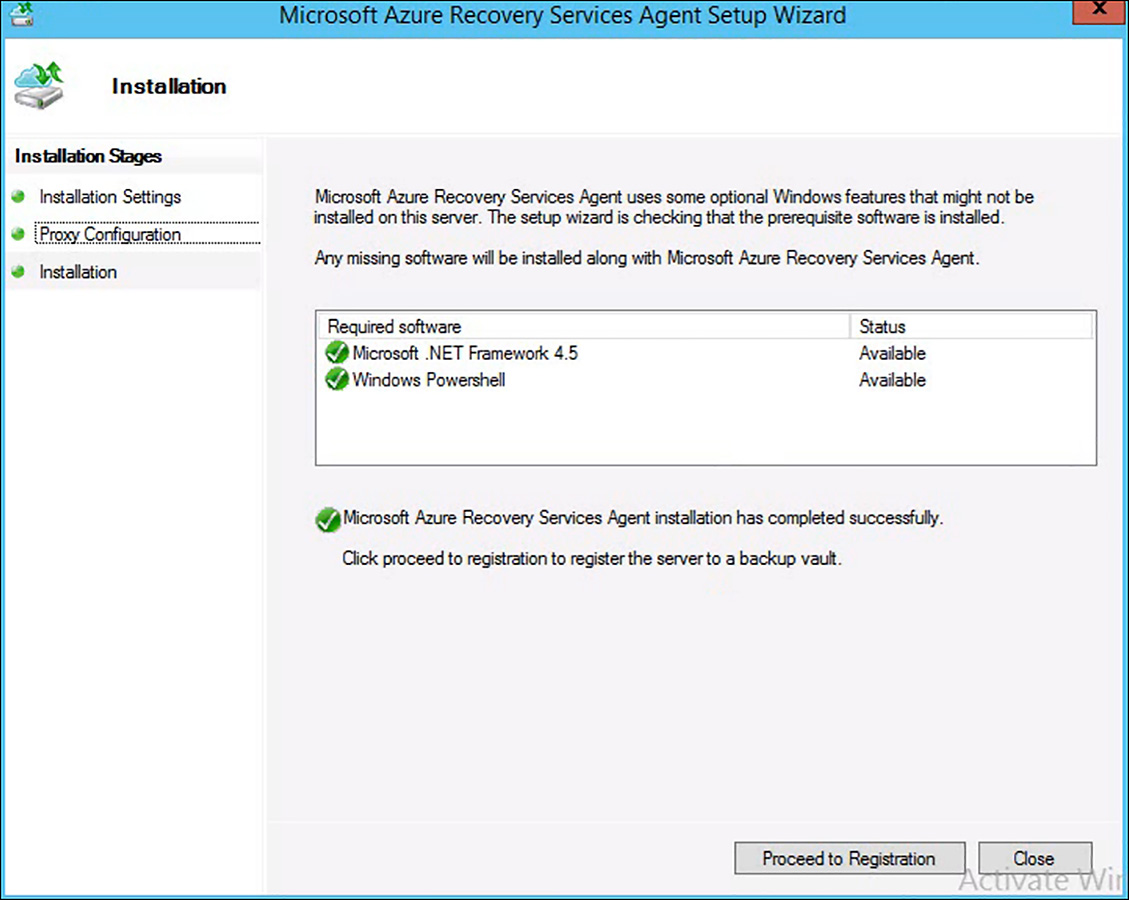
FIGURE 6-90 Recovery Services Agent installation on an SCVMM-managed Hyper-V host
After the SCVMM server or the Hyper-V hosts are installed and registered, the target environment must be configured. In this step, the Azure storage account and virtual network are selected. The storage account holds the replicated data from on-premises and the virtual network is used to host the networking capabilities of VMs that are failed over.
With the target environment prepared, next configure the replication policy. The replication policy defines how long recovery points and application-consistent snapshots should be retained, and this policy is associated with the Hyper-V site. The screen shot in Figure 6-91 shows the association of the Hyper-V site with a custom replication policy.
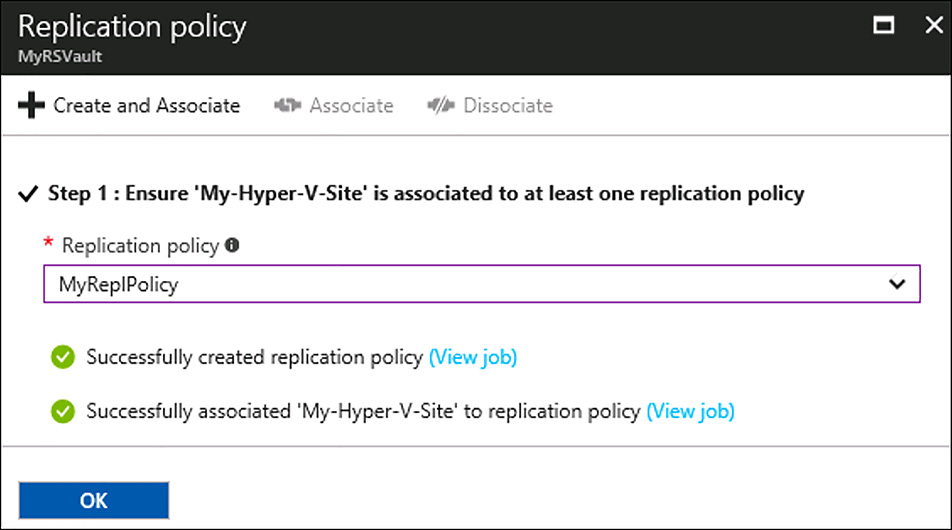
FIGURE 6-91 Creating and associated a replication policy with the Hyper-V site
The next step in implementing ASR in the Hyper-V scenario is to enable replication. In this step, the source and target environments are specified, the VMs to protect are chosen, and the replication policy is specified. After replication is enabled, it begins the replication process immediately. The initial replication does take some time to complete.
Next, create a recovery plan. As in the VMware scenario, a recovery plan defines the steps that govern how a workload fails over. Pre and post failover tasks can be defined and the order in which servers are powered on is specified.
After the initial replication is complete and the recovery plan is configured, ASR is set up and ready to be tested. To ensure all is working well, perform a test failover by right-clicking the recovery plan and choosing Test Failover. When the failover is complete, validate the functionality of the application and make any necessary tweaks to the recovery plan. Finally, perform a test failover cleanup to delete the failed over resources.
Implementing ASR Azure to Azure VIrtual Machine protection
The Azure cloud is not without failure, and sometimes a failure can impact an entire region. Thankfully, Azure Site Recovery supports region-to-region VM replication and failover. Earlier, this chapter covered the concept of using disk snapshots as an approach for VM recovery to another region. Now that Site Recovery supports this scenario, a much better level of protection can be achieved with an increased number of recovery points and a dramatically reduced recover time objective. A high-level diagram representing this capability is shown in Figure 6-92.

FIGURE 6-92 ASR Region-to-Region Protection
The process to implement Azure-to-Azure Site Recovery is less complex than the on-site to Azure options because it is a completely platform-managed service with no separately installed roles or software to manage. However, there is still planning to accomplish for this scenario.
First, ensure that protected VMs can communicate with the Office 365 authentication and identity endpoints, because the service must authenticate to function. Also, protected VMs must communicate with the source region IP addresses that represent the caching storage account (a concept that is discussed later in this chapter). Finally, protected VMs must communicate with the ASR service endpoint IP addresses to replicate data and orchestration information. We start with this requirement because no Azure to Azure functionality is possible without it.
When Azure-to-Azure VM replication is enabled, a cache storage account is created in the source region (the same region as the replicated VMs). The cache storage account is used by the Mobility extension (installed on the protected VMs) to initially write intercepted disk changes. Also, another storage account is created in the target region. This is where replicated data is eventually replicated and stored awaiting a failover action. A virtual network is created in the target region as well, which hosts the networking requirements of failed over VMs. Lastly, if the source VMs are in an availability set, a target availability set is created
As replication begins, the Mobility service extension is installed on the protected VMs (Figure 6-93, step 1). This service intercepts disk writes and handles the replication of data and then VMs are registered with the Site Recovery service (step 2). Next, the data writes are transferred to the cache storage account in the source region. This transfer is accomplished using the blob endpoint of the cache storage account (step 3). Finally, replicated data is sent by way of the Site Recovery service into the target storage account (step 4).
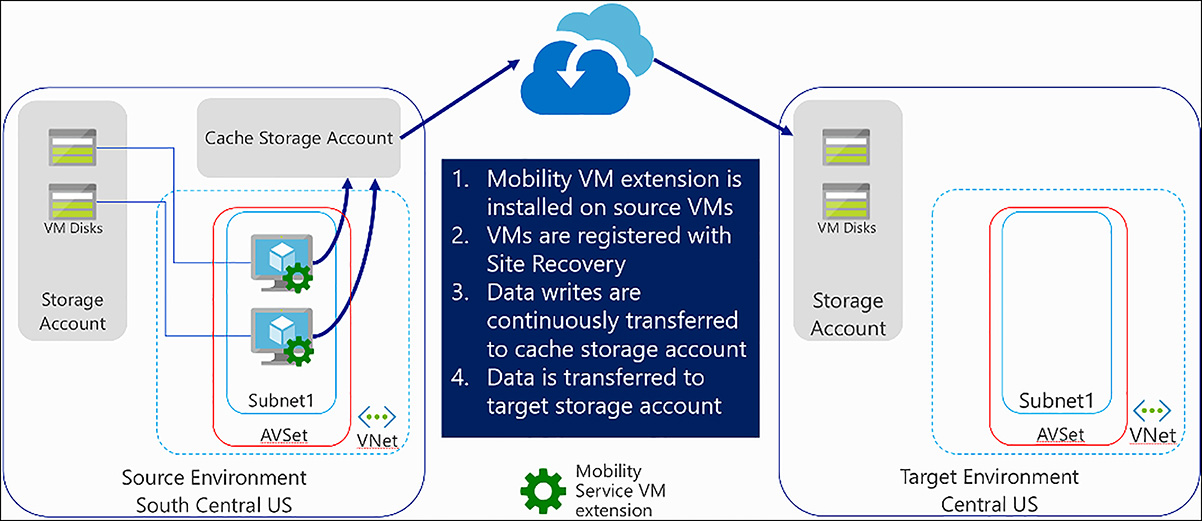
FIGURE 6-93 ASR Region-to-Region workflow
When a failover is initiated, replication stops and VMs are created within the target region and are configured to participate in the virtual network, subnet, and availability zone.
Some caveats to be aware of with Azure-to-Azure Site Recovery (as of this writing) include:
The management plan is Azure portal only
VM Scale Sets are not supported
Maximum OS disk size is 1023 GB
Maximum data change rate supported is 6 MBps
Managed disks are not supported
Azure disk encryption is not supported
Cannot replicate/failover between geographic clusters (basically must stay within the same continent)
Though the planning is easier with Azure-to-Azure Site Recovery, there are still things to consider. For example, the target region is a critical concern. Choose this region considering the same criteria as you would in a normal disaster recovery configuration. The replicated data should be a significant distance away from the primary data, and in areas less prone to natural disasters. Also keep in mind the outbound networking requirements mentioned earlier.
To implement Azure-to-Azure Site Recovery, begin by creating a Recovery Services vault in a target region that meets requirements. As in other scenarios, primarily ensure there is sufficient distance from the source region. Create the vault in one of the ways shown earlier in this chapter. This can be done via the Azure portal or PowerShell.
Next, configure the required outbound connectivity so that protected VMs can access the Site Recovery service endpoints, either by URL (if using a URL proxy) or IP address (if using firewall or NSG rules). The protected VMs must also be able to access the IP ranges of the Office 365 authentication and identity IP V4 endpoints and the blob service endpoint of the cache storage account. To make this configuration easier, Microsoft has released a PowerShell script that configures a Network Security Group with all of the required outbound rules. Access this script here: https://gallery.technet.microsoft.com/Azure-Recovery-script-to-0c950702.
Configure ASR in this scenario by navigating to the vault properties, choosing to enable replication, and selecting the appropriate source environment. Also choose the deployment model (which is generally Resource Manager), and select the resource group containing the VMs to protect. These configuration options are shown in Figure 6-94.

FIGURE 6-94 Selecting the source environment to protect
Next, choose the virtual machines to protect, and then customize the target resources (if required). Site Recovery pre-populates target resource information and a default replication policy, but any of these items can be customized as required. These configuration options are shown in Figure 6-95.
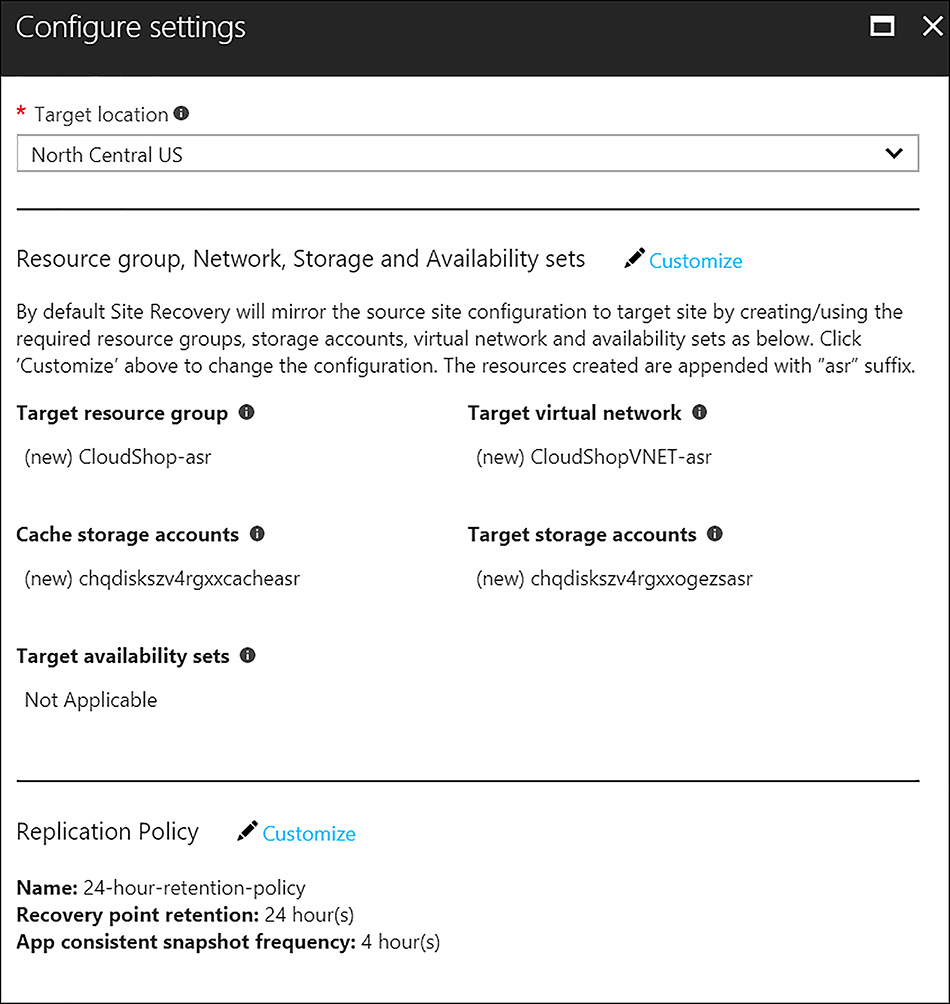
FIGURE 6-95 Configuring the target environment
With these options selected, enable replication by clicking Enable Replication. Failover is impossible until the initial replication is complete.
As in the other scenarios that have been covered, a Recovery Plan that dictates how failed over resources are brought online must be created. The recovery plan has all of the same capabilities discussed in earlier scenarios, including the ability to run pre and post scripts, Azure Automation runbooks, and direct the order VMs power on.
As with the other scenarios, no disaster recovery capability can be trusted until it is tested. Test the failover by right-clicking the recovery plan and selecting Test failover. After failover, validate the application functionality and clean up the test failover, by right-clicking the recovery plan and selecting Clean up test failover.
Thought experiment
In this thought experiment, demonstrate your skills and knowledge of the topics covered in this chapter. You can find answers to this thought experiment in the next section.
You are the administrator at Fabrikam, and your director has asked you to help solve a problem the users in your organization are experiencing. It seems most users access software as a service (SaaS) applications in their daily work stream. In particular, your project managers are leveraging an application called Aha!, the legal department utilize Dropbox for the storage of their least-sensitive tier of client documents, and HR is piloting the use of Workday to replace an antiquated people management system. These teams all have a similar problem. They must remember several usernames and passwords in their daily work stream. They log into their workstations in the morning, and they also log into several SaaS applications to accomplish their work. You need to provide a single sign-on experience to your users, but do so in a cost-effective, secure way. In particular, the legal team has a requirement to use multi-factor authentication when they access client documents. However, the lawyers are notoriously opposed to having to carry around dedicated authentication tokens.
On a potentially-related note, Fabrikam underwent a migration to Office 365 one year ago, and all is going well with the use of this cloud service.
How do you:
Provide a single sign-on experience for various SaaS applications, and preferably do so by group, instead of by user?
Ensure the single sign-on solution is secure and supports multi-factor authentication?
How will you deal with turnover in your organization as it pertains to SaaS application access?
Thought experiment answer
This section contains the solution to the thought experiment.
Fortunately, in this scenario, Fabrikam is using Office 365 meaning they are already using Azure Active Directory. Azure AD is the Identity and access management solution for all of Microsoft’s cloud properties, including Azure.
Azure Active Directory has the capability to provide single sign-on to thousands of SaaS applications. Access can be granted by user with the free and basic SKU, or by group with the premium SKU.
Azure Active Directory supports the use of multi-factor authentication with the premium SKU. Multi-factor authentication in Azure AD can use a person’s phone as the second factor, either with an authenticator application install or through texts/phone calls.
With Azure AD licensed with the Premium SKU, administrators can manage SaaS application access by group. This means an administrator can remove a user from a group representing the application access in the on-premises AD. After synchronization, the user is removed from the Azure AD group and their access to the SaaS application is deprovisioned.
Chapter summary
This chapter covered a wide variety of security-related topics, including securing and managing company secrets, keys, and certificates, provisioning access to SaaS applications, and ensuring that access to data and services is maintained. Some of the key things to remember include:
Azure Key Vault is a great way to protect secrets, keys, and certificates. This service can be created and managed via the Azure portal, PowerShell, or the Azure CLI, and includes support for protecting these items with FIPS 140-2 Level 2 validated hardware security modules (HSMs).
Azure Security Center is enabled by default within your Azure subscription and helps to prevent and detect security issues. Security Center helps secure more than just your Azure deployments. The Microsoft Monitoring Agent can be installed on workloads in other clouds or on-premises to extend the value of this service.
Azure Active Directory can be used to configure single sign-on access to thousands of SaaS applications and can do so with either federated access or through securely storing and presenting the SaaS application password on behalf of the user.
Authentication via social providers, such as Facebook, Google, and LinkedIn can be enabled by using Azure Active Directory Business to Consumer (B2C) feature set. This is generally used by developers who want to simplify the addition of robust authentication in their web and mobile apps.
Azure Backup can be used to protect files and folders, applications, and IaaS virtual machines. This cloud-based data protection service helps organizations by providing offsite backups in the cloud and protection of VM workloads they have already moved to the cloud.
Azure IaaS VMs can be protected through the use of disk snapshots. These can be copied to storage accounts in other regions and, when required, VMs can be provisioned from these disk snapshots. This can be thought of as a way to provide for disaster recovery of IaaS VMs before Azure Backup and Site Recovery were available. Today, Azure Backup and Site Recovery represent a superior way to protect data and quickly restore service in the case of a sustained outage.
Azure Site Recovery has several scenarios for enabling the replication and failover of workloads. ASR can protect physical, VMware, and Hyper-V-based workloads from on-premises into Azure. It can also replicate and failover VMs from one Azure region to another.