CHAPTER 5
Design and deploy ARM templates
The Azure Resource Manager (ARM) provides a central control plane whereby Azure resources can be provisioned and managed. When you use the Azure portal to create and configure resources, you are using ARM. Likewise, if you use command line tools such as Azure PowerShell or the CLI, you are using ARM because these tools are simply invoking what the API’s ARM exposes.
The Azure Resource Manager enables IT professionals and developers to describe an infrastructure in a declarative way using JSON documents, known as ARM templates, and then send those documents to ARM to provision the resources described in the template. This is a significant advancement from the approach of invoking a sequence of imperative commands to provision an infrastructure. The declarative model for provisioning resources is arguably what ARM is best known for. However, ARM is much more than a means for provisioning complex infrastructures. It is also the control plane through which access to resources, permissions, and policies are configured.
This chapter covers the Azure Resource Manager through the lens of an IT professional responsible for implementing infrastructures on Azure, configuring access to resources, and implementing built-in and custom policies to govern the environment.
Skills covered in this chapter
Skill 5.1: Implement ARM templates
When you author an ARM template to describe an Azure infrastructure to be implemented, you have at least one JSON file that contains the definitions of the resources you want ARM to deploy. However, in most situations, your infrastructure is complex enough that you need several files to describe your infrastructure and parameterize deployments to support different environments, such as development, test, UAT, and production. If you have heard the term “infrastructure as code,” that’s exactly what ARM templates are. It is code (JSON files and scripts) that define the infrastructure and deploy it.
This skill covers how to:
Author ARM templates
Deploy an ARM template
Author ARM templates
In the simplest of cases, an infrastructure described as code includes the following types of files:
ARM template file This is a JSON file where the resources (virtual machines, virtual networks, etc.) for your infrastructure are described. You may have one or multiple files used to describe your infrastructure. For example, you may have one file that describes core infrastructure such as a virtual network, jumpbox server, and a virtual appliance. You may have another file that describes workload specific infrastructure, such as a cluster of web server virtual machines, availability set, load balancer, and database server cluster. This file is required.
ARM template parameter file This is a JSON file that provides parameter values for parameters defined in the ARM template file. For example, if you have a virtual machine resource defined in your ARM template file, it is common to have the size of the virtual machine parameterized so that you can deploy different sized virtual machines for different environments. This file is optional but almost always necessary for even a simple infrastructure. You may also have multiple files used to define parameter values. Generally speaking, for each ARM template file you have an ARM template parameter file.
Deployment script file This can be a PowerShell script or a Bash script that is used to deploy the infrastructure described in the ARM template file using parameter values from an ARM template parameter file. If you are working solely in a Windows environment, a PowerShell script may be all you need. If you are working in a Windows, Linux, or Mac environment, authoring a Bash script with CLI commands would be necessary. It’s common to have both a PowerShell script and a Bash script so the IT professional can use the scripting environment they are most comfortable with. This file is optional but always should be present. Without a deployment script, you would have to use the Azure portal to deploy your ARM template and specify parameter values, which is error prone and inefficient.
Artifact files These are files that augment your infrastructure deployment by configuring the internals of a resource. For example, if your ARM template file describes a Windows Server 2016 virtual machine resource, this is an ARM provision. However, if you need the virtual machine to be an IIS web server, or Active Directory server, or file server, this configuration must be done inside the virtual machine instance. A common approach for Windows virtual machines is to use Desired State Configuration (DSC) to describe the desired state the virtual machine should be in after it has been provisioned. DSC requires PowerShell scripts, modules, and optionally other files to configure the virtual machine instance. These files are examples of artifact files that would be part of your infrastructure-as-code. Artifact files are optional.
To author the ARM template files, parameter files, and deployment scripts, you want an editor that can provide a rich authoring experience for each of these types of files. While any text editor works, a couple of options that delivers a rich authoring experience with IntelliSense support are described below. Both can be downloaded from https://www.visualstudio.com/downloads/.
Visual Studio Code A code editor that runs on Windows, Linux, and Mac. For authoring ARM templates and deployment scripts, install the following extensions: Azure Resource Manager Tools, Azure CLI Tools, and PowerShell.
Visual Studio Community 2017 A full-fledged integrated development environment (IDE) that runs on Windows and Mac. For authoring ARM templates and deployment scripts, install the following extensions: Azure Resource Manager Tools and PowerShell tools.
The first line in an ARM template file is a $schema property that defines the schema for the document. This document specifies the types of elements that can be defined in the document, what their properties are, whether they are optional or required, and references to additional schema files for specific resource types. At the time of this writing, the value you should use for the $schema property and what you find references to in the ARM template documentation is at http://schema.management.azure.com/schemas/2015-01-01/deploymentTemplate.json.
MORE INFORMATION ARM TEMPLATE SCHEMAS
The schemas for ARM template files and parameter files are open-sourced on GitHub at https://github.com/Azure/azure-resource-manager-schemas. Here, you can dig deeper into the schema definitions, follow the development of schema files, raise issues, and even contribute to the repository.
The schema file referenced in the $schema property defines five additional elements for an ARM template file as described here:
contentVersion A four-part version number for the document, such as 1.0.0.0. This is required.
variables An object containing variable definitions used in the document. This is optional.
parameters An object containing parameter values that can be passed in when deploying the ARM template. This is optional.
resources An array containing resource definitions. This is required.
outputs An object containing values resulting from the deployment of an ARM template. For example, if a deployment organizes a public facing load balancer, you may choose to output the IP address of the load balancer. This is optional.
The JSON code below is an example of a valid ARM template with all the required and optional elements. You can name the ARM template file anything you want. However, a common naming convention is to name it azuredeploy.json and is the filename that is used in this text.
{
    "$schema": "http://schema.management.azure.com/schemas/2015-01
-01/deploymentTemplate.json#",
    "contentVersion": "1.0.0.0",
    "parameters": {  },
    "variables": {  },
    "resources": [  ],
    "outputs": {  }
}
In the following sections, we add resources to the azuredeploy.json file to provision a Windows Server virtual machine with two network interface cards (NICs).
Define a virtual network resource
Every resource in Azure is unique. So, the definition of a resource, and its properties and values, varies from one resource to the next. The schema that defines the structure of the ARM template file includes the schema that defines the shape of a resource. If you are ever unsure about how to define a resource, you can always refer to the resource schema if you need to. Also, Visual Studio Code and Visual Studio 2017 provide IntelliSense to help you author the resource definitions.
MORE INFORMATION RESOURCE SCHEMAS
A useful trick discovering the schema for a resource is to deploy the resource using the Azure portal first. Then, open the Resource Group blade for where the resource is deployed in, and click Automation Script to see the resource template.
Azure Quickstart Templates are another source of community contributed ARM templates and scripts to deploy simple and complex infrastructures. This is also a good learning resource. You can access the Azure Quickstart Templates at https://azure.microsoft.com/en-us/resources/templates/.
The code in Listing 5-1 below shows how a virtual network resource could be defined in the azuredeploy.json file. The brief narrative of the code added to define the virtual network is as follows:
A parameter was added to allow for the name of the virtual network to be parameterized for each deployment. The name of the parameter,
vnetName, is how the parameter value is referenced later in the resources array. The parameter is of type string, with a default value of vnet. In the resources array, the value of the parameter is accessed using theparameters()function.A few variables were added. The first is the
vnetPrefix, which is referenced in the resources section to define the address space for the virtual network. ThevnetAppsSubnetNameandvnetAppsSubnetPrefixvariables provide a name and address space for a subnet named Apps. Following are similar variables for a subnet named Data. In the resources array, the value of these variables are accessed using thevariables()function.The actual definition of the virtual network resource is added to the resources array. The first four elements in the virtual network resource definition are common to all resources. Their values are different, but every resource must provide the following:
name The name of the resource, which can be any value. In this scenario, the value is passed in as a parameter during template deployment.
type The type of the resource is always in the format of <provider namespace>/<resource type>. For the virtual network resource, the provider namespace is Microsoft.Network and the resource type is virtualNetwork.
apiVersion A resource type is defined in a resource provider. A resource provider exposes the APIs and schema for the resource types it contains. A resource provider takes on a new version number when resource types are added, changed, deleted, and when there are schema changes. As a result, resource providers usually have multiple API versions. So, when defining a resource in an ARM template, you must specify the version of the resource provider you wish to use.
location The location refers to the region to deploy the resource in, such as East US, West US, West Europe, etc. It is common convention for a resource to be located in the same region as the resource group it is contained in. The
resourceGroup()function exposes a location property for this purpose.
Next is the properties element, where resource-specific properties can be set. The properties element is present for most resources in Azure. However, its shape (i.e. properties inside) varies for each resource type. For the virtual network resource, the properties element provides settings for the address space of the virtual network and its subnets.
LISTING 5-1 The azuredeploy.json file after adding a virtual network resource
{
  "$schema": "https://schema.management.azure.com/schemas/2015-01
-01/deploymentTemplate.json#",
  "contentVersion": "1.0.0.0",
  "parameters": {
    "vnetName": {
      "type": "string",
      "defaultValue": "vnet"
    }
  },
  "variables": {
    "vnetPrefix": "10.0.0.0/16",
    "vnetAppsSubnetName": "Apps",
    "vnetAppsSubnetPrefix": "10.0.0.0/24",
    "vnetDataSubnetName": "Data",
    "vnetDataSubnetPrefix": "10.0.1.0/24"
  },
  "resources": [
    {
      "name": "[parameters('vnetName')]",
      "type": "Microsoft.Network/virtualNetworks",
      "apiVersion": "2016-03-30",
      "location": "[resourceGroup().location]",
      "properties": {
        "addressSpace": {
          "addressPrefixes": [
            "[variables('vnetPrefix')]"
          ]
        },
        "subnets": [
          {
            "name": "[variables('vnetAppsSubnetName')]",
            "properties": {
              "addressPrefix": "[variables('vnetAppsSubnetPrefix')]"
            }
          },
          {
            "name": "[variables('vnetDataSubnetName')]",
            "properties": {
              "addressPrefix": "[variables('vnetDataSubnetPrefix')]"
            }
          }
        ]
      }
    }
  ]
}
The Azure platform provides hundreds of resource types that can be used to define an infrastructure. As you learned in this section, a resource type is made available through a resource provider. You can get a list of all the resource providers using the Get-AzureRmResourceProvider Azure PowerShell cmdlet or by using the az provider list CLI command. For each of the providers returned, you can see the namespace, resource types, and API versions it supports.
MORE INFORMATION ARM TEMPLATE FUNCTIONS
ARM templates generally make use of several ARM template functions. You learned about a few of them in this section, such as the resourceGroup, variables, and parameters functions. There are many more functions available though. For a list of all the ARM template functions and how they can be used, see https://aka.ms/arm-template-functions.
Define a pair of NIC resources
The NIC resource binds a virtual machine to a virtual network. Like a physical machine, a virtual machine can have multiple NICs to bind the virtual machine to multiple subnets, such as a public facing subnet and a non-public facing backend subnet. ARM provides a looping construct that is useful in scenarios such as this where you need to define multiple copies of a resource. Without it, you would have to explicitly define each copy of the resource plus any variables and parameters used to define the resource. This would result in very large template files with a large number of parameters and variables, which is important because there are limits to how large a template file can be and how many parameters and variables can be defined.
MORE INFORMATION
Documentation on Azure’s subscription and service limits, quotas, and constraints is available at https://aka.ms/azurelimits.
The code in Listing 5-2 shows the azuredeploy.json file with a pair of NIC resources added using ARM’s looping construct. A brief narrative of the code added is as follows:
A parameter was added to allow for the name of the NIC to be parameterized for each deployment.
A few variables were added. The vnetID uses the resourceId() function to construct a string representing the unique resource ID of the virtual network resource. The vnetID is then referenced in the definition of variables nicAppsSubnetRef and nicDataSubnetRef, which uses the concat() function to construct a reference to the two subnets. These two variables are then placed into an array variable called nicSubnetRefs that are referenced by index in the NIC resource definition. The nicCount is used to indicate the number of NICs to be created.
The NIC resource definition is added after the virtual network resource definition. In this resource definition, the dependsOn array is added with a reference to the vnetID variable. The dependsOn element provides a way to order the provisioning of resources defined in an ARM template. By default, ARM attempts to provision resources in parallel. This results in efficient deployment times. However, some resource types depend on the presence of another resource type as part of their definition, which is the case for the NIC resource. The NIC resource definition must specify the subnet in the virtual network it will be bound to, which requires that the virtual network resource already be provisioned. If you don’t indicate this dependency in the dependsOn array, ARM will try to provision the NIC at the same time it provisions the virtual network, resulting in a failed deployment. ARM evaluates all the dependencies in an ARM template and then provisions the resources according to the dependency graph.
The looping mechanism for creating multiple resources of this type is provided by the copy element, where you need to provide only a name for the copy operation and a count value, which is provided by the
nicCountvariable. When ARM sees the copy element, it goes into a loop and provisions a new resource in each of the iterations. In this scenario, there are two iterations. A unique name must be provided for every resource, which can be problematic when using this looping mechanism. To resolve this conflict, the name makes use of thecopyIndex()function to append the iteration number of the resource being provisioned. In other words, thecopyIndex()returns the iteration number of the resource type being provisioned in the loop. ThecopyIndex()function can only be used in a resource definition if the copy object is also provided. The complete name for each NIC is constructed using theconcat()function to concatenate the name provided as a parameter and then a number which is the iteration number fromcopyIndex(). The ARM looping mechanism is zero-based, which meanscopyIndex()will return 0 in the first iteration of the loop. The ‘1’ passed tocopyIndex()is used to increment the zero-based iteration number by 1 so that the number added to the end of the name begins with 1 instead of 0.The copyIndex() function is also used to index back into the nicSubnetRefs array variable. This results in the first NIC being bound to the Apps subnet and the second NIC being bound to the Data subnet.
LISTING 5-2 The azuredeploy.json file after adding a pair NIC resources
{
  "$schema": "https://schema.management.azure.com/schemas/2015-01-01/deploymentTemplate.json#",
  "contentVersion": "1.0.0.0",
  "parameters": {
    "vnetName": {
      "type": "string",
      "defaultValue": "vnet"
    },
    "nicName": {
      "type": "string",
      "defaultValue": "nic"
    }
  },
  "variables": {
    "vnetPrefix": "10.0.0.0/16",
    "vnetAppsSubnetName": "Apps",
    "vnetAppsSubnetPrefix": "10.0.0.0/24",
    "vnetDataSubnetName": "Data",
    "vnetDataSubnetPrefix": "10.0.1.0/24",
    "vnetID": "[resourceId('Microsoft.Network/virtualNetworks', parameters('vnetName'))]",
    "nicAppsSubnetRef": "[concat(variables('vnetID'), '/subnets/', variables('vnetAppsSubnetName'))]",
    "nicDataSubnetRef": "[concat(variables('vnetID'), '/subnets/', variables('vnetDataSubnetName'))]",
    "nicSubnetRefs": [ "[variables('nicAppsSubNetRef')]", "[variables('nicDataSubnetRef')]" ],
    "nicCount": 2
  },
  "resources": [
    {
      "name": "[parameters('vnetName')]",
      "type": "Microsoft.Network/virtualNetworks",
      "apiVersion": "2016-03-30",
      "location": "[resourceGroup().location]",
      "properties": {
        "addressSpace": {
          "addressPrefixes": [
            "[variables('vnetPrefix')]"
          ]
        },
        "subnets": [
          {
            "name": "[variables('vnetAppsSubnetName')]",
            "properties": {
              "addressPrefix": "[variables('vnetAppsSubnetPrefix')]"
            }
          },
          {
            "name": "[variables('vnetDataSubnetName')]",
            "properties": {
              "addressPrefix": "[variables('vnetDataSubnetPrefix')]"
            }
          }
        ]
      }
    },
    {
      "name": "[concat(parameters('nicName'), copyIndex(1))]",
      "type": "Microsoft.Network/networkInterfaces",
      "apiVersion": "2016-03-30",
      "location": "[resourceGroup().location]",
      "dependsOn": [
        "[variables('vnetID')]"
      ],
      "copy": {
        "name": "nicCopy",
        "count": "[variables('nicCount')]"
      },
      "properties": {
        "ipConfigurations": [
          {
            "name": "ipConfig",
            "properties": {
              "privateIPAllocationMethod": "Dynamic",
              "subnet": {
                "id": "[variables('nicSubnetRefs')[copyIndex()]]"
              }
            }
          }
        ]
      }
    }
  ]
}
Define a virtual machine resource
The virtual machine resource definition, as shown in Listing 5-3, leverages the same ARM template authoring concepts discussed previously. Therefore, it is not necessary to narrate all the changes that were made to the template file to define the virtual machine resource. It is, however, worth pointing out the adminUser and adminPassword parameters that were added. These parameters do not provide a default value, which is recommend for secure information such as credentials. However, these parameters are required because the minLength property was included in the parameter definition. Because these parameters are strings, the minLength indicates the length of the string value must be at least 1 for the adminUser and 12 for the adminPassword. Similarily, the maxLength property can be included to limit the length of the parameter value if desired.
It is common to see examples where the credentials for a virtual machine resource, and other resource types that require credentials, are passed in as parameters. It’s convenient to do so. However, for security reasons, it is not recommended to do this. Instead, it is recommended to store your credentials in Azure Key Vault and create template parameters to pass in the required Key Vault settings so that ARM can pull the credentials from Key Vault when provisioning the virtual machine. An example demonstrating how to use Key Vault to pass secure values into an ARM template during deployment is available at https://docs.microsoft.com/en-us/azure/azure-resource-manager/resource-manager-keyvault-parameter.
LISTING 5-3 The azuredeploy.json file after adding the virtual machine resource
{
  "$schema": "https://schema.management.azure.com/schemas/2015-01-01/deploymentTemplate.json#",
  "contentVersion": "1.0.0.0",
  "parameters": {
    "vnetName": {
      "type": "string",
      "defaultValue": "vnet"
    },
    "nicName": {
      "type": "string",
      "defaultValue": "nic"
    },
    "vmName": {
      "type": "string",
      "defaultValue": "vm"
    },
    "vmSize": {
      "type": "string",
      "defaultValue": "Standard_DS2_v2"
    },
    "adminUser": {
      "type": "string",
      "minLength": 1
    },
    "adminPassword": {
      "type": "securestring",
      "minLength": 12
    }
  },
  "variables": {
    "vnetPrefix": "10.0.0.0/16",
    "vnetAppsSubnetName": "Apps",
    "vnetAppsSubnetPrefix": "10.0.0.0/24",
    "vnetDataSubnetName": "Data",
    "vnetDataSubnetPrefix": "10.0.1.0/24",
    "vnetID": "[resourceId('Microsoft.Network/virtualNetworks', parameters('vnetName'))]",
    "nicAppsSubnetRef": "[concat(variables('vnetID'), '/subnets/', variables('vnetAppsSubnetName'))]",
    "nicDataSubnetRef": "[concat(variables('vnetID'), '/subnets/', variables('vnetDataSubnetName'))]",
    "nicSubnetRefs": [ "[variables('nicAppsSubNetRef')]", "[variables('nicDataSubnetRef')]" ],
    "nicCount": 2
  },
  "resources": [
    {
      "name": "[parameters('vnetName')]",
      "type": "Microsoft.Network/virtualNetworks",
      "apiVersion": "2016-03-30",
      "location": "[resourceGroup().location]",
      "properties": {
        "addressSpace": {
          "addressPrefixes": [
            "[variables('vnetPrefix')]"
          ]
        },
        "subnets": [
          {
            "name": "[variables('vnetAppsSubnetName')]",
            "properties": {
              "addressPrefix": "[variables('vnetAppsSubnetPrefix')]"
            }
          },
          {
            "name": "[variables('vnetDataSubnetName')]",
            "properties": {
              "addressPrefix": "[variables('vnetDataSubnetPrefix')]"
            }
          }
        ]
      }
    },
    {
      "name": "[concat(parameters('nicName'), copyIndex(1))]",
      "type": "Microsoft.Network/networkInterfaces",
      "apiVersion": "2016-03-30",
      "location": "[resourceGroup().location]",
      "dependsOn": [
        "[variables('vnetID')]"
      ],
      "copy": {
        "name": "nicCopy",
        "count": "[variables('nicCount')]"
      },
      "properties": {
        "ipConfigurations": [
          {
            "name": "ipConfig",
            "properties": {
              "privateIPAllocationMethod": "Dynamic",
              "subnet": {
                "id": "[variables('nicSubnetRefs')[copyIndex()]]"
              }
            }
          }
        ]
      }
    },
    {
      "name": "[parameters('vmName')]",
      "type": "Microsoft.Compute/virtualMachines",
      "apiVersion": "2017-03-30",
      "location": "[resourceGroup().location]",
      "dependsOn": [ "nicCopy" ],
      "properties": {
        "hardwareProfile": {
          "vmSize": "[parameters('vmSize')]"
        },
        "osProfile": {
          "computerName": "[parameters('vmName')]",
          "adminUsername": "[parameters('adminUser')]",
          "adminPassword": "[parameters('adminPassword')]"
        },
        "storageProfile": {
          "imageReference": {
            "offer": "WindowsServer",
            "publisher": "MicrosoftWindowsServer",
            "sku": "2016-Datacenter",
            "version": "latest"
          },
          "osDisk": {
            "createOption": "FromImage"
          }
        },
        "networkProfile": {
          "networkInterfaces": [
            {
              "id": "[resourceId('Microsoft.Network/networkInterfaces', concat(parameters('nicName'), '1'))]",
              "properties": {
                "primary": true
              }
            },
            {
              "id": "[resourceId('Microsoft.Network/networkInterfaces', concat(parameters('nicName'), '2'))]",
              "properties": {
                "primary": false
              }
            }
          ]
        }
      }
    }
  ]
}
Because most ARM templates define parameters to parameterize the deployment it is common to author an ARM template parameter file to provide the parameter values. You may even have multiple template parameter files for a single template. For example, consider the scenario where you need to deploy the same infrastructure for a line-of-business application in different environments, such as a testing environment and a production environment. To deploy the template to the testing environment, you may use fewer virtual machines and with fewer cores and less memory because you just need to test functionality of the application. To deploy the template to the production environment, you may require more virtual machines, each with more cores and memory to meet real production demand. To support this scenario, it is common to create separate template parameter files for each environment.
The first line in an ARM template parameter file is a $schema property that defines the schema for the document. It serves the same purpose as the $schema property you learned about for the template file. At the time of this writing, the value you should use for the $schema property and what you will find references to in documentation is at http://schema.management.azure.com/schemas/2015-01-01/deploymentParameters.json.
The schema file referenced in the $schema property defines two additional elements for an ARM template parameter file as described here:
contentVersion A four-part version number for the document, such as 1.0.0.0. This is required. This enables you to version your parameter file just like you would version the template file.
parameters An object containing the values for the parameters defined in the ARM template. This is required.
The JSON code below is an example of a valid ARM template parameter file for the template created earlier in the text. You can name the ARM template parameter file anything you want.
However, a common naming convention is to name it azuredeploy.parameters.json, which is the filename used in this text.
{
  "$schema": "https://schema.management.azure.com/schemas/2015-01-01/deploymentParameters.json#",
  "contentVersion": "1.0.0.0",
  "parameters": {
    "vmSize": {
      "value": "Standard_A2"
    },
    "adminUser": {
      "value": "adminuser"
    }
  }
}
Recall that some of the parameters defined in the template file included default values. So, it’s only required to provide a parameter value for a parameter if you want a different value or if a default value is not provided and the parameter is required. In this case, a different value for the vmSize is provided and the adminUser value is provided since it is required. If a parameter is defined in a template that is required and you don’t provide a value for the parameter in a template parameters file, you are prompted to enter the value at the time you deploy the template. This is another way to address the same security concern mentioned previously regarding the passing of credentials through a template parameter. Just don’t store the password in the template parameter file because it results in the user being prompted to enter it at the time of deployment.
MORE INFORMATION DEPLOY ARM TEMPLATES TO EXISTING RESOURCE GROUPS
We cover the basic concepts necessary to author a simple ARM template. When you are defining templates for more complex architectures, it is a best practice to create a main template file that defines nested template resources. Each nested template resource can then reference a separate set of ARM template files to deploy that portion of the infrastructure. This technique enables you to break down a complex infrastructure into smaller and easier to manage parts. It also helps avoid exceeding the ARM template limits and quotas. The nested templates can also be re-used in other main templates. For example, you could have a nested template that defines a SQL Server and SQL Database. That nested template could be used by other templates anytime a SQL Server and SQL Database are required. For a deeper discussion on this technique and other ARM template authoring best practices, see https://docs.microsoft.com/en-us/azure/azure-resource-manager/resource-manager-template-best-practices.
As an ARM template’s complexity increases, so does the number of parameters you must define to allow for parametrized deployments. A common practice in complex templates is to define a parameter as an object type. This enables you to pass in a JSON structure with multiple properties in a single object. In the example used in this text to create a virtual machine there were just a few parameters defined. You would probably have more though to parameterize things like the number of data disks you want, which operating system, and so on. Rather than creating a new parameter for each, you could create a single object parameter in the template file as shown here.
  "parameters": {
    "vnetName": {
      "type": "string",
      "defaultValue": "vnet"
    },
    "nicName": {
      "type": "string",
      "defaultValue": "nic"
    },
    "vmSettings": {
      "type": "object"
    },
    "adminUser": {
      "type": "string",
      "minLength": 1
    },
    "adminPassword": {
      "type": "securestring",
      "minLength": 12
    }
  },
Then, in the template parameter file, define the settings for the virtual machine as shown here.
  "parameters": {
    "adminUser": {
      "value": "adminuser"
    },
    "vmSettings": {
      "value": {
        "vmName": "vm",
        "vmSize": "Standard_A2"
      }
    }
  }
In the ARM template file, you can then reference these parameter values using the parameters() function and object notation as shown here.
      "name": "[parameters('vmSettings').vmName]",
      "type": "Microsoft.Compute/virtualMachines",
      "apiVersion": "2017-03-30",
      "location": "[resourceGroup().location]",
      "dependsOn": [ "nicCopy" ],
      "properties": {
        "hardwareProfile": {
          "vmSize": "[parameters('vmSettings').vmSize]"
        },
For further details on this technique and examples on how to use objects as parameters in ARM templates see https://docs.microsoft.com/en-us/azure/architecture/building-blocks/extending-templates/objects-as-parameters.
Deploy an ARM template
There are two steps required to deploy an ARM template.
Create a resource group for the resources in the ARM template to be provisioned in.
Create a resource group deployment. This is the step where you send your template file and template parameter file to Azure Resource Manager. After the files are received, Azure Resource Manager evaluates the template to insure it is syntactically correct, determines resource dependencies, and then begins provisioning the resources into the resource group.
MORE INFORMATION ARM TEMPLATES
It is possible to deploy an ARM template to an existing resource group rather than create a new resource group each time. This is often done when you are re-deploying an ARM template because it failed to deploy previously or perhaps you have added new resources to the template. By default, ARM template deployments are incremental, meaning that Azure Resource Manager will not try to redeploy resources from the template that already exist in the resource group. Instead, it will deploy resources in the template that don’t already exist in the resource group. For more details on the incremental and complete modes that ARM supports and examples on how ARM behaves in these two modes, seehttps://docs.microsoft.com/en-us/azure/azure-resource-manager/resource-group-template-deploy#incremental-and-complete-deployments.
Deploy an ARM template using Azure PowerShell
Use the New-AzureRmResourceGroup and New-AzureRmResourceGroupDeployment cmdlets to deploy an ARM template as shown here:
$resourceGroupName = "contoso"
$location = "westus"
$deploymentName = "contoso-deployment-01"

# Create the resource group
$rg = New-AzureRmResourceGroup -Name $resourceGroupName -Location $location -Force

# Deploy the ARM template
New-AzureRmResourceGroupDeployment -ResourceGroupName $rg.ResourceGroupName -Name $deploymentName '
    -TemplateFile ".azuredeploy.json" -TemplateParameterFile ".azuredeploy.parameters.json"
MORE INFORMATION DEPLOYING ARM TEMPLATES WITH POWERSHELL
To learn more about deploying ARM templates using PowerShell and additional deployment techniques see https://docs.microsoft.com/en-us/azure/azure-resource-manager/resource-group-template-deploy.
Deploy an ARM template using CLI
Use the az group create and az group deployment create commands to deploy an ARM template as shown here:
#!/bin/bash

resourceGroupName="contoso"
location="westus"
deploymentName = "contoso-deployment-01"

# Create the resource group
az group create --name $resourceGroupName -- location $location

# Deploy the ARM template
az group deployment create --resource-group $resourceGroupName --name $deploymentName
    --template-file "./azuredeploy.json" --parameters "./azuredeploy.parameters.json"
MORE INFORMATION DEPLOYING ARM TEMPLATES USING CLI
To learn more about deploying ARM templates using CLI and additional deployment techniques see https://docs.microsoft.com/en-us/azure/azure-resource-manager/resource-group-template-deploy-cli.
Deploy an ARM template using the Azure portal
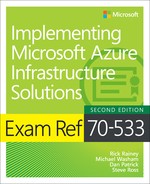
The Azure portal provides an interface whereby you can upload an ARM template file, provide parameter values, and even edit the template in your browser. To deploy an ARM template using this technique, search the Marketplace for Template Deployment. In the Template Deployment blade, click Create to begin a custom deployment, and then click the link To Build Your Own Template In The Editor. In the template editor blade, click the Load File link in the toolbar near the top of the blade, select your template file (ie: azuredeploy.json), and then click Save. In the Custom deployment blade, fill in the values for the parameters and click Purchase, as shown in Figure 5-1.
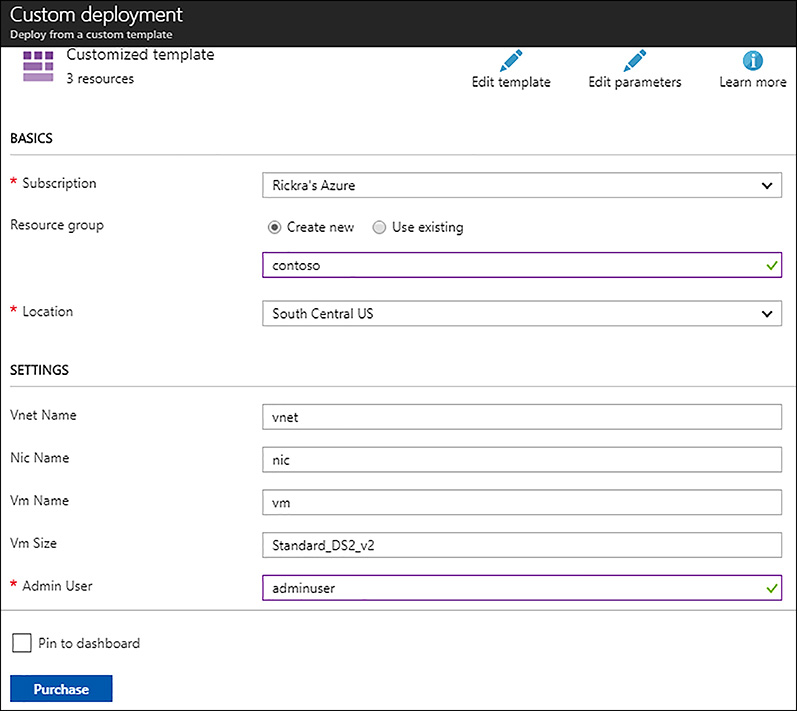
FIGURE 5-1 Custom deployment of ARM template file using the Azure portal
Skill 5.2: Control access
A challenge for many organizations adopting a cloud platform is how to implement controls, policies, and procedures to govern their cloud environments such that the benefits of the cloud can be realized while respecting the business’s security, compliance, and operational requirements. While the concepts for managing access to resources in the cloud is like those for on-premises environments, the techniques for implementing these concepts are different. The global presence of cloud environments and the increasing number of services available in the cloud introduces new challenges for IT. Things like data sovereignty requirements that may not have been a concern for a company operating in Europe or the United States prior to adopting the cloud, suddenly become real. Managing the types of resources available to the organization and being able to identify those resources for things like cost chargebacks is another example.
This skill covers how to:
Leverage service principles with ARM authentication
Set management policies
Lock resources
Leverage service principals with ARM authentication
When you sign-in to your Azure subscription you must authenticate to Azure Active Directory (AD). After successfully authenticating, you can manage resources within the subscription to the extent your permissions and the subscription policies allow you to. The permissions you have are tied to your identity in Azure AD. As an IT professional, such as an IT administrator, your permissions are generally less restrictive. Others in the organization may have permissions that allow them to do their job, such as being able to access several line-of-business applications, but nothing more. These identities and the permissions associated with them exist for the people in the organization. However, an identity (or directory object) does not always represent a person. There are many scenarios where an application or service needs to authenticate to Azure AD and perform functions to the extent it has permissions to do so. Identities such as this are called service principals, and the permissions associated with them are restricted to a very specific set of permissions.
Consider a scenario where an application needs access to a database, which requires a connection string to connect to the database. For added security, the connection string is stored and maintained in an Azure key vault. To read a secret in the key vault, the identity of the caller (in this case the application) must be authenticated and have permission to read the secret. To achieve this, a service principal is created for the application and given only the permission to read the secret from key vault. This very restrictive set of permissions, which is to read a secret from key vault, is all the application needs to function in this scenario. We use this scenario as context for the next few sections.
Register an application in Azure AD
The first thing you need to do is register the application with Azure Active Directory. The application registration tells Azure AD the type of application (or client) that will be authenticating to Azure AD, and hence the OAuth2 protocol flow that occurs when the application needs to authenticate to Azure AD. There are two types of applications you can choose from when registering an application in Azure AD, which are Web App / API and Native. In the context of service principals, the only option that is applicable is the Web App / API application type.
When you register an application with Azure AD using command-line tools such as PowerShell or the CLI, the Web App / API application type is used. It’s only when you’re using the Azure portal that you see an option for the Native application type.
MORE INFORMATION AZURE AD AUTHENTICATION SCENARIOS
You may be asking yourself if the Web App / API is the only option that applies, why are Native application types mentioned? The answer is that in this section, we’re talking about a very specific use case of an application authenticating to Azure AD using a service principal. However, application registrations in Azure AD are typically the result of configuring an application to be protected by Azure AD, which requires users of the application to first authenticate to Azure AD before they can use the application. Those “user applications” can be web-based applications or native.
A web-based application is exactly that, an application typically accessed through a browser using HTTPS, whereas a native application is an application running on a device, such as a desktop, phone, or tablet. The OAuth2 protocol flow that plays out when a user is authenticating to the application is different for each of these application types. For a detailed description of the different types of authentication scenarios using these types of applications see https://docs.microsoft.com/en-us/azure/active-directory/develop/active-directory-authentication-scenarios. Using the CLI, you can use the az ad app create command to create a new application registration with Azure AD as shown here:
#!/bin/bash

# Define properties for the AD app registration
adAppName="contos0"
adAppIdUris="https://contos0-app"

# Create a new app registration in Azure AD
az ad app create --display-name $adAppName --homepage $adAppIdUris --identifier-uris $adAppIdUris
After the application registration is complete, you see the properties for the application registration, as shown in Figure 5-2.
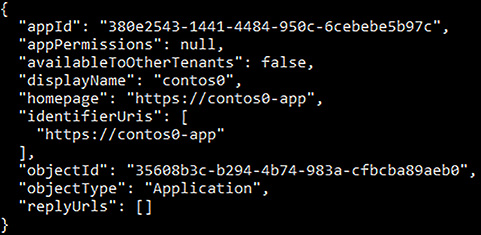
FIGURE 5-2 Azure AD application registration properties
Using Azure PowerShell, you can use the New-AzureRmADApplication cmdlet to create a new application registration with Azure AD as shown here:
# Define properties for the AD app registration
$adAppName="contos0"
$adAppIdUris="https://contos0-app"

# Create a new app registration in Azure AD
$app = New-AzureRmADApplication -DisplayName $adAppName -IdentifierUris $adAppIdUris
Using the Azure portal, you can create a new application registration from the Azure Active Directory blade. In the Azure AD blade, click App Registrations. In the App Registrations blade, click New Application Registration in the toolbar. Provide a name, select the application type, and provide a sign-on URL, which can be any unique URL in your Azure AD tenant, as shown in Figure 5-3.
FIGURE 5-3 Azure AD application registration using the Azure portal
When you create a new application registration using the Azure portal, an associated service principal is created automatically for you. If you use the command-line tools, you must explicitly create a service principal for your application, which is covered in the next section.
Create a service principal in Azure AD
Using the CLI, you can use the az ad sp create command to create a new service principal for the application registered in the previous section. When creating the service principal, you need to provide the object ID of the application registration as a parameter.
#!/bin/bash

# The object ID of the application registered with Azure AD
adAppId="35608b3c-b294-4b74-983a-cfbcba89aeb0"

# Create a new service principal for the application
az ad sp create --id $adAppId
After the service principal is created, you see the properties for the service principal as shown in Figure 5-4.

FIGURE 5-4 Azure AD service principal properties
MORE INFORMATION SERVICE PRINCIPAL USING CLI
For a deeper discussion and examples on creating a service principal using the CLI, managing roles, and updating the service principal credentials see https://docs.microsoft.com/en-us/cli/azure/create-an-azure-service-principal-azure-cli. Using Azure PowerShell, you can use the New-AzureRmADServicePrincipal cmdlet to create a new service principal for the application as shown here:
# Define properties for the AD app registration
$adAppName="contos0"
$adAppIdUris="https://contos0-app"

# Create a new app registration in Azure AD
$app = New-AzureRmADApplication -DisplayName $adAppName -IdentifierUris $adAppIdUris

# Create a new service principal for the application
$sp = New-AzureRmADServicePrincipal -ApplicationId $app.ApplicationId
For the application to authenticate to Azure AD, you need to create a key. In some documentation, this is referred to as the client secret. Either way, an application such as a web application in this scenario needs to provide an application ID and a key (client secret) when attempting to authenticate to Azure AD. This key could be created using the command-line tool during application registration. Or, you can create it afterward using the Azure portal. To create a key using the Azure portal, open the application registration blade for the application registered in Azure AD and click Keys. Specify a name for the key, the duration, and click Save. The key (or client secret) is displayed, as shown in Figure 5-5.

FIGURE 5-5 The Keys blade for an application registered with Azure AD
Now you have all the pieces required for an application to authenticate itself with Azure AD using the service principal. The permissions for the service principal, such as being allowed to access the key vault, are configured with the key vault instance. The application, such as the web application, authenticates to Azure AD using the Application ID from the application registration and the Key (client secret).
There is a significant number of developer-related tasks needed to complete this scenario. Because this text is targeting the IT professional, those tasks are not covered here. Instead, only the tasks that most IT professionals would complete are covered. For a complete end-to-end description of all the tasks required to complete this, including assigning permissions to the key vault for the service principal see https://docs.microsoft.com/en-us/azure/key-vault/key-vault-use-from-web-application.
MORE INFORMATION APPLICATIONS AND SERVICE PRINCIPALS
It should be clear that there is a subtle, but very distinct, difference between an application registration in Azure AD and a service principal. In some documentation, these are sometimes referred to as one in the same. But, understanding the differences will aid the IT professional in creating robust service principal to application registration configurations. For more details on the differences between applications and service principals see https://docs.microsoft.com/en-us/azure/active-directory/develop/active-directory-application-objects.
Set management policies
Organizations adopting public cloud quickly realize the need to govern their cloud environments to adhere to their business and operational requirements. Where an organization does business, the geographies where data can be stored, legal requirements for data protection, auditing user activity, and controlling costs are just a few examples of things an organization must consider.
It’s easy for anyone in an organization to obtain an Azure subscription and start deploying solutions and building applications, resulting in shadow IT systems that could potentially put the organization at risk. Shadow IT is not unique to cloud because these same behaviors often occur in on-premises environments. However, the global footprint of public cloud and the massive number of services available in public cloud exacerbate this problem.
MORE INFORMATION ENTERPRISE GUIDANCE
Microsoft provides guidance for enterprises on how to implement and manage their Azure subscriptions. The concept is referred to as the enterprise Azure scaffold. It identifies patterns for provisioning subscriptions, defining and applying policies, and other best practices for subscription governance. The guidance is available at https://docs.microsoft.com/en-us/azure/azure-resource-manager/resource-manager-subscription-governance.
Azure resource policies provide a mechanism for an organization to apply some governance to Azure resources used by the organization. Resource policies can be scoped to a subscription or to a resource group and are essential to implementing governance in Azure.
Azure resource policy
An Azure resource policy, as its name implies, enforces policy on a resource at the time a resource is deployed. When you initiate a deployment for a resource using an ARM template, script, or REST API, ARM first validates the request before proceeding to provision the resource. As part of that validation, ARM checks for any policies that have been assigned and then validates the resource against those policies. If there is a conflict because of policy the deployment is aborted. For example, suppose you have a policy assigned to your subscription that says you can only deploy A-series virtual machines. If you tried to deploy a DS11 v2 virtual machine using the Azure portal, you would see an error message similar to that shown in figure 5-6.
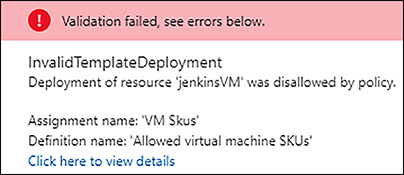
FIGURE 5-6 Validation error in Azure port as a result of a resource policy conflict
Azure provides many built-in resource policies for common governance needs. You can also create your own custom policies if needed. Some of the built-in policies include, but are not limited to, the following:
Allowed locations Used to enforce geo-location requirements by restricting which regions resources can be deployed in.
Allowed virtual machine SKUs Restricts the virtual machines sizes/SKUs that can be deployed to a predefined set of SKUs. Useful for controlling costs of virtual machine resources.
Enforce tag and its value Requires resources to be tagged. This is useful for tracking resource costs for purposes of department chargebacks.
Not allowed resource types Identifies resource types that cannot be deployed. For example, you may want to prevent a costly HDInsight cluster deployment if you know your group would never need it.
You can discover all the built-in policies available by going to the Subscription blade in the Azure portal, and clicking Policies. In the Policies blade, click the Policies tab at the top of the page. This displays both built-in and any custom policies that may be defined, as shown in figure 5-7.
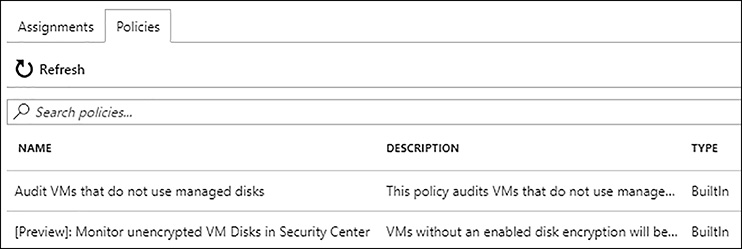
FIGURE 5-7 Resource policies listed in the Subscription Policies blade in the Azure portal
Custom resource policy
If you need to enforce something that is not covered by a built-in policy, then you can create a custom policy. A policy definition is described using JSON and includes a policy rule, which is an if/then construct. As an example, consider a policy that denies a storage account from being created unless the storage encryption service is enabled. The following JSON illustrates such a policy rule.
{
    "if": {
        "allOf": [
            {
                "field": "type",
                "equals": "Microsoft.Storage/storageAccounts"
            },
            {
                "field": "Microsoft.Storage/storageAccounts/enableBlobEncryption",
                "equals": "false"
            }
        ]
    },
    "then": {
        "effect": "deny"
    }
}
In the if section, there are two conditions defined. The first condition states that the type field for a resource must match the namespace Microsoft.Storage/storageAccounts. In other words, this policy rule only applies to storage accounts. The second condition states that the storage account field, enableBlobEncryption, be set to false. The allOf array states that all of the conditions described in the array must match.
In the then section, the effect property tells Azure Resource Manager to deny the request to provision the storage account.
To create a custom resource policy using Azure PowerShell, use the New-AzureRmPolicyDefinition cmdlet as shown in the following code (this assumes the JSON above was saved to a JSON file):
$policyName = "denyStorageAccountWithoutEncryption"

# Create a new policy definition
$policyDef = New-AzureRmPolicyDefinition -Name $policyName -DisplayName $policyName '
    -Description "Require storage accounts to have the storage encryption service enabled" '
    -Policy ".denyStorageWithoutEncryption.json"
To remove a policy definition using Azure PowerShell, use the Remove-AzureRmPolicyDefinition cmdlet as shown in the following code:
# Remove a policy definition
Remove-AzureRmPolicyDefinition -Name $policyDef.Name
MORE INFORMATION ARM CUSTOM POLICIES
For more information on how to create a custom policy using other logical operators, resource fields, and different effects, see https://docs.microsoft.com/en-us/azure/azure-resource-manager/resource-manager-policy.
Resource policy assignment
The previous sections discussed built-in and custom resource policy definitions. However, for a policy to be evaluated during resource deployment, it must be assigned. Resource policies can be assigned at the subscription and resource group level.
To assign a resource policy, open the Subscriptions blade in the Azure portal, and click Policies. In the Assignments tab, click the Add Assignment button near the top of the page. The Add Assignment blade provides an interface for you to select a policy definition, specify the scope (subscription or select a resource group), and provide other properties necessary to complete the assignment. Figure 5-8 shows a resource policy assignment of the custom policy definition created in the previous section. The scope is set to the resource group named contoso-app. After completing this assignment, if anyone tries to create a storage account in the contoso-app resource group without enabling the storage encryption service, the request is denied.
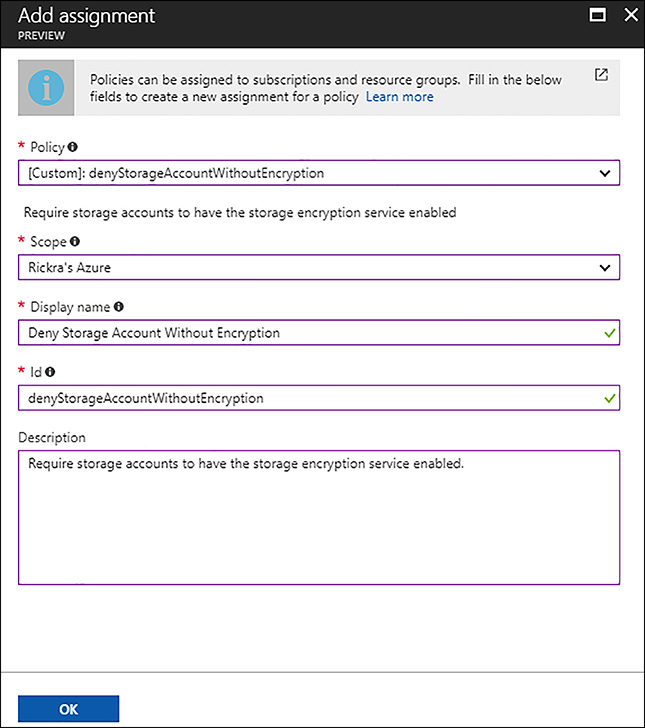
FIGURE 5-8 Assigning a custom policy to a resource group using the Azure portal
To create a resource policy assignment at the subscription level for the custom policy definition from the previous section using the CLI, use the az policy assignment create command, as shown in the following code:
#!/bin/bash
policyName = "denyStorageAccountWithoutEncryption"

# Create a new resource policy assignment at the subscription level
az policy assignment create --policy $policyName
Lock resources
For some infrastructure resources, such as a virtual network, express route circuit, or network virtual appliance, it is often desired to lock down resources to mitigate the risks of accidental deletion or modification of resources. In Azure, resource locks provide this capability and are available at two levels:
CanNotDelete This lock level indicates that a resource can be read and modified, but it cannot be deleted.
ReadOnly This lock level indicates that a resource can be read, but it cannot be modified or deleted.
Users assigned the Owner or User Access Administrator built-in role can create and remove locks. Users in these roles are not excluded from the lock. For example, if an owner creates a ReadOnly lock on a resource and then later tries to modify the resource, the operation will not be allowed because of the lock that is in place. The owner would have to remove the lock first, and then proceed to modify the resource.
The scope of a resource lock can vary. It can be applied at a subscription level, resource group, or as granular as a single resource. A resource lock applied at the subscription level would apply to all resources in the subscription. For example, if you have implemented a hub and spoke network topology where the resources in the hub are in a separate subscription from the spokes, you may want to apply a ReadOnly lock at the subscription level to protect against accidental modification or deletion.
MORE INFORMATION HUB AND SPOKE NETWORK
For more information on the hub and spoke network topology and to see a reference architecture detailing this pattern, see https://docs.microsoft.com/en-us/azure/architecture/reference-architectures/hybrid-networking/hub-spoke.
If a lock is scoped at the resource group level, it applies to all resources in the resource group for which the lock has been applied. Resources in the resource group inherit the resource group lock. If a resource is added to a resource group where resource group lock of CanNotDelete is already present, that new resource inherits the CanNotDelete lock.
Create a resource lock
Using the Azure portal, you can manage locks for any resource by clicking Locks in the resource blade. Figure 5-9 illustrates creating a CanNotDelete, resource group level lock.

FIGURE 5-9 Creating a resource group level lock using the Azure portal
The Locks blade is where you can view and manage locks at a resource group level or resource level. If you need to manage locks at a subscription level, open the subscription blade and click Resource Locks, as shown in Figure 5-10.
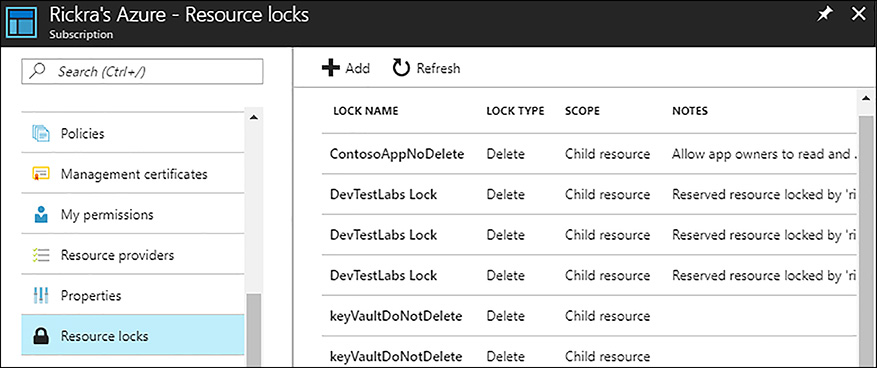
FIGURE 5-10 Managing subscription level resource locks using the Azure portal
Using the CLI, you can use the az lock create command to create a new resource lock. The code below creates a resource lock on a virtual machine resource.
#!/bin/bash

# Resource lock properties
lockName="vmNoDeleteLock"
resourceGroupName="Dev"
resourceName="jenkinsVM"
resourceType="Microsoft.Compute/virtualMachines"

# Create a CanNotDelete resource lock for a virtual machine
az lock create --name $lockName --lockType CanNotDelete
    --resource-group $resourceGroupName --resource-name $resourceName
    --resource-type $resourceType
Using Azure PowerShell, you can use the New-AzureRmResourceLock cmdlet to create a new resource lock. The code below creates a resource lock on a resource group.
# Resource lock properties
$lockName = "devGroupNoDeleteLock"
$resourceGroupName = "Dev"

# Create a CanNotDelete resource lock for the resource group (ie: all resources in the resource group)
New-AzureRmResourceLock -LockName $lockName -LockLevel CanNotDelete '
    -ResourceGroupName $resourceGroupName
Resource locks are proper resources just like any other resource you may already be familiar with. A difference is that a lock is specific to a resource unless it is scoped to the subscription.
MORE INFORMATION RESOURCE LOCKS
For more information and examples on how to create, modify, and delete resource locks see https://docs.microsoft.com/en-us/azure/azure-resource-manager/resource-group-lock-resources.
Skill 5.3: Design role-based access control (RBAC)
Managing access to resources in Azure is a critical part to implementing an organization’s security and compliance requirements. Azure Resource Manager provides support for role-based access control (RBAC), enabling you to manage who has access to a resource and control what they can do with the resource. RBAC is tightly integrated with Azure Active Directory where the identity of users, user groups, applications, and service principals are managed. Using RBAC, you can implement a least-privilege model for resource access and control by scoping access and control to individual resources, resource groups, or subscriptions.
This skill covers how to:
Implement Azure RBAC standard roles
Design Azure RBAC custom roles
Implement Azure RBAC standard roles
Azure provides many built-in roles for common scenarios. Every role definition includes an actions and notactions property that controls what entities assigned to the role can do. The actions property lists the actions that are allowed, while the notactions property lists the actions that are not allowed. A role definition also includes an assignableScopes property, which scopes the permissions described in the actions and notactions. For example, a role may be scoped to a certain subscription, resource group, or resource.
To better understand these properties, we’ll look at three of the most basic built-in roles in the following sections, which are the Owner, Contributor, and Reader roles. There are many more built-in roles than this, but most are a derivation of one of these three roles with actions and notactions specific to a specific resource type, such as the Virtual Machine Contributor built-in role. To get a list of all the built-in roles using Azure CLI, use the az role definition list command, as shown in Figure 5-11 (output abbreviated).
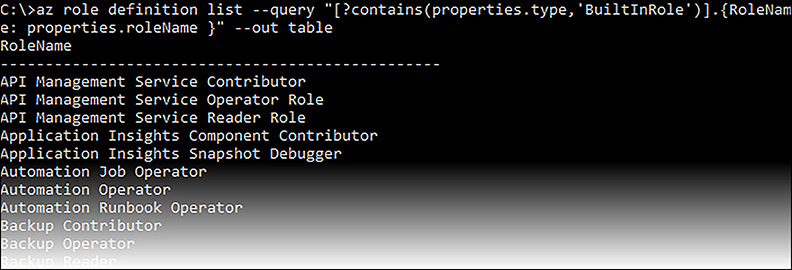
FIGURE 5-11 Getting a list of built-in roles using Azure CLI
You can also get a list of roles (custom and built-in) using the Azure portal. Open the Subscription blade, or a Resource Group blade, or an individual resource blade, and click Access Control (IAM) in the left navigation. Next, click Roles in the toolbar at the top of the blade. This lists the roles that are available, and the number of users and groups already assigned to each role. For example, Figure 5-12 shows an abbreviated list of roles available for a resource group named “contoso-app.”

FIGURE 5-12 Getting a list of built-in roles using the Azure portal
MORE INFORMATION BUILT-IN ROLES
At the time of writing, the number of built-in roles is increasing so documentation may not be current. However, you can always see what roles are available using the Azure CLI or PowerShell. For more information on how to manage roles using Azure CLI, see https://docs.microsoft.com/en-us/azure/active-directory/role-based-access-control-manage-access-azure-cli. For more information on how to manage roles using Azure PowerShell, see https://docs.microsoft.com/en-us/azure/active-directory/role-based-access-control-manage-access-powershell.
Owner built-in role
The Azure CLI tools provide an easy way to view a role’s definition using the az role definition command, as shown in Figure 5-13 where the Owner built-in role definition is displayed.
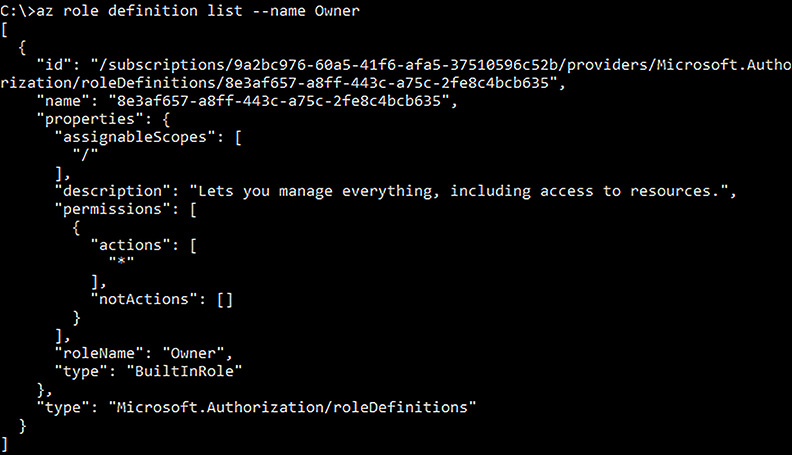
FIGURE 5-13 The role definition for the Owner built-in role
The actions allowed by the Owner role are defined as ‘*’, which means any entity assigned to the Owner role for a resource has unrestricted permissions to perform any action within the assigned scopes. The assigned scopes are defined as ‘/’, which means this role is available to any subscription, resource group, and resource.
The actions not allowed by the Owner role are defined as an empty array, meaning there are not any actions the Owner is not allowed to perform.
Contributor built-in role
The Contributor built-in role is similar to the Owner role in that the actions allowed are defined as ‘*’. However, there are three actions the Contributor is not allowed to perform, as shown in Figure 5-14.

FIGURE 5-14 The role definition for the Contributor built-in role
The three actions not allowed by the Contributor role are defined as:
Microsoft.Authorization/*/Delete
Microsoft.Authorization/*/Write
Microsoft.Authorization/elevateAccess/Action
These actions are all part of the Microsoft.Authorization namespace. In the first action, which is Microsoft.Authorization/*/Delete, the wildcard notation indicates that this role cannot perform any delete operations on any resource type in the Microsoft.Authorization namespace. To find all the delete operations in the Microsoft.Authorization namespace, use the az provider operation show command, as shown in Figure 5-15.

FIGURE 5-15 All Delete operations in the Microsoft.Authorization namespace
In the second action, which is Microsoft.Authorization/*/Write, the write operations that this role cannot perform are shown in Figure 5-16.
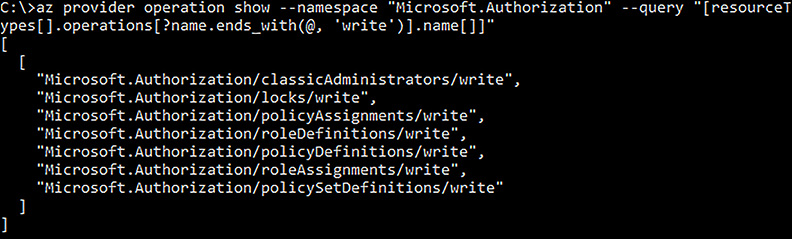
FIGURE 5-16 All Write operations in the Microsoft.Authorization namespace
The third action, which is Microsoft.Authorization/elevateAccess/Action, does not include the wildcard notation. Instead, this is a specific action to elevate access as a tenant admin in the Azure Active Directory. In other words, the Contributor cannot manage other user’s access to resources. To learn more about this specific action, see https://docs.microsoft.com/en-us/azure/active-directory/role-based-access-control-tenant-admin-access.
To summarize the Contributor built-in role, users assigned to this role can do any except the following:
Create, modify, or delete classic administrators
Create, modify, or delete locks
Create, modify, or delete policy definitions, sets of policy definitions, or role definitions
Create, modify, or delete policy assignments or role assignments
Elevate access as an Azure AD tenant administrator (i.e. manage access for others)
Reader built-in role
The Reader built-in role definition, as shown below in Figure 5-17, indicates that users assigned to this role can read any resource within the assigned scope, which is ‘/’.
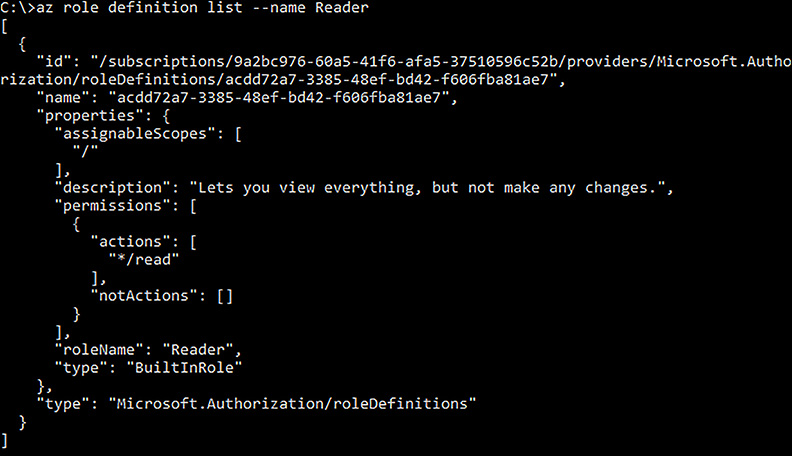
FIGURE 5-17 The role definition for the Reader built-in role
Implement role assignment
A role definition by itself does not enforce any kind of role-based access control. To implement role-based access control, you must assign a role to a user, user group, or application. Furthermore, assignment of the role must be scoped to a subscription, resource group, or an individual resource.
The Azure portal provides a rich user interface for implementing role assignments. For example, to grant a user Contributor permission for all resources in a resource group, open the Resource Group blade, click Access Control (IAM) in the left navigation, and click +Add in the toolbar at the top of the blade. This opens the Add permissions blade where you can select the role (built-in or custom), the type of entity you want to assign the permissions to (user, user group, or application), and the name or email address of the entity you want to assign the role to. Figure 5-18 illustrates assigning the Contributor role to a user.
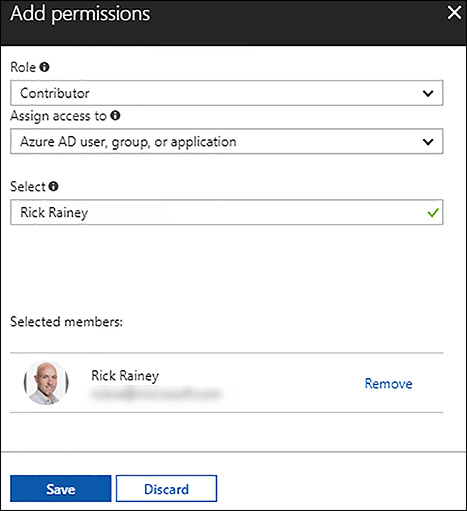
FIGURE 5-18 Adding a Contributor role assignment to a resource in the Azure portal
The same role assignment scoped to a resource group using the Azure CLI could be implemented as follows:
#!/bin/bash

# Role assignment properties
roleName="Contributor"
assigneeName="[email protected]"
resourceGroupName="contoso-app"

# Create a new role assignment
az role assignment create --role $roleName --assignee $assigneeName --resource-group $resourceGroupName
Or, using Azure PowerShell, the same assignment could be implemented as follows:
$roleName = "Contributor"
$assigneeName = "[email protected]"
$resourceGroupName = "contoso-app"

New-AzureRmRoleAssignment -RoleDefinitionName $roleName -SignInName $assigneeName '
    -ResourceGroupName $resourceGroupName
Design Azure RBAC custom roles
You can create custom role definitions if the built-in roles don’t meet your requirements. For example, a member of a SysOps group may require permissions to manage multiple resource types, such as storage account, virtual networks, virtual machines, key vaults, and others.
A role definition is described using JSON and includes the properties you learned about earlier, such as the actions, notactions, and assignableScopes properties. The following JSON is an example of a custom role definition.
{
    "Name": "contoso-SysOps",
    "Description": "Manages spoke resources in a hub and spoke configuration.",
    "AssignableScopes": [
        "/subscriptions/ bfaf8b92-925c-4629-8333-137a0a64429c"
    ],
    "Actions": [
        "Microsoft.Storage/*",
        "Microsoft.Network/*",
        "Microsoft.Compute/*/read",
        "Microsoft.Authorization/*/read",
        "Microsoft.Resources/subscriptions/resourceGroups/*",
        "Microsoft.Insights/alertRules/*",
        "Microsoft.Insights/diagnosticSettings/*",
        "Microsoft.Support/*",
        "Microsoft.KeyVault/vaults/deploy/action"
    ],
    "NotActions": []
}
The custom role definition above sets the assignable scope to a specific subscription in the AssignableScopes array. This limits the role’s availability to just this subscription. If you have a situation where you need to make the role available to several subscriptions, you can simply add additional subscription Ids to the scope.
The Actions array identifies names spaces and operations/actions that this role can perform. This list can be whatever you need it to be, as long as it is syntactically correct. The actions listed are an example of a SysOps role for users needing to manage spokes in a hub and spoke configuration.
To create a custom role definition using Azure CLI, use the az role definition create command as shown in the following code (this assumes the JSON above was saved to a JSON file named sysops.json):
az role definition create --role-definition "./sysops.json"
To create the same role definition using Azure PowerShell, use the New-AzureRmRoleDefinition cmdlet as shown in the following code:
New-AzureRmRoleDefinition -InputFile .sysops.json
MORE INFORMATION CUSTOM RBAC ROLES
Additional information on how to implement custom RBAC roles is available at https://docs.microsoft.com/en-us/azure/active-directory/role-based-access-control-custom-roles.
Thought experiment
In this thought experiment, demonstrate your skills and knowledge of the topics covered in this chapter. You can find answer to this thought experiment in the next section.
You are the IT Administrator for Contoso and need to provision an environment in Azure to run a new line-of-business application. The application is a web application that internal users will access using their browsers. The application will be protected by Azure AD and Contos’s Azure AD tenant is already synced with their on-premises Server Active Directory. The application will use SQL Database (PaaS) for data. The logical SQL Server that will host the SQL Database for this application will also need to host SQL Databases for other applications. Contoso has a strict policy stating keys and secrets must be stored in Azure Key Vault. Furthermore, all services and data storage must reside in the U.S. You need to implement ARM templates and scripts to deploy this environment. You also need to implement controls to insure the SQL Server is not accidentally deleted.
What kind of resources will you deploy to support the web application?
How many resource groups would you use, and which resources would exist in each?
How will you handle the requirement to protect the SQL Server from accidental deletion?
What will you need to do to support the requirement that all passwords and secrets be stored in Azure Key Vault?
How will you ensure data and services exist only in the U.S?
Thought experiment answers
This section contains the solution to the thought experiment for this chapter.
The web application can be run in an Azure App Service Web App. Alternatively, you could run the application in virtual machines, but this introduces additional maintenance and security concerns that the business would have to manage. So, a web app would be the best option. Therefore, the resources needed to support the application would include the following:
App Service Web App
App Service Plan
SQL Server (PaaS)
SQL Database (PaaS)
Key Vault
You can put all of the resources in a single resource group. However, the SQL server will host your SQL Database and potentially the SQL Databases of other application owners. This suggests that the resource management lifecycle for the databases (and servers) is going to be different. Therefore, it would be better for the SQL Server and SQL Database to be in a separate resources group.
You can use a resource lock to protect the SQL Server from accidental deletion. The lock can be added as a child resource of the SQL Server resource in the ARM template. An example of how this may be implemented in the ARM template is shown here:
{
 "name": "[concat(variables(‘contoso-srvName’),
 ‘/Microsoft.Authorization/SQLServerNoDelete’)]",
 "type": "Microsoft.Sql/servers/providers/locks",
 "apiVersion": "2015-01-01",
 "properties": {
 "level": "CannotDelete"
 },
 "dependsOn": [
 "[resourceId(‘Microsoft.Sql/servers’, variables(‘contoso-srvName’))]"
 ]
 }
Because the application is using a SQL Database, it needs a connection string to connect to the database, which should be protected. The connection string can be stored in Azure Key Vault. To support this, you need to first create an application registration in Azure AD and then create a service principal for the application. The permissions for the key vault need to be updated to allow the web app to read the secret from Azure Key Vault. The client ID, client Secret, and secret URI for the connection string stored in Key Vault should be stored as app settings in the web app.
To ensure data and services stay in the U.S., you should assign the Allowed Locations resource policy and specify only US regions.
Chapter summary
Infrastructure described as code includes ARM template files, ARM template parameter files, artifacts such as custom scripts and DSC, and deployment scripts.
The elements of an ARM template file are $schema, contentVersion, parameters, variables, resource, and outputs.
The elements of an ARM template parameter file are $schema, contentVersion, and parameters.
Every resource defined in an ARM template file must include the name, type, apiVersion, and location. The type is used to describe the resource type you want to implement, and is of the form < resource provider namespace >/< resource type >.
Every resource in Azure is made available through a resource provider. The resource provider may define more than one resource type. For example, the resource provider for the Microsoft.Network namespace defines many resource types, such as virtualNetworks, loadBalancers, publicIPAddresses, routeTables, and more.
The dependsOn element in an ARM template is used to inform Azure Resource Manager of resource dependencies for the resource.
The copy element in an ARM template is used to create multiple instances of a resource type. When the copy element is used, the
copyIndex()function can be used to return the current iteration ARM is in when provisioning the resource. The iteration value returned fromcopyIndex()is zero-based.There are two steps to deploy an ARM template. First, you must create a resource group if one doesn’t already exist. Second, invoke a resource group deployment, where you pass your ARM template files to Azure Resource Manager to provision the resources described in the ARM template.
When implementing complex architectures using ARM templates, you should de-compose the architecture into reusable nested templates that are invoked from the main template.
A service principal can be created to use a password or certificate to authenticate with Azure AD. The latter is recommended when the service principal is used to run unattended code or script.
An app registration must first be created in Azure AD before you can create a service principal. The service principal requires the application ID from the app registration.
To create a new app registration using PowerShell, use the New-AzureRmADApplication cmdlet.
To create a new app registration using CLI, use the
az ad app createcommand.To create a new service principal using PowerShell, use the New-AzureRmADServicePrincipal cmdlet.
To create a new service principal using CLI, use the
az ad sp createcommand.Resource policies are comprised of policy definitions and policy assignments.
Resource policies are evaluated against resource properties at the time of deployment.
A policy rule is what ARM evaluates during a deployment. The policy rule is described in JSON and uses an
if/thenprogramming construct.To create a policy definition using PowerShell, use the New-AzureRmPolicyDefinition cmdlet.
To create a policy definition using CLI, use
az policy definition createcommand.To create a policy assignment using PowerShell, use the New-AzureRmPolicyAssignment cmdlet.
To create a policy assignment using CLI, use the
az policy assignment createcommand.A policy assignment can be scoped to an Azure subscription or to a resource group.
The two types of resource locks are ReadOnly and CanNotDelete. Both types protect a resource from deletion and allow the resource to be read. The CanNotDelete also allows the resource to be modified.
To create lock using PowerShell, use the New-AzureRmResourceLock cmdlet.
To create lock using CLI, use the
az lock createcommand.The three most basic built-in roles are Owner, Contributor, and Reader. Many of the other built-in roles are a derivation of these, but scoped to a specific resource type.
Role-based Access Control (RBAC) is comprised of role definitions and role assignments.
RBAC is evaluated against user actions on a resource at different scopes.
A role assignment can be scoped to an Azure subscription, resource group, or resource. The entity for which a role can be assigned can be a user, user group, or application.
The permissions property of a role definition includes an actions array and a notactions array. The actions array defines the actions/operations a member of the role can perform, while the notactions array defines the actions/operations a member of the role is not allowed to perform. The actions and notactions that are defined are scoped according to the scopes in the assignableScopes property.
To create a role definition using PowerShell, use the New-AzureRmRoleDefinition cmdlet.
To create a role definition using CLI, use
az role definition createcommand.To create a role assignment using PowerShell, use the New-AzureRmRoleAssignment cmdlet.
To create a role assignment using CLI, use the
az role assignment createcommand.