
11
Using the Mesh to MetaHuman Plugin
In the previous chapter, we reached the end of the process of creating a MetaHuman and making a video featuring our MetaHuman. While writing this book, Epic Games released version 5 of Unreal Engine – first, as an early access version, and later as a fully supported release. In addition, Epic Games also released a groundbreaking plugin that allows users to use custom meshes of faces to be used as the face of their MetaHuman. The free plugin is called Mesh to MetaHuman and at its core is the MetaHuman Identity Asset.
This opens up opportunities for artists to use all the great MetaHuman-related tools and functionality on custom face sculptors or digital scans of real people. Because we can use digital scans of real people, it gives artists the ability to create MetaHumans that have an incredible likeness to actors or even artists.
In this chapter, we will focus on how to create and utilize a digital scan of your own face and apply it to a MetaHuman. To do this, we will use an app called KIRI Engine that is available on both iPhone and Android. We will then import the digital scan to use with the Mesh to MetaHuman plugin.
So, in this chapter, we will cover the following topics:
- Installing the Mesh to MetaHuman plugin for Unreal Engine
- Introducing and installing the KIRI Engine app on your smartphone
- Importing your scanned mesh into Unreal Engine
- Modifying the face mesh inside MetaHuman Creator
Technical requirements
In terms of computer power, you will need to meet the technical requirements detailed in Chapter 1.
You will also need:
- An iPhone or Android phone with at least 200 MB of free space
- A stable internet connection as you will be downloading a plugin and uploading data to a server
- Access to the Epic Games Launcher used to install Unreal Engine
- The KIRI app
- The Mesh to MetaHuman plugin
- A new project in Unreal Engine
Note
You will need to be familiar with the MetaHuman Creator online application from Chapter 2, but you don’t need to have any projects open from previous chapters.
Installing the Mesh to MetaHuman plugin for Unreal Engine
To get started, create a new project in Unreal Engine and leave it open. Then, to enable the Mesh to MetaHuman plugin, we first need to download it from the Unreal Engine Marketplace via the Epic Games Launcher.
When you have located the Mesh to MetaHuman plugin page, click on the Install to Engine button as seen in Figure 11.1:

Figure 11.1: The MetaHuman plugin
With the Mesh to MetaHuman plugin installed, we’ll now go to the next section to begin our journey into creating a digital scan with the KIRI Engine app.
Introducing and installing KIRI Engine on your smartphone
What is KIRI Engine? Well, KIRI Engine is an application that falls under the category of photogrammetry. Photogrammetry is the process of creating 3D geometry inside a 3D application (automatically, for the most part) using photographs.
In the context of creating a face scan for a MetaHuman, photogrammetry requires the artist to take multiple photographs in a 180-degree arc and at varying heights. From Figure 11.2, you can see four different angles of a head and shoulders.

Figure 11.2: Typical camera positions
We are only interested in the front of the face, which is why we only capture within a 180-degree arc. It’s also important to get high and low angles so that we get information for under the chin, nostrils, and the forehead.
Tips for shooting photogrammetry
- Use diffused (soft) lighting so there are no shadows on the face
- Have your subject sit very still with their chin tilted slightly up
- If possible, use a polarizing lens filter to minimize reflections on the skin
Now, let’s get started with working with KIRI. Recently, KIRI Engine has become available for desktop when using a web browser on either macOS or Windows, which you can download here: https://www.kiriengine.app/web-version/. However, for the purpose of this book, I will assume that you have access to an Android smartphone or iPhone and that you are downloading the KIRI Engine app onto your smartphone.
If you have an Android device, you can install the app from Google Play for free, as seen here:

Figure 11.3: KIRI Engine on Google Play
As many of you will have used an iPhone during Chapter 8, Using an iPhone for Facial Motion Capture, you’ll be pleased to know that you don’t have to run off and get an Android. By going over to the App Store, you can download the KIRI Engine app on your device:

Figure 11.4: KIRI Engine on the App Store
Using KIRI Engine is very straightforward as there are very few options to choose from when running the app. When you first open KIRI Engine, whether you’re on an Android or iPhone device, you’ll be greeted with a simple interface as seen in Figure 11.5:

Figure 11.5: The KIRI Engine welcome screen
Here, you will be given a choice of uploading photographs that you’ve taken before or taking photos with the KIRI app. Choose the latter, Take photos, and you will see the screen change:

Figure 11.6: The manual option
The manual capture setting is the default setting. It is denoted by the stills camera icon at the top left of Figure 11.6. This is a manual capture option, which means you’ll have to click on the big white button at the bottom of the screen every time you want to take a picture. The problem with this is, every time you tap the screen of your smartphone it introduces a slight camera shake, which in certain lighting conditions will give you a blurry picture.
The auto-capturing setting is accessible by clicking the movie camera icon on the right, as shown in Figure 11.7. With this setting, you need to click on the red button just once to start capturing. This setting takes a picture every couple of seconds (as many as 70 pictures) and will also give you warnings if you are moving the camera too fast.

Figure 11.7: The auto-capturing option
Note the progress line above the record button; this indicates the quality of the coverage, namely, Acceptable, Good, and Perfect. An Acceptable result will get you a less detailed 3D model and will be prone to lumpiness, whereas a Perfect photo result will get you a more detailed and smoother 3D model.
Ideally, you should get as much overlap from one picture to the next as possible. Around 80% overlap is a good rule of thumb from one image to the next sequentially. By overlap, I mean that every two or three consecutive images should share at least one feature such as an eye or a nose.
As soon as you have reached the maximum number of images and have reached a reasonable level of coverage around your face, you’ll be greeted with the interface shown in Figure 11.8:

Figure 11.8: The upload screen
In this interface, you’ll see the following options:
- Face Counts: The number of polygons used to create the 3D model. Choose High to ensure the MetaHuman plugin has enough geometry to work with (you don’t need to worry about producing very dense geometry as MetaHumans are designed to work with very high-density meshes in terms of polycounts).
- Texture Quality: KIRI doesn’t produce massive texture maps and if you’ve managed to work with a MetaHuman in Unreal Engine, then you’ll have no problem with the highest quality texture map created by KIRI. So, choose High again.
- File Format: While Unreal Engine can import both OBJ and FBX file formats, the FBX format has been reported to have longer processing times; Epic Games recommends OBJ for the plugin to work quickly, so choose OBJ.
When you have made your selections, hit the big Upload button. The upload process depends on the speed of your internet connection; if your connection is intermittent, expect problems as you may have to repeat the upload process. Once your photos have been successfully uploaded, you’ll see the following message:

Figure 11.9: Upload Successful notification
A couple of factors need to be taken into consideration for the processing time of your photos. Because the processing is being taken care of by servers in the cloud, your upload will most likely have been put into a queue. So, if there’s a lot of traffic, you’ll need to hang tight for a few minutes. You’ll be prompted if your job has been put into a queue or has started processing and you can check on the status of it within the app.
Once the process kicks in, the model is created alarmingly fast. When it’s finished, you can open it up to inspect the model. In Figure 11.10, you can see a model of me. I know that you’re probably distracted by how angelic I look, so I’ll just say briefly that from start to finish that whole process from taking the photos to getting a usable 3D model only took around 10 minutes.

Figure 11.10: 3D scan result
The next step couldn’t be simpler. Just hit the Export button, which will take you to this screen:

Figure 11.11: Sending your exported model
In Figure 11.11, you are given the option to supply an email address. Once provided, hit Send to receive a download link to your model. It will come in the form of a .zip folder containing both the OBJ of the mesh and a JPG for the texture map. Make sure to unzip the folder before continuing.
In the next section, you will bring your face mesh into Unreal Engine.
Importing your scanned mesh into Unreal Engine
With Unreal Engine open, go to the Content folder and create a new folder inside it called FaceMesh. Inside the FaceMesh folder, right-click and select Import to Game/FaceMesh. This will bring up the import dialog box, as per Figure 11.12, where you’ll see the JPG (on the left of the figure) and OBJ files (on the right):

Figure 11.12: The JPG and OBJ files
You just need to click on the 3DModel OBJ file, then hit OK.
This will open up FBX Import Options, as per Figure 11.13 (this may seem odd as the file is an OBJ file, but this is correct):

Figure: 11.13: Import mesh options
Make sure you have ticked Combine Meshes to ensure the model is imported as just one singular mesh. This is the only option that needs to be changed. Then, click on Import All.
It will take a moment to import. You will most likely get an error log dialog box saying there are issues in the smoothing group, but this is completely normal so don’t be alarmed. If it happens, it will occur at the end of the import process so there is no action to be taken.
Once imported, as seen in Figure 11.14, there are three assets in the FaceMesh folder: the model, the shader, and the texture map, which automatically created the shader.

Figure 11.14: The imported assets
Now, right-click inside the FaceMesh folder, navigate down to MetaHuman, and click on MetaHuman Identity. This will engage the new Mesh to MetaHuman plugin you installed into the engine at the beginning of this chapter.

Figure: 11.15: Creating a MetaHuman Identity Asset
By clicking on MetaHuman Identity, you will create a MetaHuman Identity Asset, which is required to use the 3D scan you just imported.
Now, double-click on the MetaHuman Identity icon once it is created within FaceMesh. MetaHuman Identity, as seen in Figure 11.16, has a relatively simple interface that consists of four main functions.

Figure 11.16: The MetaHuman Identity interface
Highlighted from left to right, the functions of the MetaHuman Identity interface are:
- Components from Mesh: Where we bring in the mesh that we imported into the engine earlier
- Promote Frame: Where we set up a viewing angle of our mesh for MetaHuman Identity to use as a reference for where key features such as the eyes, nose, and mouth are
- Track Active Frame: Where MetaHuman Identity uses a facial recognition algorithm to determine key facial features from the new face mesh
- MetaHuman Identity Solve: Where the magic happens, creating a MetaHuman that is aligned to the proportions of the new face mesh
Note that I have highlighted each of the four functions in Figure 11.16. The far-left function, Components from Mesh, is the only one that is active. The rest are inactive as each is dependent on the previous one to work, working as a series of steps that we must follow in order.
We will now go through these four functions:

Figure 11.17: Adding your scanned mesh
Then use the F key to center your model, and use the rotate gismo with the E key to make your model face forward.

Figure 11.18: Rotating the model

Figure 11.19: Promote Frame
If you take a look at Figure 11.19, you can see that under the viewport we now have a promoted frame titled Frame 0. This tells us that a frame has been created that will be used as a reference. You can create additional frames by clicking on the camera icon (in the bottom right), which will allow you to get a new angle. Then, you need to click on the Promote Frame button again. However, for the purpose of this chapter, let’s keep things simple and just use Promote Frame once.
- Moving on, we need to make sure that the face mesh can be properly tracked. Click on the Track Active Frame button, as highlighted in Figure 11.20.

Figure 11.20: Track Active Frame
The MetaHuman Identity tool tracks the facial features that it sees. To make sure it’s doing a good job, I suggest you toggle between Lit and Unlit in the viewport marked in Figure 11.20. In general, it does a great job at identifying the eyes and the mouth, which is enough to get you a really good likeness to your face scan.
- Next, we need to create a body type for the new MetaHuman. Take a look at Figure 11.21. Select Body and then choose a body type close to your own.

Figure 11.21: Choosing a body
- Now, we need to process the new mesh shape from the face mesh scan. Click on MetaHuman Identity Solve, as per Figure 11.22.
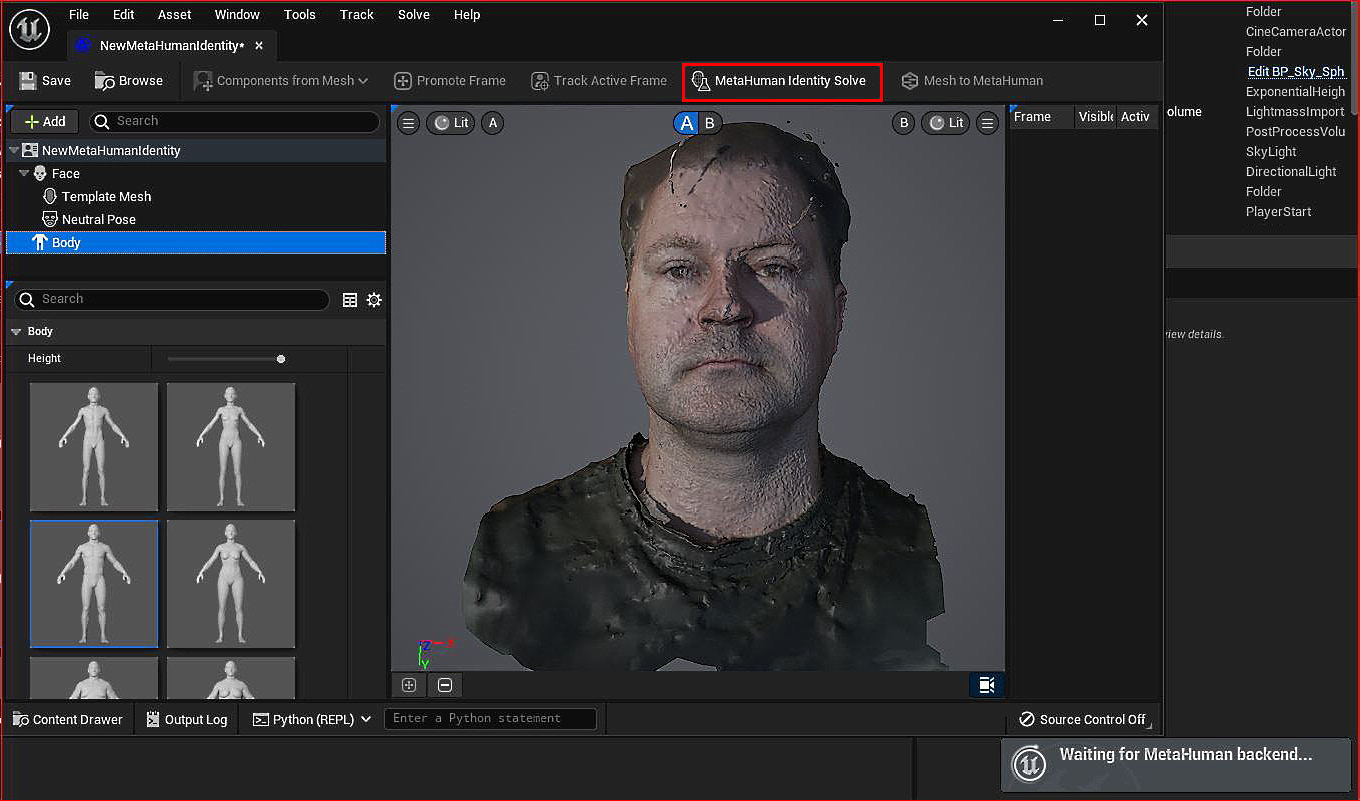
Figure 11.22: Waiting for MetaHuman backend…
You’ll see a prompt in the bottom right of the screen saying Waiting For MetaHuman backend…. This is because the processing will take place on the MetaHuman Cloud as it creates a MetaHuman Solution.
- The process of waiting for the backend can take a few minutes, but as soon as it has completed, the Mesh to MetaHuman button will be available to select, as shown in Figure 11.23.

Figure 11.23: The Mesh to MetaHuman button
- Once selected, you will get a Mesh to MetaHuman pop-up dialog box, as per Figure 11.24. Just click OK.

Figure 11.24: Your MetaHuman is now available
At this point, we can’t see the progress of the Mesh to MetaHuman plugin because the processing takes place in the cloud. More specifically, we need to go to the MetaHuman Creator online tool to see the result.
In the next section, we will go over to Quixel Bridge, which can be accessed from your Content folder or the standalone Quixel Bridge application. We are using Quixel Bridge to gain access to our new MetaHuman so we can make adjustments with the online MetaHuman Creator.
Modifying the face mesh inside the MetaHuman Creator online tool
Once you have opened up Quixel Bridge, navigate to My MetaHumans. There you will see a new black-and-white icon. As per Figure 11.25, the icon indicates that this MetaHuman was created with the Mesh to MetaHuman plugin. Click on the black-and-white icon and navigate to the Start MHC button.
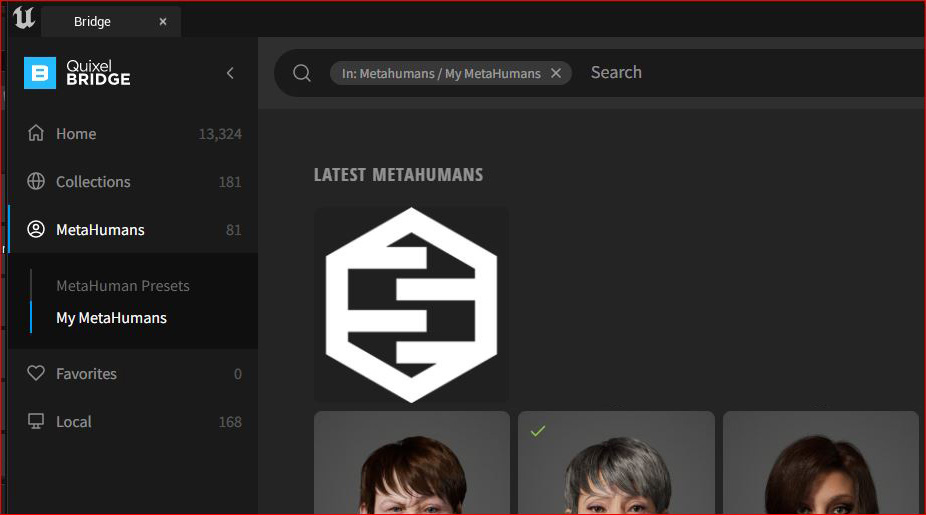
Figure 11.25: MetaHuman Identity icons
You will be taken to the familiar MetaHuman Creator online application featured in Chapter 2. As you can see in Figure 11.26, the MetaHuman has no skin and it is somewhat distorted. Most notably, the upper head protrudes unnaturally. The reason for this is that the face mesh scan that was created using the KIRI Engine app also scanned my hair; the MetaHuman Identity solver couldn’t determine what the hair actually was, resulting in skin tissue instead of hair.
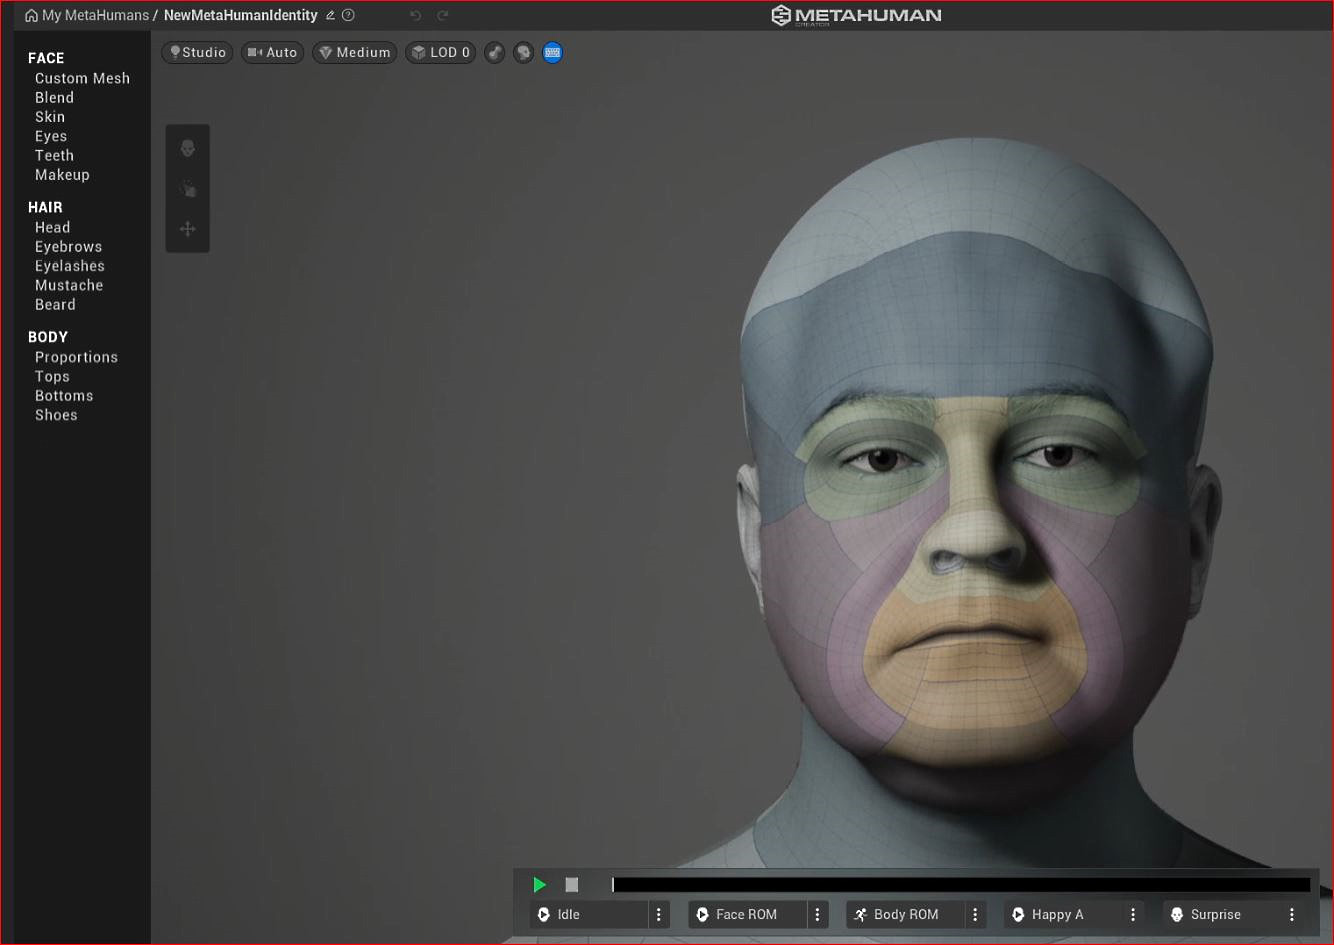
Figure 11.26: MetaHuman Creator with the face scan
There is an easy fix to the hair issue. Click on the Custom Mesh option under Face, as per Figure 11.27.

Figure 11.27: The Custom Mesh tool
If you look at the face thumbnail on the left, it is split into various components that correspond to the color-coded components on my face on the right.
Take note of the Region Influence slider too, which I have reduced down to 0. This means that the MetaHuman template determines the shape of that part of the mesh rather than the face mesh created by the KIRI Engine scan. When you compare Figure 11.26 and Figure 11.27, you can see the difference – the former has a much lumpier head than the latter.
If you wish to make further edits, you can click on the ENABLE EDITING button to fine-tune the mesh. However, I urge you to first refine your scanning technique to get a better result and use the ENABLE EDITING option as a last resort.
Note
Higher-quality photographs will get you a better result. In this example, a smartphone under less-than-ideal lighting conditions contributed to distortion issues. Using a DSLR in a small studio setup with a blank background and very soft light would give superior results. In addition, making use of a polarizer filter to further remove any reflection would be an added bonus.
Now, let’s move on to the skin. The texture map and shader we gained from both the KIRI Engine scan and the subsequent import to Unreal Engine have been lost. This is a good thing. MetaHumans have an incredibly powerful skin shader that responds to lighting in Unreal Engine very realistically that we will take advantage of instead.
So, click on Skin as shown in Figure 11.28, and then click on the ASSIGN button to assign a skin color.

Figure 11.28: Assigning a skin color
Instantly, this will give us skin colors with all the shader attributes that come with MetaHumans. We now have the same level of skin control with our custom face scan that we had when we were first creating our MetaHuman back in Chapter 2:

Figure 11.29: Editing the skin
You can also see from Figure 11.29 that the default lighting gives us a somewhat soft lighting result. As taking photographs with KIRI Engine in soft lighting is preferred, using the default lighting in MetaHuman Creator would be helpful for matching the skin tone of our original photographs.
To get a better sense of whether your model is working, add some hair that is similar to your own, as I did in Figure 11.30:
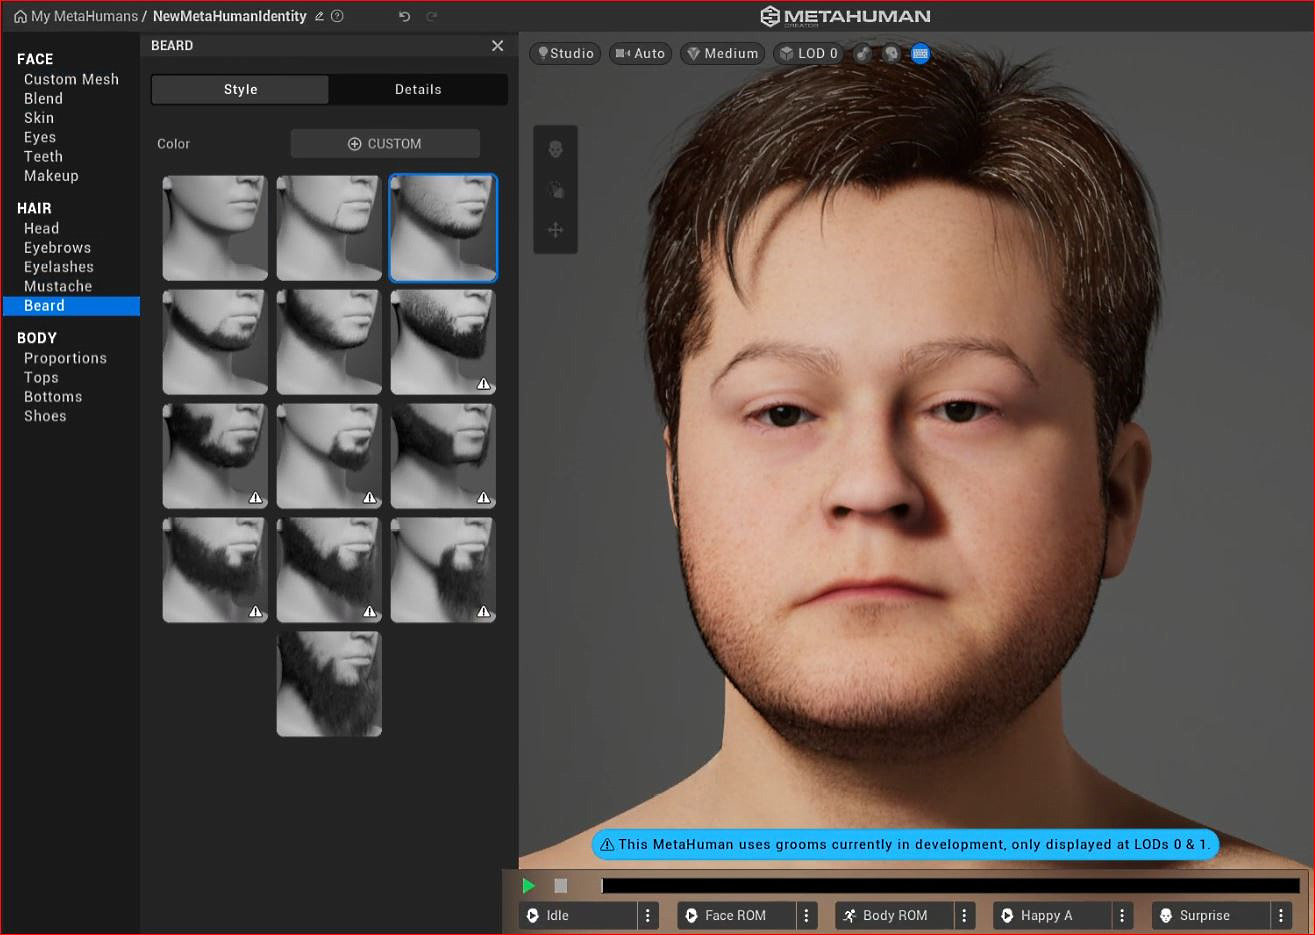
Figure 11.30: Adding hair
Because MetaHuman Creator constantly saves your MetaHuman automatically, you can come back to this at any time. You can also add your new MetaHuman with the custom face mesh into your project at any time using Quixel Bridge.
You can spend a lot of time modifying your custom MetaHuman and the time that you should spend on this really depends on what your end goal is. If you’re looking for a perfect likeness, you have all the move and sculpt tools in MetaHuman Creator along with all the photographs used with KIRI for reference to achieve greater realism.
Summary
In this chapter, we learned about a fantastic extra feature that can be used for creating characters that share a likeness with real people. We covered the process of downloading and installing the Mesh to MetaHuman plugin, before moving on to using the photogrammetry KIRI Engine. After that, we imported the KIRI Engine face mesh and made use of the MetaHuman Identity plugin, learning how to get a custom face mesh working inside MetaHuman Creator and how to refine it and fix issues.
Effectively, this chapter was a bonus chapter that delved into a new tool that was made available during the process of writing this book. It is a very powerful new tool that has the potential to not only create reasonable likenesses for digital character doubles but also, with some extra effort, provide very realistic results for digital doubles.
In addition to using 3D scans of people, you may find yourself scanning sculptures, or repurposing other 3D models such as fantasy characters or even toon-like characters. The possibilities are endless.
And that’s the end of this book! We have covered a lot of ground here, which is rather an understatement when you think about the technology and innovation we have embraced throughout these pages.
It was my intention, as an artist and filmmaker, to bring together a guide for other artists and filmmakers to follow and enjoy. Many of you will be well versed in CGI and animation and many will be novices at the beginning of your journey. Either way, you now have a step-by-step guide on how you can create your own visions, animations, and entertainment with technology that until recently was exclusive to major animation studios!