
Chapter 13: Configuring User Experience Settings
In this chapter, we will look at user experience. We will start by looking at the powerful capabilities of Universal Print before looking at Microsoft Endpoint Manager. Then, we will look at Start Virtual Machine (VM) on Connect, which is very useful for those who want to reduce the cost and control the startup of VMs. After that, we will cover Screen Capture protection for protecting corporate data, FSLogix profile troubleshooting, and provide some useful information on remote desktop client connection issues.
The following topics will be covered in this chapter:
- Configuring Universal Print
- Configuring user settings using Microsoft Endpoint Manager
- Start VM on Connect
- Screen capture
- Troubleshooting FSLogix profile issues
- Troubleshooting client connection issues
Important Note
For more information on configuring persistent and non-persistent desktops and configuring Remote Desktop properties for a host pool, please refer back to Chapter 7, Configure Azure Virtual Desktop Host Pools.
We will kick off this chapter by looking at Universal Print and the fundamentals of how the product works.
Configuring Universal Print
What is Universal Print? This is a cloud-managed print service that's provided by Microsoft through Microsoft Azure. Universal Print runs solely on Microsoft Azure. So, when it's deployed with Universal Print-compatible printers, you do not require any on-premises infrastructure to use the service.
The service is essentially a Microsoft 365 subscription-based service that you can use to centralize print management through the Universal Print portal. It's important to note that this service is fully integrated into Azure Active Directory and supports single sign-on scenarios.
This section will look at Universal Print and how you can use this Azure service with Azure Virtual Desktop.
Let's take a quick look at its architecture:
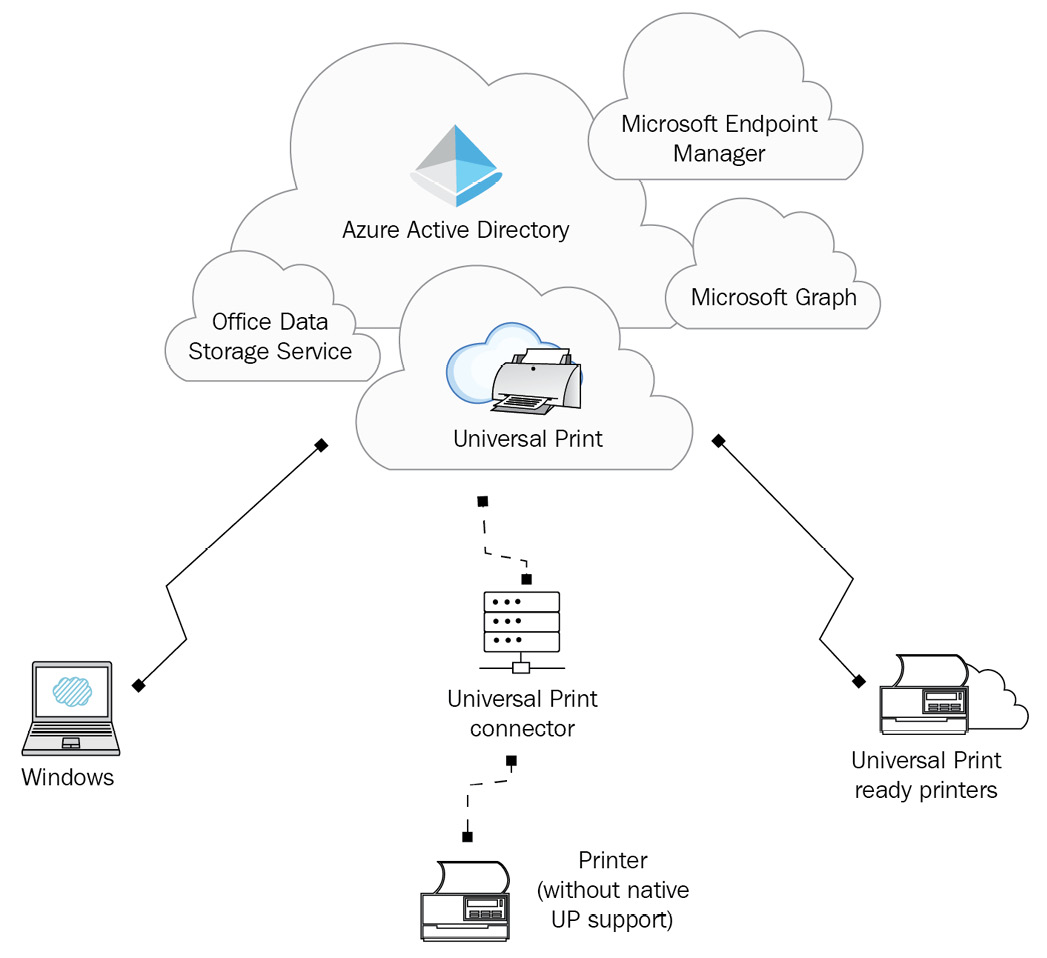
Figure 13.1 – The component architecture of universal print
The universal print service leverages the following components:

The preceding table was taken from the following Microsoft site: https://docs.microsoft.com/universal-print/fundamentals/universal-print-whatis#architecture.
Now, let's look at the required licensing and Universal Print's prerequisites.
Before we look at Universal Print, we must look at the required licensing for using the service. The following subscriptions include Universal Print:
- Microsoft 365 Enterprise F3, E3, E5, A3, and A5
- Windows 10 Enterprise E3, E5, A3, and A5
- Microsoft 365 Business Premium
If you have issues accessing the Universal Print service with any of the correct licenses, you need to ensure that you have checked the Universal Print Service Plan. To check this, follow these steps:
- Within the Azure portal, go to Azure Active Directory | Licenses | All products.
- Select the product from the list shown.
- Navigate to the Service plan details section in the left-hand menu.
- Check if Universal Print is in the service plan list:
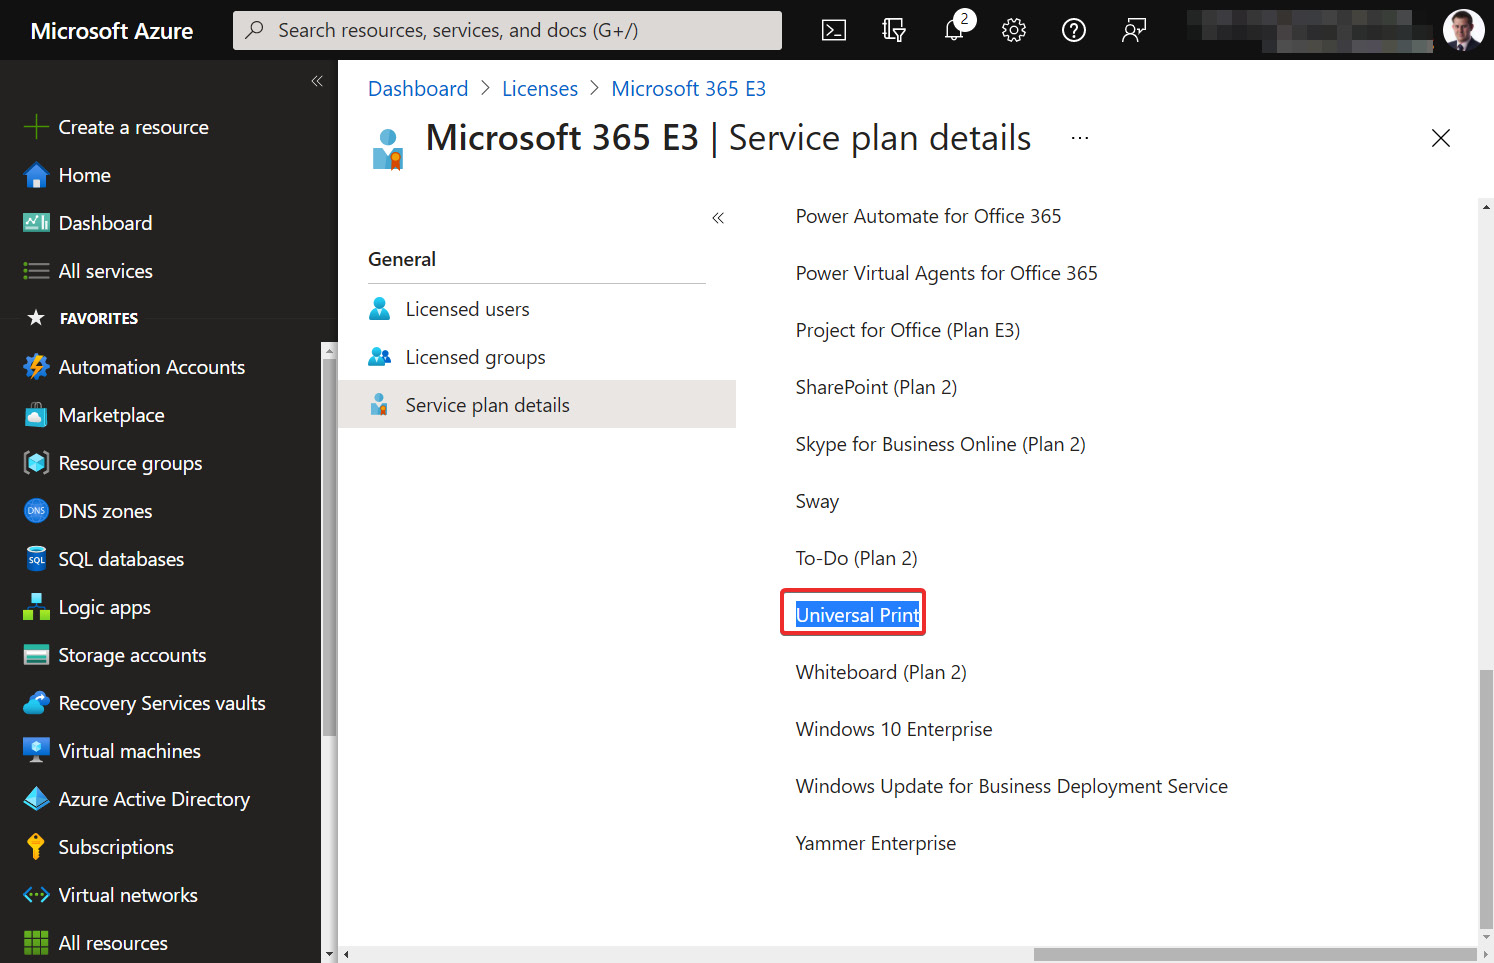
Figure 13.2 – Universal Print listed in the service plan for Microsoft 365 E3
- If this is included in one or more product licenses, you need to ensure that the required licenses are assigned to those users who require the Universal Print service.
Next, let's look at the requirements we need to have in place for configuring Universal Print.
Important Note
Where is print data stored? Universal Print stores all print queues in its office data storage. This is the same storage that's used to store Office 365 mailboxes and OneDrive files. A job can be queued for a few days. If the job is not claimed by a printer within 3 days, the job gets marked as aborted. You may see jobs stay within Universal Print for up to 10 days. Please note that when print jobs are sent using Universal Print, they are cloud encrypted.
Prerequisites for Universal Print
In this section, we will look at the prerequisites for Universal Print:
- You will need a Universal Print (eligible) license that has been assigned to the user by a Global Administrator.
- To configure and manage Universal Print, the IT administrator must have a Universal Print-eligible license assigned.
- To configure and manage Universal Print, an administrator must be assigned either of the following two Azure Active Directory (Azure AD) roles: Printer Administrator or Global Administrator.
- To install and print from Universal Print, you need a client device running a Windows client OS that's at version 1903 or beyond. Where possible, use the latest operating system for the best user experience. For a list of partner integrations that you can use for Universal Print, please go to https://docs.microsoft.com/universal-print/fundamentals/universal-print-partner-integrations.
- An internet connection.
Ensure that the following firewall rules have been applied to the device that's been chosen to host the connector. If you are using a Windows client device, remember that you will need to disable the hibernation/sleep controls and that you also need to ensure that the following firewall rules are set at the perimeter and on the client device:
- *.print.Microsoft.com
- *.microsoftonline.com
- *.azure.com
- *.msftauth.net
- go.microsoft.com
- aka.ms
Important Note
Make sure that both TCP 443 and 445 are open on the firewall to ensure you don't experience any issues when using Universal Print.
Universal Print administrator roles
There are two designated limited Azure administrator roles that you can use to manage Universal Print. The following table details these two roles:

The preceding table was taken from the following Microsoft resource: https://docs.microsoft.com/universal-print/fundamentals/universal-print-administrator-roles.
Now, let's learn how to set up Universal Print.
Setting up Universal Print
When it comes to setting up Universal Print, first, we need to deploy a Universal Print connector that enables printers to communicate with the Universal Print service.
Important Note
Some in-market printers do not support the required Universal Print protocols. It is most likely that printer manufacturers will offer printer firmware upgrades that add Universal Print support directly to the printer; however, you need to use the Universal Print connector for those that do not.
The connector's purpose, as per its name, is to make sure that a wide range of printers can connect to and communicate with the Universal Print service. All those printers with the Universal Print protocol within their firmware don't require the Universal Print connector.
The key functions of the connector are as follows:
- The connector enables IT admins to register printers with the Universal Print service.
- It reports a print job's status and the printer's status to the Universal Print service.
- The connector collects print jobs from the Universal Print service and delivers them to their target printer.
Important Note
The print connector passes jobs to the print spooler without locally storing the files the user intends to print. However, depending on their size, the connector may need to store the file to ensure it is submitted successfully to the spooler. In some cases, the deletion may not be successful and IT admin intervention will be required to clear these no longer needed files.
Connector prerequisites
Ensure that the following firewall rules are applied to the device chosen to host the connector. If you are using a Windows client device, remember that you will need to disable hibernation/sleep controls and that you also need to ensure the required firewall rules are set as detailed in the Prerequisites for Universal Print section.
The recommended operating system is Windows 10 64-bit Pro or Enterprise on build 1809 onwards. If you are using a server, you will need a minimum of Windows Server 2016 64-bit. Both Windows Server 2019 and 2022 are supported.
Important Note
When you create a print connector, a device object is created in Azure AD with an object ID.
Installing the connector
Follow these steps to install the connector:
- First, you will need to download the connector file from the following link: https://aka.ms/UPConnector.
Important Note
For those using proxy services, you can use bitsadmin to set the proxy. You can find more information on this here: https://docs.microsoft.com/windows-server/administration/windows-commands/bitsadmin-util-and-setieproxy.
- Once you have downloaded the installation files, run the .exe file and follow the steps to install it, as guided by the wizard:

Figure 13.3 – The Universal Print connector installer wizard
- Once installed, you will be prompted to launch the connector. Click the Launch button, as shown in the following screenshot:

Figure 13.4 – The Universal Print connector has been installed successfully
Once the Universal Print connector has been launched, you will see the option to sign in. Go ahead and sign in using the administrator account that's been assigned to the Universal Print license:
Important Note
Make sure that the user account that's used to configure the Universal Print connector's configuration has either the role of Printer Administrator or Global Administrator.

Figure 13.5 – Universal Print connector configuration form
- Once you've signed in, you will see a box appear within the Universal Print connector form showing the connector name label and text box for registration. Enter a name and register:

Figure 13.6 – Successfully signing in for the Universal Print connector with the registration field shown

Figure 13.7 – Registration progress message/progress bar

Figure 13.8 – Registered Universal Print connector listing the available printers to register
Within the Universal Print portal, you will see the connector under Universal Print | Connectors:

Figure 13.9 – Registered Universal Print connectors
In this subsection, we looked at the Universal Print connector's prerequisites and installed the connector on a device. Now that we have installed the Universal Print connector, we can register the printer.
Registering printers using the Universal Print connector
In this section, we'll learn how to register printers with Universal Print using the Universal Print connector we installed in the previous section.
Important Note
Ensure that you have configured the correct external URLs through the perimeter security and localhost firewall.
There are essentially three steps to registering a printer with Universal Print:
- Select the printers you want to register from the available list and click the Register button. The printers will appear in the Available Printers list if the registration process is successful:
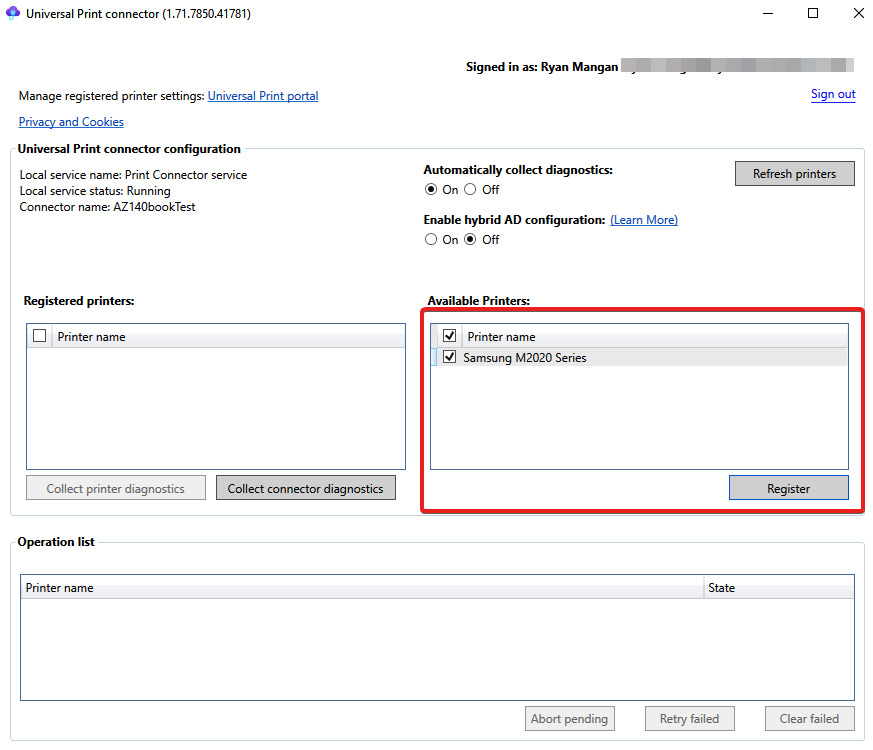
Figure 13.10 – Available printers that can be registered
The registration process can take between 10 to 30 seconds on a typical internet connection. It may take longer, so please be patient.
Important Note
The option to set Enable Hybrid AD Configuration to Enable is used for those organizations that use both Active Directory as well as Azure AD. In this type of setup, the user account exists in both Directory services.
You can read more about Hybrid AD Configuration here: https://docs.microsoft.com/en-us/universal-print/fundamentals/universal-print-hybrid-ad-aad-environment-setup#what-is-a-hybrid-adconfiguration.
- Once the registration process is complete, you will see the printer(s) appear in the Registered printers section, as shown in the following screenshot:
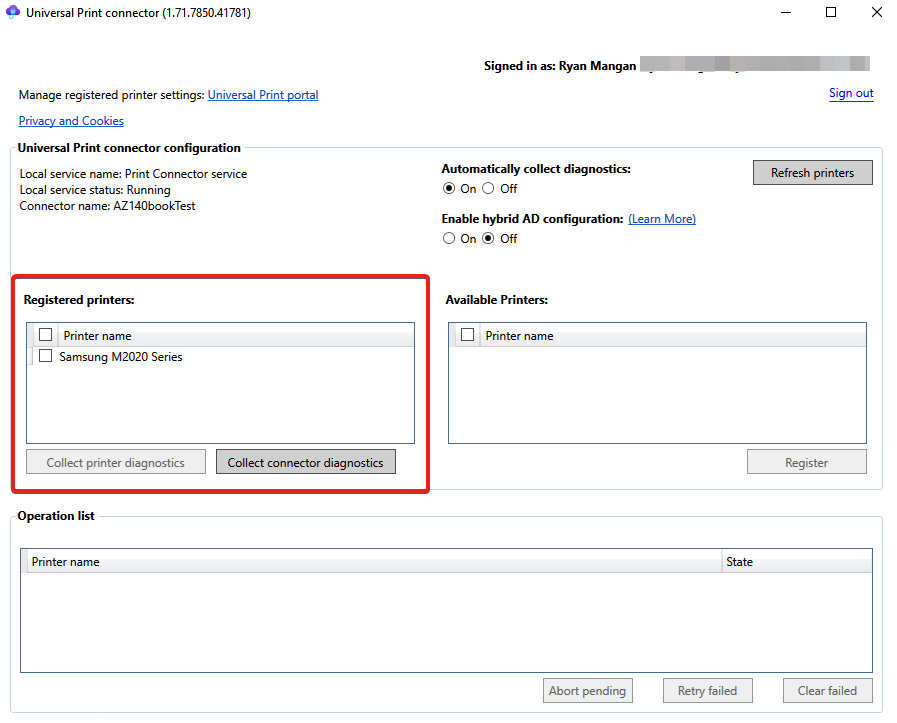
Figure 13.11 – The printer is now registered
Now that we have registered the printer, you should see the newly registered printer within Azure portal | Universal Print | Printers:

Figure 13.12 – Printers registered within the Azure Universal Print page
If the printer registration process fails, you will note that it will remain in the operations list and show a failure in the status section. You can retry the failed registration process and clear it using the buttons at the bottom left of the form, as shown in the preceding screenshot.
Now that we have registered a printer with Universal Print, we can assign permissions to the registered printers and share them.
Assigning permissions and sharing printers
Now that we have installed the print connector and registered the printers, the next stage is to share the printer. This means making the printer accessible to users. Before a user can print to a printer, the printer must be shared, thus granting access.
The quickest way to share a printer is to navigate to Printer Shares and click the Add button (https://portal.azure.com/#blade/Universal_Print/MainMenuBlade/PrinterShares):

Figure 13.13 – The Printer Shares page with the Printer Shares function highlighted
Once you have clicked the Add button, the Create printer share blade will appear. Enter the share name, the printer/printers, and the selected Azure users/Azure groups or allow access to everyone in your organization. Once you have entered the correct information for the share, click Share Printer:
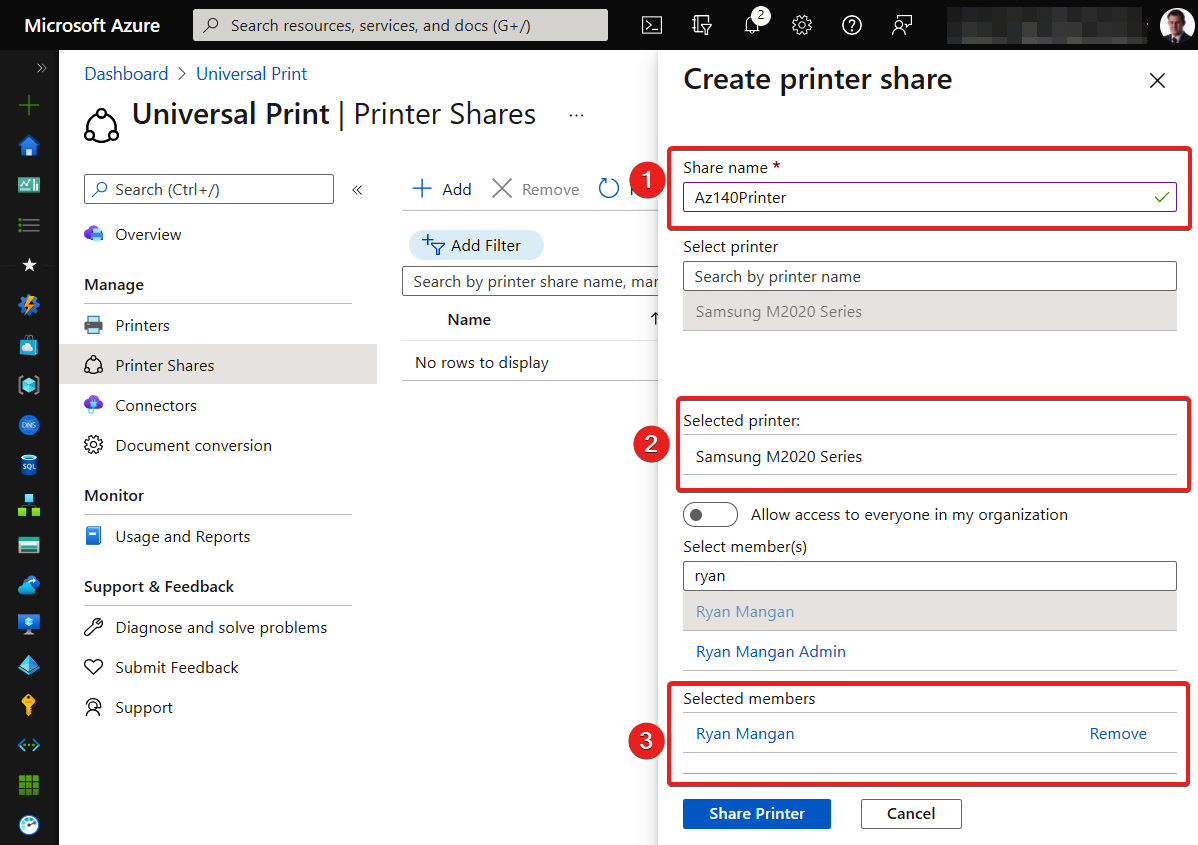
Figure 13.14 – The Create printer share blade
Once created, you will see the printer share appear on the Printer Shares page within Universal Print, as per the following screenshot:

Figure 13.15 – Universal Print – the Printer Shares page
When you click on Printer Shares, you will see options for managing access control, which is where you can add more users to the printer share, have the opportunity to delete the printer share, and swap the printer, as shown in the following screenshot:
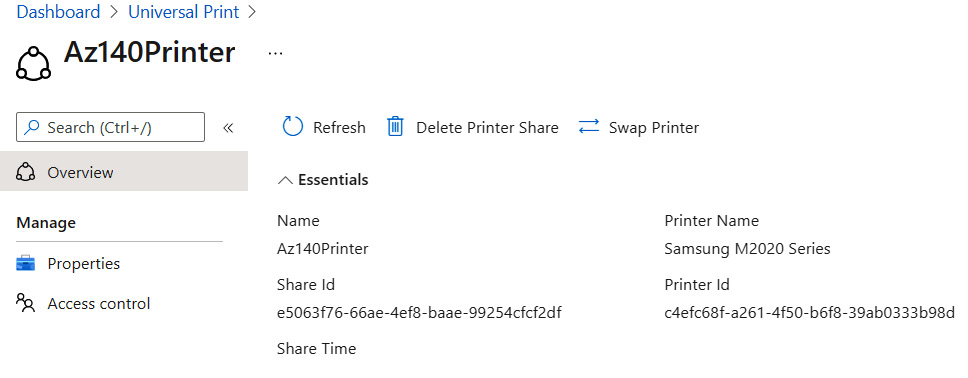
Figure 13.16 – Printer Share details
Tip
When a printer needs to be replaced, you can use the Swap Printer button to choose another printer that has been registered with Universal Print.
In this section, we learned how to assign printers to a printer share and how to assign user (member) permissions to use the Universal Print service. Now that we have configured printer sharing, we must add the Universal Print printer to a Windows device.
Adding a Universal Print printer to a Windows device
In this final section on configuring Universal Print, we will assign a printer to a Windows device. The following are the prerequisites we must have before we can add the printer to the user's device:
- The user's device needs to be Azure AD joined, Azure AD registered, or hybrid domain joined.
- The Universal Print printer must have been shared, and the user must have been assigned the appropriate permissions to use the printer.
- The user must have the appropriate license for Universal Print.
There are typically three steps to adding a Universal Print printer to a device:
- Navigate to Settings on the Windows client and search for Printers & scanners:
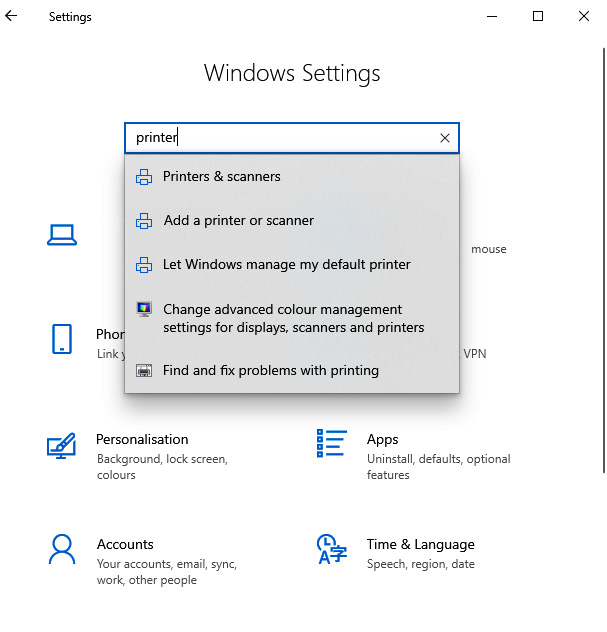
Figure 13.17 – The Windows Settings page
- Click Add a printer or scanner to start scanning for printers. You should then see the Universal Print printer appear, as shown in the following screenshot, as Az140Printer:

Figure 13.18 – The Printers & scanners page
- Once the printer has been installed, you will see it appear as ready and that it's in the Printers & scanners list:
Important Note
It is advised that you don't change the driver for Universal Print printers as this could cause the printer to stop printing.

Figure 13.19 – Universal Printer added to the client device
There you have it – with that, we have deployed Universal Print for Azure Virtual Desktop. The key takeaway from this section is that you need to install a connector on a device on-premises to register the printers within the Azure Universal Print portal page. Then, unless you have a printer that supports the Universal Print protocols out of the box, you need to share the printer and assign the necessary permissions. Once they have been shared, you can add the printer to user devices that have the required license to use Universal Print.
In the next section, we will look at user settings in Group Policy and Microsoft Endpoint Manager.
Configuring user settings using Microsoft Endpoint Manager
This section will briefly look at ways you can configure and manage user settings on Azure Virtual Desktop. You can manage user settings using local policies and registry entries, group policy settings, and Microsoft Endpoint Manager.
Endpoint Manager is a cloud-based platform that focuses on both mobile and device management. This type of service offering is referred to as Mobile Device Management (MDM) or Mobile Application Management (MAM).
Microsoft Endpoint Manager enables you to control and manage your organization's devices and how they are used. This is the same for Azure Virtual Desktop and Microsoft's latest offering, which is known as Windows 365 or, as some call it, Cloud PC.
In the Devices | Windows section, there are several Windows policies you can configure. This includes compliance, configuration, the use of PowerShell scripts, and Windows updates/feature updates.
Let's take a brief look at creating a Configuration Profile for Azure Virtual Desktop users:
Important Note
Intune/Endpoint Manager supports both Windows 10 Enterprise machines and Windows 10 Enterprise Multi-Session for Azure Virtual Desktop.
- To create a profile, navigate to Devices | Windows | Configuration profiles. Then, click Create profile:

Figure 13.20 – The Windows Configuration profiles page within Microsoft Endpoint Manager
- Once you click Create profile, a blade will appear on the left-hand side, where you can choose your platform and the profile type. In this example, we chose Windows 10 and later as the platform and Templates as the profile type. We have also selected the administrative templates that you would find in a group policy:
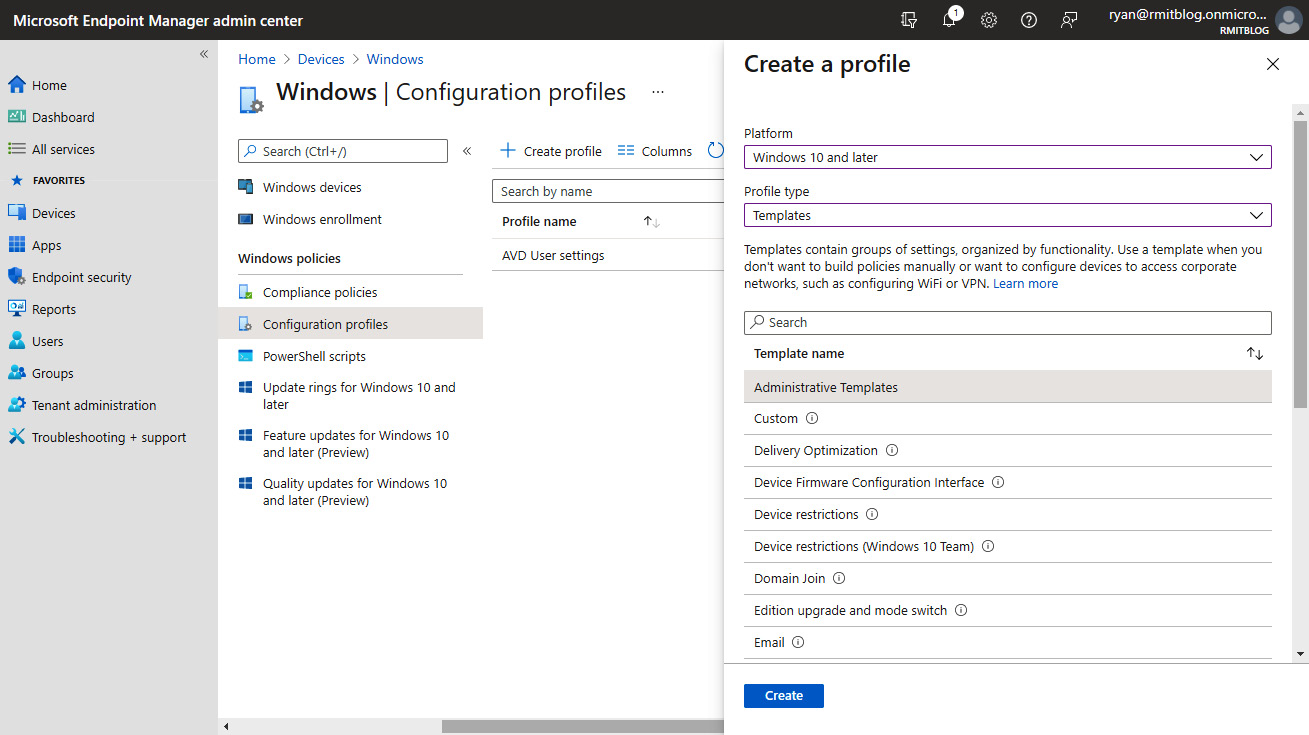
Figure 13.21 – The Create a profile blade within the Configuration profiles page
- Once you have finished selecting your requirements, click the Create button. A wizard form will appear with four sections called Basics, Configuration settings, Scope tags, and Assignments. You can click Review + create to check the configurations you have specified.
Enter a name and description for the configuration policy:
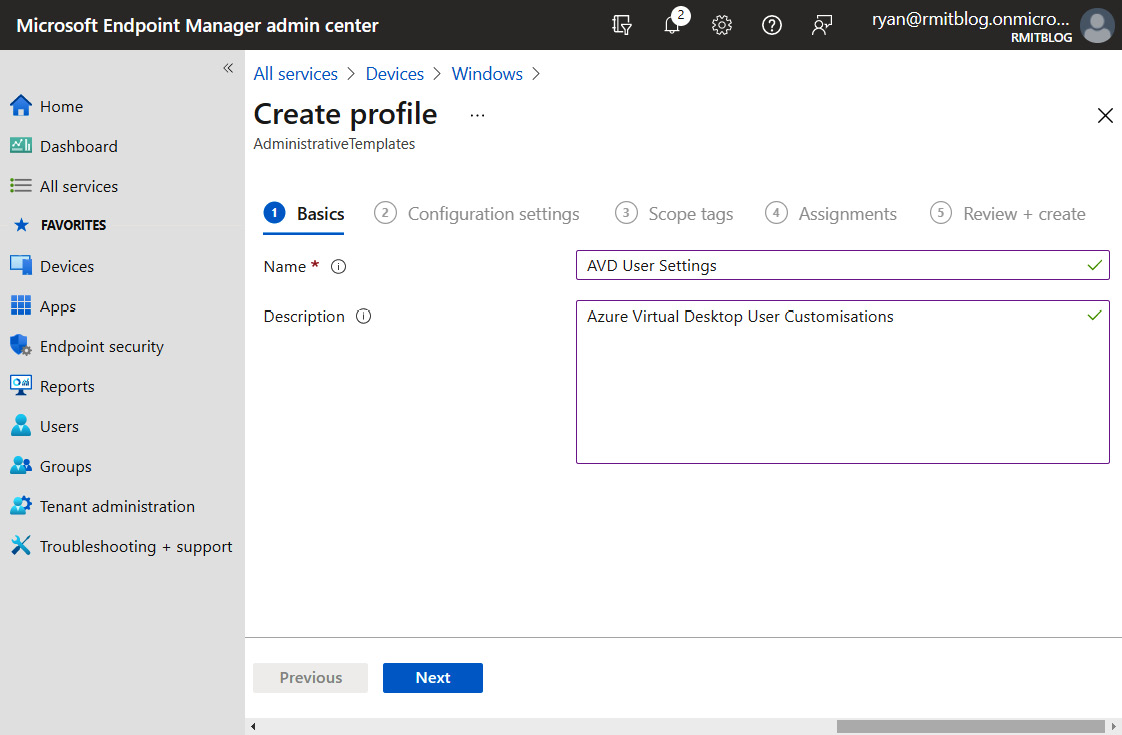
Figure 13.22 – The Create profile page when creating a new configuration profile
- Click Next to move on to the Configuration settings section of the Create profile wizard form. Within the Configuration settings page, you can select both user and computer settings. In this example, I am going to choose a few user settings to lock down the desktop:

Figure 13.23 – Configuration options that are available for the computer and user settings
As you can see, there are several different policies you can enable to lock down a desktop. These are the same ones that you would find in a group policy or the local policy on the session host itself.
- Choose the policies you require and, once complete, click Next:
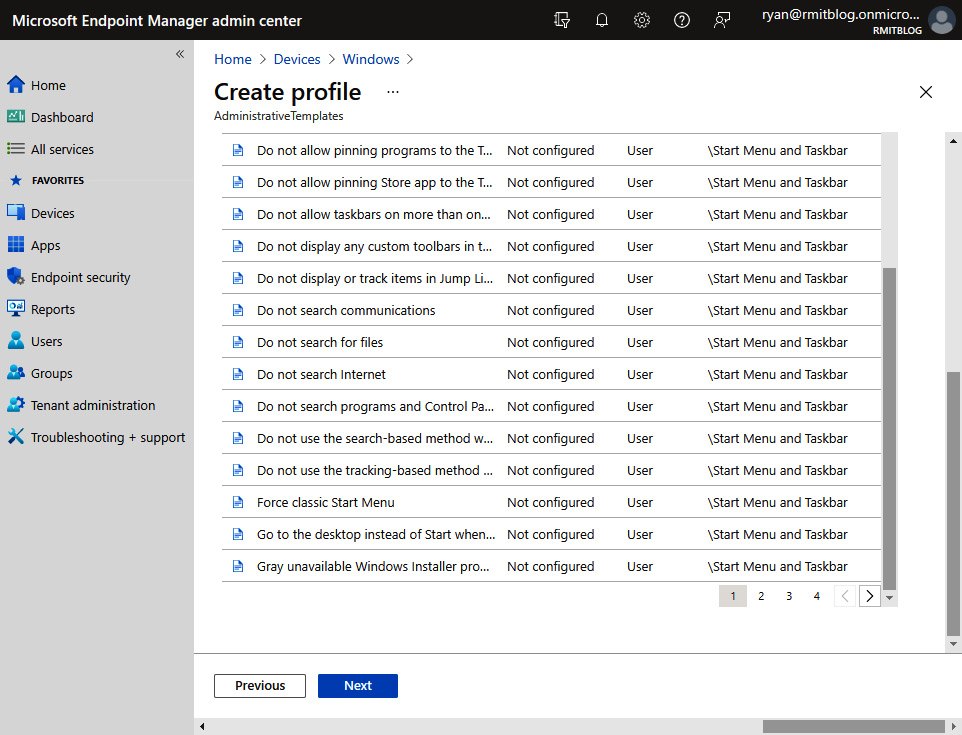
Figure 13.24 – Some of the policies you can add to the configuration profile
- You should now see the Scope tags section. A scope tag is like a virtual version of an Active Directory Organizational Unit (OU) that can be used to assign/group devices to configuration profiles and compliance policies:
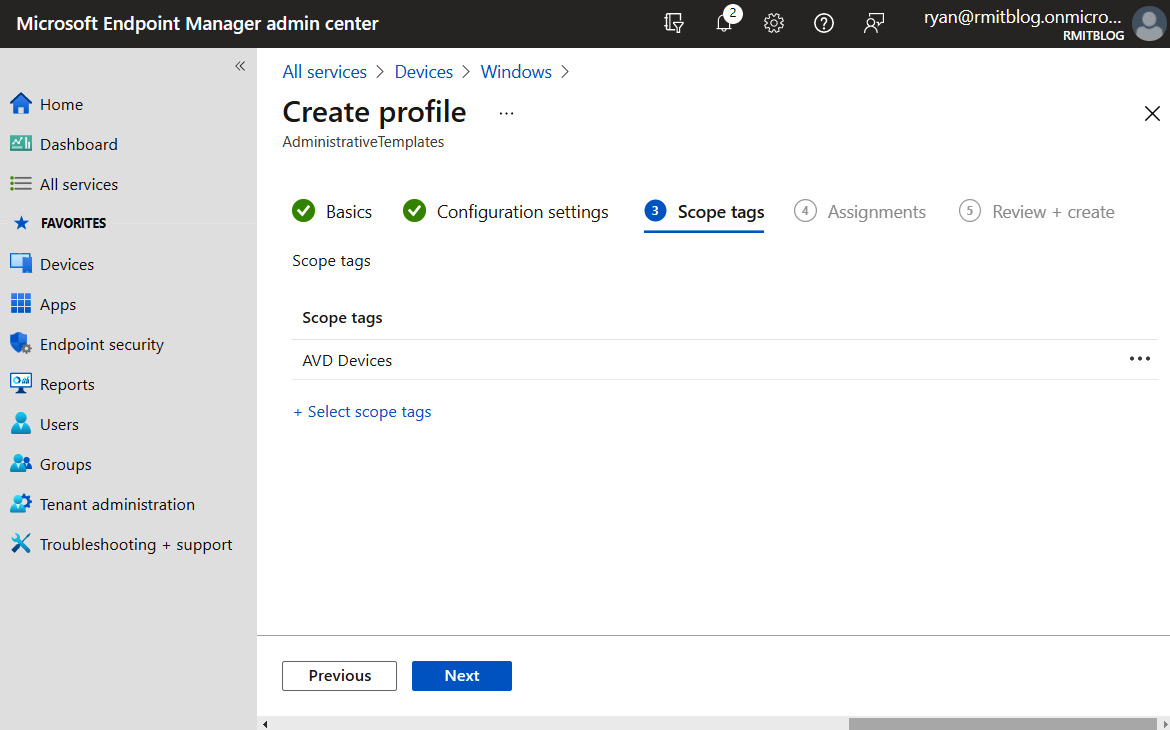
Figure 13.25 – The Scope tags setting with AVD Devices selected
- Once you have finished adding your scope tags, you can start assigning users. In this example, we will assign all users. You can add users or groups; however, you cannot mix user and device groups across the included and excluded groups:

Figure 13.26 – The Assignments tab of the configuration policy allows you to select included and excluded groups
As shown in the following screenshot, I have selected three user configuration items in this policy that will be rolled out to the Azure Virtual Desktop session hosts.
- Once you are happy with the settings/configuration, click Create to create the policy:

Figure 13.27 – The Review + create page of the Create profile page
Once created, you will see the new policy within the Configuration policies page:

Figure 13.28 – The created configuration profile
There you have it – we have created our first configuration policy for Azure Virtual Desktop using Microsoft Endpoint Manager! You can learn more about Microsoft Endpoint Manager by reading Mastering Microsoft Endpoint Manager, by Christiaan Brinkhoff, Per Larsen, Packt Publishing.
This section looked at how we can assign configuration policies to Azure Virtual Desktop session hosts using Microsoft Endpoint Manager. In the next section, we will look at configuring Start Virtual Machine on Connect.
Start Virtual Machine on Connect
In this section, we will look at the Start VM on Connect feature. This offers a cost-saving mechanism for organizations as Start Virtual Machine on Connect essentially allows you to turn VMs on when required; when they are not needed, the user can turn them off. Start Virtual Machine on Connect is a great way for you to boot VMs on demand. This can be useful for personal desktops or resources that shut down every evening, as scheduled by the IT department.
The following screenshot shows Start Virtual Machine on Connect in action:
Figure 13.29 – Start Virtual Machine on Connect
Important Note
Start Virtual Machine on Connect is available for personal and pooled host pools and uses the Azure portal and PowerShell.
We now take a look at using the Azure portal to configure Start Virtual Machine on Connect.
Configuring with the Azure portal
Now, let's look at the configuration within the Azure portal:
- Within the Azure portal, navigate to Subscriptions.
- Within the required subscription, go to Access Control (IAM).
- Select the Add custom role button.
- You will then see the Create custom Role page.
- Select Start from JSON and upload the Start_VM_On_Connect.json file, which you can download from here: https://github.com/PacktPublishing/Remote-Productivity-with-Windows-Virtual-Desktop/blob/main/B17392_07/Start_VM_on_connect.json.
The JSON template should look something like this:
{ "properties": { "roleName": "Start VM on connect (Custom)", "description": "Start VM on connect with AVD (Custom)", "assignableScopes": [ "/subscriptions/<EnterSubscriptionHere>" ], "permissions": [ { "actions": [ "Microsoft.Compute/virtualMachines/start/action", "Microsoft.Compute/virtualMachines/read" ], "notActions": [], "dataActions": [], "notDataActions": [] } ] }}
The following screenshot shows where you would import the JSON configuration file for the custom role:

Figure 13.30 – The Create a custom role page within the Azure portal
- Once imported, you will see that the form fields have been populated and that, as you navigate through the tabs, the required permissions have been assigned.
- Navigate to Review + create and click Create:

Figure 13.31 – The Review + create tab of the Create a custom role page
- The final step is to assign the custom role you just created to Windows Virtual Desktop (soon to be renamed Azure Virtual Desktop):

Figure 13.32 – Assigning the Windows Virtual Desktop service to the Start Virtual Machine on Connect custom role
Once you have completed this step, you will be ready to enable Start Virtual Machine on Connect within the required host pool.
This section looked at setting up Start Virtual Machine on Connect by creating a custom role and assigning the Windows Virtual Desktop (soon to be renamed Azure Virtual Desktop) service to the role.
In the next section, we will look at screen capture protection for Azure Virtual Desktop.
Enabling screen capture protection for Azure Virtual Desktop
The screen capture protection feature can be used as a data leak prevention tool to prevent sensitive information from being captured on endpoint clients. When this feature is enabled, remote content will be automatically blocked or hidden in screenshots and screen shares.
Important Note
The Remote Desktop Client hides content from any malicious software that may be capturing the screen.
Prerequisites
Screen capture protection is an Azure Virtual Desktop feature that is configured at a session host level and is enforced on the client. You can only use screen capture protection with Windows Desktop Clients for full desktops only. However, macOS clients using version 10.7.0 or later support screen capture protection for both RemoteApp and full desktops.
Configuring screen capture protection
In this subsection, we will configure screen capture protection:
Tip
This example shows you how to configure the Session Host itself. However, you can use the Group Policy Central store within Active Directory to do this.
- To configure screen capture protection, you will need to download a set of administrative templates and add them to the session host/session host template.
- You can download the template files from here (AVDGPTemplate.cab) and extract the .cab file and ZIP archive's contents: https://github.com/PacktPublishing/Remote-Productivity-with-Windows-Virtual-Desktop/blob/main/B17392_07/AVDGPTemplate.cab.
- Then, you need to copy the terminalserver-avd.admx file to the %windir%policyDefninitions folder.
- A similar process must be followed for the adml file – copy it to the %windir%policyDefninitionsen-us folder.
- Once both files have been copied to their required locations, you can check that the policies have been added correctly by opening the local group policy editor and navigating to Computer Configuration | Administrative Templates | Windows Components | Remote Desktop Services | Remote Desktop Session Host | Azure Virtual Desktop.
- You should then see the Enable screen capture protection policy:
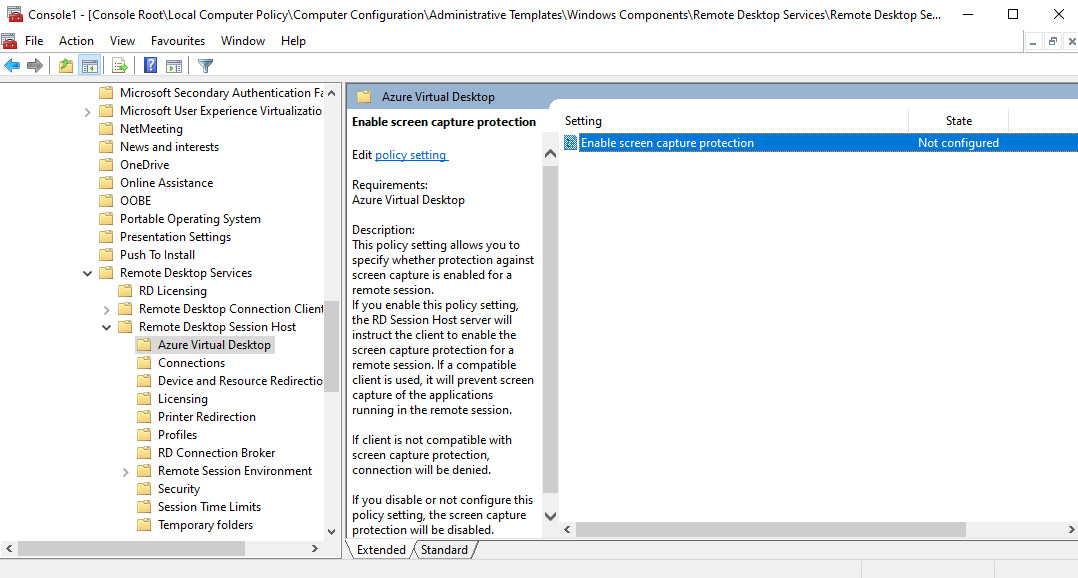
Figure 13.33 – Enable screen capture protection within the local computer policy of the session host
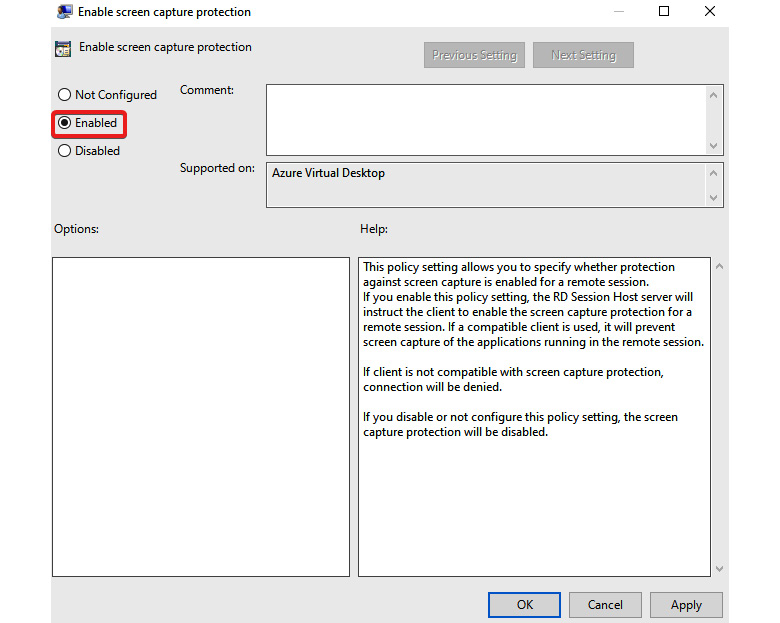
Figure 13.34 – The Enable screen capture protection page
- Once enabled, you will need to reboot the host if you want to test it.
Important Note
There is no guarantee that the feature will fully restrict protected content, and it is recommended that you test it before rolling it out to a production environment. It is also recommended that you consider restricting access to items such as the clipboard, drive, and printer redirection as well as using screen capture protection. It is also important to understand that users cannot use local collaboration software such as Microsoft Teams when the screen capture protection feature is enabled.
In this section, we looked at how to configure and enable screen capture protection for Azure Virtual Desktop. Now, let's learn how to troubleshoot FSLogix profile containers.
Troubleshooting FSLogix profiles
This section will provide an overview of troubleshooting FSLogix profile containers. We will provide a few pointers to help you when you're diagnosing profile-related issues.
The quickest way to get insight into FSLogix profile issues is to review the logs using the FSLogix profile status utility. This enables you to view both administrative and operational profile-related events. You can find the profile status utility here: C:Program FilesFSLogixAppsfrxtray.exe.
Tip
You can review the logs for FSLogix remotely via %ProgramData%FSLogixLogs.
Using the FSLogix profile status utility and cross-referencing the status codes will help you quickly diagnose an issue. You can find the list of status codes on the Microsoft Docs site at https://docs.microsoft.com/fslogix/fslogix-error-codes-reference:
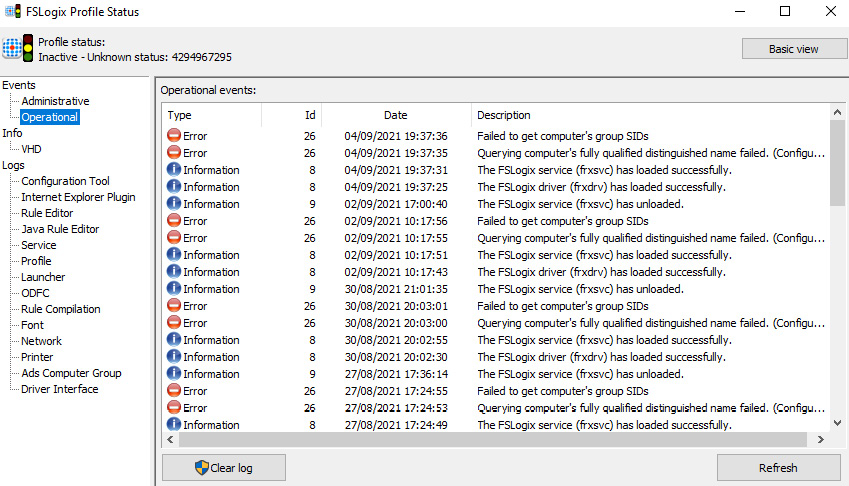
Figure 13.35 – The FSLogix Profile Status utility tool's operational events page
You can also review VHD/VHDX disk usage and size using the FSLogix profile status utility tool and view logs that are specific to a particular area, such as the profile or service.
Important Note
You can review the FSLogix logs via the Event Viewer by going to EventViewer - Applications and Services Logs | Microsoft | Fslogix.
You can read more about FSLogix profile logs by going to the Microsoft Docs site: https://docs.microsoft.com/fslogix/logging-diagnostics-reference.
One of the more typical issues related to FSLogix profile containers is ensuring that you have enabled the service on the session host or via Group Policy central management. Also, ensure that you have specified a valid VHD location (VHDLocations) and that the permissions have been set correctly for the profile to be mounted for the user trying to log on.
Important Note
When you're using the FSLogix cloud cache, VHDLocations is replaced with CCDLocations.
A couple of final closing issues to watch out for when troubleshooting FSLogix profile containers are that the user or group in question is not in the FSLogix profile's excluded group, that a local profile doesn't already exist for the user or group of users, and that there is space available on the selected profile storage.
Important Note
For more information on configuring FSLogix profile containers, please refer back to Chapter 12, Implementing and Managing FSLogix.
In this section, we looked at troubleshooting FSLogix profile container issues within Azure Virtual Desktop. We provided a high-level summary and discussed the FSLogix profile status utility, as well as some common problems to watch out for. In the next section, we will look at troubleshooting Azure Virtual Desktop clients.
Troubleshooting Azure Virtual Desktop clients
In this section, we will look at troubleshooting Azure Virtual Desktop client issues and some hints and tips to help you on your way with diagnosing problems.
You need to ensure that your user can communicate with the Azure Virtual Desktop service and on corporate devices; you should add the correct firewall rules to do so.
The following table details the required URLs that the client should be able to access:

The preceding table was taken from https://docs.microsoft.com/azure/virtual-desktop/safe-url-list#remote-desktop-clients.
In the next section, we will look at testing connectivity to help you troubleshoot any issues.
Testing connectivity
This subsection will look at how to test that the client can communicate correctly with Azure Virtual Desktop. We will look at two tests – one that uses PsPing and another that uses nslookup.
You can also complete client tests using Sysinternals PsPing, which allows you to test connectivity from the client to the Azure Virtual Desktop service.
You can download PsPing from https://docs.microsoft.com/sysinternals/downloads/psping.
The test that was run in the following screenshot essentially pings the RDweb service using port 443; that is, "psping64.exe" -t rdweb.wvd.microsoft.com:443.
As you can see, the device can communicate with the service:

Figure 13.36 – PsPing testing port 443's connectivity to the Azure Virtual Desktop Rdweb service
You can also use nslookup to ensure that DNS is working as expected:
nslookup rdweb.wvd.microsoft.com
You should see the following output. If DNS is working, it should resolve with IP addresses and other information, such as aliases:
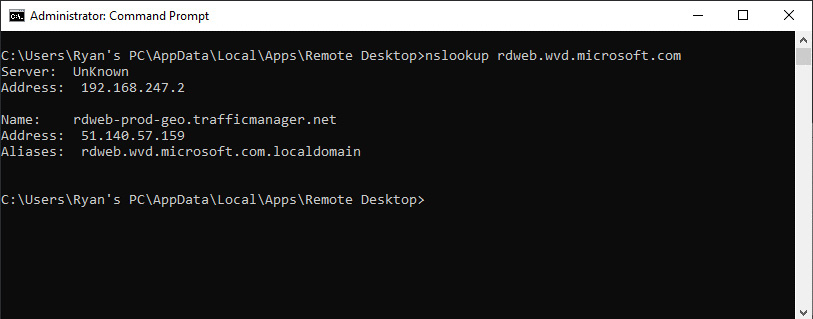
Figure 13.37 – PsPing testing DNS connectivity to the Azure Virtual Desktop Rdweb service
Now that we have looked at how to test client connectivity to the Azure Virtual Desktop service, let's learn how to reset the client.
Resetting the Remote Desktop Client
If you find that a user's Remote Desktop Client stops responding, cannot be opened, or you receive messages such as certificate errors, you may want to try resetting the client as a way to resolve the issue:
"%userprofile%appdatalocalappsRemote Desktopmsrdcw.exe" /reset
The result of the preceding query is shown in the following screenshot:

Figure 13.38 – Command line for resetting the Remote Desktop client
You can also add the [/f] switch to force the reset without receiving a popup message. This is useful if you want to automate the process of resetting multiple devices using an endpoint manager or other tool.
To reset with the force switch, you can use the following command:
"%userprofile%appdatalocalappsRemote Desktopmsrdcw.exe" /reset /f
Now that we have covered resetting the remote desktop client, let's move on to the next section, where we will learn what to do if the remote desktop client is showing no resources.
Remote Desktop Client is showing no resources
If your client is showing no resources, this is usually because the user has been taken out of the app group. If there has been a resource move between resource groups, this can impact the configuration of Azure Virtual Desktop. If no resources exist, check the app groups first. It is also advised that the user logs out of the client and re-authenticates to see if the issue persists.
In this section, we looked at troubleshooting Azure Virtual Desktop clients. We looked at troubleshooting and confirming connectivity, including testing connectivity to the Azure Virtual Desktop service using PsPing from Sysinternals and nslookup to ensure that DNS is working correctly.
Summary
In this chapter, we started by learning about Universal Print, which offers a modern, flexible print solution for organizations and compliments Azure Virtual Desktop as both services are built inside Microsoft Azure. We then looked at Microsoft Endpoint Manager and the benefits it offers Azure Virtual Desktop in the sense that you can centralize and configure configuration policies for users using scope tags. Next, we looked at a relativity new feature to the Azure Virtual Desktop portfolio known as screen capture protection, which offers better protection for sensitive workspaces. We looked at how to add the required policies and configure them. Finally, we looked at troubleshooting FSLogix profile containers and troubleshooting the Remote Desktop client.
The next chapter is very exciting as we look at installing and configuring apps on a session host.
Further reading
Step-by-Step: Configure and manage Microsoft Universal Print: https://techcommunity.microsoft.com/t5/itops-talk-blog/step-by-step-configure-and-manage-microsoft-universal-print/ba-p/2227224
Questions
Answer the following questions to test your knowledge of this chapter:
- Does Screen Capture Protection support both remote apps and full desktops when you're using a Windows client?
- Name the two Universal Print roles within Azure Virtual Desktop.
- Where can you retrieve the FSLogix logs from a session host?
- When you're troubleshooting a Remote Desktop client on a Windows operating system, what command you would use to remove your user data, restore the default settings, and unsubscribe from all workspaces?
Answers
- Windows clients only support full desktop screen capture protection at the time of writing.
- Printer Administrator and Printer Technician.
- %ProgramData%FSLogixLog.
- "%userprofile%appdatalocalappsRemote Desktopmsrdcw.exe" /reset