
Chapter 11: Managing Security
In this chapter, we'll take a look at security and compliance settings for Azure Virtual Desktop (AVD). First, we'll look at planning and implementing multi-factor authentication (MFA) and Conditional Access policies for AVD. Next, we'll look at Microsoft Defender for Cloud and the benefits of turning this feature on and enabling Azure Defender. To finish the chapter, we'll look at Microsoft Defender Antivirus and additional configurations you can apply to streamline the security signature updates to session hosts.
This chapter covers the following topics:
- Planning and implementing MFA
- Managing security by using Microsoft Defender for Cloud
- Using Microsoft Defender for Cloud for AVD
- Enabling Azure Defender for AVD
- Configuring Microsoft Defender Antivirus for AVD
Introduction to MFA
MFA is an authentication layer you can add to the sign-in process as a way of improving sign-in security. When accessing corporate accounts, apps, or other services, the user is required to provide additional identity verification. This additional verification can be scanning a fingerprint or entering a code received by a phone or token-generating device.
Important Note
The security threat landscape is consistently changing, with new threats appearing daily. It is advised as a best practice that organizations use MFA as a standard practice to harden the sign-in process to protect users and corporate data.
How does Azure MFA work?
Azure Active Directory (AD) MFA works by the user requiring two or more authentication methods to complete a sign-in process. The first method is typically a password. Trusted devices such as a phone or hardware key or biometrics such as a fingerprint or face scan can be used as a second method.
Important Note
Azure AD MFA also offers a feature known as secure password reset. This can be enabled when users register for Azure AD MFA, which appears as an additional step.
You can use the following forms of authentication when using Azure MFA:
- Microsoft Authenticator app
- OATH hardware token (preview)
- OATH software token
- SMS
- Voice call
The verification when using Azure MFA looks similar to the following screenshot:

Figure 11.1 – Azure MFA prompt during a user sign-in process
You have the option of configuring the security defaults to enable Authenticator for all users or choosing conditional access policies that can be used to control specific events and applications. You can configure conditional policies to allow regular sign-in or to include a prompt for additional verification when a user is remote or on a personal device.
Let's now take a look at the security defaults available to you on Azure.
Security defaults
Security defaults are a feature that helps simplify security hardening when applying MFA to your organization's Azure tenant. When applying preconfigured security settings, you essentially set the following:
- Requiring all users to register for Azure AD MFA
- Requiring administrators to do MFA
- Blocking legacy authentication protocols
- Requiring users to do MFA when necessary
- Protecting privileged activities such as access to the Azure portal

Figure 11.2 – Manage Security defaults section
You can read more on security defaults here: https://docs.microsoft.com/azure/active-directory/fundamentals/concept-fundamentals-security-defaults.
Conditional Access
As the technology ecosystem continues to evolve and change day by day, the way people work and access corporate resources changes. This can also be described as the modern security perimeter, which essentially refers to users and device identities that access corporate data and network resources from outside the corporate network.
When looking at conditional access, we need to first understand the three core principles: signals, decisions, and enforcements.
Important Note
To use conditional access policies, you need the Azure AD Premium P1 license. You can read more here: https://www.microsoft.com/security/business/identity-access-management/azure-ad-pricing?rtc=1.
Let's now take a look at these three components that are required for conditional access organizational policies:

Figure 11.3 – The three components of Conditional Access policies
Signals
The following are taken into consideration when making policy decisions using conditional access:

Decisions
The following table details the two decisions and the options available when you select Grant Access:

Enforcement
The following is a list of examples of some of the applied policies you can set:
- Blocking risky sign-in behaviors
- Requiring MFA for Azure management tasks
- Blocking sign-ins for users attempting to use legacy authentication protocols
- Requiring trusted locations for Azure AD MFA registration
- Requiring MFA for users with administrative roles
- Blocking or granting access from specific locations
- Requiring organization-managed devices for specific applications
You can read more on the three components of Conditional Access here: https://docs.microsoft.com/azure/active-directory/conditional-access/overview.
The following diagram shows the use of the three components in actions to enforce conditional access on the required apps and data for your organizations:
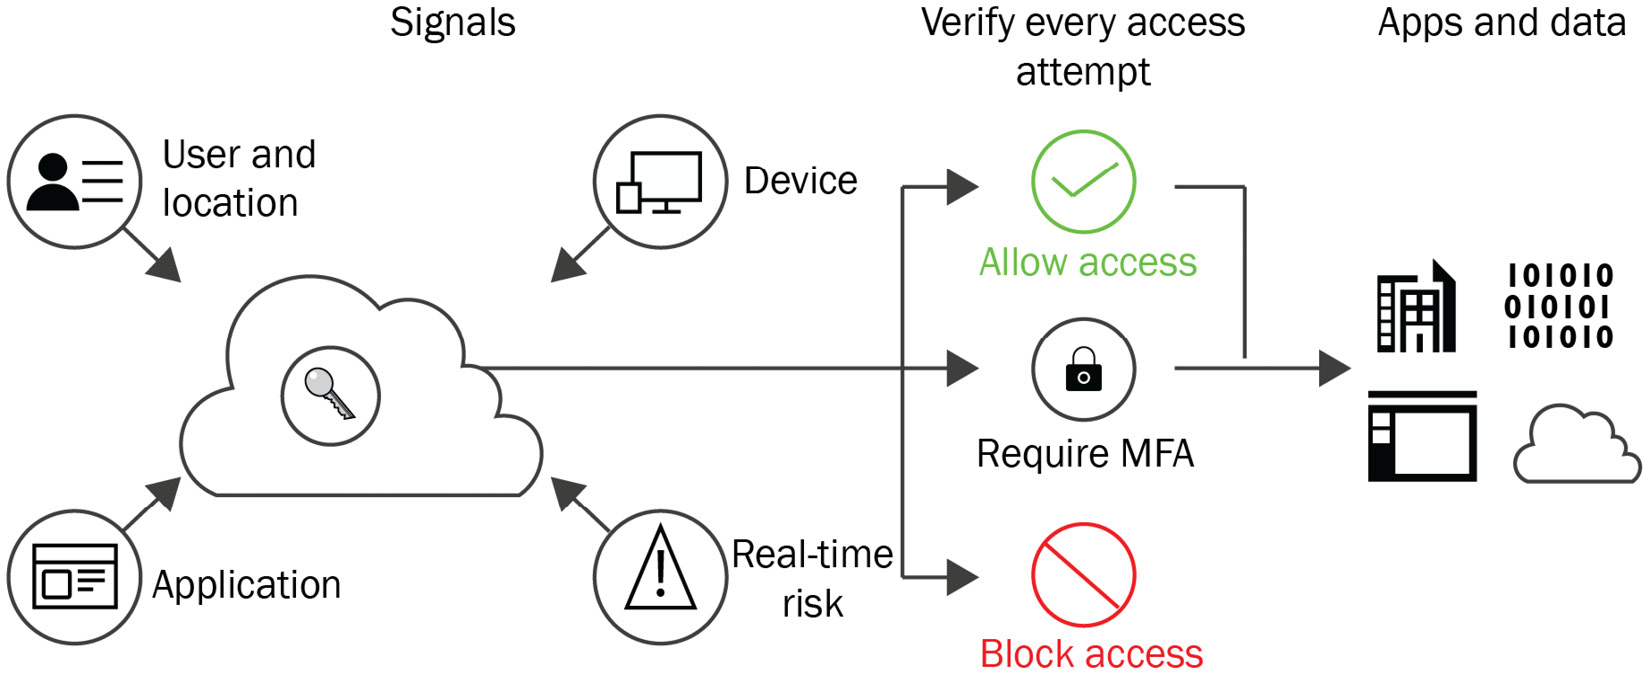
Figure 11.4 – Logical diagram of how Conditional Access works
We'll now move on to take a look at the planning and implementation of MFA.
Planning and implementing MFA
This section goes into detail on how to implement MFA for AVD. We will navigate through the process step by step. The benefit of MFA is that it provides an extra layer of security for users, and only the user with access to the token can log in, reducing the risk of unauthorized access to the network and IT resources.
The prerequisites for getting started are as follows:
- You first need to assign a license to users that includes Azure AD Premium P1 or P2.
- You also need to create a new Azure AD group for MFA and ensure that you have included the users you want to assign MFA to.
- Ensure you enable Azure MFA for all required users.
For more information on the prerequisites, please see the following link: https://docs.microsoft.com/en-us/azure/active-directory/authentication/howto-mfa-getstarted#prerequisites-for-deploying-azure-ad-mfa.
You also need to ensure that your users are configured to use MFA. This is done by following the steps I have summarized here:
- First, sign in to the Azure portal using an administrator account.
- Select Azure Active Directory from the left-hand menu, then select Users | All users.
- Select Per-user MFA. The following screenshot shows the All users section within Azure AD:

Figure 11.5 – The All users page within Azure AD
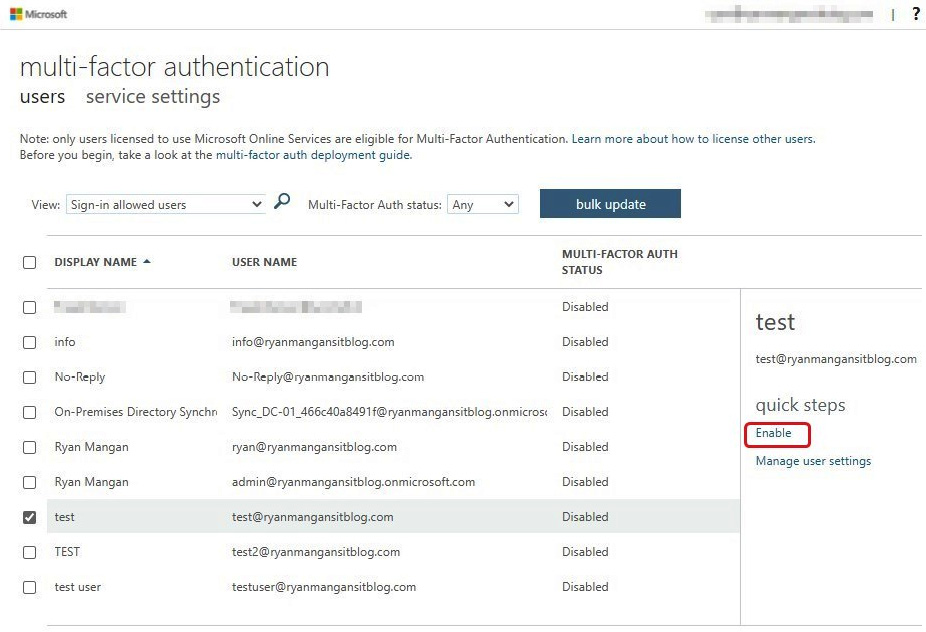
Figure 11.6 – The multi-factor authentication page for enabling MFA for users found in the Office.com portal
To configure multi-factor user states, see the following link: https://docs.microsoft.com/azure/active-directory/authentication/howto-mfa-userstates.
Tip
It is recommended that you do not manually change the user state to Enforced unless the user is already registered or understands there will be an interruption in connections to legacy authentication protocols.
In the following subsection, we take a look at configuring the required conditional access policy for AVD to enforce MFA.
Creating a conditional access policy for MFA
In the previous section, we discussed conditional access policies and the three components: signals, decisions, and enforcements. We'll now take a look at creating a conditional access policy.
The following steps guide you through creating a conditional Access policy that requires MFA when connecting to AVD:
- Log in to the Azure portal as an administrator.
- Navigate to Azure Active Directory | Security | Conditional Access. This screenshot shows the Security menu within the Azure Active Directory menu in the Azure portal:

Figure 11.7 – Conditional Access option on the Azure AD page
- Select + New policy. This screenshot shows the button to add a new conditional access policy:

Figure 11.8 – Add new policy button
- Enter a name for your policy.
- Under the Assignments section, select users and groups. Under Include, click on select users and groups | users and groups and choose the group you created in the prerequisites stage. Click on Done.
- Under Cloud apps or actions | Include, click on Select apps. Select one of the following apps based on which version of AVD you're using.
Tip
Please note you may find that the name has not changed from Windows Virtual Desktop, and it is advised you check for both.
If using AVD, choose this app: Azure Virtual Desktop (app ID 9cdead84-a844-4324-93f2-b2e6bb768d07).
The following screenshot shows the details filled in for creating a new conditional access policy, which we will apply to AVD as specified in the Cloud apps | Include section:

Figure 11.9 – Cloud apps AVD
Tip
To find the app ID of the app you want to select, navigate to Enterprise Applications and select Microsoft Applications from the Application type drop-down menu. You can read more here: https://docs.microsoft.com/azure/active-directory/manage-apps/view-applications-portal?tabs=azure-portal#search-for-an-application.
- Next, navigate to Conditions | Client apps. In Configure, select Yes, and then select where to apply the policy:
- If you want the policy to apply to the web client, then select Browser.
- If you want to apply the policy to other clients, then select Mobile apps and desktop clients.
- If you want to apply the policy to all clients, then select both the checkboxes.
The following screenshot shows the conditions set for this conditional access policy; you will note that both Browser and Mobile apps and desktop clients have been set for this policy:
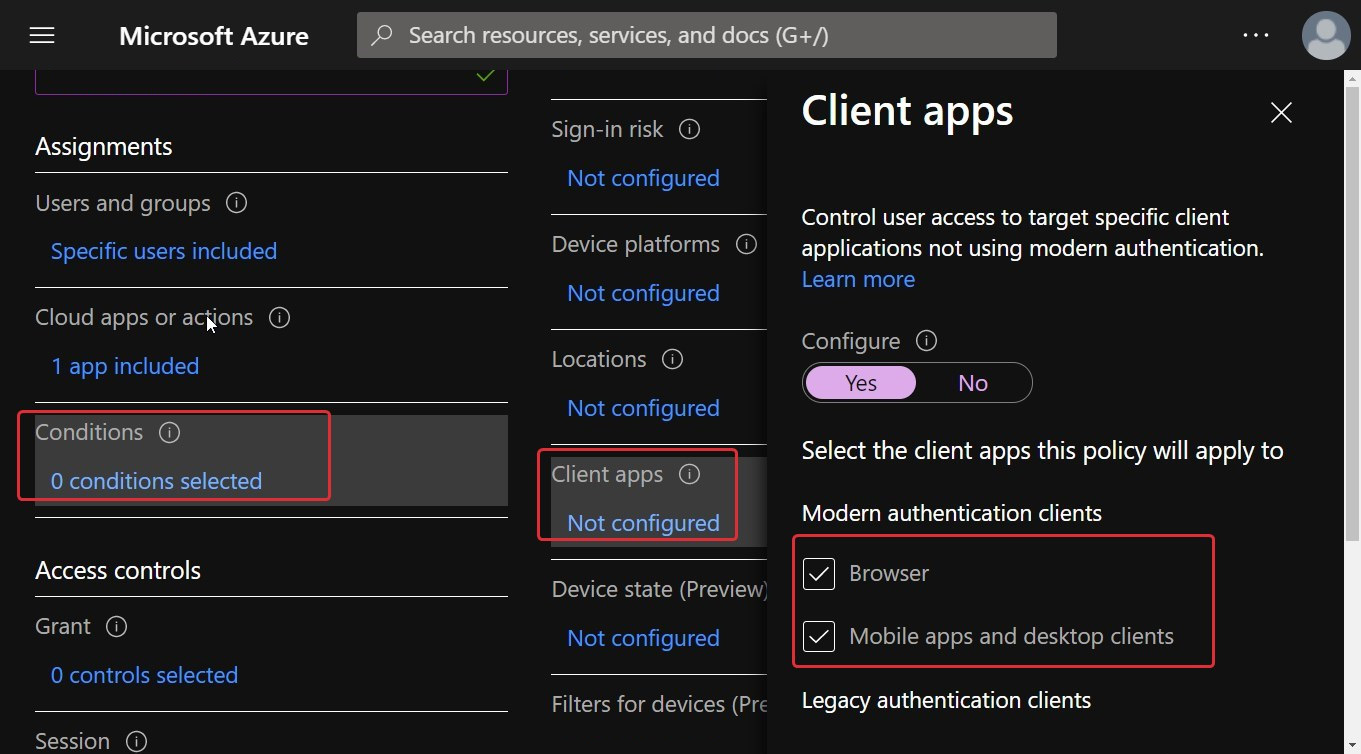
Figure 11.10 – Conditions being set for browser and mobile apps and desktop clients
- Once you've selected the required client apps as shown in Figure 9.10, click Select, and then click on Done.
- Under Access controls | Grant, select Grant access | Require multi-factor authentication, and then Select.
The following screenshot shows the configuration of access controls, specifically the Grant access control. By setting Require multi-factor authentication, you force the user to complete two-factor verification to access the resources configured within the conditional access policy:

Figure 11.11 – Control for enforcing MFA for granting access to the cloud app
- Under Access controls | Session, select Sign-in frequency, set the value to the time you want between MFA prompts, and then click on Select. For example, setting the value to 4 and the unit to Hours will require MFA if a connection is launched 4 hours after the last.
The following screenshot shows the customization of the sign-in frequency setting. You can set a specific time before a user needs to reauthenticate:

Figure 11.12 – Sign-in frequency setting for enforcing re-authentication
- Confirm the settings and set Enable policy to On. The following screenshot shows that Enable policy has been turned on for the conditional access policy:
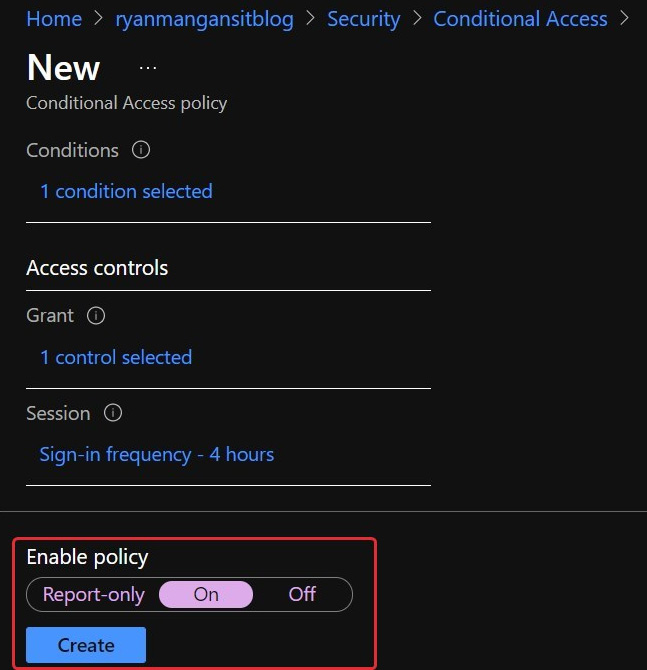
Figure 11.13 – Setting the policy to On
- Select Create to enable your policy.
There you have it; you have enabled MFA and configured the required conditional access policy for AVD.
Tip
It is advised that you use Report-only before introducing this to a production environment. Report-only allows you to identify any issues and ensure the configured conditional access policy is functioning correctly.
This section looked at enabling MFA for users and then configuring an AVD conditional access policy. The next section looks at managing security by using Microsoft Defender for Cloud.
Managing security by using Microsoft Defender for Cloud
Microsoft Defender for Cloud was previously known as Azure Security Center and Azure Defender. I want to set some context around the reasoning and detail of the responsibilities split between Microsoft and the customer.
We previously spoke about some advanced security features, such as reverse connect, which reduces the risk of exposing virtual desktop resources directly to the public network. We'll now look at the security responsibilities and some of the Azure security best practices available to you.
Here are the security areas you're responsible for in your AVD deployment. Note that the value under the Customer responsibility column is Yes if the customer is responsible and No if Microsoft is responsible:

This table was taken from the following Microsoft link:
https://docs.microsoft.com/en-us/azure/virtual-desktop/security-guide#security-responsibilities
As detailed in the table, Microsoft takes care of the physical aspects of the cloud infrastructure and the virtualization control plane. The customer is responsible for everything else. This is why it makes sense to use Microsoft Defender for Cloud to assist with security hardening all the required components for your AVD environment.
Important Note
Microsoft Defender for Cloud is an essentially security posture manager that has two offerings, the first being a free version and the second option known as enhanced security, which offers a number of security features and tools to help you harden your environment.
Microsoft Defender for Cloud represents a number of security services that are specific to different workloads, such as databases, storage accounts, containers, and key vaults.
Microsoft Defender for Cloud helps you harden your resources, as well as mapping your current security posture and tracking future changes to help protect against cyber attacks and streamline your IT security. As Microsoft Defender for Cloud is natively integrated, it provides a simple and easy way to deploy Defender to secure your resources by default.
Take a look at the three core needs when managing security with Microsoft Defender for Cloud:
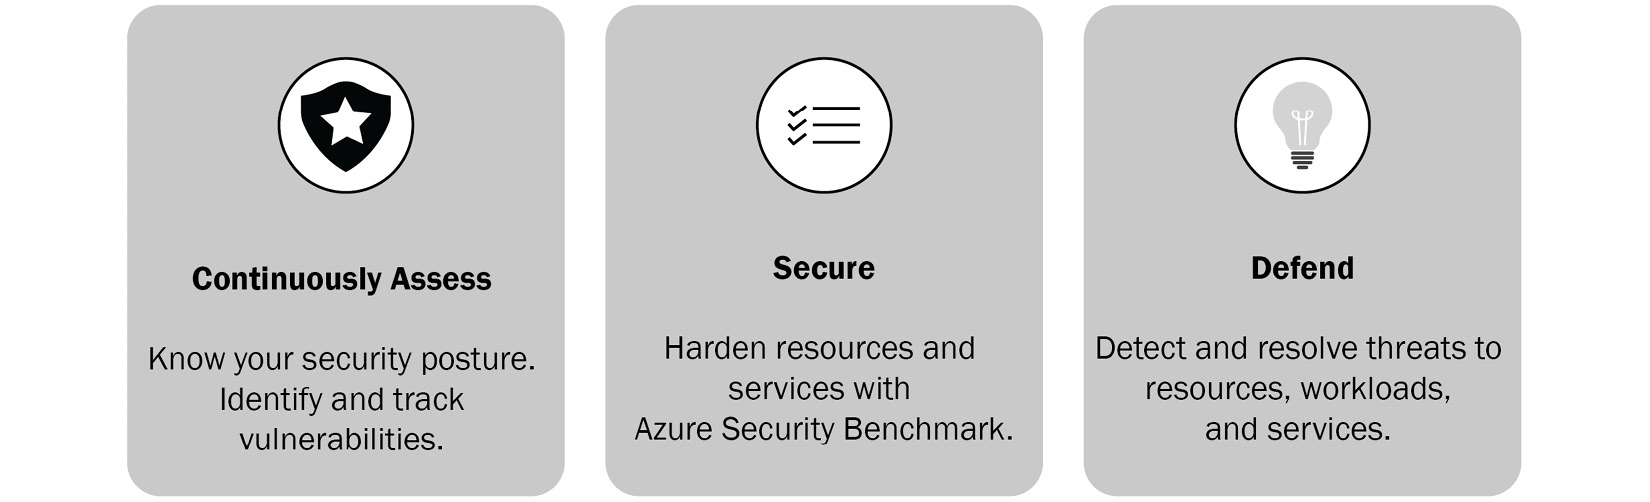
Figure 11.14 – The three core needs when managing the security of your resources in the cloud or on-premises
For a detailed breakdown of Microsoft Defender for Cloud, take a look at the following link: https://docs.microsoft.com/azure/defender-for-cloud/defender-for-cloud-introduction.
The following table describes the three core security requirements used within Defender for Cloud:

The table is taken from the Microsoft documentation site: https://docs.microsoft.com/azure/defender-for-cloud/defender-for-cloud-introduction.
Important Note
Please note that when using custom/third-party technologies such as network virtual appliances (NVAs), you may get false positive alerts from Microsoft Defender for Cloud regarding best practices. These alerts or recommendations become a false positive because you are effectively bypassing the default Azure configurations with a third-party security feature/technology. One good example is the use of port forwarding that is typically enabled for an NVA. This would flag an alert in Microsoft Defender for Cloud. However, port forwarding must pass traffic through the NVA and thus must be enabled on the NVA.
Microsoft Defender for Cloud provides a security score, which is essentially a set of recommendations and best practices for improving your AVD environment:
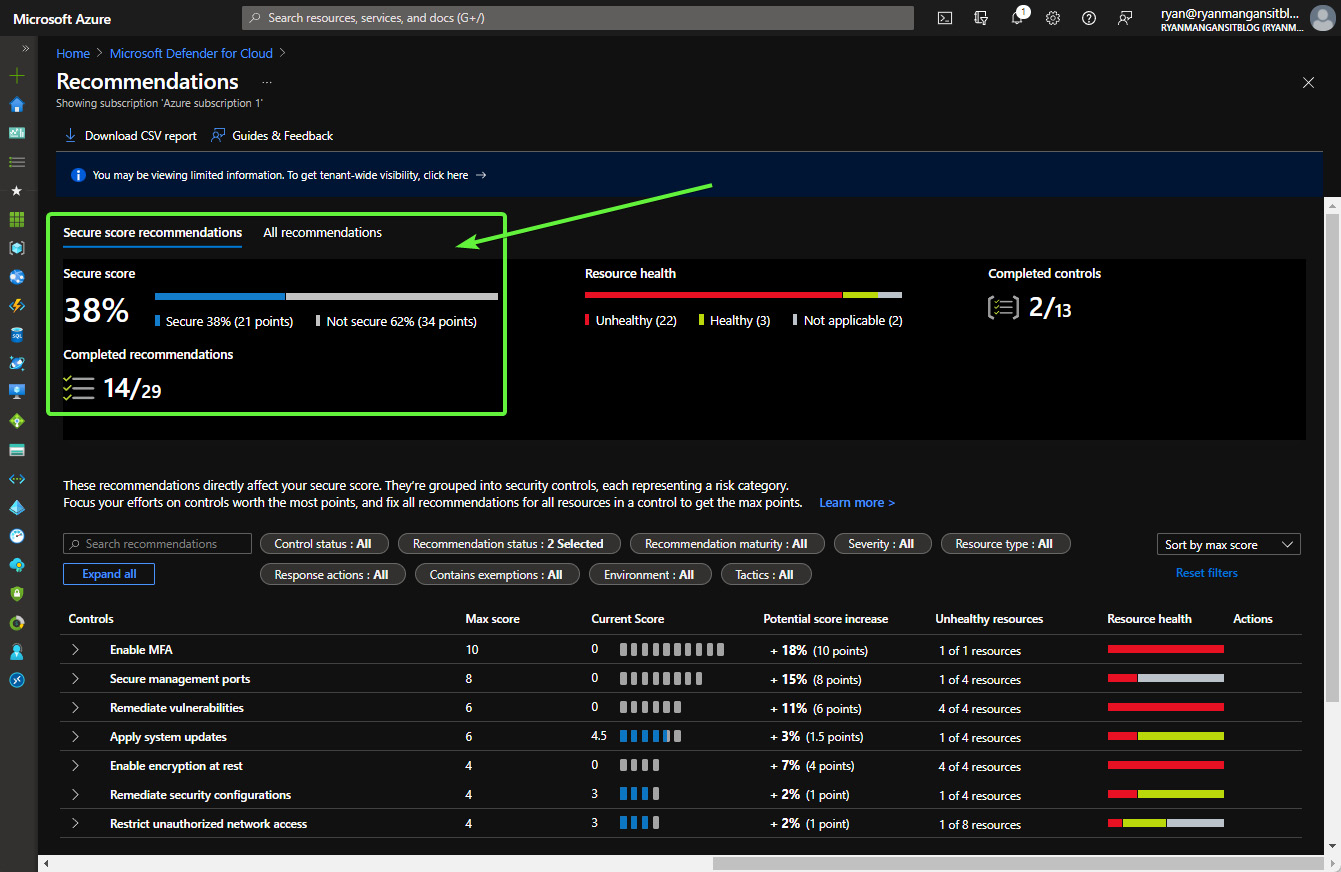
Figure 11.15 – Security score and list of recommendations below
The good news is that recommendations are prioritized to help you select the most important. There is also the Fix option to help you quickly identify and address any vulnerabilities. This is important to note. The Fix button helps with some issues but does not provide full coverage. It's advised that you conduct internal security reviews to ensure that you meet the requirements for your organization's security posture:

Figure 11.16 – The Fix option within the Recommendations section of Microsoft Defender for Cloud
Important Note
The recommendations will update when changes in the IT ecosystem occur, meaning that new recommendations will be provided when the security landscape changes, such as new vulnerabilities arising or new/better ways to maintain your AVD environment's security develop.
The next section takes a look at securing your AVD security environment and enabling enhanced security within Microsoft Defender for Cloud.
Securing AVD using Microsoft Defender for Cloud
As summarized in the introduction to this section, the customer is responsible for the following areas under the shared responsibility model:
- Network
- Deployment configuration
- Session host operating system
- Application security
- Identity
Security posture is a term used to reference the overall cybersecurity strength of an organization. It can also be used to predict, prevent, and respond to ever-changing threats. Therefore, it is advised that you examine both the required level of threat protection and the security posture for your AVD environment.
The misconfiguration of the network and/or virtual machines can increase the attack surface or possibly compromise an endpoint.
Important Note
You need to ensure that all management ports are closed on your AVD virtual machines. No direct access to session hosts from the public network is required. If you want direct access to virtual machines, it is advised to use Azure Bastion or connect over a VPN.
We cover endpoint protection in the next section; however, it is necessary to call out the following security controls to protect users from browsing to malicious sites or connecting to malicious devices.
Here is a list of benefits Microsoft Defender for Cloud offers for improving security posture and threat protection for AVD when enabling Azure Defender:
- Secure configuration assessment and Secure Score
- Industry-tested vulnerability assessment
- Host-level detections
- Agentless cloud network micro-segmentation and detection
- File integrity monitoring
- Just-in-time virtual machine access
- Adaptive application controls
The following table shows different security areas and what Microsoft Defender for Cloud offers in terms of capabilities:

This section provided a high-level overview of Microsoft's and the customer's security responsibilities. In addition, it provided an introduction to Microsoft Defender for Cloud to set the scene for the following sections of this chapter. We'll now move on to take a look at using Microsoft Defender for Cloud and Azure Defender for AVD.
Using Microsoft Defender for Cloud and AVD
Out of the box, you can use Microsoft Defender for Cloud to provide continuous assessments and security recommendations, fixes, and Azure security scores, which can be used to gauge your security posture.
Enabling Azure Defender opens up additional features, including just-in-time virtual machine access, adaptive application controls/network hardening, compliance dashboards/reports, threat protection for Azure virtual machines, and non-Azure servers.
Important Note
It is important to note that Microsoft Defender for Cloud is a security posture manager (SPM).
The following screenshot shows the differences between Microsoft Defender for Cloud being switched on and off:
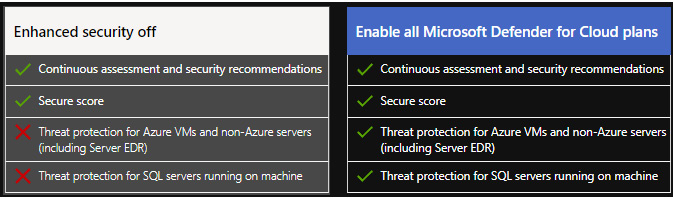
Figure 11.17 – The different features available when Microsoft Defender for Cloud is on and off
To access Microsoft Defender for Cloud, you will see an icon in the main window of the Azure portal with the Security Center icon. When you click this, you will be taken to the Overview window of Microsoft Defender for Cloud, as shown in the following screenshot:
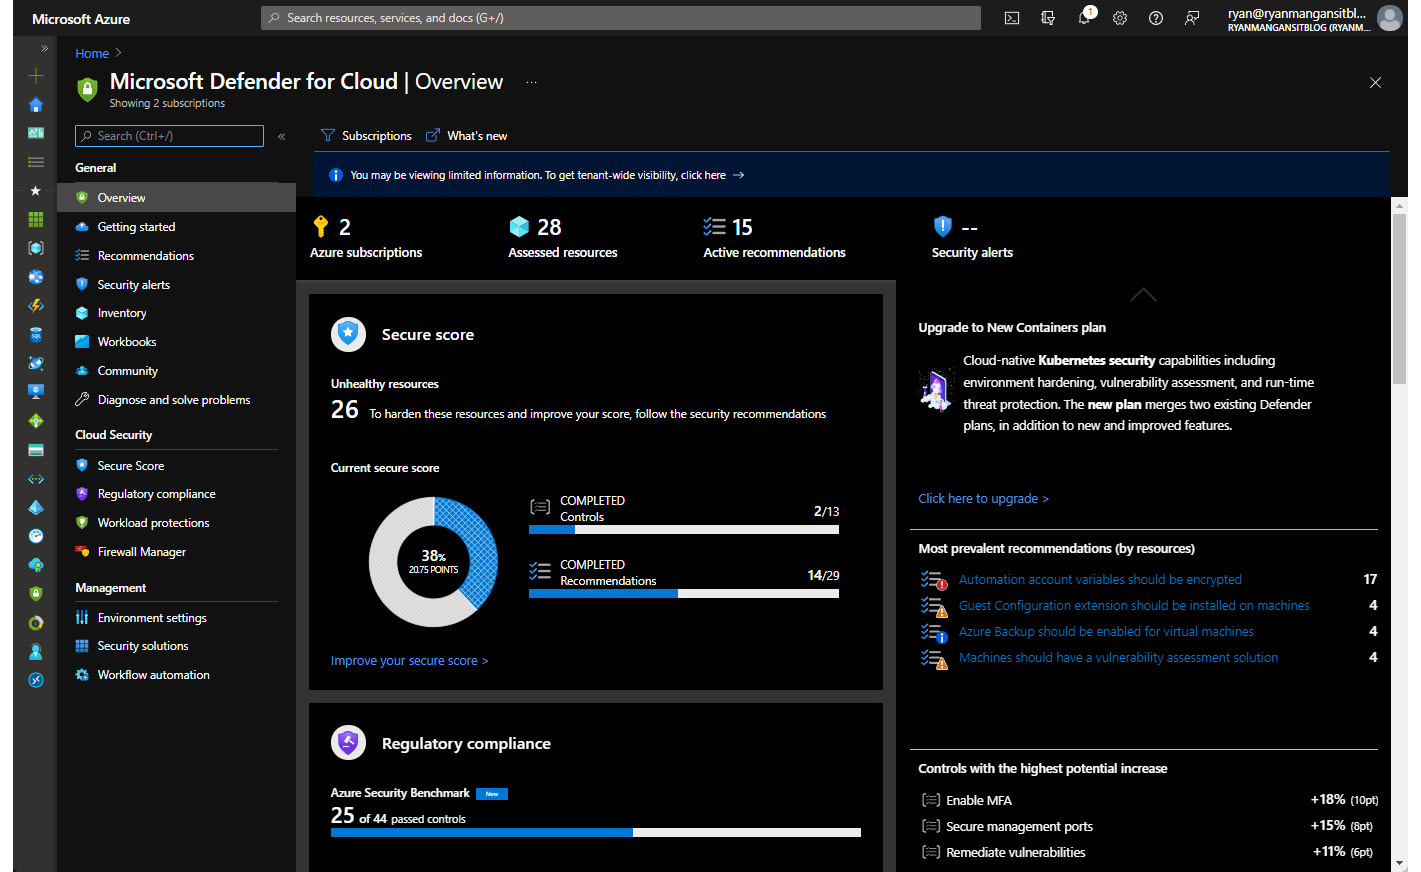
Figure 11.18 – Microsoft Defender for Cloud Overview page
Within Microsoft Defender for Cloud, you can review and configure various security controls/policies and review best practices. A lot of the content within Microsoft Defender for Cloud is out of scope for this book; however, we will take a brief look at what you can use for AVD to improve your desktop virtualization security posture.
You can take a look at your resources via the inventory, as highlighted in the following screenshot. This lets you see which resources are configured with monitoring agents, turn Azure Defender on/off, and see recommendations.
The following screenshot shows the Inventory page of Microsoft Defender for Cloud. This page is used for reviewing all resources, including total, unhealthy, unmonitored, and unregistered subscriptions:
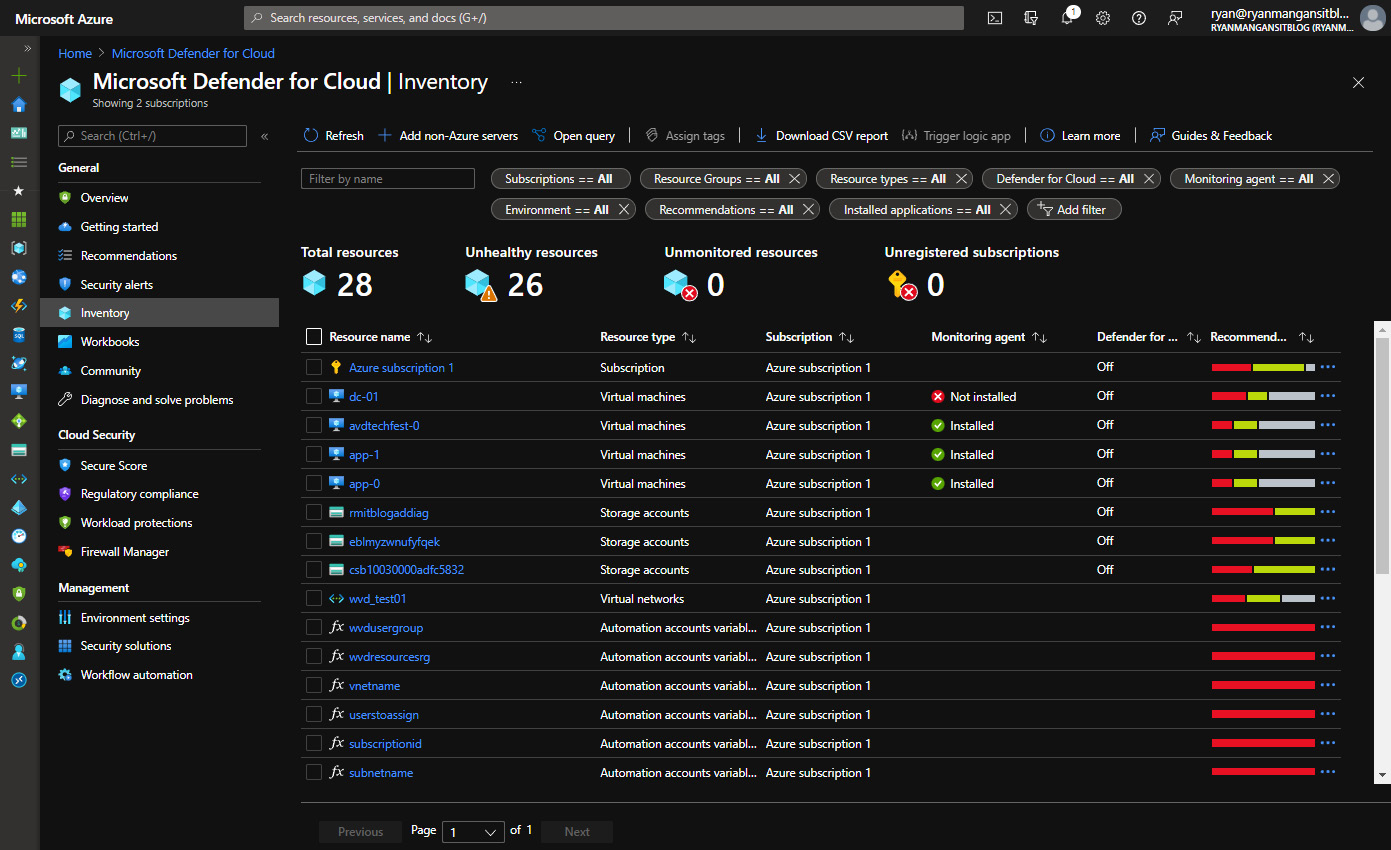
Figure 11.19 – Microsoft Defender for Cloud Inventory page
One final part I wanted to cover before we move on to enabling Microsoft Defender for Cloud is the Recommendations page. This provides a centralized list of recommendations to improve your Azure security score, as well as gauging your current state and future security score.
Tip
Did you know that the regulatory compliance feature within Microsoft Defender for Cloud is part of the free module?
The following screenshot shows the list of recommendations for Azure Security Center based on the current score and configuration of the Azure subscription:

Figure 11.20 – Recommendations page within Azure Security Center
In this section, we looked at Microsoft Defender for Cloud and how it can help improve your AVD's security posture. The next section takes a look at enabling Azure Defender for AVD.
Enabling enhanced security for AVD
This section summarizes the basic steps for enabling enhanced security for Microsoft Defender for Cloud on your Azure subscription. This will allow you to use the more advanced features of Security Center at a cost.
The link to pricing can be found here: https://azure.microsoft.com/pricing/details/azure-defender/.
Important Note
You will need to enable enhanced security for Microsoft Defender for Cloud for each subscription you use.
The basic steps for enabling Azure Defender on your Azure subscription are as follows:
- Navigate to Security Center located on the left-hand menu. Within the Microsoft Defender for Cloud menu, select Environment settings. The following screenshot shows the Environment settings menu option, which lists the subscriptions:

Figure 11.21 – Pricing and settings page in Microsoft Defender for Cloud
- Click on the required Azure subscription.
- Select Enable all Microsoft Defender for Cloud plans.
Important Note
It is important to note that if you select the option for Enable all Microsoft Defender for Cloud plans, this will onboard all resources within the subscription. If you want to onboard only a subset, you will need to manually onboard the specific required resources.
The following screenshot shows the option to turn Microsoft Defender for Cloud on and off:

Figure 11.22 – Selecting Enable Microsoft Defender for Cloud plans on the Defender plans page
- Select the resource types that you would like to enable on the Defender plans page. The following screenshot shows the different plans you can configure when you want to enable enhanced security:
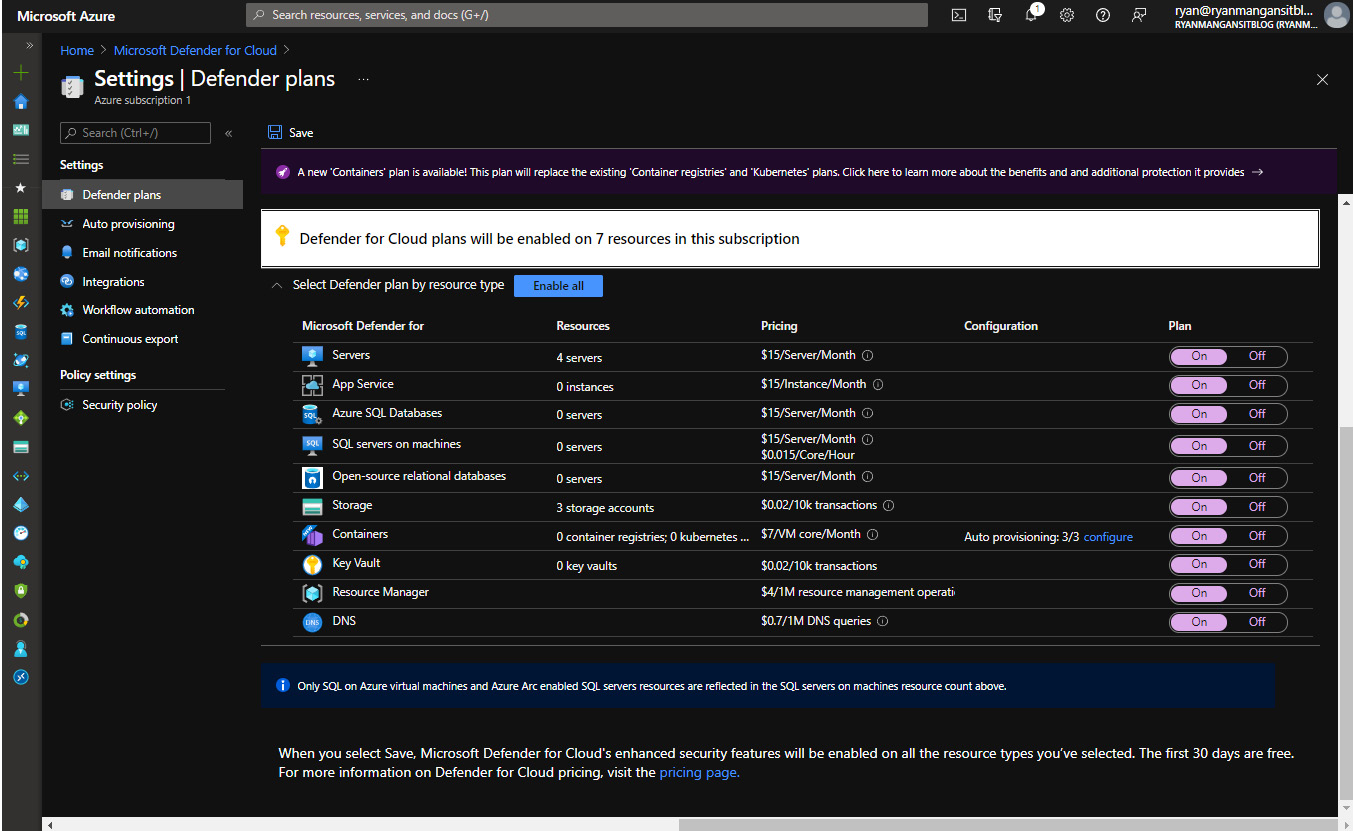
Figure 11.23 – Selected plans and saving the chosen plans
Once you have chosen the resource types (plans) you require, click Save.
- Then, navigate back to the main Microsoft Defender for Cloud page and click Workload protections from the left-hand menu. The following screenshot shows the Workload protections page within Microsoft Defender for Cloud:
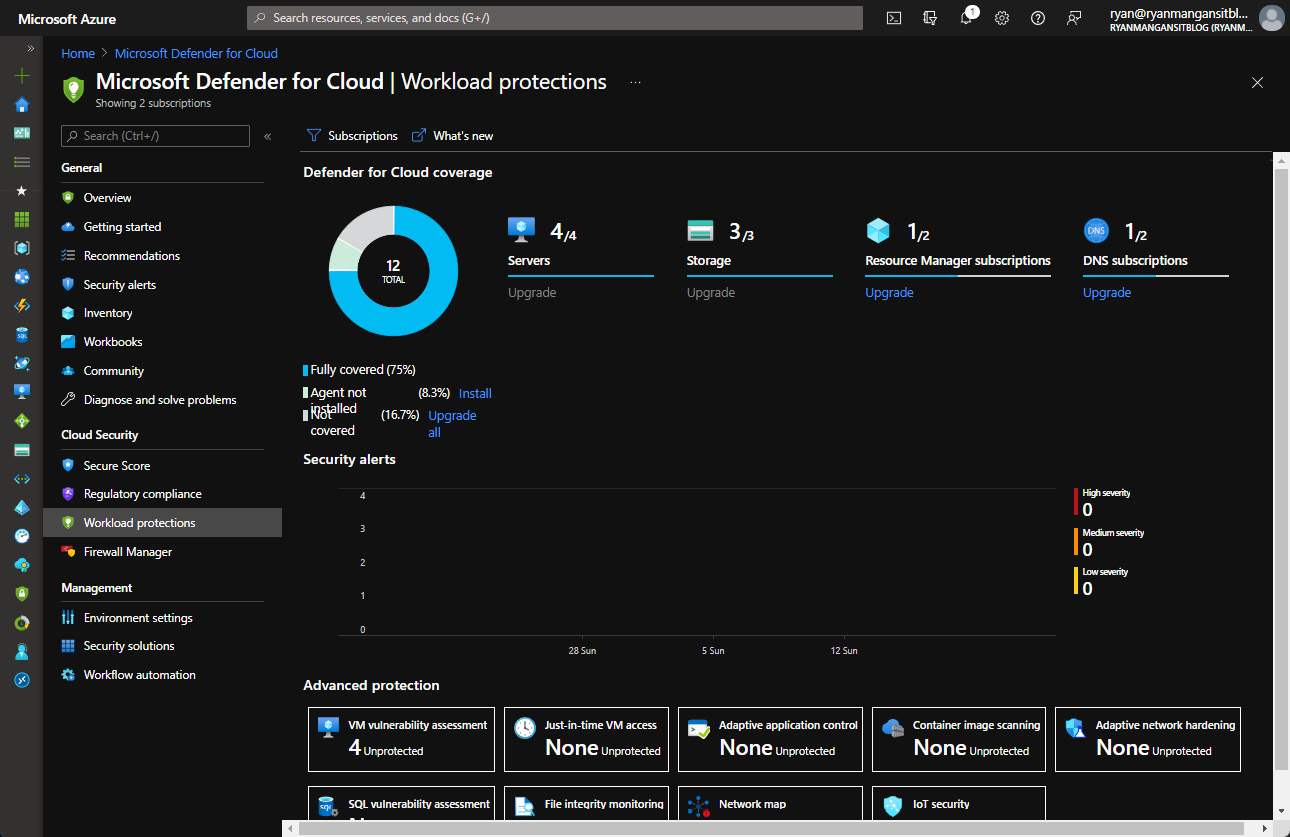
Figure 11.24 – Workload protections page detailing the coverage graphically
As shown in the preceding screenshot, you can see that you can now review Azure Defender's coverage. This concludes the enablement of enhanced security within Microsoft Defender for Cloud for AVD.
For more information on Microsoft Defender for Cloud, check out this link for the planning and operations guide: https://docs.microsoft.com/azure/defender-for-cloud/security-center-planning-and-operations-guide.
In the next section, we'll look at configuring Microsoft Defender Antivirus for session hosts and useful configurations for ensuring antimalware signatures are constantly updated.
Configuring Microsoft Defender Antivirus for session hosts
This section takes a look at Microsoft Defender Antivirus for session hosts. Before we look at scans and prevent notifications, I want to first take a look at offloading security intelligence updates onto a host machine.
The benefit of doing this is to reduce the impact on the CPU, disk, and memory resources of the session hosts when security intelligence updates are processed. You can manage Microsoft Defender Antivirus using Group Policy; however, you can also use System Center Configuration Manager, Intune, and other third-party mobile device management (MDM) platforms.
See the following link from Microsoft on deploying Microsoft Defender Antivirus: https://docs.microsoft.com/microsoft-365/security/defender-endpoint/deployment-vdi-microsoft-defender-antivirus.
What is the difference between Microsoft Defender Antivirus and Microsoft Defender for Endpoint?
Microsoft Defender for Endpoint is an additional license you can purchase that essentially offers an extra layer of security to your endpoints. It is an enterprise endpoint security platform that offers additional features to antivirus offerings, including advanced threat detection.
The following table details why you should consider both Microsoft Defender Antivirus and Microsoft Defender for Endpoint together:

The preceding table was taken from the following Microsoft link: https://docs.microsoft.com/microsoft-365/security/defender-endpoint/why-use-microsoft-defender-antivirus.
Important Note
The Microsoft Defender Antivirus feature was introduced in Windows 10 version 1903; however, it has been backported to Windows 10 version 1703 and above.
Let's now take a look at configuring some of the Microsoft Defender Antivirus features.
In this example, you will use Group Policy to enable the Microsoft shared security intelligence feature:
Important Note
The shared security intelligence feature is used to offload the processing required by an endpoint in terms of unpackaging and installing security intelligence updates. Using a network or local path reduces the resource utilization of a client when security intelligence updates are applied.
- On the management machine with Group Policy installed, open the Group Policy management console, right-click the Group Policy object you want to configure, and then click Edit.
- In Group Policy Management Editor, navigate to Computer configuration.
- Click the Administrative templates.
- Expand the tree to Windows components | Microsoft Defender Antivirus | Security Intelligence Updates.
- The following screenshot shows the Security Intelligence Updates | Define security intelligence location for VDI clients policy location:
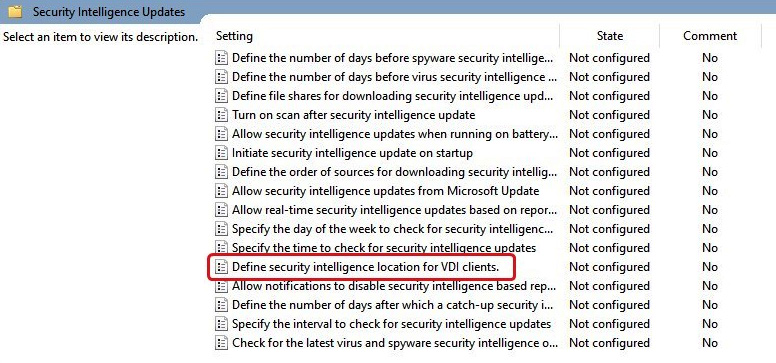
Figure 11.25 – The Define security intelligence location for VDI clients policy within the Security Intelligence Updates policy folder
Double-click Define security intelligence location for VDI clients, and then set the option to Enabled within the form. A field should then automatically appear:

Figure 11.26 – Configuration form for Define security intelligence location for VDI clients
- Enter \<fileshare>av-update (for help with this value, we will look at how to download these updates shortly).
- Click OK to close the form with the new configuration.
- Deploy the Group Policy object to the virtual machines you want to test.
Tip
You can also use PowerShell to enable the feature using the following cmdlet: Set-MpPreference -SharedSignaturesPath \<fileshare>av-update. You can deliver these on each machine or use the Custom Script Extension.
Getting the latest updates
To download and unpack the latest security updates, it's advised that you configure a PowerShell script as a scheduled task to automatically update the file share with new security update definitions when they are released:
$vdmspathbase = "$env:systemdriveav-update{00000000-0000-0000-0000-"
$vdmspathtime = Get-Date -format "yMMddHHmmss"
$vdmspath = $vdmspathbase + $vdmspathtime + '}'
$vdmspackage = $vdmspath + 'mpam-fe.exe'
New-Item -ItemType Directory -Force -Path $vdmspath | Out-Null
Invoke-WebRequest -Uri 'https://go.microsoft.com/fwlink/?LinkID=121721&arch=x64' -OutFile $vdmspackage
cmd /c "cd $vdmpath & c: & mpam-fe.exe /x"
Setting the scheduled task to run the PowerShell script
The following steps guide you in setting a scheduled task to run the PowerShell script:
- On your chosen management machine, open the Start menu and type Task Scheduler. Open and select Create task... on the side panel.
- Enter the name as Security intelligence unpacker or another name of your choosing. Go to the Trigger tab. Select New... | Daily and select OK.
- Go to the Actions tab. Select New.... Enter PowerShell in the Program/Script field. Enter -ExecutionPolicy Bypass c:av-updatevdmdlunpack.ps1 in the Add arguments field. Select OK.
- You can also choose to configure additional settings if you require.
- Select OK to save the configured scheduled task.
You can start the update manually by right-clicking on the task and clicking Run.
Manually downloading and unpacking
If you would prefer to configure manually, this is what to do to replicate the script's behavior:
- Create a new folder on the machine root called av_update to store intelligence updates; for example, create the c:av_update folder.
- Create a subfolder under av_update with a GUID name, such as {00000000-0000-0000-0000-000000000000}.
Here's an example: c:av_update{00000000-0000-0000-0000-000000000000}.
Important Note
In the Getting the latest updates section, you will note that the script includes the date, month, and year within the GUID so that a new folder is created for each update. This can be changed so that files are downloaded to the same folder each time.
- Download a security intelligence package from https://www.microsoft.com/wdsi/definitions into the GUID folder. The file should be named mpam-fe.exe.
- Open a Command Prompt window and navigate to the GUID folder you previously created. Use the /X extraction command to extract the files, for example, mpam-fe.exe /X.
Tip
The session host virtual machines will pick up the updated package when a new GUID folder is created with an update package or whenever the existing folder is updated with new packages.
The next section looks at configuring quick scans for AVD session hosts.
Configuring quick scans
This section takes a quick look at configuring the group policy for specifying the scan type. In the example, we will be configuring a quick scan:
- In Group Policy Editor, go to Administrative templates | Windows components | Microsoft Defender Antivirus | Scan:

Figure 11.27 – The Specify the scan type to use for a scheduled scan policy in the Scan policy folder
- Select Specify the scan type to use for a scheduled scan and then edit the policy setting. The following screenshot shows the Specify the scan type to use for a scheduled scan form set to Enabled and the scan type set to Quick scan:

Figure 11.28 – Policy form for configuring the scan type
- Set the policy to Enabled, and then under Options, select Quick scan.
- Select OK.
- Deploy your Group Policy object.
This section showed you how to configure a quick scan for AVD session hosts. We will now take a look at how to suppress notifications for Microsoft Defender Antivirus.
Suppressing notifications
This section looks at how you can suppress Microsoft Defender Antivirus notifications. Follow these steps detailed to configure it:
- In Group Policy Editor, go to Windows components | Microsoft Defender Antivirus | Client Interface. The following screenshot shows the Microsoft Defender Antivirus | Client Interface | Suppress all notifications policy:

Figure 11.29 – Suppress all notifications in Group Policy
- Select Suppress all notifications and then edit the policy settings. The following screenshot shows the Suppress all notifications policy set to Enabled:
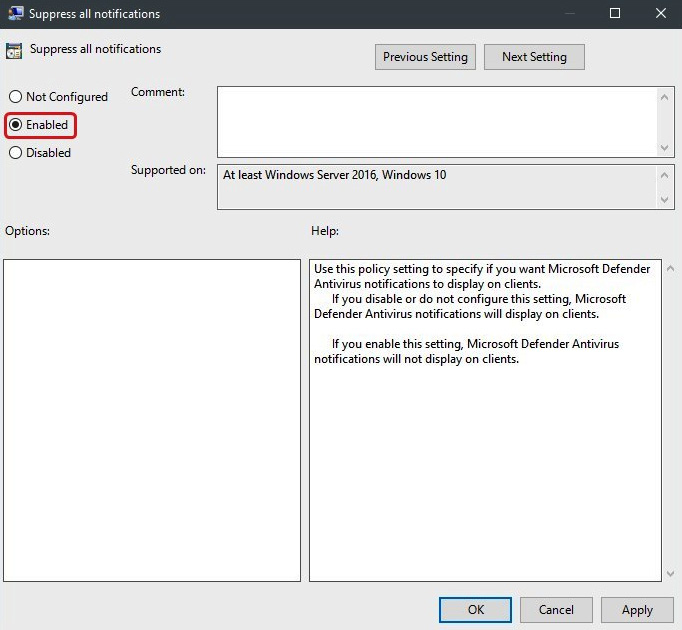
Figure 11.30 – Suppress all notifications policy form
This section looked at suppressing all notifications for Microsoft Defender Antivirus. Next, we'll look at enabling headless UI mode, which essentially hides the UI from the user.
Enabling headless UI mode
Headless UI mode is a great feature for AVD as it hides the UI from the end user. This means that the IT admin is in full control and schedules scans when required.
The following steps detail how to configure headless UI mode:
- In Group Policy Editor, navigate to Windows components | Microsoft Defender Antivirus | Client Interface.
- Select Enable headless UI mode and edit the policy. The following screenshot shows the Microsoft Defender Antivirus | Client Interface | Enable headless UI mode policy:

Figure 11.31 – The Enable headless UI mode policy within the Client Interface folder for Microsoft Defender Antivirus

Figure 11.32 – The Enable headless UI mode policy form
In this section, we looked at enabling headless UI mode to hide Microsoft Defender Antivirus from the users' view.
Summary
This chapter provided an insight into Microsoft Defender for Cloud with a focus on AVD. We started the chapter off by looking at enabling MFA and then configuring a conditional access policy to enforce MFA on AVD. We then moved on to looking at the security responsibilities of both Microsoft and the customers. We then dived into Microsoft Defender for Cloud, the value it offers Azure customers, and how you can use it to improve your AVD security posture as well as the security of the Azure resources running more widely within your subscription(s). To finish off the chapter, we looked at Microsoft Defender Antivirus at a high level, focusing on some of the features you may want to configure for AVD.
In the next chapter, we will change topics to look at implementing and managing FSLogix profile containers in AVD.
Questions
- What is the difference between Microsoft Defender Antivirus and Microsoft Defender for Endpoint?
- What are the three core principles required for setting up a Conditional Access policy?
- What does the security defaults policy do in regards to Azure MFA?
- What are the two options when configuring Azure Defender for Cloud?
Answers
- Microsoft Defender Antivirus is native to the operating system. Microsoft Defender for Endpoint is an additional service for which you require a license.
- Signals, decisions, and enforcements.
- Applies a default set of preconfigured security settings.
- Enhanced security off and enhanced security on.