
Chapter 9: Creating and Managing Session Host Images
In this chapter, we will look at creating a custom image that we can use with Azure Virtual Desktop and some of the customization, updates, and publishing capabilities that are available in the Azure Compute gallery. It is important to note that the images for Azure Virtual Desktop are one of its core components as this is what the user will access. It's important to ensure that you configure and optimize them correctly so that you provide a good user experience. We will also take a look at troubleshooting some of the Operating System (OS) issues related to Azure Virtual Desktop.
In this chapter, we will cover the following topics:
- Creating a gold image
- Modifying a Session Host image
- Creating and using an Azure Compute Gallery (ACG)
- Troubleshooting OS issues related to Azure Virtual Desktop
Creating a gold image
In this section, we will look at provisioning a virtual machine (VM) in Microsoft Azure and preparing it for Azure Virtual Desktop.
Creating a VM
To create a standardized template image for Azure Virtual Desktop, you will need to spin up a VM. In this section, we will look at doing just that.
To get started, you will need to navigate to the Azure portal at https://portal.azure.com. From there, follow these steps:
- Type virtual machines in the search bar located at the top of the page.
- Under Services, select Virtual machines.
- On the Virtual machines page, select Add and then Virtual machine:

Figure 9.1 – The Virtual machines page
- Under Project details, select the correct subscription and then choose to create a new resource group in the Basics tab. Type myResourceGroup for Name:

Figure 9.2 – The Create a virtual machine page
- Under Instance details, enter a name under Virtual machine name and choose your required Region. Next, choose Windows 10 Enterprise Multi-Session for Image and select the required VM Size. Leave the other options as-is:

Figure 9.3 – Instance details when creating a virtual machine
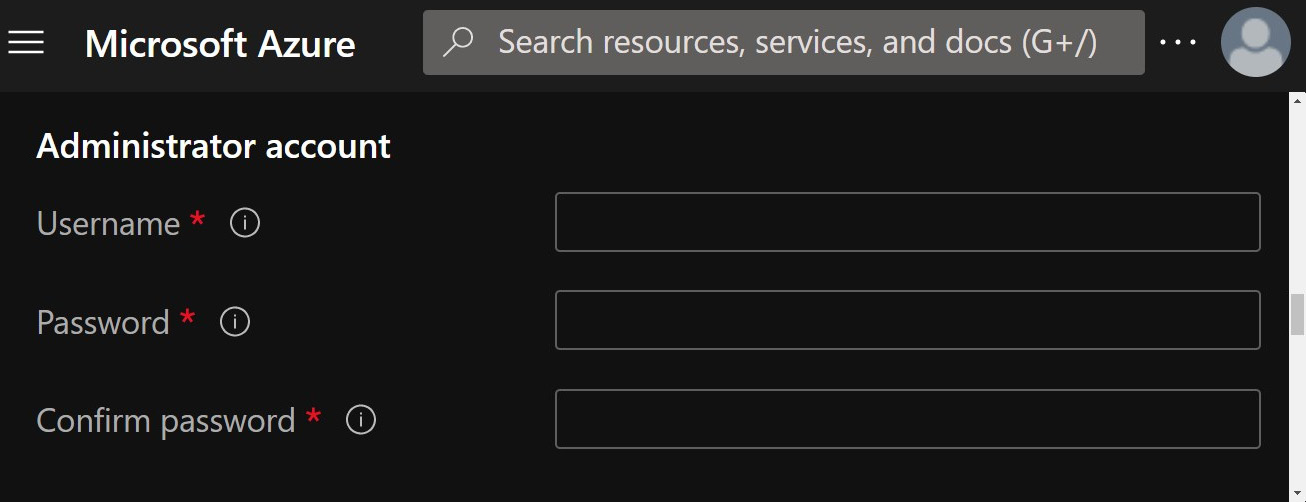
Figure 9.4 – The Administrator account section
Tip
Your password must be at least 12 characters long and meet the required complexity. For more information, go to https://docs.microsoft.com/azure/virtual-machines/windows/faq#what-are-the-password-requirements-when-creating-a-vm-.

Figure 9.5 – Inbound port rules
- Confirm the license eligibility for Windows 10 and click the Review + create button at the bottom of the page:
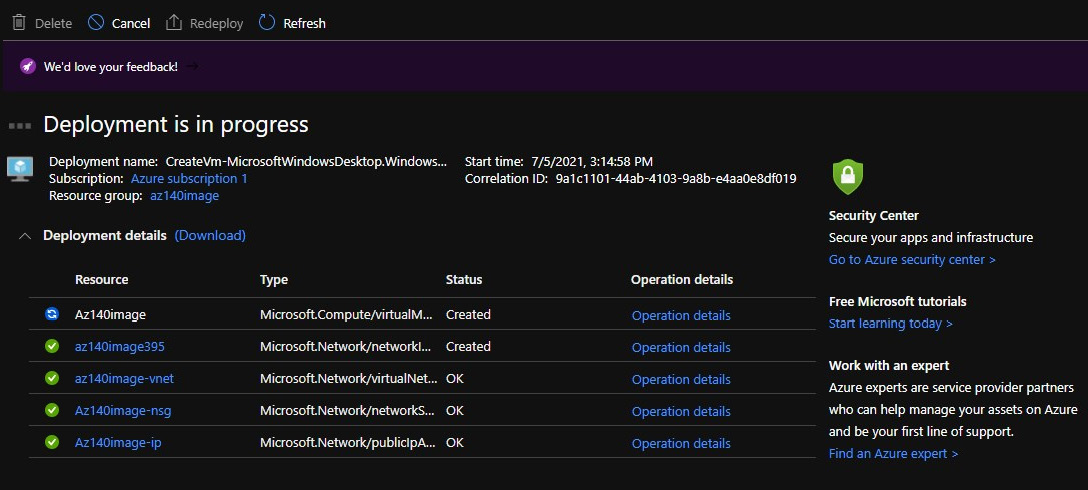
Figure 9.6 – Deployment is in progress
Once you have created the VM, you are ready to connect to it.
Connecting to the VM
You can connect to an Azure VM using a remote desktop connection. You have two options – you can connect using a direct connection via a public IP address or connect using the local private IP address behind a VPN connection. Let's get started:
- Navigate to the overview page of the VM you just deployed, select the Connect button, and then select RDP:
Important
Even though this section shows you how to connect using RDP via a public IP address, it is recommended that you connect over a VPN connection or Azure Bastion.
In Chapter 4, Implementing and Managing Networking for Azure Virtual Desktop, we learned how to configure Azure Bastion. It is recommended that you use Azure Bastion as RDP is insecure.

Figure 9.7 – Using the Connect button to download an RDP file for the VM
- On the Connect with RDP page, keep the default options to connect by IP address, over port 3389, as-is, and click Download RDP file:

Figure 9.8 – The public and private IP address options for the RDP file
- Open the downloaded RDP file and click Connect when prompted:

Figure 9.9 – RDP file connecting to the virtual machine
Once connected to the RDP session, you will see the session appear, as shown in the following screenshot:

Figure 9.10 – VM connected via RDP
Once you've connected to the VM via a public or local IP address, you can then modify/customize the image based on your organization's requirements.
Tip
You can also use Azure Bastion to connect to the VM if you don't want to connect via the Microsoft Terminal Services Client (MSTSC).
In the next section, we are going to learn how to modify a Session Host image, including customizing and optimizing it.
Modifying a Session Host image
In this section, we will look at some of the customizations/optimizations you can apply to an image for Azure virtual Desktop.
Tip
When you're using Windows 10 Multi-Session images from Azure Gallery, FSLogix profile containers come pre-installed. It's recommended that you use an Azure Gallery template when possible.
Disabling automatic updates
When you're using pooled desktops, images are typically deployed centrally. First, updates are completed on the master image, and then VMs are redeployed to the host pool on the next scheduled maintenance window.
You should consider disabling Windows updates for Azure Virtual Desktop images as these should be carried out on the master image during a maintenance window. This enables control over patch updates and consistency through the deployed virtual desktop estate.
You may also want to consider configuring a validation environment, as discussed in Chapter 7, Configuring Azure Virtual Desktop Host Pools.
You can disable automatic updates directly on the Windows image using Regedit:
reg add "HKLMSOFTWAREPoliciesMicrosoftWindowsWindowsUpdateAU" /v NoAutoUpdate /t REG_DWORD /d 1 /f
Alternatively, you can use a Group Policy to apply the same change, as detailed in the following steps:
- Open Local Group Policy Editor | Administrative Templates | Windows Components | Windows Update.
- Right-click Configure Automatic Update and set it to Disabled.
Now, let's install some language packs that we can use on the Azure Virtual Desktop image.
Installing language packs in Azure Virtual Desktop
To use multiple languages within Azure Virtual Desktop, you need to ensure that all the required languages are installed.
Tip
Windows 11 onwards will only allow language packs to be distributed as .cab files, which can be used for imaging. LIP languages that aren't distributed as .cab files will only be available as .appx packages, which can be acquired through the Settings app after logging in.
Before you start customizing your image with multiple languages, you will need to download the required files for the language configuration; these can be found at the following links:
- Language ISO files: https://software-download.microsoft.com/download/pr/19041.1.191206-1406.vb_release_CLIENTLANGPACKDVD_OEM_MULTI.iso
- Feature on-demand disk: https://software-download.microsoft.com/download/pr/19041.1.191206-1406.vb_release_amd64fre_FOD-PACKAGES_OEM_PT1_amd64fre_MULTI.iso
- Inbox Apps ISO for Windows 10, version 21H1: https://software-download.microsoft.com/download/sg/19041.928.210407-2138.vb_release_svc_prod1_amd64fre_InboxApps.iso
Important Note
Please note that the inbox apps that are included in the ISO are not the latest versions of the pre-installed Windows apps. You will need to update the apps using the Windows Store App and perform a manual search for updates after installing the additional languages.
You can find all the language ISO files here: https://docs.microsoft.com/azure/virtual-desktop/language-packs#prerequisites.
When you're installing languages on Windows 10 version 2004, 20H2, and 21H1, it's recommended that you check the known issues to ensure you choose the correct ISO: https://docs.microsoft.com/en-us/windows-hardware/manufacture/desktop/language-packs-known-issue.
Tip
You can read more about language packs here: https://docs.microsoft.com/en-gb/azure/virtual-desktop/language-packs.
The following summary steps will show you how to create a custom Windows 10 Enterprise Multi-Session image and connect the repository as a drive letter:
- Deploy an Azure VM, as shown previously. Then, go to Azure Gallery and select the current version of Windows 10 Enterprise Multi-Session that you plan on using.
- Once you have deployed the VM, connect to the VM using RDP as a local administrator.
- Make sure that your VM has all the latest Windows updates installed. Then, download the updates and restart the VM, if required.
- Connect to the language package, features on-demand, and Inbox Apps file share repository and mount it to a letter drive (for example, drive Z). Note that you can use it on the root of C: if you have a large OS drive.
Important Note
Please note that the script should be customized to your needs and requirements. Running the entire script can take some time to complete.
You can find the script for adding languages to run Windows images here: https://github.com/PacktPublishing/Remote-Productivity-with-Windows-Virtual-Desktop/blob/main/B17392_07/Languages_winimage.ps1/.
Once the script has finished running, you can check that the language packs have been installed correctly by navigating to Start | Settings | Time & Language | Language. If the language files have been installed, you will see them here.
Once you have confirmed that the licenses have been installed, you can install the inbox apps for each required language. Then, you can update the inbox apps by refreshing the pre-installed apps using the inbox app's ISO image. You can use the PowerShell script template to automate this process and update only the installed versions for the inbox apps with no internet access: https://github.com/PacktPublishing/Remote-Productivity-with-Windows-Virtual-Desktop/blob/main/B17392_07/Update%20inbox%20Apps%20for%20Multi%20Language.ps1.
Once you have finished, make sure that you disconnect the share you attached previously (for example, drive Z).
Tip
To ensure that modern apps can use the additional language packs, you should use the following PowerShell cmdlet, which is used to disable language pack cleanup:
Disable-ScheduledTask -TaskPath "MicrosoftWindowsAppxDeploymentClient" -TaskName "Pre-staged app cleanup"
You can also find this within the example script provided here: https://github.com/PacktPublishing/Remote-Productivity-with-Windows-Virtual-Desktop/blob/main/B17392_07/Languages_winimage.ps1/.
Now, let's learn how to optimize an image.
Optimizing an image
In this section, we will look at two ways to optimize Azure Virtual Desktop images. Optimizing an image can improve the user experience for Azure Virtual Desktop users and can also improve user density per Session Host.
Important Note
Remember, turning off/disabling features and services can impact the functionality and behavior of the user desktop and applications that are running. Make sure that you fully understand what you are optimizing before applying it.
Using the VMware OS Optimization Tool
The VMware OS Optimization Tool allows you to analyze the current optimization state and available optimizations. You can even take a backup, which will allow you to roll back the changes you make.
To get started, download the VMware Optimization Tool by going to https://flings.vmware.com/vmware-os-optimization-tool:
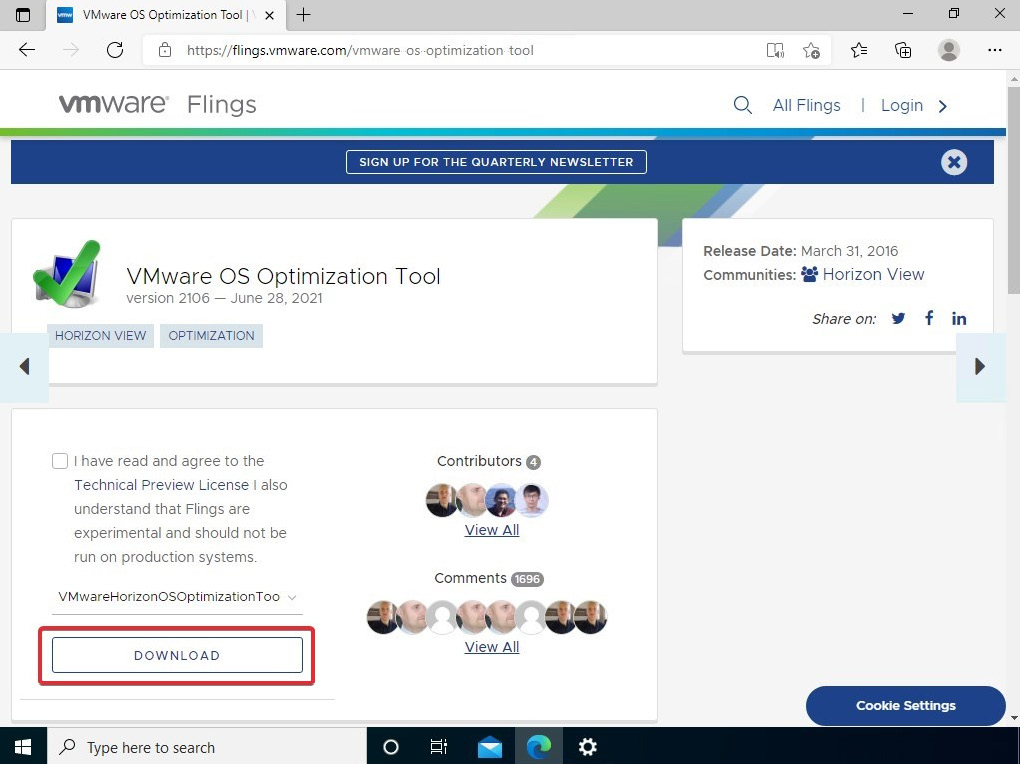
Figure 9.11 – VMware Flings download page for the Vmware OS Optimization Tool
Once it's been downloaded, run the application:

Figure 9.12 – Main page of VMware's OS Optimization Tool
You will be presented with the screen shown in the preceding screenshot. Next, select the required template and click Analyze.
Once the application has finished reviewing the configurations, you will see an analysis summary and several optimizations that you can apply. Once you have finished choosing the required optimizations for your image, you can go ahead and click on Optimize, which is located in the bottom right-hand corner, as shown in the following screenshot:
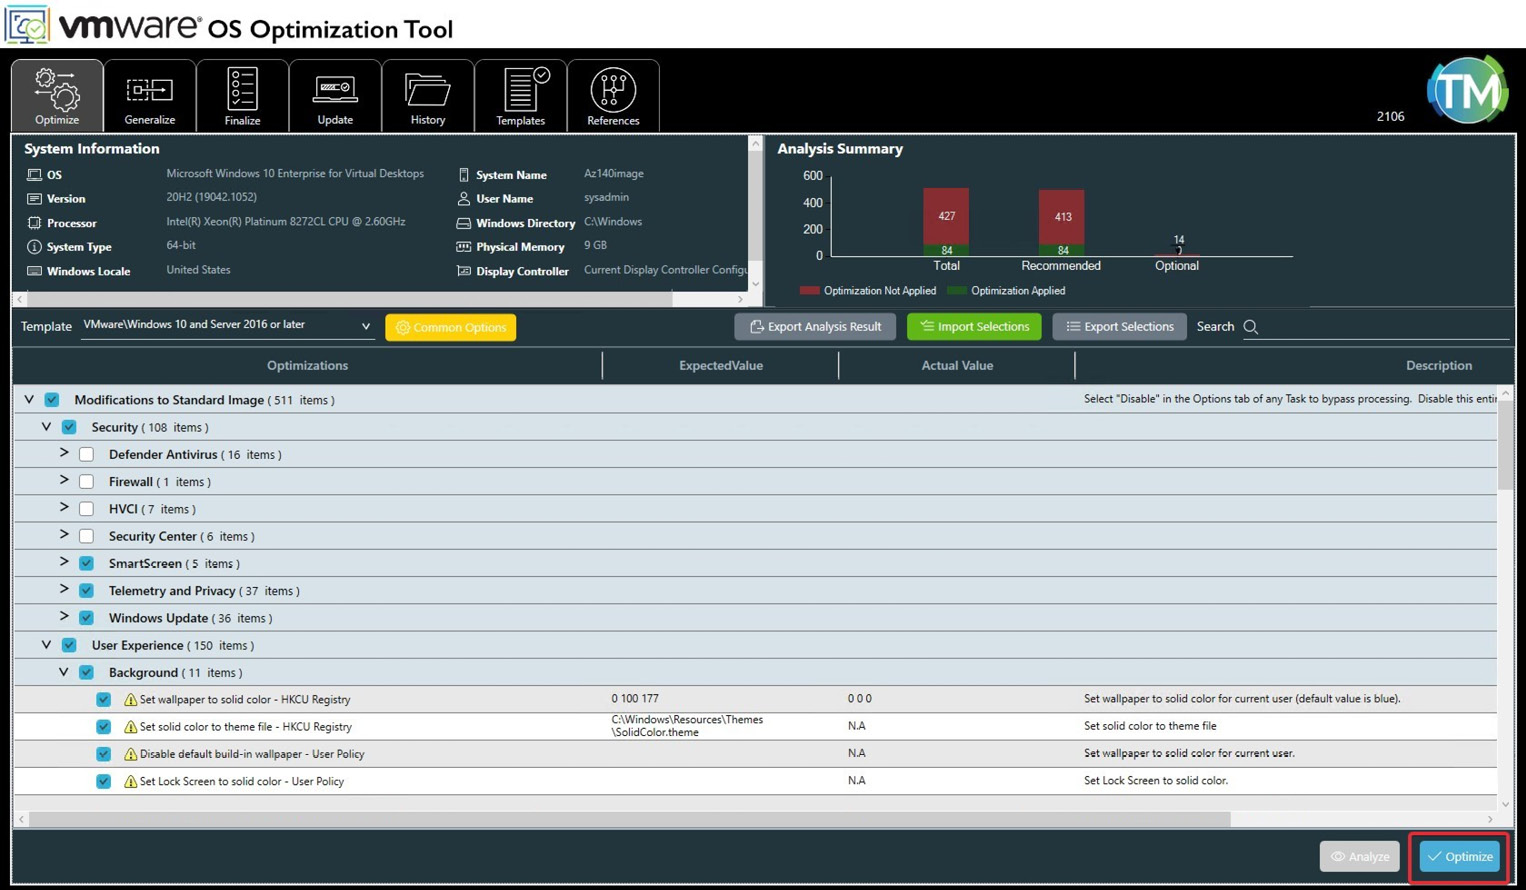
Figure 9.13 – The Analyze page of the VMware OS Optimization Tool
Once you have clicked Optimize and the process has finished, you will see a table of optimizations that have been applied to the image, as shown in the following screenshot:

Figure 9.14 – Post-optimization results of the VMware OS Optimization Tool
If you need to roll back the configurations to the previous state, you can complete this by following these steps:
- Click on History.
- Select the template at the date and time you want to roll back to.
- Click rollback.
The following screenshot shows these three steps, numbered as 1, 2, and 3:

Figure 9.15 – History of the VMware OS Optimization Tool
There you have it. I have shown you how to analyze the current state, apply a set of optimizations, and roll them back if required.
Tip
You can export your selections using the Export selections button for future image creation. This means that you can import a different image into the VMware OS Optimization Tool and maintain optimizations from a previously tested configuration.
Virtual Desktop Optimization Tool
The second option would be to use the optimization tool and a set of PowerShell scripts that you can run on the template image to configure optimizations for the Virtual Desktop image.
You can access these scripts by going to the following GitHub repository https://github.com/The-Virtual-Desktop-Team/Virtual-Desktop-Optimization-Tool.
First, you will need to download the scripts from the aforementioned GitHub repository. Once you've downloaded them, you must find the build version of your OS – for example, C: empoptfilesConfigurationFiles – and change the required settings to Enabled (default) or Disabled. The following screenshot provides an example of the JSON configuration file for AppxPackages.json:

Figure 9.16 – Snippet of the AppxPackages.json file
Once you have finished customizing the configuration files, you need to run the optimization script using PowerShell.
First, open PowerShell as an administrator, then set the execution policy to Bypass:
Set-ExecutionPolicy -ExecutionPolicy Bypass
The following screenshot shows the set execution policy's bypass cmdlets that have been run:

Figure 9.17 – The set-execution policy cmdlet being run
Once set, you need to run the script. Remember to use the required Windows version you are using. In this example, you will note that -WindowsVersion is 2004:
.Win10_VirtualDesktop_Optimize.ps1 -WindowsVersion 2004 -Verbose
The following screenshot shows the script being run and that the optimization process is in progress, as denoted by the progress bar:
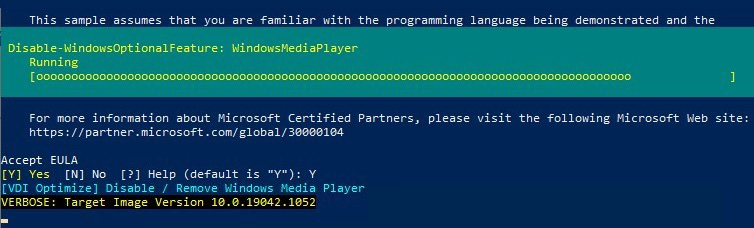
Figure 9.18 – Optimization script running
Once complete, the script will finish and prompt you to reboot:

Figure 9.19 – Optimization script finished
Once you have rebooted, you may notice that the processes and threads may have reduced within the TaskManager | Performance tab.
The following screenshot shows the number of processes and threads before optimization:

Figure 9.20 – The number of processes, threads, and handles before optimization
The following optimization screenshot shows a reduction in processes, threads, and handles:

Figure 9.21 – The number of processes, threads, and handles after optimization
Important Note
The Azure Virtual Desktop optimization script is community-driven and not supported by Microsoft.
Remember, optimizations have an impact on the user experience and some can be difficult to restore. So, ensure you create a snapshot before applying such changes to your image as it is not as easy to roll back using the Virtual Desktop optimization script.
In the next section, we will look at capturing an image template.
Capturing an image template
In this section, we will look at capturing an image template so that you can distribute the same image across multiple hosts within a host pool or even multiple host pools.
Important Note
Before you capture a VM in an image, make sure that you run the following command first:
C:WindowsSystem32SysprepSysprep.exe /oobe /generalise/shutdown
Once you've run this, make sure that the VM has been stopped in Azure. Then, you can proceed with the capture process.
It is also important to note that installing Microsoft Store apps or updating existing Store apps before generalizing a Windows image can cause Sysprep to fail. Sysprep also requires all apps to be provisioned for all users. When you update an app from the Microsoft Store, that application will become associated with the user account. You will then see the following error message:
<package name> was installed for a user, but not provisioned for all users. This package will not function properly in the Sysprep image.
This will be located within the Sysprep log file, here: %WINDIR%System32SysprepPanther.
You can read more about Sysprep here: https://docs.microsoft.com/windows-hardware/manufacture/desktop/Sysprep--generalize--a-windows-installation?view=windows-11.
To capture a template, follow these steps:
- First, you need to navigate to the Azure portal (https://portal.azure.com/) to manage the VM image. Then, search for and select Virtual machines.
- Select your VM from the Virtual Machine list.
- On the Virtual machines page for the VM, go to the top menu and click the Capture button:

Figure 9.22 – The Capture button located within the VMs page
The Create image page will then appear.
- For Name, use the pre-populated name or enter a new name that you would like to use for the image:

Figure 9.23 – The Create an image page within the Azure portal
For Resource group, use the existing one, select one from the dropdown, or create a new one.
- For Instance details, ensure you select the No, capture only a managed image within the share image option to create a managed image only.
- To delete the source VM once the image has been created, select Automatically delete this virtual machine after creating the Image.
- If you want to use the image in any availability zone, select On for Zone resiliency.
- Select Create to create the image; this will start the image creation process.
- Once the image has been created, you can find it as an image resource in the list of resources in the resource group:

Figure 9.24 – Image created – post-creation process
In this section, we created an image from a VM and customized it. I will now show you how to create and use an Azure Compute Gallery.
Creating and using an Azure Compute Gallery (ACG)
A Shared Image Gallery (SIG) is a service that distributes images that can be shared across multiple regions and subscriptions within an Azure Active Directory (AAD) tenant. This is extremely useful for Azure Virtual Desktop as SIGs enable easy deployment of standard company desktop/server image templates across multiple Azure Regions. One of the other benefits of SIGs is that you can have different image versions and the newest can be referenced easily.
The following table details the different resource types within a SIG:
Tip
It is recommended that you become familiar with the terms within the following table before continuing.

The preceding table was taken from Microsoft's documentation: https://docs.microsoft.com/en-us/azure/virtual-machines/windows/shared-images-portal.
This section provided an overview of ACG and some of the specific terms that are used. In the next section, we will look at creating an ACG.
Creating your first Azure Compute Gallery
In this section, you will learn how to create an ACG, ready for you to capture an image inside it:
Important Note
SIG has been renamed Azure Compute Gallery (ACG). Note that some of the new names have not been fully updated on the Microsoft documentation site. You can read more here: https://docs.microsoft.com/azure/virtual-machines/create-gallery.
- Sign into the Azure portal by going to https://portal.azure.com.
- Type Azure Compute Gallery in the search box and select Azure Compute Gallery from the results.
- On the Azure compute galleries page, click the Add button:
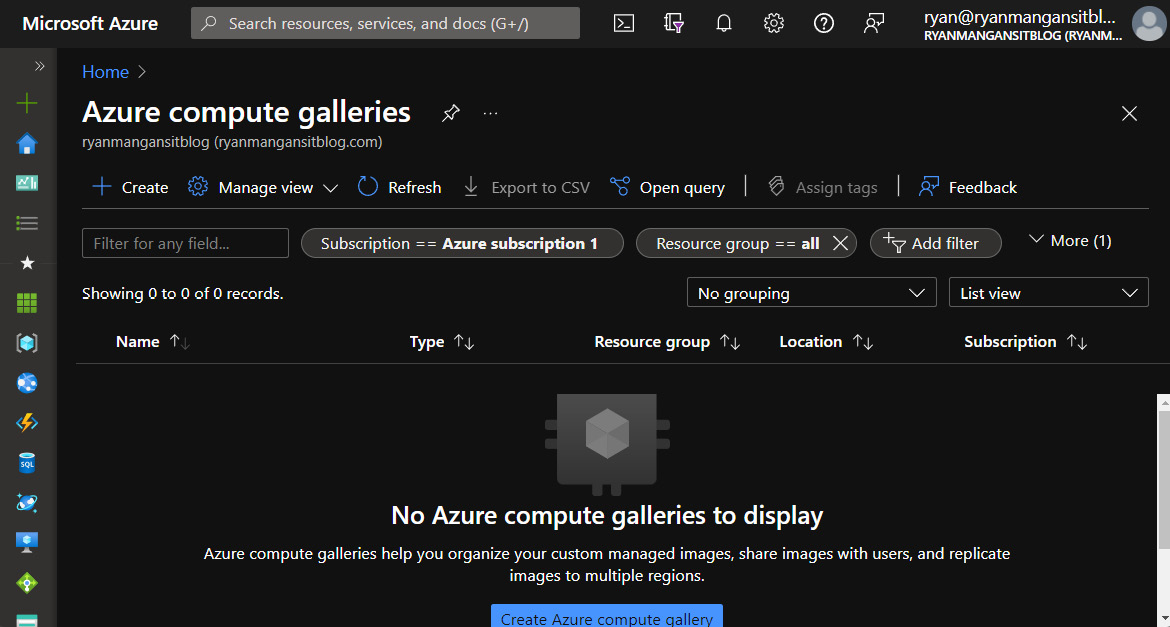
Figure 9.25 – The Azure compute galleries page in the Azure portal
- On the Create Azure compute gallery page, ensure you select the correct subscription.
- For Resource group, select Create new and enter the required resource group name.
- For Name, provide a name for the name of the gallery.
- Choose the required Region.
- You can enter a short description of the gallery, such as it being a desktop VM gallery, for testing purposes:

Figure 9.26 – The Create Azure compute gallery page
- Then, click Review + create.
- Once the validation process has been completed, select Create.
- Once the deployment has finished, select Go to be taken to the resource. This will open ACG:

Figure 9.27 – ACG
There you have it; we have now created an ACG and are ready to add image definitions. In the next section, we will capture an image in an ACG and create an image definition and our first version.
Capturing an image in an Azure Compute Gallery
In this section, we will capture an image in the ACG we created previously. Similar to the capture process shown in the previous section, when we captured a template, we can capture the image from a generalized VM within the Virtual machines page:
Important Note
What does a generalized VM mean? Before you can deploy a Windows image to your Azure Virtual Desktop environment, you need to run a process called Generalize. This essentially removes computer-specific information such as the computer's security identifier (SID) and other items, such as drivers. This process enables you to turn the OS into a deployable template.
- Select your VM from the Virtual Machine list.
- On the Virtual machines page for the VM, from the top menu, click the Capture button:
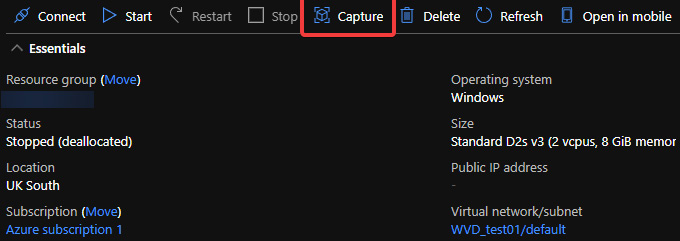
Figure 9.28 – The Capture button on the VMs page in the Azure portal
- The Create image page will appear.
- Select the required resource group and ensure you select Yes to share the image to your ACG:

Figure 9.29 – The Capture page for capturing an image in an ACG
- Select the Automatically delete this virtual machine after creating the virtual machine check box if required.
- Choose an availability zone if required (if your chosen region supports this).
- Select the target image gallery we created previously and state if the image was generalized or specialized:
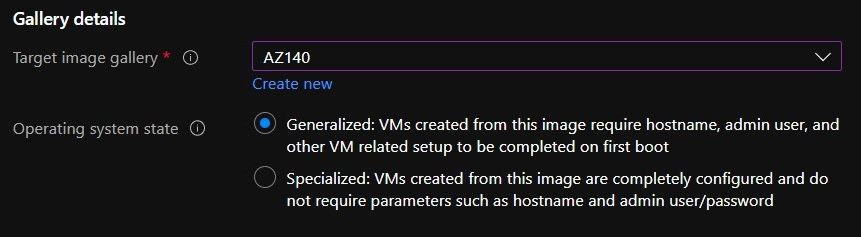
Figure 9.30 – The Target image gallery and OS state options
- Create a new target image definition or use an existing one if you created one previously.
Important Note
An image definition's purpose is to carry information about the image and its requirements. This information is for IT use, and you can include release notes, as well as the minimum/maximum memory. You can also enter a publisher, offer, and SKU code, which is typically used for Azure Marketplace deployments.
The Azure Marketplace uses the following terminology:
Publisher: The organization that created the image; for example, MicrosoftWindowsServer.
Offer: The name of a group of related images that have been created by a publisher; for example, WindowsServer.
SKU: An instance of an offer, such as the major release of a distribution; for example, 2019-Datacenter Version, which is the version number of the image's SKU.
If you are not using the Azure Marketplace, you don't have to enter descriptive information, though it is recommended that you provide a description so that other IT admins can identify the specific image definition.
As shown in the following screenshot, I have provided the Publisher, Offer, and SKU fields with non-descriptive information. However, it is recommended that Publisher is set to your organization's name, Offer is set to the OS type (Windows 11), and SKU is set to the version (MultiSession):

Figure 9.31 – The Create an image definition page

Figure 9.32 – Version details for an image definition
The following are the four fields within the Version details section:
- Version number: The version number is used as the name of the image version. The format for this is MajorVersion.MinorVersion.Patch. When you specify to use latest while creating a VM page or via PowerShell, the latest image is chosen based on the highest major version, then minor version, then patch.
- source can be a VM, managed disk, snapshot, managed image, or another image version.
- The Exclude from latest setting allows you to keep a version from being used as the latest image version.
- The End of life date field is used to indicate the end-of-life date for the image version. End-of-life dates are for informational purposes only, and users can still create VMs from versions past the set end-of-life date.
- You can use the Replication to configure the replication of the template across different regions by entering the required target regions, as shown in the following screenshot:
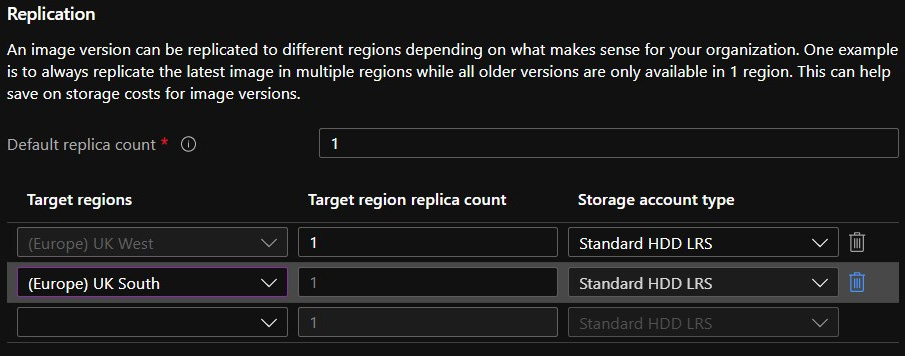
Figure 9.33 – The Replication section for specifying target regions that you would like to replicate the image to
- Then, click on Review + Create.
Once you've finished, click Go to resource. You will see the new image version:

Figure 9.34 – Image version
With that, we have captured an image in the ACG; this has created both an image definition and an image version. Next, we will look at creating an image definition without using the capture feature shown previously.
Creating an image definition from the Shared Image Gallery
This section will show you how to create a new image definition from the ACG:
- On the page for your recently created image gallery, select Add a new image definition at the top.
- Under Add new image definition to the Azure Compute Gallery, for Region, select the required Region:

Figure 9.35 – The Image definition page
- For Image definition name, enter a name.
- For Operating system, select your source VM.
- For VM generation, select the option based on your source VM type. These are typically Gen 1, though you can build Gen 2 images.
- For Operating system state, select an option based on your source VM.
- For Publisher, enter an appropriate name.
- For Offer, enter an appropriate name.
- For SKU, enter an appropriate name:

Figure 9.36 – Required image definition details
- When you're finished, click Review + create.
- Once the image definition has been validated, click Create.
- When the deployment has finished, click Go to the resource.
In this short section, we looked at creating an image definition from a SIG. Now, let's learn how to create an image version.
Creating an image version
In this section, we will learn how to create an image version within the image definition:
Tip
Image versions are useful for updating images and their general management.
- Within the page of your created image definition, select Add version from the top of the page:
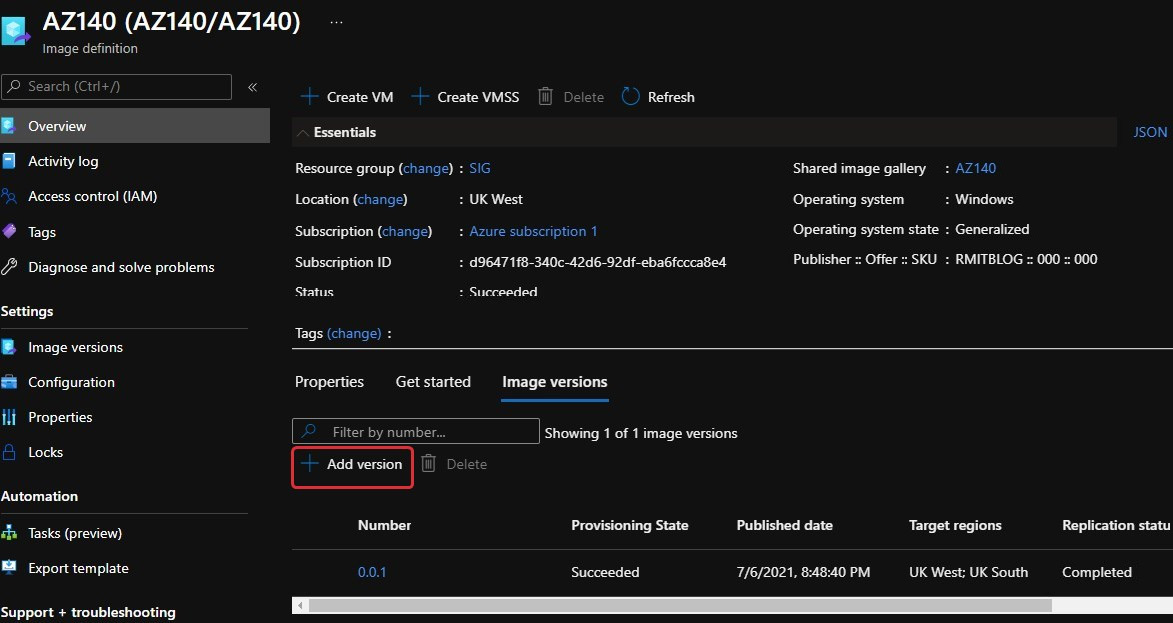
Figure 9.37 – The Add version button on the image definition
- For Region, select the region where you want to create the image.
- For Version number, enter a number, such as 1.0.0. The image version name must follow the major.minor.patch format and use integers.
- For Source image, select your source-managed image from the dropdown.
The following table shows the specific details for each source type:
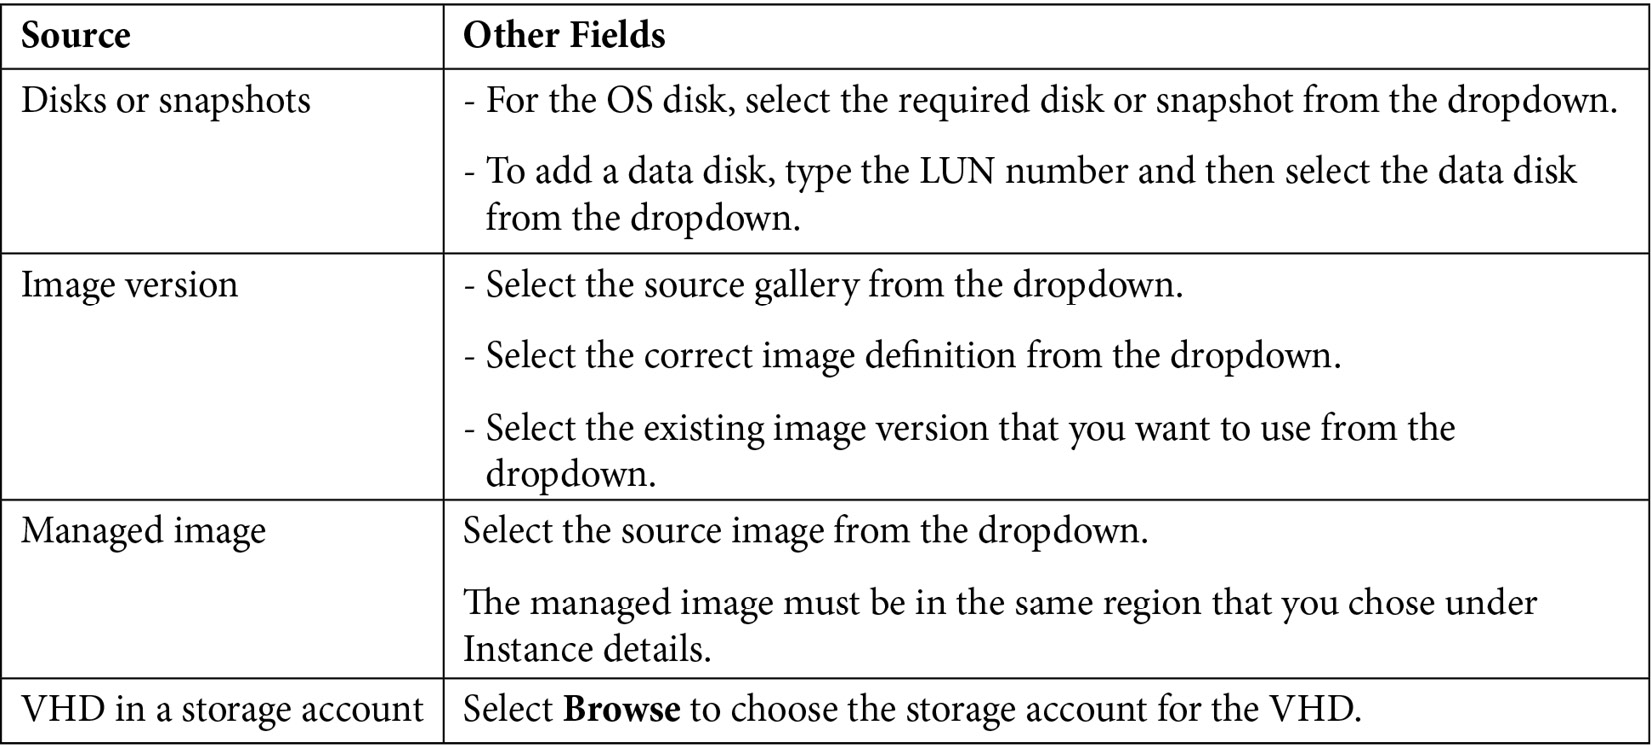
The preceding table was taken from Microsoft's documentation: https://docs.microsoft.com/azure/virtual-machines/linux/shared-images-portal.
- For Exclude from latest, leave it set to No.
- For End-of-life date, choose a date from the calendar. This can be a few weeks, months, or even years.
- In the Replication tab, select the required storage type from the dropdown:

Figure 9.38 – The replication options for the image version
- Enter a number for Default replica count. You can also override this for each Azure Region you add.
- You need to replicate to the source region. This means that the first replica in the list will be in the region where you created the image. You can add more replicas by selecting the required region from the dropdown and adjusting the replica count as necessary.
- When you are done, click Review + create. Azure will validate your configuration.
- When the image version passes validation, click Create.
- When the deployment is finished, click Go to the resource.
- It may take a while to replicate the image to all of the target regions.
In this section, we looked at creating an image version. Now, let's learn how to troubleshoot OS image issues related to Azure Virtual Desktop.
Troubleshooting OS issues related to Azure Virtual Desktop
In this section, we will learn how to troubleshoot Session Host configuration issues. We will focus on the most common issues, including domain joins and communication between the Azure Virtual Desktop service and session host agent.
VMs are not joined to the domain
VMs not joining a domain typically occurs because the username and password that were entered during the host pool's setup/adding VMs were incorrect. Make sure that you check your password and use the full UPN of your Active Directory domain; for example, domJoin.company.local.
Important Note
When you're using AAD joined hosts, you would expect to see the hosts joined without the domain extension shown previously.
The other issue that may be preventing your VMs from joining the domain is a networking-related one, specifically DNS. Ensure that you have configured DNS correctly so that it points to your Active Directory Domain Service's infrastructure before trying to deploy session hosts.
Tip
Ensure that the account that you used for the domain join does not have multi-factor authentication (MFA) configured. You should use a service account with its password expiry set to disabled. You should also make sure that the account has delegated permissions to make sure the account can join multiple devices to the domain.
You should also check that you have configured the correct permissions for the domain join account; otherwise, the domain join process will fail. As shown in the following screenshot, there is no check password feature in the form. It is advised that you write the password out in text form and copy and paste it into the form to ensure it's correct:

Figure 9.39 – Active Directory details for a domain join when adding VMs to a host pool
In this section, we looked at how to troubleshoot domain joins issues when deploying session hosts to a host pool within Azure Virtual Desktop. We will now look at some of the Azure Desktop Agent and Bootloader issues that may occur.
Azure Desktop Agent and Virtual Desktop Bootloader are not installed
For Azure Virtual Desktop to see the Session Hosts, you need to ensure that the Session Hosts have Azure Virtual Desktop Agent and Azure Virtual Desktop Bootloader installed. You can check this by reviewing the installed programs via Control Panel | Programs | Programs and Features. Alternatively, you can review the scriptlog.log file by navigating to the c:windows empScriptLog.log file path. The log file will show error messages to help you diagnose the root cause.
Important Note
Azure Desktop Agent and Virtual Desktop Bootloader should not be installed on the master image. This is installed automatically through a VM deployment for a host pool or a manual process.
If the ScriptLog.log file is missing, this would indicate that the Azure Resource Manager template had the incorrect permissions entered into it or that these credentials do not have the required permissions. Likewise, if PowerShell DSC was unable to start and run, this would indicate a permissions issue, that the hostname is incorrect, or that MFA is enabled, causing the sign-in process to fail.
The next section will look at Azure Virtual Desktop Agent not registering issues.
Azure Virtual Desktop Agent is not registering with the Azure Virtual Desktop service
If you encounter an issue where the Session Host is unavailable within the Azure Virtual Desktop portal, this is typically due to the agent not communicating correctly with the Azure Virtual Desktop service. It is advised that you check connectivity from the Session Host to the Azure Virtual Desktop service using Sysinternals tools such as PSPing.
You can download PSPing from https://docs.microsoft.com/en-us/Sysinternals/downloads/psping/.
To test your connectivity, run the following as an administrator within the command line:
Important Note
For those who have already deployed an AVD environment, you can use the WVDAgentUrlTool.exe tool, which can be found in the C:Program FilesMicrosoft RDInfraRDAgent_* folder.
psping rdbroker.wvdselfhost.microsoft.com:443
The following screenshot shows using PSPing to confirm that the host can communicate with the Rdbroker for Azure Virtual Desktop:

Figure 9.40 – The output of PSPing when testing communication with the broker
Tip
This test is also useful if the Azure Virtual Desktop agent is not reporting a heartbeat when you run the Get-AzWvdSessionHost PowerShell cmdlet.
Once you have checked your network connectivity and confirmed that this is not the issue, you should follow these steps to update the agent manually:
- Download a new version of the Azure Virtual Desktop agent on the problematic Session Host VM.
- Open Task Manager and, within the Service tab, stop the RDAgentBootLoader service from running.
- Run the installer for the downloaded copy of Azure Virtual Desktop Agent.
- When you're prompted for the registration token, remove the INVALID_TOKEN entry and click Next (no token is required).
- Complete the installation wizard and close it.
- Open Task Manager and start the RDAgentBootLoader service.
If the Azure Virtual Desktop Agent registry entry called IsRegistered shows a value of 0, then the registration token has expired. You will need to generate a new registration token to fix this:

Figure 9.41 – The Azure Virtual Desktop Agent registry entry – IsRegistered
You can check this using a Powershell cmdlet.
- If there's already a registration token, remove the token using the following command:
Remove-AzWvdRegistrationInfo
- Run the New-AzWvdRegistrationInfo cmdlet to generate a new token.
- Confirm that the -ExpriationTime parameter has been set to 3 days.
Further Information
For more information on common Virtual Desktop Agent issues, you can find a complete list of errors and troubleshooting guidance at https://docs.microsoft.com/azure/virtual-desktop/troubleshoot-agent.
This section looked at some of the troubleshooting issues that may affect how the image communicates with Azure Virtual Desktop. We will now look at basic performance troubleshooting in Azure Virtual Desktop.
Basic performance troubleshooting in Azure Virtual Desktop
In this section, we will look at ways to identify and resolve common performance issues that may occur on Session Hosts within an Azure Virtual Desktop environment.
Four key resources can impact performance on a Session Host, as follows:
- Central Processing Unit (CPU)
- Random Access Memory (RAM)
- Storage (Disk)
- Network
The typical performance issues you may experience include capacity, constraints, and overall performance degradation or lag.
First, we will look at troubleshooting CPU performance issues.
CPU troubleshooting
CPU constraints are a common issue with session-based desktops. Performance and high CPU utilization issues can occur for several reasons and not be due to a single app or service. The web browser can be one such suspect, especially if hardware rendering has been left set to on once the master image has been optimized. You can view your CPU usage by going to Task Manager, and then go to Azure monitoring features within the Azure portal for specific VM and using Sysinternals Process Explorer:
Tip
You can download process explorer here: https://docs.microsoft.com/Sysinternals/downloads/process-explorer.

Figure 9.42 – The CPU utilization of a session host within Azure monitoring features
The following screenshot shows using the Sysinternals process explorer to gauge the CPU usage when monitoring the performance of an OS:
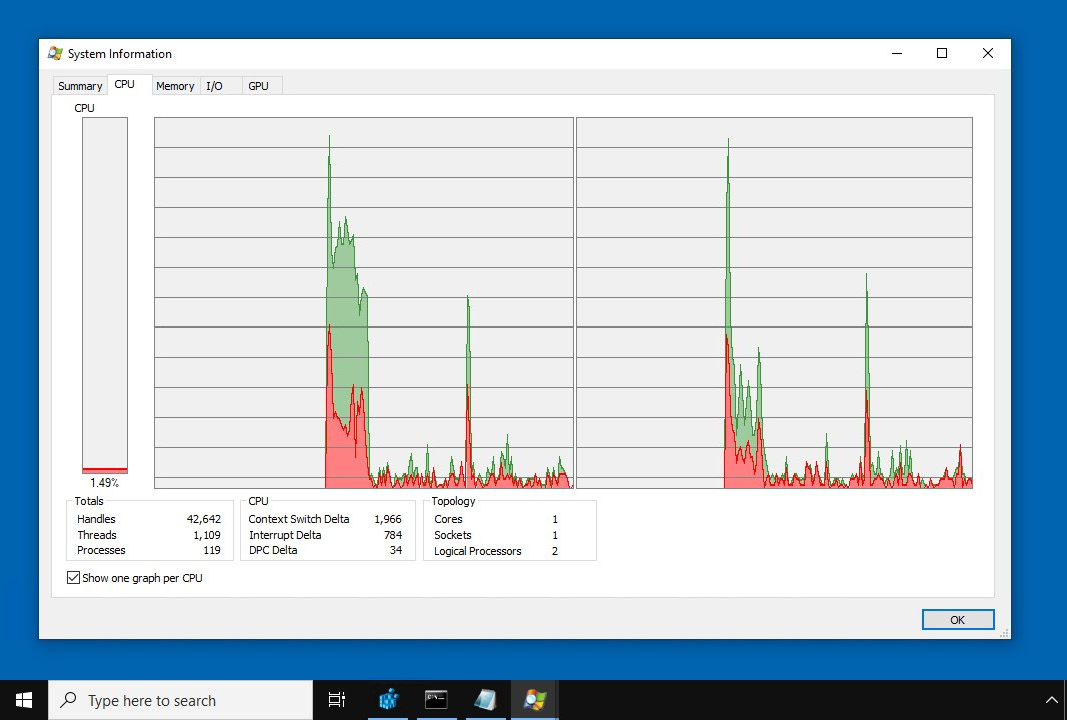
Figure 9.43 – CPU utilization of a session host using the Sysinternals process explorer
The following screenshot shows using the Sysinternals process explorer to monitor running processes to see which are consuming the most CPU and memory. This is a great tool for identifying processes that are consuming excessive resources:

Figure 9.44 – Sysinternals process explorer (running processes) on a Session Host
The following are some useful tips for when you're troubleshooting CPU resource issues:
- Low RAM can cause the CPU to spike and also increase disk activity due to memory paging, which is a process that stores and retrieves data from a disk for use in the main memory. Paging typically uses the OS disk or a temporary disk to use in the main memory.
- If hardware rendering is not disabled on a non-graphic process unit VM, then more CPU resources will be used for tasks such as video playback or graphics software. However, if a Graphics Processing Unit (GPU) is installed on the session host, you do not need to disable hardware rendering on web browsers, Office applications, and others.
- Specific processes may be causing performance issues on the Session Host. You can use Sysinternals Process Explorer to view CPU time, allowing you to review your processes, the time they've run for, and if they are causing the system to hang. One good example of a process impacting the CPU is large Excel files with macros. Additionally, multiple users on the same Session Host using large Excel files or other resource-heavy applications may impact the session host. In this case, it's advised that you move these power users to higher spec Session Hosts or personal pools.
Tip
It is recommended that you build more session hosts with fewer CPUs. This is advised because when you increase the number of cores, the system's synchronization overhead also increases. Smaller resourced VMs would perform better than fewer and larger specification VMs.
Here are a few examples of potential symptoms you may see when the CPU is under contention:
- Slow/lagging switching between windows.
- The loading cursor appears for long periods.
- The log on and log off process is slow, taking minutes to process.
- Applications are consistently going into a not responding state or locking/crashing.
- Web pages are jumping, slow to load, or become unresponsive.
Now, let's look at a few RAM performance issues and how to spot some of them.
RAM challenges
Modern applications consume more RAM. For example, when you combine Microsoft Office Suite, Microsoft Teams, and have multiple other applications open simultaneously, this can impact RAM consumption. When RAM reaches high consumption or becomes full, it will revert to the page file as secondary storage for the main memory.
The challenge with page file is speed. For example, a Solid State Drive (SSD) could have a typical write speed of 456 MB per second, whereas RAM writes at estimated speeds of 12,800 MB per second. When all the RAM has been consumed, the performance drops as secondary storage is being used. This performance drop will be seen by users and will most likely cause performance degradation for multiple users on a session host.
You can view your session host RAM utilization in Azure monitoring, as shown in the following screenshot:

Figure 9.45 – Available RAM on a session host in Azure monitoring
The following are some tips for troubleshooting RAM issues:
- Try to spread your users across multiple Session Hosts. You can manage this using the Depth and Breadth load balancing modes.
- One of the ways to address issues with a session that has become saturated would be to enable stop drain and ask a subset of users to log off and then back on. This will clear resources, free up RAM, and restore the expected user experience for the remaining users on that session host.
- Leaving users in an idle state and not rebooting Session Hosts can cause longer-term resource consumption issues. Therefore, it is advised that users log off and that the session hosts are restarted regularly.
Some of the symptoms you may see with RAM issues are as follows:
- Applications crashing
- Windows errors stating that there's low memory
- A slow log on and log off experience, which will be visible
- Applications locked in a Not responding state
- Application launch times are slow
- Running applications causes performance degradation and they are slow to use
We now move on to the next section where we look at disk performance and troubleshooting.
Disk performance troubleshooting
This is a common problem as it's easy to forget about the OS disk when it comes to multi-session deployments. Within Microsoft Azure, different sized disks have different performance outputs, which are measured in input/output operations per second (IOPS). To avoid any disk performance degradation, you should size the disk based on IOPS and factor in the expected total number of users per session host. P15 Azure Managed Disks or higher is recommended to ensure there's enough IOPS to serve all users and applications in use. Every environment can be different; it is advised to baseline your requirements for IOPS by using one or two users on a Session Host to generate IOPS consumption. You can then see the total usage of the disk over a set period from the test users carrying out their typical day-to-day tasks.
You can then use the data that's been collected to calculate the requirements and estimate the required IOPS based on a set number of users per Session Host.
See the following link for a list of the premium SSD disk sizes and their allocated IOPS: https://docs.microsoft.com/en-us/azure/virtual-machines/disks-types#premium-ssd-size.
Tip
It is also important to note that choosing a VM that's the wrong size may limit the throughput that's allowed by the disk. So, you must check the VM specs as well as the disk IOPS output. The following link provides a table detailing the max IOPS per VM size: https://docs.microsoft.com/en-us/azure/virtual-machines/dav4-dasv4-series#dav4-series.
The following command can help you identify disk performance issues by spotting high disk queues:
typeperf -si 2 "PhysicalDisk(*)Avg. Disk Queue Length"
The following screenshot shows the output of the current disk queue length of the OS. This is a great tool for identifying any issues with the disk performance on the OS:

Figure 9.46 – Disk queue output from running typeperf
For a centralized view of potential disk performance issues, you can use Azure Monitor or Log Analytics. Azure Monitor and Log Analytics will be covered in Chapter 18, Monitoring and Managing Performance and Health.
The following are some key points regarding disk troubleshooting:
- You should not use standard disks for multi-session environments.
- When you're deploying multi-session host pools, it is advised to use p-type SSD disks.
- Prevent users from using streaming services such as radios and music as this can impact the disk.
Now, let's take a look at the symptoms. The following are some disk performance symptoms:
- Files take a long time to open and save
- Slow switching between screens
- Logon and logoff times are long
- Applications stop responding or repeatedly show Not responding before becoming active again
- Applications are slow to launch
This section looked at disk performance issues, as well as some troubleshooting hints and tips that you can use to resolve some of the issues you may face.
Networking troubleshooting
Networking issues can occur in three areas: the user endpoint device, Azure Virtual Desktop's management service, and the session host itself. When you're reviewing network issues, it is recommended that you start with the client device and then look at the Azure Virtual Desktop management service and session host connectivity.
There are four typical network contention issues that you can experience:
- A jittery mouse or delayed typing
- Audio degradation or distortion
- The connection to Azure Virtual Desktop keeps dropping
- The screen goes blank and reappears frequently
These issues are usually found on the user side, all of which can be due to many different reasons. However, it is important to follow the necessary processes and check all three areas. There can be issues with the broker service, gateway communication, and even the Session Host agent service.
You can also review the connection information by right-clicking on the Session title bar, as shown in the following screenshot:

Figure 9.47 – The menu that appears after right-clicking the Session desktop title bar
Click the Connection information button to see the Connection information window appear. Click show details to view the connection details for the client connection. Note that the round trip time, available bandwidth, and frame rate are shown here:

Figure 9.48 – The connection information for the Remote Desktop client on a Windows device
The following are some tips for identifying network issues:
- Conduct a broadband/ISP speed test to understand if the user has network connectivity issues to the public network.
- Use tools such as PSPing to test connectivity to www.microsoft.com and rdweb.microsoft.com:443, as well as the broker service shown in the previous section.
- Force session hosts to redeploy, which moves the VM within a specific region to another physical host.
- Check the status of the session host using PowerShell.
Using Azure Virtual Desktop's Insights dashboard to view end user latency and poor user bandwidth. Azure Monitor and Azure Virtual Desktop Insights will be covered in Chapter 18, Monitoring and Managing Performance and Health.
This section looked at some hints and tips for spotting possible issues and resource contentions that may impact or affect your Session Hosts and connecting users.
Summary
In this chapter, we looked at creating a gold image for Azure Virtual Desktop, as well as modifying the session image, including customizing it, optimizing it, and capturing it in an image template. Then, we created an ACG, including creating image definitions and image versions. Finally, we looked at troubleshooting the OS and diagnosing possible performance and resource contention issues.
In the next chapter, we will look at managing access and configuring IT admin and user security permissions.
Questions
Answer the following questions to test your knowledge of this chapter:
- When you're configuring a custom image, you need to ensure that modern apps can use the additional language packs. What Powershell cmdlet would you use to disable pre-stage app cleanup?
- You have created a VM to be used as the image master. You install applications on the image and apply the necessary optimizations and configurations. What should you do before making the image distributable as a template?
- You need to replicate the custom session host image to multiple Azure Regions. Which Azure service would you use to complete this task?
Answers
- Disable-ScheduledTask -TaskPath "MicrosoftWindowsAppxDeploymentClient" -TaskName "Pre-staged app cleanup"
- At the command prompt, run the Sysprep command
- Azure Compute Gallery