Most topics in this book cover attack scenarios. Unfortunately, one day you might experience attempts against your own systems. This means your security defense measures will be challenged and hopefully you will have the right tools to identify and prevent the breach from causing damage to your organization.
We want to be clear that the Raspberry Pi is not the ideal tool to leverage for cyber defense. Best practice is layering security solutions that offer various features such as application layer controls, stateful firewall, intrusion prevention, access control, network segmentation, malware detection, network monitoring, data loss, and so on. Most tools that provide the level of protection you need to combat the threats seen on today's networks require very high power processing and tons of storage. Unfortunately, the Raspberry Pi does not offer this.
If you are looking to test some basic security concepts in a small lab such as segmentation using firewall features or scanning for basic threats with an IDS, the Raspberry Pi can act as a decent portable lab. Some ARM images claim to be ideal for home office protection, however, we would not recommend using a Raspberry Pi with the intention of protecting real assets.
Let's start off by looking at how to turn a Raspberry Pi into IDS/IPS. Later in this chapter, we will look at other Raspberry Pi security defense use cases such as how to use the Raspberry Pi as a VPN server, a content filer, or a Tor node.
There might be a time when you become the victim of a network breach. The best defense is layering multiple security solutions that cover various points on your network so if one gets bypassed, other tools are there to identify and stop the attacker. Common defense tools range from firewalls to detection technologies such as IDS/IPS solutions.
The Raspberry Pi can be configured as a low budget IDS/IPS to protect a part of your network. This should obviously only be considered for a very specific goal as there are far better options for providing real long term IPS/IDS solutions. The Raspberry Pi does not have the horsepower or storage for anything beyond basic detection and prevention, so consider this option for lab use and training purposes.
When considering an IPS/IDS, the first thing to decide is how it will be deployed. The typical use case is between a router and another device, or between a system and network. You could also be an intrusion detection system, meaning the device is a tap in the network viewing copies of the traffic and won't have any enforcement capabilities. In my example, I'll use Snort as an inline IPS between my laptop and external network acting as a man-in-the-middle. This could be ideal for connecting to an untrusted network while not leveraging VPN. This setup will require two Ethernet ports so I'll be utilizing a USB to Ethernet adapter to accommodate the second port.
Deploying the Raspberry Pi for man-in-the-middle attacks is similar to acting as a man-in-the-middle for IPS deployments. You will need to set the IP address of both interfaces as 0.0.0.0, and use the bridge utility to bridge both interfaces together. We covered this process in Chapter 3, Penetration Testing under the Man-in-the-middle section. A summary of the commands used to bridge the two interfaces together is shown in the following screenshot:

The most popular open source IDS/IPS used today is Snort now owned by Cisco due to the acquisition of Sourcefire. The major problem with using Snort on a Raspberry Pi is the resource requirements that extend beyond what the Raspberry offers. It is recommended to tune down processes on Snort prior to running it to get decent functionality.
Snort can run from a Kali Linux installation but it is not preinstalled.
Let's look at how to install and use Snort once your man-in-the-middle bridge is established in the following manner:
- The first step to is download required files using the following command:
sudo apt-get install flex bison build-essential checkinstall libpcap-dev libnet1-dev libpcre3-dev libmysqlclient15-dev libnetfilter-queue-dev iptables-dev - Snort also requires libraries that do not ship with the Kali Linux ARM image. To get the libraries required for Snort to function properly, type the following command:
wget https://libdnet.googlecode.com/files/libdnet-1.12.tgz - Next, you need to uncompress the file by using the
tar –zxvf libdnet-1.12.tgzcommand. Once the file is uncompressed, use thecdcommand to navigate to the directory. - You will change the
CFLAGSvariables to be configured for a 64-bit OS by typing the./configure CFLAGS="-fPIC"command. Once this is done, type themakecommand. - Next, you need to build a symbolic link from the location of
libdnetto where Snort expectslibdnetto be located. Type the following command to do this:ln -s /usr/local/lib/libdnet.1.0.1 /usr/lib/libdnet.1 - Now, you need to move to a directory used for Snort. We created a new directory called
snorton our desktop by using themkdir snortcommand from the desktop folder in command line or by right clicking on the desktop in the GUI and selecting it to make a new directory. - Next, we will need to download the Snort data acquisition libraries. Type the
wget https://www.snort.org/downloads/snort/daq-2.0.4.tar.gzcommand to do this. Note the version we are using might be different from what is available. Check snort.org to ensure you are using the latest version. - Download Snort with the following command:
wget https://www.snort.org/downloads/snort/snort-2.9.7.0.tar.gz - Next, we will unzip and install the Snort data acquisition libraries using the following commands:
tar -zxvf daq-2.0.4.tar.gz
cd daq-2.0.4
./configure; make; sudo make install
- The last step is downloading either Oinkcode, or community rules. Oinkcode rules are unique keys associated with an existing Snort user account. If you do not have Oinkcode rules, you can download community rules.
- We will download community rules by using the
wget https://www.snort.org/rules/communitycommand. This should download a file calledcommunity.tar.gzinto your directory. You will need to uncompress the file using thetar xvfz community.tar.gz -C /etc/snort/rulescommand. - Now we are ready to install Snort. To install Snort, type
apt-get install snort. You will get a prompt to configure the IP address and subnet mask of the Snort interface as shown in the following screenshot: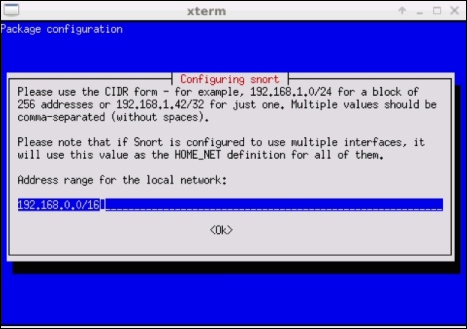
You should see Snort complete its installation process, as shown in the following screenshot:
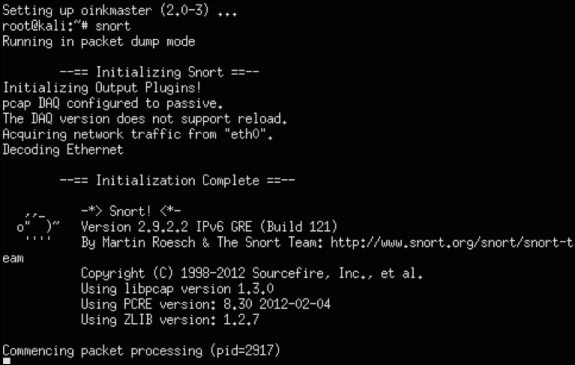
You have successfully configured Snort. There are many things you can do with Snort from this point such as analyzing traffic crossing the network bridge you set up in previous steps by using the snort command. We could write an entire book on Snort, and there are some books dedicated to the subject matter. If you are unfamiliar with Snort, we suggest you visit www.snort.org.
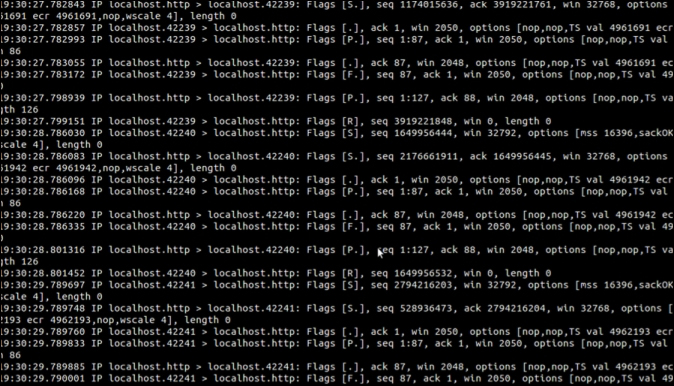
The easiest way to start Snort is just to type ./snort –i eth0; this will start Snort and listen on Ethernet 0. There are many more advanced configurations that allow you to capture and run everything to a syslog server for further analysis. By default, Snort will log everything to the terminal screen, as shown in the following screenshot. Don't worry if it is difficult to see, as the messages scroll fast on the screen and that is why most people will log to an external syslog server.
One additional step you might take is setting up Snort to automatically start by creating a script. This is typically only used if you have the Raspberry Pi dedicated to Snort. The following example shows how to create a script to auto start snort when you boot up your Raspberry Pi:
autostart-IDS.sh
#!/bin/bash
# Configures the virtual bridge between the two physical interfaces.
ifconfig eth0 0.0.0.0
ifconfig eth1 0.0.0.0
brctl addbr bridge0
brctl addif bridge0 eth0
brctl addif bridge0 eth1
ifconfig bridge0 up
# Configures Snort and TCPdump tools to begin listen and inspecting
# the network traffic that travels through the bridge interface.
TCPdump -i bridge0 -w /root/IDS-log/networkdump/network-traffic-$(date +%y%m%d).cap &
Snort -i bridge0 -v |tee /root/IDS-log/snortdump/Snort-dump-$(date +%y%m%d) &
A content filter is used to control the type of content a reader is authorized to access while surfing the Internet. Older content filters require lot of manual tuning based on updating URL lists, however, most commercial offerings provide content categories that are automatically updated with new website labels. The most common use case for requiring a content filter is blocking inappropriate content such as pornography from business networkers. Typically, content filters are bundled in with capabilities offered by network proxies or application layer firewalls.
Let's look at how to turn a Raspberry Pi into a home office content filter. This is great for parents wanting to keep their personal network kid-friendly.
KidSafe is used to filter inappropriate content while users surf the Internet. KidSafe accomplishes this by using open source web URL filtering services through a Squid proxy. This allows parents to control their children's Internet experience through an easy-to-use GUI.
KidSafe can be installed on any Linux-based system including Kali Linux for the Raspberry Pi. The application is suited for low powered, low cost computing systems making it ideal for home use. We recommend installing KidSafe on the Raspbian operating system so you don't have to worry about the additional settings associated with setting up Kali Linux. The Raspbian ARM image is typically installed by default when purchasing a Raspberry Pi. However, you can download it from http://www.raspberrypi.org/downloads/. The installation process is similar to how we installed Kali Linux in Chapter 1, Raspberry Pi and Kali Linux Basics.
The steps are as follows:
- The first step to prepare for KidSafe is changing the default Dynamic Host Configuration Protocol (DHCP) behavior to a static address so we don't have to worry about our IP address changing. Clients such as PCs and phones will proxy to and from this IP address to connect to the Internet, so it is important to make sure a static address is selected that is reachable by other devices on the network. It is also important that it is static so endpoints don't have to adjust their proxy settings. We can do this in the following way:
- Let's change our IP address to a static address.
- Type the
ifconfigcommand to see your network interfaces. You should see something like what's shown in the following screenshot. Note what you see when you run the command.
- You will edit the network interface file. We will use
vi, but you can use your favorite editor. Type thesudo nano /etc/network/interfacescommand. The launch of this command is shown in the following screenshot: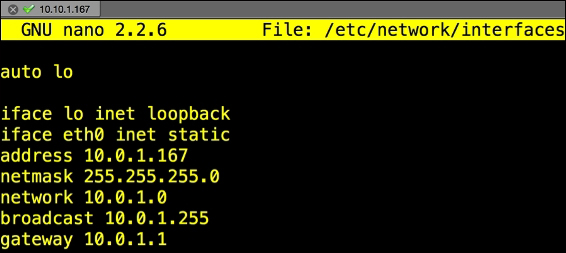
- Look for the line that says something close to
iface eth0 inet dhcp. You will change that line to a static address. In our example, we will change to a static IP of10.0.1.167with a subnet mask of255.255.255.0as well as default gateway of10.0.1.1using the commands in the following screenshot:

- Now, let's install Tor using the
sudo apt-get install torcommand. - Next, install Squid using the
sudo apt-get install squid3command. - Next, install a light web server using the
sudo apt-get install lighttpdcommand. - PHP is required for KidSafe. To install PHP, use the
sudo apt-get install php5-common php5-cgi php5 php5-mysqlcommand. You need to enable PHP scripts using thesudo lighty-enable-mod fastcgi-phpacommand. - At this point, you will need to reload the server using the
sudo service lighttpd force-reloadcommand. - The next step is to install the GUI admin tool for PHP. This is not required but we recommend it since it makes administrating PHP much easier. To install the GUI admin, use the
sudo apt-get install phpmyadmincommand. Once installed, you will be able to administer PHP from a web browser by accessinghttp://localhost/phpmyadmin/. - Next, we will change the directory owner and group by typing the
sudo chown www-data:www-data /var/wwwcommand. We also need to change permissions on our directory using thesudo chmod 775 /var/wwwcommand. - If you do not have a username, create one using the
sudo adduser proxycommand. Also, make sure to change the password for your username using thesudo passwd proxycommand. You will add your username to the directory group to give it permissions to manage using thesudo usermod -a -G www-data proxycommand. - Change to
/optdirectory. You can do so by typing insudo cd /opt. Make sure you are in the/optdirectory by using thecdcommand. - Next, we will download a helper application that is used to configure the proxy and Squid settings much easier. Go to http://www.penguintutor.com/software/squid-kidsafe/0.2.0/kidsafe-squidapp-0.2.0.tgz to download the application. You can do so by typing
sudo wget http://www.penguintutor.com/software/squid-kidsafe/0.2.0/kidsafe-squidapp-0.2.0.tgzfrom the command line. Make sure you are in the/optdirectory. - Use the
sudo tar –zxvf kidsafe-squidapp-0.2.0.tgzcommand to untar the file. - You will edit the
/opt/kidsafe/kidsafe.squid3.incfile using your favorite editor. Go to the last line of the file and change the192.168.0.3address to your IP address. - Change
acl local_acl dst 192.168.0.0/16to what is appropriate for your subnet. - You will need to merge the Squid files with the KidSafe files. Do so by typing
include /opt/kidsafe/kidsafe.squid3.inc. - Several files will need their permissions changed or updated. Type in the following commands:
cd /opt/kidsafe
sudo chown :www-data .
sudo chmod 775 .
sudo chown :proxy kidsafe.py
sudo chmod 770 kidsafe.py
sudo chown :www-data kidsafe.rules kidsafe.session
sudo chmod 664 kidsafe.rules kidsafe.session
- Now you can download and install the KidSafe application in the
/var/wwwdirectory. To download KidSafe, typesudo wget kidsafe-webapp-0.2.0.tgz. Make sure you are in the/var/wwwdirectory. Also note the version you are downloading as it might differ from the example we used. - Uncompress the file using the following command:
sudo tar -xvzf /home/pi/kidsafe-webapp-0.2.0.tgz - Now open up a web browser and go to
http://localhost/phpmyadmin/. Click on Databases and select Create New Database. Name the databasekidsafe. We will set the database type to Local as shown in the following screenshot: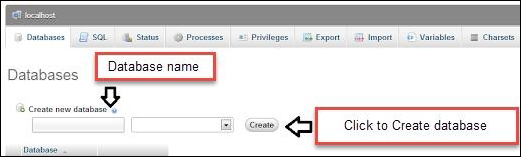
- Password will be set to: <as defined in the
kidsafe-config.phpfile>. Save and apply the configuration. In the Database-specific privileges menu select thekidsafedatabase. For Privileges, select only SELECT, INSERT, UPDATE, DELETE. For Grant, select No. For Table-specific privileges, select No. - Now click on the Databases button on the left side of the tab. Go to the SQL tab and execute the commands (just copy and paste) from the following file at http://www.penguintutor.com/software/squid-kidsafe/0.2.1/kidsafe-database.txt.
Note
Alternatively you can get the same file at http://www.drchaos.com/wp-content/uploads/2014/11/kidsafe-database.txt.
The following screenshot shows the phpMyAdmin page:

- You should change permissions on the
logfile. Type the following commands:cd /var/log/squid3 sudo touch kidsafe.log sudo chown :www-data kidsafe.log
Setup is now complete. You can configure rules, logins, and other settings by going to
http://localhost/kidsafe.Note
For more information on how to use KidSafe check out http://www.penguintutor.com/linux/raspberrypi-kidsafe.
The following screenshot shows the KidSafe administered Website blocked page:

Tip
Don't manually manage websites you want to block. Download free blacklists from http://www.squidguard.org/blacklists.html to get updated lists that have categorized millions of websites.
A Virtual Private Network (VPN) is an essential security element to many organizations. VPNs provide a method to connect directly to a remote network as if you are on-site and protect traffic in between the client and the connected network using encryption. This prevents many man-in-the-middle attacks and allows people to be more productive while out of the office. OpenVPN can turn a Raspberry Pi into a VPN concentrator providing these and other benefits at an extremely low cost.
Let's look at how to transform a Raspberry Pi into a VPN concentrator using the following steps:
- The first step is installing the latest Raspbian image through the NOOBS package or directly from the Raspberry Pi website following steps from Chapter 1, Raspberry Pi and Kali Linux Basics.
- We also suggest updating your image with the
apt-get updateandapt-get upgradecommands as specified for Kali Linux in Chapter 1, Raspberry Pi and Kali Linux Basics. - Since the goal of this solution is to be outside-facing, we strongly suggest changing the default password before starting the OpenVPN configuration.
- Once your Raspbian build is upgraded, you will need to identify an accessible IP address to the outside network where you plan to connect from. You will also need to pick a port to connect through, such as UDP traffic on port 1194. This would mean opening forward port 1194 on your router and firewall. You can use a different port or protocol, such as TCP depending on what you are confortable with opening on your router and firewall.
- OpenVPN isn't installed by default on most operating systems, so you will need to use
apt-get install openvpnto install it as shown in the following screenshot: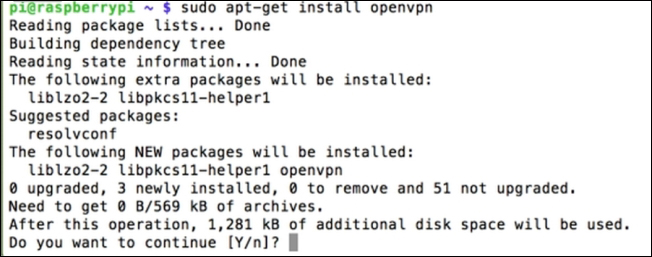
- Next you will want to generate keys to protect your VPN server. We will use
easy-rsafor this purpose. You will need to be arootuser so make sure to typesudo –sprior to moving forward. Use the following command to copy everything from theeasy-rsa/2.0folder to theeasy-rsafolder:cp –r /usr/share/doc/openvpn/examples/easy-rsa/2.0 /etc/openvpn/easy-rsa - Next, go to the
easy-rsafolder found withcd /etc/openvpn/easy-rsa. If you typels, you should see a file calledvars. We want to edit that, so typenano vars. Now, find and change theEASY_RSAvariable toexport EASY_RSA="/etc/openvpn/easy-rsa". The following screenshot shows this adjustment at line 13: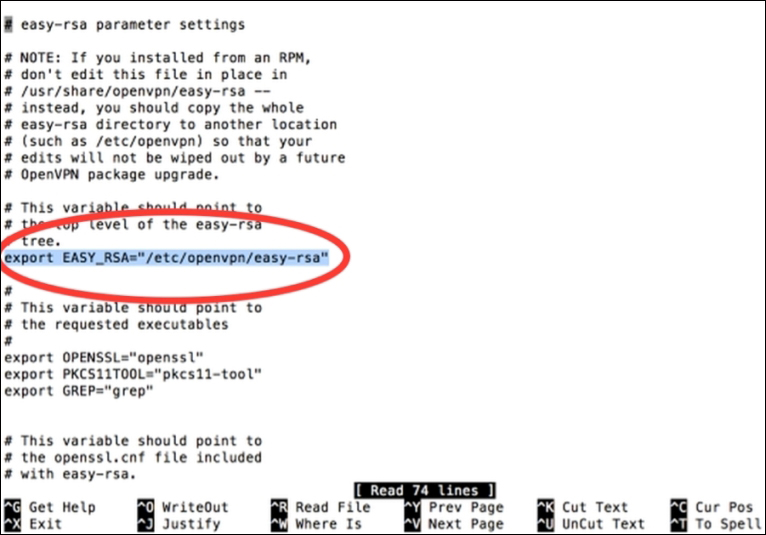
- You could increase the encryption method from 1024-bit to 2048-bit if you are paranoid. Just find the line that states
export KEY_SIZE=1024and increase the value to2048. Once you are done, type Ctrl + X to save your changes. - Now we need to build a Certificate Authority (CA) certificate and Root CA certificate. The Raspberry Pi will act as its own certificate authority and sign off on OpenVPN keys. You should still be in the
easy-rsafolder. Typesource ./varsto load thevarsdocument. Type./clean-allto remove any previous keys. - Type
./build-cato build your certificate authority. You will be asked a bunch of questions regarding where you live, company name, and so on. The following screenshot shows the first question once I ran the previous commands: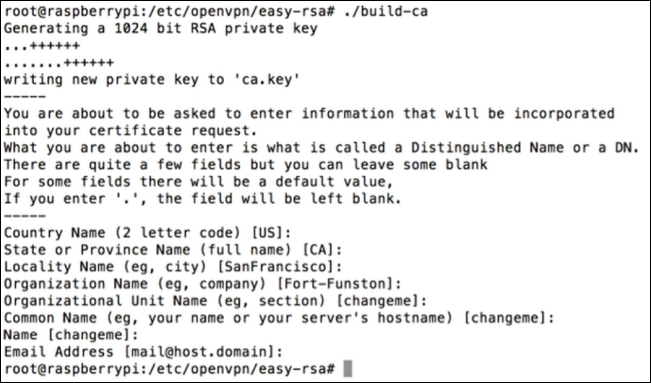
- After you finish the last question regarding an e-mail address, you can name your server by using the
./build-key-server [Server_Name]command. Once again, you will have to answer some optional fields. Make sure this time around you use the name you picked for the Common Name field, which should default to that name. You must also leave A challenge password field blank. - You will get a message saying your certificate will be signed for 3,650 more days and it will ask you to commit. Say yes (y) and it will generate your certificate.
- Now that the server side is up, let's build keys for the "clients" also known as users. For example, we will create a key for our laptop. To do this, use the
./build-key-pass [UserName]command. So for our example, the user name islaptop1. It will ask you for a pass phrase to remember. Fill that out and go through the prompts. Make sure to leave A challenge password field blank. Confirm to sign the certificate and it will display that the database has been updated. - Go to the
keysfolder usingcd keysand typeopenssl rsa –in laptop1.key –des3 –out laptop1.3des.key. This will applydes3also known as des encryption three times to each data block. - At this point, you have created a server certificate and a client certificate. You can repeat the client process if you want to create certificates for other devices. When you are done, go back to the
easy-rsafolder usingcdso you can generate the Diffie-Hellman key exchange. Type./build-dhto execute this.This could take a while depending on your encryption size. If you increased things to 2048-bit encryption earlier on, expect to wait longer. We are stuck with 1024, so it took a few minutes to complete.
- The next step is to enable Denial of Service (DoS) protection using a Hash-based Message Authentication Code (HMAC) key. This will have the Raspberry Pi first ask for a static key before attempting to authenticate an access request. This stops attackers from spamming the server with random repeated requests. Use the
openvpn –genkey –secret keys/ta.keycommand to enable this. - At this point, we have generated keys and had a CA sign them. Now let's configure OpenVPN. We first need to create a
.conffile that will be used by OpenVPN to list things such as where we are connecting from and the type of connections. Typenano /etc/openvpn/server.conf. This will open a blank document in theopenvpnfolder. Use the following commands to configure OpenVPN:local 192.168.2.0 # CHANGE THIS TO YOUR RASPBERRY PI IP ADDRESS dev tun proto udp. # This is the protocol port 1194 ca /etc/openvpn/easy-rsa/keys/ca.crt cert /etc/openvpn/easy-rsa/keys/Server.crt # USE YOUR CERT NAME YOU CREATED key /etc/openvpn/easy-rsa/keys/Server.key # USE YOUR KEY NAME YOU CREATED dh /etc/openvpn/easy-rsa/keys/dh1024.pem # IF YOU CHANGED THE ENCRYPTION SIZE ADJUST THIS server 10.8.0.0 255.255.255.0 # These are the server and remote endpoints ifconfig 10.8.0.1 10.8.0.2 # This adds a route to Client routing table for the OpenVPN Server push "route 10.8.0.1 255.255.255.255" # This adds a route to Client routing table for the OpenVPN Subnet push "route 10.8.0.0 255.255.255.0" # This is your local subnet push "route 192.168.2.0 255.255.255.0" # CHANGE THIS TO YOUR RASPBERRY PI IP ADDRESS # Set primary domain name server address to the Router push "dhcp-option DNS 8.8.8.8" push "redirect-gateway def1" client-to-client duplicate-cn keepalive 10 120 tls-auth /etc/openvpn/easy-rsa/keys/ta.key 0 cipher AES-128-CBC comp-lzo user nobody group nogroup persist-key persist-tun status /var/log/openvpn-status.log 20 log /var/log/openvpn.log verb 1
Press Ctrl + X once you are finished to save.
- Now, we need to create another file to configure the Raspberry Pi to forward Internet traffic. To do this, let's edit a file called
sysctl.confby using thenano /etc/sysctl.confcommand. Look for the line close to the top that says # Uncomment the next line to enable packet forwarding for IPv4 and remove the # to uncomment it. This will tell the Raspberry Pi to relay Internet traffic rather than just being a receiver. Press Ctrl + X to save changes. - Next, type
sysctl –pto apply the changes. Thesysctlcommand configures kernel parameters at runtime. - Everything regarding the VPN should be up, however, the Raspbian firewall will block incoming connections. Also, the Raspbian's firewall configuration resets by default when the Pi is rebooted. We need to use a script to make sure the Raspberry Pi remembers that the OpenVPN connection is always permitted. Use the
nano /etc/firewall-openvpn-rules.shcommand to open a blank executable file. Enter the following commands into the file:#!/bin/sh iptables -t nat -A POSTROUTING -s 10.0.2.0/24 -o eth0 -j SNAT --to-source 192.168.X.X.
- The
10.0.2.0/24in the command is the default address for Raspberry Pi clients that are connected over the VPN. You need to update this to your Raspberry Pi's IP address. Note that the script specifies theeth0interface as the outside-facing interface. Type Ctrl + X to save the changes. - You need to change this to an executable file by updating its permissions and ownership of the
etc/firewall-openvpn-rules.shfile. We need to change the mode to700,meaning owner can read, write, execute, as well as change the owner toroot. The commands to do this are:chmod 700 /etc/firewall-Openvpn-rules.sh chown root /etc/firewall-Openvpn-rules.sh
- We need to place this script into the interface setup code so it runs on boot. This will punch the hole for OpenVPN to function properly. Type
nano /etc/network/interfaces, look for the line that statesiface eth0 inet dhcp, and add the linepre-up /etc/firewall-openvpn-rules.shwith an indent below this line. Type Ctrl + X to save your changes. - Reboot your Pi using
sudo reboot.Congratulations, you have a fully functional VPN concentrator!
Now let's download an OpenVPN client and connect back to our Raspberry Pi OpenVPN server using the following steps. There are a variety of OpenVPN clients that are available. We actually prefer Viscosity from SparkLabs.
- Go to https://www.sparklabs.com/viscosity/ to download the Viscosity client.
The following screenshot shows the Viscosity client's Preferences window:
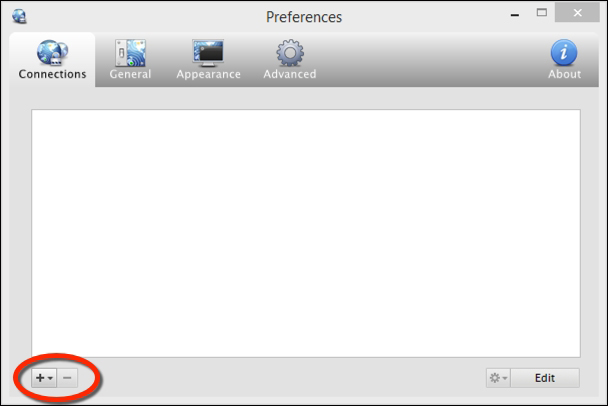
- After you install the client, you will need to add a new connection. Put in the IP address of your VPN server so the client knows where to connect. This is the reachable IP address of your Raspberry Pi server. The following screenshot shows the New Connection window's General tab:

- Next, click on the Authentication tab. In the drop-down list, select PKCS12. We have different authentication schemes available, however, if you remember when we set up our system, we generated client certificates. We can simply select the PKCS12 certificate and import it directly into our client.
The following screenshot shows the menu under the Authentication tab:

- You can now click on Save, then right-click on the connection, and click Connect as shown in the following screenshot:

You are now connected to your OpenVPN server.
Tor, sometimes known as onion routing, is used for anonymous access to the Internet by using a system of volunteer nodes and services to route and mask traffic. Using Tor makes it difficult to track Internet usage. This is ideal when you want to defend against unwanted traffic analysis that can be used to violate your privacy. Detailed information around Tor can be found at https://www.torproject.org/.
A Tor relay works by randomly selecting systems to use as a path to communicate from one point to another. Endpoints access the Tor network by using special software that pushes traffic through the Tor network. The following diagram shows how two systems might use different paths to communicate back and forth on a Tor network:

The Raspberry Pi can be configured as a Tor node and Tor router. A Tor node acts as a system passing through other users' traffic, meaning it is part of the Tor network helping other people remain anonymous while they access the Internet. A Tor router acts as an entry point for an internal network into the Tor network, so all devices surfing through the router will have their traffic randomized through the Tor network. A Tor router replaces the need for every user to run the special Tor software to access the Tor network, since all traffic is routed through Tor by the router.
Let's look at how to turn a Raspberry Pi into a Tor node and Tor router.
You can turn your Raspberry Pi running Kali Linux into a Tor node so that you can take part in the Tor project.
Note
Running a TOR node might have legal or ethical constraints and requirements. We suggest you do your research before running Tor to completely understand what it means. Running a TOR node might mean anonymous users will be using your Internet connection for possibly malicious or illegal activities. Additionally, with the closure of Silk Road 2.0 and other law enforcement arrests, the anonymity of Tor has recently been questioned.
If you are going to participate in the Tor network with your Kali Linux Raspberry Pi, you will need to do some cleanup work using the following steps:
- First, turn off any excess services or applications running on Raspberry Pi. If you are unsure, start with a clean install, or use the Raspbian distribution instead.
- Change your
rootpassword. Use a minimum of twelve alphanumeric characters. - We will install
sudopackages and add atorusername. That way, you don't have to work with therootusername. We will also update and upgrade our software; use the following steps:apt-get install sudo adduser tor passwd tor apt-get update apt-get upgrade
- We will also need to add the
toraccount to the list ofsudoers. You can do this by editing the/etc/sudoersfile. Type thesudo visudocommand then add the linetor ALL=(ALL) ALL.The following screenshot shows the
/etc/sudoersfile: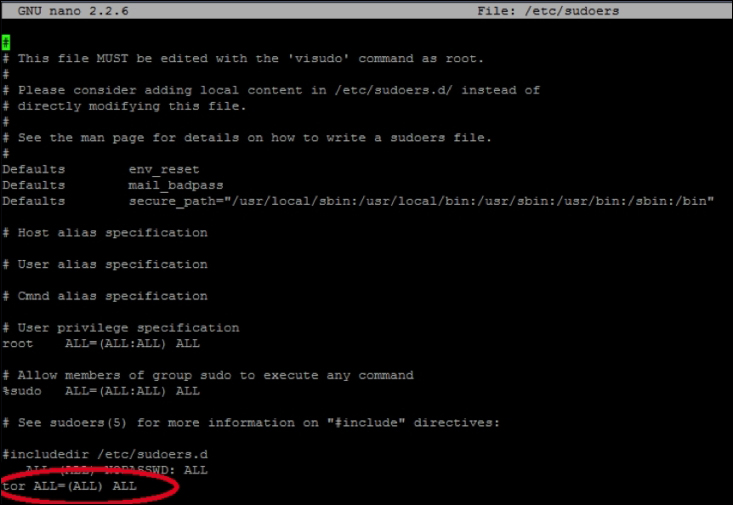
- We need to change the default DHCP behavior of Kali Linux to a static address. Technically, we could keep a DHCP address, but most likely you will need a static address on the device. Type the
ifconfigcommand to see your network interfaces. You should see something like what's shown in the following screenshot. Write this down:
You will edit the network interface file. We will use
vi, but you can use your favorite editor. Use thesudo vi /etc/network/interfacescommand.Look for the line that says something close to
iface eth0 inet dhcp, as shown in the following screenshot: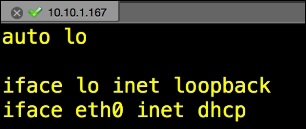
You will change that line to a static address. In our example, we will change to a static IP of
10.0.1.167,with a subnet mask of255.255.255.0,as well as default gateway of10.0.1.1using the following commands:iface eth0 inet static address 10.0.1.167 <- chose an IP that fits to your network! This is only an example! netmask 255.255.255.0 <- Apply the correct settings network <- The IP network broadcast <- enter the IP broadcast address gateway 10.0.1.1 <- Enter your router or default gateway
The following screenshot shows the launch of the preceding commands:

- Now, let's install Tor. Type the
sudo apt-get install torcommand. Edit thetor configfile in/etc/tor/torrc. You will need to add or change the configuration to match the following lines. It is okay if there is excess stuff in the configuration file.Add or change the following to match the configuration:
SocksPort 0
Log notice file /var/log/tor/notices.log
RunAsDaemon 1
ORPort 9001
DirPort 9030
ExitPolicy reject *:*
Nickname xxx (you can chose whatever you like)
RelayBandwidthRate 100 KB # Throttle traffic to 100KB/s (800Kbps)
RelayBandwidthBurst 200 KB # But allow bursts up to 200KB/s (1600Kbps)
The following screenshot shows the launch of the
sudo apt-get install torcommand: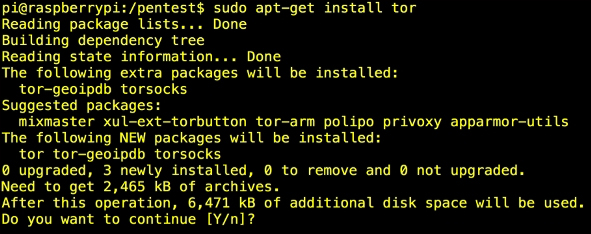
- You will need to ensure TCP ports 9030 and 9001 are open from your firewall to your Raspberry Pi. You will want to make sure that the outside world can contact these ports as well. You might need to Network Address Translate (NAT) your Raspberry Pi with a static (or one-to-one) NAT statement. If you have a home router, this is sometimes called a Demilitarized Zone (DMZ) or a Game port.
- Reboot your system.
- Now, start Tor by using the
sudo /etc/init.d/tor restartcommand in CLI. Check the Torlogfile to ensure the service has started. The Torlogfiles are located in/var/log/tor/log. You can view thelogfiles by issuing theless /var/log/tor/logcommand. Look for the entry Tor has successfully opened a circuit. Looks like client functionality is working. If you see this, you have set up your system correctly.
At this point, you will most likely want to use a Tor client to get on the Tor network. There are many clients available for a variety of operating systems. Here are a few links to help you get started:
- Windows: https://www.torproject.org/docs/tor-doc-windows.html.en
- Linux/Unix/BSD: https://www.torproject.org/docs/tor-doc-unix.html.en
- Debian/Ubuntu: https://www.torproject.org/docs/debian.html.en
- Mac OS X: https://www.torproject.org/docs/tor-doc-osx.html.en
- Android: https://www.torproject.org/docs/android.html.en
At this point, you have a fully functional Tor relay point and a Tor client to access the Tor network. You will not see much when the product is configured, besides some information and status messages on the terminal. There are other views available that will give you more information on traffic and your node participation status as well, which you can toggle through.
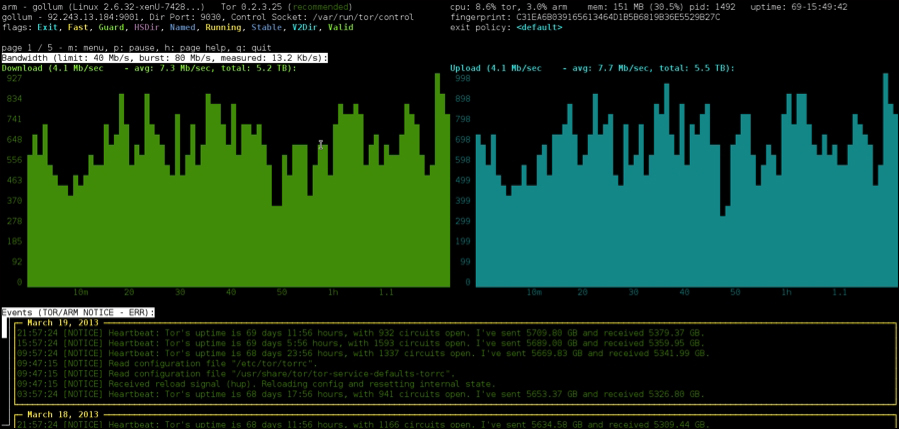
The Tor terminal
The previous section explained how Raspberry Tor turns the Raspberry Pi into a Tor node. You can connect to the node and be anonymous with your traffic as well as other users who are on the Tor network. To connect to a node, you typically need to use special software. What if you want to run your entire network through Tor so that all traffic coming from your network remains anonymous? This can be accomplished by turning a Raspberry Pi into a Tor router.
For example, you can have the Raspberry Pi plug into your outside router and broadcast a private SSID that users can connect to and have their traffic filtered through the Tor network. This is ideal for setting up a quick mobile hotspot that masks all user traffic using Tor.
Let's look at how to configure a Raspberry Pi into a Tor router using the following steps:
- The first step is downloading the latest version of Raspbian from http://www.raspberrypi.org/downloads/. The latest version in our case is
2014-09-09-wheezy-raspbian.img. You will need to unzip the file after you have downloaded it. - Install the Raspbian image onto a SD (microSD) card you will use in the Raspberry Pi. We covered this process in Chapter 1, Raspberry Pi and Kali Linux Basics. The command for our image is as follows:
sudo dd if=~/Desktop/2014-09-09-wheezy-raspbian.img of=/dev/disk1. - Boot your Raspberry Pi with the Raspbian image you installed on your microSD. The default username and password for Raspbian is
piandraspberry. - When you log in to the GUI desktop, open the terminal application on the desktop. Type the
sudo apt-get updatecommand followed bysudo apt-get upgrade. - You need to install a DHCP server. You will get errors by doing this but ignore them. Type the
sudo apt-get install vim tor hostapd isc-dhcp-servercommand. - Next, you will edit the
/etc/dhcp/dhcpd.conffile with your favorite editor. Open up the/etc/default/isc-dhcp-serverfile and go to the last line. Edit theINTERFACESline to readINTERFACES="wlan0". Make sure you include the quotes withwlan0in your configuration. - You will need to edit the
wlan0network configuration. Use your favorite editor to change the/etc/network/interfacesfile. Go to thewlan0section and give it a static IP address. The file should look like the following:iface wlan0 inet static address 10.99.99.1 netmask 255.255.255.0 allow-hotplug wlan0 #iface wlan0 inet manual #wpa-roam /etc/wpa_supplicant/wpa_supplicant.conf #iface default inet dhcp
- Next, we will want to configure the Raspberry Pi with encryption so that our wireless network has security. You will need to create a new file called
/etc/hostapd/hostapd.conf.Note
Note that you will need to ensure your wireless card is compatible with
hostapt.conf. If it is not, you will need to compile your own version or you cannot have wireless security. The people at Adafruit have an alternatehostapd.conffile that works with many other chipsets. You can find it at http://www.adafruit.com/downloads/adafruit_hostapd.zip.We will configure our
hostapd.conffile for WPA2-PSK encryption, SSID of DrChaos, and a password of Kali Raspberry. Of course these settings can be changed to anything of your liking. Create a file called/etc/hostapd/hostapd.confor download it from http://www.adafruit.com/downloads/adafruit_hostapd.zip and place it in the/etc/hostapddirectory. You might need to create the directory in the following manner:interface=wlan0 driver=rt2800usb ssid=DrChaos hw_mode=g channel=6 macaddr_acl=0 auth_algs=1 ignore_broadcast_ssid=0 wpa=2 wpa_passphrase=KaliRaspberry wpa_key_mgmt=WPA-PSK DAEMON_CONF="/etc/hostapd/hostapd.conf"
Open the
/etc/sysctl.conffile and remove the comment from thenet.ipv4.ip_forward=1line to make it active. - Turn on IP forwarding by typing the following command:
echo 1 > /proc/sys/net/ipv4/ip_forward - Next, we will add some simple iptable rules to NAT and route our data from wireless to the Internet.
Note
The following iptable rules are extremely relaxed. It is possible that these rules might expose the true IP address of the client under certain circumstances. If you would like to add an additional layer of security, then skip step 16 (or change the echo from
1back to0), and explicitly state which connections you will allow.Add the following commands in iptables:
iptables -t nat -A POSTROUTING -o eth0 -j MASQUERADE
iptables -t nat -A PREROUTING -i wlan0 -p tcp --dport 22 -j REDIRECT --to-ports 22
iptables -t nat -A PREROUTING -i wlan0 -p udp --dport 53 -j REDIRECT --to-ports 53
iptables -t nat -A PREROUTING -i wlan0 -p tcp --syn -j REDIRECT --to-ports 9040
iptables -A FORWARD -i eth0 -o wlan0 -m state --state RELATED,ESTABLISHED -j ACCEPT
iptables -A FORWARD -i wlan0 -o eth0 -j ACCEPT
iptables-save > /etc/iptables.ipv4.nat
The following screenshot shows our data being routed with
iptables: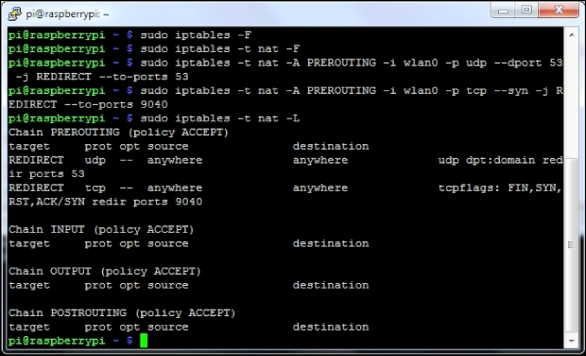
- Next, you need to edit the
/etc/tor/torrcfile in the following manner:Log notice file /var/log/tor_notices.log VirtualAddrNetwork 10.99.0.0/10 AutomapHostsSuffixes .onion,.exit AutomapHostsOnResolve 1 TransPort 9040 TransListenAddress 10.99.99.1 DNSPort 53 DNSListenAddress 10.99.99.1
You can now plug in your wired connection on the Raspberry Pi to the Internet. At this point, your wireless users will be able to connect the DrChaos SSID using the password of Kali Raspberry to connect. All traffic will be funneled through the Tor network.
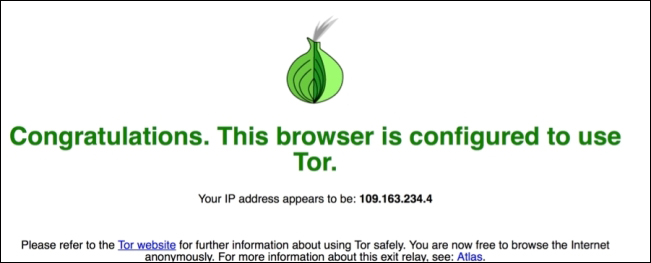
Open up a web browser and go to https://check.torproject.org/, and you will get a message showing whether you are on Tor or not as shown in the following screenshot: