
A commonly found security protocol for protecting wireless networks is Wi-Fi Protected Access (WPA). WPA was later replaced by WPA2 and it will be probably what you will be up against when you perform a wireless penetration test.
WPA and WPA2 can be cracked with Aircrack. Kali Linux includes the Aircrack suite, which is one of the most popular applications to break wireless security. Aircrack works by gathering packets seen on a wireless connection to either mathematically analyze the data to crack weaker protocols such as Wired Equivalent Privacy (WEP), or use brute force on the captured data with a wordlist.
Cracking WPA/WPA2 can be done due to a weakness in the four-way handshake between the client and the access point. In summary, a client will authenticate to an access point and go through a four-step process. This is the time when the attacker is able to grab the password and use a brute force approach to identify it. The time-consuming part in this is based on how unique the network password is, how extensive your wordlist that will be used to brute force against the password is, and the processing power of the system. Unfortunately, the Raspberry Pi lacks the processing power and the hard drive space to accommodate large wordlist files. So, you might have to crack the password off-box with a tool such as John the Ripper. We recommend this route for most WPA2 hacking attempts.
Here is the process to crack a WPA running on a Linksys WRVS4400N wireless router using a Raspberry Pi on-box options. We are using a WPA example so that the time-consuming part can be accomplished quickly with a Raspberry Pi. Most WPA2 cracking examples would take a very long time to run from a Raspberry Pi; however, the steps to be followed are the same to run on a faster off-box system.
The steps are as follows:
- Start Aircrack by opening a terminal and typing
airmon-ng;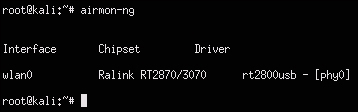
- In Aircrack, we need to select the desired interface to use for the attack. In the previous screenshot,
wlan0is my Wi-Fi adapter. This is a USB wireless adapter that has been plugged into my Raspberry Pi. - It is recommended that you hide your Mac address while cracking a foreign wireless network. Kali Linux ARM does not come with the program macchanger. So, you should download it by using the
sudo apt-get install macchangercommand in a terminal window. There are other ways to change your Mac address, but macchanger can provide a spoofed Mac so that your device looks like a common network device such as a printer. This can be an effective way to avoid detection. - Next, we need to stop the interface used for the attack so that we can change our Mac address. So, for this example, we will be stopping
wlan0using the following commands:airmon-ng stop wlan0 ifconfig wlan0 down
- Now, let's change the Mac address of this interface to hide our true identity. Use macchanger to change your Mac to a random value and specify your interface. There are options to switch to another type of device; however, for this example, we will just leave it as a random Mac address using the following command:
macchanger -r wlan0Our random value is
b0:43:3a:1f:3a:05in the following screenshot. Macchanger shows our new Mac asunknown.
- Now that our Mac is spoofed, let's restart
airmon-ngwith the following command:airmon-ng start wlan0 - We need to locate available wireless networks so that we can pick our target to attack. Use the following command to do this:
airodump-ng wlan0 - You should now see networks within range of your Raspberry Pi that can be targeted for this attack. To stop the search once you identify a target, press Ctrl + C. You should write down the Mac address, also known as
BSSID, and the channel, also known asCH, used by your target network. The following screenshot shows that our target withESSIDHackMePlease is runningWPAonCH6: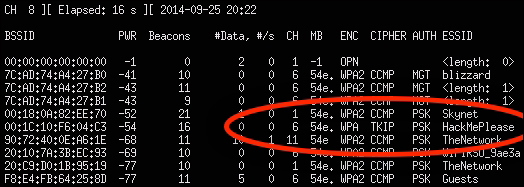
- The next step is running
airodumpagainst the Mac address that you just copied. You will need the following things to make this work:- The channel being used by the target
- The Mac address (
BSSID) that you copied - A name for the file to save your data
Let's run the
airodumpcommand in the following manner:airodump-ng –c [channel number] –w [name of file] –-bssid [target ssid] wlan0This will open a new terminal window after you execute it. Keep that window open.
Open another terminal window that will be used to connect to the target's wireless network. We will run
aireplayusing the following command:aireplay-ng-deauth 1 –a [target's BSSID] –c [our BSSID] [interface]For our example, the command will look like the following:
aireplay-ng -–deauth 1 –a 00:1C:10:F6:04:C3 –c 00:0f:56:bc:2c:d1 wlan0The following screenshot shows the launch of the preceding command:

Note
You may not get the full handshake when you run this command. If that happens, you will have to wait for a live user to authenticate you to the access point prior to launching the attack. The output on using Aircrack may show you something like Opening [file].cap a few times followed by No valid WPA handshakes found, if you didn't create a full handshake and somebody hasn't authenticated you by that time. Do not proceed to the next step until you capture a full handshake.
- The last step is to run Aircrack against the captured data to crack the WPA key. Use the
–woption to specify the location of a wordlist that will be used to scan against the captured data. You will use the.capfile that was created earlier during step 9, so we will use the namecapturefile.capin our example. We'll do this using the following command:Aircrack-ng –w ./wordlist.lst wirelessattack.capTip
The Kali Linux ARM image does not include a
wordlist.lstfile for cracking passwords. Usually, default wordlists are not good anyway. So, it is recommended that you use Google to find an extensive wordlist (see the next section on wordlists for more information). Make sure to be mindful of the hard drive space that you have on the Raspberry Pi, as many wordlists might be too large to be used directly from the Raspberry Pi. The best practice for running process-intensive steps such as brute forcing passwords is to do them off-box on a more powerful system.You will see Aircrack start and begin trying each password in the wordlist file against the captured data. This process could take a while depending on the password you are trying to break, the number of words in your list, and the processing speed of the Raspberry Pi. We found that it ranges from a few hours to days, as it's a very tedious process and is possibly better-suited for an external system with more horsepower than a Raspberry Pi. You may also find that your wordlist doesn't work after waiting a few days to sort through the entire wordlist file.
Note
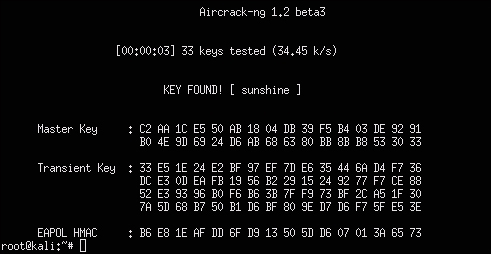
If Aircrack doesn't open and start trying keys against the password, you either didn't specify the location of the
.capfile or the location of thewordlist.lstfile, or you don't have the captured handshake data. By default, the previous steps store files in the root directory. You can move your wordlist file in the root directory to mimic how we ran the commands in the previous steps since all our files are located in the root directory folder. You can verify this by typinglsto list the current directory files. Make sure that you list the correct directories of each file that are called by each command.If your attack is successful, you should see something like the following screenshot that shows the identified password as sunshine:
It is a good idea to perform this last step on a remote machine. You can set up a FTP server and push your
.capfiles to that FTP server or use steps similar to those covered under the Scripting tcpdump for future access section found later in this chapter.Tip
You can learn more about setting up an FTP server at http://www.raspberrypi.org/forums/viewtopic.php?f=36&t=35661.
There are many sources and tools that can be used to develop a wordlist for your attack. One popular tool called Custom Wordlist Generator (CeWL), allows you to create your own custom dictionary file. This can be extremely useful if you are targeting individuals and want to scrape their blogs, LinkedIn, or other websites for commonly used words. CeWL doesn't come preinstalled on the Kali Linux ARM image, so you will have to download it using apt-get install cewl.
To use CeWL, open a terminal window and put in your target website. CeWL will examine the URL and create a wordlist based on all the unique words it finds. In the following example, we are creating a wordlist of commonly used words found on the security blog www.drchaos.com using the following command:
cewl www.drchaos.com -w drchaospasswords.txt
The following screenshot shows the launch of the preceding command:
You can also find many examples of popular wordlists used as dictionary files on the Internet. Here are a few wordlist examples sources that you can use; however, be sure to research Google for other options as well:
Here is a dictionary that one of the coauthors of this book put together:
http://www.drchaos.com/public_files/chaos-dictionary.lst.txt
It is great to get access to a target network. However, typically the next step, once a foothold is established, is to start looking at the data. To do this, you will need a method to capture and view network packets. This means turning your Raspberry Pi into a remotely accessible network tap.
Tcpdump is a command-line-based packet analyzer. You can use tcpdump to intercept and display TCP/IP and other packets that are transmitted and seen attached by the system This means the Raspberry Pi must have access to the network traffic that you intend to view or using tcpdump won't provide you with any useful data. Tcpdump is not installed with the default Kali Linux ARM image, so you will have to install it using the sudo apt-get install tcpdump command.
Once installed, you can run tcpdump by simply opening a terminal window and typing sudo tcpdump. The following screenshot shows the traffic flow visible to us after the launch of the preceding command:
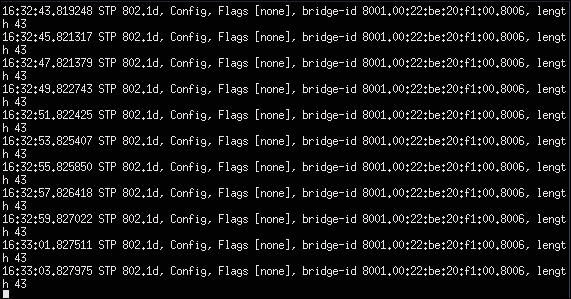
As the previous screenshot shows, there really isn't much to see if you don't have the proper traffic flowing through the Raspberry Pi. Basically, we're seeing our own traffic while being plugged into an 802.1X-enabled switch, which isn't interesting. Let's look at how to get other system's data through your Raspberry Pi.
Tip
Running tcpdump consumes a lot of the Raspberry Pi's processing power. We found that this could crash the Raspberry Pi by itself or while using it with other applications. We recommend that you tune your data capture to avoid this from happening. Tuning a data capture will be covered later in this chapter.
One common method to capture sensitive information is by performing a man-in-the-middle attack. By definition, a man-in-the-middle attack is when an attacker makes independent connections with victims while actively eavesdropping on the communication. This is typically done between a host and the systems. For example, a popular method to capture passwords is to act as a middleman between login credentials passed by a user to a web server. We will cover this as well as a few other common man-in-the-middle attacks performed with tools found in Kali Linux.
Let's look at a few versions of man-in-the-middle attacks used to get data into your Raspberry Pi.