
By now, you hopefully have a clear understanding of the BPM system structure, the language that we will use to define our business processes, and we already had a sneak preview of the jBPM6 project APIs and how BPMN 2.0 is used to describe processes.
Now, it is time to take a look at the tooling provided by the jBPM6 project. The jBPM6 tooling projects contain both a platform to integrate multiple forms of knowledge (information), as well as functionality to extend and run said commands. This knowledge can be in the form of processes, rules, decision tables, and so on. Because of that, it has been encapsulated under the concept of Knowledge Is Everything (KIE) and exposed in a workbench-like web interface called the KIE Workbench.
A workbench, in this context, means a piece of software that allows both file management and application functionalities. In this sense, the KIE Workbench provides knowledge asset file management (to design processes, data models, and other knowledge components) and process and rule runtimes. It also allows us to configure external communications (a topic we will cover in detail in Chapter 10, Integrating KIE Workbench with External Systems). In this chapter, we will study the tools provided by this workbench and their relationship with jBPM6.
This chapter starts by describing the tools provided by the workbench and describes how to implement your own domain-specific tooling from scratch, keeping in mind the important concepts to have on a full workbench. After we understand the tooling components, we will discuss how to extend the already provided workbench to add our own extra components.
In this chapter, we will cover the following topics:
- How to set up the environment to start working with jBPM6
- The workbench description and how to start working with processes in it
- The workbench internal architecture
Before we start with the descriptions of each specific component, I would like to mention that in order to install and use the workbench, we need to have the basic knowledge of how to work with Java and Maven. The installation procedure is very simple, but we need to have a set of tools previously installed in our environment to be able to install and run the KIE workbench. The prerequisites are the following:
- JDK 6 or higher, which can be found at http://www.oracle.com/technetwork/java/javase/downloads/index.html
- Apache Ant 1.9.x, which can be found at http://ant.apache.org/bindownload.cgi
- Apache Maven 3.1.x, which can be found at http://maven.apache.org/download.cgi
<JAVA_HOME>/bin,<M2_HOME>/bin, and<ANT_HOME>/binadded to thePATHsystem variable
Once we have these tools installed and ready to be used, we can run the KIE Workbench installer that you can find in the code section under the name kie-wb-installer. This section will cover the following topics:
- Installing the KIE Workbench
- What you will need to create the jBPM6 business processes
- What you will need to run the jBPM6 business processes
KIE Workbench installation is quite simple. All components are part of a single WAR file, with very few customized configurations needed outside of it. The required steps are as follows:
- Download the WAR file of the workbench and an application server.
- Install the application server and place the WAR file in the
standalone/deploymentsfolder. - Add users to the application server configuration.
So we created a special Maven project to do those steps for us, by just invoking mvn clean install from the chapter-04/kie-wb-installer folder of the code section of this book. You can also run the server using the same command line by typing mvn exec:exec once the installation is done.
If you prefer to download it and install it manually, all you have to do is look for the WAR file published in http://repository.jboss.org/nexus under the org.kie:kie-wb-distribution-wars:6.1.0.Beta3:jboss-as7 release ID and add it to a JBoss Application Server 7.1 installation. You can download JBoss Application Server from www.jboss.org. After you have installed the JBoss Application Server following the instructions on the site, all you have to do is put the WAR file in the standalone/deployments folder, change its name to kie-wb.war, and start the server with the following command:
bin/standalone.sh --server-config=standalone-full.xml
One good thing about this installer is that it will need all the prerequisites we listed in the previous section. So, it is also a test that all prerequisites are properly installed.
Installation could take a while to finish (it will download approximately 500 MB from the JBoss Maven repository), but once it is finished and the application server is running, you will be able to access the workbench from the URL http://localhost:8080/kie-wb, and log in typing the user mariano and password mypass. This username and password can be changed by using the bin/add-user.sh command from the JBoss Application Server and creating a user with an admin role for the Application realm. Once logged in, you will see the following page:

Notice the top navigation bar (the one in black). We will be using it to access all the functionality of the KIE Workbench. We have different functions to manage process-related project authoring and deployment tasks, process runtime, tasks assigned to a user, and even dashboards about the execution of our environment. We will be explaining the ones more related to running the process in the next few sections.
One set of tools that we will need is the one related to creating new processes that we can execute later on. To do so, we need a new set of high-level tools (editors, validation tools, and different types of connectors) as well as low-level functionality (such as filesystem management and publication services for the runtime to grab finished components). The tools most related to process generation are as follows:
- Workbench utilities: In order to define special configurations that our business processes will need to be executed in the way we want, we need special utilities that will allow us to define the execution configuration that the runtime will have to use, such as external connectors for invoking other systems, special listeners to expose information about our processes to monitoring tools, and strategies to define the isolation level of processes. All these components will be discussed throughout this book as we get to each specific component.
- A process designer: This is the tool you will use to create executable processes. It could go from a simple notepad application to directly write XML-based BPMN files, and even to a full visual diagram tool to visually edit all the contents of your process. Luckily for us, the jBPM6 process designer is closer to the latter option.
- Knowledge asset editors: In order to create all of the process runtime elements that define our domain, most of the time, business processes alone won't be enough to define all the runtime. We will need data modelers to generate the data components that will be used by the processes, rule editors for complex decisions, or work item definitions to extend the possible types of tasks that a process could use.
The KIE Workbench provides a series of utilities that allow us to create a detached communication between the process definition and the process execution. In order to do so, it provides a very specific structure that will look quite familiar to developers. Let's first explore how the process definitions (and other types of knowledge assets) are grouped in the KIE Workbench.
The Workbench groups process in Maven-based projects. Each Maven project is an individual, self-sufficient unit containing information about the know-how to compile, deploy, run, and test itself and can declare dependencies to other modules in their pom.xml file. Each project is part of a repository, and each repository belongs to an organizational unit. The end picture for this structure looks something like what is shown in the following diagram:

The configurations we will be most interested in tweaking when using the KIE Workbench to define our projects are the ones directly associated with our project. To edit those properties, we must go to the perspective available by clicking on the navigation bar option Authoring | Project Authoring. There, we can create a new project (clicking on Project) in a particular repository by selecting the option from the second menu bar, the one under the black menu bar, called New Item. A project creation wizard will guide us in configuring a Maven release ID for the project. Have a look at the following screenshot:

Once the Finish button is clicked on, we're directed to the project editor, where we can configure dependencies, KIE Bases, KIE Sessions, and all the project-relevant components. The project editor groups all responsibilities to define dependencies, for project runtime configurations, and to allow the user to build and deploy the project in a Maven repository.
The same options are available when selecting an already existing project by clicking on the Tools | Project Editor option that appears under the navigation bar in the Project Authoring perspective, as shown in the following screenshot:

In the preceding screenshot, we can see that we have different types of settings for our project. We are mostly interested in the Knowledge bases and sessions item of the settings list box, because it will allow us to configure where and how the business processes that we will define will end up exposed to the runtime.
Each Maven project that we define in the KIE Workbench encloses a particular configuration for one or more types of runtime. Each runtime definition will have its own KIE Bases, KIE Sessions, and special configurations for each one to work in the way we expect them.
Keep track of how to get to the knowledge settings of our project for now, because we will use it later. But first, before we configure how to expose our process definitions, we need first to learn how to define them. To do so, let's take a look at the jBPM6 Process Designer.
The process designer is started whenever we choose to create a business process (by selecting the New Item | Business Process option in the project authoring perspective), or open one that we previously created from the Project Explorer view (the one on the left-hand side of the Project Authoring perspective). It should be a tool flexible enough to allow users to create their own specific types of extensions to the BPMN2 standard, but strict enough to allow the generated process definition to still comply with the standard. That way, the generated process will be able to run the process runtime with jBPM6 the way the user wants, and at the same time, it will be able to run in any other type of process runtime that is compliant with BPMN2.
To achieve this level of flexibility, enough configurations should be allowed so that every implementation parameterization can be added to the business processes being defined. In order to keep the structure of the process in a tidy but efficient way, the process designer provides an attribute panel to define specific parameters for all the components in the diagram, from a specific sequence flow to the process itself.
In the following screenshot, we see a brief glimpse of the process designer UI present in the Workbench:

In the preceding screenshot, we can see a few of the characteristics available for the designer. We can see the diagram definition, the properties of a selected node (the terminate event) in the panel to the right-hand side corner of the editor, and we can see that we can change the type of the selected node as well. At the top of the editor, we can see a series of icons with many different functions: save, cut, copy, paste, delete, undo, redo, and a few others that we will cover in more detail in the next few chapters. This section is called the action bar of the process designer. We can also see other sections, such as the Metadata tab, at the bottom, where we can put specific information about our knowledge asset, such as version history and item description. Also, the canvas has tabulation at the top, dividing the Process Modelling view from another called Simulation Results, which will be explained in detail in Chapter 5, Creating a Process Project in the KIE Workbench.
There are more attributes to the process designer that, at this moment, are going to distract us from getting a full perspective of the Workbench, which is why we will leave the full induction to the designer for Chapter 5, Creating a Process Project in the KIE Workbench.
In order to be able to create executable processes, we will end up needing more than just the process definitions. Process definitions will be dependent, at least in runtime, of a specific data model, handlers for specific tasks, and even rules to make complex decisions at particular points. In order to be able to run such complex processes we will need a way to define all these components along with the business processes. The KIE Workbench provides us with many different editors that cover all these necessities.
All types of knowledge definitions that we will need to create will be accessible later on from the Project Explorer view on the right-hand side of the project authoring perspective, and can be created from the display view after clicking on the New Item option. Each type of knowledge asset has a different structure, and due to size restrictions in the book, we won't be able to explain every single one. However, we will cover the ones most related to process definitions and runtimes.
The first things that a growing process definition will need are work item definitions. Work item definitions are specific mappings added to abstract tasks in BPMN2 in order to determine some form of special behavior that a given task should have. They have predefined inputs and outputs that suggest a way of communicating with the task, a given name to map it to a specific implementation, and (for the purpose of diagramming) they have a display name and an (optional) icon. In the KIE Workbench, work item definitions are written in a special scripting language called MVEL (http://mvel.codehaus.org), and the given editor provides a few helper buttons to create the needed script faster, as shown in the following screenshot:

But work item definitions are just the beginning of the needed components. Also, depending on the type of tasks we use from the BPMN2 standard, we might need to create rules for Business Rule tasks, or classes to be used for data objects. The KIE Workbench provides a way to define both types of assets, through the different rule editors and the data modeler, as shown in the following screenshot:

In the preceding screenshot, we see a business rule opened from the Guided Rule Editor window, which allows us to define a rule in natural language. It will be based on a Java-based model, created with the data modeler shown in the following screenshot:

Finally, we need a way to define all configurations to the runtime that will be specific for a particular process definition or group of process definitions. Now that we have seen how to define processes, we can go back to the project editor and see the configuration behind the Knowledge bases and sessions option, as shown in the following screenshot:

In the view shown in the preceding screenshot, we can define different KIE bases for our project. We can make one of them the default one and decide which packages to include inside them. The packages will represent the different folders that we create in our project and where we might add processes, work item definitions, rules, or anything else. In this way, we can have multiple KIE bases in one project with different process definitions working inside each one.
Each KIE base will have a series of KIE sessions associated, and we will be able to configure them to work in multiple ways. We will see the different configurations for KIE sessions when we see the interaction of processes and other knowledge definition types in Chapter 9, Integration with Other Knowledge Definitions.
This is the point where the process definition environment ends and the process runtime begins. The next step is to click on the Build & Deploy button in the project editor to make the project and all its configurations available for the runtime. I understand that you would have preferred to start defining your own processes, but don't despair. We will start doing so as soon as we start with Chapter 5, Creating a Process Project in the KIE Workbench. For now, we need to concentrate on understanding how all components are interconnected.
Process defining components only need to worry about the process until it is deployed in a Maven repository. Later on, each process runtime should be concerned with having the corresponding version of a Maven dependency running inside.
Now, that we have the workbench running, we need to understand how its execution components are used. There are many components inside the runtime part of the workbench, ranging from dashboard indicators to asynchronous task management tools, but the ones we will focus on (and about which we will be going into the most detail) are the ones needed to get process executions running. In order for process instances to be able to interact with people, the workbench needs the following tools:
- User configuration: This tool is used to define roles and authentication (to which you can add users with the JBoss command line
add-user.shoradd-user.bat) - Process Runtime: This tool is used to execute processes
- Process UI: This tool is used to interact with the executions
- Human Task List: This tool is used to see assigned and potential human tasks
- Human Task Forms: This tool is used to perform said human tasks
The process runtime is the internal configuration that the workbench must provide to create and execute process instances. In order to do so, it must provide external system connectors to connect to other systems and human tasks. This configuration should be something that can be easily extended over time.
The KIE Workbench provides this extension capacity through the project authoring perspective, which allows us to manage all our knowledge through KIE modules. Once we have all the business processes and other knowledge assets we need in our project, we can open the Tools | Project Editor option from the second navigation bar in the project authoring perspective. This would open the editor shown in the following screenshot:

In the preceding screenshot, we selected the Evaluation project in the Project Explorer view, by clicking first on the jbpm-playground repository and then in the Evaluation project. Once in the project editor (which will open once you select the Evaluation project), we click on the Build & Deploy button to actually compile the project content and publish it on an internal Maven repository.
Once a project is deployed, it becomes a component in the engine that feeds process definitions that can be executed to our environment. We call this engine configuration the process runtime. In a sense, the process runtime is just a preconfigured environment for jBPM6 to execute processes already connected to all external systems and humans.
A process runtime should be configurable, that is, we should be able to include all the different configurations to make sure the environment is going to run the process definitions in the way we want. To do so, we can edit the kmodule.xml file of the projects we are creating. To do so, we need to select the Project Settings: Project General Settings to see a drop-down menu and select Knowledge Base Settings inside the Project Editor tool. The following screenshot shows the Knowledge Base Settings editor:

The process runtime can be configured in this editor to have special external connectors and can be later on exposed to many other servers using the runtime engine and runtime manager interfaces, which are discussed in detail in Chapter 7, Defining Your Environment with the Runtime Manager.
Having the process runtime allows our processes to be able to execute in the backend of our workbench. In order to interact with said workbench directly, we need a special UI to access all the methods involved in process execution. For that, the KIE Workbench provides a few entries in the Process Management navigation bar option. We'll discuss each one of them.
Only when we have successfully deployed a KIE module, can we see its process definitions in the Process Definitions List perspective (found inside the Process Management navigation bar option). In the following case, we see the process definitions available in the demo/jbpm-playground-Evaluation project. The following screenshot shows the Process Definitions perspective in the KIE Workbench:

In the list shown in the preceding screenshot, we can see an icon (the magnifying glass icon) to see the process details (its human tasks, the users and the roles assigned to them, the process ID, and so on) and another icon (the play button icon) to start the process (which will provide a previously defined form to fill the data necessary to begin the process). When we press the play icon, it will show us the following form to start a process instance of the Evaluation process. After completing the form and pressing the large play button, we will have created a new process instance as shown in the following screenshot:

This interface allows us to see the different process definitions available to start them, but we still need an interface to see the currently running process instances and its internal state. For that, there is another option in the Process Management navigation bar option, called Process Instances. In the following screenshot, we can see the task initiated by completing the form in the preceding screenshot:

The UI allows us to filter process instances by their state, see their details, send signals to them, or abort them. But this is mostly an administrative topic to handle process systems. End users would mostly interact with the tasks assigned to them, or their roles. To do so, the workbench needs a way to show:
- A collection of all the different human tasks with which a user can interact
- A particular form to interact with each one of the said human tasks
For that purpose, the workbench provides us with task lists and task form interfaces.
It is important that all asynchronous tasks (that the process runtime is waiting to be completed) have a way to be managed from external tools. The case of human tasks is special, because they won't be handled by an automatic external system, but by people who need a UI to interact with said tasks. For that purpose, the workbench provides a way to see tasks that are either owned by the current user or could be assigned to the current user in the form of lists. On this view, we can perform a series of different actions on each task: claim them, release them, and start them, which are all explained in detail in Chapter 6, Human Interactions. Task lists can be generic, but for some special cases, we might want to make them more specific to show special data of certain types of tasks.
In the following screenshot, which can be accessed using the main toolbar option Tasks | Tasks List, we will find several views for task lists dedicated to personal tasks:
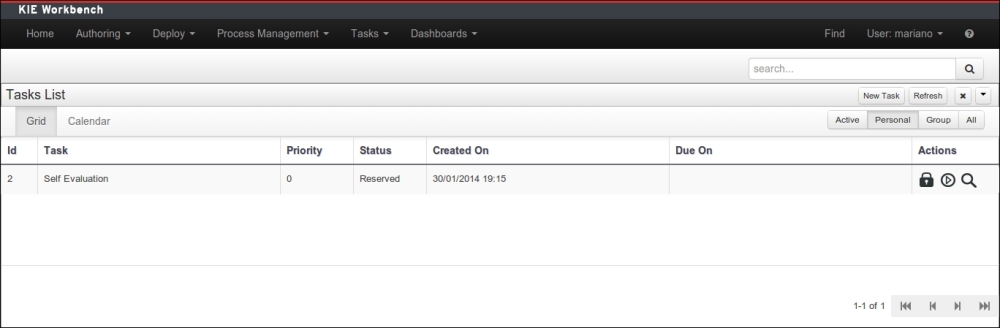
Tip
To see tasks assigned to your user, created from the Evaluation process definition, you will need to complete the Employee field of the start process form with your user ID. Otherwise, the task will be assigned to some other user that you will have to log in with in order to see the Self Evaluation task assigned to him or her.
And when we click on the play button in one of those tasks, we go ahead to the next important UI point for human tasks, the Task Forms option.
Task forms can be generic, based on task input and output information (elements described in Chapter 3, Using BPMN 2.0 to Model Business Scenarios), but should be dependent on each specific task to provide the most interaction help to the end user, because sometimes input/output information is not enough to infer the expected user interaction. Once a task is started, we can click on it to see its details, and we can have access in the workbench to the specific task form by clicking on the Work button. Have a look at the following screenshot:

From the view shown in the preceding screenshot, we can save the progress of the task, release it to the group, and complete it. Some generic abilities enabled for all tasks involve attaching documents and adding comments. Both are provided in the task details as well at a click on the Attachments or Comments buttons. At this point, if you go back to the Process Instances view, you will see that the process instance is in another stage because you completed the specific task.
Using these components, we will have enough user interfaces to work with any process we might encounter. We will use this chapter as a guide to start creating the managing processes in Chapter 5, Creating a Process Project in the KIE Workbench.
All these components are bonded together in the KIE Workbench thanks to a particular framework called UberFire that allows us to have a configurable and extensible workbench environment. We will dedicate Appendix, The UberFire Framework, to discussing its structure and use, which will become useful if you wish to extend the jBPM6 provided tooling for your own personal customization. This is an advanced topic, but will give you a full control over how to use the KIE Workbench to fit it best to your company.