Game Maker games consist of many different types of resources. At a minimum, every game must consist of at least one room. However, to really do anything, you must add different types of objects to your games and configure their appearance and behavior. Objects are the core components of every game, so a good understanding of them is essential. This chapter provides you with an overall view of how things work in Game Maker and then focuses in on objects, explaining how they are created and how to make them respond to events and perform actions. To help tie everything together, the chapter ends by walking you through the creation of a demo application, giving you the opportunity to make use of your new understanding of the objects and the Game Maker IDE.
An overview of the major topics covered in this chapter includes:
How objects, sprites, rooms, sounds, and backgrounds come together to create games
How to create objects and configure their properties
How to configure objects to respond to different types of events
How to use action icons to specify object behavior
As you learned in Chapter 2, every Game Maker game consists at an absolute minimum of at least one room, although games can consist of as many rooms as necessary. These rooms can serve as different locations or parts of a larger game world. Alternatively, in a game made up of different levels, you can use rooms as the basis for each new level. To bring your games to life, you need to add different objects to these rooms. These objects are things like planes, cars, tanks, and monsters as well as missiles, bullets, bouncing balls, and obstacles like walls.
Objects are the key elements upon which games are based. In order to be able to see them, objects must be assigned sprites. Sometimes objects are represented by more than one sprite to allow for the animation of that object. For example, the sprite shown in Figure 3.1, which consists of two subimages, might be used to animate the movement of a bug. If you look closely at both images, you will notice that the bug’s limbs are at different locations. By switching between the two images when the sprite moves, you can create the illusion that the sprite is walking.

Most objects are visible to the user during game play, but they don’t have to be. While some objects, such as walls, don’t do anything, most of the objects in games move around and interact with one another in some form. Objects can move on their own or under the control of the player. As objects move, they may collide within one another, such as when a player hits a ball with a bat in a baseball game or when a missile hits a spaceship in an outer space shootout game.
Players control certain objects in games. For example, in an adventure game the player may move the main character around the game world in search of treasure and adventure. In a Pac-man-style game, the player moves the Pac-man character around a maze. In addition, other things occur during game play that the player has little if any control over. For example, in Pac-man, ghosts move around the maze and sometimes chase the Pac-man.
The different things that occur during game play are referred to as events. Events occur for all sorts of reasons. For example, events automatically occur when a game is first started or when a room is first displayed. Using these events, your game can set certain things into motion, such as the movement of ghosts in Pactnan or the launching of missiles at enemy space ships in a space shootout game. Events also occur when the player does something. For example, events occur when the player presses keyboard keys or moves the mouse around. Events also occur when objects run into one another, creating collision events. Game Maker support dozens of different types of events.
A big part of game development is deciding to what events you want the objects to react. You specify the actions that objects make in response to events by assigning different action icons to events belonging to objects. For example, if a missile object collides with a spaceship object, you might specify a series of actions that might include:
Destroying the missile object
Destroying the spaceship object
Creating and displaying an explosion object
Playing a sound
Subtracting one from the number of player lives
Restarting the current room (level)
The actions outlined above represent only a small subset of the number of actions that Game Maker supports. As of the writing of this book, Game Maker 7.0 Pro supports 125 different action icons.
To make the rooms in your games more interesting, you will want to decorate them by either assigning them a background color or by using one or more graphic background images to create a suitable playing field or backdrop. In addition to using colorful and well-designed graphics for sprites and backgrounds to make your games visually appealing, you will also want to add sounds to your games to make them more realistic and fun. Use of sound usually involves the addition of sound effects that are played to identify when events occur, such as when a ball slams into a wall or when a missile hits a plane and blows it up. In addition to sound effects, most games include background music that helps to establish a mood and to convey a sense of urgency, suspense, excitement, etc.
To summarize, to create a game using Game Maker you must:
Create at least one room
Populate the room(s) with its objects (which are represented by sprites)
Specify the different types of events that the objects should respond to
Assign actions to objects that tell them what actions to perform when events occur.
Hint
The key components to any Game Maker game are objects, rooms, sprites, sounds, and backgrounds. In addition to these components, more advanced games may consist of other types of components, including paths, scripts, fonts, and timelines. This chapter’s primary focus is on objects. You’ll dig deeper into sprites, sounds, backgrounds, and rooms in Chapter 4. In addition, other game resources will be demonstrated in some of the book’s later chapters.
A critical component in any game is the objects that you define. These objects represent everything that the player sees and interacts with in the game, except for backgrounds. In addition, many games make use of invisible objects, which although unseen by the player, are used to control key activities within the game. A good understanding of objects, their relationship to one another, and their interactions with each other and the player is essential to any Game Maker developer.
Objects represent things like cars, ships, planes, monsters, bullets, missiles, and so on in games. Most, though not all, objects are represented by a graphical sprite. Objects are designed to react to events that occur during computer games, such as when the player presses a keyboard key or moves the mouse or when two objects collide with one another, such as when a missile hits a tank in a tank battle game. Objects are created by clicking on Resources > Create Object. This displays the Object Properties window as shown in Figure 3.2.

Objects are really just blueprints or templates that define all attributes of an entity in your game as well as the events that the entities respond to and the actions the entities take in response to those events. Once defined, you can add instances of objects to your game. Each instance that you add is a mirror copy of the object.
You can add as many instances of an object as you want to a game. As such, you can define an object representing an enemy fighter plane and then use it as the basis for instantiating any number of enemy aircraft in a computer game.
Objects are complex entities that consist of a number of properties. Objects have a name, which must be unique within an application. By assigning an object a sprite, you make it possible for the game to display it. In addition, by displaying an object’s Visible property, you can control whether its sprite is visible or not. By enabling or disabling an object’s Solid property, you can determine whether an object can create a collision when it makes contact with other solid objects.
Objects also have a Depth property that determines whether they are drawn on top of or under other objects when they overlap one another. Objects with a higher depth value are drawn first. Objects with a lower value are drawn last (on top). You can even assign a negative value to an object to ensure that it is always drawn on top of other objects. Objects assigned the same depth are drawn in the order in which they are created.
By default, objects are deleted when they leave rooms. However, by enabling an object’s Persistent property, you can keep it alive for as long as you want, thus making it possible to move objects between rooms. An object’s Mask property is used when working with 3D objects to help determine when collisions occur.
Objects can also have child/parent relationships with one another. Objects in Game Maker support a mechanism known as inheritance, which provides you with a powerful means of managing and configuring common object properties and actions. Every object can be assigned a parent. Property changes made to a parent object are automatically reflected in its child objects. Thus if you create a game that uses an army of robots, you can create a parent robot object and configure it, and then, by assigning it as the parent object for other robot objects, automatically configure all of the child objects. That’s a real time-saver.
Hint
As already stated, parent objects can also have parent objects, but you need to make sure that you do not create any cyclical relations. In other words, you cannot assign a parent object’s child object as its parent object.
If necessary, you can further configure child objects. Any changes made to the child object that conflict with those specified in the parent object automatically override the parent’s settings. Objects inherit both the properties and actions of their parents. You can create as many levels of parent/child relationships as you need, in effect defining child, parent, and grandparent objects and so on. One common development technique that Game Maker developers often use is to create a master object and use that object to outline default properties and actions for other objects. This way, if you ever need to modify object behavior, all you need to do is to modify the master object. This can save you tons of time in creating and modifying your games and sure beats having to create objects from scratch or even creating new objects by copying existing ones.
Hint
If you elect to use the master object as an active character within a game, any collisions that occur with this object also apply to all of its child objects. So you’ll need to be careful if you use this approach. Note, however, that if a child object has a collision, the collision has no effect on the child’s parent object.
In order for objects to do anything, you must configure them to respond to different types of events that occur during game play. Events are a type of message that Game Maker generates during game play, informing objects when things occur. Using Game Maker’s event-driven approach, you can specify different types of actions you want the object to take when different types of events occur. Table 3.1 provides a high-level overview of the different types of events to which all objects can be configured to respond.
Table 3.1. Game Maker Events
Event | Icon | Description |
|---|---|---|
Create | Occurs when an instance is created | |
Destroy | Occurs when an instance is destroyed or deleted | |
Alarm | Occurs after a specified number of steps elapse (every instance supports up to 12 alarm events) | |
Step | Occurs continuously throughout application execution providing you with the ability to repeatedly execute actions during game play | |
Collision | Occurs when two instances collide (touch) one another during game play | |
Keyboard | Occurs when the player presses a keyboard key, allowing your application to repeatedly execute one or more actions for as long as a keyboard key is being pressed | |
Mouse | Occurs when the player moves the mouse or clicks on one of its buttons, allowing your application to respond to user input | |
Other | A collection of events that do not fit into other categories that can be used to initiate actions in response to events that occur, for example, when a game or room is started or ended, when a player runs out of lives or health, or when an object moves outside of a room | |
Draw | Allows you to take control of game activity when a sprite drawing event occurs, allowing you to draw a different sprite or to execute any number of alternative actions | |
Key Press | Occurs when the player presses down on a keyboard key allowing your application to respond when a keyboard key is initially pressed | |
Key Release | Occurs when the player releases a keyboard key, allowing your application to respond whenever a pressed key is released | |
Cancel | Closes the Event Selector window (not an event) |
As you can see, Game Maker supports a considerable number of events. To specify the events you want to assign to an object, you click on the Object Properties window’s Add Event button located below the events list. This displays the Event Selector window shown in Figure 3.3.

Once added, events are displayed in the events list column of the Object Properties window.
Adding events to objects is only half of the story. In order to enable objects to respond to events, you must assign and configure specific types of actions to those events. Game Maker comes equipped with all kinds of predefined actions that it makes accessible on seven sets of tabs located on the right-hand side of the Object Properties window, shown in Figure 3.4 and as listed here:

Move. The actions that control the movement of objects.
Mainl. These actions create, modify, and destroy instances of objects; change the sprites assigned to objects; control sound playback; and control movement between different rooms.
Main2. These actions control timing within a game, allow a scene to be paused for a specified period of time, display text messages and game information, and provide the ability to restart, terminate, save, and load games.
Control. These actions perform the conditional execution of actions, execute GML code and scripts, and create and access variable data.
Score. These actions assist you in keeping track of player score, health, and lives.
Extra. These actions work with Game Maker’s particle system, enabling you to add various special effects to your games, including rain, snow, smoke, and explosions.
Draw. These actions facilitate the drawing of sprites within rooms, allowing you to take control of and manage Game Maker’s drawing operations.
To assign one or more actions to an event, you must select the event and then drag and drop actions onto the actions area. Each action is identified by a description icon that identifies what the action does. In addition, if you move the mouse pointer over an action, Game Maker will display a brief description of the action in a popup window.
Depending on the action selected, Game Maker may display a configuration window when you drop the action on the actions area, allowing you to specify how the action should execute. While configuration options may vary, two common parameters appear on most actions. These options include the Applies to and Relative options. For example, Figure 3.5 shows the window that appears when the Moved Fixed action is added to an event.

Figure 3.5. Most actions include the Applies to and Relative options located at the top and bottom of the Action Configuration window.
The Applies to option allows you to select one of three choices. Self sets the object to which the action belongs as the target for the action. When working with collision, the Other option lets you apply the action to the other object involved in the collision. Lastly, the Object option lets you specify the name of any object you want as the target of the action. By default, when assigning a numeric value of an object, Game Maker replaces its value with the value specified on the configuration window. However, by selecting the Relative option, you can instruct Game Maker to increment the value by the amount specified.
A quick review of all of the actions provided through the Game Maker IDE is provided in the sections that follow. This is followed by how to create a demo application, with specific focus on the definition of objects, events, and actions.
Hint
The sheer number of available actions can be a little difficult to take in all at once. I suggest you glance through the tables shown in the following sections and that you bookmark these pages so that you can come back to them later when you need to locate a specific type of action.
Game Maker provides a large number of actions that control the movement of objects. The actions, located on the Move tab, are outlined in Table 3.2.
Table 3.2. Game Maker’s Move Actions
Icon | Action | Edition | Description | |
|---|---|---|---|---|
Move | Move Fixed | Lite/Pro | Moves an instance in one of a number of predefined directions | |
Move Free | Lite/Pro | Moves an instance in a specified direction (between 0 and 360 degrees) | ||
Move Towards | Lite/Pro | Specifies a position and speed an instance should move toward | ||
Speed Horizontal | Lite/Pro | Sets the speed of an instance as it moves horizontally | ||
Speed Vertical | Lite/Pro | Sets the speed of an instance as it moves vertically | ||
Set Gravity | Lite/Pro | Specifies the direction and speed at which gravity affects an instance | ||
Reverse Horizontal | Lite/Pro | Reverses the horizontal direction of an instance | ||
Reverse Vertical | Lite/Pro | Reverses the vertical direction of an instance | ||
Set Friction | Lite/Pro | Applies friction to an instance as it moves | ||
Jump | Jump to Position | Lite/Pro | Jumps an instance to a specific location | |
Jump to Start | Lite/Pro | Jumps an instance to the location where it was created | ||
Jump to Random | Lite/Pro | Jumps an instance to a random location within a room | ||
Align to Grid | Lite/Pro | Ensures that an instance’s location is kept in alignment with the room’s grid | ||
Wrap Screen | Lite/Pro | Moves an instance exiting one side of a room to the other side of the room | ||
Move to Contact | Lite/Pro | Moves an instance until it collides with another instance | ||
Bounce | Lite/Pro | Bounces an instance away from another instance when a collision occurs | ||
Paths | Set Path | Lite/Pro | Instructs an instance to follow a specific path | |
End Path | Lite/Pro | Instructs an instance to stop on its specified path | ||
Path Position | Lite/Pro | Changes an instance’s position on a path | ||
Path Speed | Lite/Pro | Modifies the speed at which an instance moves along a path | ||
Steps | Step Towards | Lite/Pro | Instructs an instance to move toward a position on a path | |
Step Avoiding | Lite/Pro | Moves an instance along a path while attempting to avoid any obstacles that may be in the way |
Game Maker has a large number of actions that can do things like create instances of objects, change sprites, play sounds, and move between the different rooms that make up your games. These actions, outlined in Table 3.3, are located on the Main1 tab.
Table 3.3. Game Maker’s Main1 Actions
Subcategory | Icon | Action | Edition | Description |
|---|---|---|---|---|
Objects | Create Instance | Lite/Pro | Creates a new instance of a specified object | |
Create Moving | Lite/Pro | Creates a new object, assigning it a speed and direction | ||
Create Random | Lite/Pro | Creates an instance using a pool of 1 to 4 objects at a specified location | ||
Change Instance | Lite/Pro | Changes the current instance of an object into an instance of another object | ||
Destroy Instance | List/Pro | Destroys an instance of an object | ||
Destroy at Position | Lite/Pro | Destroys any instances within a specified area | ||
Sprite | Change Sprite | Lite/Pro | Changes the sprite or subimage used to represent an instance | |
Transform Sprite | Pro | Changes the size and orientation of an instance’s sprite | ||
Color Sprite | Pro | Changes a sprite’s color by blending its colors with a specified color | ||
Sounds | Play Sound | Lite/Pro | Plays a specified Sound resource | |
Stop Sound | Lite/Pro | Stops playback of a specified Sound resource | ||
Check Sound | Lite/Pro | Checks to see if a specified Sound resource is being played | ||
Rooms | Previous Room | Lite/Pro | Moves to the game’s previous room | |
Next Room | Lite/Pro | Moves to the game’s next room | ||
Restart Room | Lite/Pro | Restarts a room back to its initial state | ||
Different Room | Lite/Pro | Moves to a specified room | ||
Check Previous | Lite/Pro | Checks to see if a previous room exists | ||
Check Next | Lite/Pro | Checks to see if the next room exists |
Game Maker also provides access to actions that you can use to control timing within a game, allow a scene to be paused for a specified period of time, and display text messages and game information. In addition, there are actions that provide you with the ability to restart, terminate, save, and load games. These actions, located on the Main2 tab, are outlined in Table 3.4.
Actions located on the Control tab, listed in Table 3.5, control when other types of actions are performed. These actions involve some sort of analysis in which a condition is examined. If the condition proves true, one or more additional actions are performed; otherwise, they are skipped. Other actions let you specify actions to be performed in the event an analysis proves false. Using Start blocks and End blocks you can even group collections of actions together, allowing you to conditionally control the execution of all the actions embedded within the block, in very much the same manner that programmers control the conditional statement execution when writing program code.
Table 3.4. Game Maker’s Main2 Actions
Subcategory | Icon | Action | Edition | Description |
|---|---|---|---|---|
Timing | Set Alarm | Lite/Pro | Sets one of twelve alarm clocks for an instance | |
Sleep | Lite/Pro | Pauses a scene for a specified amount of time | ||
Set Time Line | Lite/Pro | Assigns a timeline to an instance | ||
Time Line Position | Lite/Pro | Sets or modifies the position within a timeline | ||
Info | Display Message | Lite/Pro | Displays a text string in a dialog window | |
Show Info | Lite/Pro | Displays game information in a window | ||
Show Video | Pro | Plays a video | ||
Game | Restart Game | Lite/Pro | Restarts a game | |
End Game | Lite/Pro | Terminates a game | ||
Save Game | Lite/Pro | Saves the current status of a game | ||
Load Game | Lite/Pro | Loads game status for a previously saved game | ||
Resources | Replace Sprite | Pro | Replaces a sprite with an image from a graphic file | |
Replace Sound | Pro | Replaces a sound with a sound loaded from an audio file | ||
Replace Background | Pro | Replaces a background with an image loaded from a graphic file |
Table 3.5. Game Maker’s Control Actions
Icon | Action | Edition | Description | |
|---|---|---|---|---|
Questions | Check Empty | Lite/Pro | Determines if an instance would generate a collision if placed in a specified location (e.g., to determine if it is safe to move the instance) | |
Check Collision | Lite/Pro | Determines if a collision has occurred | ||
Check Object | Lite/Pro | Determines if an instance has come into contact with another specified instance | ||
Test Instance Count | Lite/Pro | Counts the total number of instances for a specified object | ||
Test Chance | Lite/Pro | Generates a random value by rolling a virtual die | ||
Check Question | Lite/Pro | Interacts with the player by displaying a text string and prompts the player to click on a Yes or No button | ||
Test Expression | Lite/Pro | Evaluates an expression and executes the next action if the expression evaluates as being true | ||
Check Mouse | Lite/Pro | Determines whether a mouse button is being pressed | ||
Check Grid | Lite/Pro | Determines whether an object is evenly aligned with the grid | ||
Other | Start Block | Lite/Pro | Specifies the beginning of a block of actions | |
Else | Lite/Pro | Executes the next action when the results of the previous evaluation proves false | ||
Exit Event | Lite/Pro | Stops the execution of actions for the current event | ||
End Block | Lite/Pro | Specifies the end of a block of actions | ||
Repeat | Lite/Pro | Repeats the execution of one or more blocks a specified number of times | ||
Call Parent Event | Lite/Pro | Calls an event within a parent object | ||
Code | Execute Code | Lite/Pro | Executes GML code typed into the action form | |
Execute Script | Lite/Pro | Executes GML code stored as a script | ||
Comment | Lite/Pro | Adds a comment line to the actions lists, displays text in italic | ||
Variables | Set Variable | Lite/Pro | Creates a variable and assigns a value to it | |
Test Variable | Lite/Pro | Evaluates the value assigned to a variable | ||
Draw Variable | Lite/Pro | Draws (displays) the value assigned to a variable |
Game Maker maintains a built-in score feature that makes it easy for you to keep track of the player’s score. Game Maker also facilitates the tracking of player lives, which you can interact with and control using various actions. Lastly, Game Maker maintains a mechanism for assigning and tracking a player’s health that, like score and lives, can be managed using various actions. All of these actions, outlined below in Table 3.6, are available on the Score tab.
The actions located on the Extra tab, outlined in Table 3.7, are designed to work with Game Maker’s particle system, which can add a variety of special effects to your games. These special effects include things like fireworks, rain, and snow, and are made possible through Game Maker’s built-in particle system.
Hint
You can exercise even more detailed control over Game Maker’s particle system using functions made available to scripts written in GML. You will learn about programming using GML later in this book, in Chapters 9 through 11.
Particles are small, consisting of individual pixels or small sprites. A subset of Game Maker’s particle system can be accessed through different particle actions. Particles have a shape, size, and color. They exist for a limited amount of time and move in a specified speed and direction and are affected through the application of gravity. Particles are created using particle emitters and can be created in bursts or a constant stream. Game Maker allows you to work with up to eight particle emitters at a time. Also included on the Extra tab are actions that allow you to play and control the playback of CDs.
The default behavior in Game Maker is for games to manage the drawing of sprites within rooms. However, using various actions made available on the Draw tab, outlined in Table 3.8, you can modify this behavior and dictate how drawing operations are handled.
Table 3.6. Game Maker’s Score Actions
Subcategory | Icon | Action | Edition | Description |
|---|---|---|---|---|
Score | Set Score | Lite/Pro | Sets or changes the player’s score | |
Test Score | Lite/Pro | Evaluates the value of the player’s score | ||
Draw Score | Lite/Pro | Draws (displays) the value assigned to the player’s score | ||
Show Highscore | Lite/Pro | Displays the top ten scores for the game in a highscore list table | ||
Clear Highscore | Lite/Pro | Clears out the values stored in the highscore list table | ||
Lives | Set Lives | Lite/Pro | Sets or changes the number of lives the player has left in the game | |
Test Lives | Lite/Pro | Evaluates the value of lives the player has left in the game | ||
Draw Lives | Lite/Pro | Draws (displays) the number of lives that the player has left in the game | ||
Draw Life Images | Lite/Pro | Substitutes graphic images representing player lives in place of text when displaying the number of lives remaining | ||
Health | Set Health | Lite/Pro | Sets or changes the player’s health | |
Test Health | Lite/Pro | Evaluates the value of the player’s health | ||
Draw Health | Lite/Pro | Draws (displays) the value assigned to the player’s health | ||
Score Caption | Lite/Pro | Allows you to specify whether Game Maker should display the player’s score, lives, and health in the game window’s titlebar |
Okay, now that we have reviewed the overall big picture of game development using Game Maker and spent some time focusing on the importance of objects and their support for events and actions, let’s work on a demo program named BouncingBall that will help tie everything together. To begin, start Game Maker, or if Game Maker is already running, click on File > New to create a new application. In response, the Game Maker IDE appears as shown in Figure 3.6.

Table 3.7. Game Maker’s Extra Actions
Icon | Action | Edition | Description | |
|---|---|---|---|---|
Particles | Create Part System | Pro | Creates a particle system | |
Destroy Part System | Pro | Destroys a particle system | ||
Clear Part System | Pro | Clears out any currently displayed particles | ||
Create Particle | Pro | Creates a specified particle type | ||
Particle Color | Pro | Sets the color used when drawing a particle | ||
Particle Life | Pro | Specifies how long a particle is to remain visible | ||
Particle Speed | Pro | Assigns the speed and direction used when particles move | ||
Particle Gravity | Pro | Allows you to affect the movement of particles by applying gravity to them | ||
Particle Secondary | Pro | Allows you to create new particles from existing ones | ||
Create Emitter | Pro | Creates up to eight particle emitters, which are required to generate particles | ||
Destroy Emitter | Pro | Destroys a specified particle emitter | ||
Burst from Emitter | Pro | Instructs a particle emitter to begin generating particles | ||
Stream from Emitter | Pro | Instructs Game Maker to begin streaming a specified number of particles | ||
CD | Play CD | Pro | Plays tracks located on a CD | |
Stop CD Pause CD | Pro | Stops CD playback | ||
Pauses CD | Pro | Pauses CD playback | ||
Resume CD | Pro | Resumes CD playback | ||
Check CD | Pro | Checks to see if there is a CD in the computer’s default CD drive | ||
Check CD Playing | Pro | Checks to see if the computer’s default CD contains a CD | ||
Other | Set Cursor | Pro | Replaces the mouse pointer with a sprite | |
Open Webpage | Pro | Opens a specified web page using the player’s default web browser |
Table 3.8. Game Maker’s Draw Actions
Icon | Action | Edition | Description | |
|---|---|---|---|---|
Drawing | Draw Sprite | Lite/Pro | Draws a sprite and subimage at a specified position | |
Draw Background | Lite/Pro | Draws a background at a specified position | ||
Draw Text | Lite/Pro | Draws text at a specified position | ||
Draw Scaled Text | Pro | Draws text using a specified horizontal and vertical scaling at a specified position | ||
Draw Rectangle | Lite/Pro | Draws a rectangle shape based on specified attributes | ||
Horizontal Gradient | Pro | Draws a rectangle using a horizontally drawn gradient color | ||
Vertical Gradient | Pro | Draws a rectangle using a vertically drawn gradient color | ||
Draw Ellipse | Lite/Pro | Draws an ellipse using specified attributes | ||
Gradient Ellipse | Pro | Draws an ellipse using gradient color | ||
Draw Line | Lite/Pro | Draws a line between two specified sets of coordinates | ||
Draw Arrow | Lite/Pro | Draws an arrow between two specified sets of coordinates | ||
Settings | Set Color | Lite/Pro | Specifies the color to be used when performing a drawing operation | |
Set Font | Lite/Pro | Specifies the font type and attribute data used when drawing text | ||
Set Full Screen | Lite/Pro | Changes screen display mode to either full screen or a window | ||
Other | Take Snapshot | Pro | Captures a screen shot of the game, storing it as a bitmap (.bmp) file | |
Create Effect | Pro | Creates various effects like rain, snow, smoke, and explosions |
Once complete, the demo will display a window that shows a purple ball bouncing around the screen. The demo will execute within a single window. Each time the ball moves across the screen, it eventually makes contact (collides) with a wall that surrounds the window. After hitting the wall, the ball will bounce off, heading in a different direction. In addition, each time the ball collides with one of the game’s four walls a sound is played.
In order to create this game, you will need to perform a number of steps, as outlined here:
Define two sprites, one to represent the purple ball, and one to represent the wall.
Define the sound that will be use to generate the game’s sound effect.
Configure the game’s background.
Define two objects, one representing the ball and another representing the wall object.
Add a room to the game; populate the room with instances of both objects and configure various room properties.
Configure the ball object to respond to various events and perform specificactions.
Once you have completed these steps, you will be able to save and run the demo.
The first step in creating the BouncingBall demo is to create the sprites it will use to represent objects during game play. While you can certainly use Game Maker’s built-in graphic editor to create your sprites from scratch, this editor only provides basic editing capabilities. Most game developers elect instead to either create their sprites using a more powerful third-party tool or to acquire their sprites from other sources, such as purchasing them from professional graphic artists or myriad of sprite packages that can be purchased and downloaded from the Internet.
For this demo, you will use two sprites supplied by Game Maker (as part of the collection of sprites that it stores by default in a collection of folders located at C:Program FilesGame Maker7Sprites). Let’s begin by creating a sprite for the game’s ball. To do so, click on Resources > Create Sprite. This will add a new sprite to the application and open the Sprite Properties window, as shown in Figure 3.7.

Type spr_ball in the Name file and then click on the Load Sprite button. Using the Open dialog window that appears, drill down into the SpritesVarious folder, select the Ball2.ico file, and then click on the Open button. A picture of the purple ball should be visible when you are returned to the Sprite Properties window. Click on OK to close the Sprite Properties window.
Repeating the steps outlined above, create a second sprite, this time naming it spr_wall and loading Square.ico file, also located in the SpritesVarious folder. These two sprites are the only sprites that you will need to define to create the BouncingBall demo program.
The next step in the development of the demo program is to define and generate a sound effect that will be played whenever the ball collides with and bounces off one of the game’s walls. To do so, click on Resources > Create Sound. This will open the Sound Properties window as shown in Figure 3.8. Assign a name of snd_collision to the sound. To import the sound file used as the basis for defining this sound resource, click on the Load Sound button and drill down into the C:Program FilesGame Maker7Sounds folder, select the beep2.wav file, and click on the Open button. When done, the Sound Properties window should look like the example shown in Figure 3.8.
Hint
As you can see in Figure 3.8, Game Maker allows you to configure numerous properties that affect the playback of sounds. You will learn about these properties in Chapter 4.

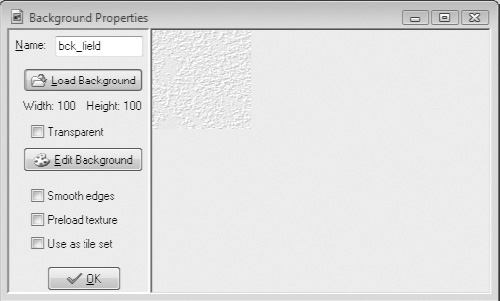
With the demo’s sprites and sound resources now defined, the next step is to define the application’s background. To do so, click on Resources > Create Background. In response, Game Maker displays the Background properties window. Once displayed, enter bck_field into the Name file and then click on the Load Background button and drill down into the C:program FilesGame Maker7Backgrounds folder, select the gray2.wav file, and click on the Open button. When done, the Background Properties window should look like the example shown in Figure 3.9.
Hint
As you can see in Figure 3.9, Game Maker lets you specify a number of different properties that affect the appearance of backgrounds. You will learn about these properties in Chapter 4.
As previously stated, the core components of any Game Maker application are the objects that interact with one another and the player. To create the Boun-cingBall demo, you need to define two objects, a ball object and a wall object. To create the ball object, click on Resources > Create Object. In response, the Object Properties window is displayed. Next, type obj_ball in the Name field and then click on the context menu icon located at the end of the Sprite text field. In response, a context menu is displayed that lists all of the sprites that have been defined in the application. Select the spr_ball object by clicking on its name in the context list. At this point, the Object Properties screen should look like the example shown in Figure 3.10.

Click on the OK button to close the Object Properties window. Now, repeating the steps outlined above, create a new object named obj_wall and assign it the spr_wall sprite, as demonstrated in Figure 3.11.

Before closing the Object properties window for the obj_wall object, enable the Solid property. This is necessary to ensure that a collision event occurs when the obj_ball object comes into contact with it.
Now that the application’s objects have been created, you need to create a room within which the objects can be placed and interact with one another. To do so, click on Resources > Create Room. In response, the Room Properties window appears as shown in Figure 3.12.

Once created, you need to add instances of the objects that make up the demo application to the room. Let’s begin by adding as many instances of the obj_wall object as are needed to completely close in the entire room. To do so, click on the context menu icon located at the end of the object name file located on the middle of the Objects tab and then select the obj_wall object. You should now see the object’s sprite displayed at the top of the Objects tab. Now, using the mouse pointer, left-click on the upper-left grid square. When you do, an instance of the obj_wall object is displayed in that location in the room. Left-click on the upper-left square just to the right of the instance that you just added to add another object. Repeating this process, add as many instances of the obj_wall object as needed to wall in the entire outer perimeter of the room.
Trick
If you need to add entire rows or columns of the same object, you can quickly do so by moving the mouse pointer to the location where you want to place the first instance of the object and then press and hold the Shift key while also pressing and holding down the left mouse button as you move the mouse. In response, Game Maker will automatically add repeated instances of the object to the window for you.
Once you have completed the above task, you need to add an instance of the obj_ball object to the center of the room. To do so, click on the context-menu icon next to the object name field and select the obj_ball object. Next, left-click just once in the middle of the room. At this point, the room should look like the example shown in Figure 3.13.
Before closing the Room Properties window, let’s assign the room a name and specify a text string to be displayed in the application window’s titlebar area. To do so, click on the Settings tab and then enter Level1 in the Name field and then type Bouncing Ball Demo in the Caption for the room field, as demonstrated in Figure 3.14. When you are done, click on the green checkmark button located on the Room Properties window’s toolbar to close the Room Properties window.
Hint
As you can see in Figures 3.13 and 3.14, Game Maker lets you specify a number of different properties that affect the appearance and operation of rooms. You will learn about these properties in Chapter 4.


At this point, you have added and configured all of the different resources needed by the demo application. If you want, you can run the application by clicking on the Green arrow button located on the Game Maker toolbar. In response, Game Maker will load the application and you will see the purple ball and the surrounding walls. However, because you have not yet added any program logic to the game, nothing will happen.
There are two objects in this application. The obj_wall object does not do anything, meaning that it does not respond to any events or execute any actions. The obj_ball object, on the other hand, is supposed to move around the room and bounce off the walls. To set this up, you need to drill down into the Object folder located in the resource folder tree and then double-click on the obj_ball object to re-open its properties window.
In order to get things started, you need to provide instructions to the obj_ball object that will make it move. To accomplish this, you need to first add the Create event to the obj_ball object and then add the Moved Fixed actions to it. To add the Create event, click on the Add Event button located at the bottom of the events list area. In response, the Event Selector window is displayed. Click on the Create button to add the Create event to the object’s events list. Now, select the Create event in the events list and click on the Move tab located on the right-hand side of the Object Properties window. Next, drag and drop an instance of the Moved Fixed icon onto the actions area. When you do, the Move Fixed window appears as shown in Figure 3.15, allowing you to configure the operation of this action.

Figure 3.15. Using the Move Fixed action, you can instruct Game Maker to move an object in any of up to eight randomly selected directions at any speed you specify.
For this demo, the ball will begin moving in one of four randomly selected directions. To set this up, click on each of the four diagonally oriented arrows. As you click on each arrow, it will turn from blue to red, indicating its selection. Next, in order to get the ball moving, specify a value of 8 in the Speed text field. This setting instructs Game Maker to begin moving the ball at a speed of 8 pixels per step. In Game Maker, activity is measured in steps. By default, Game Maker takes 30 steps every second.
Hint
A step is a period of time in which Game Maker performs operations, such as moving sprites around in a room. By default, Game Maker executes 30 steps every second. However, as will be explained in Chapter 4, you can override this behavior by modifying the Speed setting located on the Room Properties Settings tab. A pixel (picture element) is the smallest addressable area that can be drawn on the screen or window.
Click on the OK button to save the changes outlined above. Game Maker will respond by closing the Move Fixed window, leaving the Object Properties window visible. At this point, the Object Properties window for the obj_ball object should look like the example shown in Figure 3.16.

If you try running the demo at this point, you will see that when initially started, the ball will randomly move in one of four possible directions. However, instead of bouncing off the walls that make up the perimeter of the game window, the ball keeps moving and disappears. Obviously, this is not how things should work. To correct the situation, you need to add a Collision event to the obj_ball object and then add an action that instructs the ball to bounce away from walls when it comes into contact with them. To accomplish this, click on the Add Event button and then click on the Collision button when the Event Selector window appears. In response, Game Maker will display a context menu, listing all of the objects defined in the application. Click on the obj_wall object. This tells Game Maker that you want to do something whenever the ball collides with a wall.
Now that you have configured the required collision event, select it and then drag and drop the Bounce action (located on the Move tab) to the actions area. When you do, the Bounce window appears. You do not need to make any changes on this window, so click on its OK button to close it. To make the demo more interesting, let’s add an action that plays a sound effect whenever a collision occurs with the ball and a wall. To set this up, click on the Main1 tab and then drag and drop the Play Sound icon onto the actions area. In response, Game Maker will display the Play Sound window. To tell Game Maker what sound you want it to play, click on the context menu icon located at the end of the sound field. Game Maker will then display a context list showing all of the Sounds added to the application. Click on the entry for the snd_collision sound, which you previously added to the application. At this point, the Object Properties window for the obj_ball object should look like the example shown in Figure 3.17.

Assuming that you followed along carefully with the instructions provided in the previous sections, your copy of the BouncingBall demo should be ready for execution. To test it, click on Run > Run normally or click on the Run the game button located on the IDE’s toolbar. In response, the Game Maker IDE will disappear and within a few moments the demo will load and execute, as demonstrated in Figure 3.18.

Figure 3.18. The purple ball will bounce around the window until you decide to close the application.
As you observe the execution of the demo, note the smooth movement of the ball as it glides across the screen, bouncing off each wall in different directions. Also note that every time the ball collides with a wall, the game’s sound effect is played. Further, take note that the text “Bouncing Ball Demo” is visible in the application window’s titlebar. Although it is not a very complex application, the development of this demo application has shown you the basic steps that you need to follow when creating Game Maker games and has demonstrated how Game Maker’s drag-and-drop icon-based approach to program development works.
Once you are done watching the bouncing ball, close the demo application. The Game Maker IDE will reappear. At this point, you may want to save the demo application. To do so, click on File > Save and specify a filename of BouncingBall when prompted to name your application. Game Maker will then save your game in whatever location you specified. You can later reopen the application by clicking on File > Open or by double-clicking on its file icon, as shown in Figure 3.19

This chapter provided you with a big picture overview of how objects, sprites, backgrounds, sounds, and rooms are used in the creation of Game Maker games. Since the formulation of objects is the most important part of the game development process, the chapter focused on providing you with a solid understanding of how objects are defined and an outline of all of the different events and action icons that are available to you through the Game Maker IDE. To help tie everything together, the chapter concluded with a demo project that showed you the basic steps involved in application creation.