This chapter introduces most of the menus, toolbar buttons, and windows that make up the Game Maker integrated development environment or IDE. You will learn how to create all of the basic types of resources that make up Game Maker games, including things like objects, sprites, sounds, and backgrounds. In addition to an overview of the different components that make up the IDE, this review will include an examination of Game Maker’s configuration settings.
Specifically, you will learn:
About the different parts of the Game Maker IDE
How to work with menu and toolbar commands
How to work with the windows responsible for creating different game resources
How to configure different IDE preferences and settings
How to access Game Maker help files
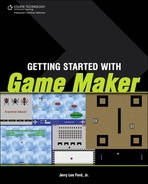
The Game Maker IDE provides access to all of the tools you need to create computer games. It is your primary interface for creating, testing, and compiling games. Figure 2.1 shows how Game Maker Pro’s IDE looks when run in Advanced mode.
As you can see, Game Maker’s IDE is organized into a number of different parts. Like most Windows applications, there is a menu and toolbar located along the top of the IDE. On the left-hand side of the IDE, you will find the resource folder tree, which is where all of the resources that you add to your Game Maker games are listed and organized. The rest of the IDE serves as the IDE’s main working area, providing you with space in which to work with other Game Maker windows (when you open them).
Hint
If you do not see all of the menus, toolbar buttons, and resources listed in the resource folder tree area, then you must be running Game Maker in Simple mode. To switch to advanced mode, click on File > Advanced.
Game Maker’s IDE includes all of the editing commands that you have come to expect from Windows applications, including copy, cut, and paste. In addition, it provides specialized commands designed to create, test, compile, and execute Game Maker games. Game Maker’s IDE is set up as the default application for any Game Maker files (e.g., files with a .gmk file extension). So, if you doubleclick on a Game Maker file, Windows will automatically start Game Maker and load that file into its IDE, allowing you to edit and make changes to it.
Game Maker Pro provides access to numerous commands through menus located at the top of the IDE. The File menu offers commands that let you create new games, open existing ones, save, and close projects. You will also find commands that permit you to create a standalone executable version of your games, allowing them to run outside of Game Maker, like other Windows applications.
The Edit menu offers commands that allow you to copy, create, delete, and rename resources. The Edit menu also lets you open the properties window for any selected resource, display information about objects, and search for resources in your games. The Resources menu contains commands that create all of the different resources that make up Game Maker games. The Scripts menu holds commands that you need to work with when developing GML scripts in advanced games.
The Run menu contains two commands that allow you to run your games within the IDE normally or in a special debug mode. The Window menu contains commands that let you cascade the display of windows in the IDE and arrange IDE icons. The Help menu provides access to Game Maker’s help file, information about extension packages, online help, and access to the YoYo Games website and forums.
As is the case with its menus, the number of buttons available on Game Maker’s toolbar varies depending on whether you are working in Simple or Advanced mode. Each button provides access to a commonly used Game Maker command, all of which can also be found in Game Maker’s menus. Figures 2.2 and 2.3 show how the IDE’s toolbar looks when run in Simple and Advanced modes, respectively.


The toolbar provides access to the most commonly used Game Maker commands. Using the toolbar, you can create, open, and save games, run them, create new game resources and access game information, global game settings, and extensions. You can also access Game Maker’s help files. The IDE’s toolbar is static, which means you cannot add or remove toolbar icons.
As already pointed out, the resource folder tree resides on the left-hand side of the Game Maker IDE. It displays a tree-like view of all of the resources that make up your games. As you work with the IDE and add resources to your games, you will see an instance of the resources represented in the appropriate folder on the resource folder tree. Any folder with a + sign in front of it contains resources. You can drill into these folders and display their contents by clicking on the + sign or by double-clicking on the folder name.
Once visible, you can double-click on a resource to open its respective editor or window and work with it. You can right-click on these folders to display a context menu that provides access to commands that allow you to create new resources or subfolders. Likewise, you can right-click on any resource made visible in the resource folder tree to access a context menu that will allow you to copy, delete, rename, and access the resource’s properties window.
In addition to displaying and allowing you to access and work with the resources that make up games, the resource folder tree also provides access to the following resources.
Game Information. Allows you to type in information that the player can display by pressing the F1 key when playing the game. Typically, this is where you enter information on how to play the game.
Global Game Settings. These settings control the way Game Maker displays your game, loads images, manages player interaction, and allows you to specify any external files needed by your game.
Extension Packages. Allows you to install extension packages that add new capabilities and features to Game Maker, letting you create more advanced games.
More information and how to work with all three of the above listed resources is provided later in this chapter.
Game Maker’s main work area is the part of the IDE where most of the windows that you will work with are opened. For example, when you add or edit a sprite in your game, the Sprite Properties window is displayed in the work area. Likewise, when you add a sound file to a game, the Sound Properties window is opened in the main work area. Although most of Game Maker’s windows are open and confined to the main work area, some windows, such as the Game Information window and Game Maker’s Help window, open outside of the Game Maker IDE, allowing you to move them anywhere you want on your computer screen.
Within Game Maker, games are created by adding different types of resources to them. Games created when working in Game Maker’s Simple mode consist of five types of resources, as listed here:
Sprites. Graphic representations of objects that make up a computer game.
Sounds. Sound files that provide sound effects and background music in games.
Background. Graphic images used to provide interesting backdrops in games.
Objects. Resources in games that you control and interact with while playing (e.g., plans, bullets, monsters, etc.).
Rooms. Locations in the game world where objects interact.
Games created in Advanced mode can include any of the following additional resources.
Paths. A predetermined direction and course along which games are played.
Scripts. Programming logic outlined within GML that provides greater control over the operation of games than is possible using drag-and drop events and predefined actions.
Fonts. Definitions that specify the type, size, and other attributes of the fonts used to display text in games.
Time Lines. Timers that execute predefined actions at predetermined intervals during game play.
Much of the rest of this chapter is dedicated to explaining how to work with the menus, toolbar commands, and windows used to create all of these different types of resources. Once you are familiar with these resources, Chapter 3, “A Review of the Basic Components of Game Maker,” offers a more detailed explanation of how these resources are defined and used to create computer games.
One of the first steps in creating a computer game is to design the graphics that will be used to represent various objects that make up the game. The graphics will represent different things in your games, including such things as monsters, cars, planes, and aliens. You can create these graphics yourself using third-party graphic applications or you can get them from other places like the internet. Optionally, you can create them yourself using Game Maker’s built-in graphics editor.
Most of the graphics that you will create will be used to represent different objects in your games. These graphics, when added to Game Maker, will be used to create sprites. A sprite is a 2D bitmap image representing an object such as a tank or other game character. To add a new sprite to your game, you must click on Resources > Create Sprite or click on the Create a Sprite button located on the toolbar. In response, the Sprite Properties window is displayed, as demonstrated in Figure 2.4.

Trick
You can also add a sprite to your game by right-clicking on the Sprites folder located in the resource folder tree and selecting the Create Sprite option.
Using the Sprite Properties window, you can assign a name to the sprite and then click on the Load Sprite button to locate and load an existing graphics file, or you can click on the Edit Sprite button to open Game Maker’s Sprite Editor window, allowing you to create a new sprite from scratch. Game Maker provides its own sprite editor, which you will learn about in later chapters. You can use it to create and edit all of the sprites that make up your games. Using this editor, you can draw lines, rectangles, different freeform shapes, as well as draw filled in shapes using solid colors or gradient colors.
Hint
You can also create graphics for your sprites using any third-party graphics application and then import them into Game Maker. However, creating graphics from scratch is a labor-intensive task. You may find that you are better off looking for sprites on the internet where you will find no shortage of professional graphic artists eager to sell you collections of graphics at affordable prices.
Computer games can be enhanced significantly through the clever application of sound effects and mood setting background music. Before you can add actions to objects to play background music and sound effects, you must first add sounds to your games, after which you can assign the audio files you want to play in your games. To add a Sound to your game, click on Resources > Create Sound. In response, the Sound Properties window appears, as shown in Figure 2.5.

When assigning a name to the sound, it is a good idea to supply a name that describes the sound and its purpose. To assign an audio file to a sound, click on the Load Sound button and specify the name and location of the audio file in the window that appears.
Hint
Game Maker can work with three types of sound files. Wave files are compressed audio files used to store small sound files and are used in games to play sound effects. Midi files do not contain any actual audio, just instructions that tell your computer’s built-in midi player what notes must be played to play a particular sound. Midi files are typically used to provide games with background music and are not well suited to other purposes like providing sound effects. MP3 files are used to store digital music and provide an alternative way to supply a game with background music. However, MP3 files must be decompressed before they can be played and this takes time, which usually make them poor candidates as a source of sound effects or background music.
When creating games in Advanced mode, you can specify a path along which a game should follow. You can then add an action to the objects in your game to make them follow that path. Paths are created by drawing them. To do so, click on Resources > Create Path. In response, the Path Properties window appears, allowing you to specify a name for the path and to begin defining the points that outline the path, as demonstrated in Figure 2.6.

To add a point, click on the Add button. A copy of the current position is made, which you can then move to a specified point by clicking on the desired location in the grid area. To insert a point before the current point, click on the Insert button, and to delete the current point just click on the Delete button. The coordinates of the points that make up the path are displayed in the properties pane and the resulting path is outlined on the right-hand side of the window in the grid area. A red dot identifies the currently selected point on the path. A green square identifies the starting part of the path. Blue dots identify all of the other points that make up the path.
You can modify the shape of the path at any time by clicking and dragging a portion of the path to another location. Using property settings located at the bottom-left side of the Path Properties window, you can specify whether a path should be made up of straight lines or curved lines and whether the path should be closed.
By default, Game Maker displays any text that is drawn and displayed during game play using a font type of Arial with a point size of 12. However, when creating games in Game Maker’s Advanced mode, you can display text using different fonts and assign them different point sizes and other attributes by adding fonts resources to your games. To add a new font, click on Resources > Create Font. In response, the Font Properties window appears, as shown in Figure 2.7.

Figure 2.7. You can specify the type, size, and different attributes of the fonts used to displayed text in your games.
Once added, you can assign a unique name to the font and then specify its properties. You can determine which font resource should be used at any point in time by selecting different fonts using different action icons.
Another resource available to you when working in Advanced mode is timelines. A timeline is a resource that lets you set up a schedule that controls the execution of actions at predetermined intervals, measured in steps. A step is a measurement of time. In Game Maker, 30 steps equal one second. By creating a timeline and assigning it to an object, you can use it to control the performance of specified actions during game play. For example, you might create a timeline that generates waves of alien spaceships at specified intervals in a space shootout game.
To create a timeline, click on Resources > Create Time Line. In response, the Time Line Properties window appears, as shown in Figure 2.8.

You begin building a timeline by assigning it a unique name and then clicking on the Add button to add a new moment to the timeline. For example, to set up a moment that occurs 20 seconds after its associated object is created, click on the Add button and enter 600 as the moment value when prompted by the Adding a Moment window. To add a second moment that occurs one minute later, click on the Add button and enter 1800 as the moment. Once you have added all of the moments to the timeline, you can select each moment and then drag and drop any actions you want to be executed to the actions area.
In addition to adding new timeline moments, you can modify them by selecting a specific moment from the Moments list and then clicking on the Change button. You can delete and copy moments by clicking on the Delete and Duplicate buttons. Deleting a moment deletes any actions that you have assigned to it and duplicating a moment also duplicates all of that moment’s assigned actions.
Using the Shift button you can shift some or all moments forward or backward a specified number or steps in time. The Merge button lets you merge all or some of the moments that make up the timeline into a single moment. Clicking on the Clear button clears out all moments as well as any actions that have been assigned so that you can start creating the timeline all over again from scratch.
Objects represent the components within games that move about and interact with one another and the player(s). In most cases, you will want to make objects visible so that the player can see them. You do this by assigning sprites to your objects. To do so, click on Resources > Create Object. In response, the Object Properties window is displayed, as demonstrated in Figure 2.9.

All objects require a name. If they are to be visible, they also need you to assign them a sprite. To do so, click on the icon located at the end of the Sprite field. This will display a context menu listing all of the sprites that you have added to your game. To assign a sprite to an object, all you have to do is select it from this list.
Trap
When naming objects, make sure you give them names that are unique. Otherwise, errors will occur. Consider developing and applying a naming convention for all of your game’s resources. For example, you will notice that in every sample game created in this book, the names of sprites begin with the characters spr_ whereas all objects begin with the characters obj_. This not only helps to explicitly identify different types of resources but ensures that you do not accidently assign duplicate names to different types of resources.
Objects are controlled by different events and actions that occur during game play. You specify the different types of events you want an object to respond to by clicking on the Add Event button located at the bottom of the event lists area. In response, the Event Selector window shown in Figure 2.10 is displayed.

Events occur for various reasons. For example, events occur when the player moves the mouse, presses a keyboard key, and when objects collide with one another. Once you add an event to an object’s events list, you assign the actions you want the object to take by dragging and dropping different action icons from the actions collections located on the right-hand side of the window onto the actions area. You can add as many different events as you want to an object. Each event that is assigned can have any number of actions. Actions are executed in the order that you add them to the actions area.
Game Maker supplies you with access to over 100 different actions, each of which performs a specific task. These actions are organized into groups that you can access by clicking on tabs located on the right-hand side of the Object Properties window. There are, for example, actions that create and destroy objects, modify the player’s score, and alter object movement when objects collide with one another. Game Maker supports a drag-and-drop approach to game development, which aids beginning game developers in getting started. This allows them to drag and drop different icons, representing actions that can be taken, onto different events belonging to the objects that make up computer games.
Once defined, you can add instances of objects to your games. You may add as many instances as you want, and the behavior of each of these objects will be governed by the events and actions that you assigned to its object definition. You will learn a lot more about objects and their associated events and actions throughout the remainder of this book.
In games created with Game Maker, game play occurs inside rooms. Your games may consist of one or more rooms. For example, a game like Pong is played within a single room, whereas a game like Pac-man is played in different rooms, each of which would represent a different level in the game. Every Game Maker game must have at least one room to run. To add a room to a game, click on Resources > Create Room. In response, the Room Properties window is displayed, as shown in Figure 2.11.

Like all resources, rooms need a name and should be assigned a caption, representing text that will be displayed at the top of the game window in the titlebar. You specify this by selecting the Settings tab located on the left-hand side of the Room Properties window. Technically, all of the other resource types (sprites, objects, sounds, etc.) are optional, although without them your game would consist of empty rooms. To demonstrate, create a new game by clicking on File > New and then add a new room to it by clicking on Resources > Create Room. Now click on Run > Run Normally or the Run the Game button to run your new game. In response, Game Maker will compile your application and then run it, displaying an empty window.
As demonstrated in Figure 2.12, you can click on the Game Maker icon located in the upper-left corner of the window to access a context menu with commands that you can use to control the size of the window and to close your application. Alternatively, you can click on the minimize, maximize, and close buttons located in the upper-right corner of the window. You can also move the window around by clicking and dragging on its toolbar. You can close the application by pressing the Escape key. All of the functionality is provided automatically, without you having to do anything to your application other than adding a room to it. Pretty cool, don’t you think?

Of course, in order for your application to do something, you will need to add objects to it, assigning them different events and actions. You will also want to add different sprites, sounds, backgrounds, etc.
In order to make the rooms for your games more interesting, you can add graphical backgrounds to them. For example, if your game is one involving a spaceship shootout in outer space, you can make the game more interesting by adding a background of planets and stars. To add a background to your game, click on Resources > Create Background. In response, the Background properties window is displayed, as shown in Figure 2.13.

Using the Background Properties window, you can assign a name to the background and then click on the Load Background button to locate and load an existing graphics file, or you can click on the Edit Background button to open Game Maker’s Sprite Editor window, allowing you to create a new background from scratch.
You can create entire computer games using all of the previously described resources. However, there are limits as to how far you can go using only Game Maker’s drag-and-drop icon based approach to game development. To create really advanced games, you need to learn how to program using Game Maker’s built-in Game Maker Language (GML) scripting language. You work with GML in several ways, including:
Adding scripts to your games and executing them using an action, or by calling upon them from within other scripts.
Executing GML code statements as actions.
Adding GML code to a room that will execute when the room is initially created.
For example, to add a script to your game, click on Resources > Create Script. In response, the Script properties window is displayed. This window services as Game Maker’s script editor. You assign a unique name to your script by filling in the name field located in the script editor’s toolbar. You can then add whatever code statements are required to accomplish your intended task, as demonstrated in Figure 2.14.

The script editor provides a number of handy features that help you when creating scripts. It has a toolbar that provides single-click access to various commands like copy and paste. It supports both undo and redo operations as well as search and replace. It automatically color codes all statements that you type and supports auto indenting of statements and intelligent tabbing. In addition to the toolbar commands, you can access editor commands from a context menu from within the windows by right-clicking in the code editing area and then selecting the appropriate command.
You will learn all about Game Maker’s scripting capabilities and the Game Maker Language in Chapters 9 through 11.
An important feature for any game is the ability to display information about the game. This information may include instructions on how to play, as well as information about its creator and your website. To add this information to your game, double-click on the Game Information entry in the resource folder tree. In response, the Game Information window is displayed. This window looks and works just like a simple word processor, allowing you to enter text, specify different font types and sizes, and to specify various other attributes like bold, italics, underline, and color. Text can also be left or right justified or centered. Figure 2.15 shows an example of how you might use this window to provide the player with information about a game.

Figure 2.15. Enter game instructions and other text you want your users to see when they press the F1 key.
The player can access this information at any time during game play by pressing the F1 key. By default, when the F1 key is pressed, game play freezes and the game information is displayed in the game window. If you want, you can instruct Game Maker to display game information in a separate window by opening the Game Information window and then clicking on File > Options. In response, the Game Information Options window is displayed, as shown in Figure 2.16.

To display game information in its own window, select the Show Help in a Separate Window option. You can specify a text string that will be displayed in the titlebar of the Game Information window. You can also specify the width and height of this window and various options that determine how the window is displayed.
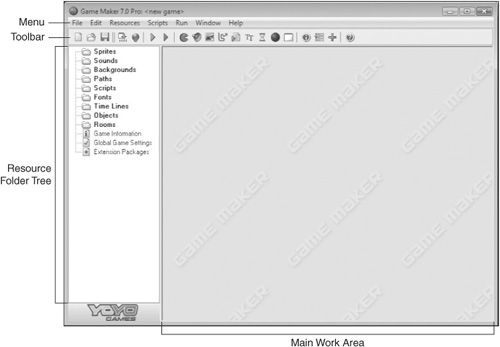
The Global Game Settings entry in the resource folder tree provides access to settings that control the configuration of various aspects of game operation, including things like whether the game loads in full screen mode or in a window and the resolution settings used to run the game. As shown in Figure 2.17, these settings are organized into a series of tabs located on the Global Game Settings window.
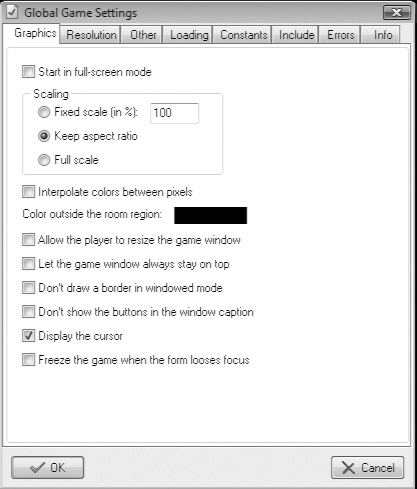
Figure 2.17. Game Maker allows you to configure a host of different settings that affect the operation of your games.
The following list provides a high level overview of the settings found on each of the tabs in the Global Games Settings window.
Graphics. Contains options that govern whether the game is played within a window or in full screen mode as well as how games played in a window behave and whether or not the cursor should remain visible.
Resolution. Allows you to determine whether the game changes the player’s screen resolution. If this option is selected, screen resolution is returned to its previous state once the game is closed.
Other. This tab allows you to prevent the Escape key from ending the game, prevent the F1 key from displaying the Game Information window, and disable operations associated with other function keys.
Loading. This tab lets you replace Game Maker’s default splash screen with an image of your own and lets you replace or suppress the progress bar and substitute the default game icon with one of your own choosing.
Constants. Allows you to define global constant values that you can then reference from within scripts and actions.
Include. Allows you to specify external files needed by your computer game to execute. These files will be included as part of your game’s execution file, which will automatically export them when run. (Available only in the Pro version of Game Maker.)
Errors. The configuration settings located on this tab determine whether error messages are displayed, whether they are recorded in the game_ errors.log file, and whether your game terminates when non-fatal errors occur.
Info. This tab allows you to enter your name, a version number for the game, as well as any other additional information you feel is important to maintain. Although not accessible to players, it helps to document your application and may prove useful to other game developers if you share the game’s source code with them.
Game Maker is a highly extensible software development tool. One way of extending its capabilities is through the installation and addition of extension packages. Extension packages can add new actions, functions, and constants to Game Maker. Game Maker 7.0 comes with three extension packages. You can view these extension packages by double-clicking on the Extension Packages entry in the resource folder tree, as demonstrated in Figure 2.18.
If you select one of these extension packages, information about the package is displayed at the bottom of the window. If you want to use one of these extension packages in your game, select the package. In response, a button will be displayed between the used packages and the available packages lists. Click on this button to move the package to the used packages list.

Additional extension packages are available on the YoYo Games website by clicking on the Extensions link located on the http://www.yoyogames.com/ resources page. To download one of these packages, click on its Download link and specify the location where you want to store the download. Depending on the download, you may get a file with a .gex file extension or a zip file with multiple files in it, including a .gex file. Once downloaded, you can install the extension package by opening the Extension Packages window and then clicking on the Install button. In response, the Installing Extension Packages window appears. Click on its Install button and then locate and select the .gex extension package’s .gex file and click on Open.
Hint
If you want to try your hand at creating extension packages, visit http://www.yoyogames.com/ extensions and click on the Extension Maker link. This will initiate the download of a zip file containing a program that you can use to create new extension packages.
Another useful IDE resource that you will want to get familiar with is the Game Maker Help window, which you can access by clicking on Help > Contents. As demonstrated in Figure 2.19, you can access Game Maker’s official document by opening this window. Using the window’s Index and Search options, you can quickly look up information on different topics, including all of Game Maker’s events, actions, and functions.

Game Maker is highly configurable. You make configuration changes to Game Maker by modifying its preferences, which you can access by clicking on File > Preferences. This displays the Preferences window, which is organized into a series of six tabbed screens. By default, Game Maker automatically displays the preferences belonging to the General tab as shown in Figure 2.20.
By modifying these preference settings you can configure the way Game Maker manages the display of recently edited games in the File menu and determine whether Game Maker automatically makes backups of your game files. From here you can also specify whether you want to see Game Maker’s progress bar when it loads and saves your game files.
As shown in Figure 2.21, the Forms tab provides access to preference settings that affect the appearance and operations of the Sprite window, the Object window, and the Room window. By default, most of these settings are enabled. However, as you become more experienced with Game Maker, you may want to disable some of them.

Once you begin working on more advanced games, you will need to learn how to work with Game Maker’s scripting language. The setting located on the Scripts and Code tab, shown in Figure 2.22, gives you control over a number of the editor controls provided by Game Maker’s built-in Script Editor window.

Figure 2.22. Scripts and Code preferences control the operation of Game Maker’s built-in script editor.
Note that the last setting on the Script and Code tab allows you to stipulate an external code editor. If selected, Game Maker will load this editor in place of its built-in editor, allowing you to work with a third-party script editor you are already familiar with.
By default, Game Maker’s built-in script editor color-codes the words that make up script statements. This allows you to visually identify language keywords, comments, resource names, and so on and results in more readable code statements. You can turn off this feature by clicking on the Preferences window’s Colors tab, shown in Figure 2.23.
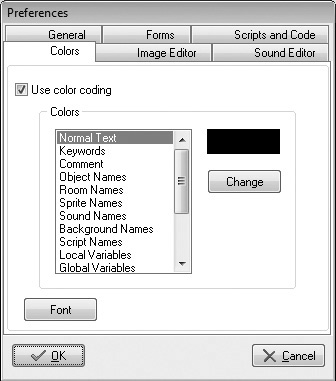
Note that you can change the color scheme that Game Maker uses when displaying different parts of code statements. In addition, you can also modify the font and various font attributes to suit your own liking.
If you have a third-party graphics application that you would like to work with in place of Game Maker’s built-in image editor, you can configure Game Maker to do so from the Image Editor tab, as shown in Figure 2.24. You may want to change image editors given that Game Maker’s built-in editor only provides basic graphics manipulation and editing functionality.

Figure 2.24. Image editor preferences allow you to specify an optional external image editor to be used when creating and editing sprites and backgrounds.
Lastly, one feature that is completely lacking in Game Maker is a sound editor. You will have to use a third-party sound editor if you need to create or modify your sound files. While Game Maker lets you import any wave or midi file, it cannot assist you in creating them. However, to make things more convenient, it allows you to configure Game Maker so that it can automatically load a third-party sound editor of your choice. To set this up, click on the Sound Editor tab, as shown in Figure 2.25.

This chapter introduced you to Game Maker’s integrated development environment. You learned about all of the major parts of the IDE. This included learning how to work with menu and toolbar commands and to work with windows responsible for creating different types of game resources. You also learned how to configure various IDE preferences and settings as well as how to access Game Maker’s help files.