Welcome to the final chapter of this book. This chapter rounds out your Game Maker development instruction by providing an overview of how to deal with the errors that inevitably occur when developing complex computer games and applications. This includes learning about the types of errors that you will run into and how to deal with them. The chapter will end by walking you through the development of this book’s final game, Arachnid Attack! This game is designed to help tie together all of the major development and programming concepts that you have learned in this book, with specific focus on the use of both actions and scripts in developing program logic.
An overview of the major topics covered in this chapter includes:
An examination of the different types of errors that can occur in Game Maker programs
Advice on how to monitor program execution and track down and fix application bugs
An overview of how to work with Game Maker’s built-in debugger
One unfortunate fact that every programmer has to come to terms with is that no matter how experienced or talented you may be, errors are going to occur within your applications. Errors, often referred to as bugs, result in unpredictable results, causing the generation of error messages, unreliable results, and potentially even causing applications to crash. As such, it is essential to understand the types of errors you will run into and that you learn a little something about how to track them down so that you can eliminate them.
The best way of dealing with errors is to try to prevent them from occurring. To do this, make sure that when you sit down to develop your games and their program code that you do so a piece at a time, testing your games as you go along. In addition, whenever possible, make liberal use of GML functions rather than trying to reinvent the wheel yourself.
When testing your applications, make sure that in addition to verifying that everything works as expected that you also test your application’s susceptibility to invalid input. If your applications do not handle invalid input correctly, modify them so that they do. There are a number of additional steps that you can take to help prevent errors from occurring when your games run. These steps include:
Commenting your code statements to make them easy to understand
Indenting your program code to make it easier to follow
Providing players with clear instruction on how to play the game
Adopting a consistent and descriptive naming scheme for all game resources, variables, arrays, and scripts
Game Maker monitors everything that programmers do within its IDE, validating all programmer input to ensure that it makes syntactic sense. If a programmer attempts to enter data that does not make sense within the context of the current situation, it notifies the programmer of the error by highlighting the mistake, as demonstrated in Figure 11.1.

By flagging program errors made within the IDE, Game Maker helps make the programmer’s job a lot easier, saving you the hassle of having to identify and track them down yourself.
Like most programming languages, Game Maker is subject to three different types of errors, as listed here:
Syntax errors
Logical errors
Runtime errors
The most common type of error is a syntax error, which is an error that occurs when you fail to follow GML’s syntax requirements. This can happen, for example, when you make typos when keying in code statements or when you fail to provide required arguments when calling on GML functions. Syntax errors in GML scripts prevent your games from running and result in the generation of an error message. For example, suppose you add the following statement to a GML script.
play_soun(snd_help);
This statement was supposed to play a sound file. However, a typo has been made when attempting to reference the PlaySound() function. As a result, an error message like the one shown in Figure 11.2 is displayed if the application containing the script is executed.

Game Maker’s error messages provide an explanation of the error and tell you where it was found. This error could have easily been caught prior to running the application by clicking on the Script Editor’s Check the Script for Syntax Errors toolbar button. In response, Game Maker performs a syntax check of your code statement and highlights the error, as demonstrated in Figure 11.3.

Because they generate error messages, syntax errors are relatively easy to deal with. A more sinister type of error to deal with is a logical error. A logical error is one that occurs when you apply faulty logic when performing a task. For example, a logical error occurs if you accidentally add together two numbers that you should have multiplied or divided. As a result, your application runs and does exactly what it was told to do, yielding output that is contrary to your expectations.
The challenge in tracking down logical errors is that they do not generate error messages. The best way of dealing with them is to prevent them in the first place, which you can do through careful planning and testing. If, despite your best efforts, you believe a logical error has made its way into a GML script within an application, you should review your script to see if you can spot the problem. If you are unable to track it down, you can try to track it down using Game Maker’s built-in debugger, which is covered a little later in this chapter.
A third type of error that you need to be on the lookout for is a runtime error. A runtime error is one that occurs when your application tries to perform an illegal action. One of the problems in dealing with runtime errors is that Game Maker cannot detect them when scripts are interpreting for execution. Runtime errors can occur for a number of reasons. For example, a needed file might have been deleted or the drive on which it results might crash. As a simple example of what a runtime error looks like, consider the following script.
{
    number = get_string("enter a number","");
    number = real(number);
    result = 5 / number;
    show_message(string(result));
}
Here, a popup dialog window is displayed that prompts the user to enter a number. Since the get_string() function returns anything it collects as a string, the data that the user enters is converted to a real number using the real() function. This value is then used as the denominator in a mathematic expression, the result of which is then converted back to a string using the string() function and then displayed in a popup dialog using the show_message() function. A runtime error will occur when this script is executed whenever the user enters a non-numeric character or if the user enters a zero, because division by zero is an illegal operation.
Depending on what your application is designed to do, it may not be possible to eliminate every possible runtime error from occurring. However, careful testing and a little data validation may go a long way in helping to reduce their occurrence.
If you find yourself in a situation where you have a program with an error that you just cannot seem to track down, not all hope is lost. Game Maker provides a built-in debugger that you can use to track down the problem. A debugger is a program designed to execute applications in a special mode that lets you control the application’s statement execution while at the same time monitoring variable values. This gives you a view as to what is happening inside your application as it executes.
To start a debug session for an application that is giving you trouble, click on Run > Run in Debug mode or click on the red Run Game in Debug Mode button located on Game Maker’s toolbar. This starts your application and displays the Debug Information window shown in Figure 11.4.

Figure 11.4. Game Maker’s built-in debugger gives you complete control over your application’s execution.
Hint
The Run menu provides access to commands that replicate the functionality of the debugger’s toolbar.
Using the buttons located on the debugger’s toolbar, you can pause the application’s execution. While paused, you can display windows that show the current values of variables and keep an eye on object instances. When you are ready, you can resume execution, execute a single step, restart the application from the beginning, or halt the application’s execution. By pausing your application, displaying variable values, and then stepping through its execution a step at a time, you can validate that variable values are being correctly set and that things are occurring in the order you want them to.
The debugger’s Watch menu provides access to the following commands.
Add—Lets you enter an expression you want monitored.
Change—Lets you change a monitored expression.
Delete—Lets you delete a monitored expression.
Clear—Clears out all listed expressions.
Load—Saves the current set of expressions.
Save—Loads a list of previously saved expressions.
Using these commands, you can enter a list of expressions whose values you want to monitor during your debug session. For example, Figure 11.5 shows how the Debugger Information window looks when monitoring three expressions.

One of the most important features of Game Maker’s debugger is its ability to display and dynamically update both local and global variable values during the debug session. To do so, click on Tools > Show Global Variables or Tools > Show Local Variables. Figure 11.6 shows an example of what you will see when monitoring a game’s global variables.

Figure 11.6. The data that is displayed in the Global Variables window is continuously updated, allowing you to keep an eye on how the data is being collected and managed.
The Local Variable window displays similar data for a local variable that you want to monitor. You can monitor as many different local variables as you want at the same time. The Tools menu also provides commands that let you monitor the status of object instances.
If you want, you can execute a code statement during your debug session and then observe its effect on the application’s execution. One reason for doing this might be to change a variable value to see what impact it has on how the application executed. To do so, click on Tools > Execute Code. This displays the popup dialog window shown in Figure 11.7.

Figure 11.7. You can execute code statements when debugging to see how they impact your application.
All you have to do is enter the desired statement and click on the OK button and then monitor its effect on the application. If you want, you can also change the speed at which the application is executing, by clicking on Tools > Set Speed. This displays the popup dialog window shown in Figure 11.8.

By changing an application’s speed, you can temporarily slow things down so that you can more closely observe what is going on or you can even speed things up.
It is time to turn your attention to the development of this book’s final game project, Arachnid Attack! This single-player game’s goal is for the player to defend the earth from hordes of invading arachnid armies, which arrive in wave after wave. To fight off the arachnids, the player is given control over a jet fighter plane capable of shooing arachnids out of the sky. The player is given three lives (jets). Game play ends after the player’s jet is shot down three times by the bugs or when they manage to overwhelm the player and descend all the way to the bottom of the screen. Player score and lives are displayed at the top of the screen throughout game play. The game keeps track of the top 10 scores and displays a high scores table at the end of the game.
The player controls the jet via the keyboard using the following keyboard keys.
Left Arrow. Moves the jet left.
Right Arrow. Moves the jet right.
Space. Fires the jet’s guns.
Players score points by shooting alien bugs. Points are awarded as follows:
10 points for killing an ant
20 points for killing a spider
40 points for killing a beetle
100 points for killing a wasp
Figure 11.9 shows an example of Arachnid Attack! in action.

The remainder of this chapter will focus on guiding you through the process of creating this game. The game’s programming logic will be provided through a combination of actions and scripts. Specifically, scripts will be used to develop any programming logic that cannot otherwise be developed using fewer than 10 action icons.
Begin the development of the Arachnid Attack! game by adding all the sprites required by the game. Begin by starting Game Maker. If it is already started, click on File > New to begin a new game. The following procedures outline the steps required to create the game’s sprites. Note that the graphic files for all of the game’s sprites are available for download from the book’s companion webpage (www.courseptr.com/downloads).
Next click on Resources > Create Sprite. The Sprite Properties window opens. Type
spr_antas the sprite’s name and click on the Load Sprite button. Navigate to the location where you saved the game’s graphic files and select theant.giffile and then click on Open. Click on the center button to center the sprite’s alignment.Create a sprite named
spr_spider, assign itspider.gif, and then center its alignment.Create a sprite named
spr_beetle, assign itbeetle.gif, and then center its alignment.Create a sprite named
spr_wasp, assign itwasp.gif, and then center its alignment.Create a sprite named
spr_jet, assign itjet.gif, and then center its alignment.Create a sprite named
spr_player_bullet, assign itplayer_bullet.gif, and then center its alignment.Create a sprite named
spr_invader_bullet, assign itbug_bomb.gif, and then center its alignment.Create a sprite named
spr_blockand assign itfull_block.gif.Create a sprite named
spr_half_blockand assign ithalf_block.gif.Create a sprite named
spr_mini_jetand assign itmini_jet.gif.
The Arachnid Attack! game will also include a front end. To support the development of this room, you will need to add five additional sprites to the game as instructed below.
The second step in the development of the Arachnid Attack! game is to add the sounds needed to provide the game’s sound effects. These effects include playing an explosive sound whenever a bug or the player’s jet is shot, playing a sound when the bug army advances down the screen, and playing a sound when the wasps glide across the top of the screen. Sounds are also played when shots are fired. All of the audio files you will need to create these sounds are included with Game Maker. By default, Game Maker places these audio files in C:Program FilesGame Maker7Sounds.
The following procedure outlines the steps required to add and configure all of the game’s sounds.
Create the first sound by clicking on Resources > Create Sound. The Sound Properties window appears. Name the sound
snd_bug_move, click on the Load Sound button, navigate to the C:Program FilesGame Maker7Sounds folder, assign theclick.wavfile to the file, and then click on Open. Click on OK to close the Sprite Properties window.Create a new sound named
snd_shotand assign it thezap.wavfile.Create a new sound named
snd_bug_explosionand assign it thegunshot2.wavfile.Create a new sound named
snd_jet_explosionand assign it theexplosion.wavfile.Create a new sound named
snd_waspand assign it thebeep6.wavfile.
The game will display the player’s score on the screen during game play. Game Maker’s default font size of 12 is too small to adequately display the player’s score. To address this situation, you must add a font to the game using the following procedure.
The Arachnid Attack! game is made up of 12 objects plus an additional five objects needed for its front end. The objects include different types of bugs, the player’s jet, player and bug bullets, and the wall objects that are used to build bunkers behind which the player can hide his ship. The game will use a parent object for the ant, spider, and beetle bugs, allowing behavior to be inherited and thus simplifying game development. Likewise, a parent wall object will be created. Finally, there will be a special controller object and a series of objects needed to build the front end. Instructions for creating all of these objects are provided here:
Click on Resources > Create Object. The Object Properties window appears. Type
obj_bug_parentin the Name field. Click on OK to close the Object Properties window.Add another object named
obj_parent_block.Add a new object named
obj_ant, assigning it thespr_antsprite, and setting its parent toobj_bug_parent.Add a new object named
obj_spider, assigning it thespr_spidersprite, and setting its parent toobj_bug_parent.Add a new object named
obj_beetle, assigning it thespr_beetlesprite and setting its parent toobj_bug_parent.Add a new object named
obj_wasp, assigning it thespr_waspsprite, but do not assign it a parent.Add a new object named
obj_block, assigning it thespr_blocksprite, and setting its parent toobj_parent_block.Add a new object named
obj_half_block, assigning it thespr_half_blocksprite, and setting its parent toobj_parent_block.Add a new object named
obj_controller.Add a new object named
obj_player, assigning it thespr_jetsprite.Add a new object named
obj_player_bullet, assigning it thespr_player_bulletsprite.Add a new object named
obj_invader_bullet, assigning it thespr_invader_ bullet sprite.Add a new object named
obj_intro, assigning it thespr_introsprite.Add a new object named
obj_start, assigning it thespr_startsprite.Add a new object named
obj_scores, assigning it thespr_scoressprite.Add a new object named
obj_help, assigning it thespr_helpsprite.Add a new object named
obj_quit, assigning it thespr_quitsprite.
The next step in the development of the Arachnid Attack! game is to add two rooms to it. These rooms represent the game’s front end and the room that the game is played in. Instructions for creating and designing these rooms are provided in the sections that follow.
To create the game’s front end room, click on Resources > Create Room. The Room Properties window appears. Click on the Settings tab and then name the room room_intro. Change the size of the room, setting width to 514 and its height to 360, and then add a caption of Arachnid Attack! to the Caption for the Room field.
To finish up the development on the room, click on the Objects tab and then add an instance of each of the following objects to the room: obj_intro, obj_ start, obj_scores, obj_help, and obj_quit. Arrange these instances as shown in Figure 11.10.

Add a second room to the game and click on the Settings tab, naming the room room_level1. Change the size of the room, setting width to 514 and its height to 360 and then add a caption of Arachnid Attack! to the Caption for the Room field. Also, modify the room’s Speed stetting to 55. This will speed up the play of the game within the room to an appropriate level.
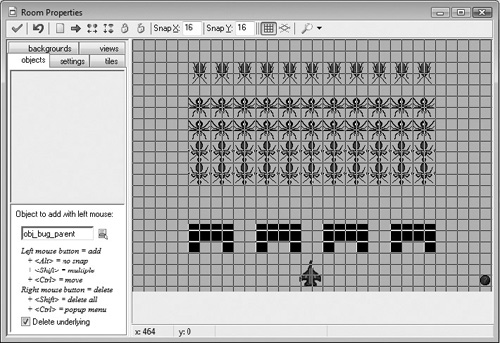
To wrap up work on this room, click on the Objects tab and then add the following object instances to it: obj_ant, obj_spider, and obj_beetle; obj_block, obj_half_block, obj_player, and obj_controller. Arrange these instances as shown in Figure 11.11.
Now it is time to develop the programming logic required to bring the Arachnid Attack! game to life. As previously explained, the game’s programming logic will be developed using a combination of GML scripts and action icons. Let’s begin by developing the three GML scripts that will be used to do the following:
Initialize variables for the
obj_controllerobject.Manage the programming logic that is performed by the
obj_controllerat every step of the game.Control the movement of the arachnid armies.
The first script that you need to create will be executed by the obj_controller object to initialize a number of variables. To create this script, click on Resources > New Script. The Script Properties window appears. Assign the script a name of scr_obj_controller_variables and then add the following statements to it.
/*This script creates a number of variables for the obj_controller object*/
{
     //Used to set the bug's pace
     game_pace = 20;

     //Used to keep track of when obj_controller should do something
     counter = 0;

     //Specifies the direction the bugs are currently moving
     currentDirection = 9;

     //Specifies the direction the bugs should move (initially to the right)
     targetDirection = 9;

     //When set to true the bugs should move
    timeToMoveBugs = false;

     //When set to true the bugs should move down the screen
     moveBugsDownward = false;

     //Used to set flag indicating when the bugs have been moved downward
     downMoveComplete = false;

     //Capture the initial starting location of the player's ship
     startx = obj_player.x;

     //Capture the initial starting location of the player's ship
     starty = obj_player.y;
}
As you can see, there are nine assignment statements that make up the scripts, along with comments that document the purpose of each variable that is declared. When done, click on the green checkmark button located on the Script Properties toolbar to close the script.
Next, create another script named scr_obj_controller_step and add the following statements to it.
/*This script is executed by obj_controller at every step that occurs in
the game. */
{
   counter = counter + 1; //Increment the variable by 1

   //When counter equals game_pace it is time to move the bugs
   if (counter == game_pace) {
       timeToMoveBugs = true;       //Set bug movement trigger
       sound_play(snd_bug_move); //Play the sound
   }

   //See if the bugs have already been moved
   if (moveBugsDownward == true) {

       //If downcheck equals true the bugs have already been moved
       if (downMoveComplete == true) {
           moveBugsDownward = false; //No need to move bugs
           downMoveComplete = false; //Turn off variable flag
       }
   }

    //Determine if a new cycle should be started
    if (counter > game_pace) {
        counter = 0;        //Reset counter to zero to
        timeToMoveBugs = false; //Disable bug movement trigger
    }

    //See if the bugs have switched directions
    if (targetDirection != currentDirection) {
        moveBugsDownward = true; //Time to move the bugs downward
        targetDirection = currentDirection; //Update the target direction
    }
    //Check to see if the player has killed all of the bugs
    if (instance_number(obj_bug_parent) == 0) {
        room_restart() //Restart the room if all bugs are destroyed
        sound_stop(snd_wasp) //Disable sound playback
    }

    //Randomly create instances obj_wasp
    if (action_if_dice(2000) == true) {
        //Position it in the upper-left corner
        instance_create(20, 30, obj_wasp)
    }
}
As the embedded comments explain, the script uses a variable named counter to keep track of the number of steps that have occurred, and every 24 steps (e.g., when counter == game_pace) the timeToMoveBugs variable is set to true and the snd_bugMove sound is played using the GML sound_play() function. Since this script runs at the same time as the scr_bug_movement script, which you will work on next, a check is made of the value assigned to the downMoveComplete variable to see whether the bugs have already been moved on the screen. If this is the case, both moveBugsDownward and downMoveComplete are set to false. The value of counter is checked again to see if it has become greater than 24, in which case it is time to reset counter back to 0, and timeToMoveBugs to false in order to start a new cycle.
Next, a check is made to see if the bugs have switched directions on the screen. If this is the case, they need to be moved downward, so moveBugsDownward is set equal to true, and then the bug’s target direction is updated based on their current direction. A check is then made to see if the player has killed all of the bugs on the screen, in which case the room needs to be restarted. This is achieved using the GML room_ restart() function. Also, the GML sound_stop() function is used to halt the playing of the snd_wasp sound, just in case there was an instance of the obj_wasp object on the screen when the round ended. Finally, the GML action_if_dice() function is used to randomly generate the creation of a new obj_wasp object. The instance of the obj_wasp object is created using the GML instance_Create() function.
Hint
This script made use of five built-in GML functions. These functions all have equivalent action icons as shown below.
sound_play()---ThePlay Soundactionroom_restart()---TheRestart Roomactionstop_sound()---TheStop Soundactionaction_if_dice()---TheTest Chanceactioninstance_create()---TheCreate Instanceaction
The game’s final script is responsible for managing the movement of the arachnid armies on the screen. To create it, add a new script to the game, naming it scr_bug_movement, and then assigning the following statements.
/* This script controls the movement of the bugs*/
{

    //See if it is time to move the bugs
    if (obj_controller.timeToMoveBugs == true) {
        //See if the bugs should be moved to the right
        if (obj_controller.currentDirection == 9) {
             //Make sure the bugs should not be moved downward
             if (obj_controller.moveBugsDownward == false){
                  x=x+9; //Move the bugs 9 pixels to the right
                  y=y+0; //Make no changes downward
             }

        }

        //See if the bugs should be moved to the left
        if (obj_controller.currentDirection == -9) {
             //Make sure the bugs should not be moved downward
             if (obj_controller.moveBugsDownward == false){
                 x=x- 9; //Move the bugs 9 pixels to the left
                 y=y+0; //Make no changes downward
             }
        }

        //See if the bugs should be moved downward
        if (obj_controller.moveBugsDownward == true) {
            x = x + 0; //Make no changes left or right
            y = y + 9; //Move the bugs downward 9 pixels
           //Mark the downward movement as complete
           obj_controller.downMoveComplete = true;
        }
   }  else {
        //Make sure the bugs have not tried to move too far to the right
        if (self.x > 480) {
            obj_controller.currentDirection = -9 //Change the bugs' direction
        }
        //Make sure the bugs have not tried to move too far to the left
        if (self.x < 32) {
            obj_controller.currentDirection = 9 //Change the bugs' direction
        }
   }
}
As you can see, the script consists of a series of nested if statement code blocks, all of which are embedded within one large if statement code block that has an else block. The high level if statement code block manages bug movement and the lower else statement code block is responsible for making sure that the bugs change directions when they reach the sides of the game window.
The arachnid armies move nine pixels at a time, left or right, depending on their direction. Remember, movement occurs every 24 steps in the game. Movement left or right is controlled by adding or subtracting a value of 9 to the x coordinate. Likewise, movement downward is managed by adding a value of 9 to the y coordinate. Downward movement only occurs when the arachnid armies reach the side of the screen.
The else statement code block ensures that the arachnid armies do not scroll off the side of the screen by monitoring the value assigned to self.x and reversing direction when its value exceeds 480. Likewise, direction is changed when the value of self.x becomes less than 32.
Now that you have completed the development of the game’s scripts, it is time to add the programming logic that is controlled through action icons. Again, the use of action icons in this game has been restricted to tasks for which actions exist and can be completed using fewer than 10 action icons. As is the case with most Game Maker games, not all objects are going to have any action icons, either because they do not take any action or because they inherent their actions from parent objects.
In order to simplify the game’s development, common functionality shared between the obj_ant, obj_spider, and obj_beetle objects will be added to a parent object named obj_bug_parent. Instructions for programming this object are provided below.
Double-click on the
obj_beetleobject and add aStepevent to the object.Add a
Test Chanceaction to the event and assign it1500sides.Add a
Start Blockand an End Block to the event, then embed aCreate Instanceaction inside these two actions, setting theCreate Instanceaction to create theobj_invader_bulletatxcoordinate0andycoordinate15. Enable the action’s Relative setting.Add an
Execute Scriptaction to the bottom of the actions area and set it to run thescr_bug_movementscript.
Double-click on the
obj_playerobject.Add a
Createevent to the object and then add aSet Variableaction to the event, assigning a value offalseto a new variable namedgun_fired.Add a
Stepevent and assign it the following actions.Test Lives—Setting it to check for a value smaller than 1.Start BlockStop Sound—Setting it to stop playing thesnd_waspsound.Show HighscoreDifferent Room—Setting it to go to theroom_introroom.End Block
Add a collision event for the
obj_antobject and then add theSet Livesaction, setting new lives to0.Add a collision event for the
obj_spiderobject and then add theSet Livesaction, setting new lives to0.Add a collision event for the
obj_beetleobject and then add theSet Livesaction, setting new lives to0.Add a
<Left>keyboard event and then add the following actions to it.Comment—EnterDo not allow the player to move the ship past the left-hand side of the screen.Test Variable—Set it to test whetherxis larger than 22.Jump to Position—Setxto -4 andyto0and enable theRelativeproperty.
Add a
<Right>keyboard event and then add the following actions to it.Comment—EnterDo not allow the player to move the ship past the right-hand side of the screen.Test Variable—Set it to test whetherxis smaller than490.Jump to Position—Setxto4andyto0and enable theRelativeproperty.
Add a
<Space>keyboard event and then add the following actions to it.Start BlockSet Variable—Setgun_firedto true.Create Instance—Set it to create an instance ofobj_player_bullet, settingxto0andyto-16. Enable the action’s Relative property.End Block
Double-click on the
obj_player_bulletobject.Add a
Createevent to the object and then add aSpeed Verticalaction to the event, assigning a value of-9to Vert. Speed, followed by aPlay Soundaction set tosnd_shot.Add a collision event for the
obj_antobject and then add the following actions to it.Play Sound—Set it to play thesnd_bug_explosionsound.Set Score—Set New Score to10and enable theRelativesetting.Create Effect—Settypetoexplosion,sizetosmall, andwheretobelow objects, and enable theRelativesetting.Destroy Instance—SetApplies toto Other.Destroy Instance—SetApplies totoSelf.Set Variable—SetAppliesto toobj_playerand setgun_firedtofalse.
Add a collision event for the
obj_spiderobject and then add the following actions to it.Play Sound—Set it to play thesnd_bug_explosionsound.Set Score—Set New Score to20and enable theRelativesetting.Create Effect—Settypetoexplosion, sizetosmall, andwheretobelow objectsand enable theRelativesetting.Destroy Instance—SetApplies totoOther.Destroy Instance—SetApplies totoSelf.Set Variable—SetApplies totoobj_playerand setgun_firedtofalse.
Add a collision event for the
obj_beetleobject and then add the following actions to it.Play Sound—Set it to play thesnd_bug_explosionsound.Set Score—Set New Score to40and enable theRelativesetting.Create Effect—Settypetoexplosion,sizeto small, andwheretobelow objectsand enable theRelativesetting.Destroy Instance—SetApplies totoOther.Destroy Instance—SetApplies totoSelf.Set Variable—Set
Applies totoobj_playerandset gun_firedtofalse.
Add a collision event for the
obj_waspobject and then add the following actions to it.Play Sound—Set it to play thesnd_bug_explosionsound.Set Score—Set New Score to100and enable theRelativesetting.Create Effect—Settypetoexplosion,sizetosmall, andwheretobelow objectsand enable theRelativesetting.Destroy Instance—SetApplies totoOther.Destroy Instance—SetApplies totoSelf.Stop Sound—Set sound tosnd_wasp.Set Variable—Set
Applies totoobj_playerandset gun_firedtofalse.
Add an
Outside Roomevent, add theDestroy Instanceaction (set toSelf) and theSet Variableaction, settingApplies totoobj_playerand setgun_firedtofalse.
Double-click on the
obj_invader_bulletobject.Add a
Createevent to the object and then add aSpeed Verticalaction to the event, assigning a value of5toVert.Speedfollowed by aPlay Soundaction set tosnd_shot.Add a collision event for the
obj_playerobject and then add the following actions to it.Play Sound—Set it to play thesnd_jet_explosionsound.Set Lives—Set New Lives to-1and enable theRelativesetting.Create Effect—Settypetoexplosion,sizetosmall, andwheretobelow objectsand enable theRelativesetting.Destroy Instance—SetApplies totoOther.Destroy Instance—SetApplies totoSelf.Sleep—Set Milliseconds to500.Create Instance—Set object toobj_player,xtoobj_controller.startx, andytoobj_controller.starty.
Add an
Outside Roomevent and then add theDestroy Instanceaction (set toSelf).
Add a
Stepevent and then add anExecute Scriptaction, assigning it to execute thescr_obj_controller_stepscript.Add a
Start Roomevent and then add anExecute Scriptaction, assigning it to execute thescr_obj_controller_variablesscript followed by theScore Captionaction, settingshow score,show lives, andshow health to don't show.Add a
Drawevent and then add the following actions to it.Set Color—Setcolorto black or a dark gray color.Set Font—SetFonttofont_terminalandaligntoleft.Draw Score—Setxto10,yto2, andcaptiontoSCORE.Draw Life Images—Setxto450,yto2, andimagetospr_mini_jet.
Add a collision event for the
obj_antobject and then add theDestroy Instanceaction to it (set toSelf).Add a collision event for the
obj_spiderobject and then add theDestroy Instanceaction to it (set toSelf).Add a collision event for the
obj_beetleobject and then add theDestroy Instanceaction to it (set toSelf).Add a collision event for the
obj_player_bulletobject and then add theDestroy Instanceaction to it (set toSelf). Add anotherDestroy Instanceaction to it (set toOther) followed by aSet Variableaction, settingApplies totoobj_playerand then assigninggun_fireda value offalse.Add a collision event for the
obj_invader_bulletobject and then add theDestroy Instanceaction to it (set toSelf). Add anotherDestroy Instanceaction to it (set toOther).
Double-click on the
obj_waspobject.Add a
Createevent to the object and then add aMove Fixedaction to the event, selecting the left arrow button and setting Speed to-2. Add thePlay Soundaction assigning is thesnd_waspsound.Add an
Outside Roomevent and then add theDestroy Instanceaction (set toSelf), followed by theStop Soundaction, assigning it thesnd_waspsound.
You are almost done. All that remains is to add a little game information so that the player will know how the game is played and to modify the game resolution, demonstrating how Game Maker manages screen resolution settings on computers with different resolution settings. To create the game’s information page, double-click on the Game Information entry in the resource tree folder, and then enter the text shown below, which describes the game and how it is played.
The objectives of this game are to defend the world from the onslaught of an army of arachnid invaders and to score as many points as possible in the process. Points are scored by shooting down the ants, spiders, beetles, and wasps that make up the arachnid invasion army. Killing an ant is worth 10 points. Killing a spider is worth 20 points. Killing a beetle is worth 40 points. Killing a wasp is worth 100 points.
Use the left and right arrow keys to control the movement of your jet fighter plane and the spacebar to shoot. You have three lives with which to play. You lose a life each time you are shot by the enemy. Game play ends when you are killed and have no more lives with which to play. Game play also ends if the arachnid horde defeats you by making its way to the bottom of the screen.
Game Maker provides the ability to temporarily modify screen resolution on player computers and to restore the player’s previous resolution setting at the end of the game. This allows you to specify and control the resolution at which your game is played. For the Arachnid Attack! game, let’s adjust the resolution on the player’s computer to 800x600. This will ensure that the game is played within an adequately large window at a resolution that is universally supported on all modern computers. To set this up, double-click on the Global Game Settings entry in the resource tree folder, click on the Resolution tab, and then select the 800x600 bullet entry located in the Resolution sections of the tabbed page.
At this point, your new game should be ready for testing. When testing, make sure that your computer’s resolution is set to something other than 800x600 so that you can observe the manner in which the game modifies resolution.
Congratulations on making it to the end of the book. Making it all the way to the end represents the completion of a significant commitment and has provided you with a strong foundation from which you can continue to work and learn more about Game Maker and programming in general. Before you end your journey, take a few extra minutes to look through the bonus appendices on the companion website (www.courseptr.com/downloads), including Appendix B, “What’s Next?”. It provides you with recommendations of links to other Game Maker and game development resources on the internet that you can visit to continue your game development and programming education.