Games developed using Game Maker consist of many different types of resources in addition to objects. These resources include sprites, sounds, backgrounds, and rooms. You’ve already learned a little about these resources. This chapter will take a much deeper delve, providing you with an in-depth understanding of these resources and their use. By the time you reach the end of the chapter, you will have a good understanding of all of the basic components that make up Game Maker computer games. To wrap things up, the chapter concludes by guiding you through the development of the Super Pong game.
An overview of the major topics covered in this chapter includes:
An examination of sprites and their properties and usage
The use of sounds as a means of adding special effects and background music to games
An examination of backgrounds and their configuration
A detailed review of rooms, their role in games, and their property settings
In Chapter 3 you learned all about objects, including how to create them, modify their property settings, and to add them to rooms. You also learned how to bring them to life through the specification of events and the addition and configuration of actions. Objects are but one resource that is essential to game development; other essential resources include:
Sprites
Sounds
Backgrounds
Rooms
In order for objects to be seen during game play, you must assign sprites to them. A sprite is a graphic image or a collection of graphic images used to animate the movement of an object. You can create sprites yourself using Game Maker’s built-in graphics editor or a third-party graphic editor or you can purchase and download them from various sources on the internet. You can also find various collections of sprites on the YoYo Games website.
Sprites are created in Game Maker by clicking on Resources > Create Sprite. This opens the Sprite Properties window and begins a new sprite definition. To finish the process of adding a sprite to a game, you should assign the sprite a descriptive name. Of course, you also need to assign a graphic to represent the sprite, as demonstrated in Figure 4.1. Game Maker supports many different types of graphics, including .png, .gif, .pic, .pcx, .tif, .jpg, .bmp, .wmf, and .ico.

Trick
Although it is not a hard and fast requirement, the Game Maker documentation recommends that you limit resource names to letters, numbers, and the underscore character and that you begin all names with a letter.
Trap
Be sure to follow a consistent naming policy in assigning names to different game resources and that you do not assign the same name to more than one resource; otherwise, an error will occur.
To use an existing graphic file as the basis for defining the sprite, click on the Load Sprite button. This displays a standard Open dialog window, allowing you to specify the name and location of the graphic file you want to use. Once selected, the Open dialog window is closed and the sprite’s graphic image should be visible in the Sprite Properties window. Note that Game Maker displays three pieces of information about the image just under the Load Sprite button, indicating the image’s width and height as well as a count of the number of subimages that image consists of (if the file is an animated .gif file).
By default, all sprites are defined as transparent, which means that only the sprite and not the rectangular background in which the sprite resides is displayed. However, if you want, you can clear the Transparent checkbox to display the entire contents of the graphic image.
Trick
Game Maker determines the transparent area of a sprite by checking the lower-left corner of a graphic image. So, to make sure that only the actual image is displayed when transparency is used, you need to ensure that the lower-left pixel is assigned the same color as the sprite’s transparent background. If necessary, you can enlarge the rectangular background that encloses a sprite.
If you need to, you can edit a sprite once it has been loaded or you can create a new sprite from scratch by clicking on the Edit Sprite button. When you do this, the Sprite Editor window is opened showing the sprite’s image, as demonstrated in Figure 4.2.

If a sprite consists of multiple subimages, all of the subimages will be displayed. By default, the Show Preview option is disabled; however, by selecting this checkbox, you can see a preview of the resulting animation for the sprite on the left-hand side of the window. When working with subimages, it is essential that they all have the same width and height dimensions; otherwise, the animation sequence will not work correctly.
You can test the animation at various speeds by overtyping the value displayed in the Speed text field. Note, however, that this setting does not control the speed of the animation in the game. This is determined by the speed assignment configured for the room in which the sprite’s object is placed. If you want, you can also change the background color for the sprite by clicking on the Background Color button and selecting a different color from the Color dialog window that appears.
Trick
You can remove a subimage from a sprite with multiple subimages by selecting a subimage and clicking on Edit > Delete. You can create a copy of one of the subimages by selecting it and then clicking on Edit > Copy followed by Edit > Paste. Other commands on the Edit menu change the order in which subimages are listed by letting you move them left and right, clear out or erase a subimage, and add new blank images. Commands on the Transform menu let you flip, rotate, resize, stretch, and scale images. The Images menu contains commands that let you modify an image’s color and apply different effects to it like blur and fade. The Animation menu contains commands that let you do things like flatten, grow, and shrink images.
Another way of animating sprites in your games, in addition to adding animated gif files, is to work with strips. A strip is a graphic file that contains all of the graphic images needed to generate an animated sequence. An example of a small graphic strip is provided in Figure 4.3.

As you can see, graphics are drawn on strings in rows and columns. To use them, you must load them into Game Maker and then provide Game Maker with a little information about how the graphics are organized. To do so, open the Sprite Editor window and click on File > Create from Strip. This will open a standard Open dialog window, which you can use to specify the name and location of the graphic file containing the strip. Once this is done, the window shown in Figure 4.4 opens.

Hint
If you want to perform any of these examples covered in this section yourself, you will need to download the graphic files that are used from this book’s companion website located at www.courseptr.com/downloads.
In order to work with the strip, you have to provide Game Maker with a little information. In the case of the example shown in Figure 4.4, the strip consists of eight images stored in a single row. Each image is 64 pixels wide and 64 pixels tall. So, to set things up, type 8 in the Number of images field, 8 in the Images per row field, and 64 in both the Image width and Image height fields. Once you have made these changes, you will be able to visually verify that Game Maker has correctly mapped out the strip into separate subimages, as demonstrated in Figure 4.5.
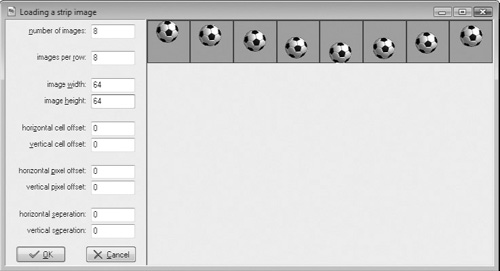
Once the strip has been mapped out, you can click on the OK button to close the Loading a strip image window. You will then see each of the separate subimages that Game Maker has created in the Sprite Editor window, as demonstrated in Figure 4.6.

You can use Gamer Maker’s built-in image editor to modify any graphic image or subimage. To do so, double-click on the image or subimage in the Sprite Editor window. When you do, the image editor application starts and the image or subimage is automatically loaded into it, as demonstrated in Figure 4.7.

This image editor works very much like the Microsoft Windows Paint program. Coverage of how to work with this program or any other paint program is outside the scope of this book. Once you have used the image editor to modify the graphic image, close the Image Editor window and click on Yes when prompted to save the changes you have made. The results of your changes should be immediately evident when you are returned to the Sprite Editor window.
Sprites have a number of properties that you can modify from the Sprite Properties window. The first of these properties is precise collision checking. Collisions occur when two objects touch one another. Collision detection is a key aspect of most computer games. Game Maker supports two types of collision detection: bounded rectangle collision detection and precise collision detection.
As demonstrated in Figure 4.8, sprites are images displayed within transparent bounded rectangles in which the sprite is completely enclosed. Here, a jet fighter plane is depicted on a transparent background.

With bounded rectangle collection detection, a collision occurs when two bounded sprites come into contact with one another. Figure 4.9 demonstrates how bounded collisions occur. Here two bullet sprites have both collided with the bounded portion of the sprite.
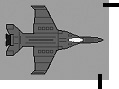
Figure 4.9. A bounded collision occurs when the bounded boxes within which sprites exist come into contact with each other.
Bounded collisions occur when both sprites’ bounding rectangles make contact. As a result, each rectangle is made up of just four sets of coordinates, making it easy to detect collisions and consume fewer resources in games where large numbers of objects are moving about, colliding with one another. However, the disadvantage of bounded collisions is that they lack precision. Therefore, bounded collisions sometimes occur in situations where two sprites are not actually on a true collision course with one another (e.g., near misses).
If your games require greater precision, you can enable the Precise collision checking option. When enabled, collisions occur only when the pixels that make up the sprites come into contact with each other, as demonstrated in Figure 4.10.

Figure 4.10. With Precise collision checking the pixels that make up sprites must come into contact with one another.
The advantage of precise collision detection is that it removes all ambiguity from your games when collisions and near misses occur. The disadvantage of precise collision detection is that it consumes more resources and may slow down game play on resource-constrained computers.
Another sprite property, disabled by default, is the smooth edges option. When enabled, this option makes the outer edge of the sprite transparent, which can sometimes make sprites look less blocky. All sprites are converted to textures that must be moved into memory before they can be used by games. By default, Game Maker loads sprites only when they are needed. However, by enabling the preload texture, you instruct Game Maker to automatically load the sprite when the game loads. This will eliminate any delay during game play. However, if your game consists of lots of sprites, particularly large complex sprites, enabling this option for every sprite can use up a lot of memory and make things run unnecessarily slow.
All sprites have a point of origin, which identifies how the sprite aligns by default with the grid that makes up rooms. By default, every sprite’s point of origin is its upper-left corner. However, you can change this using the mouse to point and click on the location on the sprite where you want to set its origin. In response, coordinates representing the sprite’s point of origin are updated on the Sprite Properties window. A common point of origin for sprites is the center, which you can specify by clicking on the Center button.
By default, the size of a sprite’s bounding rectangle is determined when you add it. However, if you want, you can modify its size using the settings made available in the Bounding Box section of the Sprite Properties window. In most situations, it’s best to let Game Maker set up a sprite’s bounding rectangle itself.
An important component of any game is the clever use of sound, including both sound effects and background music. Game Maker supports the playback of two types of audio files, wave and midi. Wave files are generally used for sound effects because, even though they use of a lot of memory, they can be played instantly. Midi files are usually used to add the playback of background music to games. They have lower memory requirements because they only support instrumental playback. In order to add a sound to a game you must click on Resources > Create Sound, opening the window shown in Figure 4.11.
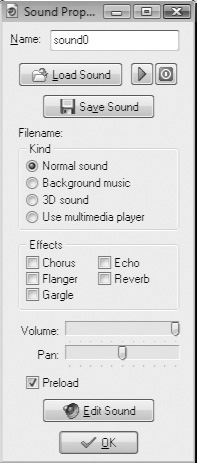
You can create your own sounds using any third-party audio application you want or you may purchase and download sound files from the internet. Once you have your audio files ready, you can add them to your games. To do so, click on the Sound Properties window’s Load Sound button and then specify the name and location of your audio file. Once loaded, you can click on the green Play the Sound button to hear what the audio file will sound like when played. The sound will play continuously. To stop its playback, click on the red Stop the Sound button. Immediately beneath these buttons is a button labeled Save Sound. This button allows you to save a copy of the sound file on your computer but otherwise is of little use.
Trap
When downloading a sound file from the internet, be careful to follow any copyright restrictions its creator may set.
You can specify what kind of file you have loaded by selecting from one of the following four options in the file name section.
Normal sound. Sounds (wave files) used to generate special sound effects.
Background music. Sounds similar to normal sound files but which can only be played one at a time.
3D sound. Sounds to which 3D effects can be programmatically applied.
Use multimedia player. MP3 audio files that Game Maker plays using the computer’s default media player.
If you load a wave file, Game Maker will automatically configure it as a normal sound. If you add a midi file, Game Maker configures it as background music. If you load an MP3 file, Game Maker automatically configures it to use the multimedia player option. The advantage of using normal sounds is that games can simultaneously play multiple normal sounds. Background sounds can only be played one at a time. Game Maker supplies a number of built-in functions that you can programmatically apply when playing sounds configured as 3D sounds. MP3 files are played using the computer’s media player instead of DirectX. Unlike other sounds, you cannot control the volume or specify any effects when playing MP3 files. In addition, because MP3 files are highly compressed files, they take extra time to load and play, which can result in delays and pauses during game play.
You can apply any of the following combination of five sound effects to normal, background, and 3D sounds.
Chorus
Flanger
Gargle
Echo
Reverb
Using the two scrollbars located at the bottom of the Sound Properties window, you can specify the volume level at which the sound is played as well as control how sound is panned between the computer’s left and right speakers. Lastly, you can specify whether a sound is preloaded into memory. Preloaded sounds are loaded when games first start and are thus ready for immediate playback. However, preloading files consumes more memory up front and can needlessly consume unnecessary resources. When not preloaded, sound files are loaded only when needed. Game Maker does not have a built-in sound editor. So unless you configure it to use one, as described in Chapter 2, “Getting Comfortable with the Game Maker IDE,” the Edit Sound button does not do anything.
An important component of most computer games is the use of creative and colorful backgrounds that help to add an important element of realism or establish an element of excitement. These backgrounds can then be added to the rooms you add to your games. Backgrounds are added by clicking on Resources > Create Background. This opens the Background Properties window.
To use the contents of an existing graphic file as the basis for creating a background, click on the Load Background button and specify the name and path of the file. Once loaded the width and height of the image are displayed (in pixels), just under the Load Background button, as demonstrated in Figure 4.12.

You can create a background image from scratch or modify a loaded background by clicking on the Edit Background button. This opens Game Maker’s Image Editor window. This is the same editor that you use to edit sprites.
By default, Game Maker displays backgrounds as solid images. However, by clicking on the Transparent option, you can make backgrounds transparent. Game Maker provides three additional options that you can enable. The first of the options is Smooth Edges, which when enabled helps to alleviate any choppiness of the edges of backgrounds by drawing the outer pixels as partially transparent. The second option is Preload Texture, which when enabled instructs Game Maker to load the texture, which it creates to represent the background, into video memory when the game initially loads. The last option is Use as Tile Set. When enabled, this option allows you to create a tile set from a background file. A tile set is a background made up of a collection of smaller graphic images that can be added to rooms.
To work with a tile set, create a new Background and then enable the Use as Tile Set option. As demonstrated in Figure 4.13, a new set of properties is displayed in the middle of the Background Properties window. The Tile width and Tile height properties let you tell Game Maker how to map out and identify the different pieces of the tile set. The Horizontal offset and Vertical offset properties let you specify where the top-left tile starts on the tile set (in pixels), and the Horizontal sep and Vertical sep properties let you specify whether there is any separation (in pixels) between tiles.

As has already been stated, every Game Maker game has to have at least one room. However, you can add as many rooms as needed to your games, using them to create different parts or levels in your games. To add a room to your game, you must click on Resources > Create Room. This adds a new room and opens the Room Properties window shown in Figure 4.14 so that you can configure the room and begin adding instances of objects to it.

Figure 4.14. Tabs located on the left-hand side of the Room Properties window provide everything you need to configure rooms.
The Room Properties window has its own toolbar along the top of the window, as shown in Figure 4.15.

If you add a large number of object instances to a room, it is sometimes useful to click on the Lock All Instances toolbar button. This will prevent you from accidentally moving instances around the room. If you want to move something, you can always click on the Unlock All Instances button, make the changes, and then lock things back down again. By default, Game Maker organizes rooms using a grid made up of squares that are 16 pixels wide by 16 pixels high. Depending on the type of game you are creating, you may need to modify these settings. For example, when creating maze games, you will probably want to set grid size to at least 32 × 32.
In order to work with rooms, you need to click on any of the six tabs located on the left-hand side of the Room Properties window. These tabs provide access to commands and settings that let you add object instances, configure room settings, work with tile sets, add and configure backgrounds and set up different views.
By default, Game Maker always displays the contents of the Objects tab whenever you create a new room. As shown in Figure 4.16, this is the tab that you must select in order to add instances of objects to rooms. This is accomplished by clicking on the context menu icon located at the end of the Object to Add with Left Mouse text field and then selecting the sprite representing the object you want to work with from the list that is displayed. Once selected, the object’s sprite is displayed in a graphic pane loaded at the top of the Objects tab. You can then add instances of the object to the room by left-clicking on the appropriate location in the room. Instances automatically align with the room’s grid based on how you set the origin of its sprite.

Trick
You can exercise more precise control over a sprite’s location by pressing and holding the Alt key when adding sprites to the room. This allows you to place the instance on the room without it automatically aligning to the grid. You can add instances of objects one at a time or you can add repeated instances by pressing and holding the Shift key when holding down and moving the mouse button. You can delete instances by right-clicking on them and selecting the Delete option.
By default, if you place one instance on top of another, Game Maker will remove the underlying instance. However, if you disable the Delete Underlying option, you can turn off this behavior.
Game Maker applies a number of configuration settings to every room that you add to your games. These settings are displayed on the Room Properties window’s Settings tab, shown in Figure 4.17.

Every room needs a name and can be assigned a text string that will be used to display a caption message that will appear in the game window’s titlebar when the room is loaded. By modifying the Width and Height settings, you can specify the height and width (in pixels) of the room. Every room has a Speed property that determines the speed at which object instances move in the room. By default, all rooms are assigned a speed of 30.
Every room also has a Persistent setting, which is disabled by default. As a result, when you leave a room in a game and return back to it later in the game, the room is returned to its initial status. By enabling the Persistent option, you instruct Game Maker to maintain the state of the room so that when returned to it, things are restored to the state that they were when you left the room. Lastly, there is a Creation code button located at the bottom of the Settings tab that when clicked opens a code editor window, into which you can add a GML script that will automatically be run whenever the room is opened.
If you have added a tile set background to your game, you can work with that tile set by clicking on the Room Properties window’s Tiles tab as shown in Figure 4.18.

Tiles are often used in the creation of maze games as a means of spicing up their appearance. This works better than using large numbers of differently drawn wall objects, which if used will consume large amounts of system resources. To work with a tile set you first need to modify the grid size of the room to match the dimension of the tiles in the tile set. Once you have modified the room’s grid size and have added a background to your application and configured it as a tile set, all you have to do is click on the Tiles tab and then click on the context menu icon in the middle of the tab pane in order to select the tile set. Once added, you can select the different pieces of the tile set and begin adding them to the room, using them to outline the shape of the walls you want to create, as demonstrated in Figure 4.19.

With the outline of the wall now laid out using decorative tiles, all you need to do is create a square-shaped sprite with the same dimensions as the tiles in the tile set and then create an object, assigning it the sprite. Once this new wall object has been created, use it to outline the wall, placing as many instances of the object as it takes to cover all of the tiles. Once this task has been completed, open the wall object and make it invisible.
This leaves the wall invisible but still in place. The player will not be able to see the wall even though it is still there. Instead, the decorative tiled outline of the wall is all that is visible. This approach reduces the overall number of resources required to create and manage the game by allowing you to work with a single object instead of having to create a dozen or more different objects that would have otherwise been required to create the wall.
Most rooms in games include either a background color or one or more backgrounds. To assign a solid color background to a room, click on the Backgrounds tab as shown in Figure 4.20 and select the Draw Background Color checkbox. If you plan on assigning a background image to be used as the room’s background, you should instead clear the Draw Background Color option.

You can assign a single graphic image to be used as the background for the entire room or you can assign two or more graphic images to fill in the room’s background. Game Maker allows you to assign as many as eight backgrounds to a room, although at most you only usually need 1 or 2. To assign a single background image to the room, select the Background 0 entry (selected by default) and then click on the context menu icon located in the middle of the Backgrounds tab and select the background from the list that appears. Next, select the Visible When Room Starts option so that the background will be made visible when the room loads.
The next configuration setting on the Backgrounds tab is the Foreground Image option, which when enabled turns the background image into a foreground image, drawing it on top of everything in the room. To be useful, you need to make the background transparent when you add it to the game. The Backgrounds tab has three options that you can use to tell it what to do when the size of the background is smaller than the size of the room to which it has been assigned.
Tile Hor.
Tile Vert.
Stretch
The last two settings located at the bottom of the Backgrounds tab allows you to set the room up as a horizontal or vertical scrolling background by specifying the speed at which the background should be moved within the room. To create a horizontal scrolling game, assign a speed to Hor. Speed and leave Vert. Speed set to zero. To create a vertical scrolling game, do the opposite. By creating scrolling room, you can create the illusion that game characters are moving through a larger virtual world, which is a key technique used in the development of scrolling shooter games. You learn how to create one such game in Chapter 7.
The last of the tabs on the Room Properties window is the Views tab. The settings on this tab allow you to draw different parts of a room at different locations on the screen. Views let you limit how much of a room is visible at any one time. Views can also be used to create a split-screen view within a room, so that two players can view the game from their own slightly different perspectives. Views are also instrumental in creating rooms with a status panel, where the panel remains fixed while the rest of the room scrolls.
As shown in Figure 4.21, you must select the Enable the Use of Views option in order to use views with a room.

Settings that you can use to configure each view are shown below the views list. For starters, you can specify whether a view should be enabled when the room is started. Each view that you define lets you view the area within a rectangular portion of the room to be seen. You must define two things for each view, the actual area within the room that is visible within the view and the area on the screen where the view is to be placed.
Hint
Game Maker maps out the coordinates of the area in which game play occurs using a coordinates system depicted in Figure 4.22.

As shown in Figure 4.22, the upper-left corner of the game play area is located at coordinates (0, 0). The game area has both an X-axis and a Y-axis.
You define the coordinates for this area by first specifying the upper-left corner of the view and then the width and height of the view. You then repeat these steps by specifying the location on the screen where the view is to be displayed. You will often want to configure a view to follow the movement of an object, typically the object controlled by the player during game play. To set this up, click on the context menu icon located at the end of the Object Following field and then select the object for which the view should follow.
Rather than have the view constantly move every time the object it tracks moves, you typically want to allow the object to move around within the view without constantly adjusting it, moving it only when the object reaches a predefined boundary within the view. To set this up, you specify the number of horizontal (Hbor) and vertical (Vbor) pixels from the outer edge of the view at which this boundary resides. You can also configure the speed at which views change by specifying a horizontal (Hsp) and vertical (Vsp) speed. A value of —1 forces an immediate change. A higher value may result in a better transition but may also result in a small delay in the updating of the view when the object being tracked moves out of sight.
All right, let’s change focus a bit and get to work on developing Super Pong, your first real computer game. As its name implies, Super Pong is based on the original Atari Pong game, which pits two players against one another in a video game version of ping-pong. Each player is assigned a paddle that is moved by pressing on keyboard keys. The goal is to keep each other from scoring points by deflecting a bouncing ball past the other player’s side of the screen. Game play ends when one of the players scores 11 points. Figure 4.23 shows an example of the game in action.

In order to create this game, you will need to perform a number of steps, as outlined here:
Define the sprites representing the game ball, paddle, goal, and wall.
Define sounds that will be played when the ball collides with a wall or player paddle and when a player scores.
Configure the game’s background.
Add and configure a font.
Define objects representing the game ball, player paddles, game walls, invisible left and right goals, and a special controller object.
Configure the ball object to respond to various events and perform specific actions.
Add a room to the game and populate it with the ball, player paddles, walls, invisible goals, and the controller object.
To create this game you will need to add four sprites to it, representing a ball, paddle, goal, and wall. The ball sprite will be used later to create a ball object that will bounce around the screen. The players will attempt to keep the ball in play, using a paddle object represented by the paddle sprite. As the ball moves across the screen, it may bounce off the game’s upper and lower walls, represented by repeated instances of the wall sprite. Lastly, an invisible goal object will be placed along the left and right sides of the screen. Players will score points when they hit the ball past their opponent’s paddle into the invisible goal.
If you have not already done so, begin by starting Game Maker, or if Game Maker is already running, click on File > New to create a new application and then use the following steps to add the game’s first sprite.
Next, click on Resources > Create Sprite and then type
spr_ballas the name for the game’s first sprite.The graphic files you will need to create each of the game’s sprites are available for download on this book’s companion web page located at www.courseptr.com/downloads. Once downloaded, click on the Load Sprite button to navigate to the location where you saved the files and select the ball.gif file and then click on Open.
Click on OK to close the Sprite Properties window.
Using the process outlined above, create a new sprite named spr_paddle, assigning it the paddle.gif file; a sprite named spr_goal, assigning it the goal.gif file; and a sprite named spr_wall, assigning it the wall.gif file. Unlike all of the other sprites, the wall.gif file does not have a transparent background, so disable the spr_wall sprite’s Transparent setting.
The second step in the development of the Super Pong game is to define the sounds that will be used to play the game’s sound effects. You will need to create two sounds, one for when the ball collides with the wall or a paddle and one for when a player scores. Game Maker comes equipped with a nice collection of audio files that are perfect for generating sound effects. By default, these audio files are stored in the C:Program FilesGame Maker7Sounds folder. Two of these files will be used as the basis for creating the game’s sounds.
The following procedure outlines the steps required to create the first sound.
Click on Resources > Create Sound. This will open the Sound Properties window.
Assign a name of
snd_collisionto the sound.Click on the Load Sound button and navigate to the C:Program FilesGame Maker7Sounds folder and select the Beep1.wav file and then click on Open.
Click on OK to close the Sprite Properties window.
Using the process outlined above, create a new sound named snd_score, assigning it the zap.wav file.
Now that the game’s sprites and sounds have been defined, it is time to define a background for the game. The steps required to add the game’s background are outlined here:
Click on Resources > Create Background. Game Maker will respond by displaying the Background Properties window.
Enter
bck_blackinto the Name file.The graphic file you will need to create the background is available for download on this book’s companion web page located at www.courseptr.com/downloads. Once downloaded, click on the Load Background button and navigate to the location where you saved the file and select the black.bmp file and then click on Open.
Click on OK to close the Background Properties window.
In this game, player scores are going to be displayed, well actually drawn, at the top of the screen. By default, Game Maker draws all text using a font type of Arial at a font size of 12 points. This is too small to suit the game’s needs. To make player’s scores stand out, the game needs a larger-sized font. To set this up, you need to add a font to your game. The steps that you need to follow are outlined here:
Click on Resources > Create Font. Game Maker will respond by displaying the Font Properties window as shown in Figure 4.24.
Enter
font_textinto the Name file.Leaving the Font type set to Arial, enter 18 as the size of the font, and then click on OK.

Now that a new font has been added, you will be able to tell Game Maker to use it later in the development of the game to display player scores.
Super Pong consists of a number of objects, some of which players can see and some of which they cannot. The visible objects include the ball, paddles, and walls. The invisible objects include the left and right goals and a special controller object. A controller object is an object that is usually not visible and its purpose is to perform actions that help initiate, manage, and terminate game play. In this game, the controller object will be used to do the following:
Initialize special values used to keep track of player scores
Display a caption in the game window
Create the first instance of the ball, thus starting game play
Specify the font to be used when drawing player scores
Specify the color to be used when drawing
To draw both player’s starting scores (0)
None of the actions listed above are directly associated with any of the ball, paddle, or wall objects, so it makes sense that they be performed by a different special-purpose object (e.g., the controller object).
Let’s begin by defining all of the objects that will be visible to the players, starting with the ball object and then moving on to the paddle objects followed by the wall object.
Click on Resources > Create Object. Game Maker responds by displaying the Object Properties window.
Type
obj_ballin the Name field.Click on the context menu icon located at the end of the Sprite text field. A list of all the sprites defined in the application appears.
Select the
spr_ballobject.Click on the OK button to close the Object Properties window.
Click on Resources > Create Object. Game Maker responds by displaying the Object Properties window.
Type
obj_rightpaddlein the Name field.Click on the context menu icon located at the end of the Sprite text field. A list of all the sprites defined in the application appears.
Click on the OK button to close the Object Properties window.
Click on Resources > Create Object. Game Maker responds by displaying the Object Properties window.
Type
obj_leftpaddlein the Name field.Click on the context menu icon located at the end of the Sprite text field. A list of all the sprites defined in the application appears.
Select the
spr_paddleobject.Click on the OK button to close the Object Properties window.
Click on Resources > Create Object. Game Maker responds by displaying the Object Properties window.
Type
obj_wallin the Name field.Click on the context menu icon located at the end of the Sprite text field. A list of all the sprites defined in the application appears.
Select the
spr_wallobject.In order to facilitate collision with the ball object, enable the object’s
Solidproperty.Click on the OK button to close the Object Properties window.
Now that all of the visible objects have been accounted for, let’s create the object that the players cannot see.
Click on Resources > Create Object. Game Maker responds by displaying the Object Properties window.
Type
obj_rightgoalin the Name field.Click on the context menu icon located at the end of the Sprite text field. A list of all the sprites defined in the application appears.
This object is not to be seen by the player, so clear its
Visibleproperty.Click on the OK button to close the Object Properties window.
Click on Resources > Create Object. Game Maker responds by displaying the Object Properties window.
Type
obj_leftgoalin the Name field.Click on the context menu icon located at the end of the Sprite text field. A list of all the sprites defined in the application appears.
Select the
spr_goalobject.This object is not to be seen by the player, so clear its
Visibleproperty.Click on the OK button to close the Object Properties window.
Click on Resources > Create Object. Game Maker responds by displaying the Object Properties window.
Type
obj_controllerin the Name field. This object will not be visible to the player and therefore will not be assigned a sprite. Note that although this object will not be seen, it will be assigned an action that draws player’s scores on the screen and therefore itsVisibleproperty must remain enabled.Click on the OK button to close the Object Properties window.
Now that you have added all of the objects that are needed to play the game, it is time to go back and add the program logic to those objects to bring them to life. This of course means assigning events to objects and then the actions those events will trigger. Some objects, specifically the obj_wall, obj_rightgoal, and obj_leftgoal objects, do not do anything during game play other than simply exist. Therefore, you will not have to assign any program logic to these objects, only to the special controller object and the objects that move about the screen.
When initially created, an instance of the obj_ball object becomes visible. It should pause briefly and then begin moving randomly in one direction. The obj_ball object must be programmed to respond to collisions with the wall, player paddles, and the left and right goals.
Begin by expanding the Objects folder located in the resource folder tree and then double-click on the
obj_ballobject and the Add Event button and then click on the Create Event button to add the Create event to the object.Click on the main2 tab and drag and drop an instance of the Sleep action onto the actions area. A window will appear prompting you to specify how long the object should pause before resuming its execution. Enter 2000 to pause the object for two seconds.
Click on the Move tab and drag and drop an instance of the Move Fixed action onto the actions area. Click on all three of the arrows located in the first and last columns, instructing Game Maker to move the object in one of six random directions. Then enter 10 in the Speed field to get the object moving 10 pixels per step in the randomly selected direction, as shown in Figure 4.25.
Click on the Add Event button and then click on the Collision Event button. Game Maker will display a list of objects in the application. Select the
obj_rightpaddleobject, click on the Move tab, and drag and drop an instance of the Move Fixed action onto the actions area. Click on all three of the arrows located in the first column, and then enter 10 into the Speed field.Click on the main1 tab and drag and drop an instance of the Play Sound action onto the actions area. Click on the context menu icon located at the end of the Sound field and select the
snd_collisionsound.Click on the Add Event button and then click on the Collision Event button. Select the
obj_leftpaddleobject. Drag and drop an instance of the Move Fixed action onto the actions area. Click on all three of the arrows located in the last column, and then enter 10 into the Speed field. Drag and drop an instance of the Play Sound action onto the actions area and assign it thesnd_collisionsound.Add a new collision event to the object and set it to the
obj_wallobject. Click on the Move tab and drag and drop an instance of the Bounce action into the actions area. No changes are required for this action so click on OK to close its configuration window. Add the Play Sound action to the actions area and configure it to use thesnd_collisionsound.Add a new collision event to the object and set it to the
obj_leftgoalobject. Click on the Score tab and drag and drop an instance of the Set Score action to the actions area. Type 1 in the New Score field and enable the Relative option. This will increase Player 1’s score by one point when he scores a point.Select the main1 tab and add an instance of the Destroy Instance action. Leave the default setting of Self selected and click on OK to close its configuration window when it is displayed. This will remove the current instance of the
obj_ballobject from the room.Drag and drop the Play Sound action onto the actions area and set it to play the
snd_scoresound.Now it is time to do a little conditional programming logic. Begin by selecting the Score tab and adding the Test Score action. Enter 11 into the Value field and leave the Operation field set to a value of “equal to.” Next, click on the Control tab and add the Start of a Block followed by the End of a Block actions to the actions area. Any actions placed inside the two blocks will execute when the value of score is equal to 11.
Select the main2 tab and drag and drop an instance of the Sleep action in between the Start of a Block action and the End of a Block action and enter 500 (a half second) in the Milliseconds field. Add an instance of the Display Message action to the actions area, immediately following the Sleep action and enter “Game over. Click on OK to play again.” in its message field. Lastly, add an instance of the Restart Game action to the Actions area immediately following the Display Message action.
Next, select the Control tab and add an instance of the Else action to the bottom of the actions area followed by a Start of a Block and an End of a Block action. Any actions you embed inside the Start of a Block and End of a Block actions will only be executed when the value of score is not equal to 11.
Select the main1 tab and drag and drop an instance of the Create Instance action in between the Start of a Block and an End of a Block actions, selecting
obj_balland entering 384 and 284 as the value to the objects starting X and Y coordinates (placing the object roughly in the middle of the room). At this point the programming logic for the collision event with theobj_leftgoalobject should look like the example shown in Figure 4.26.
Figure 4.26. The programming logic used to control what happens with collisions between the ball and the left goal.
Trick
Game Maker provides built-in actions for keeping track of player scores in single-player games. However, it does not provide equivalent actions for keeping track of a second player’s score. One quick and easy way around this limitation is to use Game Maker’s lives actions to keep track of the second player’s score. You will learn more about how to work with both score and lives actions in Chapter 7.
All that remains is to add a collision event with the
obj_rightgoalobject. The program logic used by this event is almost identical to that used by theobj_leftgoalobject. The only difference being that lives actions are used in place of score actions. To save time in setting up this event, right-click on theobj_leftgoalevent and select Duplicate Event from the context menu that appears. Game Maker will prompt you to specify the type of event you want to work with. Click on the Collision button and then selectobj_rightgoal. Now all you have to do is replace the event’s Set Score action with the Set Lives action, which you will find on the Score tab, and assign a Set Lives action a value of 1 and enable its Relative option. Lastly, you need to replace the event’s Test Score action with the Test Lives action and assign that action a value of 11.

The right and left paddles must move in response to keyboard input. Specifically the right paddle must move up when Player 2 presses the up arrow key and down when Player 2 presses the down arrow key. It must stop moving when the player releases both of these keys and it must also react when it bumps into the upper or lower wall.
Double-click on the
obj_rightpaddleobject in the resource folder tree, click on the Add Event button, select the Collision Event button, and then select theobj_wallobject.Select the Reverse Vertical action and drag and drop it onto the actions area. Leave the default selection of Self and click OK on the actions configuration window to close it. This will deflect the ball backward when hit by the right paddle.
Click on the Add Event button and when prompted click on the Event Selector window’s Keyboard button and select the
<no key>option. Next, drag and drop an instance of the Moved Fixed action to the actions area and then select the center button in the Directions area. This will halt the movement of the paddle.Click on the Add Event button and when prompted click on the Event Selector window’s Keyboard button and select the
<Up>option. Next, drag and drop an instance of the Speed Vertical action to the actions area and then enter -6 as the value assigned to vert. speed. This will move Player 2’s paddle in a downward direction when the down arrow key is pressed.Click on the Add Event button and when prompted click on the Event Selector window’s Keyboard button and select the <Down> option. Next, drag and drop an instance of the Speed Vertical action to the actions area and then enter 6 as the value assigned to vert. speed. This will move Player 2’s paddle in an upward direction when the up arrow key is pressed.
Double-click on the
obj_leftpaddleobject in the resource folder tree, click on the Add Event button, select the Collision Event button, and then select theobj_wallobject.Select the Reverse Vertical action and drag and drop it onto the actions area. Leave the default selection of Self and click OK on the actions configuration window to close it. This will deflect the ball backward when hit by the right paddle.
Click on the Add Event button and when prompted click on the Event Selector window’s Keyboard button and select the
<no key>option. Next, drag and drop an instance of the Moved Fixed action to the actions area and then select the center button in the Directions area. This will halt the movement of the paddle.Click on the Add Event button and when prompted click on the Event Selector window’s Keyboard button and select the
<Shift>option. Next, drag and drop an instance of the Speed Vertical action to the actions area and then enter -6 as the value assigned to vert. speed. This will move Player 2’s paddle in a downward direction when the left Shift key is pressed.Click on the Add Event button and when prompted click on the Event Selector window’s Keyboard button and select the
<Ctrl>option. Next, drag and drop an instance of the Speed Vertical action to the actions area and then enter 6 as the value assigned to vert. speed. This will move Player 1’s paddle in an upward direction when the left Control key is pressed.
The controller object, as already stated, gets things started by creating the first instance of the ball and initializing player scores. It must also specify the font and color used to draw player scores on the screen and draw both players’ initial scores.
Double-click on the
obj_controllerobject in the resource folder tree, click on the Add Event button, select the Other Event button, and then select the Room Start event.The next step is to select the Score tab and add an instance of both the Set Score and Set Lives actions. By default, both of these actions will default to an initial value of 0 so no changes are required.
By default, Game Maker displays player score as a caption in the game window’s titlebar. You will need to disable this feature for this game by dragging and dropping the Score Caption action from the Score tab to the actions area and then assigning a value of Don’t Show for the Show Score, Show Lives, and Show Health fields, as shown in Figure 4.27.
Select the main1 tab and add an instance of the Create Instance action to the actions area. When prompted, assign as its object the
obj_ballobject and assign 384 and 284 as the initial X and Y coordinates for this new instance of the object.Click on the Add Event button and then add the Draw event to the
obj_controllerobject. Once added, click on the Draw tab and add the Set Font action, specifying thefont_textfont when prompted.Next, add an instance of the Set Color action and select a color of yellow when prompted by clicking on the context menu located on the Set Color window and selecting the color from the color palette that is displayed.
Finally, click on the Draw tab and drag and drop two instances of the Draw Text action onto the actions area. Configure the first instance by entering
'Player 1:' + string(lives)in its text field and 50 and 25 as its X and Y coordinates. Likewise, configure the second instance by entering'Player 2:' + string(score)in its text field and 630 and 25 as its X and Y coordinates.

Hint
The statement that you were instructed to key into the text fields of the Draw Text action window are examples of expressions created using the GML scripting language. Each of these expressions is ultimately resolved into a text string that dynamically reports a player’s current score. You will learn all about GML in Chapters 9 through 11.
The last step in the creation of the Super Pong game is to add a room in which game play will occur. To do so, click on Resources > Create Room. The Room Properties window appears. By default, Game Maker sizes new rooms at 640 × 480 pixels. This is not a lot of space for a game like Super Pong. To remedy this situation, click on the Settings tab and change the room’s width to 800 and its height to 594. Also, add a caption of Super Pong to the Caption for the Room field. Next, click on the Backgrounds tab and then change the background color of the room to black by clicking on the Color field. This opens a window displaying a color palette. Select black as the background color and click on OK to close the Color window. You are now ready to begin populating the room with the objects needed to facilitate game play. The instructions for completing this final task are outlined next.
Click on the Objects tab and then click on the context menu in the middle of the tab pane to display a list of the game’s objects. Select
obj_walland then, using repeated instances of this object, fill the entire upper and lower rows of the window with this object. You should end up with two solid walls, one along the top of the room and another along the bottom of the room.Next, click on the context menu again and this time select the
obj_leftgoalobject and then use it to fill in the entire first column of the room.Repeat step two above, this time selecting the
obj_rightgoaland filling in the entire last column in the room.Next, click on the context menu and select the
obj_rightpaddleobject and then add a single instance of it to the room in the center of the second to last far right column.Repeat step 4, this time adding the
obj_leftpaddle, placing it in the center of the second column on the left-hand side of the room.Lastly, click on the context menu and select the
obj_controllerobject and then add a single instance of it to the room. The object is invisible and can be placed anywhere you want within the room.
Trap
If you forget to add the special control object to a room, that object will not be able to initiate, manage, or terminate any activities within the room.
Once you are done working on the room, it should look like the examples shown in Figure 4.28.

Figure 4.28. Adding a room and populating it with objects is the final step in the development of the game.
Assuming that you followed along carefully with the instructions that have been presented and that you have not accidently skipped any steps, your copy of the Super Pong game should be ready for testing. Give it a go and see how well it works!
This chapter rounded out your understanding of the different types of resources required to create basic computer games. You learned more about how to work with sprites and how to configure their properties. You also learned more about sounds and how they are used to generate audio effects and background music. This chapter also provided a detailed overview of backgrounds, including how to work with tile sets. Lastly, this chapter provided a detailed review of rooms and explained their importance and usage in games. Finally, you learned how to create the Super Pong game.