
CHAPTER 8
Manage Azure Identities
Microsoft has long been a leader in the identity space. This leadership goes back to the introduction of Active Directory (AD) with Windows 2000 before the cloud even existed. Microsoft moved into cloud identity with the introduction of Azure Active Directory (Azure AD), which is now used by over five million companies around the world. The adoption of Office 365 led this extended use of Azure AD. These two technologies however have very different purposes, with AD primarily used on-premises and Azure AD primarily used for the cloud.
Microsoft has poured resources into making AD and Azure AD work together. The concept is to extend the identity that lives on-premises to the cloud by synchronizing the identities. This ability is provided by a technology named Azure AD Connect. Microsoft has also invested in extending those identities to enable scenarios such as single sign-on by using Active Directory Federation Services (ADFS), which is deployed in many large enterprises.
Microsoft has continued pushing forward by developing options for developers to leverage Azure AD for their applications. Microsoft provides the ability for developers to extend a company’s Azure AD to users outside of the organization. The first option is known as Azure AD B2C (Business to Consumer). This allows consumers to sign into applications using their social media accounts, such as a Facebook ID. A complementary technology, known as Azure AD B2B (Business to Business), extends Azure AD to business partners.
As the cloud becomes more popular and Azure AD adoption continues to pick up, there are some legacy applications that require you to use the traditional AD, even in the cloud. For this, Microsoft has developed a service called Azure AD Domain Services. This allows for traditional Kerberos and LDAP functionality in the cloud without deploying Domain Controllers into a VNet.
This area of the 70-533 exam is focused on the management of identities by using Azure, as well as monitoring their health and functionality by using Azure AD Connect Health.
Skill 8.1: Monitor On-Premises Identity Infrastructure and Synchronization Services with Azure AD Connect Health
Azure AD Connect Health is a monitoring tool integrated into the Azure portal. Azure AD Connect Health can be used to monitor your on-premises identity infrastructure and synchronization services to the cloud.
Maintaining your users’ identities is critical to ensure their ability to leverage Azure, Office 365, and any other Microsoft Online services. Azure AD Connect Health Services can be used to monitor Active Directory Federation Services (ADFS) servers, Azure AD Connect servers (also known as Sync Engine), Active Directory Domain Services, and traditional AD Domain Controllers. Azure AD Connect Health can also provide usage data which helps you better understand how your users are leveraging the cloud.
This skill covers how to:
Monitor Sync Engine & Replication
Monitor Domain Controllers
Setup Email Notifications for Critical Alerts
Monitor ADFS Proxy and Web Application Proxy Servers
Generate Utilization Reports
Monitor Sync Engine & Replication
Replication is a critical service that must be monitored and maintained to ensure reliable access to your cloud. Without healthy replication, directory objects are not available or updated on a regular basis, which makes deploying services to the Microsoft cloud unreliable.
When you synchronize AD with Azure AD, users are more productive because they leverage a common identity across both cloud and on-premises resources. Azure AD Connect Health monitors and provides visibility into your on-premises identity infrastructure used to access Office 365 and Azure AD applications. It is as simple as installing an agent on each of your on-premises identity servers. Figure 8-1 shows the Azure AD Connect Health blade in the Azure portal.

FIGURE 8-1 Azure AD Connect Health
 EXAM TIP
Azure AD Connect Health requires Azure AD Premium, either P1 or P2 SKU. The first Azure AD Connect Health agent requires at least one Azure AD Premium license. Each additional registered agent requires 25 additional Azure AD Premium licenses.
In Figure 8-1, there is an unhealthy message for the examref.onmicrosoft.com Domain. To examine the Domain, click its name which brings you to the monitoring page. Here, you can review the status of this Domain, as shown in Figure 8-2.
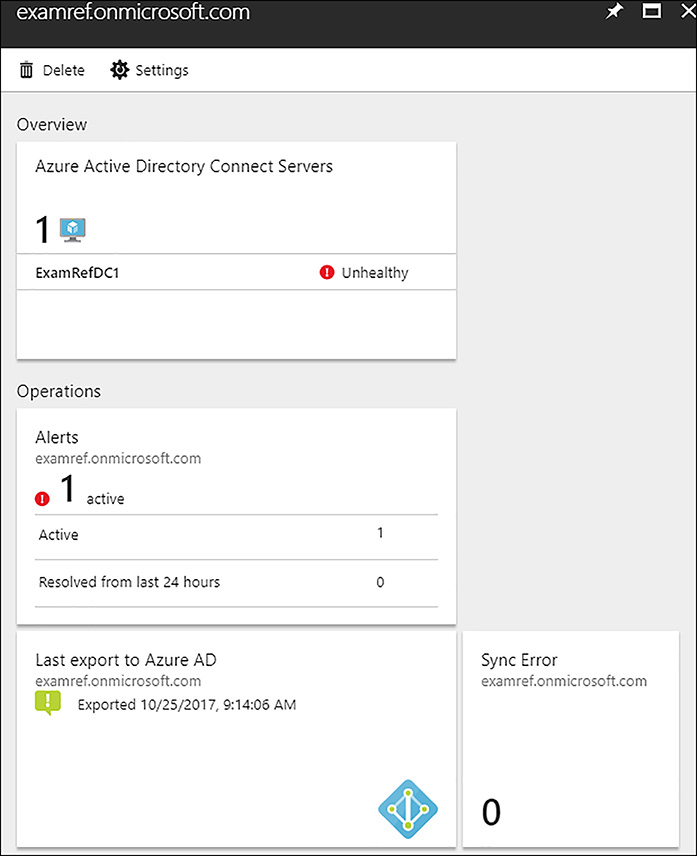
FIGURE 8-2 Azure AD Connect Health Domain Monitoring
To determine the cause of the unhealthy state, you can review the alerts and click through to Alerts Details. Figure 8-3 shows the details of the following alert, stating the Health service data is not up to date.
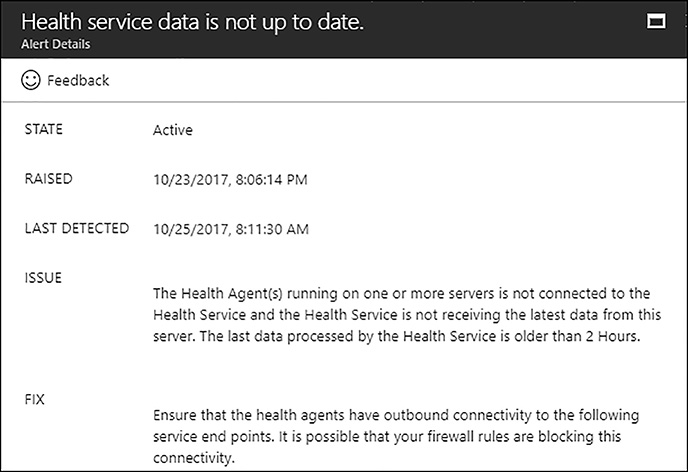
FIGURE 8-3 Azure AD Connect Health Alert
Monitor Domain Controllers
The Azure AD Connect tool is installed on one Domain controller (DC), to synchronize the identities of an on-premises AD Domain to Azure AD. In most AD installations there are many DCs. The first DC installed with AD Connect will automatically have the Azure AD Connect Health Agent installed and reports status updates on the Azure portal.
The Azure AD Connect Health tool can also monitor other AD DCs on-premises or running in a VNet in Azure. To configure these DCs you need to install the Azure AD Connect Heath agent for AD DS. Figure 8-4 shows, the links available in the Quick Start area of the Azure AD Connect Health blade in the Azure portal.
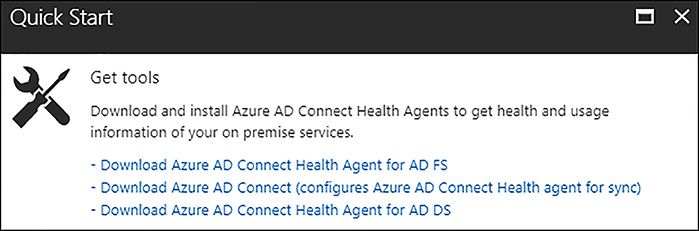
FIGURE 8-4 Azure AD Connect Health Quick Start Links
The health agent installer should be downloaded to the DC you want to add to the Azure AD Connect Health monitoring portal. Figure 8-5 shows the tool after the initial install has been completed. Click Configure Now to start the process to connect the DC to Azure AD Connect Health.
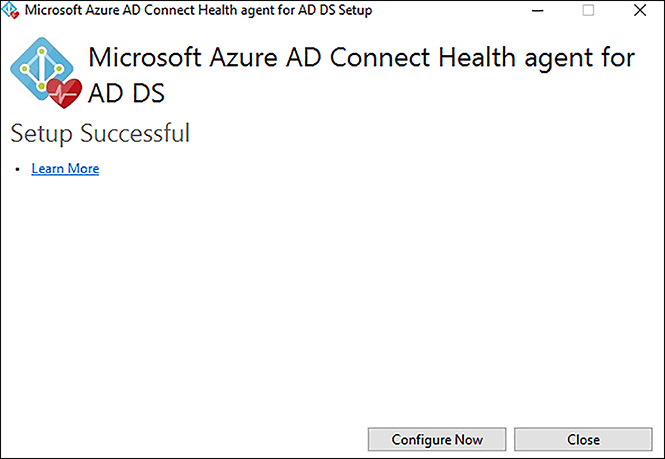
FIGURE 8-5 Azure AD Connect Health agent for AD DS
After clicking Configure Now, you are prompted to log in to your Azure AD tenant by using a global admin account, as shown in Figure 8-6.
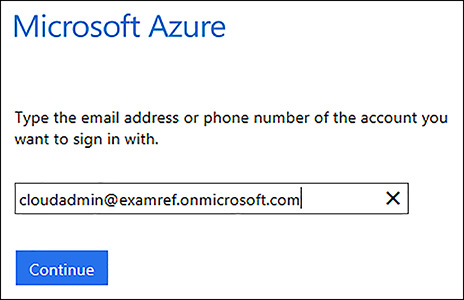
FIGURE 8-6 Azure AD Connect Health agent for AD DS Authentication
After a successful authentication, a PowerShell window appears running the configuration. Figure 8-7 features a resemblance of what you will see during the installation.

FIGURE 8-7 Azure AD Connect Health agent for AD DS Registration using PowerShell
After this is completed, the on-premises domain appears in the Azure AD Connect Health Portal, as shown in Figure 8-8.
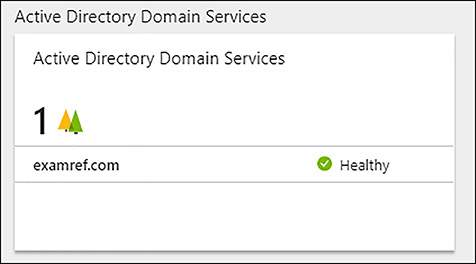
FIGURE 8-8 Azure AD Connect Health showing the monitoring domain
When you click through to the next blade in the portal, important information about the Domain and its DCs appears, as shown in Figure 8-9. This blade includes information about the Domain, DC errors, and monitoring of authentications along with other performance monitors.
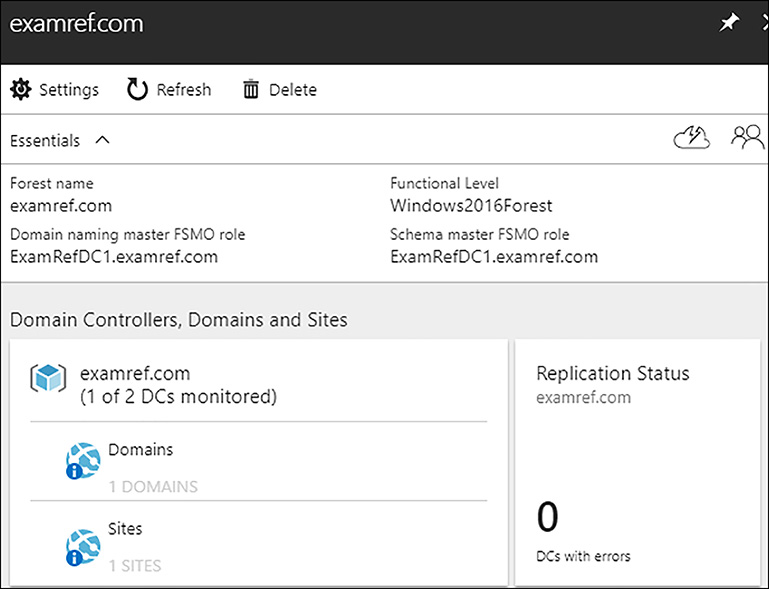
FIGURE 8-9 Azure AD Connect Health monitoring on-premises forest, domain, and DCs
Setup Email Notifications for Critical Alerts
One of the important functions of the Azure AD Connect Health tool is the ability to make notifications when errors are detected. In the portal’s Sync Error section, different types of errors can be located, investigated, and the notification settings can be configured. Figure 8-10 shows the Sync Error blade where both of these activities can take place.
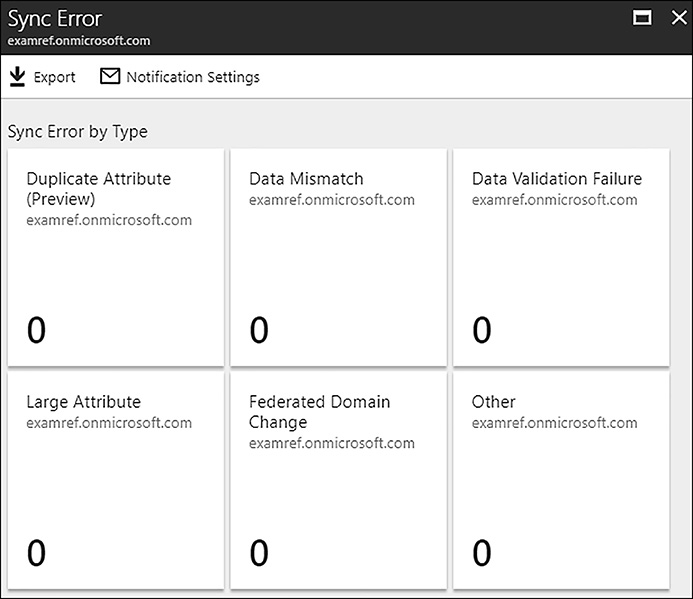
FIGURE 8-10 Sync Error Blade of Azure AD Connect Health
You can configure email alerts by clicking Notification Settings on the blade. By default, the notifications are enabled and setup to send email to global administrators. Figure 8-11, shows that another email address has been configured to send email to a distribution group named [email protected].
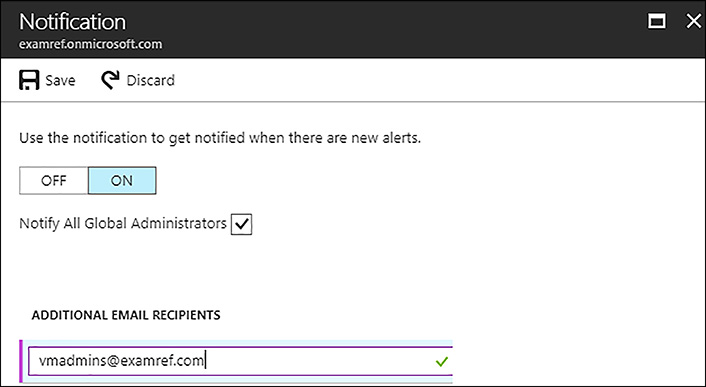
FIGURE 8-11 Email Notifications configured in Azure AD Connect Health
Monitor ADFS proxy and Web Application proxy Servers
Azure AD Connect Health for ADFS supports ADFS 2.0 & 3.0 on Windows Server 2008 R2, Windows Server 2012, Windows Server 2012 R2, and Windows Server 2016 respectively. It also supports monitoring the ADFS proxy or web application proxy servers that provide authentication support for extranet access. These services are provided after the Azure AD Connect Health for ADFS agent is installed on those servers.
EXAM TIP
The following are some important capabilities that Azure AD Connect Health for ADFS and App Proxy provide:
Monitoring with alerts to know when ADFS and ADFS proxy servers are not healthy
Email notifications for critical alerts
Trends in performance data, which are useful for ADFS capacity planning
Usage analytics for ADFS sign-ins with pivots (apps, users, and network location), which are useful to understand how ADFS is used
Reports for ADFS, such as top 50 users who have bad username/password attempts and their last IP address
The Azure AD Connect Health Alerts for ADFS shows a list of active alerts. You can open an alert and additional information is provided to information can include steps that you can take to resolve the alert and links to documentation. You can also view historical data on alerts resolved in the past. Figure 8-12, shows alerts for an ADFS installation in the Azure AD Connect Health portal.
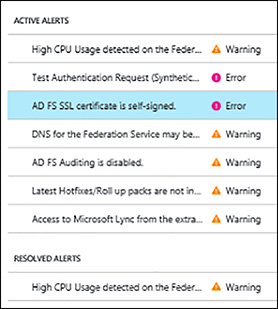
FIGURE 8-12 Azure AD Connect Health monitoring ADFS Alerts
Azure AD Connect Health Usage for ADFS provides detailed information on authentication traffic of your federation servers. You can drill into the data by opening the usage analytics blade as shown in Figure 8-13, showing several metrics and groupings.
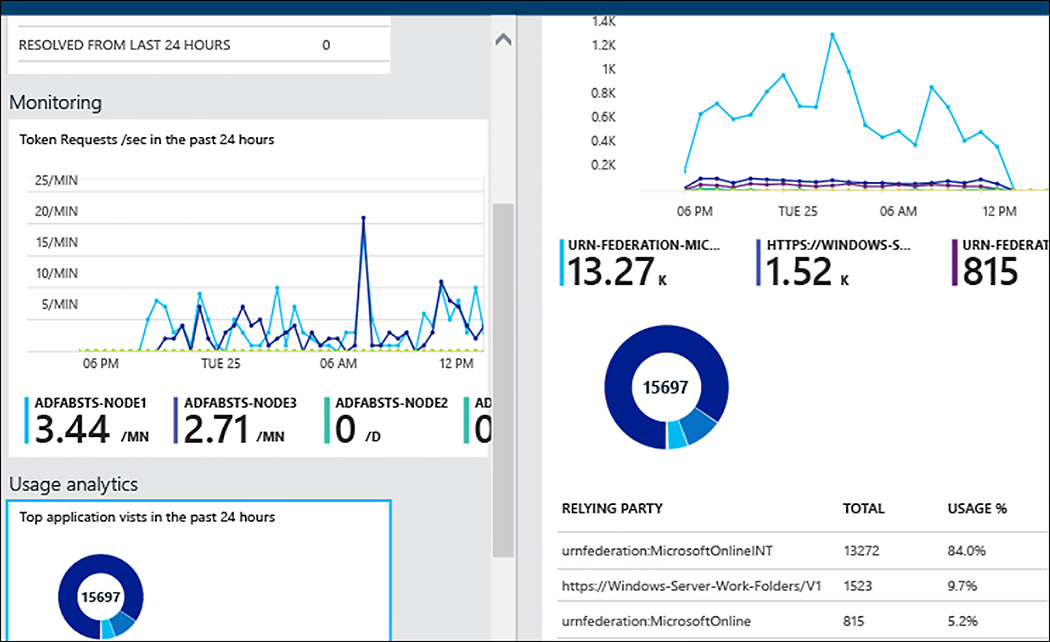
FIGURE 8-13 Azure AD Connect Health ADFS Usage metrics
Generate Utilization Reports
Azure AD reporting can be used to better understand how your environment is functioning. You can gain visibility into how your apps and services are being utilized by the users. Risks impacting the environment’s health can also be detected. This empowers administrators to troubleshoot issues preventing users from accessing applications and systems.
There are two types of reports available:
Security reports
Activity reports
Security Reports
By using the security reports in Azure AD, you can protect your organization’s identities.
Azure AD detects suspicious activities that are related to your user accounts. For each detected action, a record called risk event is created and shown in the reports.
There are two types of security reports in Azure Active Directory:
Users flagged for risk Report showing an overview of user accounts that might have been compromised.
Risky sign-ins Report showing indicators for sign-in attempts that might have been performed by someone who is not the legitimate owner of a user account.
Activity Reports
The audit logs report provides you with records of system activities that are generally used for compliance purposes.
There are two types of activity reports in Azure Active Directory:
Audit logs The audit logs activity report provides you with access to the history of every task performed in your tenant.
Sign-ins With the sign-ins activity report, you can determine who has performed the tasks reported by the audit logs report.
Skill 8.2: Manage Domains with Active Directory Domain Services
Azure AD Domain Services is a cloud based service that provides managed Domain activities, such as Domain Join, Group Policy management, LDAP, and Kerberos/NTLM authentication, which are fully compatible with Windows Server Active Directory. Azure AD Domain Services functionality works if your directory is a cloud-only Azure AD tenant or synchronized to your on-premises AD.
You can leverage these services without the need to deploy, manage, and patch Domain Controllers in the cloud. Azure AD Domain Services integrates with your existing Azure AD tenant making it possible for users to log in by using their corporate credentials.
Existing groups and user accounts can then be used to secure access to resources. This means that moving on-premises resources to Azure Infrastructure Services is quicker and less complex.
This skill covers how to:
Implement Azure AD Domain Services
Join Azure virtual machines to a Domain
Securely Administer Domain-joined virtual machines by using Group Policy
Migrate On-premises Apps to Azure
Handle Traditional Directory-aware Apps along with SaaS Apps
Implement Azure AD Domain Services
Azure AD Domain Services is provisioned and managed using the Azure portal. You need to select your region and VNet where it should be deployed before starting the provisioning process. Part of this process requires you to create a new subnet in the VNet where you are deploying domain services. After the deployment, you are not able to make any changes to this subnet. In this example, a new subnet was created named DomainServices in a VNet named ExamRefVNET.
On the Azure portal, click New and then search for Azure AD Domain Services. Click Domain Services and then click Create. As shown in Figure 8-14, complete the Basics blade, consisting of the DNS domain name, Resource group, and Location fields.

FIGURE 8-14 Azure AD Domain Services Basics blade
IMPORTANT AZURE AD DOMAIN SERVICES
When selecting the DNS domain name for Azure AD Domain Services, you should only use the default name or a custom domain already added to your Azure AD tenant.
On the Network blade, choose the VNet where domain services should be deployed. Then, select the subnet, as shown in Figure 8-15.
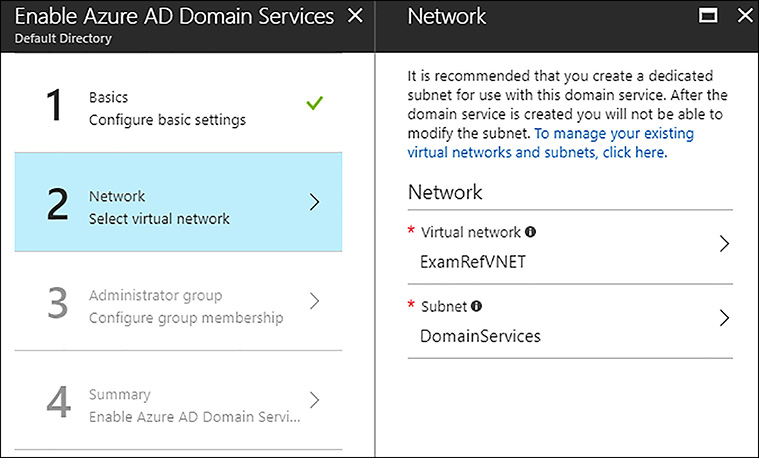
FIGURE 8-15 Azure AD Domain Services Network blade
On the Administrator group blade, you need to add a user or group to the new AAD DC Administrators group to be provisioned. You should select at least one global admin for this group. Figure 8-16 shows that the user CloudAdmin, a global admin for this Azure subscription, is selected.

FIGURE 8-16 Azure AD Domain Services Administrator group blade
The final step is to click OK after you review the Summary blade. Following the completion of the provisioning, you can review the Domain Services object.
After the Domain Services blade is opened, next you need to configure your DNS servers for the VNet to point to the domain services as the DNS servers. As shown in Figure 8-17, click Configure DNS Servers to update them with the IP addresses that are shown. Notice these addresses are in the dedicated DomainServices subnet.

FIGURE 8-17 Azure AD Domain Services Configure DNS Servers
The final step is to enable password synchronization to Domain Services. The process is different for user accounts synchronized from an on-premises directory and for those that are cloud user accounts created in Azure AD.
MORE INFORMATION PASSWORD SYNCHRONIZATION SETTINGS
To understand the details of setting up the password synchronization, review this article: https://docs.microsoft.com/en-us/azure/active-directory-domain-services/active-directory-ds-getting-started-password-sync-synced-tenant.
Join Azure virtual machines to a Domain
After the Azure AD Domain Services are deployed and active, you can add VMs that are running in your VNet to the Domain. These machines must not be deployed to the DomainServices subnet. When you are ready to add these machines, follow the same steps as you normally would when adding a machine to an AD.
Figure 8-18, shows the Server Manager program on a VM named ExamRefServer1. To add the machine to the domain servers, select WORKGROUP.

FIGURE 8-18 Windows Server 2016 Server Manager
Next, select Change on the System properties window followed by Member of Domain, and type in the DNS Domain name of the Azure AD Domain Services Domain. Figure 8-19 shows examref.onmicrosoft.com entered in this dialog box.

FIGURE 8-19 Adding ExamRefServer1 to the Azure AD Domain Service Domain
Securely Administer Domain-joined virtual machines by using Group Policy
Azure Active Directory Domain Services provide the ability to manage Domain-joined Azure VMs by using Group Policy Objects (GPOs). You cannot manage on-premises machines of any type by using these GPOs because they are only for VMs that are running in Azure and joined to the Domain services.
When the Domain Services is configured by Azure it will create two Organization Units (OUs) for the management of users and groups. These are named: AD DC Users and AAD DC Computers. There are two built-in GPOs used to manage these OUs which are assigned to each respectively. You can customize these built-in GPOs to configure Group Policy on the managed Domain. You can also create your own custom OUs in the managed Domain and then create custom GPOs to manage these new OUs.
IMPORTANT AAD DC GROUP POLICY
Users belonging to the AAD DC Administrators group are granted Group Policy administration privileges on the managed Domain.
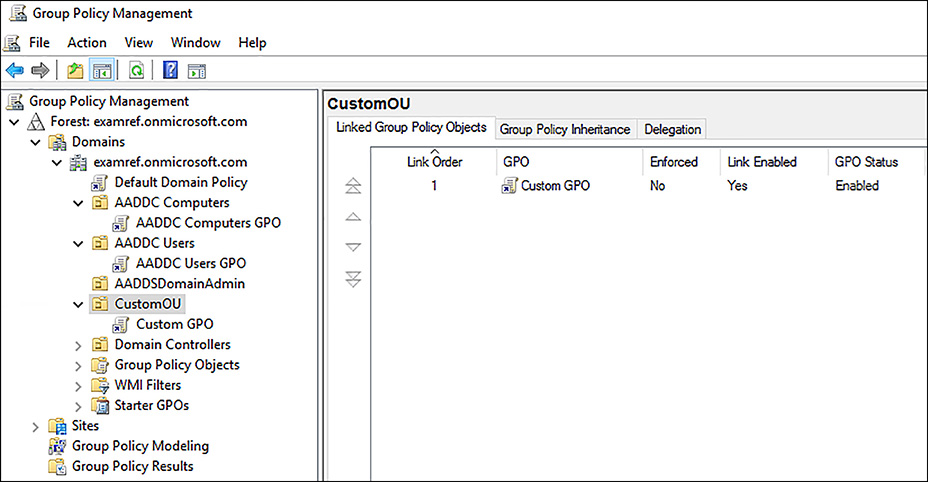
FIGURE 8-20 Group Policy Objects (GPOs) in Azure AD Domain Services
MORE INFRORMATION OUS IN DOMAIN SERVICES
For more information on managing OUs in Domain Services review this article https://docs.microsoft.com/en-us/azure/active-directory-domain-services/active-directory-ds-admin-guide-administer-group-policy.
Migrate On-premises Apps to Azure
Applications running in a traditional AD environment require the AD authentication services such as LDAP, NTLM and Kerberos. Given this requirement, these applications cannot be moved to the cloud into Azure IaaS. By using Azure AD Domain Services, you are able to migrate legacy directory-aware applications running on-premises to Azure without having to worry about those identity requirements.
When using the Azure AD Domain Services, users can submit their corporate credentials to authenticate with the managed Domain. This makes the transition of these applications to the cloud seamless to the users without the complexities of deploying DCs into Azure. Their credentials are kept in sync with the Azure AD tenant. For synced tenants, Azure AD Connect ensures that changes to credentials made on-premises are synchronized to Azure AD.
Handle Traditional Directory-aware Apps along with SaaS Apps
Another issue that some deployments face is providing SaaS applications with the ability to do LDAP reads of your AD. Azure AD Domain Services provides this feature, so your traditional directory-aware applications can run alongside your modern cloud apps.
Skill 8.3: Integrate with Azure Active Directory (Azure AD)
Integrating an on-premises AD with Azure AD is the lifeblood for hybrid cloud deployments. This section focuses on how to accomplish this by using Azure AD Connect and then leveraging that setup to provide more complex scenarios, such as multi-factor authentication in the cloud.
This skill covers how to:
Add Custom Domains
Implement Azure AD Connect and Single Sign-on with On-premises Windows Server
Multi-Factor Authentication (MFA)
Config Windows 10 with Azure AD Domain Join
Implement Azure AD Integration in Web and Desktop applications
Leverage Microsoft Graph API
Add Custom Domains
When creating an Azure AD, it always has an initial Domain name in the form of domainname.onmicrosoft.com. This name cannot be changed or deleted, but it is possible to add a registered internet domain names to your Azure AD. Companies typically have domain names they use to do business and users who sign in by using their AD Domain name. Adding custom domain names to Azure AD allows you to assign user names familiar to users. This means they could log in by using their email address [email protected], instead of [email protected].
The process to add a customer domain is simple:
Add the custom domain name to your directory.
Add a DNS entry for the domain name at the domain name registrar.
Verify the custom domain name in Azure AD.
To add a customer domain by using the Azure portal, open the Azure AD that you wish to add a custom domain. Next, select Domain names followed by +Add domain name, then enter a domain, such as examref.com. Upon completion, you can see a screen resembling the screen shown in Figure 8-21 with instructions on adding a DNS record to your authoritative NS server which Azure will use to verify you are the owner of the domain.
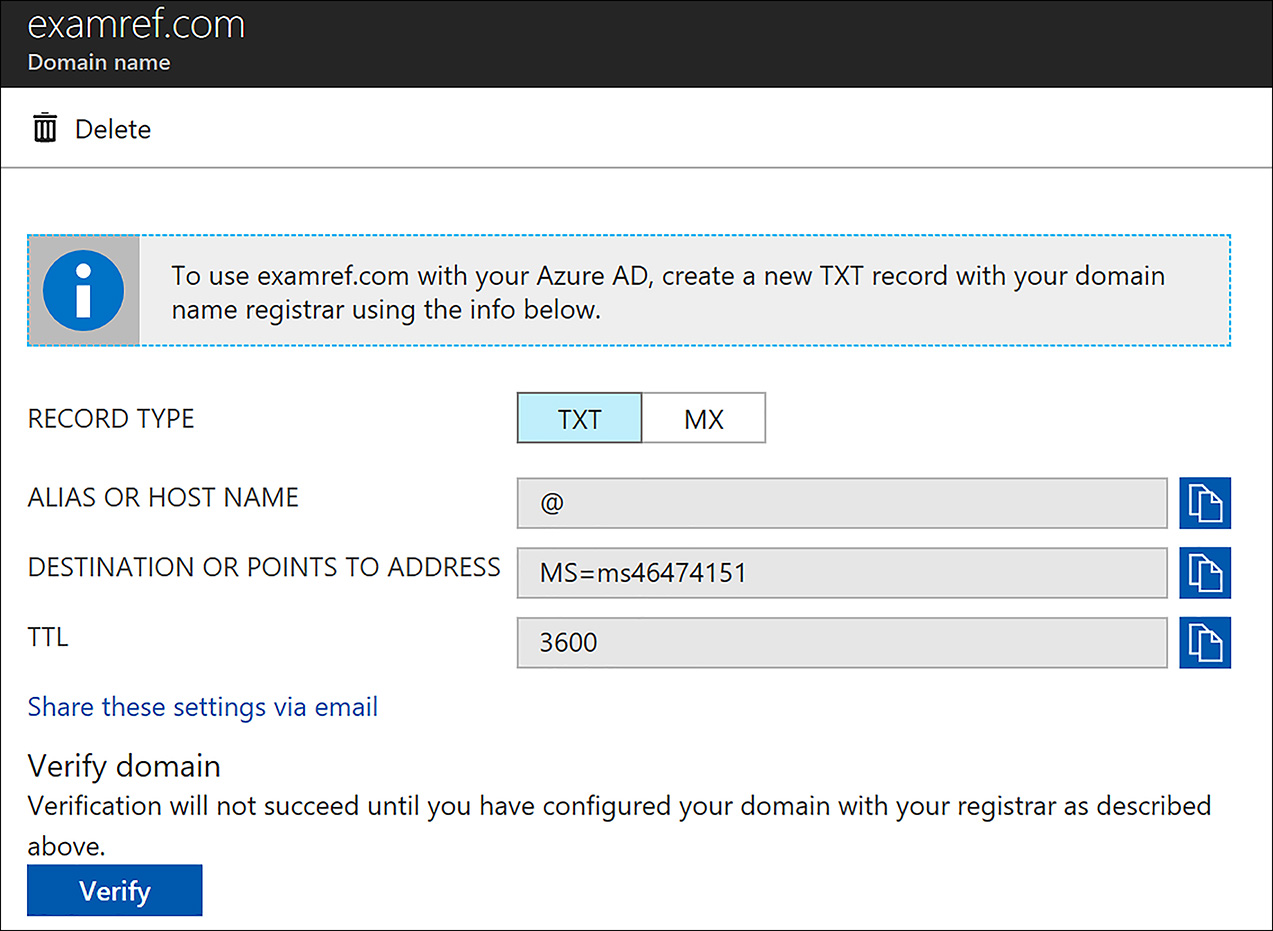
FIGURE 8-21 Adding a Custom Domain to an Azure AD
After the records are added, click Verify, and the domain is added to the list of domains that can be used with this Azure AD.
IMPORTANT ON-PREMISES CREDENTIALS
You should add your custom domain and verify it prior to synchronizing the directory to an on-premises Active Directory. This allows your users to log in to Azure AD by using their on-premises credentials.
Implement Azure AD Connect and Single Sign-on with On-premises Windows Server
Integrating your on-premises AD with Azure AD provides a common identity for accessing both cloud and on-premises resources. Users and organizations can take advantage of using a single identity to access on-premises applications and cloud services, such as Office 365.
To make this integration possible, Microsoft provides the Azure AD Connect tool, and when it’s installed and configured on a DC, it synchronizes the local identities found in the on-premises AD to the Azure AD.
In this example, the Active Directory Forest and Domain and Azure AD have already been created, and they are ready for Azure AD Connect to be installed and configured on a DC named ExamRefDC1. Using an enterprise admin account from the forest, sign into to the Domain controller. Next open internet Explorer, and sign into your Azure subscription using the global admin account to the Azure AD you want to synchronize. Next, open the Azure AD in the Azure portal and, click Azure AD Connect which loads the Azure AD Connect configuration screen, as shown in Figure 8-22.
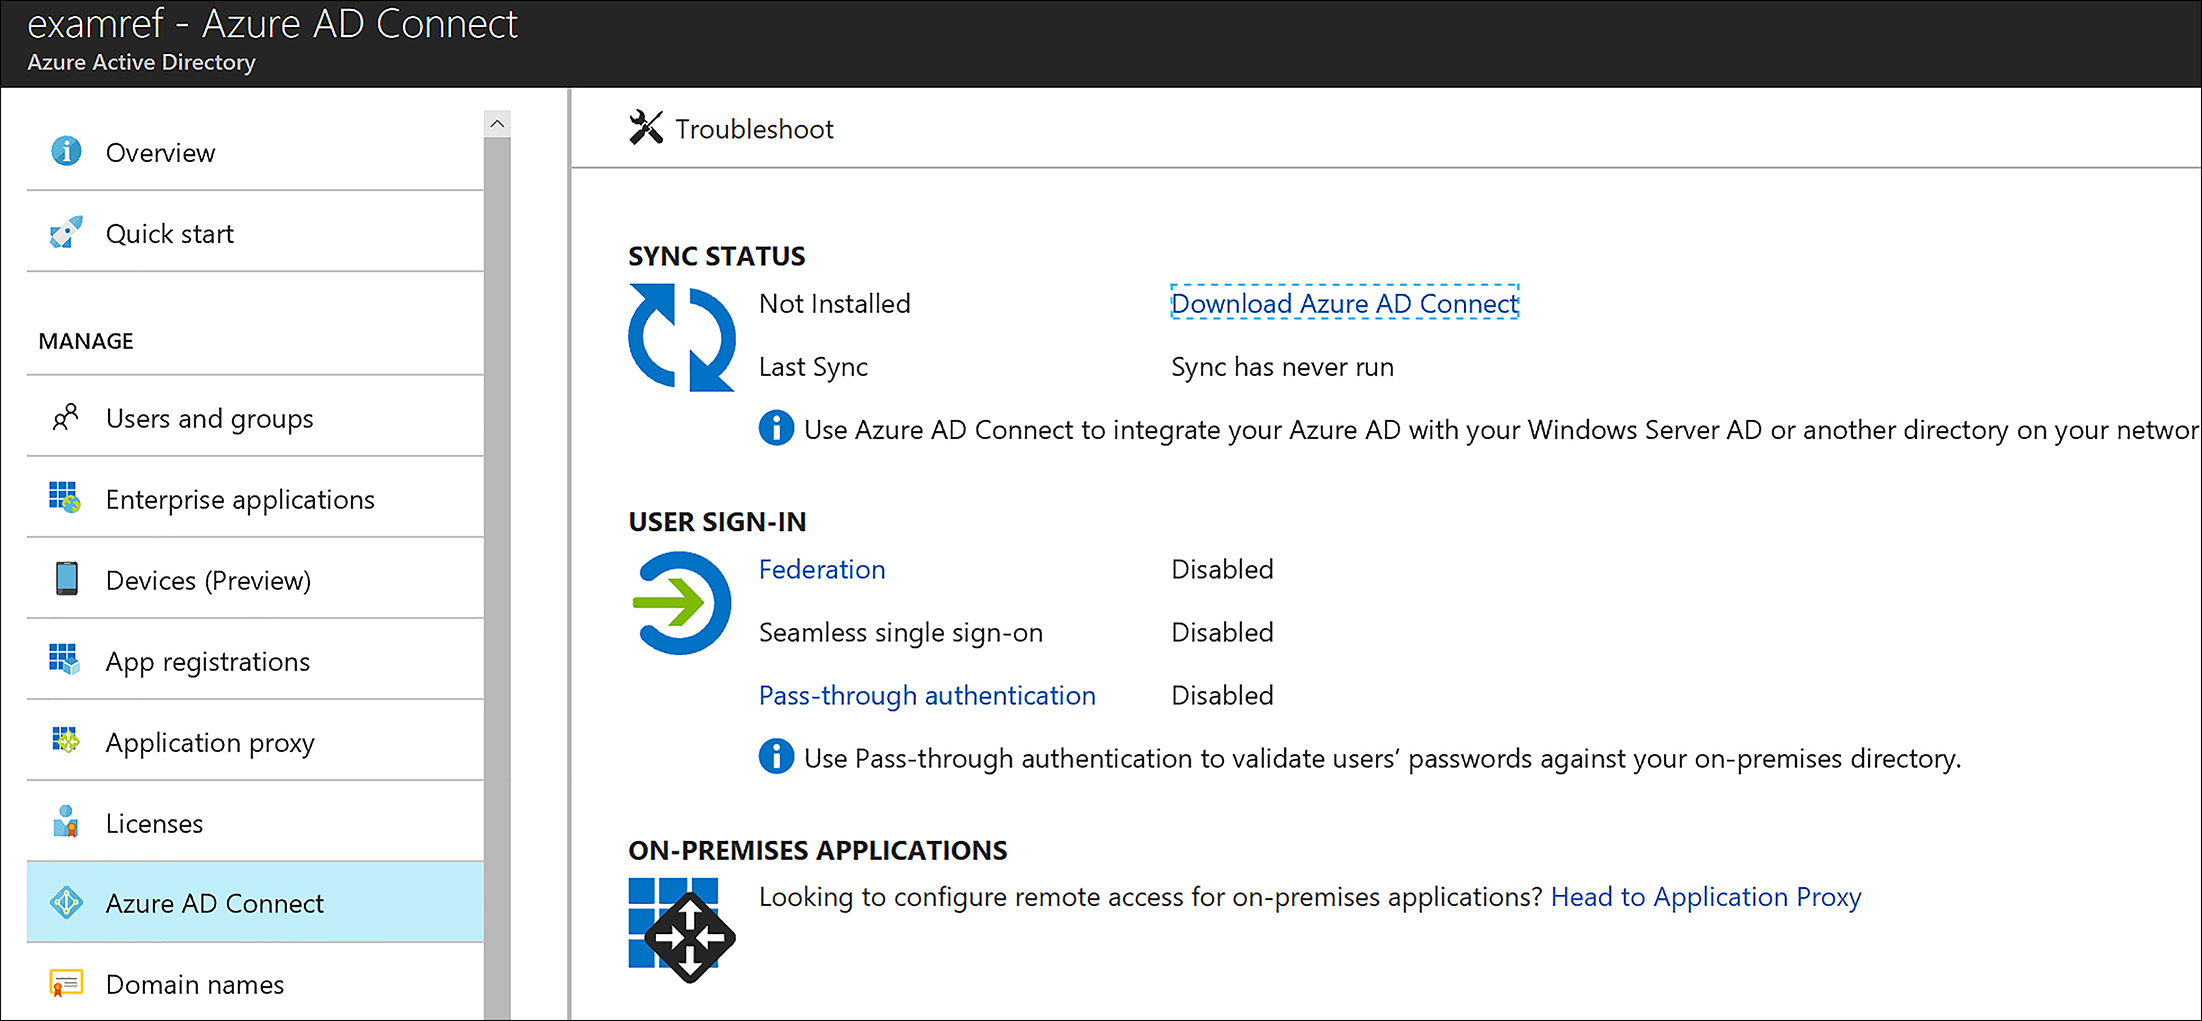
FIGURE 8-22 Azure AD Connect in the Azure Portal prior to being configured
Click Download Azure AD Connect. This downloads the software to your local DC. After the software downloads, start the program, and click continue. In this example, there is only one forest, so you can select the Use Express Setting option.
EXAM TIP
If your network has more than one Active Directory Forest, you must use the customized settings option in Azure AD Connect.
As shown in Figure 8-23, you are challenged for the global admin credentials for the Azure AD you want to synchronize.

FIGURE 8-23 Enter the Global Admin Credentials for the Azure AD
As shown in Figure 8-24, you are now challenged to enter the on-premises AD Domain Enterprise Admin credentials.
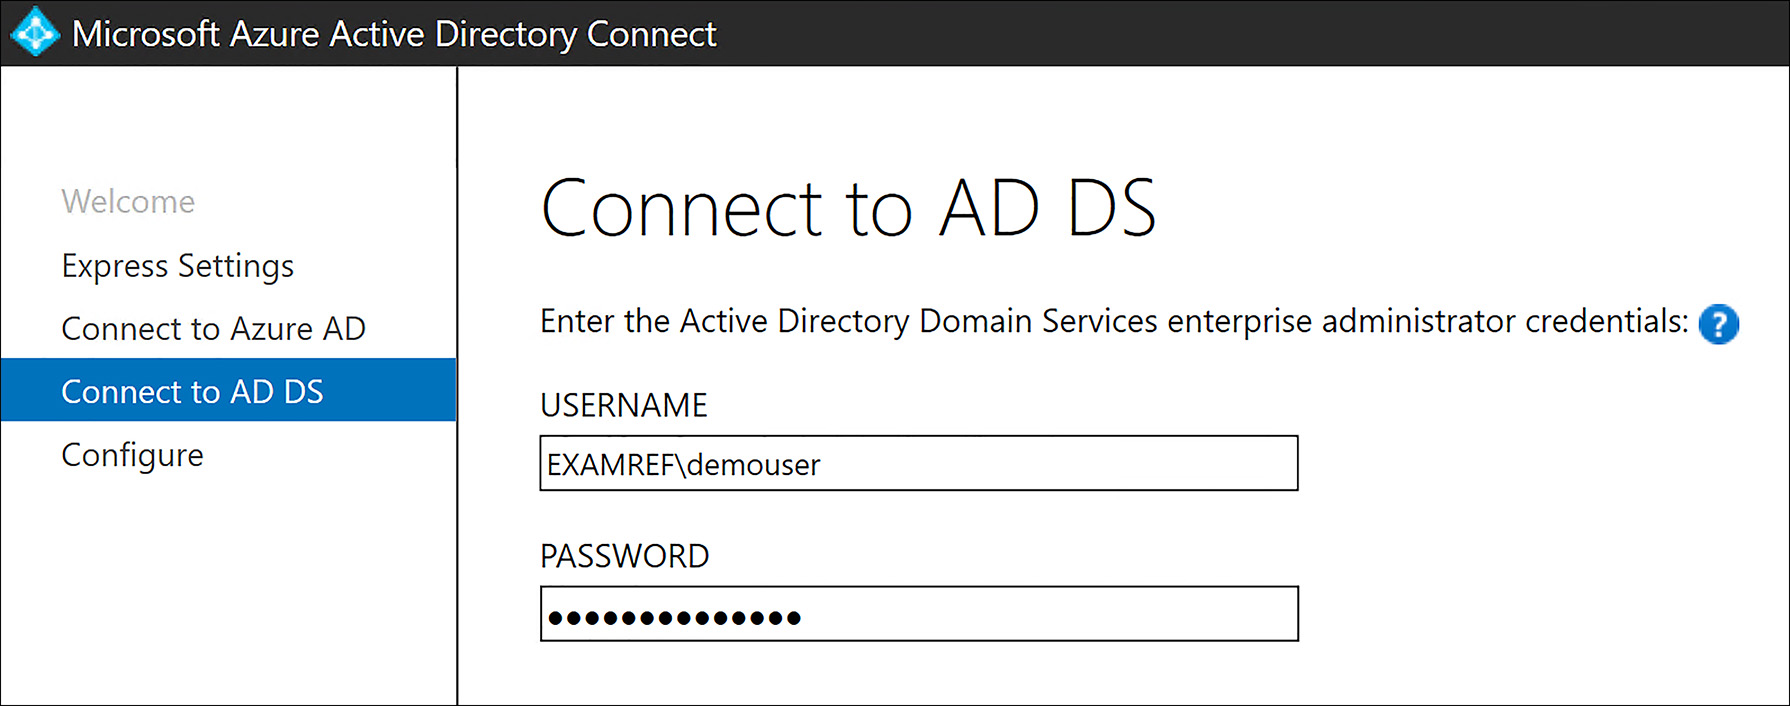
FIGURE 8-24 Enter the Enterprise Admin Credentials for the Active Directory Domain
You can now complete the confirmations, and Azure AD Connect installs and synchronizes the identities. After this is complete, the users and groups from the on-premises AD appear in the Azure AD portal.
Multi-Factor Authentication (MFA)
Azure Multi-Factor Authentication (MFA), is Microsoft’s multi-step account credentials verification solution. Azure MFA helps safeguard access to data and applications while providing a simple sign-in process. MFA delivers a strong authentication via a range of verification methods, including phone call, text message, or mobile app. MFA does require that Azure AD Premium licenses be applied to the users you want to use the service. All the Azure AD Premium SKUs include the MFA feature.
One requirement that must be met prior to assigning an Azure AD Premium license and enabling MFA for the user is the usage location must be set in the user’s profile. Figure 8-25 shows that the Usage location field for the user CloudAdmin has been set to the United States.

FIGURE 8-25 Usage location set to their local country
Using the Azure portal on the Azure AD that is being configured, click the Licenses link then, select Product. When Azure AD Premium is listed, select it and then, click +Assign. Select the user. In this case the CloudAdmin user is selected, as shown in Figure 8-26.

FIGURE 8-26 The CloudAdmin user is selected for an Azure AD Premium License
After you select the user(s), next click Assignment options. The portal loads, as shown in Figure 8-27. Click On for each of the three options, and then click Assign. By assigning this license it is now possible to enable MFA feature for CloudAdmin user.
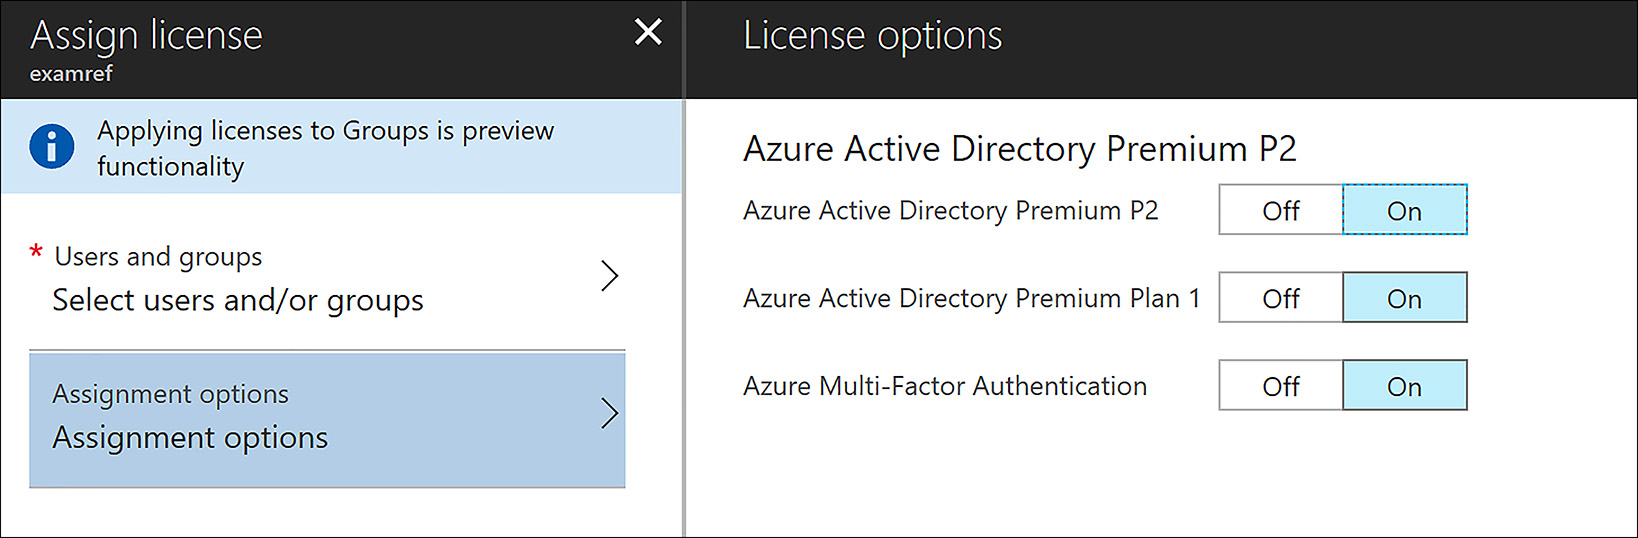
FIGURE 8-27 The Azure AD Premium License options are selected including MFA
To force the user to use MFA, you need to create a Conditional Access Policy. To create this policy by using the Azure portal, click Conditional Access under the Security section of your Azure AD. Next, click +New Policy and provide a name and select the users, the groups, or all users for this policy to apply to in the Assignments section. Then click All Cloud Apps to have this policy impact the applications in this Azure AD. Next, under Access Controls, click Grant access and then select the Require multi-factor authentication option, as shown in Figure 8-28.
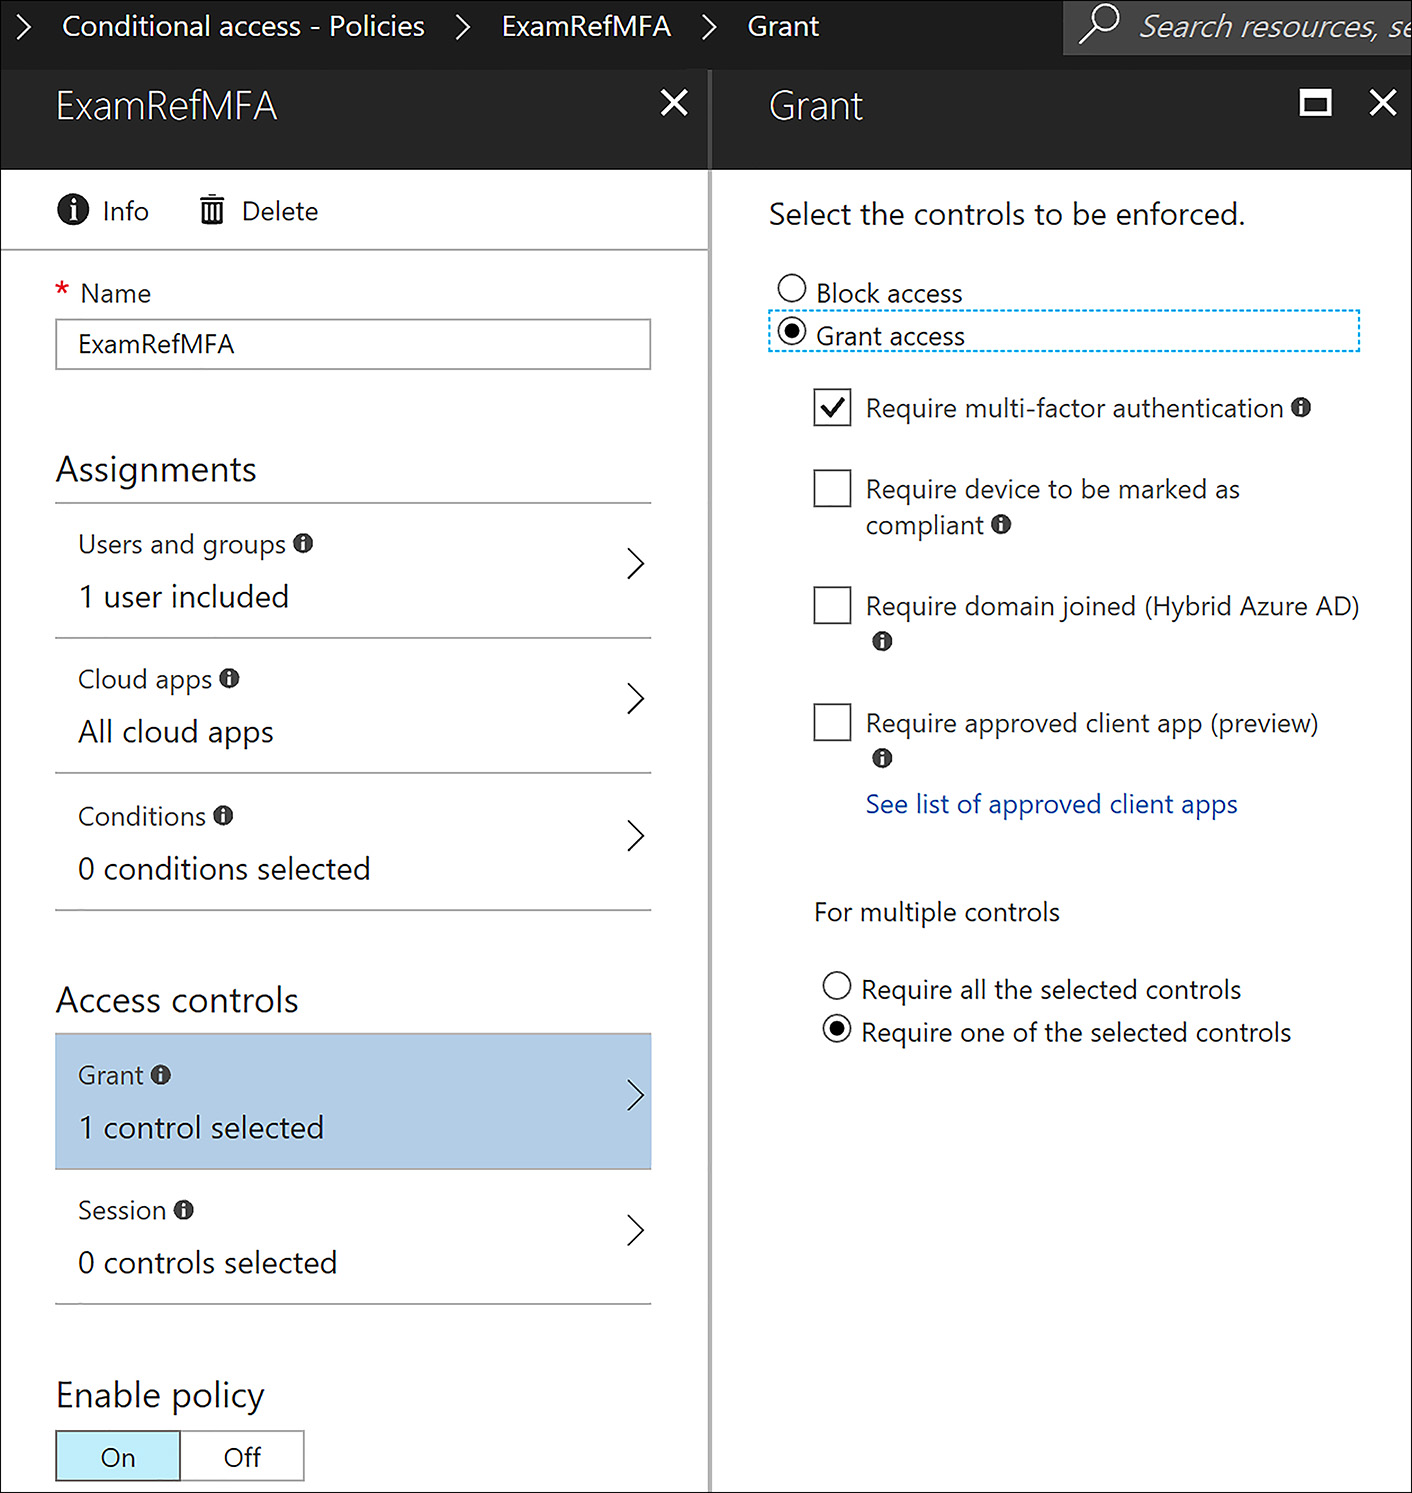
FIGURE 8-28 Conditional Access Policy to require All Users to using MFA
After this is complete, upon their next login to any Azure or Office 365 service the users are required to enroll with the MFA service. Figure 8-29 shows the MFA enrollment screen that the users see when they first enroll.
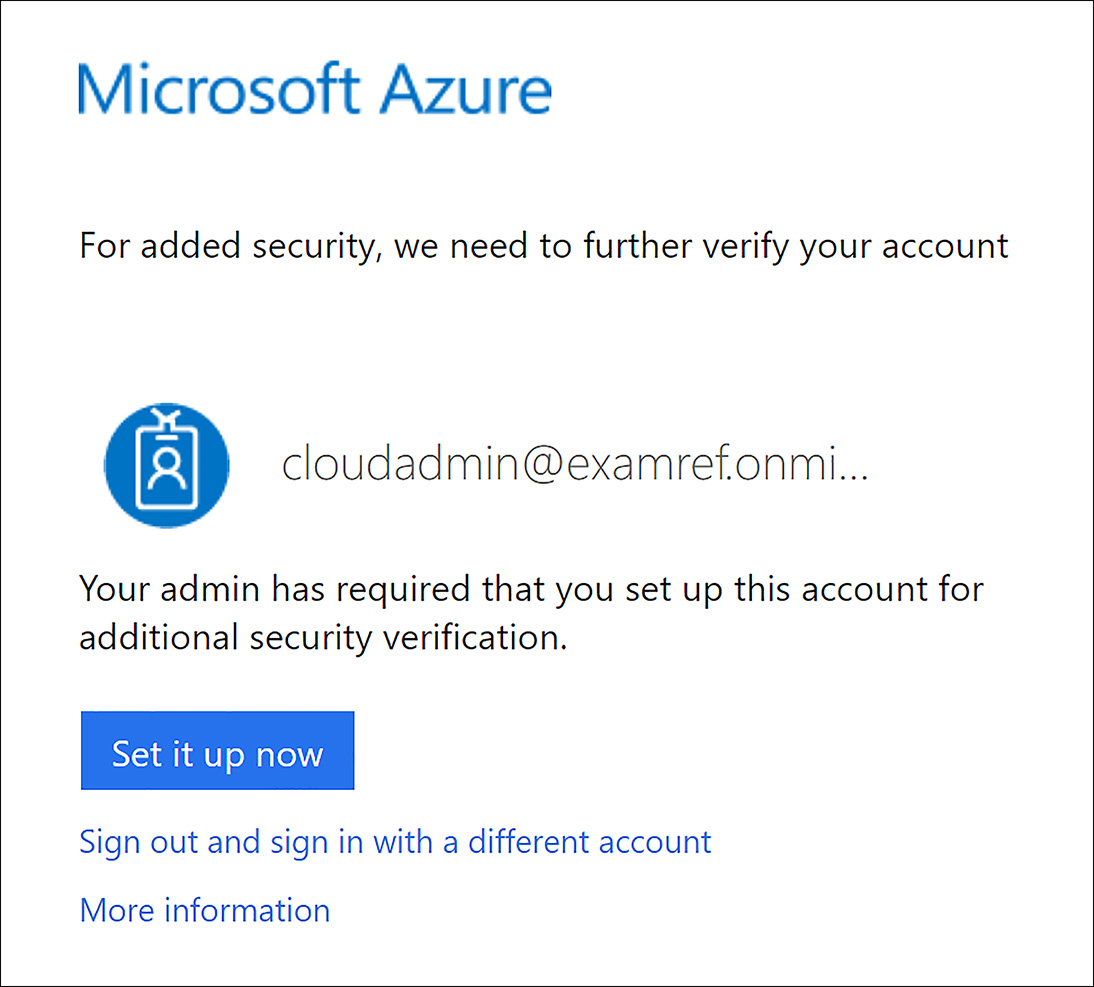
FIGURE 8-29 Azure requiring a user to enroll in MFA
After it is set up, every time users authenticate to one of the applications that are a part of your Azure AD, they need to complete a two-step login. The user enters their username and password and are then challenged, as shown in Figure 8-30.

FIGURE 8-30 Azure MFA challenging a user for a code sent to a mobile phone
To verify their identity, a code is sent to the user’s mobile phone via SMS message. After the user receives the code on their mobile phone, as shown in Figure 8-31, the code must be entered into the webpage to complete the sign in process to access the Azure AD application.

FIGURE 8-31 Azure MFA verification code sent to a user on a mobile phone
Config Windows 10 with Azure AD Domain Join
Azure AD allows you to add and manage devices in the directory. This management then allows you as the administrator to ensure that your users are accessing resources from devices that meet your standards for security and compliance.
If you want all your users to leverage a Bring Your Own Device (BYOD) policy, you can accomplish this by configuring Azure AD registered devices. In Azure AD, you can configure Azure AD registered devices for Windows 10, iOS, Android, and macOS. For the exam, you need to understand the process as it relates to Windows 10 devices.
To allow the registration of a Windows 10 device, the device registration service must be configured. In addition, to having permission to register devices in your Azure AD tenant, you must have fewer devices registered than the configured maximum.
To allow users to join devices to Azure AD, open the directory in the Azure portal and click Devices. Next, click Device settings and set the Users may join devices to Azure AD option to All. Figure 8-32 shows this configuration.

FIGURE 8-32 Device Settings set to allow Users to join devices to Azure AD
Now, that the Azure AD is configured to allow devices to the directory, adding a Windows 10 device is done from the device. On Windows 10, open the All settings menu and then open Accounts, as shown in Figure 8-33.

FIGURE 8-33 Settings in Windows 10
Click Access work and school and then click connect, as shown in Figure 8-34.
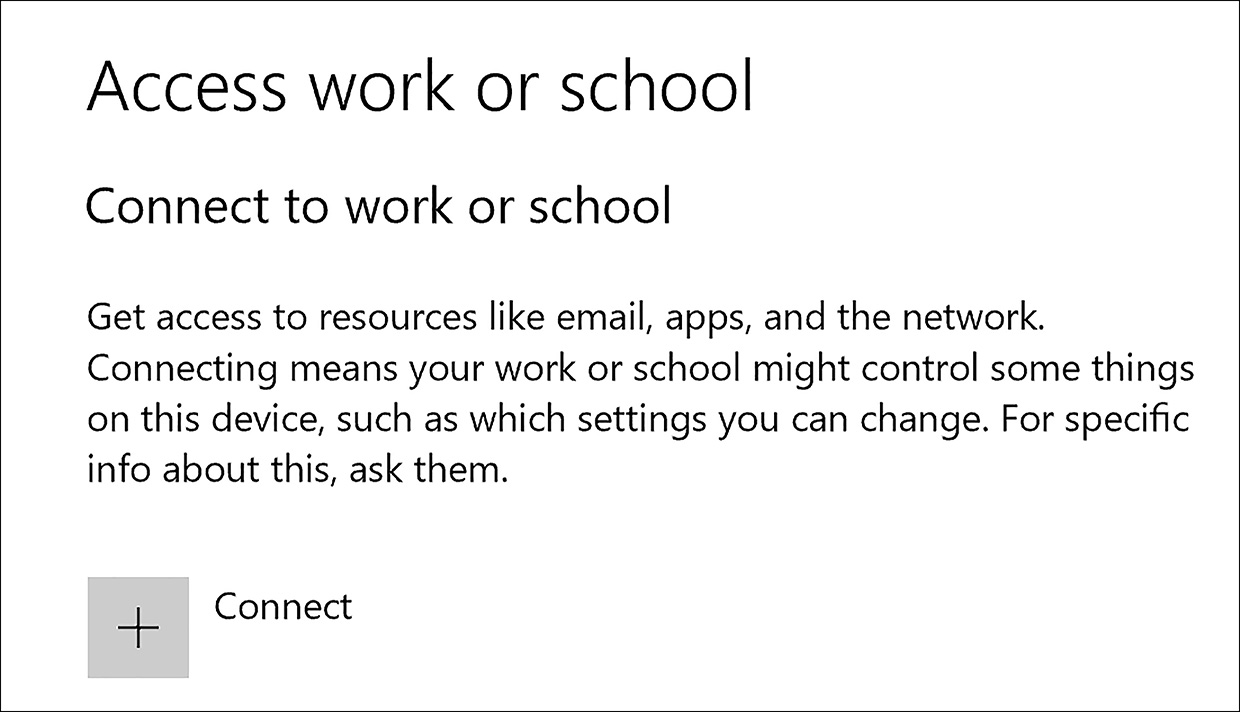
FIGURE 8-34 Click Connect to add the Windows 10 device to Azure AD
Next, sign in by using your account. If the users are set up for MFA, they are challenged, which is to be expected for this type of sign in, as shown in Figure 8-35.
FIGURE 8-35 Azure AD Account used to add the device to Azure AD
The device is now added to Azure AD and appears in the Azure AD portal as a managed device.
Implement Azure AD Integration in Web and Desktop Applications
Independent Software Vendors (ISV), enterprise developers, and software as a service (SaaS) providers can develop cloud applications services that can be integrated with Azure Active Directory (Azure AD) to provide secure sign-in and authorization for their services. To integrate an application or service with Azure AD, a developer must first register the application with Azure AD.
Any application that wants to use the capabilities of Azure AD must first be registered in an Azure AD tenant. This registration involves providing Azure AD details about the application, such as the URL where it’s located, the URL to send replies to after a user is authenticated, and the URI that identifies it.
To register a new application by using the Azure portal in the Azure AD blade, click App registrations, and click +New application registration. Next, enter your application’s registration information, including Name, Application type: “Native” for client applications that are installed locally or “Web app / API” for client applications and resource/API applications that are installed on a secure server.
As shown in Figure 8-35, you need to complete the Sign-on URL field. If the application is a “Web app / API” you should provide the base URL. For “Native” applications, provide the Redirect URI used by Azure AD to return token responses. Notice the app shown in Figure 8-36 is registered by using a sign-on URL of http://localhost:30533.
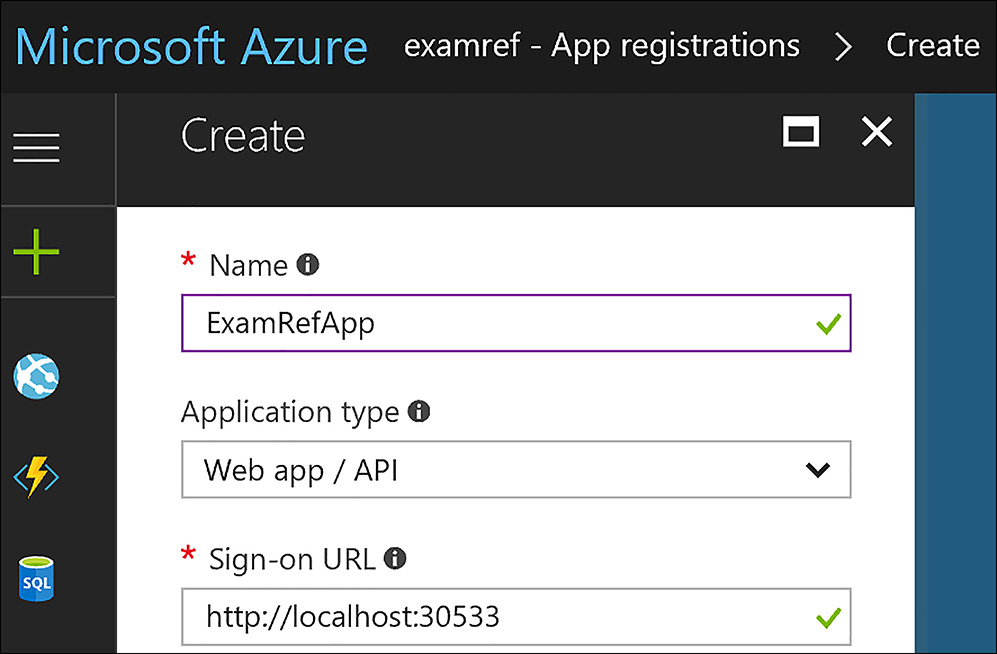
FIGURE 8-36 Azure AD Application Registration
When finished, click Create. Azure AD assigns a unique application ID to your application, and you’re taken to the application’s main registration page.
Keep in mind there are different types of applications that can be registered with Azure AD. Depending on whether your application is a web or native application (client installed), different options are required to add additional capabilities to your application.
Leverage Microsoft Graph API
You can use the Microsoft Graph API to interact with the user data in the Microsoft cloud. Microsoft Graph can be leveraged to build apps for organizations that connect to many types of resources, relationships, and intelligence. There is a single endpoint for using the Graph API, which is https://graph.microsoft.com.
Microsoft Graph can access Azure AD resources to enable scenarios like managing roles or inviting external users to your directory. The Graph API also provides methods that applications can use to find information about users, groups, or role memberships.
To use the Graph APIs on Azure AD resources, your application needs the appropriate permissions. Many of the APIs exposed on Azure AD resources require one of more directory permissions be assigned to function properly.
Skill 8.4: Implement Azure AD B2C and Azure AD B2B
Azure AD Business to Consumer (B2C) and Business to Business (B2B) are unique Azure directories that enable authentication scenarios in support of consumer based applications or enterprises that want to partner with other companies. This section focuses on these directories as well as some other more advanced features, including Multi-Factor Authentication (MFA) and self-service password reset features provided to users by Azure.
This skill covers how to:
Create an Azure AD B2C Directory
Register an Application
Implement Social Identity Provider Authentication
Enable Multi-Factor Authentication (MFA)
Set up Self-service Password Reset
Implement B2B Collaboration and Configure Partner Users
Integrate with Applications
Create an Azure AD B2C Directory
Azure AD B2C is a cloud identity management solution for your web and mobile applications. It is a highly available global service that scales to hundreds of millions of identities.
With minimal configuration, Azure AD B2C enables your application to authenticate:
Social Accounts (such as Facebook, Google, LinkedIn, and more)
Enterprise Accounts (using open standard protocols, OpenID Connect, or SAML)
Local Accounts (email address and password, or username and password)
Create an Azure AD B2C tenant in the Azure Portal
To create a new Azure AD B2C tenant by using the Azure portal, first click New and then search the marketplace for Azure Active Directory B2C and click Create. Next, click Create a new Azure AD B2C Tenant, as shown in Figure 8-37.

FIGURE 8-37 Create a new B2C Tenant
Next, you need to enter the Organization name, enter the Initial domain name, and select your country or region. In Figure 8-38, the name ExamRefB2C is used for the Organization name and the Initial domain name (must be globally unique to the Microsoft cloud). Next, click Create.

FIGURE 8-38 Creating a new B2C Tenant using the Azure portal
After the directory is created, a link appears that says Click here, to manage your new directory. Click the link, as shown in Figure 8-39, to open the Azure AD B2C tenant that was just created.
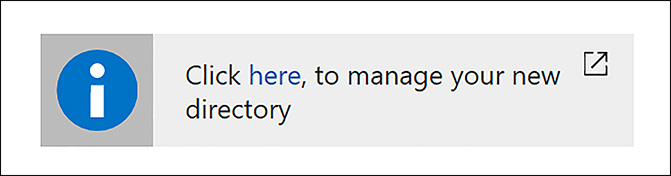
FIGURE 8-39 Link to the new B2C Tenant
The next step is to register this B2C tenant with your subscription. When the window loads after clicking the link shown in Figure 8-39, you land on the management page. Note that no subscription has been linked to the B2C tenant, as shown in Figure 8-40.
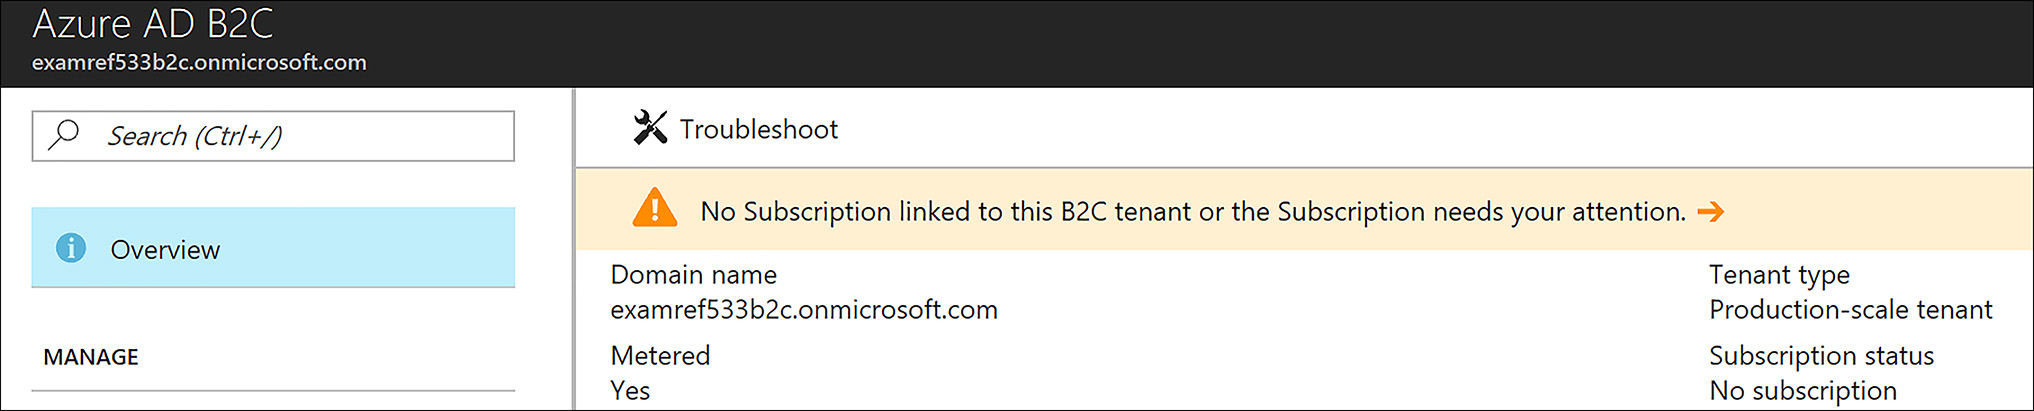
FIGURE 8-40 The Azure B2C Tenant showing No Subscription linked
To link the new Azure AD B2C tenant to an Azure subscription by using the Azure portal, first click New in the Azure portal and then search the marketplace for Azure Active Directory B2C and click Create. Next, click Link an existing Azure AD B2C Tenant to my Azure subscription, as shown in Figure 8-41.

FIGURE 8-41 Link an existing Azure AD B2C Tenant to my Azure subscription
After clicking the link, you need to select your Azure AD B2C tenant, create a resource group, New Resource Group and select a region, as shown in Figure 8-42. When this is complete, click Create.
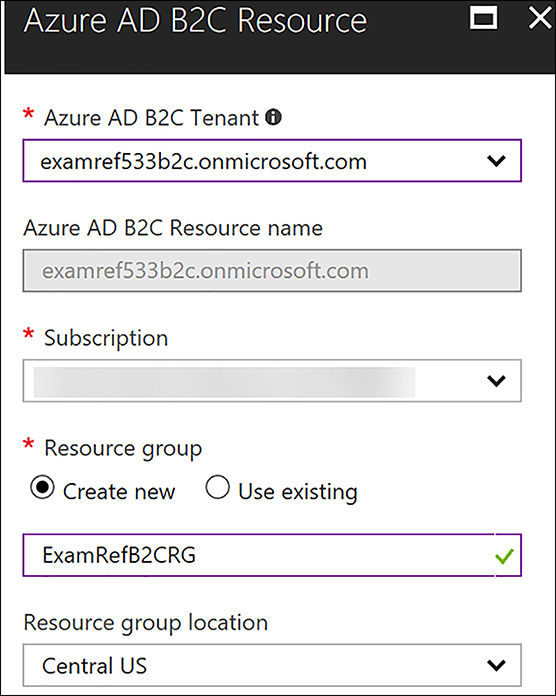
FIGURE 8-42 Completed details Linking Azure AD B2C Tenant to a subscription
After this has completed, you are directed to the B2C page. As shown in Figure 8-43, you can then click the Settings link.
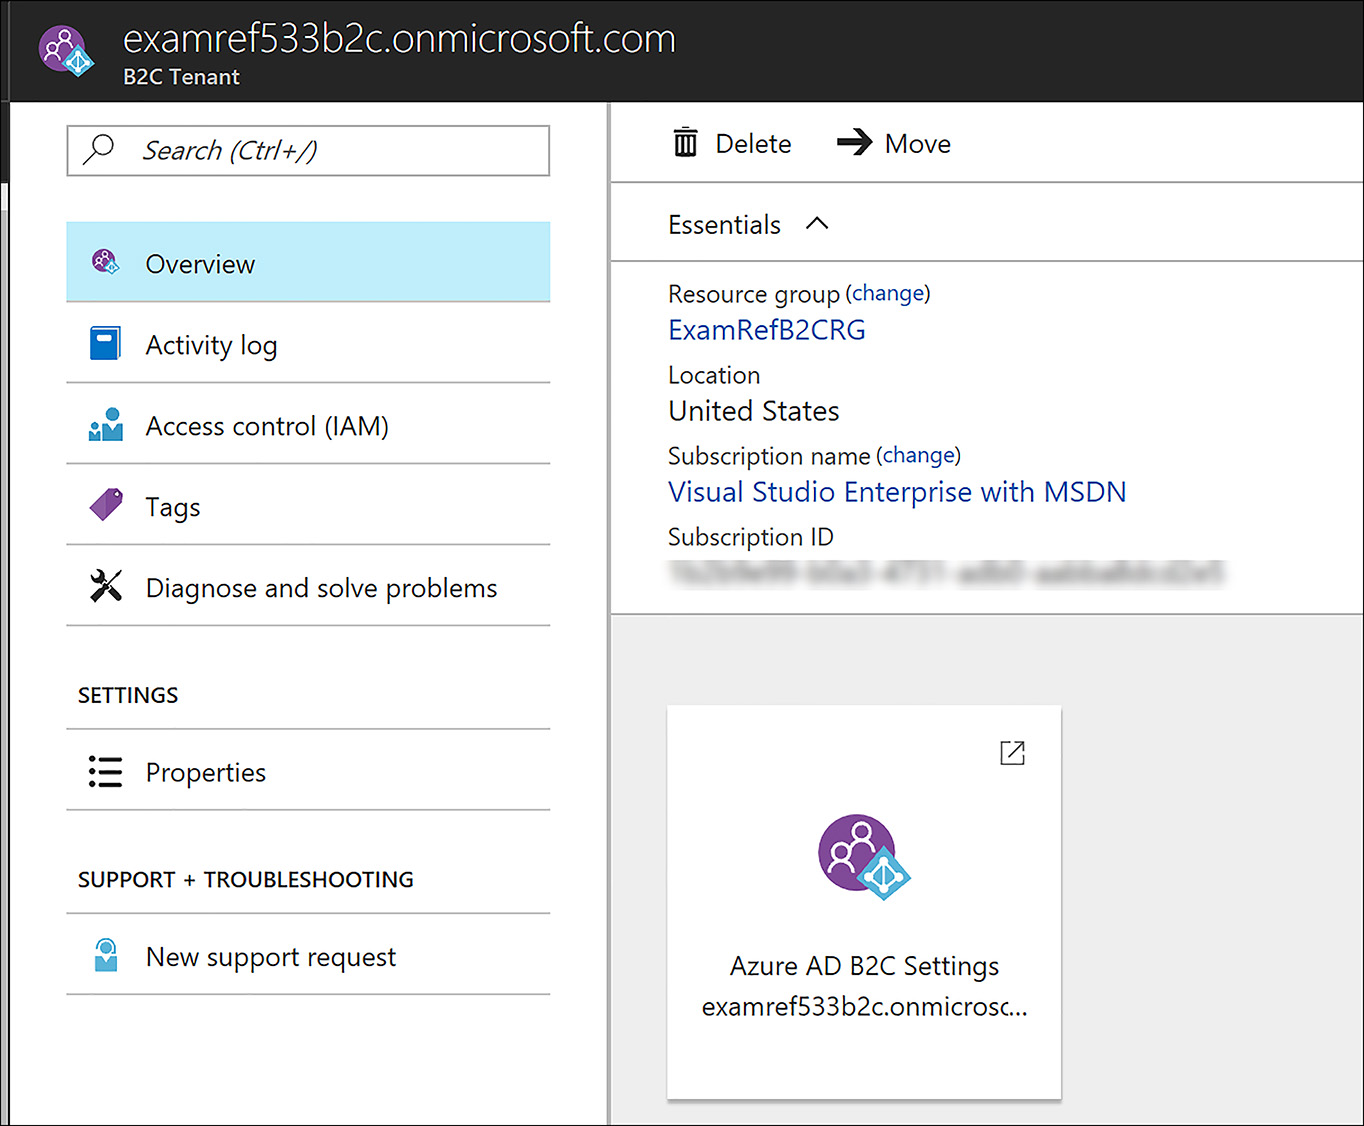
FIGURE 8-43 B2C Tenant to a subscription after linked to the Azure Subscription
The settings for the Azure AD B2C tenant are then used for registering applications, implementing social identity providers, enabling multi-factor authentication, and other configurations. These settings can be selected from the Azure portal, as shown in Figure 8-44.

FIGURE 8-44 B2C Tenant settings in the Azure portal
You can also switch to this Azure AD tenant by using the Azure portal and selecting the B2C directory in the top-right corner of the portal. Figure 8-45 shows the ExamRefB2C directory being selected as the Directory being viewed in the Azure portal.
FIGURE 8-45 Switching Directories in the Azure portal
Register an Application
To build an application that accepts consumer sign-up and sign-in, first you need to register the application with an Azure Active Directory B2C tenant.
Applications created from the Azure AD B2C blade in the Azure portal must be managed from the same location.
You can register the following types of applications:
Web Applications
API Applications
Mobile or Native Applications (Client Desktop)
From the B2C Settings in the Azure portal, click Applications and then click +Add. To Register a Web App, use the following settings, as shown in Figure 8-46.

FIGURE 8-46 Registering an Application with the B2C Tenant
EXAM TIP
Reply URLs are endpoints where Azure AD B2C returns any tokens that your application requests. Make sure to enter a properly formatted Reply URL. In this example, the app is running locally and listening on port 40533 as represented by the http://localhost:40533 URL.
After the application is created you can view its properties by clicking the name in the portal. Changes can be made to the configuration of the application registration. Also, the Application ID is shown and this is required for the code of the application to call this application from your B2C. The application created in this example is shown in Figure 8-47.

FIGURE 8-47 The Application Registration after being added to the B2C Tenant
Implement Social Identity Provider Authentication
Azure AD B2C is an identity management solution for web and mobile applications focused toward consumers. The feature allows your application’s users to leverage an existing account that they already have in place on a social media site instead of creating a new user ID on your site.
The process to enable a social identity provider is a multi-step process that involves setting up the provider that you want to integrate with for this application. For example, to allow users to leverage their Facebook ID with your application, you need to sign up as a Facebook developer and create an application on their site, as shown in Figure 8-48.
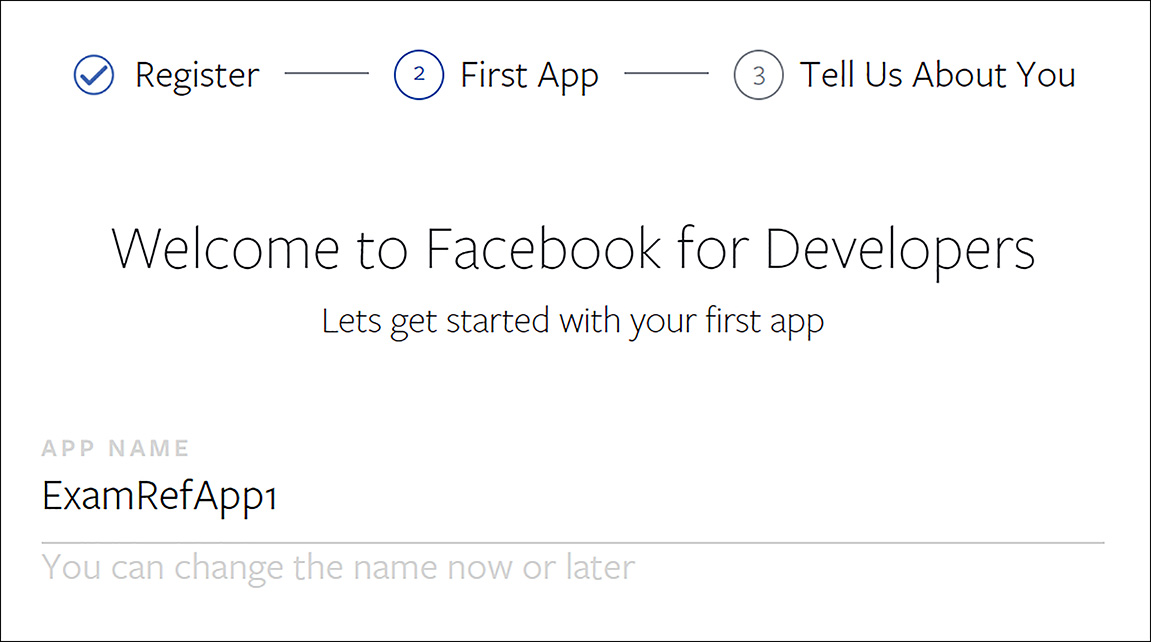
FIGURE 8-48 Facebook Application
After you complete this process, you are provided an App ID and an App Secret, as shown in Figure 8-49. These are used to add the social provider to your B2C tenant by using the Azure portal.

FIGURE 8-49 Facebook Application App ID and App Secret
To enable Facebook, the last step is to add it as an identity provider. This is done by clicking the identity provider’s link in the settings of the B2C tenant and then clicking +Add. From here you need to enter the name you want to give the provider, select the provider from the list of supported providers, and then enter the App ID and App Secret as the Client ID and Client Secret respectively. When this is complete, click Create to add Facebook as an identity provider for your application, as shown in Figure 8-50.
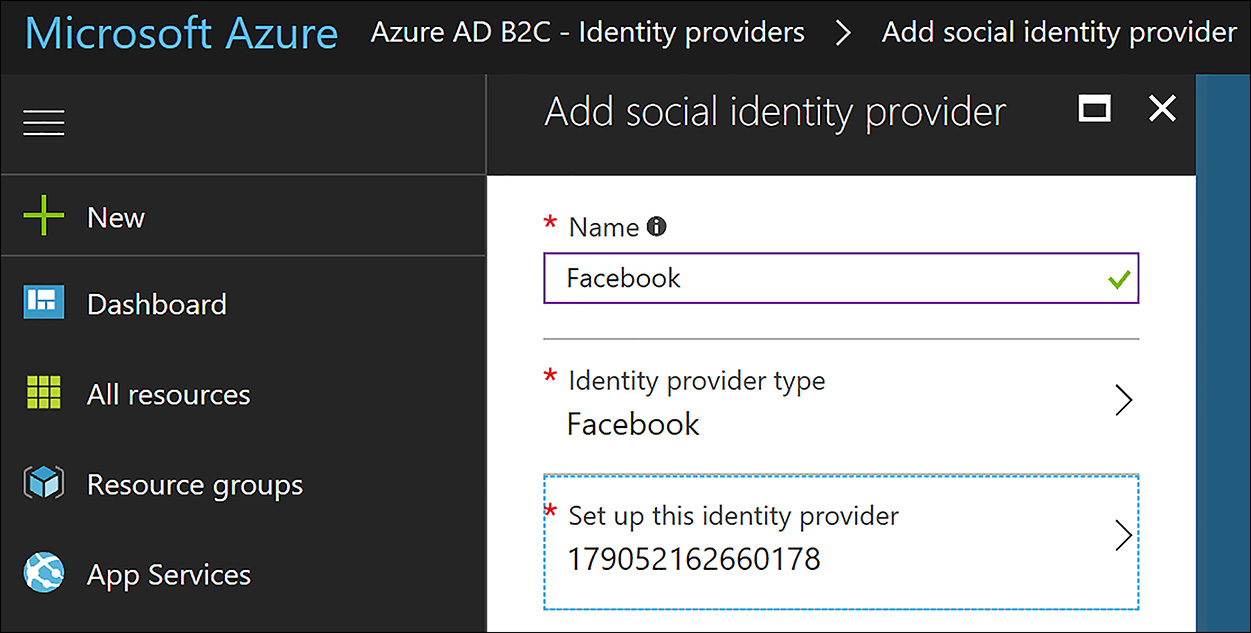
FIGURE 8-50 Adding Facebook as a Social Identity Provider
MORE INFORMATION SOCIAL PROVIDER CONNECTIONS
To implement connections to social providers such as Facebook, Google, Microsoft, and others, review this article https://docs.microsoft.com/en-us/azure/active-directory-b2c/active-directory-b2c-overview#get-started. You need to complete steps with the provider first to enable this functionality on the Azure AD B2C tenant.
After the identity provider is created, you need to create a Sign-up or Sign-in Policy. This is done by using the Azure portal and clicking Sign-up or Sign-in Policy and clicking +Add. From here, provide a name for the policy and select the providers, along with the attributes and claims that you need for your application. After it is configured, the portal page will resemble Figure 8-51.
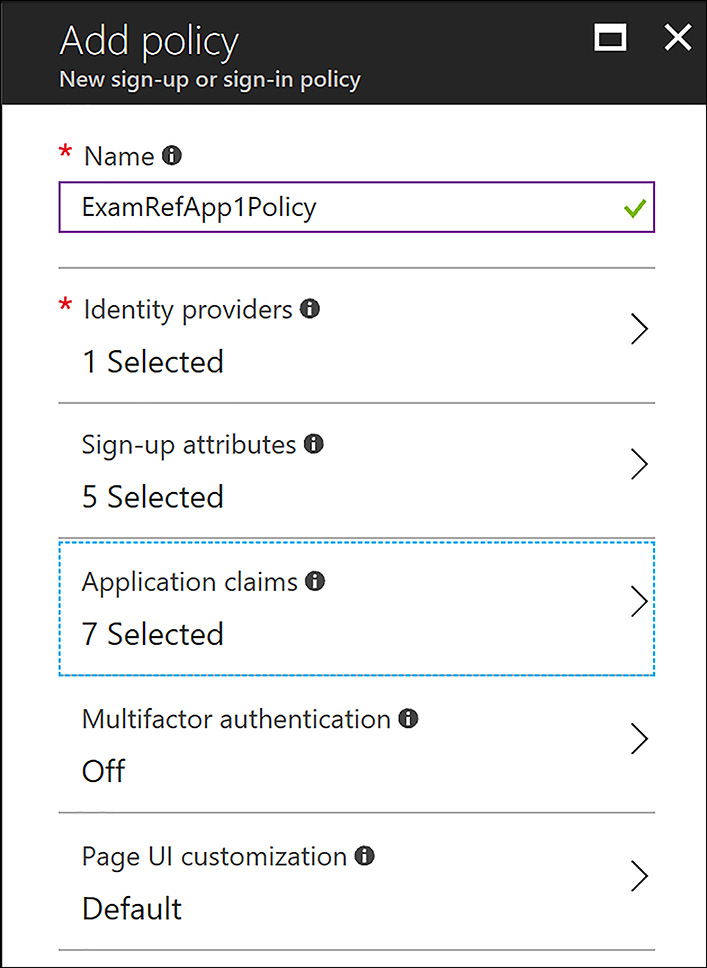
FIGURE 8-51 Creating a Sign-up or Sign-in Policy
After you save this policy, you can open it and click Run Policy. Running the policy then opens a new web browser to show the user experience when users connect their Facebook accounts to your application, as shown in Figure 8-52.
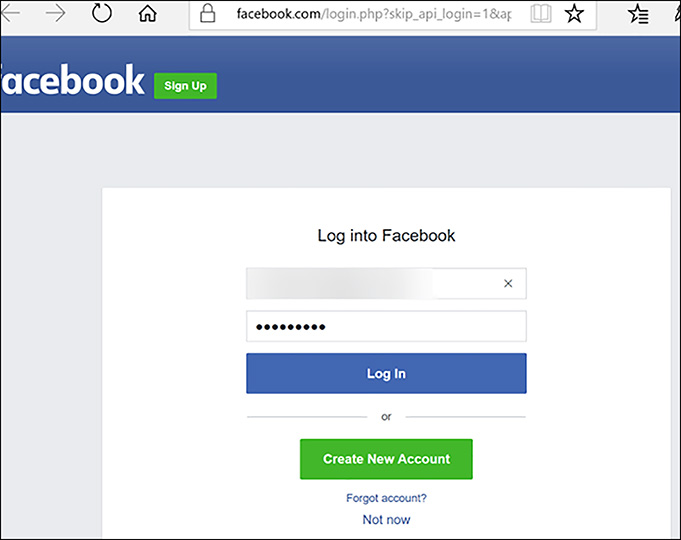
FIGURE 8-52 The Facebook Login Page as an Identity Provider to the B2C Tenant Application
Enable Multi-Factor Authentication (MFA)
Azure AD B2C integrates directly with Azure MFA, so that you can add a second layer of security to sign-up and sign-in consumer-focused applications. This can be achieved without needing to write any additional code in the application. Microsoft currently supports phone call and text message verification for these applications.
To change the multi-factor authentication settings, open Sign-up or Sign-In Policy and click Edit in the Azure portal on the B2C directory. A simple change to the settings turns on multi-factor authentication, as shown in Figure 8-53.

FIGURE 8-53 Enabling Multi-Factor Authentication
Set up Self-Service Password Reset
You can set up Self-Service Password Reset by adding a Password Reset policy. By using the Azure portal with the B2C directory open, click Password Reset Policies and then click +Add. When the blade for the password reset policy loads, supply the appropriate information as shown in Figure 8-54.
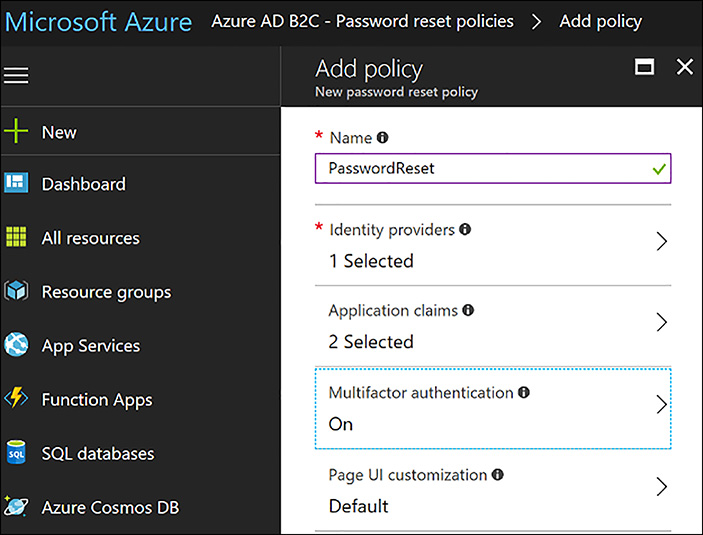
FIGURE 8-54 Enabling Self-Service Password Reset using Multi-Factor Authentication
Implement B2B Collaboration and Configure Partner Users
Azure AD Business to Business (B2B) collaboration capabilities enable any organization that uses Azure AD to work safely and securely with users from any other organization. The partner companies that are invited to use Azure AD B2B can be set up with or without their own Azure AD for this to work properly.
Companies that use Azure AD can provide access to applications, documents, or other resources to their partners, but they always maintain complete control over their own data. Also, it’s easy for users to navigate, which minimizes helpdesk calls.
EXAM TIP
Azure AD B2B works with any type of partner directory. Partners use their own credentials. There is no requirement for partners to use Azure AD and no external directories or complex setup is required. The invitation to join is the critical action that makes this scenario work.
Global admins and limited admins can use the Azure portal to invite B2B collaboration users to the directory, to any group, or to any application.
To add a B2B user, open Azure AD in the Azure portal and click through to All-Users. From this point, click +New Guest User, as shown in Figure 8-55.

FIGURE 8-55 Adding a New Guest User
The next step is to add the user’s email address and then include a welcome message, as shown in Figure 8-56.
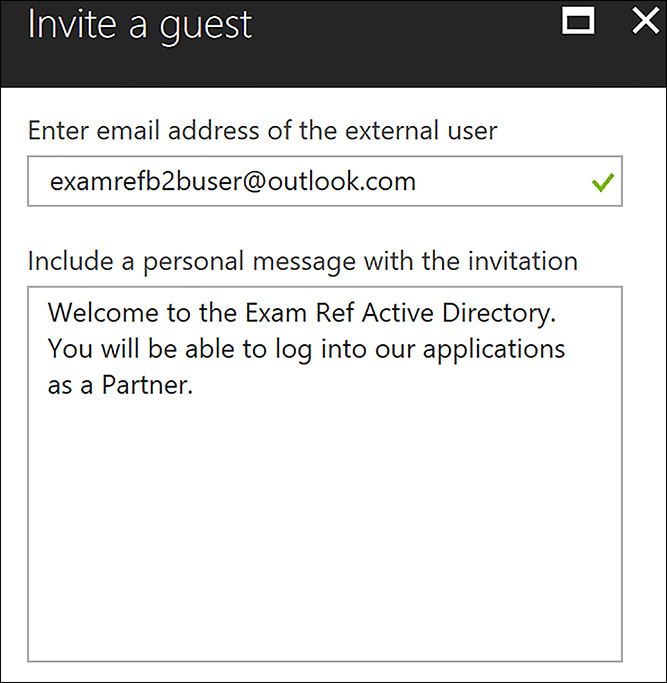
FIGURE 8-56 Adding a Guest User’s Email and Welcome Message
The user receives an invite in their inbox to the Azure AD as a B2B user, as shown in Figure 8-57. They can click through and then complete a process to add their user name to the directory.

FIGURE 8-57 Email Invitation received by a B2B user added to Azure AD
Integrate with Applications
Adding users to applications in Azure AD is required for them to have access. After the users are added, the applications show up on their MyApps portal. To add a B2B external user, or any user for that matter, open the Azure AD in the Azure portal and click Enterprise Applications. Next, open the application that you want to give the user access to. In the example shown in Figure 8-58, you see the application DocuSign has been added to the Azure AD.

FIGURE 8-58 Application added to Azure AD
Click the application to open it and then click Users and Groups. Next, click +Add User as shown in Figure 8-59.
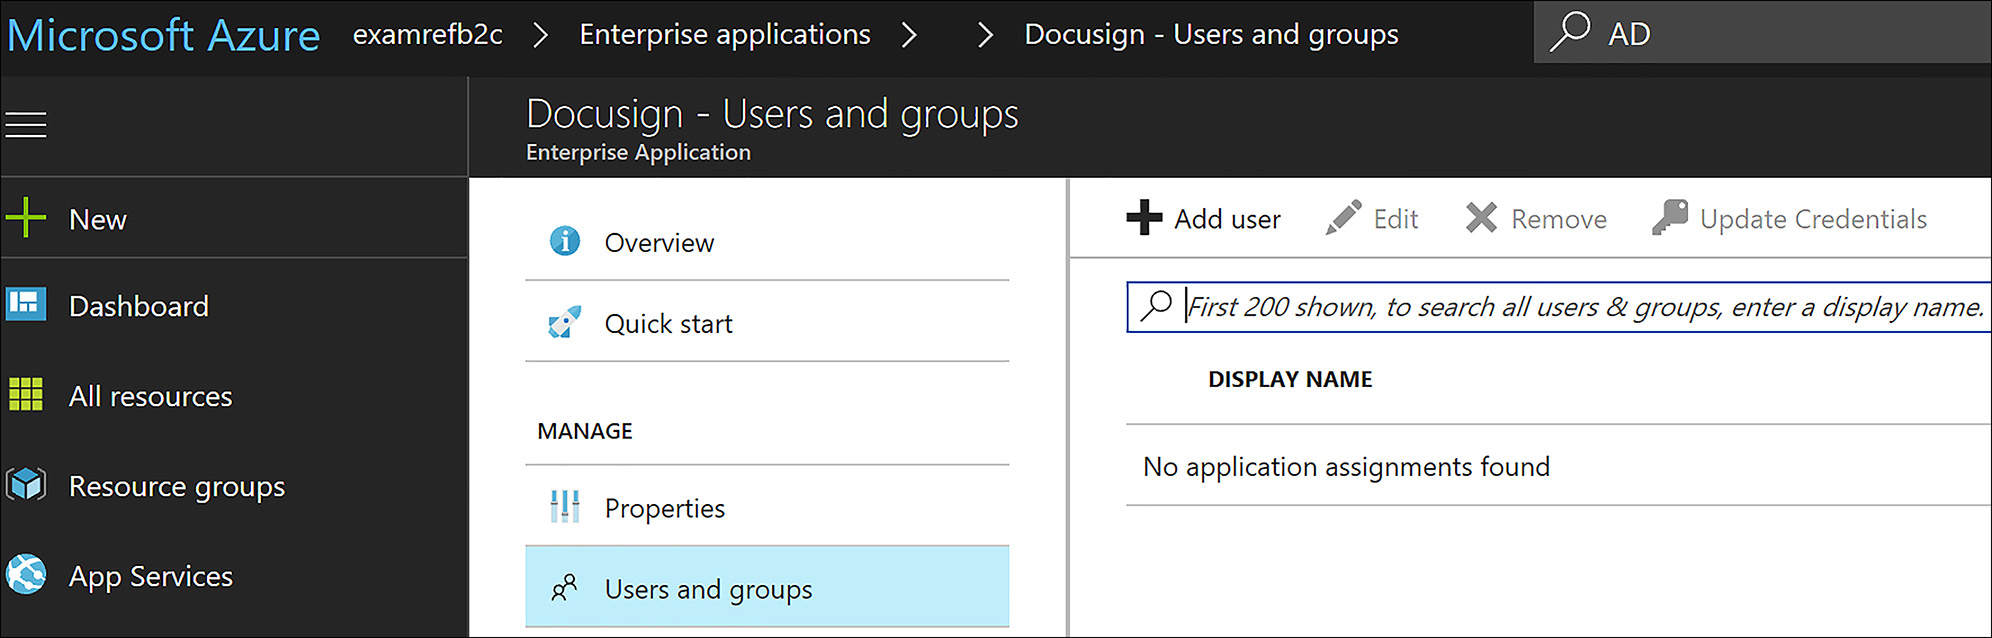
FIGURE 8-59 Click +Add User to add the B2B user
From the list of users, add the B2B user, as shown in Figure 8-60. Click Assign and the user is added to the application.
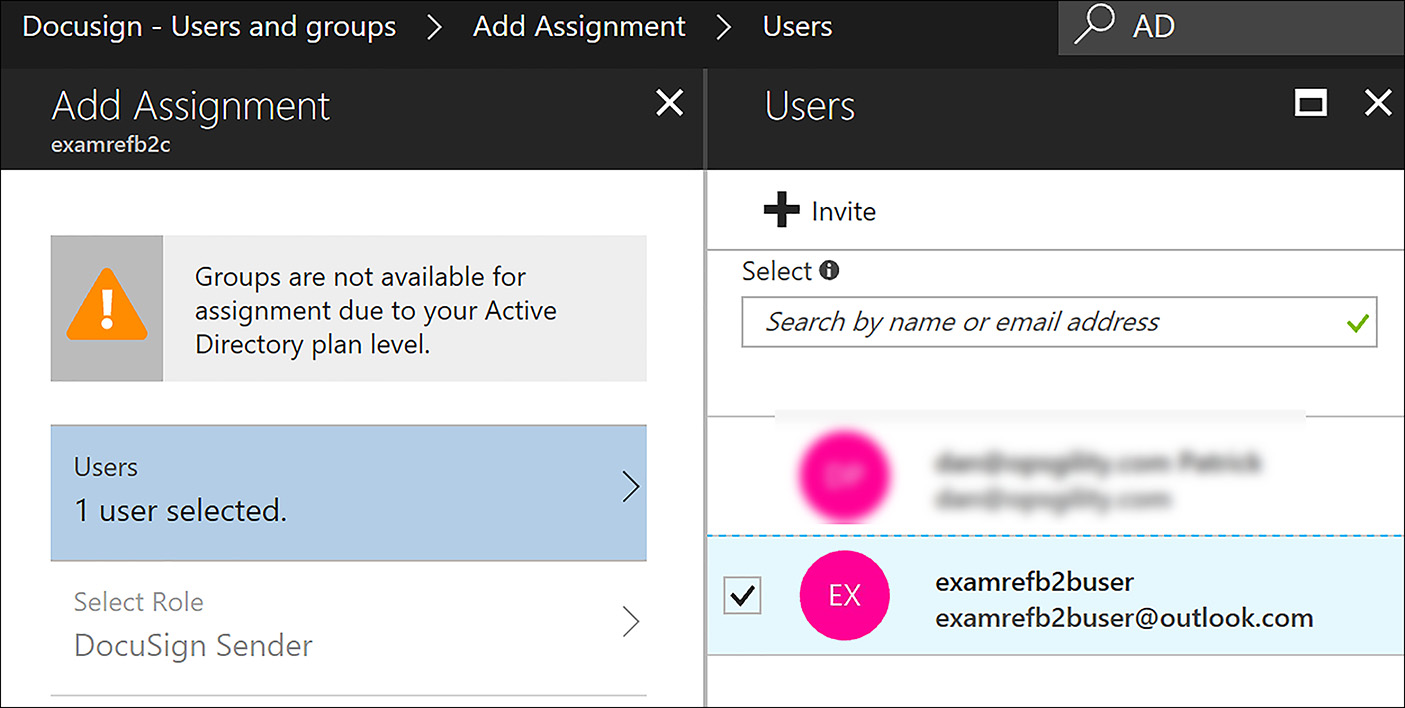
FIGURE 8-60 Adding a B2B user to an Azure AD Application
The user can now point their web browser to http://myapps.microsoft.com where the application shows up as an option after they sign in. Figure 8-61 shows that the user can now access the application.
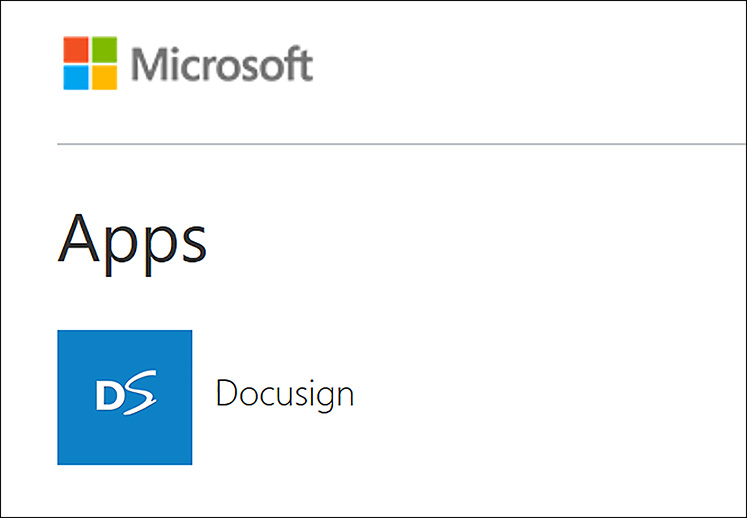
FIGURE 8-61 MyApps portal showing an Azure AD application assigned to a user
Thought experiment
In this thought experiment, apply what you have learned in this chapter. You can find answers to these questions in the “Answers” section at the end of this chapter.
You are the new IT Administrator at TailSpin Toys, which is a global leader in selling and distributing toys around the globe. Recently TailSpin purchased one of the leading online websites for gaming. As a part of this transition, your CIO has determined that you will use Azure and Office 365 moving forward.
As a result, you have been put in charge of setting up the identity with Azure AD for the following systems:
Any TailSpin user needs to be able to authenticate to Azure solutions and Office 365 by using the same user name and password as they use today. Currently, they log in to the on-premises AD domain, which is running Windows Server 2012R2 Native mode.
The online gaming system should use Azure AD and allow users to use their social media accounts.
TailSpin’s main ordering system will be moved to Azure. The security team has advised you that partners can no longer have accounts in the TailSpin AD, so you need a way to provide them access to this application.
What Azure tools should you use to securely synchronize the AD accounts from the AD Domain on-premises to Azure? How should you monitor this replication as well as your domain controllers?
What type of directory should you deploy for the online gaming site? How will you allow for the users to sign-up and sign-in to the application by using their social media identities?
What type of directory should you use for the ordering system? What user login IDs should the partners use since security is taking away the IDs that had been provided to partners in the past?
Thought experiment answers
This section contains the solution to the thought experiment for this chapter.
Use Azure AD Connect to synchronize the users and groups from the local AD to Azure AD. Use Azure AD Connect Health to monitor all the directory implementation at TailSpin Toys.
An Azure B2C tenant should be deployed to support the online gaming system. Social media providers should be added to the Azure AD application to allow users to leverage their social media IDs. Since their IDs are held by the social media provider, there should not be any helpdesk calls for password resets.
Use Azure AD B2B for the ordering system. New invitations are emailed to users. By using their own IDs, users are now able to gain access to the TailSpin ordering system. This allows for the removal of their partner accounts that are a part of the on-premises AD and thus meets the security team’s requirements.
Chapter summary
Below are some of the key takeaways from this chapter:
All versions of Active Directory can be managed by using Azure AD Connect Health
On-premises domain controllers can be managed by using Azure AD Connect Health
Email notifications can be set up to send emails to alert of issues found while monitoring your different AD directories
Azure AD Domain Services allows for joining Azure VMs to a directory without the need to deploy DCs into Azure IaaS
Azure AD Domain Services supports the use of GPOs
Traditional AD aware applications can be deployed to the cloud and use LDAP and Kerberos authentications with the support of Azure AD Domain Services
Custom domains can be added to Azure AD, such as contoso.com, but there is always a default contoso.onmicrosoft.com domain
Multi-Factor Authentication (MFA), requires users to supply another form of verification other than just user name and password. This is in the form of phone call, text message, or verification app on a mobile phone.
MFA requires a Premium license for each user and their location must be set prior to enabling the service
Windows 10 can be added to Azure AD as a device to be managed, enabling BYOD or corporate cloud only deployments
Azure AD B2C allows developers to leverage the social identity of users such as Facebook and Microsoft ID amongst others
Azure AD B2B allows administrators to invite partner companies to gain access to their cloud resources