
Chapter 13. Advanced Iteration: Looping Like Crazy

It’s often amazing how much time our programs spend in loops. This isn’t a surprise, as most programs exist to perform something quickly a whole heap of times. When it comes to optimizing loops, there are two approaches: (1) improve the loop syntax (to make it easier to specify a loop), and (2) improve how loops execute (to make them go faster). Early in the lifetime of Python 2 (that is, a long, long time ago), the language designers added a single language feature that implements both approaches, and it goes by a rather strange name: comprehension. But don’t let the strange name put you off: by the time you’ve worked through this chapter, you’ll be wondering how you managed to live without comprehensions for so long.
Bahamas Buzzers Have Places to Go
To learn what loop comprehensions can do for you, you’re going to take a look at some “real” data.
Operating out of Nassau on New Providence Island, Bahamas Buzzers provides island-hopping flights to some of the larger island airports. The airline has pioneered just-in-time flight scheduling: based on the previous day’s demand, the airline predicts (which is just a fancy term for “guesses”) how many flights they need the next day. At the end of each day, the BB Head Office generates the next day’s flight schedule, which ends up in a text-based CSV (comma-separated value) file.
Here’s what tomorrow’s CSV file contains:


Head Office calls this CSV file buzzers.csv.
If you were asked to read the data from the CSV file and display it on screen, you’d use a with statement. Here’s what we did at IDLE’s >>> prompt, after using Python’s os module to change into the folder that contains the file:

Geek Bits

Learn more about the CSV format here: https://en.wikipedia.org/wiki/Comma-separated_values.
Reading CSV Data As Lists
The CSV data, in its raw form, is not very useful. It would be more useful if you could read and break apart each line at the comma, making it easier to get at the data.
Although it is possible to do this “breaking apart” with hand-crafted Python code (taking advantage of the string object’s split method), working with CSV data is such a common activity that the standard library comes with a module named csv that can help.
Here’s another small for loop that demonstrates the csv module in action. Unlike the last example, where you used the read method to grab the entire contents of the file in one go, in the code that follows, csv.reader is used to read the CSV file one line at a time within the for loop. On each iteration, the for loop assigns each line of CSV data to a variable (called line), which is then displayed on screen:

The csv module is doing quite a bit of work here. Each line of raw data is being read from the file, then “magically” turned into a two-item list.
In addition to the header information (from the first line of the file) being returned as a list, each individual flight time and destination pair also gets its own list. Take note of the type of the individual data items returned: everything is a string, even though the first item in each list (clearly) represents a time.
The csv module has a few more tricks up its sleeve. Another interesting function is csv.DictReader. Let’s see what that does for you.
Reading CSV Data As Dictionaries
Here’s code similar to the last example, but for the fact that this new code uses csv.DictReader as opposed to csv.reader. When DictReader is used, the data from the CSV file is returned as a collection of dictionaries, with the keys for each dictionary taken from the CSV file’s header line, and the values taken from each of the subsequent lines. Here’s the code:

There is no doubt that this is powerful stuff: with a single call to DictReader, the csv module has transformed the raw data in your CSV file into a collection of Python dictionaries.
But imagine you’ve been tasked with converting the raw data in the CSV file based on the following requirements:
Convert the flight times from 24-hour format to AM/PM format
Convert the destinations from UPPERCASE to Titlecase
In and of themselves, these are not difficult tasks. However, when you consider the raw data as a collection of lists or a collection of dictionaries, they can be. So, let’s write a custom for loop to read the data into a single dictionary that can then be used to perform these conversions with a lot less fuss.
Let’s Back Up a Little Bit
Rather than use csv.reader or csv.DictReader, let’s roll our own code to convert the raw data in the CSV file into a single dictionary, which we can then manipulate to perform the required conversions.
We’ve had a chat with the Head Office folks over at Bahamas Buzzers, and they’ve told us they’re very happy with the conversions we have in mind, but would still like the data kept in its “raw form,” as that’s how their antiquated departures board expects its data to arrive: 24-hour format for flight times, and all UPPERCASE for destinations.
You could perform conversions on the raw data in your single dictionary, but let’s ensure that the conversions are performed on copies of the data, not the actual raw data as read in. Although it’s not totally clear at the moment, the noises coming out of Head Office seem to indicate that whatever code you create may have to interface with some existing systems. So, rather than face the prospect of converting the data back into its raw form, let’s read it into a single dictionary as is, then convert to copies as required (while leaving the raw data in the original dictionary untouched).
It’s not an awful lot of work (over and above what you had to do with the csv module) to read the raw data into a dictionary. In the code below, the file is opened, and the first line is read and ignored (as we don’t need the header info). A for loop then reads each line of raw data, splitting it in two at the comma, with the flight time being used as your dictionary key, and the destination used as your dictionary value.


Stripping, Then Splitting, Your Raw Data
The latest with statement used the split method (included with all string objects) to break the line of raw data in two. What’s returned is a list of strings, which the code individually assigns to the k and v variables. This multivariable assignment is possible due to the fact that you have a tuple of variables on the left of the assignment operator, as well as code that produces a list of values on the right of the operator (remember: tuples are immutable lists):

Another string method, strip, removes whitespace from the beginning and end of an existing string. Let’s use it to remove the unwanted trailing newline from the raw data before preforming the split.
Here’s one final version of our data-reading code. We create a dictionary called flights, which uses the flight times as keys and the destinations (without the newline) as values:

Geek Bits
Whitespace: the following characters are considered whitespace in strings: space, ,
, and
.
What if you switched the order of the methods in your code, like so:

What do you think would happen?
Be Careful When Chaining Method Calls
Some programmers don’t like the fact that Python’s method calls can be chained together (as strip and split were in the last example), because such chains can be hard to read the first time you see them. However, method chaining is popular among Python programmers, so you’ll likely run across code that uses this technique “in the wild.” Care is needed, however, as the order of the method calls is not interchangeable.
As an example of what can go wrong, consider this code (which is very similar to what came before). Whereas before the order was strip, then split, this code calls split first, then tries to call strip. Look what happens:

To understand what’s going on here, consider the type of the data to the right of the assignment operator as the above method chain executes.
Before anything happens, line is a string. Calling split on a string returns a list of strings, using the argument to split as a delimiter. What started out as a string (line) has dynamically morphed into a list, which then has another method invoked against it. In this example, the next method is strip, which expects to be invoked on a string, not a list, so the interpreter raises an AttributeError, as lists don’t have a method called strip.

The method chain from the previous page does not suffer from this issue:
       ...
line.strip().split(',')
       ...
With this code, the interpreter starts out with a string (in line), which has any leading/trailing whitespace removed by strip (yielding another string), which is then split into a list of strings based on the comma delimiter. There’s no AttributeError, as the method chain doesn’t violate any typing rules.
Transforming Data into the Format You Need
Now that the data is in the flights dictionary, let’s consider the data manipulations BB Head Office has asked you to perform.
The first is to perform the two conversions identified earlier in this chapter, creating a new dictionary in the process:
Convert the flight times from 24-hour format to AM/PM format
Convert the destinations from UPPERCASE to Titlecase
Applying these two transformations to the flights dictionary allows you to turn the dictionary on the left into the one on the right:

Note that the data in both dictionaries has the same meaning, it’s just the representation that’s changed. Head Office needs the second dictionary, as they feel that its data is more universally understandable, as well as friendlier; Head Office thinks all- UPPERCASE is akin to shouting.
At the moment, the data in both dictionaries has a single line for each flight time/destination combination. Although Head Office will be happy when you’ve transformed the dictionary on the left into the dictionary on the right, they’ve also suggested that it would be really useful if the data could be presented with single destinations as keys and a list of flight times as values—that is, a single row of data for each destination. Let’s look at how that dictionary would appear before embarking on coding the required manipulations.
Transforming into a Dictionary Of Lists
Once the data in flights has been transformed, Head Office wants you to perform this second manipulation (discussed at the bottom of the last page):

Think about the data wrangling that’s needed here...
There’s a bit of work required to get from the raw data in the CSV file to the dictionary of lists shown above on the right. Take a moment to think about how you’d go about doing this using the Python you already know.
If you’re like most programmers, it won’t take you long to work out that the for loop is your friend here. As Python’s main looping mechanism, for has already helped you extract the raw data from the CSV file and populate the flights dictionary:

It’s tempting to suggest that this code be amended to perform the transformations to the raw data as it is read from the CSV file—that is, prior to adding rows of data to flights. But recall the Head Office’s request that the raw data remain untouched in flights: any transformations need to be applied to a copy of the data. This makes things more complex, but not by much.
Let’s Do the Basic Conversions
At the moment, the flights dictionary contains flight times in 24-hour format as its keys, with UPPERCASE strings representing destinations as its values. You have two initial conversions to perform:
Convert the flight times from 24-hour format to AM/PM format
Convert the destinations from UPPERCASE to Titlecase
Conversion #2 is easy, so let’s do that one first. Once data is in a string, simply call the string’s title method, as this IDLE session demonstrates:

Conversion #1 involves a bit more work.
If you think about it for a minute, things get quite involved when it comes to converting 19:00 into 7:00PM. However, this is only the case when you look at the 19:00 data as a string. You’d need to write a lot of code to do the conversion.
For more on string format specifiers, see https://docs.python.org/3/library/datetime.html#strftime-and-strptime-behavior.
If you instead consider that 19:00 is a time, you can take advantage of the datetime module that is included as part of Python’s standard library. This module’s datetime class can take a string (like 19:00) and convert it to its equivalent AM/PM format using two prebuilt functions and what’s known as string format specifiers. Here’s a small function, called convert2ampm, which uses the facilities of the datetime module to perform the conversion you need:


Let’s put the conversion techniques from the last page to work.
Below is the code that reads the raw data from the CSV file, populating the flights dictionary as it goes. The convert2ampm function is also shown.
Your job is to write a for loop that takes the data in flights and converts the keys to AM/PM format, and the values to Titlecase. A new dictionary, called flights2, is created to hold the converted data. Use your pencil to add the for loop code in the space provided.
Hint: when processing a dictionary with a for loop, recall that the items method returns the key and value for each row (as a tuple) on each iteration.


Did You Spot the Pattern in Your Code?
Take another look at the program you’ve just executed. There’s a very common programming pattern used twice in this code. Can you spot it?
from datetime import datetime
import pprint

def convert2ampm(time24: str) -> str:
    return datetime.strptime(time24, '%H:%M').strftime('%I:%M%p')

with open('buzzers.csv') as data:
    ignore = data.readline()
    flights = {}
    for line in data:
        k, v = line.strip().split(',')
        flights[k] = v

pprint.pprint(flights)
print()

flights2 = {}
for k, v in flights.items():
    flights2[convert2ampm(k)] = v.title()

pprint.pprint(flights2)
If you answered: “the for loop,” you’re only half-right. The for loop is part of the pattern, but take another look at the code that surrounds it. Spot anything else?
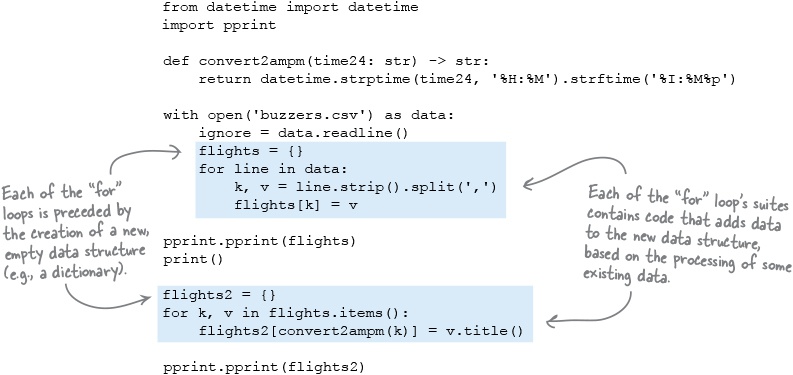
Spotting the Pattern with Lists
The examples on the last page highlighted the programming pattern as it relates to dictionaries: start with a new, empty dictionary, then use a for loop to process an existing dictionary, generating data for a new dictionary as you go:

This pattern also makes an appearance with lists, where it is easier to spot. Take a look at this IDLE session, where the keys (i.e., the flight times) and the values (i.e., the destinations) are extracted from the flights dictionary as lists, then converted into new lists using the programming pattern (numbered 1 through 4 in the annotations):

This pattern is used so often that Python provides a convenient shorthand notation for it called the comprehension. Let’s see what’s involved in creating a comprehension.
Converting Patterns into Comprehensions
Let’s take the most recent for loop that processed the destinations as our example. Here it is again:

Python’s built-in comprehension feature lets you rework the above three lines of code as a single line.
To convert the above three lines into a comprehension, we’re going to step through the process, building up to the complete comprehension.
Begin by starting with a new, empty list, which is assigned to a new variable (which we’re calling more_dests in this example):

Specify how the existing data (in flights in this example) is to be iterated over using the familiar for notation, and place this code within the new list’s square brackets (note the absence of the colon at the end of the for code):

To complete the comprehension, specify the transformation to be applied to the data (in dest), and put this transformation before the for keyword (note the absence of the call to append, which is assumed by the comprehension):

And that’s it. The single line of code at the bottom of this page is functionally equivalent to the three lines of code at the top. Go ahead and run this line of code at your >>> prompt to convince yourself that the more_dests list contains the same data as the destinations list.
Take a Closer Look at the Comprehension
Let’s look at the comprehension in a little more detail. Here’s the original three lines of code as well as the single-line comprehension that performs the same task.
Remember: both versions produce new lists (destinations and more_dests) that have exactly the same data:

It’s also possible to pick out the parts of the original three lines of code and see where they’ve been used in the comprehension:

If you spot this pattern in other code, you can easily turn it into a comprehension. For example, here’s some code from earlier (which produces the list of AM/PM flight times) reworked as a comprehension:

What’s the Big Deal?

Yes. We think it’s well worth the effort.
There are two main reasons why taking the time to understand comprehensions pays off.
Firstly, as well as requiring less code (which means comprehensions are easier on your fingers), the Python interpreter is optimized to run comprehensions as quickly as possible. This means comprehensions execute faster than the equivalent for loop code.
Secondly, comprehensions can be used in places where for loops can’t. In fact, you’ve already seen this, as all the comprehensions presented so far in this chapter have appeared to the right of the assignment operator, which is something a regular for loop can’t do. This can be surprisingly useful (as you’ll see as this chapter progresses).
Comprehensions aren’t just for lists
The comprehensions you’ve seen so far have created new lists, so each is known as a list comprehension (or listcomp for short). If your comprehension creates a new dictionary, it’s known as a dictionary comprehension (dictcomp). And, so as not to leave any data structure out, you can also specify a set comprehension (setcomp).
There’s no such thing as a tuple comprehension; we’ll explain why later in this chapter.
First, though, let’s take a look at a dictionary comprehension.
Specifying a Dictionary Comprehension
Recall the code from earlier in this chapter that read the raw data from the CSV file into a dictionary called flights. This data was then transformed into a new dictionary called flights2, which is keyed by AM/PM flight times and uses “titlecased” destinations as values:

Let’s rework these three lines of code as a dictionary comprehension.
Start by assigning a new, empty dictionary to a variable (which we are calling more_flights):

Specify how the existing data (in flights) is to be iterated over using the for loop notation (being sure not to include the usual trailing colon):

To complete the dictcomp, specify how the new dictionary’s keys and values relate to each other. The for loop at the top of the page produces the key by converting it to an AM/PM flight time using the convert2ampm function, while the associated value is turned into titlecase thanks to the string’s title method. An equivalent dictcomp can do the same thing and, as with listcomps, this relationship is specified to the left of the dictcomp’s for keyword. Note the inclusion of the colon separating the new key from the new value:

And there it is: your first dictionary comprehension. Go ahead and take it for a spin to confirm that it works.
Extend Comprehensions with Filters
Let’s imagine you need only the converted flight data for Freeport.
Reverting to the original for loop, you’d likely extend the code to include an if statement that filters based on the current value in v (the destination), producing code like this:


If you execute the above loop code at the >>> prompt, you’ll end up with just two rows of data (representing the two scheduled flights to Freeport as contained in the raw data file). This shouldn’t be surprising, as using an if in this way to filter data is a standard technique. It turns out that such filters can be used with comprehensions, too. Simply take the if statement (minus the colon) and tack it onto the end of your comprehension. Here’s the dictcomp from the bottom of the last page:
more_flights = {convert2ampm(k): v.title() for k, v in flights.items()}And here’s a version of the same dictcomp with the filter added:

If you execute this filtered dictcomp at your >>> prompt, the data in the newly created just_freeport2 dictionary is identical to the data in just_freeport. Both just_freeport and just_freeport2’s data is a copy of the original data in the flights dictionary.
Granted, the line of code that produces just_freeport2 looks intimidating. Many programmers new to Python complain that comprehensions are hard to read. However, recall that Python’s usual end-of-line-means-end-of-statement rule is switched off whenever code appears between a bracket pair, so you can rewrite any comprehension over multiple lines to make it easier to read, like so:

Recall What You Set Out to Do
Now that you’ve seen what comprehensions can do for you, let’s revisit the required dictionary manipulations from earlier in this chapter to see how we’re doing. Here’s the first requirement:

Given the data in the flights dictionary, you’ve seen that the following dictionary comprehension performs the above conversions in one line of code, assigning the copied data to a new dictionary called fts here:
fts = {convert2ampm(k): v.title() for k, v in flights.items()}The second manipulation (listing flight times per destination) is a little more involved. There’s a bit more work to do due to the fact that the data manipulations are more complex:

Before starting to work on the second manipulation, let’s pause for a bit to see how well the comprehension material is seeping into your brain.
You’ve been tasked with transforming the three for loops on this page into comprehensions. As you do, don’t forget to test your code in IDLE (before flipping the page and peeking at our solutions). In fact, before you try to write the comprehensions, execute these loops and see what they do. Write your comprehension solutions in the spaces provided.


Deal with Complexity the Python Way
With your comprehension practice session behind you, let’s experiment at the >>> prompt to work out what has to happen to the data in the fts dictionary in order to transform it into what’s required.
Before writing any code, take another look at the required transformation. Notice how the keys in the new dictionary (on the right) are a list of unique destinations taken from the values in the fts dictionary (on the left):

It turns out that producing those four unique destinations is very straightforward. Given that you have the data on the left in a dictionary called fts, you can access all of the values using fts.values, then feed that to the set BIF to remove duplicates. Let’s store the unique destinations in a variable called dests:

Now that you have a way to get the unique destinations, it’s time to grab the flight times associated with those destinations. This data is also in the fts dictionary.
Before turning the page, have a think about how you’d go about extracting the flight times given each unique destination.
In fact, don’t worry about extracting all the flight times for every destination; just work out how to do it for West End first.
Extract a Single Destination’s Flight Times
Let’s start by extracting the flight time data for a single destination, namely West End. Here’s the data you need to extract:

As before, pull up the >>> prompt and get to work. Given the fts dictionary, you can extract the West End flight times using code like this:

On seeing this code, you should hear little alarm bells ringing in your brain, as this for loop is surely a candidate for reworking as a list comprehension, right?
That for loop becomes this equivalent listcomp:

Now that you know how to extract this data for one specific destination, let’s do it for all the destinations.
Extract Flight Times for All Destinations
You now have this code, which extracts the set of unique destinations:
And you also have this listcomp, which extracts the list of flight times for a given destination (in this example, that destination is West End):

To extract the list of flights times for all of the destinations, you need to combine these two statements (within a for loop).
In the code that follows, we’ve dispensed with the need for the dests and west2 variables, preferring to use the code directly as part of the for loop. We no longer hardcode West End, as the current destination is in dest (within the listcomp):

The fact that we’ve just written a for loop that appears to conform to our comprehension pattern starts our brain’s little bell ringing again. Let’s try to suppress that ringing for now, as the code you’ve just experimented with at your >>> prompt displays the data we need...but what you really need is to store the data in a new dictionary. Let’s create a new dictionary (called when) to hold this newly extracted data. Head back to your >>> prompt and adjust the above for loop to use when:

If you’re like us, your little brain bell (that you’ve been trying to suppress) is likely ringing loudly and driving you crazy as you look at this code.
That Feeling You Get...
...when a single line of code starts to look like magic.
Switch off your brain bell, then take another look at the code that makes up your most recent for loop:
when = {}
for dest in set(fts.values()):
    when[dest] = [k for k, v in fts.items() if v == dest]
This code conforms to the pattern that makes it a potential target for reworking as a comprehension. Here’s the above for loop code reworked as a dictcomp that extracts a copy of the data you need into a new dictionary called when2:
when2 = {dest: [k for k, v in fts.items() if v == dest] for dest in set(fts.values())}It looks like magic, doesn’t it?
This is the most complex comprehension you’ve seen so far, due mainly to the fact that the outer dictcomp contains an inner listcomp. That said, this dictcomp showcases one of the features that set comprehensions apart from the equivalent for loop code: you can put a comprehension almost anywhere in your code. The same does not hold for for loops, which can only appear as statements in your code (that is, not as part of expressions).
Of course, that’s not to say you should always do something like this:

Be warned: a dictionary comprehension containing an embedded list comprehension is hard to read the first time you see it.
However, with repeated exposure, comprehensions do get easier to read and understand, and—as stated earlier in this chapter—Python programmers use them a lot. Whether you use comprehensions is up to you. If you are happier with the for loop code, use that. If you like the look of comprehensions, use them...just don’t feel you have to.
Before moving on, let’s put all of this comprehension code into our do_convert.py file. We can then run the code in this file (using IDLE) to see that the conversions and transformations that are required by Bahamas Buzzers are occurring as required. Confirm that your code is the same as ours, then execute the code to confirm that everything is working to specification.


That’s a great question.
And the answer is: yes and no.
Yes, it is possible to create and use a set comprehension (although, to be honest, you will encounter them only very rarely).
And, no, there’s no such thing as a “tuple comprehension.” We’ll get to why this is after we’ve shown you set comprehensions in action.
The Set Comprehension in Action
A set comprehensions (or setcomp for short) allows you to create a new set in one line of code, using a construct that’s very similar to the list comprehension syntax.
What sets a setcomp apart from a listcomp is that the set comprehension is surrounded by curly braces (unlike the square brackets around a listcomp). This can be confusing, as dictcomps are surrounded by curly braces, too. (One wonders what came over the Python core developers when they decided to do this.)
A literal set is surrounded by curly braces, as are literal dictionaries. To tell them apart, look for the colon character used as a delimiter in dictionaries, as the colon has no meaning in sets. The same advice applies to quickly determining whether a curly-braced comprehension is a dictcomp or a setcomp: look for the colon. If it’s there, you’re looking at a dictcomp. If not, it’s a setcomp.
Here’s a quick set comprehension example (which hearkens back to an earlier example in this book). Given a set of letters (in vowels), and a string (in message), the for loop as well as its equivalent setcomp produce the same result— a set of the vowels found in message:

Take a few moments to experiment with the code on this page at your >>> prompt. Because you already know what listcomps and dictcomps can do, getting your head around set comprehensions isn’t that tricky. There’s really nothing more to them than what’s on this page.
How to Spot a Comprehension
As you become more familiar with the look of comprehension code, they become easier to spot and understand. Here’s a good general rule for spotting list comprehensions:
If you spot code surrounded by [ and ], then you are looking at a list comprehension.
This rule can be generalized as follows:
If you spot code surrounded by brackets (curly or square), then you are likely looking at a comprehension.
Why the use of the word “likely”?
In addition to code being surrounded by [], comprehensions can also, as you’ve seen, be surrounded by {}. When code is surrounded by [ and ], you are looking at a list comprehension. When code is surrounded by { and }, you are looking at either a set or a dictionary comprehension. A dictcomp is easy to spot thanks to its use of the colon character as a delimiter.
However, code can also appear between ( and ), which is a special case, even though you’d be forgiven for suggesting that code surrounded by parentheses must surely be a tuple comprehension. You’d be forgiven, but wrong: “tuple comprehensions” don’t exist, even though you can put code between ( and ). After the “fun” you’ve been having with comprehensions so far in this chapter, you may be thinking: could this get any weirder?

Let’s conclude this chapter (and this book) by exploring what’s going on with code that appears between ( and ). It’s not a “tuple comprehension,” but it is obviously allowed, so what is it?
What About “Tuple Comprehensions”?
Python’s four built-in data structures (tuples, lists, sets, and dictionaries) can be put to many uses. However, all but tuples can be created via a comprehension.
Why is this?
It turns out that the idea of a “tuple comprehension” doesn’t really make sense. Recall that tuples are immutable: once a tuple is created, it cannot be changed. This also means that it’s not possible to generate a tuple’s values in code, as this short IDLE session shows:

There’s nothing weird or wonderful going on here, as this is the behavior expected from tuples: once one exists, it cannot be changed. This fact alone should be enough to rule out using a tuple within any sort of comprehension. But take a look at this interaction at the >>> prompt. The second loop differs from the first in the smallest of ways: the square brackets around the listcomp (in the first loop) have been replaced with parentheses (in the second):

Parentheses Around Code == Generator
When you come across something that looks like a listcomp but is surrounded by parentheses, you’re looking at a generator:

As you saw at the bottom of the last page, when you replace a listcomp’s surrounding square brackets with parentheses, the results are the same; that is, the generator and the listcomp produce the same data.
However, they do not execute in the same way.
If you’re scratching your head at the previous sentence, consider this: when a listcomp executes, it produces all of its data prior to any other processing occurring. Taken in the context of the example at the top of this page, the for loop doesn’t start processing any of the data produced by the listcomp until the listcomp is done. This means that a listcomp that takes a long time to produce data delays any other code from running until the listcomp concludes.
With a small list of data items (as shown above), this is not a big issue.
But imagine your listcomp is required to work with a list that produces 10 million items of data. You’ve now got two issues: (1) you have to wait for the listcomp to process those 10 million data items before doing anything else, and (2) you have to worry that the computer running your listcomp has enough RAM to hold all that data in memory while the listcomp executes (10 million individual pieces of data). If your listcomp runs out of memory, the interpreter terminates (and your program is toast).
Listcomps and generators produce the same results, but operate in a very different way.
Generators produce data items one at a time...
When you replace your listcomp’s square brackets with parentheses, the listcomp becomes a generator, and your code behaves differently.
Unlike a listcomp, which must conclude before any other code can execute, a generator releases data as soon as the data is produced by the generator’s code. This means if you generate 10 million data items, the interpreter only needs enough memory to hold one data item (at a time), and any code that’s waiting to consume the data items produced by the generator executes immediately; that is, there’s no waiting.
There’s nothing quite like an example to understand the difference using a generator can make, so let’s perform a simple task twice: once with a listcomp, then again with a generator.
Using a Listcomp to Process URLs
To demonstrate the difference using a generator can make, let’s perform a task using a listcomp (before rewriting the task as a generator).
As has been our practice throughout this book, let’s experiment with some code at the >>> prompt that uses the requests library (which lets you programmatically interact with the Web). Here’s a small interactive session that imports the requests library, defines a three-item tuple (called urls), and then combines a for loop with a listcomp to request each URL’s landing page, before processing the web response returned.
Download “requests” from PyPI using the “pip” command.
To understand what’s going on here, you need to follow along on your computer.

If you’re following along on your computer, you will experience a noticeable delay between entering the for loop code and seeing the results. When the results appear, they are displayed in one go (all at once). This is because the listcomp works through each of the URLs in the urls tuple before making any results available to the for loop. The outcome? You have to wait for your output.
Note that there’s nothing wrong with this code: it does what you want it to, and the output is correct. However, let’s rework this listcomp as a generator to see the difference it makes. As mentioned above, be sure to follow along on your computer as you work through the next page (so you can see what happens).
Using a Generator to Process URLs
Here’s the example from the last page reworked as a generator. Doing so is easy; simply replace the listcomp’s square brackets with parentheses:

A short moment after entering the above for loop, the first result appears:

Then, a moment later, the next line of results appear:

Then—finally—a few moments later, the last results line appears (and the for loop ends):

Using a Generator: What Just Happened?
If you compare the results produced by your listcomp to those produced by your generator, they are identical. However, the behavior of your code isn’t.
The listcomp waits for all of its data to be produced before feeding any data to the waiting for loop, whereas the generator releases data as soon as it becomes available. This means the for loop that uses the generator is much more responsive, as opposed to the listcomp (which makes you wait).
If you’re thinking this isn’t really that big a deal, imagine if the URLs tuple was defined with one hundred, one thousand, or one million URLs. Further, imagine that the code processing the response is feeding the processed data to another process (perhaps a waiting database). As the number of URLs increases, the listcomp’s behavior becomes worse compared to that of the generator.

No. We wouldn’t say that.
Don’t misunderstand: the fact that generators exist is great, but this doesn’t mean you’ll want to replace all of your listcomps with an equivalent generator. Like a lot of things in programming, which approach you use depends on what you’re trying to do.
If you can afford to wait, then listcomps are fine; otherwise, consider using a generator.
One interesting usage of generators is to embed them within a function. Let’s take a look at encapsulating your just-created generator in a function.
Define What Your Function Needs to Do
Let’s imagine that you want to take your requests generator and turn it into a function. You’ve decided to package the generator within a small module you’re writing, and you want other programmers to be able to use it without having to know or understand generators.
Here’s your generator code once more:

Let’s create a function that encapsulates this code. The function, which is called gen_from_urls, takes a single argument (a tuple of URLs), and returns a tuple of results for each URL. The returned tuple contains three values: the length of the URL’s content, the HTTP status code, and the URL the response came from.
Assuming gen_from_urls exists, you want other programmers to be able to execute your function as part of a for loop, like this:

Although this new code does not look all that different from the code at the top of the page, note that programmers using gen_from_urls have no clue (nor do they need to know) that you’re using requests to talk to the Web. Nor do they need to know that you’re using a generator. All of your implementation details and choices are hidden behind that easy-to-understand function call.
Let’s see what’s involved in writing gen_from_urls so that it can generate the data you need.
Yield to the Power of Generator Functions
Now that you know what the gen_from_urls function needs to do, let’s go about writing it. Begin by creating a new file called url_utils.py. Edit this file, then add import requests as its first line of code.
The function’s def line is straightforward, as it takes a single tuple on the way in, and returns a tuple on output (note how we’ve included type annotations to make this explicit for users of our generator function). Go ahead and add the function’s def line to the file, like so:

The function’s suite is the generator from the last page, and the for line is a simple copy-and-paste:

The next line of code needs to “return” the result of that GET request as performed by the requests.get function. Although it’s tempting to add the following line as the for’s suite, please don’t do this:
return len(resp.content), resp.status_code, resp.url
When a function executes a return statement, the function terminates. You don’t want this to happen here, as the gen_from_urls function is being called as part of a for loop, which is expecting a different tuple of results each time the function’s called.
But, if you can’t execute return, what are you to do?
Use yield instead. The yield keyword was added to Python to support the creation of generator functions, and you can use it anywhere a return is used. When you do, your function morphs into a generator function that can be “called” from any iterator, which, in this case, is from within your for loop:

Let’s take a closer look at what’s going on here.
Tracing Your Generator Function, 1 of 2
To understand what happens when your generator function runs, let’s trace the execution of the following code:

The first two lines of code are simple enough: the function is imported, and a tuple of URLs is defined.
The fun starts on the next line of code, when the gen_from_urls generator function is invoked. Let’s refer to this for loop as “the calling code”:

The interpreter jumps to the gen_from_urls function, and starts to execute its code. The tuple of URLs is copied into the function’s sole argument, and then the generator function’s for loop executes:
The for loop contains the generator, which takes the first URL in the urls tuple and sends a GET request to the identified server. When the HTTP response is returned from the server, the yield statement executes.
This is where things get interesting (or weird, depending on your point of view).
Rather than executing, then moving on to the next URL in the urls tuple (i.e., continuing with the next iteration of gen_from_urls’s for loop), yield passes its three pieces of data back to the calling code. Rather than terminating, the gen_from_urls function generator now waits, as if in suspended animation...
Tracing Your Generator Function, 2 of 2
When the data (as passed back by yield) arrives at the calling code, the for loop’s suite executes. As the suite contains a single call to the print BIF, that line of code executes and displays the results from the first URL on screen:
print(resp_len, '->', status, '->', url)

34591 -> 200 -> https://talkpython.fm/
The calling code’s for loop then iterates, calling gen_from_urls again...sort of.
This is almost what happens. What actually happens is that gen_from_urls is awakened from its suspended animation, then continues to run. The for loop within gen_from_urls iterates, takes the next URL from the urls tuple, and contacts the server associated with the URL. When the HTTP response is returned from the server, the yield statement executes, passing its three pieces of data back to the calling code (which the function accesses via the resp object):

As before, rather than terminating, the gen_from_urls generator function now waits once more, as if in suspended animation...
When the data (as passed back by yield) arrives at the calling code, the for loop’s suite executes print once more, displaying the second set of results on screen:
34591 -> 200 -> https://talkpython.fm/
19468 -> 200 -> http://pythonpodcast.com/
The calling code’s for loop iterates, “calling” gen_from_urls once more, which results in your generator function awakening again. The yield statement is executed, results are returned to the calling code, and the display updates again:
34591 -> 200 -> https://talkpython.fm/
19468 -> 200 -> http://pythonpodcast.com/
47413 -> 200 -> https://www.python.org/
At this point, you’ve exhausted your tuple of URLs, so the generator function and the calling code’s for loop both terminate. It’s as if the two pieces of code were taking turns to execute, passing data between themselves on each turn.
Let’s see this in action at the >>> prompt. It’s now time for one last Test Drive.
In this, the last Test Drive in this book, let’s take your generator function for a spin. As has been our practice all along, load your code into an IDLE edit window, then press F5 to exercise the function at the >>> prompt. Follow along with our session (below):

The first example below shows gen_from_urls being called as part of a for loop. As expected, the output is the same as that obtained a few pages back.
The second example below shows gen_from_urls being used as part of a dictcomp. Note how the new dictionary only needs to store the URL (as a key) and the size of the landing page (as the value). The HTTP status code is not needed in this example, so we tell the interpreter to ignore it using Python’s default variable name (which is a single underscore character):

Concluding Remarks
The use of comprehensions and generator functions is often regarded as an advanced topic in the Python world. However, this is mainly due to the fact that these features are missing from other mainstream programming languages, which means that programmers moving to Python sometimes struggle with them (as they have no existing point of reference).
That said, over at Head First Labs, the Python programming team loves comprehensions and generators, and believes that with repeated exposure, specifying the looping constructs that use them becomes second nature. They can’t imagine having to do without them.
Even if you find the comprehension and generator syntax weird, our advice is to stick with them. Even if you dismiss the fact that they are more performant than the equivalent for loop, the fact that you can use comprehensions and generators in places where you cannot use a for loop is reason enough to take a serious look at these Python features. Over time, and as you become more familiar with their syntax, opportunities to exploit comprehensions and generators will present themselves as naturally as those that tell your programming brain to use a function here, a loop there, a class over here, and so on. Here’s a review of what you were introduced to in this chapter:

When it comes to working with data in files, Python has options. As well as the standard
openBIF, you can use the facilities of the standard library’scsvmodule to work with CSV-formatted data.Method chains allow you to perform processing on data in one line of code. The
string.strip().split()chain is seen a lot in Python code.Take care with how you order your method chains. Specifically, pay attention to the type of data returned from each method (and ensure type compatibility is maintained).
A
forloop used to transform data from one format to another can be reworked as a comprehension.Comprehensions can be written to process existing lists, dictionaries, and sets, with list comprehensions being the most popular variant “in the wild.” Seasoned Python programmers refer to these constructs as listcomps, dictcomps, and setcomps.
A listcomp is code surrounded by square brackets, while a dictcomp is code surrounded by curly braces (with colon delimiters). A setcomp is also code surrounded by curly braces (but without the dictcomp’s colon).
There’s no such thing as a “tuple comprehension,” as tuples are immutable (so it makes no sense to try to dynamically create one).
If you spot comprehension code surrounded by parentheses, you’re looking at a generator (which can be turned into a function that itself uses
yieldto generate data as needed).
As this chapter concludes (and, by definition, the core content of this book), we have one final question to ask you. Take a deep breath, then flip the page.
One Final Question
OK. Here goes, our final question to you: at this stage in this book, do you even notice Python’s use of significant whitespace?
The most common complaint heard from programmers new to Python is its use of whitespace to signify blocks of code (instead of, for instance, curly braces). But, after a while, your brain tends not to notice anymore.
This is not an accident: Python’s use of significant whitespace was intentional on the part of the language’s creator.
It was deliberately done this way, because code is read more than it’s written. This means code that conforms to a consistent and well-known look and feel is easier to read. This also means that Python code written 10 years ago by a complete stranger is still readable by you today because of Python’s use of whitespace.
This is a big win for the Python community, which makes it a big win for you, too.


It’s Time to Go…

You’re on your way!
We’re sad to see you leave, but nothing would make us happier than you taking what you’ve learned about Python in this book and putting it to use. You’re at the start of your Python journey, and there’s always more to learn. Of course, you’re not quite done with this book just yet. There’s the five (yes: five!) appendixes to work through. We promise they’re not that long, and are well worth the effort. And, of course, there’s the index—let’s not forget about the index!
We hope you’ve had as much fun learning about Python as we’ve had writing this book for you. It’s been a blast. Enjoy!