Perhaps the most common user interface control that you’ll see when using iOS apps is the table view. This control is a means for displaying and editing hierarchic information. Tables are typically lists of information that are used to select an item or navigate to another item. Tables can have sections for visual style, and the items within a table can be configured in a number of different styles.
In this chapter you’ll get an introduction to the table view, and you’ll see how to use delegates and data sources to configure it. You’ll also see how you can configure the table with different sections for data and different views for the table cells.
Examples of the Table View
The table view is used so heavily on the iPhone that it’s very easy to find examples of it, and the examples show the versatility of the control. In this section you’re going to look at some of these examples, and as you learn how to use the table view you’ll understand more about them.
Custom Cells in a Table View
An example of a basic table view, albeit one that still has some custom cell settings, is on the About screen in General Settings. You can see it in the iPhone simulator. See Figure 9-1.
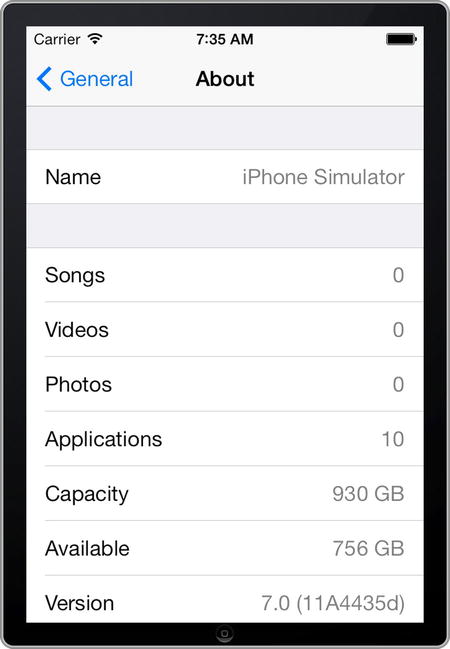
Figure 9-1. The About settings table view
This instance uses two sections: the name of the device and a list of its attributes. Each cell has been overridden from a simple text label to have two text labels, one on the left with the description and one on the right with the data.
This is another example of a table view, this time having multiple sections and being tied to a navigation controller so that it may be used to navigate to other views. See Figure 9-2.

Figure 9-2. The General Settings showing navigation
As you can see, this table has multiple sections, with some having only a single cell (the Reset section). Additionally, when cells are configured for navigation, iOS provides an arrow on their right-hand side to inform the user that selecting them will perform an action.
Graphical Subviews for Table View Cells
Another great example of the versatility of the table view is that the cells can be configured with graphics as their subviews, as in the Settings app. See Figure 9-3.
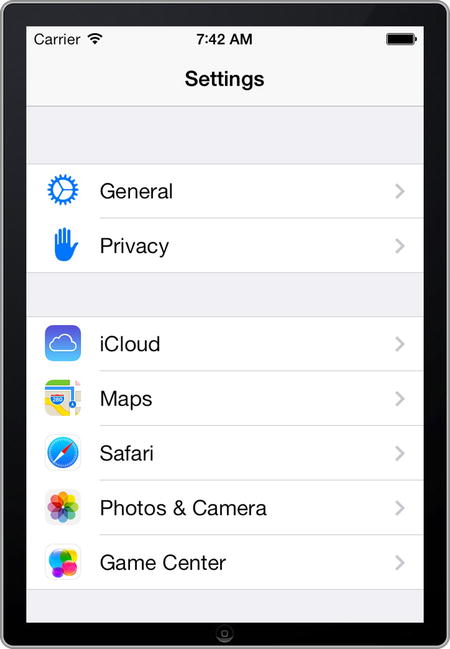
Figure 9-3. The Settings app showing sections, navigation, and graphical subviews
As well as the graphics, we see further customization, such as the sections and navigation arrows (as shown in the previous section).
Controls Within Table View Cells
Another great example of how customizable the table view is comes in the Location settings screen. Here you can see that the background has been customized with help hints, and the cells, as well as having graphics in them, also have controls, such as the switches seen in Figure 9-4.
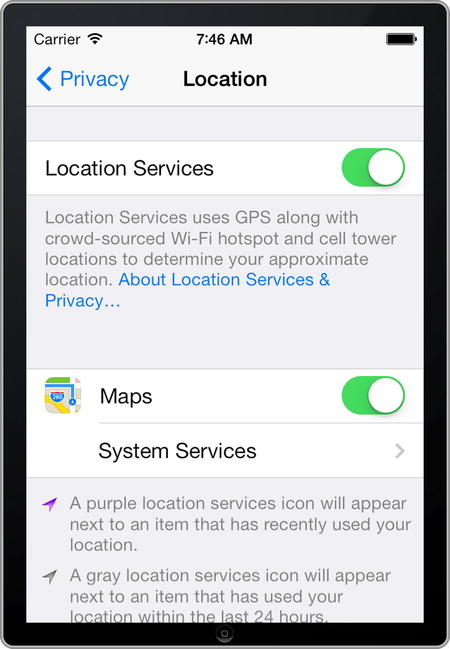
Figure 9-4. Controls within table view cells
The Maps cell shown in Figure 9-4 is particularly interesting—you can see that it has a graphical subview like with the Settings app in the previous section, as well as a switch.
These are just a few examples of the versatility of the table view. For the rest of this chapter you’re going to go hands-on in constructing your own table views.
Your First Table View App
The best way to get started with understanding how the table view works is to roll up your sleeves and get building. For this example, you’re going to create a very simple table view app for the iPhone that renders a number of cells and allows you to scroll up and down the list.
Figure 9-5 shows the app in action.

Figure 9-5. Your first table view app
To build this, create a new single view application and call it “tableViewDemo.”
Note If you’ve just jumped into this chapter, we’re going to go over some concepts that were covered in previous chapters. It’s a good idea to go back to Chapter 2 if you haven’t done any development at all, where you’ll learn how to create a simple app and understand concepts like outlets and actions. You’ll probably also want to look at Chapter 5, where we talk about patterns and delegates, which will be used heavily in the table view. Finally, you’ll want to also first read Chapter 8, where we built a custom picker control, which uses many of the same techniques as the table view, but in a more basic manner.
Open the “Main.storyboard ” file and find the “Table View” control. Note that on the control list there is also a Table View Controller, which you do not want. The “Table View” control will look something like that on Figure 9-6.

Figure 9-6. The “Table View” control
Drag and drop this onto your view controller. By default it will snap to fill the entire view. That’s fine. When you’re done, your screen should look like Figure 9-7.

Figure 9-7. Adding the table view
Next, you should open the assistant and make sure that it is showing “ViewController.h.” CTRL-drag a connection from the table view to ViewController.h and drop it just below where it says @interface. Use this to create an outlet called “teamsTable .” See Figure 9-8.

Figure 9-8. Creating the “teamsTable” outlet
This will add an @property line to your ViewController.h . In addition to this, the view controller needs to handle delegate functions (see Chapter 5) and data source functions (see Chapter 8) for the table view. This is done by adding the UITableViewDelegate and UITableViewDataSource to the interface. To do this, you update the ViewController.h like this:
#import <UIKit/UIKit.h>

@interface ViewController : UIViewController<UITableViewDelegate, UITableViewDataSource>

@property (strong, nonatomic) IBOutlet UITableView *teamsTable;

@end
Next, you’ll need to edit your ViewController.m file. First off, in the viewDidLoad function, you should let the ViewController.m file know that it is going to be the delegate and the data source for the teamTable control.
Here’s the code:
- (void)viewDidLoad
{
    [super viewDidLoad];
    // Do any additional setup after loading the view, typically from a nib.
    _teamsTable.dataSource = self;
    _teamsTable.delegate = self;
}
Now you’re ready to add data to the table. To do this, you’ll use an NSArray to hold the data, and the table will read its values from that.
At the top of ViewController.m, just below where it says @implementation, add a declaration of an NSArray called “teamsData .”
@implementation ViewController
NSArray *teamsArray;
Now, in viewDidLoad, you can add data to the teamsArray . This is done with the initWithObjects message that allows you to specify a list of objects, which in this case are strings.
teamsArray = [[NSArray alloc]initWithObjects:
              @"Manchester United",
              @"Manchester City",
              @"Arsenal",
              @"Liverpool",
              @"Chelsea",
              @"Cardiff City",
              @"Aston Villa",
              @"Crystal Palace",
              @"Everton",
              @"Fulham",
              @"Hull City",
              @"Newcastle United",
              @"Norwich City",
              @"Southampton",
              @"Stoke City",
              @"Sunderland",
              @"Swansea City",
              @"Tottenham Hotspur",
              @"West Bromwich Albion",
              @"West Ham United", nil];
You are now ready to build the table. To do this, there are functions that you have to implement because the view controller is set up as a UITableViewDelegate . These are functions that will be called by iOS when it creates the view, and if you implement them you can use them to set up the data.
In fact, if you look at Xcode, you’ll see a warning on your @implementation pointing out that you haven’t implemented these yet. It’s a useful feature that Xcode has to remind you of what you need to do! See Figure 9-9.

Figure 9-9. Warnings about non-implemented functions
The warnings are that you haven’t implemented tableView:numberOfRowsInSection, the function by which iOS will ask your app how many rows of data should be in each section. In this case we only have one section, and the number of rows that the table should have is the number of teams in the teamsArray. The tableView:cellForRowAtIndexPath is called whenever iOS is constructing each cell in the table. You use this to put the contents into each cell, such as text or graphics.
So let’s implement these next.
First, the tableView:numberOfRowsInSection. To do this, go to the bottom of the ViewController.m file, just above @end, start typing –(NSInteger)t, and you’ll see the hint for the function pop up. See Figure 9-10.

Figure 9-10. Adding the numberOfRowsInSection function
Tip If you don’t get the popup as shown in Figure 9-10, don’t worry. This appears to be a bug in Xcode. Simply close and restart Xcode and it should go away. Failing that, double check all your code to make sure that it’s correct.
Press the “tab” key a couple of times to fill out the function and then update it to return the number of teams in the teamsArray, like this:
-(NSInteger)tableView:(UITableView *)tableView numberOfRowsInSection:(NSInteger)section
{
    return [teamsArray count];

}
The tableView:cellForRowAtIndexPath function is a bit more complex. This function is called by iOS for every cell, and it expects you to return a UITableViewCell object. Thus, in the function you’ll need to create this cell.
Note This section is quite complex. Don’t worry if you don’t get it all right away. Just focus on working through the code and getting a working app. Over time, as you repeat these steps in building table views, it will become more natural.
But first things first: let’s create the method. Just above the @end line at the bottom of ViewController.m, start typing –(UITableViewCell *)t, and Xcode will pop up a menu for you. See Figure 9-11.

Figure 9-11. Adding the cellForRowAtIndexPath function
Press the “tab” key a couple of times to fill out the function and add some braces to complete it so that the function looks like this:
-(UITableViewCell *)tableView:(UITableView *)tableView cellForRowAtIndexPath:(NSIndexPath *)indexPath
{

}
First of all, some of the methods that are available on the tableView need you to have an identifier type for the cells. When a view has multiple tableView controls, identifier types are necessary to prevent confusion between the cells, where cell 0 on one table is very different from cell 0 on another. This string is called an “identifier.”
So let’s create a string called “simpleTableIdentifier ” and give it some text to use as an identifier.
static NSString *simpleTableIdentifier = @"TeamCell";
Using “static” in front of the declaration tells iOS that you’re going to use the same string across lots of different calls to this function. It’s a nice way to save memory in a circumstance like this.
Next we want to call the dequeueReusableCellWithIdentifier function on the table view to see if this cell has already been created. You do that with this code:
UITableViewCell *thisCell = [tableView dequeueReusableCellWithIdentifier:simpleTableIdentifier];
This creates a UITableViewCell called “thisCell .” If the cell already exists on the table, then thisCell will be a reference to that. If it isn’t, we’ll need to create a new one. The best way to tell is if thisCell is nil, which it will be if the cell doesn’t already exist:
if(thisCell==nil)
{
}
So if it doesn’t already exist, we’ll need to allocate a new cell within the braces.. When we allocate it, we can initialize the cell in a particular style and specify what its identifier should be. There are a number of different cell styles, but we’ll just use the default one. Here’s the code:
if(thisCell==nil)
{
  thisCell = [[UITableViewCell alloc] initWithStyle:UITableViewCellStyleDefault
                                      reuseIdentifier:simpleTableIdentifier];

}
Later on as we customize cells, you’ll look at different style types. But for now, just use this code. At this point, we know that we have a cell. Either we had one already, or we have the one that we just initialized. Every cell has a textLabel for its text, and this hasn’t been set yet. Next you’ll specify the text for this particular row. If you look at the signature for the function, no row has been passed in, but an indexPath has. When we have a table with multiple sections, the indexPath is the index of the particular section that is being called for now. In this case, we only have one section, so we can get the row for the current call with indexPath.row.
Thus, we can specify the text for this cell using the following:
thisCell.textLabel.text = [teamsArray objectAtIndex:indexPath.row];
Now all you have to do is return thisCell, and the function is complete. Here’s the code:
-(UITableViewCell *)tableView:(UITableView *)tableView cellForRowAtIndexPath:(NSIndexPath *)indexPath
{

    static NSString *simpleTableIdentifier = @"TeamCell";

    UITableViewCell *thisCell = [tableView
        dequeueReusableCellWithIdentifier:simpleTableIdentifier];
    if(thisCell==nil)
    {
      thisCell = [[UITableViewCell alloc] initWithStyle:UITableViewCellStyleDefault
        reuseIdentifier:simpleTableIdentifier];

    }
    thisCell.textLabel.text  = [teamsArray objectAtIndex:indexPath.row];
    return thisCell;
}
Now your table view is complete, so you can run the app, and you’ll see the list of soccer teams! See Figure 9-12.

Figure 9-12. Running your first table view app
And that’s it! You’ve just created your first table view app. In the next section you’ll take a look at how to edit this app to capture whatever the user selected on the table.
Capturing User Selection
In the previous section you built your first table view application. It allowed you to scroll through a list of items, and you could highlight one of them. However, even though it was highlighted, there was no way for you to catch the user selection. In this section you’ll edit the code to handle user selection.
First, resize the table view on your Main.storyboard so that you can add a label. Make it about half the height of the screen, using the arrow as a guide, and drag a “Label” control underneath it. Resize the label to fit the width of the screen. You might see vertical blue lines marking out a recommended margin for the control. See Figure 9-13 for a good placement of the label.
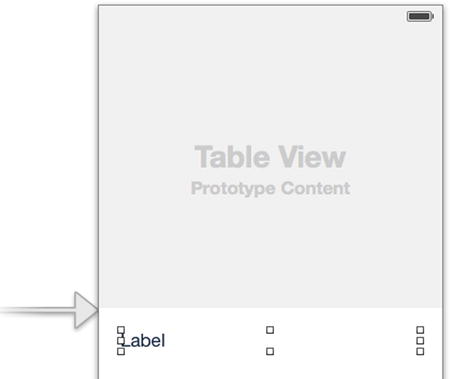
Figure 9-13. Resizing the table view and adding a label
Create an outlet for the label and call it “lblOutput.”
Now, typically when you want to run code in response to an event, you would create an action using the assistant, but, unfortunately, that isn’t supported on the table view, so you need to do it yourself in code. Fortunately, it’s easy enough to do. In a similar vein to the functions that you wrote to set up the table, you can write a method to capture user input.
The method is called tableView:didSelectRowAtIndexPath, and Xcode will assist you in creating it. At the bottom of ViewController.m, above the @end, start typing –(void)t, and the assistant will give you a window of potential options. See Figure 9-14.

Figure 9-14. Adding the tableView event function
You can see that there are lots of potential events here, but you’ll want the didSelectRowAtIndexPath one. You can get this by using your cursor keys to move the highlight down to that method, and press the “Enter” key. The method stub will be created, and you should add some braces to open and close the method too.
-(void)tableView:(UITableView *)tableView didSelectRowAtIndexPath:(NSIndexPath *)indexPath
{

}
If you recall the previous section, when you were creating the cells, you used indexPath.row to tell you what the current row is. You can use that upon row selection too, so you can specify that the lblOutput.text should be the teamsArray object at the index specified by indexPath.row. You can see the code here:
-(void)tableView:(UITableView *)tableView didSelectRowAtIndexPath:(NSIndexPath *)indexPath
{
    _lblOutput.text = [teamsArray objectAtIndex:indexPath.row];
}
Now if you run your application, and select any item, you’ll see the name of the team that you selected loaded into the label. See Figure 9-15.

Figure 9-15. Running your app and handling a selection
Now that you’ve done this, in the next section you’ll take a look at creating tables with multiple sections.
Creating a Multi-Selection Table View
Creating a multi-selection table view is very similar to a single-selection one. You need to make a few tweaks to the control properties and to your code, but they’re pretty straightforward.
To get started, create a new single view app and call it “tableViewMultiSegmentDemo.” Drag and drop a table view component to the design surface. Size it so you have a little space at the top and room for a label underneath. Drag and drop a “Label” control to that space and make it wide enough to hold some text. When done, your design surface should look something like Figure 9-16.

Figure 9-16. Designing the multi-selection table
With the table view selected, take a look at the attributes inspector and make sure that the style property is set to “Grouped,” and the separator property is set to “Single Line.” See Figure 9-17.

Figure 9-17. Setting the table view properties
As in the previous example, create an outlet for the table view and call it “teamsTable.” Also create an outlet for the label and call it “lblOutput.” Finally, make sure that you specify that this view controller will implement the UITableViewDataSource and UITableViewDelegate.
Your ViewController.h should look like this when you’re done:
#import <UIKit/UIKit.h>

@interface ViewController : UIViewController<UITableViewDataSource, UITableViewDelegate>
@property (strong, nonatomic) IBOutlet UITableView *teamsTable;
@property (strong, nonatomic) IBOutlet UILabel *lblOutput;

@end
Earlier you had an NSArray with the data for the single-sectioned table. It makes sense that if you are having more than one section, you can have more than one array in which to store the data. So, in this case we’ll create a table with two sections, one for countries and one for sports.
Thus, we’ll need two NSArray objects, one for each. Declare them below @implementation as before.
@implementation ViewController
NSArray *countriesArray;
NSArray *sportsArray;
Next, in your viewDidLoad function, initialize these and add data to them.
countriesArray = [[NSArray alloc] initWithObjects:
    @"USA",
    @"Canada",
    @"Mexico",
    nil];

sportsArray = [[NSArray alloc] initWithObjects:
    @"Baseball",
    @"Football",
    @"Hockey",
    @"Soccer",
    @"Basketball",
    nil];
Setting the Delegate and Data Source
While you’re editing viewDidLoad, you should put the code in to have the view controller be the delegate and dataSource for teamsTable.
_teamsTable.delegate = self;
_teamsTable.dataSource = self;
Setting the Number of Sections
Next up, you need to specify the number of sections in the table view. Naturally, there’s a function for that, and it’s called (unsurprisingly) numberOfSectionsInTableView . Implement that function and have it return 2, because we want two sections.
Here’s the code:
-(NSInteger) numberOfSectionsInTableView:(UITableView *)tableView
{
    return 2;
}
As before, if you don’t want to type out the whole thing, you can start typing –(NSInteger) n, and Xcode will give you hints to help.
Setting the Number of Rows per Section
In the earlier example, there was only one section in the table, so you could just return the amount of data as the number of rows. However, now we have two sections, so we want one section to have the number of elements in our array of countries, and the other to have the number of elements in our array of sports.
You use the numberOfRowsInSection function as before, but this time you can inspect the section parameter that is passed in. This is zero based, so the first section is number 0, the second is number 1, etc.
Here’s the code:
-(NSInteger)tableView:(UITableView *)tableView numberOfRowsInSection:(NSInteger)section
{
    if(section==0)
    {
        return [countriesArray count];

    }
    else
    {
        return [sportsArray count];
    }
}
As you can see, it’s very straightforward. You just check which section is passed in and return the appropriate array size.
Similarly, when you create a cell in the cellForRowAtIndexPath, you do pretty much the same work as you did for a single-section table. The only big difference is that you have to check which section is selected so you can pick the appropriate text. The parameter that is passed in to the function, indexPath, has a property called “section” that you can check. Thus, based on the value of this property, you can set the text of the cell using the indexPath.row property.
Here’s the code, with the differences between this and the single-section table highlighted:
-(UITableViewCell *)tableView:(UITableView *)tableView cellForRowAtIndexPath:(NSIndexPath *)indexPath
{
    static NSString *simpleTableIdentifier = @"MyCell";
    UITableViewCell *thisCell = [tableView dequeueReusableCellWithIdentifier:simpleTableIdentifier];
    if(thisCell==nil)
    {
        thisCell = [[UITableViewCell alloc] initWithStyle:UITableViewCellStyleDefault reuseIdentifier:simpleTableIdentifier];

    }
    if(indexPath.section==0)
    {
        thisCell.textLabel.text  = [countriesArray objectAtIndex:indexPath.row];

    }
    else
    {
        thisCell.textLabel.text  = [sportsArray objectAtIndex:indexPath.row];

    }
    return thisCell;

}
You’ve now done everything to create the multi-selection table. There’s one more task—catching the user’s selection.
Getting the User’s Selection
As with the previous functions, the indexPath parameter is available to didSelectRowAtIndexPath, and this has a section property. So, in order to know which text was most recently selected, we can take a look at the section property, and then, based on that selection, we know which NSArray to use. And, as before, we can take the correct text using the indexPath.row property, and apply it to the correct array.
Here’s the code:
-(void)tableView:(UITableView *)tableView didSelectRowAtIndexPath:(NSIndexPath *)indexPath
{
    if(indexPath.section==0)
    {
        _lblOutlet.text = [countriesArray objectAtIndex:indexPath.row];

    }
    else
    {
        _lblOutlet.text = [sportsArray objectAtIndex:indexPath.row];
    }
}
Running the App
For your convenience, here’s the complete ViewController.m code:
#import "ViewController.h"

@interface ViewController ()

@end

@implementation ViewController
NSArray *countriesArray;
NSArray *sportsArray;

- (void)viewDidLoad
{
    [super viewDidLoad];
        // Do any additional setup after loading the view, typically from a nib.
    _teamsTable.delegate = self;
    _teamsTable.dataSource = self;

    countriesArray = [[NSArray alloc] initWithObjects:@"USA", @"Canada", @"Mexico", nil];
    sportsArray = [[NSArray alloc] initWithObjects:@"Baseball", @"Football", @"Hockey", @"Soccer", @"Basketball", nil];
}

- (void)didReceiveMemoryWarning
{
    [super didReceiveMemoryWarning];
    // Dispose of any resources that can be recreated.
}

-(NSInteger) numberOfSectionsInTableView:(UITableView *)tableView
{
    return 2;
}

-(NSInteger)tableView:(UITableView *)tableView numberOfRowsInSection:(NSInteger)section
{
    if(section==0)
    {
        return [countriesArray count];

    }
    else
    {
        return [sportsArray count];
    }
}

-(UITableViewCell *)tableView:(UITableView *)tableView cellForRowAtIndexPath:(NSIndexPath *)indexPath
{
    static NSString *simpleTableIdentifier = @"MyCell";
    UITableViewCell *thisCell = [tableView dequeueReusableCellWithIdentifier:simpleTableIdentifier];
    if(thisCell==nil)
    {
        thisCell = [[UITableViewCell alloc] initWithStyle:UITableViewCellStyleDefault reuseIdentifier:simpleTableIdentifier];

    }
    if(indexPath.section==0)
    {
        thisCell.textLabel.text  = [countriesArray objectAtIndex:indexPath.row];

    }
    else
    {
        thisCell.textLabel.text  = [sportsArray objectAtIndex:indexPath.row];

    }
    return thisCell;

}

-(void)tableView:(UITableView *)tableView didSelectRowAtIndexPath:(NSIndexPath *)indexPath
{
    if(indexPath.section==0)
    {
        _lblOutlet.text = [countriesArray objectAtIndex:indexPath.row];

    }
    else
    {
        _lblOutlet.text = [sportsArray objectAtIndex:indexPath.row];
    }
}

@end
That’s everything you need, so run the app and take a look. You can see it running in Figure 9-18.

Figure 9-18. Your multi-selection table
Note There’s a lot more customization that you can experiment with on the attributes inspector for the table. For example, you’ll notice as you run it that you can only have one selection, even though you have multiple sections. To change this, use the selection property on the attribute inspector and set it to “Multiple Selection.”
Using Table Views for Navigation
In many of the examples you saw earlier in this chapter, the “Table View” control was used for navigation as opposed to selection. A visual cue of a small, right-pointing arrow was present in the cells to denote this. In this section, you’ll learn how to create a simple app that provides table view–based navigation in the same way.
Note While this book is for absolute beginners, many of the concepts presented here are more suitable for intermediate level developers. If you’ve held your own this far into the book, you’re doing brilliantly, but don’t worry if some of it goes over your head for the time being. Just keep experimenting and learning, and you’ll understand it in no time at all!
Creating the App
As you work through this section, you’ll create a table navigation app that looks like the one in Figure 9-19. This app presents a table view with three options, and when you select an option, it will navigate to a different view, passing some data as it goes.

Figure 9-19. The navigation app
As you create this app, we’ll touch upon some more details of how storyboards work, as well as of how to use navigational controllers and segues. If these are all new concepts to you, don’t worry—the best way to learn is by doing!
First, create a new single view application and call it “tableViewNavDemo.”
Before going any further, you’re going to add a navigation controller to your app. To do this, open Main.Storyboard, select the view controller, and then go to the “Editor” menu at the top of your screen. Select “Embed In” and then select “Navigation Controller.”
You’ll see that a new navigation controller gets added to your design surface. It might be partially obscuring your original view controller. If so, drag things around until you can see them all. Your screen should look like Figure 9-20.

Figure 9-20. Adding the navigation controller
Note Sometimes it’s a little hard to “grip” the view controller or navigation controller to move them around. If this is the case, simply zoom out using the tool at the bottom of the design surface, move them around, and then zoom back in.
Next, you can add a table view to the view controller screen on the right. Do not add it to the navigation controller. Place it so that it is below the grey bar at the top of the view controller. Size it so that it’s about half the height of your view. See Figure 9-21 for an example.
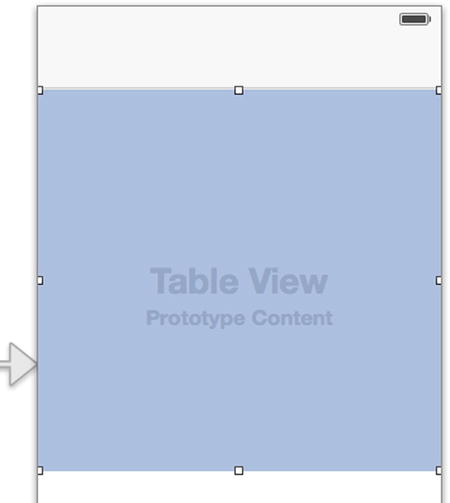
Figure 9-21. Placing the table view on the view controller
With the table view selected, on the attributes inspector, make sure that the “Content” field is set to “Dynamic Prototypes” and change the “Prototype Cells” setting to “1.” See Figure 9-22.

Figure 9-22. Configuring the table view for prototype cells
You’ll notice that once you’ve done this, the design surface changes, giving a space near the top. This is a “Table View Cell” control that you can select and configure. See Figure 9-23.
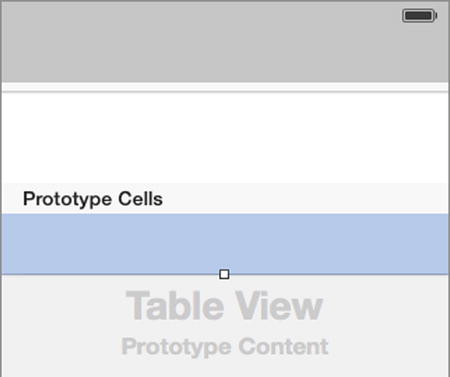
Figure 9-23. The prototype cell
Select it, and you’ll see that it has a set of properties that you can configure in the attributes inspector. A prototype cell is simply a template for how you want the table cells to appear. Having the cell contain an arrow that hints at navigation is configured using the “Accessory” property. You can see this in the attributes inspector if the cell is selected. See Figure 9-24, where we’ve changed the “Accessory” property to “Disclosure Indicator.” You’ll notice that the little arrow appears on the prototype. Also set the “Identifier” text to “navCell.”
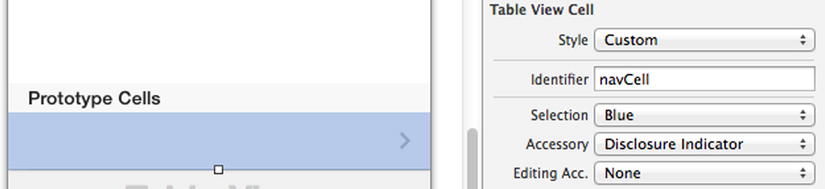
Figure 9-24. Setting the accessory type for the cell
Next, create an outlet for the table view and call it “placesTable.” Make sure that it’s the table that you CTRL-drag onto the assistant, and not the cell. If you do it right you should see the UITableView in the “Type” field for the dialog. See Figure 9-25.
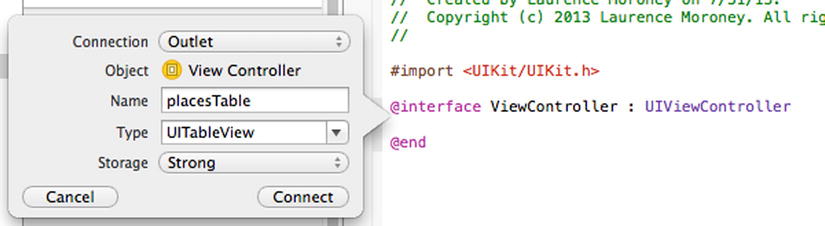
Figure 9-25. Creating the outlet for the table view
While you have the ViewController.h file open, add the interfaces to make the view controller the data source and the delegate for a UITableView.
Here’s the finished code for ViewController.h:
#import <UIKit/UIKit.h>

@interface ViewController : UIViewController<UITableViewDataSource, UITableViewDelegate>

@property (strong, nonatomic) IBOutlet UITableView *placesTable;

@end
In ViewController.m , you’ll need to set up the data for the table, as well as set up the cells of the table and their contents. If you need help with this, go back to the earlier examples in this chapter. Instead of going through all of them step by step here, we’re just going to give the code for ViewController.m. Again, if this isn’t familiar, go back and work through the earlier examples.
Here’s the code:
#import "ViewController.h"

@interface ViewController ()

@end

@implementation ViewController
NSArray *navItems;
- (void)viewDidLoad
{
    [super viewDidLoad];
        // Do any additional setup after loading the view, typically from a nib.
    _placesTable.dataSource = self;
    _placesTable.delegate = self;
    navItems = [[NSArray alloc]initWithObjects:@"Continents",
        @"Countries", @"Cities", nil];
}

- (void)didReceiveMemoryWarning
{
    [super didReceiveMemoryWarning];
    // Dispose of any resources that can be recreated.
}

- (NSInteger)tableView:(UITableView *)tableView numberOfRowsInSection:(NSInteger)section
{
    return [navItems count];
}

- (UITableViewCell *)tableView:(UITableView *)tableView cellForRowAtIndexPath:(NSIndexPath *)indexPath
{
    static NSString *simpleTableIdentifier = @"navCell";

    UITableViewCell *cell = [tableView dequeueReusableCellWithIdentifier:simpleTableIdentifier];

    if (cell == nil) {
        cell = [[UITableViewCell alloc] initWithStyle:UITableViewCellStyleDefault reuseIdentifier:simpleTableIdentifier];
    }

    cell.textLabel.text = [navItems objectAtIndex:indexPath.row];
    return cell;
}

@end
Do take note that the simpleTableIdentifier text should match what you configured in the prototype cell back in Figure 9-24, which was, in this case, “navCell.”
Now, if you run the app, you should see your table view with three cells, but you can’t do much. Earlier you added the navigation controller. In the next section you’ll see how it works.
Using a Navigation Controller
A navigation controller, as its name suggests, manages navigation between different views. Think of it like a traffic cop who controls everything when a traffic light is out. The navigation controller is in charge of keeping tabs on who is where, and, when you move forwards or backwards in navigation, that the right views get displayed.
Go to your storyboard, and, on the “Controls” list, find the view controller. It should look something like Figure 9-26.

Figure 9-26. The view controller control
Drag this and drop it to the right of the existing view controller. Then, pick the prototype cell that you created earlier and CTRL-drag it to the new view controller that you just dropped.
A menu with a number of options will pop up. See Figure 9-27.

Figure 9-27. Configuring the segue
Under “Selection Segue,” select “push.” When you’re done, you should see a connector between the views, and your Main.storyboard should look something like Figure 9-28.

Figure 9-28. Navigation controller storyboard
Select the main view controller (the one in the middle in Figure 9-28) and select the grey bar at the top. Open the attributes inspector, and you’ll be able to create a title for the navigation item. Set the “Title” field to “Places I’ve Been.” See Figure 9-29.

Figure 9-29. Setting navigation item title
Select the view controller on the right and do the same, then set the title to “Details.” When you’re done, the designer should look something like Figure 9-30.
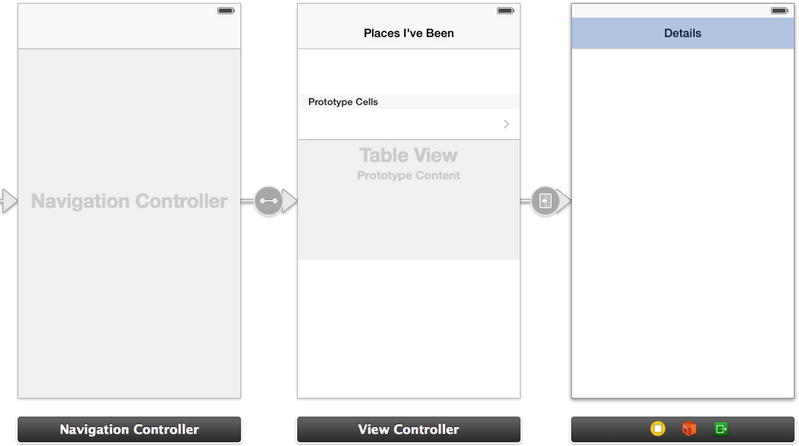
Figure 9-30. Adding the navigation titles
Now, if you run your app and select one of the items in the menu, you’ll see that the screen will navigate to the details screen, and a button labeled “<Back” will appear at the top of the screen, allowing you to return to the menu. See Figure 9-31.

Figure 9-31. Running the app
Congratulations if you’ve made it this far! This was your first foray into using navigation across multiple views. In the next section, you’re going to take it a little deeper, and we will show how you can pass data to a view. In this case, all three menu items point to the same view, so we need to distinguish each view somehow. If you are sharing a view across different navigational items, which is perfectly fine, you’ll just need to tell the view which item called it, so it can respond in kind. You’ll see that in the next section.
Passing Data to a View
In every example you’ve worked through so far, you had a single view and a class called ViewController that had the code and the data for that view. For the navigation app, you added a second view, but that view doesn’t have a class behind it.
So, let’s go and create that class now. From the File menu at the top of the screen, select “New” and then select “File.” You’ll see a dialog that asks you to select a template for your new file. See Figure 9-32.
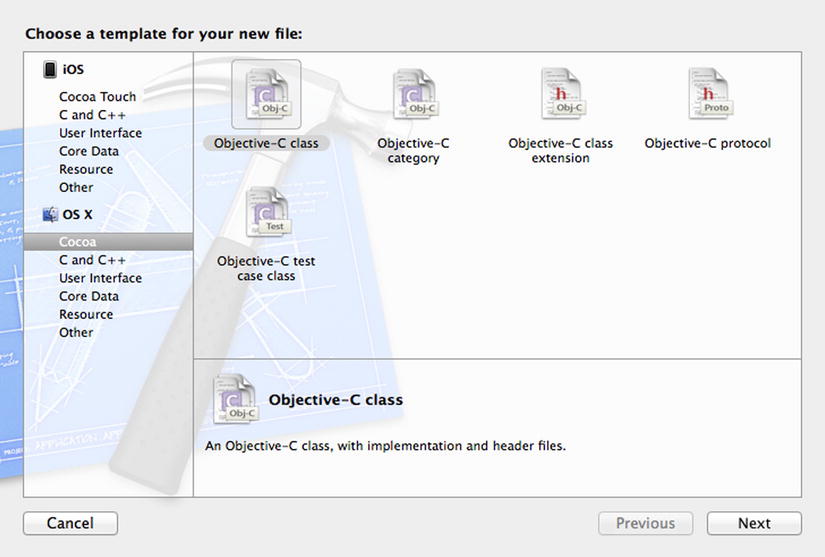
Figure 9-32. Creating a new file
Select “Objective-C “class as in Figure 9-32, and select “Next.” On the next screen, give your class the name “TravelDetailsViewController” and make sure that it is a subclass of UIViewController, as shown in Figure 9-33. Make sure also that “With XIB for user interface” is unchecked, if you can see it.

Figure 9-33. Adding the class for the details screen
Click “Next” and then click “Create” to create the class. Now return to Main.storyboard and select the details view controller. It should be the one on the right. On the inspector window, select the third icon from the left to open the identity inspector. There, change the “Class” setting to read “TravelDetailsViewController.” If you can’t see “TravelDetailsViewController” on the list, make sure that the view controller, and not the view, is selected on storyboard view. You should see a bold blue outline around it, like in Figure 9-34.
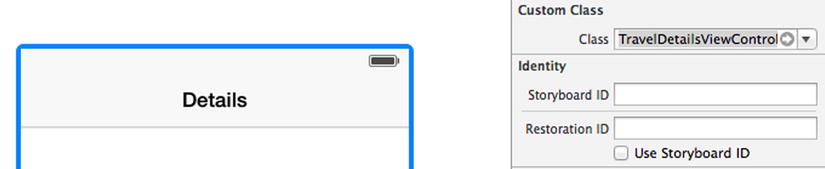
Figure 9-34. Setting the custom class for the details view
Now, add a label to the details view and make it large enough to hold some text. Make it the width of the screen (less some sensible margins as guided by the storyboard editor) and tall enough to hold three to four lines of text. Create an outlet for the label and call it “lblOutput.” When you create the outlet, make sure that you are dragging to TravelDetailsViewController.h and not ViewController.h
.Next, manually add a property by typing the code below into TravelDetailsViewController.h immediately beneath where the outlet was created. Ensure that it is above the line that reads @end.
@property (nonatomic, strong) NSString *navItemName;
This property will be a piece of data that other classes can read and write to. It’ll be used when we navigate to the details view, and the navigation item from the menu screen will set it. You’ll see that shortly.
Here’s the entire TravelDetailsViewController.h, for your convenience:
#import <UIKit/UIKit.h>

@interface TravelDetailsViewController : UIViewController
@property (strong, nonatomic) IBOutlet UILabel *lblDetails;
@property (nonatomic, strong) NSString *navItemName;
@end
In TravelDetailsViewController.m , you’ll need to do something called “synthesizing” the navItemName property that you just created. This makes the property available for getting and setting its value from outside this class.
Just below @implementation, use the following code:
@synthesize navItemName;
Finally, you’ll need to set the contents of the label to this property when the view loads. Here’s the code:
-(void)viewDidLoad
{
    [super viewDidLoad];

    _lblOutput.text = navItemName;
}
To recap: The TravelDetailsViewController now exposes a property called navItemName. Any code that uses this class can write to that property. When the view loads, that property will be read, and its contents will be loaded into the label.
To do this, go back to the Main.Storyboard and select the segue between the table view and the details view. On the attributes inspector, you’ll see settings for “Storyboard Segue.” See Figure 9-35.
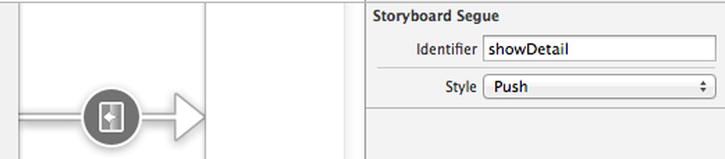
Figure 9-35. Naming the segue
Give the segue the name “showDetail,” as shown in Figure 9-35.
In ViewController.m, there are a couple of things you’ll need to do.
First, as you are going to be using the TravelDetailsViewController class that you created earlier, you need to tell ViewController.m about it. This is done using the #import function, which you point at TravelDetailsViewController.h and place at the top of the file, above where it says @interface.
#import "TravelDetailsViewController.h"
Next, you’ll need to implement the prepareForSegue method. This gets called as iOS does the transition to the next screen in the navigation. It’s the ideal place for us to set our data.
Here’s the code:
-(void)prepareForSegue:(UIStoryboardSegue *)segue sender:(id)sender
{
    if([segue.identifier isEqualToString:@"showDetail"])
    {
        NSIndexPath *indexPath = [_placesTable indexPathForSelectedRow];
        TravelDetailsViewController *deetsController = segue.destinationViewController;
        deetsController.navItemName = [navItems objectAtIndex:indexPath.row];
    }
}
Your app may have many segues, so the one that triggered this function is passed into the function with a pointer called “segue.” This has a property called “identifier,” which, if it is set to “showDetail,” we’ll know that it’s the segue that links to the detail view. Look back to Figure 9-35 where you named the segue.
Once we have the right segue, we can get our indexPath by looking at what the indexPath is for the selected row. This is the same type of indexPath that you used when setting up the table view, and it contains information about the section and row of the presently selected item.
We then create an instance of the TravelDetailsViewController class that we call deetsController. We can set its navItemName property to the item from our navItems array that corresponds to the currently selected item. And as you saw in the viewDidLoad function for TravelDetailsViewController, when this property is set it will load its contents into the label and render them.
Run the app and you’ll see this. See Figure 9-36, where “Continents” was selected to trigger the detail view for continents.

Figure 9-36. Navigating to the details view with data
Typically items that are grouped in the same section of a table will have similar views, but the view itself handles rendering the appropriate data. An example like this one shows how to pass the data, and the view itself is simple. In real-world apps, this might be used to trigger a data query for different data sets that would be rendered on the view, but, for learning purposes, hopefully this has been a good demonstration of what’s possible!
Summary
In this chapter you were introduced to the table view control. You saw a number of scenarios where it can be used, before going rolling up your sleeves and building three sample apps that use the table view. The first rendered a simple list, the second a multi-sectioned list, and the third showed how to use the table view for navigation, as many settings screens on your iOS device do.
You’ve barely scratched the surface of what’s possible with this very powerful and very complex control, but hopefully it was enough to whet your appetite and get you building some more!
In the next chapter we’re going to have a small change of pace and take a look at the map control that puts maps into applications!