C H A P T E R 12
![]()
Working with Text Files
Windows views text files as just another file type, but to Ubuntu (and to the whole Linux family in fact), they are the very fabric of which the system is made. Configuration files and program documentation are stored as plain text. This is clearly different from Windows, where any information you're supposed to read will likely be contained in a Windows help file, a rich text format (RTF) file, or even a Microsoft Word document.
So important are text files to Linux that for a long time you could have been caught in a heated debate . . . over which text editor was the best! And while traditionally text files were managed with command-line tools and text editors, the focus of this chapter is on introducing graphical tools such as gedit. No doubt one day you will get to grips with command-line text editors such as Vim, Emacs, or even both—but right now the thing is to get you up and running with Lucid Lynx!
It's worth mentioning that text files under Linux usually don't have a file extension. Unlike with Windows or other OSs, the .txt file extension is rarely used. Sometimes a .conf extension is added to plain text configuration files, but more often text files have no extension at all.
Text: A History Lesson
Given this reliance on text and text files, it has always been very important for Linux administrators and power users alike to have powerful text-manipulation tools at their fingertips.
![]() Tip Most program
Tip Most program README files, along with other assorted documentation, can be found in a directory named after the program in question within the /usr/share/doc directory.
Piping and Redirecting
When you execute a command in a terminal window (which was—and for many people still is—an everyday task), output is usually produced in the form of a text stream. So the same techniques that apply to text files can be also used on this output, with a simple operation called piping. Piping is the process of sending the output of a command as the input for another command, usually a text-manipulation tool. That output is then manipulated as if it were a file. Powerful!
We'll illustrate this with an example using grep. grep is a tool that takes text as its input, searches and tries to match a regular expression or piece of text, and prints the lines that contain that regular expression or text. If you issue the following command in a terminal window (which you can open through Applications ![]() Accessories
Accessories ![]() Terminal):
Terminal):
grep Linux operatingsystems.txt
grep will look for the text “Linux” in the file operatingsystems.txt and print only the lines that contain that text. So grep works with text files to filter lines in a file based on criteria you set.
But what if you want to do the same thing not to a text file, but to the output of a command? You use piping, which is expressed by the character |. It instructs a command to send its output to another command (and to the second command to take that as its input). For example, if you want to find a particular process—say, the process gedit (processes are listed with the ps command)—you'd type the following at the command line:
ps -d | grep gedit
This command will show you information about the gedit process (if it is running).
Another way of attaining a similar end is by means of redirecting—expressed with the character >. Redirecting means sending the output of a command to a text file. So the preceding task could be fulfilled by executing two commands: one for listing process information (and redirecting its output) and the other to display only the lines that pertain to a certain process:
ps -d > processes.txt


grep gedit processes.txt
STANDARD INPUT AND OUTPUT
As shown in Table 12-1, there are a number of text-manipulation tools that are not only useful, but that make you love them once you get to know them. The power behind grep, sed, or AWK is hardly replaced by graphical interfaces or fancy touchscreens. These tools can be imitated, but never replaced. Like many other features of Linux, they have been inherited from UNIX. Just as a reference, let's introduce you to some of these tools; should you ever become an Ubuntu guru, you'll learn how to use them in more depth and you'll become a huge fan. Guaranteed!
Table 12-1. List of Traditional Text-Manipulation Tools
| Command | Description |
grep |
The grep command searches for regular expressions or text patterns in a text file or command output, and prints only matching lines. The name is derived from “global/regular expression/print.” Use grep if you want to filter lines based on the presence of a word. |
sed |
Short for “stream editor,” as its name implies, this transforms a text stream based on specified rules and criteria. Use sed if you want to search and replace a word in a text file or modify the output of a command. |
awk |
AWK, whose name derives from the family names of its creators (Alfred Aho, Peter Weinberger, and Brian Kernighan), is a powerful text-manipulation programming language. As Alfred Aho puts it, “AWK is a language for processing files of text. A file is treated as a sequence of records, and by default each line is a record. Each line is broken up into a sequence of fields, so we can think of the first word in a line as the first field, the second word as the second field, and so on. An AWK program is of a sequence of pattern-action statements. AWK reads the input a line at a time. A line is scanned for each pattern in the program, and for each pattern that matches, the associated action is executed.” It is used, for example, to print specified columns of a text file. |
cat |
This is a UNIX command used to display and concatenate text files. You can, for example, merge two text files into a third file. |
head |
This is used to display just the first lines of a text file. |
tail |
This is used to display just the last few lines of a text file. |
more |
This is a command-line utility used to display the contents of a text file one screen at a time. |
less |
This command lets you move backward in the document. |
sort |
This tool is used to sort the lines in a text file or stream in forward or reverse order. |
diff |
This tool is used to compare two text files and print the differences between them. It's useful if you are comparing, for example, two versions of the same source code. |
![]() Note The
Note The less and more commands are sometimes known as pagers because of their ability to let you scroll through pages of text. You might still hear them referred to as such in the wider Linux community, although the term has fallen out of use.
Bash is an incredibly capable tool when it comes to text manipulation, and some of its tool set offers modest word processing–like functionality. It's no wonder that some people live their lives working at the Bash prompt and have no need of sophisticated GUI tools!
Table 12-2 lists some more text-processing tools that you can use on the command line. Along with the commands are listed any command options needed to make them work in a useful way. Some commands rely on redirection and piping, which were explained earlier in this chapter.
![]() Note Most text-processing tools under Bash were created for programmers, so some options might seem a little odd when you read the man pages. However, all the tools are extremely flexible and offer functions for every kind of user.
Note Most text-processing tools under Bash were created for programmers, so some options might seem a little odd when you read the man pages. However, all the tools are extremely flexible and offer functions for every kind of user.
Table 12-2. Useful Text-Processing Commands
If none of this makes sense to you, it doesn't matter, because you will seldom need to use this knowledge for everyday tasks. But it is an interesting insight to know that there's more to Linux than meets the eye!
The Text Editor Wars
A variety of text editors can be used within the shell, but three stand out as being ubiquitous: ed, Vim, and Emacs. The first in that list, ed, is by far the simplest. That doesn't necessarily mean that it's simple to use or lacks powerful features, but it just doesn't match the astonishing power of both Vim and Emacs. To call Vim and Emacs simple text editors is to do them a disservice, because both are extremely powerful interactive environments. In particular, Emacs is considered practically an OS in itself, and some users of Linux treat it as their shell, executing commands and performing everyday tasks, such as reading and sending e-mail from within it. There are entire books written solely about Emacs and Vim.
![]() Tip A fourth shell-based text editor found on many Linux systems is nano. This offers many word processor–like features that can be helpful if you've come to Linux from a Windows background.
Tip A fourth shell-based text editor found on many Linux systems is nano. This offers many word processor–like features that can be helpful if you've come to Linux from a Windows background.
The downside of all the power within Emacs and Vim is that both packages can be difficult to learn to use. They're considered idiosyncratic by even their most ardent fans. Both require the user to learn certain unfamiliar concepts, as well as keyboard shortcuts and commands.
Although there are debates about which text editor is better and which is best, it's generally agreed that Vim offers substantial text-editing power but isn't too all-encompassing. It's also installed by default on Ubuntu. On Ubuntu, Emacs must be installed as an optional extra. Both text editors are normally available on virtually every installation of Linux or UNIX. We'll concentrate on using Vim here.
It's important to understand that Vim is an update of a classic piece of software called vi. In fact, there are many versions and updates of vi. The original program, once supplied with UNIX, is rarely used nowadays. Vim is the most commonly used clone; Vim stands for vi improved. Another version is elvis (http://elvis.the-little-red-haired-girl.org). However, most people still refer to Vim and elvis as vi, even though they are entirely new pieces of software.
![]() Note There used to be a constant flame war between advocates of vi and Emacs, as to which was better. This could be quite a vicious and desperate debate, and the text editor you used was often taken as a measure of your character! Nowadays, the battle between the two camps has softened, and the Emacs vs. vi debate is considered an entertaining cliché of Linux and UNIX use. When users declare online which text editor they prefer, they often include a smiley symbol to acknowledge the once-fevered emotions.
Note There used to be a constant flame war between advocates of vi and Emacs, as to which was better. This could be quite a vicious and desperate debate, and the text editor you used was often taken as a measure of your character! Nowadays, the battle between the two camps has softened, and the Emacs vs. vi debate is considered an entertaining cliché of Linux and UNIX use. When users declare online which text editor they prefer, they often include a smiley symbol to acknowledge the once-fevered emotions.
Working with Text Files
Fortunately, you don't need to learn how to use those tools if you don't feel like it, because Ubuntu comes equipped with a powerful, and yes, graphical, text-editing tool: gedit. gedit is in fact the default text editor for the GNOME desktop environment, so you can find it in other distributions of Linux such as Fedora and SUSE.
Introducing gedit
The basic interface of gedit, as you can see in Figure 12-1, is quite similar of that of Notepad, and in many regards the two applications work very much alike. But gedit has some salient features, such as plug-in support, that raise it above the crowd of simple text-editing tools like Notepad. You'll see that there are a lot of available plug-ins for gedit that will enable you to do things you can only dream of doing with other text editors. In this respect, it is a tool that honors the history of Linux; it isn't just a simple GUI replacement for Vim or Emacs.

Figure 12-1. gedit: A simple yet powerful graphical text editor
One of the neat features is the ability to work with tabs, just like in your favorite web browser. Each tab is an open text file. So when you are, for example, writing a script or taking notes, you can have Don Quixote, the classic novel by Spanish writer Miguel de Cervantes Saavedra, open in another tab to take short breaks from work!
The gedit window has the following elements:
Menubar: The menubar gives you access to all gedit commands.
Toolbar: Using the toolbar you can perform common tasks such as creating, opening, and saving text files.
Display area: The display area is where the action is! This is where the text is actually displayed.
Statusbar: The statusbar, shown at the bottom of the window, displays information about current activity and contextual menus.
Side Pane: The side pane displays a list of open documents, and other information depending on which plug-ins are enabled. By default, the side pane is not shown. To show it, choose View
Side Pane.
Bottom Pane: The bottom pane is used by some programming-related plug-ins to display its output. By default, the bottom pane is not shown. To show it, choose View
To start gedit, simply go to Applications ![]() Accessories
Accessories ![]() gedit Text Editor, or right-click a text file and select “Open with gedit.” It is also very likely that if you double-click a text file it will automatically be opened with gedit.
gedit Text Editor, or right-click a text file and select “Open with gedit.” It is also very likely that if you double-click a text file it will automatically be opened with gedit.
Opening gedit with those methods assumes that you will edit the file with your everyday user account. But what if you want to edit a configuration file to which only superusers have access? Normal users will only be able to open it in read-only mode, meaning that they will be unable to save the changes they make. To edit configuration files, press Alt+F2 to invoke the Run Command dialog box and type gksu gedit in the text field. After entering your password, gedit will open with root-like privileges.
The basic operations are simply explained. You have the buttons on the toolbar and the options in the menus. To create a new file, just click File ![]() New, and a new tab will be created with a blank document (the same happens if you click the New button on the toolbar). To open an existing file, click File
New, and a new tab will be created with a blank document (the same happens if you click the New button on the toolbar). To open an existing file, click File ![]() Open…, and a dialog box will let you browse for the text file to open. Finally, click File
Open…, and a dialog box will let you browse for the text file to open. Finally, click File ![]() Save to store the results of your work to the disk.
Save to store the results of your work to the disk.
Once you have the desired file in your display area, you can begin to work as with any text editor. You can write new text, select chunks of text and copy it to the clipboard, or paste text from other sources. You cannot apply formatting to parts of the file, since gedit is only a text editor, not a word processing tool such as OpenOffice.org's Writer. What you save are text files, and because of this gedit is fully interoperable with Notepad.
gedit saves the history of recently opened files, which you can see by expanding the File menu or clicking the small arrow next to the Open button in the toolbar. If you click a file, it will open once again.
Working with gedit
Working with gedit is just a matter of entering text in the display area and saving the file from time to time. While simple, it does offer plenty of options that can make your tasks easier and more enjoyable.
The menubar gives you access to all the operations that can be performed with gedit. Table 12-3 lists all the options available in the menubar. You can open a test file and play a little with those options to familiarize yourself with them. You can also use the Personalize dialog box to modify the program's general behavior.
Table 12-3. The Menubar Options
It is worth noting that sometimes additional options will be available at each menu. It depends on which plug-ins you have enabled. Plug-ins, which are fully explained later in this chapter, extend the basic functionality of gedit, allowing you to do more. They can also extend the basic interface—for example, creating a new menu called Tools. So gedit is very extensible.
The Preferences dialog box, which you can access through the Edit menu, allows you to change how text is displayed, and to enable or disable plug-ins. There are four different tabs in the dialog box:
View: The View options allow you to configure how text is displayed.
- Text Wrapping: Select the “Enable text wrapping” option to have long lines of text flow into paragraphs instead of running off the edge of the text window. This avoids having to scroll horizontally. Select the “Do not split words over two lines” option to make the Text Wrapping option preserve whole words when flowing text to the next line. This makes text easier to read.
- Line Numbers: Select the “Display line numbers” option to display line numbers on the left side of the gedit window.
- Current Line: Select the “Highlight current line” option to highlight the line where the cursor is placed.
- Right Margin: Select the “Display right margin” option to display a vertical line that indicates the right margin. Use the “Right margin at column” spin box to specify the location of the vertical line.
- Bracket Matching: Select the “Highlight matching bracket” option to highlight the corresponding bracket when the cursor is positioned on a bracket character.
Editor: The Editor options allow you to configure how text is edited and to automatically backup files.
- Tab Stops: Use the Tab Width spin box to specify the width of the space that gedit inserts when you press the Tab key. Select the “Insert spaces instead of tabs” option to make gedit insert the specified number of spaces instead of a tab character when you press the Tab key.
- Auto Indentation: Select the “Enable auto indentation” option to make the next line start at the indentation level of the current line.
- File Saving: Select the “Create a backup copy of files before saving” option to create a backup copy of a file each time you save the file. The backup copy of the file contains a ~ at the end of the filename. Select the “Autosave files every … minutes” option to automatically save the current file at regular intervals. Use the spin box to specify how often you want to save the file.
Font & Colors Preferences: The options on this tab allow you to specify the font in which text is displayed, and the color of the text and background.
- Font: Select the “Use default theme font” option to use the default system font for the text in the gedit text window. The “Editor font” field displays the font that gedit uses to display text. Click the button to specify the font type, style, and size to use for text.
- Color Scheme: You can choose a color scheme from the list of color schemes.
Plugins: Plug-ins are very powerful features that enable you to turn on or off certain advanced features of gedit. They are configured by selecting the check box next to the plug-in name in the Active Plugins list. The complete list of default plug-ins is given in Table 12-4.
Table 12-4. List of Default Plug-Ins
| Plug-In | What It Does | How To Use It |
| Change Case | Changes the case of the selected text | When enabled, the option Change Case is added to the Edit menu. Choose it to change the case of the selected text. |
| Devhelp Support | Displays context-sensitive help from development manuals | When enabled, you can select text and press F2 or click Tools |
| Document Statistics | Displays statistics about the current document and selected text | Select the option Tools |
| External Tools | Executes external tools and sends the output to the file | You can use the default external tools available from the Tools ls -l, the output of that command will be sent to the text file. You can also create your own external tools. |
| File Browser Pane | Adds a file browser to the side pane | Enable the side pane in the view panel. A folder icon will be displayed at the bottom showing a new tab with the places on your hard disk. Browse to the file you want to open and double-click it. |
| Insert Date/Time | Inserts the date and time into the text | Select the place where you want to insert the date and time, and click the Edit |
| Modelines | Allows you to set editing preferences for individual documents, and supports Emacs-, Kate-, and Vim-style modelines | Insert the modelines for Emacs, Kate, or Vim at the start or end of the document. Preferences set using modelines take precedence over the ones specified in the Preferences dialog. |
| Python Console | Transforms the bottom panel into an interactive Python console | Enable the bottom panel in the View menu. |
| Quick Open | Lets you open documents in your Home directory very quickly | Select the File |
| Snippets | Allows you to store frequently used pieces of text, called snippets, and insert them quickly into a document | You manage snippets through the Tools |
| Sort | Sorts selected lines alphabetically (based on ASCII codes) | Select the lines and click the Edit |
| Spell Checker | Allows you to search the document for spelling errors and correct them | Go to the Tools menu and either choose to check the spelling immediately or enable the automatic spell-checker. You can also set the language. |
| Tag | Provides a method to easily insert commonly used tags/strings into a document without having to type them | Go to View |
| Text Encryption | Performs encryption operations on text | Select the text to encrypt and go to Edit |
As you can see, gedit includes by default a lot of useful plug-ins. But what would be the use of plug-ins if they were not extensible? As you might expect, there are a lot more plug-ins available both at the official Ubuntu repositories and from alternative sources.
Additional plug-ins are available, for example, in the package gedit-plugins, which you can install by using the Ubuntu Software Center. Third-party plug-ins are available from several sources as well. You can check the page http://live.gnome.org/Gedit/Plugins for information about available plug-ins.
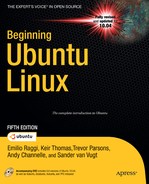
Comparing Multiple Files with Diffuse
Another graphical tool that can come in very handy at times is the Diffuse Merge Tool. It combines many of the functionalities already seen in command-line tools such as paste of diff. It lets you, for instance, compare line-by-line two or even three text files, and it spots the differences for you so you can merge the contents of a file into the other. It's very useful if, for example, you are comparing two versions of a program's source code—or if you're a teacher, two exams from different students.
Diffuse is not installed by default, but is easy to get. Simply open the Ubuntu Software Center and search for “Diffuse.” The Diffuse Merge Tool will be the first on the list, so simply click Install and wait (for more details about software installation, see Chapter 20). The Diffuse application launcher is available from Applications ![]() Programming.
Programming.
As you can see in Figure 12-2, Diffuse divides the main pane into two or three windows to enable side-by-side comparison of text files, and highlights the lines with differences.
Figure 12-2. The Diffuse Merge Tool combines the power of many command-line tools.
The third element in the main pane, at the right of the documents, is the comparison summary. The summary shows all the documents, and illustrates which lines have differences (in red) and which have been manually edited (in green). You can move from one section of the documents to another simply by moving the location bar in the comparison summary.
Once you've reviewed the differences, you can choose to modify one of the files in accordance to the other. Use the buttons on the toolbar to copy text from one document to the other. The name of modified documents will be appended with an asterisk (*) at the end; this means that the file has been changed since the last save. Make sure you save your files from time to time to avoid losing your work.
Summary
In this chapter, we showed how text files can be manipulated. In many ways, the Bash shell is built around manipulating text, and we presented various tools created with this goal in mind. We then talked about how text file editors were once the most important applications for Linux users.
With Ubuntu, the need for everyday use of such tools is greatly reduced. Nonetheless, Ubuntu includes a powerful and expandable text editor: gedit. It comes out of the box with many features not found in its Notepad counterpart, and new plug-ins are added to the list all the time. In conjunction with the Diffuse Merge Tool, it covers most of your needs for text file manipulation.