
C H A P T E R 14
![]()
Communicating with Others
Being online is all about staying in touch, and Ubuntu is no slouch in this regard. Ubuntu offers a wide range of applications, including a full-featured e-mail program, called Evolution, as well as an instant messaging client called Empathy, which allows you to connect to the most popular instant messaging sites, such as GTalk and MSN.
You can install a Skype client that allows you to connect to the popular service to make voice and video calls to other Skype users or to telephones; and you can install an open source alternative to Skype called Ekiga.
Introducing Evolution
Evolution is considered the “official” GNOME desktop e-mail program, and the Evolution interface retains the same look and feel as many elements of the Ubuntu desktop.
Evolution is similar to Microsoft Outlook: in addition to being a powerful e-mail client, it incorporates contact management, a calendar, a to-do list, and a memo function. It is a first-class business tool. Evolution is even able to connect to Microsoft Exchange (2000 and later) groupware servers and synchronize with contact and calendar data, in addition to fetching e-mail. Of course, it can also connect to standard POP3/SMTP e-mail servers, as well as IMAP, Novell GroupMail, and a handful of other mail server technologies. This means it is compatible with practically every e-mail system in common use today.
Evolution consists of five components: Mail, Contacts, Calendars, Memos, and Tasks. These are interconnected but operate as separate modes within the program. Each mode can be selected by using the switcher located at the bottom-left side of the program window. Simply click the button for the mode you wish to use. The program window, toolbar, and menu system will change to accommodate whichever mode is selected. Figure 14-1 shows the program in the default Mail mode.
![]() Tip You can shrink the switcher component to small icons or even just text buttons by selecting from the choices on the View
Tip You can shrink the switcher component to small icons or even just text buttons by selecting from the choices on the View ![]() Switcher Appearance submenu.
Switcher Appearance submenu.

Figure 14-1. You can switch between Evolution's modes by clicking the buttons at the bottom left of the program window.
The five Evolution modes work as follows:
Mail: The e-mail component is at the heart of Evolution, and all the functions you might be used to are available here. After the Mail mode is selected, you'll find the mail folders at the top left of the program window. These include the Inbox and Sent folders, along with any other mail folders you create. On the right is the list of e-mail messages, and beneath this is the message preview pane, where the body of any message you select will be displayed. Above the message list is the search box, which works like most e-mail search routines: type the relevant word(s) and press Enter. Notable icons running along the top of the window include the New button, which will let you compose an e-mail message, and the Send/Receive button, which will download new messages and also send any messages in the Outbox folder. By default, Evolution checks for new mail when the application is launched and every 10 minutes thereafter, though this behavior is configurable for each account under the Edit
Preferences menu.
Contacts: Tied in with the mail function but acting as a separate and powerful entity on its own, Contacts mode lets you store every pertinent detail about colleagues, friends, and others. After the mode is selected, you'll see the various contact folders at the left side of the program window. For most users, there will be just one, named Personal, but if you specified a groupware server during setup, you will also be able to connect to this by clicking its entry. You can also create new address books (e.g., if you have a collection of addresses for work and one for personal information). Simply right-click beneath the existing address book, select the New Address box, and fill out the form. The type On This Computer will create a new book on your machine. At the top right is the list of contacts. Clicking any contact displays that individual's information at the bottom of the window, in the contact information area. The search bar at the top of the window, beneath the toolbar, lets you quickly search for contacts by name. The New button on the toolbar lets you create a new contact, where you can enter a wealth of data. To edit an existing entry, double-click its entry and fill in the additional details. This kind of information is useful for a variety of tasks, so it's particularly useful that Evolution's Contacts mode can be used as a data source in OpenOffice.org.
Calendars: Calendars mode is arguably Evolution's second most useful function (after e-mail). You can add events in half-hour increments and view your schedule in day, week, work week, and month views by clicking the relevant button on the toolbar (work week view presents just five days in the view). After the mode is selected, you'll find the various calendars you can access at the top left of the program window. For most users, the Personal calendar will be the principal one, but you can also access shared calendars, including Google Calendar, here. Assuming the default day view is in operation, beneath this you'll see the monthly calendar and, in the middle of the program window, the appointment list, with half-hour entries covering the working day. By default, the current day is shown. To select a different day, simply double-click the day in the month view or click the Go To button on the toolbar and use the widget to find the date. You can switch among day, week, and month appointment views by clicking the labeled buttons on the toolbar. On the right of the window, any tasks or memos that have been created are displayed, as described next.
Memos: The best way to think of Evolution's Memos mode is as a personal notepad. After Memos mode is selected, the list of memos will appear on the right side of the screen, and the memo contents will appear at the bottom. Memos can consist of virtually any amount of text, along with attachments. They're ideal for jotting down notes during phone calls, for example. Again, you can use the list on the left pane of the application to create categories for memos (e.g., you can break things down by client, job, or interest).
Tasks: Effectively, this is a simple to-do list. After the mode is selected, your tasks will be listed on the right side of the program window. Beneath this will be details of any selected task. If you're a fan of the Getting Things Done method of task management, the left-pane Tasks list is the ideal companion because you can create lots of lists and then populate the main window with tasks to be accomplished.
Basic E-Mail Tasks
Evolution's e-mail functionality is arguably the heart of the program. Although it offers many features, it is quite simple to use. If you've ever used any other mainstream e-mail client, such as Microsoft Outlook, you have a head start.
This section describes how to accomplish several everyday tasks within the e-mail component of Evolution. When you start Evolution, the e-mail mode is selected automatically. However, if it isn't, or if you've switched to a different mode within the program, simply click the Mail button at the bottom left of the program window.
Configuring E-Mail Access
Before starting, you'll need to find out the addresses of the mail servers you intend to use. In the case of POP3 and IMAP mail accounts, you'll need to know the incoming and outgoing server addresses (outgoing may be referred to as SMTP). In the case of Microsoft Exchange, you'll need to know the Outlook Web Access (OWA) URL and, optionally, the Active Directory/Global Address List server. With Novell GroupWare, you'll simply need to know the server name. You'll also need to know your username and password details for the incoming and possibly outgoing mail servers.
After gathering the necessary information, follow these steps to configure Evolution:
- Start the Evolution e-mail client by clicking the little envelope beside the date and time, and selecting the Set Up Mail option. Alternatively, you can choose Applications Office Evolution Mail and Calendar.
- When Evolution starts for the first time, you'll be invited to enter your configuration details via a wizard. Click the Forward button.
- The next screen offers an option to restore Evolution settings from backup. This is a convenient option for migrating accounts from one Evolution client to another. Because this is your first time using Evolution, you can simply ignore this option by clicking the Forward button.
You will be asked for your name and the e-mail address you wish to use within Evolution. These are what will appear in outgoing messages. Beneath this is a check box that you should leave selected if you want the account you're about to create to be the default account. In nearly all situations, this will be the correct choice. You can also fill in the Reply-To and Organization information if you wish, but these fields can be left blank. They're not usually displayed by most e-mail clients. Click the Forward button to continue.
- The next screen asks for details of the receiving (incoming) mail server that you want to use, as shown in Figure 14-2. First, select the server type from the drop-down list. If you don't know which option to go with, select POP. This is by far the most common type of incoming mail server currently in use.
Additional configuration fields will appear when you make the selection of server type. Enter the server address and username in the relevant fields. Click Check for Supported Types to find out what kind of authentication security, if any, your mail server uses. Following this, you should find that the details are filled in automatically. Click Forward to continue.

Figure 14-2. Evolution can work with a variety of mail servers, including POP3, Microsoft Exchange, and IMAP.
- You might need to enter your mail password, depending on which server type you chose. In some cases, you'll need to type this later when you download your mail for the first time. Click Forward to continue.
- You're given the chance to choose between various additional options, such as how often you want Evolution to check for new mail or whether you want to delete mail from the server after it has been downloaded. Unless you have been told otherwise or have special requirements, it should be OK to leave the default settings as they are. If you use a Microsoft Exchange server, you may need to enter the Active Directory/Global Address List server details here. Click Forward to continue.
- Depending on the server type you chose, you might now need to fill in the outgoing (SMTP) server address. Type this into the Server field. If your SMTP server requires authentication, put a check in the relevant box and then enter your username. Once again, you can click the Check for Supported Types button to automatically fill in the authentication details. Click Forward to continue.
- You're invited to enter a name for the account. This is the account name you will see when you use Evolution. The default is your e-mail address, but you can type something more memorable if you wish. Click Forward to continue.
- Finally, choose your location, which will have the effect of automatically defining your time zone. This will ensure that e-mail messages are correctly time-stamped. You can choose your location from the Selection drop-down list (choose the nearest large city in your time zone), or click your location on the map. As during initial installation of Ubuntu, the map will zoom in when you click continents, allowing you to more precisely click the place where you live. Click Forward to continue, and then click the Apply button to finish the wizard.
Sending and Receiving E-Mail
After Evolution has been set up correctly to work with your e-mail servers, you can simply click the Send/Receive button on the toolbar to connect to the server(s) and both send and receive e-mail.
You may need to enter your password if you didn't enter it during setup. You can select the Remember Password check box in Account Preferences (Edit ![]() Preferences) to avoid having to type your password again, but the password will then be stored on your hard disk, posing a security risk if other people have access to your PC.
Preferences) to avoid having to type your password again, but the password will then be stored on your hard disk, posing a security risk if other people have access to your PC.
![]() Note Although e-mail is normally sent as soon as you click the Send button after composing it, if the sending has been delayed for any reason (such as being offline at the time), it will take place as soon as you click the Send/Receive button. Until that point, it will be held in the Outbox folder on the left side of the program window. You may need to choose File
Note Although e-mail is normally sent as soon as you click the Send button after composing it, if the sending has been delayed for any reason (such as being offline at the time), it will take place as soon as you click the Send/Receive button. Until that point, it will be held in the Outbox folder on the left side of the program window. You may need to choose File ![]() Work Online if you've been composing e-mail in offline mode.
Work Online if you've been composing e-mail in offline mode.
Any outstanding mail is sent first, and then the receiving procedure is started. As shown in Figure 14-3, a status dialog box will tell you how many messages there are and the progress of the download. Clicking the Cancel button will stop the procedure (although some messages may already have been downloaded). When you get a new e-mail message, an envelope icon will blink in the notification area in the top right of the desktop, and a small window will appear to tell you that you have mail.

Figure 14-3. You'll see a progress bar display whenever you click the Send/Receive button.
E-MAIL SIGNING AND ENCRYPTION
In Chapter 8, you learned how to use the Seahorse application to set up a public key pair. This allows you to encrypt e-mail messages destined for other people, so that only they can read the messages (provided you have their public key). The application also enables you to digitally sign your own e-mail, so recipients can be sure messages came from you (provided they have your public key). If you've followed the instructions to set up the key pair, and uploaded it to a key server, you now need to configure Evolution to use it. After doing this, and when you send a new e-mail message, you can select whether you wish to encrypt the e-mail and/or digitally sign it.
Remember that setting up encryption is not obligatory, and relatively few people in the wider world use e-mail encryption or signing.
Assuming you've already set up an account within Evolution, here's the procedure for configuring Evolution for encryption and digital signing:
- Click Edit Preferences, ensure that the Mail Accounts icon is selected on the left side of the window, and select your mail account in the list on the right side of the window. Then click the Edit button. In the dialog box that appears, click the Security tab.
- You now need to find your PGP key ID by using Seahorse. Click Applications Accessories Passwords and Encryption Keys. Locate your key in the list under the My Personal Keys tab, and look under the Key ID heading. You should see an eight-character hexadecimal number, like F0C1B52A. Write this down, remembering that any 0 you see is a zero, not the letter O.
- Switch back to the Evolution dialog box and type the PGP key ID you found into the PGP/GPG Key ID box. If you want every e-mail message you send to be digitally signed automatically, which is a good idea (the message itself won't be encrypted, so even if the recipients are not using encryption, they will still be able to read it), ensure there's a check in the Always Sign Outgoing Messages When Using This Account box. Then click OK and close the parent Preferences dialog box.
Encrypting outgoing messages, or signing them if you haven't selected to automatically do so, is easy. When composing a new message, click the Security menu entry and select either PGP Sign or PGP Encrypt (or both). Remember that you'll need to have imported the recipient's public key via Seahorse if you want to encrypt a message addressed to that person, or you'll see an error. If you sign a message, upon sending it, you'll be prompted to enter the PGP passphrase you entered when you created the key pair back in Chapter 8.
If, upon sending an e-mail message, you see the error message “Failed to execute GPG: Broken pipe,” it's likely you mistyped your key ID when you configured Evolution. Try again.
If you receive a message that has been encrypted using your public key, Evolution will automatically prompt you to enter your PGP passphrase to decrypt it. This is the passphrase you entered when creating your key pair back in Chapter 8.
When you receive a message from someone who uses digital signing, and you have that person's public key, the message should contain a green bar along the bottom containing the words Valid signature. If you see words to the effect that the signature is invalid, or if the signature is missing, you should be suspicious and independently verify the authenticity of the e-mail message.
Reading E-Mail
Simply click an e-mail message to view it in the preview pane at the bottom of the screen. Alternatively, you can double-click a message to open it in its own program window (selecting a message and pressing Enter will have the same effect).
As with most e-mail clients, any unread messages in the list appear in bold, and messages that have been read appear in ordinary type. By default, each message is marked as read after 1.5 seconds, but you can alter this value. To change it, click Edit ![]() Preferences, click the Mail Preferences icon in the Preferences dialog box, click the General tab, and then change the value under the Message Display heading. A value of 0 will cause the mail to switch to “read” status as soon as it's clicked, which can be useful if you want to quickly clear a lot of messages.
Preferences, click the Mail Preferences icon in the Preferences dialog box, click the General tab, and then change the value under the Message Display heading. A value of 0 will cause the mail to switch to “read” status as soon as it's clicked, which can be useful if you want to quickly clear a lot of messages.
You can also mark many messages as read by highlighting them all, right-clicking an individual one, and selecting Mark As Read from the menu that appears. You can select multiple messages in the usual way: Shift-click to select a consecutive list, or Ctrl-click for nonconsecutive selections. The Show drop-down menu, above the e-mail list, can be used to display only unread mail, which is great if you have a lot of messages that you're not going to read and want to mark them as read or delete them.
Deleting Messages
You can delete messages by highlighting them and pressing the Delete key. Alternatively, right-click any message (or a selection of them) and select Delete. The message will then be moved to the Trash folder. To empty the Trash folder, right-click the folder and select Empty Trash, as shown in Figure 14-4.
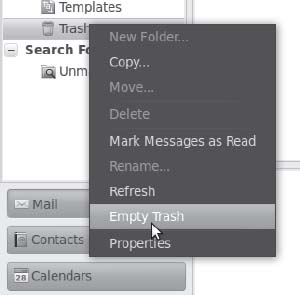
Figure 14-4. To permanently delete messages, right-click the Trash folder and select Empty Trash.
If you move any messages from folder to folder, as described later in the “Sorting and Filtering Messages” section, a copy of the mail will end up in the Trash folder. This is because Evolution doesn't literally move messages. Instead, it copies them from the old to the new location and deletes the original. This can be a little disconcerting at first, but there's nothing to worry about. The mail message will remain wherever you moved it, and it won't disappear.
Flagging Messages
You can flag messages in a variety of ways to help remind you of their status or purpose. The simplest form of flagging is to mark a message as important: right-click the message and select Mark As Important, or click in the space beneath the Important column (this is located to the left of the From column). This will add an exclamation mark symbol alongside the message.
Alternatively, you can add several different flags by right-clicking a message and selecting Mark for Follow Up. The choices, which can be selected from the Flag drop-down list in the dialog box that appears, range from Do Not Forward to No Response Necessary and Review. This heading will then appear in the message preview at the bottom of the window whenever the message is selected.
If you prefer a simple color-coding scheme, you can mark up a message by right-clicking it and selecting Label. Then assign a color. As you'll see, each color relates to a key word or phrase. You can edit both the colors and the key phrases by clicking Edit ![]() Preferences, clicking Mail Preferences on the left of the dialog box, and clicking the Labels tab.
Preferences, clicking Mail Preferences on the left of the dialog box, and clicking the Labels tab.
IMPORTING OUTLOOK E-MAIL VIA THUNDERBIRD
Earlier in the book, we discussed a method of exporting e-mail from various Microsoft e-mail programs, which use proprietary formats, so that it can be imported under Ubuntu. To recap, you can install the Mozilla Thunderbird e-mail client under Windows, import your e-mail into it from Outlook or Outlook Express, and then export Thunderbird's mailbox (.mbox) files for importing within Evolution.
If you followed these instructions and now have the .mbox files ready for use with Evolution, it's easy to import them. Click File ![]() Import. In the Import dialog box, click the Forward button and then select Import a Single File. Click Forward again and click the Filename drop-down list. This will open a file-browsing dialog box, in which you can locate the
Import. In the Import dialog box, click the Forward button and then select Import a Single File. Click Forward again and click the Filename drop-down list. This will open a file-browsing dialog box, in which you can locate the .mbox file and click Open. If you have more than one .mbox file, you'll need to import each one manually. The Automatic entry in the dialog box refers to the file type and will select the correct file type by file extension.
Composing a Message
Creating a new e-mail message is as simple as clicking the New button at the top left of Evolution's program window. Fill in the To and Subject details as usual, and then type in the main body of the message.
To add a CC or BCC, click the To button, and select addresses from your contacts list in the dialog box that appears (selecting the CC or BCC button as appropriate). Alternatively, if you would like to have the CC and BCC fields visible and available at all times, click their entries under the View menu of the Compose a Message window.
As with most Microsoft mail programs, new e-mail can be sent either as plain text or as HTML. Plain text mode is the default. To switch to HTML, click the entry on the Format menu. The advantage of HTML mail is that you can vary the style, size, and coloring of text, so you can emphasize various words or paragraphs, as illustrated in Figure 14-5. In addition, if you click Insert ![]() Image, you can insert pictures from the hard disk. Other options on the Insert menu let you insert tables, dividing lines (click the Rule menu entry), and web links.
Image, you can insert pictures from the hard disk. Other options on the Insert menu let you insert tables, dividing lines (click the Rule menu entry), and web links.

Figure 14-5. New messages can be formatted in HTML, allowing you to format text and even add images to your messages.
The disadvantage of HTML e-mail is that the person receiving the message will need an HTML-compatible e-mail program to be able to read it (though most common e-mail programs can handle HTML e-mail just fine). Your mail is also more likely to be tagged as spam by the recipient's server, because of the widespread abuse of HTML and images in mail by spammers.
![]() Tip Many people in the Linux community frown on HTML-formatted e-mail and prefer plain text messages.
Tip Many people in the Linux community frown on HTML-formatted e-mail and prefer plain text messages.
Words are automatically spell-checked in the new e-mail, and are underlined in red if the spell-checker thinks they are incorrect. To correct the word, right-click it and then select the correct spelling from the list provided.
By default, if you chose the English language during the installation of Ubuntu, the Evolution spell-checker will offer only an English (American) dictionary. You can switch to other English dialects (e.g., British, Canadian, or Australian English) by choosing Edit ![]() Preferences in the main Evolution window, clicking the Composer Preferences icon, and then clicking the Spell Checking tab. Select an alternative dictionary or multiple dictionaries by selecting the check boxes to the left of the dictionary names.
Preferences in the main Evolution window, clicking the Composer Preferences icon, and then clicking the Spell Checking tab. Select an alternative dictionary or multiple dictionaries by selecting the check boxes to the left of the dictionary names.
While composing an e-mail, you can switch languages by choosing Edit ![]() Current Languages in the menu of the Compose Message window. If the language you require is not listed, this means that you need to install an additional Aspell dictionary package with the Ubuntu Software Center. These dictionary packages usually have a two-letter suffix indicating the language that they support; for example,
Current Languages in the menu of the Compose Message window. If the language you require is not listed, this means that you need to install an additional Aspell dictionary package with the Ubuntu Software Center. These dictionary packages usually have a two-letter suffix indicating the language that they support; for example, aspell-fr is the French dictionary package. You'll need to quit and restart Evolution before the new language is visible.
![]() Note The
Note The aspell-fr package also includes the Swiss French variation of the language.
Creating an E-Mail Signature
E-mail signatures are the blocks of text that appear automatically at the end of new e-mail messages you compose. They save you the bother of typing your name and contact details each time. To create an e-mail signature, follow these steps:
- Click Edit Preferences. Select Composer Preferences from the left side of the dialog box and click the Signatures tab.
- Click the Add button at the top right of the dialog box.
- In the Edit Signature dialog box, type what you want to appear as your signature. The signature can be in either plain text or HTML (click Format HTML for the latter). Don't forget that in HTML mode, you can insert lines (Insert Rule), which can act as a natural divider at the top of your signature to separate it from the body of the e-mail, as shown in Figure 14-6.

Figure 14-6. Creating an e-mail signature saves you from having to type your contact details each time.
- Click the Save and Close icon at the top left.
- Click Mail Accounts in the Preferences dialog box, and double-click your mail account in the list on the right side.
- In the dialog box that appears, ensure that the Identity tab is selected and click the Signature drop-down list. Click the signature you just created.
- Click OK and then Close in the Preferences dialog box. Your new signature will then automatically appear in new messages. It's possible to create multiple signatures—for instance, one for work and one for personal e-mail—and then choose the appropriate signature when writing your e-mail.
Advanced E-Mail Tasks
Evolution offers several features that can help you to organize your e-mail. You can create new folders, as well as filter, sort, and search through your messages.
Creating New Folders
If you want to better organize your e-mail, you can create your own folders, which will then appear in the list on the left side of the program window.
To create a new top-level folder, which will appear in the list alongside the standard folders (Inbox, Junk, Outbox, etc.), right-click On This Computer and select New Folder. Then make sure that On This Computer is selected in the folder view of the dialog box that appears. Type a name and click Create.
You can also create second-level folders, which will effectively be “inside” other folders and will appear indented below their parent folder within the list. For example, you might want to create a series of folders within the main Inbox folder to sort your mail from various individuals or organizations. To do this, right-click Inbox, select New Folder, and give the folder a name in the dialog box that appears, as shown in Figure 14-7. After the new folder has been created, click the chevron next to Inbox to expand the display to show your new subfolder.
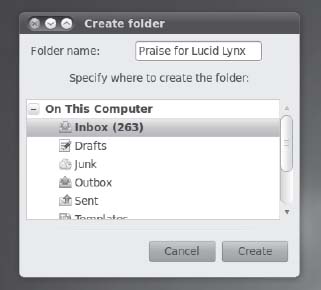
Figure 14-7. You can create your own folders to better organize your mail.
You can then drag and drop messages into the new folders, or you can simply right-click them, select Move to Folder, and select the folder from the dialog box that appears. This can be useful if you wish to select a handful of messages by holding down the Ctrl key. All you need to do then is right-click one of them and select Move to Folder.
You can also copy messages from one location to another, thus producing two copies of the same message. Simply right-click the message, select Copy to Folder, and select the folder from the list. Alternatively, you can hold down the Ctrl key while you drag the message to the new location.
Dealing with Junk E-Mail
Evolution includes intelligent junk mail filtering. Any mail that Evolution thinks is spam or junk mail will end up in the Junk folder. When you first start using Evolution, you should check the folder regularly, because there's a chance Evolution might have made a mistake. However, this is a good thing, because by right-clicking the message and selecting Mark As Not Junk, the Evolution junk mail filter will be able to better understand what to consider as junk in your particular Inbox.
In a similar way, if you find that Evolution misses junk e-mail, and it ends up in your Inbox, you can right-click it and select Mark As Junk. Alternatively, select it and click the Junk icon on the main toolbar.
To empty the Junk folder, select all the messages (Ctrl+A), right-click, and select Delete. Bear in mind that, as with any folder, after the messages are deleted, they will appear in the Trash, and you can restore them from there if necessary.
![]() Note The junk mail filter used in Evolution is a third-party program called Bogofilter (
Note The junk mail filter used in Evolution is a third-party program called Bogofilter (http://bogofilter.sourceforge.net). You can switch Evolution to an alternative spam filter, which some consider more powerful, called SpamAssassin (http://spamassassin.apache.org). To do so, install the spamassassin package. Restart Evolution, click Edit ![]() Preferences, click the Mail Preferences icon in the dialog box that appears, and click the Junk tab. Then select SpamAssassin from the Default Junk Plugin drop-down list. While on that preferences page, it's also a good idea to select the Do Not Mark Messages As Junk If Sender Is In My Address Book check box. When you are finished, click OK and then Close to return to the main Evolution program window.
Preferences, click the Mail Preferences icon in the dialog box that appears, and click the Junk tab. Then select SpamAssassin from the Default Junk Plugin drop-down list. While on that preferences page, it's also a good idea to select the Do Not Mark Messages As Junk If Sender Is In My Address Book check box. When you are finished, click OK and then Close to return to the main Evolution program window.
Sorting and Filtering Messages
You can filter incoming messages according to practically any criteria, including who sent the message, its subject line, words within the body of the mail, its size, and whether it has attachments. Coupled with the ability to create folders, this allows you to automatically sort messages as soon as they're received.
To set up filters, click Edit ![]() Message Filters. Click the Add button and, in the Rule Name box, start by giving the new rule a descriptive name by which you'll be able to recognize it in the future. You might think this isn't important, but you may create tens, if not hundreds, of filters, so being able to identify filters will be very helpful.
Message Filters. Click the Add button and, in the Rule Name box, start by giving the new rule a descriptive name by which you'll be able to recognize it in the future. You might think this isn't important, but you may create tens, if not hundreds, of filters, so being able to identify filters will be very helpful.
As shown in Figure 14-8, the Add Rule dialog box is split into two halves: Find Items That Meet the Following Conditions and Then. As implied by the labels, if the selected conditions are met, then the selected actions will take place.
The Find Items part is used to identify the mail. You can select to filter based on almost any criteria, such as who appears in the Sender field of the message, words that appear on the Subject line, the date sent, and so on. Simply select what you require from the drop-down list directly beneath the Add Condition button. In most cases, you'll then need to specify details for the filter. For example, if you select to filter by the address of the individual sending the e-mail, you'll need to provide that e-mail address.
![]() Tip Several If rules can be created. For example, you could create a rule to filter by the address of the sender, and then click the Add Condition button to create another rule to filter by text in the Subject line. If you click If All Conditions Are Met in the Find Items drop-down list, the mail will be filtered only if both conditions are met. If you click If Any Conditions Are Met from the drop-down list, the mail will be filtered if either condition is met.
Tip Several If rules can be created. For example, you could create a rule to filter by the address of the sender, and then click the Add Condition button to create another rule to filter by text in the Subject line. If you click If All Conditions Are Met in the Find Items drop-down list, the mail will be filtered only if both conditions are met. If you click If Any Conditions Are Met from the drop-down list, the mail will be filtered if either condition is met.

Figure 14-8. Creating message filters lets you automatically organize your e-mail as soon as it's received.
After you've set the Find conditions, you need to select from the Then section of the dialog box. This tells Evolution what to do with the filtered mail. The obvious course of action is to move the e-mail to a particular folder, which is the default choice, but you can also delete the e-mail, set a particular flag, beep, or even run a particular program! As with the rules for finding items, you can set more than one condition here, so you can have Evolution beep and then delete the message, for example. When designing filters, it's good practice to finish with a Then option of Stop Processing because one message may be filtered into a folder and then have other operations performed on it.
Creating Search Folders
Evolution's search folders feature is a more powerful alternative to message filters. Using search folders, you can filter mail based on a similar set of criteria, but you can choose to include messages in the results that might be associated with the filtered messages. For example, if you choose to filter by a specific individual's e-mail address, you can choose to have any replies you sent to that person included in the results, rather than simply messages received from her. In addition, you can apply search folders to specific e-mail folders on an ongoing basis, rather than all incoming e-mail.
It's important to note, however, that a search folder isn't a filter. The messages aren't moved into the new folders. They stay where they are in your Inbox (or any other folder they might be contained in). Despite the name, search folders are actually little more than saved searches. They just act like filters. However, search folders are dynamically updated—if a message is deleted from the Inbox folder, for example, it will also stop appearing in any relevant search folder.
You can create a new search folder by clicking Edit ![]() Search Folders and then clicking the Add button. As with creating message filters, clicking the drop-down box beneath the Add button will let you select filtering criteria. The choices are broadly similar to those for message filters, in that you can filter by e-mail address, size of e-mail, message body, and so on. At the bottom of the dialog box, you can choose to search specific folders (the default), all local folders, or all active remote folders (which includes any of your mail stored on a server elsewhere).
Search Folders and then clicking the Add button. As with creating message filters, clicking the drop-down box beneath the Add button will let you select filtering criteria. The choices are broadly similar to those for message filters, in that you can filter by e-mail address, size of e-mail, message body, and so on. At the bottom of the dialog box, you can choose to search specific folders (the default), all local folders, or all active remote folders (which includes any of your mail stored on a server elsewhere).
In the Include Threads drop-down box, you can select what kind of results you would like the search to return:
- None simply returns e-mail messages matching the criteria.
- All Related returns every single message that is associated with the criteria.
- Replies returns results that include replies to the messages returned via the filter.
- Replies and Parents returns results that include replies and also any initial message that you or others might have sent that inspired the message included in the filter results.
- No Reply or Parent returns results that include only initial messages sent to you.
Search folders results are listed under Search Folders on the left side of the Mail mode window.
The search folders feature is very powerful and worth spending time investigating.
TIPS FOR USING EVOLUTION E-MAIL
In many ways, Evolution is similar to e-mail programs you might have used in the past, but it also has a few of its own quirks and idiosyncratic ways of working. Here are a handful of preferences you might want to set to have Evolution behave in a more familiar way:
- Forward e-mail inline: If you attempt to forward a message, Evolution will attach it to a new message as a file. The person receiving the e-mail will then need to double-click the file to view the forwarded e-mail, which can be confusing. The solution is to make Evolution forward the message inline, which is to say that Evolution will quote it beneath the new mail message, like Microsoft e-mail programs. To do this, click Edit Preferences, click Composer Preferences on the left side of the dialog box, click the Forward Style drop-down list, and select Inline.
- Change the plain text font: Any messages sent to you in plain text format, rather than HTML, will appear in the message preview pane in a Courier-style font. To have messages display in a more attractive and readable typeface, click Edit Preferences, select Mail Preferences on the left side of the dialog box, and then remove the check from Use the Same Fonts As Other Applications. In the Fixed Width Font drop-down list, select an alternative font. The standard Ubuntu font is called Sans and is a good choice.
- Always create HTML e-mail: Evolution defaults to plain text e-mail for any new messages you create. If you want to always create HTML messages, click Edit Preferences, click Composer Preferences on the left side of the dialog box, and then put a check alongside Format Messages in HTML.
- Empty trash on exit: To automatically get rid of deleted messages each time you quit Evolution, click Edit Preferences, click Mail Preferences on the left side of the dialog box, and put a check alongside Empty Wastebasket Folders on Exit. Then select how often you would like this to happen from the drop-down list: every time you quit Evolution, once per day, once per week, or once per month.
- Vertical message window: As an alternative to positioning the message preview window beneath your messages, Outlook lets you position the message at the right of the message list, thus forming three vertical columns (folders, messages, and preview). To switch to this view under Evolution, click View Preview Vertical View.
Contacts
Evolution includes a powerful contact manager component that can catalog information about individuals. At its most basic, the contact manager stores e-mail addresses for use within the e-mail component of Evolution, but you can enter significant additional data about each individual, including addresses, phone numbers, fax numbers, and even a photograph for easy identification. This should allow Evolution to become your sole personal information manager.
To switch to the Contacts mode, click the button at the bottom-left side of the program window. Once in the Contacts mode, you can view information in several ways. Click View ![]() Current View to choose from the following views:
Current View to choose from the following views:
Address Cards: This is the default view and shows the contacts as virtual index cards arranged alongside each other at the top of the program window. Click the scrollbar beneath the cards to move through them.
List View: This shows the contact information as a simple list, arranged vertically, with various elements of the contact's personal information listed alongside, such as phone numbers and e-mail addresses.
By Company: This organizes the data in a similar way to List view but sorted by the company the contacts work for (if such data has been entered into the contact entries).
Adding or Editing Contact Information
By far, the best way of initially building up your contacts list is to right-click e-mail addresses at the head of messages, in Mail mode, and select Add to Address Book. Make sure the address book selected is Ubuntu One if you want your contact information to be synchronized to your personal space in the Internet; read the next chapter to learn more about this service. This will add a simple contact record consisting of the individual's name and e-mail address.
When using Microsoft mail applications, simply replying to an e-mail from an individual is enough to add that contact to your address book. Evolution is capable of this behavior too, but the feature isn't activated by default. To set this up, click Edit ![]() Preferences, click Mail Preferences on the left side of the dialog box, and click the Automatic Contacts tab. Next, put a check in the box marked Automatically Create Entries in the Address Book When Responding to Messages. From the Select Address Book for Automatic Contacts drop-down list, select Personal. In the same dialog box, you can synchronize contacts from the Pidgin instant messaging client so that Evolution is brought up to date with your Pidgin contacts, and vice versa. You can then edit the contact details by double-clicking the entry in Contacts mode. This will let you enter a variety of information, as shown in Figure 14-9. To import a photo for this contact, click the top-left icon. You can use any picture here, and you don't need to worry about its size, because it will be resized automatically by Evolution (although its aspect ratio will be preserved). The imported photo will appear in the lower area of the Contacts window when you click the contact's name.
Preferences, click Mail Preferences on the left side of the dialog box, and click the Automatic Contacts tab. Next, put a check in the box marked Automatically Create Entries in the Address Book When Responding to Messages. From the Select Address Book for Automatic Contacts drop-down list, select Personal. In the same dialog box, you can synchronize contacts from the Pidgin instant messaging client so that Evolution is brought up to date with your Pidgin contacts, and vice versa. You can then edit the contact details by double-clicking the entry in Contacts mode. This will let you enter a variety of information, as shown in Figure 14-9. To import a photo for this contact, click the top-left icon. You can use any picture here, and you don't need to worry about its size, because it will be resized automatically by Evolution (although its aspect ratio will be preserved). The imported photo will appear in the lower area of the Contacts window when you click the contact's name.
If you add a new contact and the details are substantially similar to those of another contact already on the system, the software will give you the opportunity to merge the two contacts into a single profile.

Figure 14-9. A lot of information can be entered for each contact, and, by clicking the button at the top left, you can also add a photograph.
Creating a Contact List
Contact lists are simply lists of e-mail addresses. After a list is created, you can right-click its entry in the contacts list, and then choose to send a message to the list or forward it to someone else as a vCard. The obvious use of contact lists is for sending e-mail messages to a particular group of people.
![]() Note A vCard is a virtual business card. Effectively, it's a small file that contains personal information. vCards can also contain pictures and audio clips. They're understood by practically all business-level e-mail programs, including Microsoft Outlook and Apple OS X's Mail program.
Note A vCard is a virtual business card. Effectively, it's a small file that contains personal information. vCards can also contain pictures and audio clips. They're understood by practically all business-level e-mail programs, including Microsoft Outlook and Apple OS X's Mail program.
To create a contact list, click the small down arrow next to the New button in Contacts mode, and select the option from the list. Give the list a name in the relevant box, and simply click and drag contacts from the main program pane onto the bottom of the Contact List Editor pane. This will automatically add their names and e-mail addresses. Alternatively, you can type their e-mail addresses manually into the field under the Members heading, and then click the Add button, which can be useful if the individual isn't in your contact list.
By selecting the Hide Addresses When Sending Mail to This List check box, you can ensure that the e-mail addresses are added to the BCC field of a new message, so people on the list don't see the others on the list.
Calendars
The Calendars mode of Evolution allows you to keep an appointments diary. Entries can be added in half-hour increments to the working day, and you can easily add events to days that are weeks, months, or even years in advance. Viewing a day's appointments is as simple as clicking its entry in the month view at the top right of the program window.
Specifying Appointment Types
You can make the following three types of diary entries:
Appointments: These are events in your diary that apply to you only. You might have a meeting with a colleague, for example, or you might simply want to add a note to your diary to remind you of a particular fact.
All-day appointments: A training day or a holiday could be entered as an all-day appointment. However, all-day events don't block your diary, and you can still add individual appointments (after all, just because your day is taken up with an event doesn't mean you won't need to make individual appointments during the event). All-day events appear as a light-blue bar at the top of the day's entry in your diary.
Meetings: Meetings are like appointments, but you also have the option of inviting others to attend. The invitations are sent as iCal attachments to e-mail, so users of Microsoft Outlook should be able to reply to them (provided Outlook is properly configured; see the program's documentation for details, and note that iCal is sometimes referred to by the specification number RFC 2446/2447). After receiving a meeting invitation, an individual can click to accept or decline. When Evolution receives this response, the individual's acceptance or declination will be automatically added to the diary entry.
Adding or Editing a Diary Entry
These instructions assume that Calendars mode is set to Day view, which shows a full working day diary alongside a monthly calendar. To ensure Day view is selected, click the Day icon on the main toolbar running across the top of the screen. Day view is the default calendar view under Evolution. The other choices are Week, Month, and Work Week (which shows appointments during the week in daily columns). If you switch to another view, Evolution will always work in that view until you change back again.
To add a new diary entry, simply select the day in the monthly calendar on the left, and then select the time the appointment is to start in the day viewer. Then right-click and choose an appointment, an all-day event (this is called an all-day appointment on the New button on the toolbar), or a meeting. To edit an existing diary entry, double-click its entry in the list.
![]() Note When you right-click in Calendars mode, you'll also see an option to add a task. Adding a task in Calendars mode automatically links it to the selected day and time. Task items due on the current day are marked in dark blue.
Note When you right-click in Calendars mode, you'll also see an option to add a task. Adding a task in Calendars mode automatically links it to the selected day and time. Task items due on the current day are marked in dark blue.
At its most basic, all an appointment needs in order to be entered into your diary is some text in the Summary field, as shown in Figure 14-10. By default, appointments and meetings are assumed to last for half an hour, but you can adjust this by using the arrows in the Hour and Minutes sections. For longer appointments, such as a holiday or conference that may last days or weeks, use the drop-down labeled For, select Until, and then define a finishing date or time.
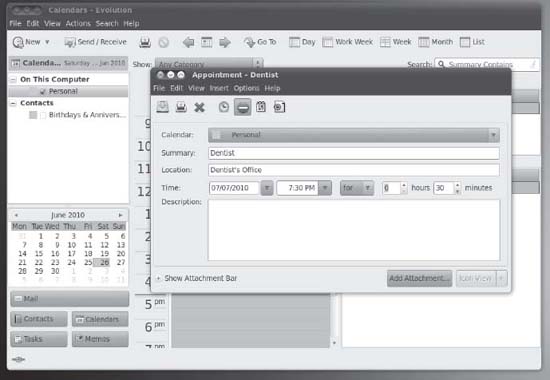
Figure 14-10. When creating a new appointment, you can add all the details you need, but don't forget to set how long it lasts!
By clicking the Recurrence button on the toolbar (note that not all buttons are visible in the default program width), you can set the appointment to be booked into your diary according to certain intervals. Start by putting a check in the This Appointment Recurs box, and then select a time interval. For example, selecting “1 week” will mean that the appointment is booked into your diary automatically on a weekly basis. After this, select a day of the week for the recurring appointment. Following this, you must specify the number of recurrences. You can specify an ending date for the appointment or select Forever. In the calendar view at the bottom of the dialog box, you'll be able to see how this looks. Days in bold are those that have appointments.
It's also possible to set exceptions, as when the meeting might skip a week. This could be useful to work around holidays, for example. Simply click the Add button, and then type a date or click the down arrow to select the date from a calendar. Finally, you can also add attachments to an appointment—a meeting agenda, minutes, and so forth—by clicking the Attach button and locating the appropriate file.
When you're finished, click the Close button to add the details of the recurring event to the appointment.
In the case of meeting appointments, you can click the Add button to invite others to the meeting via iCal invitations, which will be sent out by e-mail as soon as you've finished creating the appointment. Simply click the Add button, and in the empty field that appears, start typing the contact name of the individual you want to invite. If the person is already in your contacts list, the name will be automatically completed, but you can also type individual e-mail addresses. By clicking the entry under the Role heading, you can alter the role of the individual. The choices are Chair, Required Participant, Optional Participant, Non-Participant (i.e., somebody you want to inform about the meeting but who doesn't need to attend), and Unknown (for all other instances).
Clicking the Free/Busy button will open a new dialog box showing who can and can't attend, according to replies to the invitations sent out (obviously, this is a feature you'll be using after you initially create an appointment). On the left side of the dialog box, you will see the list of attendees and also their status: whether they've accepted, declined, or sent a busy/tentative reply (in which case you might choose to reschedule the meeting).
Additional Calendars
For those with complicated lives, Evolution can manage multiple calendars sourced from either your local machine or from an online service such as Google Calendar. Moreover, each one can be assigned a different color so you can see how events clash (or not) at a glance. To create a new local calendar, right-click the Calendars pane (on the left) and select New. Choose On This Computer from the drop-down, provide a name for the new calendar, and choose a color. When you create a new event, specify the appropriate calendar, and the event will be highlighted in its color.
You can also add a Google calendar by following the preceding instructions but choosing Google from the drop-down. Supply your Google credentials and then choose a calendar from those available. Again, you can define a color to apply to this calendar, as in Figure 14-11. The Google option is limited to viewing information added to the web service, so you can't add events by using Evolution, but this is a great way to access some of the many public calendars (such as national holidays and football match fixture lists) available on the Internet.
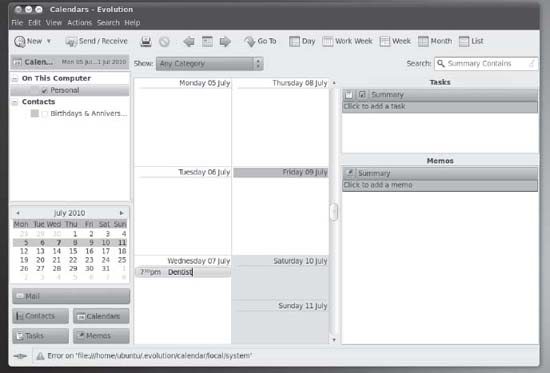
Figure 14-11. Evolution can manage both local calendars and remote calendars from the Internet, making it ideal for creating and sharing group calendars.
Memos and Tasks
The Memos and Tasks modes are the simplest components within Evolution. Memos mode allows you to jot down simple notes, and Tasks mode allows you to create a to-do list.
In both modes, which can be selected by clicking their buttons at the bottom left of the screen, the program window consists simply of an area where you can click to add a new memo/task, a list area, and a preview area, which will show any details of the currently selected task.
![]() Note Memos created in Evolution can also be opened in Tomboy, the default GNOME desktop note-taking application.
Note Memos created in Evolution can also be opened in Tomboy, the default GNOME desktop note-taking application.
In the case of Tasks mode, after you've made an entry, clicking the check box alongside it will mark it as completed. Completed items appear with a strike-through.
To add a new memo or task, click the bar that reads Click to Add a Memo (or Task), type a description, and then press Enter. You will be able to enter more tasks or memos in the same field.
Double-clicking a task or memo allows you to fine-tune its details. For example, you can add a due date for a task, so you'll know when the task must be completed. You can also add a description for future reference and attach files by clicking the relevant button on the toolbar. By clicking the Status Details button in the Task Details dialog box, you can also set a percentage figure for completion of the task, as well as its priority, ranging from low to high. By adding these details, a quick scan over your tasks will give you a good idea of which jobs are overdue, which need attention, and which will stand a little procrastination.
After you've added these details, right-click the Summary bar (at the top of the main window) and select Add a Column. You can now drag and drop elements onto the main window to get a better view of your tasks, as in Figure 14-12.
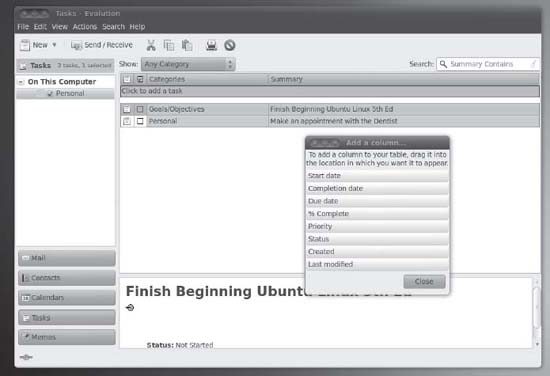
Figure 14-12. Tasks mode lets you catalog chores that you want to do during the day.
Configuring Instant Messaging
Instant messaging is a way of chatting with other people in real time. It's as if you were having a phone conversation, but you're typing instead of speaking. You can talk to one other person or a whole group of people and sometimes share files with them.
The instant messaging program under Ubuntu, Empathy, offers the same functions and works in an almost identical way to programs that you might have used under Windows. It supports virtually all the popular chat standards, such as ICQ/AOL, Google Talk, Yahoo, and MSN (Hotmail/Passport). It assumes that you already have an account with each service, which will likely be the case if you've used instant messaging programs under Windows. You can have as many accounts as you wish and log to all of them at the same time. You can see the contacts from all your instant messaging accounts in the same list and can chat with them at the same time. Using the Me menu, you can set your status for all your accounts at the same time. This is useful, as it provides a single instant messaging application that allows you to chat with users from different networks.
To configure your accounts (referred in Lucid terminology as chat accounts), click the little envelope located next to the date and time in the top panel, and select Set Up Chat. The Welcome to Empathy wizard will appear. If you select the option “Yes, I'll enter my account details now” and click Forward, you will be prompted to enter your account details, as shown in Figure 14-13.

Figure 14-13. Empathy can communicate with users across a range of different protocols.
There are a lot of instant messaging services to which you can connect, as listed in Table 14-1.
Table 14-1. Instant Messaging Services That Can Be Used with Empathy
If you're working in a small office without an Internet connection but you want to send instant messages to your coworkers, you can use the People Nearby feature by selecting the “No, I just want to see people online nearby for now” option from the Welcome to Empathy wizard. You will need to provide a full name and an alias and instruct your fellows to do the same. You will then be able to chat with them without installing a server.
Once you have configured your accounts, you will see all your contacts in Empathy's main window, the Contact List. You can change the status of all of your accounts at the same time by using the drop-down list located beneath the menus, or by using the Me menu online status list.
Installing Skype
Skype, shown in Figure 14-14, is used by millions of people around the world to make Internet telephone calls via Voice over IP (VoIP). This is a complicated way of saying that voice calls are transmitted across the Internet. Using Skype, it's possible to call other Skype users for free, or to call various phone numbers around the world, usually for a small charge.
Installing Skype is easy, and the Skype developers have even created a software repository from which it can be installed. This means that you'll be informed via Update Manager whenever a new version of Skype becomes available.
To add the Skype repository, click System ![]() Administration
Administration ![]() Software Sources. Click the Other Software tab in the window that appears, and then click the Add button. In the APT Line text box, type the following:
Software Sources. Click the Other Software tab in the window that appears, and then click the Add button. In the APT Line text box, type the following:
deb http://download.skype.com/linux/repos/debian/ stable non-free
Note the spaces between debian/ and stable, and between stable and non-free. Click the Add Source button. Click Close, and then click the Reload button in the dialog box that appears.
After you have done that, you can use the Ubuntu Software Center for installing Skype. Just search for Skype and click Install when the application appears in the list.

Figure 14-14. It's easy to install Skype under Ubuntu, and it works almost exactly as it does under Windows or Macintosh.
After the software is installed, click Applications ![]() Internet
Internet ![]() Skype to start it. Using Skype under Linux is very similar to using it under Windows or Macintosh. You'll find excellent documentation at
Skype to start it. Using Skype under Linux is very similar to using it under Windows or Macintosh. You'll find excellent documentation at www.skype.com.
![]() Tip To configure your audio input device (e.g., microphone), right-click the Speaker icon at the top right of the desktop and select Open Volume Control. Then click and drag the Microphone slider as necessary. You may need to unmute the input by removing the red cross next to the speaker icon below the Microphone slider.
Tip To configure your audio input device (e.g., microphone), right-click the Speaker icon at the top right of the desktop and select Open Volume Control. Then click and drag the Microphone slider as necessary. You may need to unmute the input by removing the red cross next to the speaker icon below the Microphone slider.
Ekiga
Ekiga, an open source alternative to Skype, offers a similar feature set. It can be installed using the Ubuntu Software Center and is available from Applications ![]() Internet
Internet ![]() Ekiga Softphone. When the software is launched for the first time, you'll be prompted to create an Ekiga.net account, which will give you a SIP address (the VoIP equivalent of an e-mail address) and an option to purchase call-out credit. After you've signed into the service, it works in a similar way to Skype, with a buddy list and, as shown in Figure 14-15, a standard numerical dial pad for calling land lines or mobile numbers. Ekiga's integration with the Ubuntu desktop is very good—for example, you can receive alerts in the notification area if one of your contacts makes a call to you.
Ekiga Softphone. When the software is launched for the first time, you'll be prompted to create an Ekiga.net account, which will give you a SIP address (the VoIP equivalent of an e-mail address) and an option to purchase call-out credit. After you've signed into the service, it works in a similar way to Skype, with a buddy list and, as shown in Figure 14-15, a standard numerical dial pad for calling land lines or mobile numbers. Ekiga's integration with the Ubuntu desktop is very good—for example, you can receive alerts in the notification area if one of your contacts makes a call to you.

Figure 14-15. Ekiga is an open source alternative to Skype.
Summary
This chapter has been a whistle-stop tour of Evolution's main features. You've looked at e-mail creation and organization, contacts management, working with the appointments calendar, and editing the task list and memos. Evolution is a powerful program. Be sure to take a look at its help documentation (Help ![]() Contents) to learn more about it.
Contents) to learn more about it.
This chapter also discussed the instant messaging client and how it integrates with the Me menu. The next chapter will go into greater detail about this new feature and what can you do with it.