C H A P T E R 10
![]()
Managing Your Data
Files are what make the world of Linux go round. They're the currency of any kind of operating system, because every time you use your computer, you generate new files, even if they're only temporary.
In this chapter, we explain how you can manage your files—that is, pictures, documents, videos, MP3s, and so forth—under Ubuntu. Linux also manages file and folder security, as does Windows, but since permissions always have associated user and group accounts, you'll have to wait until Chapter 21 to learn about the details. However, this chapter provides enough information for you to understand how the system works, and where and how you should store your data. First, we go through an introduction to Nautilus, Ubuntu's flagship file browser. Then you learn some concepts regarding the file system and how it differs from that of Windows. And last, once you have mastered Nautilus and begun to understand the file system, you will be able to perform some more advanced tasks, such as administering your disks and sharing information over a network, among others.
Using Nautilus
Nautilus is the name of the default file browser in Ubuntu. It's similar to My Computer or Windows Explorer under Windows, in that in its default view mode it presents a list of files on the right side of the window and a series of shortcuts to popular locations within the file system on the left side.
Starting Nautilus is simply a matter of clicking the Places menu and choosing a location. The main components of Nautilus are shown in Figure 10-1.

Figure 10-1. The Nautilus file explorer.
The Nautilus window consists of several elements:
Menu bar: The Nautilus menu bar has File, Edit, View, Go, Bookmarks, and Help menus. The File menu allows you to open a new tab or a new window, create files or folders, and see the current item's properties. The View menu offers options for controlling the way files are displayed in the Nautilus window, as well as the look and feel of Nautilus itself. The Edit menu lets you manually cut, copy, and paste files (operations that can also be done with the traditional Ctrt+X, Ctrl+C and Ctrl+V combinations). The Go menu lets you quickly jump to other locations in the file system or on a remote server. Using the Bookmarks menu options, you can create web browser–like shortcuts to certain file system locations or servers, so you can access them instantly. There are also some ready-made bookmarks for folders in your
/homedirectory:Documents,Music,Pictures,Videos,andDownloads.Toolbar: As in a web browser, the toolbar enables you to quickly move backward and forward from place to place in your browsing history. In addition, you can reload the file listing, in order to reflect any changes that might have taken place since the Nautilus window opened, quickly navigate to popular file system locations, such as your
/homedirectory, and change the way files are displayed.Location bar: This feature, located beneath the toolbar, is unique to Nautilus. It shows individual directories as buttons on the location bar and lets you see where you are in your file system at a glance, as well as quickly and easily move through your file-browsing history. For example, if you start in
/home/andy(displayed as the andy button), and then browse to/home/andy/Pictures/holiday/disneyworld, clicking the Pictures button will return you to/home/andy/Pictures. The other folders listed on the location bar (holidayanddisneyworldin this example) won't disappear and will still have buttons, so you can return to those as well. It's best demonstrated by example, so give it a try!Zoom controls: Zoom controls are in the toolbar. These make the icons representing the files bigger or smaller. When you're browsing a lot of files at once, shrinking them will fit more in the window. On the other hand, when you're viewing photo thumbnails, it can be handy to increase the zoom setting so you can see more detail in the pictures. This also works for text files, where you'll see a portion of the text contained within the file.
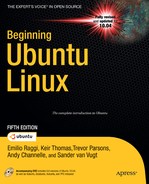
View As Icons/List: To the right of the zoom controls is a drop-down list that switches between Icon, List, and Compact view. List view shows details about the files, such as file size, the type of file, its permissions, and so on. Icon view presents the files as a series of large icons. In many cases, the icons give a clue as to the nature of the file; for example, audio files appear with musical note graphics. If the folder you're browsing contains image files (or certain document files, such as PDFs), these will be automatically thumbnailed—the icon will be a small version of the contents of the file, as shown in Figure 10-2. By default Nautilus displays only previews of local files smaller than 10MB, but you can change this by choosing Edit
Preferences and looking under the Preview tab. If you change any of these settings to Always, it could have an impact on performance when you're browsing remote directories. The preview is very handy when browsing pictures for printing or editing. Compact view lists the files in columns, like List view, but without the details. This means that several columns of files can usually fit within a single file-browsing window.
Places pane: The Places pane on the left in Figure 10-2 lists the most popular locations within the file system, as well as any locations that you've bookmarked. Clicking each icon takes you to that location instantly. Clicking the File System entry takes you to the root of the file system (
/). There are also bookmarks for your floppy drive (if you have one), the Trash folder, any attached removable storage, and any servers available on the local network.
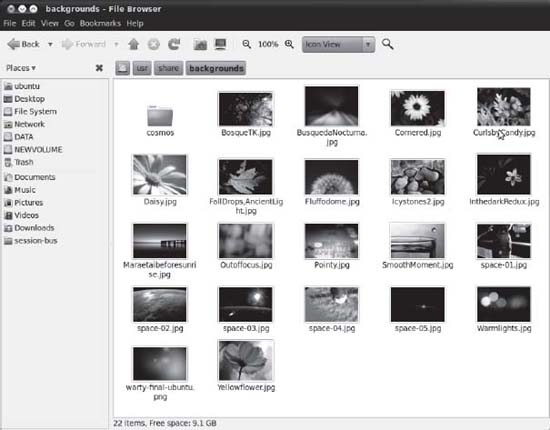
Figure 10-2. Whenever you view a folder full of pictures in Icon view, they are automatically thumbnailed.
![]() Tip To bookmark a location, drag a folder to the blank area beneath the currently bookmarked folders in the Places pane. This new location will then appear with other bookmarks in the main Places menu.
Tip To bookmark a location, drag a folder to the blank area beneath the currently bookmarked folders in the Places pane. This new location will then appear with other bookmarks in the main Places menu.
As in Windows, you can right-click each file in the file browser window to see a context menu with options to rename the file, delete it, open it with particular applications, and so on. The Properties option on the context menu lets you view information about the file and alter certain aspects of it, such as its access permissions (we discuss file permissions in Chapter 21). You can even add some text notes about the file if you want!
![]() Caution You should never delete your
Caution You should never delete your /home folder. Doing so will most likely destroy your personal Ubuntu configuration and prevent you from logging in, because many personal system and program settings are also stored in your /home folder.
Changing the View Mode
Nautilus comes equipped with several different view modes, which alter what appears in the sidebar on the left of the program window. The default mode—Places—is described in the preceding section, but several others can be selected by clicking the drop-down list at the top of the side pane. The modes are as follows:
Information: This displays simple information in the side pane about the currently browsed directory, including the number of files it contains and its date of creation. This is similar to how Windows file-browsing windows looked in the Windows 98 and Me releases.
Tree: This option shows a complete list of directories in the file system, along with the complete contents of directories within the user's
/homedirectory. Each directory has a chevron alongside it that, when clicked, unfolds that directory so its contents become visible within the side pane (only directories are shown in the side pane). This view is very similar to how file-browsing windows operated back in Windows 95.History: This view shows a list of the directories that you've visited, with the newest at the top and the oldest at the bottom. To switch to one of the directories, simply double-click its entry in the list.
Notes: This is another informational display mode. However, this time a text entry field appears, in which you can enter information about the currently browsed directory that will be recorded for future reference. This can be useful in a very large file system.
Emblems: This shows a list of icons that can be clicked and dragged onto any file or directory as a method of identifying or organizing the file for future reference. See the upcoming “Working with File and Folder Icons” section for more information.
Searching for Files
Nautilus includes a simple search tool. Click the Search button (represented by a magnifying glass) on the toolbar, and you will see a text box below the toolbar. In this text box, type any part of the filename you want to find. For example, typing festival will return any filenames with festival in them.
By clicking the plus sign icon next to the Reload button after a search, you can specify an exact file type. To do this, click the drop-down list that appears and ensure that File Type is selected. Then click the drop-down list alongside this and select the particular file type you want to find. For example, suppose you're searching for a picture taken at a festival, and you know the filename contains the word festival. You also have various documents you created related to attending the festival, and their filenames also contain the word festival. In this case, to find only photo files, you can select Picture from the drop-down list. The list, including the Picture type, is shown in Figure 10-3.
You can also restrict the search to a particular location in your file system. Simply click the plus sign icon next to the Reload button again and select Location in the drop-down list. Click the drop-down list beside this one and browse for the location in which you think your files might be.
![]() Note The simple search tool in Nautilus is not as powerful as the Search for Files option, available from the Places menu.
Note The simple search tool in Nautilus is not as powerful as the Search for Files option, available from the Places menu.

Figure 10-3. The Nautilus search function lets you filter by file type and by location.
Working with File and Folder Icons
Files and folders can have emblems assigned to them. These are smaller icons that are “tagged on” to the larger icons in both List view and Icon view. Emblems are designed to give you quick clues about the nature of the file. To apply an emblem, right-click the file or folder, select Properties, and then click the Emblems tab. As shown in Figure 10-4, a range of icons is available; in fact, any file or folder can have several emblems applied at once. Simply put a check in the box beside the icons you want to apply. Pick the ones that are meaningful to you. For example, a “cvs-conflict” emblem will probably be of interest only to programmers.
Nautilus makes use of a handful of emblem icons for its own needs too. For example, a square with an X in it indicates that you don't have permissions to access that file or folder at all—not even to view it. A padlock indicates a file or directory is read-only. In most cases, the file system emblems are self-explanatory.

Figure 10-4. A variety of miniature emblems can be applied to an icon to aid recognition of the file.
Special Nautilus Windows
As well as letting you view your files, Nautilus has a number of object modes. This is a complicated way of saying that Nautilus lets you view things other than files.
The most obvious example of this is the Computer view of your file system, which presents an eagle's eye view of your storage devices. To access this view, click Go ![]() Computer. If you have a card reader attached, it will appear here, as will any Windows partitions that may be on your hard disk. Double-clicking each item opens a standard Nautilus file browser window (for this to work with Windows partitions, they must be set up correctly, as described in the “Accessing Windows Files” section later in this chapter).
Computer. If you have a card reader attached, it will appear here, as will any Windows partitions that may be on your hard disk. Double-clicking each item opens a standard Nautilus file browser window (for this to work with Windows partitions, they must be set up correctly, as described in the “Accessing Windows Files” section later in this chapter).
Object mode comes into its own when viewing network locations. Clicking Go ![]() Network brings up the browsing Network object view, for example, which is a little like Network Neighborhood or My Network Places under Windows. You can also browse to FTP sites by clicking Go
Network brings up the browsing Network object view, for example, which is a little like Network Neighborhood or My Network Places under Windows. You can also browse to FTP sites by clicking Go ![]() Location in a file browser window and entering an FTP address (prefacing it with
Location in a file browser window and entering an FTP address (prefacing it with ftp://).
![]() Note You might be used to dragging and dropping files onto program windows or taskbar buttons within Windows in order to open the file. This only works in some programs within Ubuntu. Generally, the best policy is to try it and see what happens. If the program starts but your file isn't opened, it obviously didn't work.
Note You might be used to dragging and dropping files onto program windows or taskbar buttons within Windows in order to open the file. This only works in some programs within Ubuntu. Generally, the best policy is to try it and see what happens. If the program starts but your file isn't opened, it obviously didn't work.
HIDDEN FILES AND DIRECTORIES
When you view your /home directory via Nautilus, you're not seeing every file that's there. Several hidden files and directories relating to your system configuration also exist. You can take a look at them by clicking View ![]() Show Hidden Files in the Nautilus menu. Clicking this option again hides the files and directories.
Show Hidden Files in the Nautilus menu. Clicking this option again hides the files and directories.
You may notice something curious about the hidden items: they all have a period before their filenames. In fact, this is all that's needed to hide any file or directory: simply place a period at the front of the filename. There's no magic involved beyond this.
For example, to hide the file partypicture.jpg, you could simply right-click it and rename it .partypicture.jpg. You'll need to click the Reload button on the toolbar for the file view to be updated and for the file to disappear. As you might expect, removing the period unhides the file.
Files are usually hidden for a reason—for instance, they're not supposed to be editable or are used to configure application elements—and it's no coincidence that most of the hidden files are system files. In addition, every program that you install, or is installed by default, will usually create its own hidden folder for its system configuration data. Deleting such files by accident usually results in losing your personal settings for that particular program.
The Nautilus file manager has an additional method of hiding files. Any filename that ends with a ~ symbol does not appear in Nautilus file-browsing windows or on the desktop. For example, partypicture.jpg~ would be invisible. This method is primarily used to make temporary files created by GNOME applications invisible, but any user can also use it to hide sensitive files. Be aware that this technique is respected only by some GNOME applications, and the files will be entirely visible at the command line.
Launching Files and Running Programs
As with Windows or Mac OS X, most of the programs on your Ubuntu system automatically associate themselves with various file types that they understand. For example, double-clicking a picture will automatically open the Eye of GNOME image viewer application, and double-clicking a .doc file will start OpenOffice.org Writer.
Ubuntu is automatically set up to view common file types. Table 10-1 shows which programs are required for viewing certain types of documents.
![]() Note Whenever you install new software from the installation CD or the official software repositories, it should add an entry to the Applications menu. If for some reason it doesn't, you can create a shortcut by using the techniques explained in Chapter 9.
Note Whenever you install new software from the installation CD or the official software repositories, it should add an entry to the Applications menu. If for some reason it doesn't, you can create a shortcut by using the techniques explained in Chapter 9.
| File Type | File Extension | Viewer | Location on Applications Menu |
| Word processor document | .doc, .rtf, .odt |
OpenOffice.org Writer | Office |
| Spreadsheet | .xls, .ods |
OpenOffice.org Calc | Office |
| Presentation | .ppt, .odp |
OpenOffice.org Impress | Office |
| PDF file | .pdf |
Document Viewer | Not on Applications menua |
| Compressed file | .zip, .tar, .gz, .bz2, and others |
File Roller | Not on Applications menua |
| Image file | .jpg, .gif, .bmp, and others |
Eye of GNOME | Not on Applications menua |
| HTML file | .htm, .html |
Firefox | Internet |
| Text file | .txt |
Gedit | Accessories |
| Audio file | .wav, .mp3, .oggb |
Rhythmbox | Sound & Video |
| Music Player Video file | .mpg, .mpeg, .avib |
Totem | Sound & Video |
a Evince, File Roller, and Eye of GNOME are not present on the Applications menu. If you wish, you can add your own shortcuts for these applications by following the instructions in Chapter 9.
b Playback of many media files is possible only after extra software is installed. See Chapters 16 and 17 for more information.
If you want to temporarily open a file type with a different program, right-click the file. The context menu will display a set of options; for example, for an image, you will have Image Viewer (or Eye of the Gnome), Firefox, or F-Spot. Or you can select Open with Other Application and choose other program. From that point on, every time you right-click, you'll be offered the choice of that program to open the file.
To make Nautilus automatically and permanently use the application to open the file type, right-click it, select Properties, and then click the Open With tab. Click the Add button to locate the application you want to use if it's not in the list. Finally, ensure that the radio button alongside the program you want to use is highlighted (you may need to click twice for this to happen), as shown in Figure 10-5, and then click the Close button. This will change the program association for all the files with the same extension.
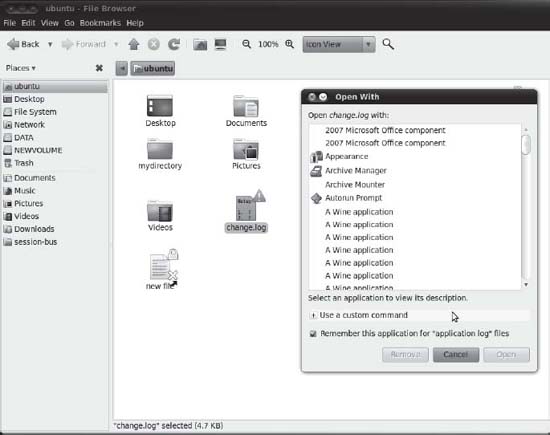
Figure 10-5. You can change which program opens a file by right-clicking, selecting Properties, and clicking the Open With tab.
![]() Note In Windows, you can use Windows Explorer to launch program executables by just browsing to their locations within Program Files and double-clicking their .
Note In Windows, you can use Windows Explorer to launch program executables by just browsing to their locations within Program Files and double-clicking their .exe files. It's technically possible to run programs by using Nautilus to browse to their locations, but this is discouraged. One reason is that Ubuntu doesn't store all of its programs in one central folder, as Windows does. However, most programs that are used on a daily basis can be found in /usr/bin. If the program itself isn't stored in /usr/bin, the folder will contain a symbolic link (effectively, a shortcut) to the program's genuine location on the hard disk, which means it's usually possible to launch an application either by typing its name into the terminal or by pressing Alt+F2 and typing the name.
Viewing File Sizes and Other Information
Using Nautilus you can use the List view to check file size and other information. By default, the file name, size, type, and date modified are shown for each file on the current folder. Nautilus selects which unit of measure (bytes, KB, MB, or GB) are most appropriate to display each file.
In order to get an idea of which are the largest files and which are the smaller, you can click the Size column label to sort files by size. Click it again and the order is reversed. You'll see a little arrow head next to the column name. When the arrow head is pointing up, the largest file is at the top of the list; when it is pointing down, the smallest file will be displayed at the top.
You can also display additional information for each of the files. To add a column to the view, simply select View ![]() Visible Columns… inside Nautilus when the List View is selected. Just check the box next to the name of the column you want to see.
Visible Columns… inside Nautilus when the List View is selected. Just check the box next to the name of the column you want to see.
Tips and Tricks for Nautilus
Although ostensibly simple, Nautilus is packed with features, and it can be a rewarding experience working through the menus to see what you can find. Here are a handful of the more useful Nautilus features that can help optimize workflow:
Tabbed browsing: You might have used tabbed browsing with the Firefox web browser, enabling you to visit more than one site simultaneously. The same principle applies to tabbed browsing in Nautilus: pressing Ctrl+T opens a new tab, which appears at the top of the program window and enables you to browse to a different location in the file system. Files can be dragged and dropped between tabs—just click and drag them to a different tab—and tabs can be reordered by clicking and dragging them. Many tabs can be open at any one time, and the only practical limitation is the width of the program window. To close a tab, click its X button.
Matched selection: Imagine you're working on a large project and have generated a great many files. However, lacking foresight, you failed to create a special project folder and mixed all the files in with others in your
Documentsfolder. The project files have a unique characteristic: they all have the name of the project within them. But some filenames contain other text, and there are varying types of files among the collection (images, documents, and so forth). Nautilus's matched selection feature, available on the Edit menu (click Select Items Matching), provides a solution: it lets you select files based on key text within the filenames. With the example quoted previously, you could type the project name into the Pattern dialog box that appears, surrounded by the asterisk wildcard (that is,*projectname*), which indicates that any number of characters can appear before or after the keyword. After you click OK, any filenames matching the text will be automatically selected, and you can then click and drag them to a new location or perform any other operation on them.E-mailing files: By right-clicking a file and selecting the Send To option, you can instantly send a file by e-mail. Ensure that Evolution is selected in the Send As drop-down list in the dialog box that appears, and enter the e-mail address within the Send As text field. Under the Compression heading, you can optionally choose to compress the file first.
Extensions: As with Firefox, it's possible to add extensions to Nautilus. There are extensions to open a file as the system administrator (
nautilus-gksu), resize a picture (nautilus-image-converter), or set an image as the desktop background (nautilus-wallpaper), and these can be installed through Ubuntu Software Center. You'll find most of them by simply typing nautilus extension in the search bar, as in Figure 10-6.
Figure 10-6. Searching for Nautilus extensions in Ubuntu Software Center
The Home Folder
Under Windows, you have access to the entire hard disk. You can write, read, or delete files anywhere (unless the system has specifically been configured otherwise). You can save your personal files in C:Windows, for example.
Under Ubuntu, the file system is a harder place for ordinary users. They can browse most of the hard disk, but they aren't able to write files to the majority of folders (in some cases, they can't even access files). For them, most folders are like somebody else's land. It is. It is the land of the root.
As an ordinary user, instead of being allowed to prowl the entire disk, you've been given your own private parcel of storage in which you can keep your stuff securely and privately. This is a directory located within the /home directory, and its name is taken from your username. If your login name is louisesmith, your place for storing files will be /home/louisesmith. You can find it as the first item in the Places pane in Nautilus and in the Places menu also. Figure 10-7 shows an example of a user's /home directory.
![]() Note Linux generally uses the terms directory and subdirectory for the places you put files, whereas Windows refers to them as folders. It's merely a matter of semantics. However, within the Nautilus file browser, directories are pictured as folders and are referred to as such.
Note Linux generally uses the terms directory and subdirectory for the places you put files, whereas Windows refers to them as folders. It's merely a matter of semantics. However, within the Nautilus file browser, directories are pictured as folders and are referred to as such.

Figure 10-7. Your personal area on the hard disk is in the /home directory and is named after your username.
Your parcel will be decorated from the very start with several default directories created with the purpose of organizing your information in a logical manner. This is not very different from Windows, as you can see just by reading the names of most of those default directories or by looking at Table 10-2.
Table 10-2. Default Home Folder Subdirectories
| Directory | Purpose |
Desktop |
This folder has the content of your desktop. Every document you place in this folder will appear on your desktop. This is like the Windows' Desktop folder. |
Documents |
Like Windows' My Documents folder, this is the default directory for storing personal documents. OpenOffice.org saves its documents in this directory. |
Downloads |
This is the folder where the files you download with Firefox are stored. |
Music |
A folder to store music files, like the Windows' My Music folder. Those files can be opened with Rythmbox. |
Pictures |
A folder to store pictures. Equivalent to the Windows' folder My Pictures. |
Public |
A special folder in which you can store content to be shared with your family or colleagues. It is not shared by default, but you can follow the instructions given later in this chapter in order to make those files accessible through the network. |
Templates |
Folder to store templates for OpenOffice.org's applications. |
Videos |
Folder to store video files that can be opened with the Movie Player. |
Examples |
This folder is actually a link to /usr/share/example-content, where you can find OpenOffice.org's sample documents, ogg audio files, and more. |
Some programs might utilize those subdirectories in your /home directory in order to store and organize their output. For example, a digital camera program might utilize the Pictures directory within your /home directory. It's up to you whether you use these or change those settings in the application.
Other applications may create a hidden folder in your home. If you instruct Nautilus to show hidden files (you already know how), you will see several folders that were hidden by default, where applications store their data, For example, the .mozilla folder is where the Firefox information is stored, and the Evolution files are in .evolution.
Files within Ubuntu remember who owns them. If user johnsmith creates a file, he can make it so that only he can read or write the file (see Chapter 21 for more details on file permissions). The default setting is that other users will be able to read the file, but not write any new data to it. Directories, too, are owned by people, and the owner can set access permissions. By default, all users on a system can access each other's /home directories and read files, but they can't change the files or write new files to any directory within /home that isn't theirs.
![]() Note Any user with superuser powers has access to all of the system and can create, edit, and delete files in all directories. This is so the superuser can perform essential system maintenance.
Note Any user with superuser powers has access to all of the system and can create, edit, and delete files in all directories. This is so the superuser can perform essential system maintenance.
Understanding File System Concepts
Now that you have been playing with Nautilus for a little while and found it to be very much like Windows Explorer, you might be wondering whether the file system concepts in both operating systems are exactly the same.
Just like Windows, Ubuntu has a file system that is shared between software components and your own personal data, which you generate with your applications or download from the Internet. However, Ubuntu differs from Windows in a couple of important ways.
The File System Explained
You might already have ventured beyond the /home directory and wandered through the file system. You no doubt found it thoroughly confusing, largely because it's not like anything you're used to. The good news is that it's not actually very hard to understand. If nothing else, you should be aware that nearly everything can be ignored during everyday use.
![]() Note The Ubuntu file system is referred to as a hierarchical file system. This means that it consists of a lot of directories that contain files. Windows also uses a hierarchical file system. Ubuntu refers to the very bottom level of the file system as the root. This has no connection with the root user, or the directory named
Note The Ubuntu file system is referred to as a hierarchical file system. This means that it consists of a lot of directories that contain files. Windows also uses a hierarchical file system. Ubuntu refers to the very bottom level of the file system as the root. This has no connection with the root user, or the directory named /root, which is the personal file storage area for the root user.
You can access the root of the file system by clicking File System in the Places pane in Nautilus.
Only users with administrative powers can write files to the root of the file system. This is to prevent damage, because most of the directories in the root of the file system are vital to the correct running of Linux and contain essential programs or data.
Most directories allow all users to browse them and access the files within. You just can't write new files there or delete the directories themselves. You might be able to modify or execute programs contained within the directory, but this will depend on the permissions of each individual file.
Table 10-3 provides a brief description of what each directory and file in the Ubuntu root file system contains. This is for reference only; there's no need for you to learn this information. The Ubuntu file system broadly follows the principles in the Filesystem Hierarchy Standard1, as do most versions of Linux, but it does have its own subtleties.
__________
1 The Filesystem Hierarchy Standard, or FHS, is a standard maintained by the Linux Foundation and defines the main directories and their content for the Linux OS.
Table 10-3. Directories and Files in the Ubuntu Root File System
| Directory | Contents |
bin |
Vital tools necessary to get the system running or for use when repairing the system and diagnosing problems. |
boot |
Boot loader programs and configuration files. (The boot loader is the menu that appears when you first boot Linux.) |
cdrom -> media/cdrom |
Symbolic link (shortcut) to the entry for the CD- or DVD-ROM drive in the /dev folder. (Accessing this file lets you access the CD- or DVD-ROM drive.) |
dev |
Virtual files representing hardware installed on your system. |
etc |
Central repository of configuration files for your system. |
lib |
Shared system files used by Linux as well as the software that runs on it. |
lost+found |
Folder where salvaged scraps of files are saved in the event of a problematic shutdown and subsequent file system check. |
media |
Where the directories representing various mounted storage systems are made available (including Windows partitions on the disk). |
mnt |
Directory in which external file systems can be temporarily mounted. |
opt |
Software that is theoretically optional and not vital to the running of the system. (Many software packages you use daily can be found here.) |
proc |
Virtual directory containing data about your system and its current status. |
root |
The root user's personal directory. |
sbin |
Programs essential to administration of the system. |
selinux |
Commands used in the SELinux security subsystem. |
srv |
Configuration files for any network servers you might have running on your system. |
sys |
Mount point of the sysfs file system, which is used by the kernel to administer your system's hardware. |
tmp |
Temporary files stored by the system. |
usr |
Programs and data that might be shared with other systems (such as in a large networking setup with many users).a |
Var |
Used by the system to store data that is constantly updated, such as printer spooling output. |
vmlinuz -> boot/ |
Symbolic link to the kernel file used during bootup. |
a The /usr directory contains its own set of directories that are full of programs and data. Many system programs, such as the X11 GUI software, are located within the /usr directory. Note that the /usr directory is used even if your system will never act as a server to other systems.
TYPES OF FILE SYSTEMS
Drive References
Perhaps the most important differences between Linux and Windows are the following:
- The Linux file system doesn't use drive letters.
- The Linux file system uses a forward slash (
/) instead of a backslash () in filename paths.
In other words, something like /home/john/myfile is typical in Ubuntu, as opposed to C:Documents and SettingsJohnmyfile in Windows. The root of the hard disk partition is usually referred to as C: in Windows. In Ubuntu, it's referred to simply with a forward slash (/).
If you have more than one drive, the drives are usually combined into one file system under Linux. This is done by mounting, so that any additional drives appear as virtual folders under the file system. In other words, you browse the other hard disks by switching to various directories within the main file system.
![]() Note If you're used to Mac OS X, the Ubuntu file system shouldn't come as much of a surprise, because both OS X and Ubuntu are based on UNIX and utilize similar concepts.
Note If you're used to Mac OS X, the Ubuntu file system shouldn't come as much of a surprise, because both OS X and Ubuntu are based on UNIX and utilize similar concepts.
Names of Files
Another important difference between Ubuntu and Windows is that filenames in Ubuntu are case sensitive. This means that MyFile is distinctly different from myfile. Uppercase letters are vitally important. In Windows, filenames might appear to have uppercase letters in them, but these actually are ignored when you rename or otherwise manipulate files.
Because of this case sensitivity, you could have two separate files existing in the same place, one called MyFile and another called myfile. In fact, you could also have myFile, Myfile, MYFILE, and so on, as shown in Figure 10-8.
As with Windows, filenames can have spaces within them. This means it's possible to have file or folder names like Pictures from Disneyland or party at bob's house.jpg.
![]() Note You might notice that some Linux old-hands avoid using spaces in filenames and use an underscore character (
Note You might notice that some Linux old-hands avoid using spaces in filenames and use an underscore character (_) or a hyphen (-) instead. This is because it's tricky to manipulate filenames with spaces in them at the command prompt.
Unlike with Windows, filenames can include virtually any symbol, including an asterisk (*), backslash (), question mark (?), less-than/greater-than signs (< and >), and so on. The only symbol that's prohibited is the forward slash (/), and that's because it has a special use in file paths, as described in the previous section. Be aware, however, that if you want to share files with colleagues running Windows, you should stick to Windows conventions to avoid incompatibilities and refrain from using the following symbols: /:*?"<>|.
We have already stated that folders and files starting with a dot (“.”) are managed as hidden so they are not displayed in Nautilus or in the terminal window.
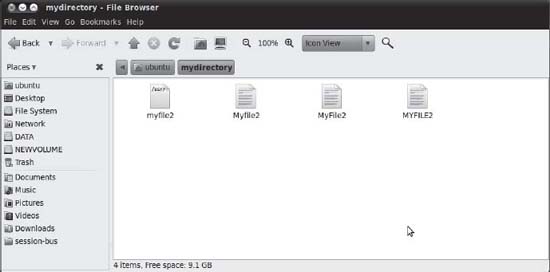
Figure 10-8. Ubuntu filenames are case sensitive, so many similar filenames can exist, differing only in which letters are capitalized.
![]() Note If you try to copy a file with illegal symbols in its name to a Windows machine across a network, Ubuntu simply won't let you, and will report an Invalid Parameters error. In our experience, it will let you copy a file with illegal symbols in its name to a Windows partition, however. This results in the file being inaccessible from within Windows, so be careful!
Note If you try to copy a file with illegal symbols in its name to a Windows machine across a network, Ubuntu simply won't let you, and will report an Invalid Parameters error. In our experience, it will let you copy a file with illegal symbols in its name to a Windows partition, however. This results in the file being inaccessible from within Windows, so be careful!
Real Files and Virtual Files
Linux sees virtually everything as a series of files. This might sound absurd and certainly requires further explanation.
Let's start with the example of plugging in a piece of hardware. Whenever you attach something to a USB port, the Linux kernel finds it, sees whether it can make the hardware work, and if everything checks out okay, it usually makes the hardware available as a file under the /dev directory on your hard disk (dev is short for devices). Figure 10-9 shows an example of a /dev directory.
The file created in the /dev directory is not a real file, of course. It's a file system shortcut plumbed through to the input and output components of the hardware you've just attached.
![]() Note As a user, you're not expected to delve into the
Note As a user, you're not expected to delve into the /dev directory and deal with this hardware directly. Most of the time, you'll use various software packages that will access the hardware for you or use special BASH commands or GUI programs to make the hardware available in a more accessible way for day-to-day use.

Figure 10-9. Hardware devices under Linux are accessed as if they were files and can be found in the /dev folder.
Here's another example. Say you're working in an office and want to connect to a central file server. To do this under Linux, you must mount the files that the server offers, making it a part of the Ubuntu file system. We discuss how this is done in the “Mounting” section later in this chapter.
![]() Note Bear in mind that, in most cases, Ubuntu takes care of mounting automatically, as discussed later in this chapter. For example, when you try to connect to a shared folder by clicking Places
Note Bear in mind that, in most cases, Ubuntu takes care of mounting automatically, as discussed later in this chapter. For example, when you try to connect to a shared folder by clicking Places ![]() Network Servers, Ubuntu automatically handles the mounting of the shared folder.
Network Servers, Ubuntu automatically handles the mounting of the shared folder.
After the network server is mounted, it is treated exactly like a directory on your hard disk. You can copy files to and from it, just as you would normally, using the same tools as you use for dealing with any other files. In fact, less-knowledgeable users won't even be aware that they're accessing something that isn't located on their PC's hard disk (or, technically speaking, within their Ubuntu partition and file system). By treating everything as a file, Linux makes system administration easier. To probe and test your hardware, for example, you can use the same tools you use to manipulate files.
Working with Disks and Volumes
So far you've learned how to work with Nautilus and what the file system is. This is what is known as the logical side of data – but there is a physical side as well, that is composed by the disks and removable media attached to your computer on which the file system rests. Without disks, there could be no file system, no directories, and no files. But it is not enough to attach the disk or plug in the removable media; you need also to make it available to the OS through an operation called mounting.
Mounting Volumes
Described in technical terms, mounting is the practice of making a file system available under Linux. Whereas Windows uses drive letters to make other file systems available in Windows Explorer, Linux integrates the new file system within the root file system, usually by making the contents appear whenever a particular directory is accessed.
The mounted file system could be a partition on your hard disk, a CD-ROM, a network server, or many other things.
Mounting drives might seem a strange concept, but it makes everything much simpler than it might be otherwise. For example, after a drive is mounted, you don't need to use any special commands or software to access its contents. You can use the same programs and tools that you use to access all of your other files. Mounting creates a level playing field on which everything is equal and therefore can be accessed quickly and efficiently.
Most of the time, external storage devices are mounted automatically by the GNOME desktop software used under Ubuntu; a GNOME background service runs constantly and watches for the user attaching any storage devices to the PC. If this occurs, the external storage device is automounted by the GNOME desktop, usually in a folder named after the device's label within the /media directory (in other words, a USB memory stick with the label KINGSTON will be mounted at /media/KINGSTON). An entry appears on the Places menu, and an icon for the device appears on the desktop, pointing to the mount point (the directory used to mount the device).
In the case of mounting network storage, such as those accessed by clicking Places ![]() Network, a system called
Network, a system called gvfs-fuse mounts the devices. Upon being mounted, these also appear on the Places menu and are given a desktop icon, but you can access them from Nautilus by browsing the hidden .gvfs directory within your /home directory. Should you access shared storage on Bluetooth hardware devices, these will also appear within the .gvfs directory.
Note that the contents of the mounted file system are made available in a virtual way. The files are not literally copied into the directory. The directory is merely a conduit that allows you to read the mounted file system contents.
There aren't any special commands used to work with drives that have been mounted. File managers such as Nautilus have no trouble browsing their contents.
![]() Note The root file system is itself mounted automatically during bootup, shortly after the kernel has started and has all your hardware up and running. If you look within the special file
Note The root file system is itself mounted automatically during bootup, shortly after the kernel has started and has all your hardware up and running. If you look within the special file /etc/fstab, used to tell Ubuntu Linux which partitions to mount, you'll see that it too has its own entry, as does the swap partition. Every file system that Linux uses must be mounted at some point.
Viewing Disk and Volume Information
Because Ubuntu organizes all files and folders in a single hierarchy, it is often easy to forget that you might have more than one disk attached, and that they can be of different types. It is hard to tell the physical layout of your data just by using Nautilus. You might even forget you have available space in one of your disks that is just not partitioned, because unpartitioned space is just not shown in Nautilus.
So when the time comes for doing some administration on your disks, you must use a different tool from Nautilus. Fortunately, and as you might already have guessed, Ubuntu includes such a tool: the Disk Utility, available at the System ![]() Administration menu. You can take a first look at it by examining Figure 10-10. Don't be scared!
Administration menu. You can take a first look at it by examining Figure 10-10. Don't be scared!

Figure 10-10. The Disk Utility lets you see disks and volumes and work with them.
By using the Disk Utility, you will be able to view your disks from a different angle. If Nautilus shows you the logical distribution of files and folders within a hierarchy starting at the root directory (“/”), the Disk Utility displays the physical disks where your information is actually stored. The file system hierarchy does not stand by itself; it is stored on disks, on which there are partitions, mounted in a mount point. You can use this tool to view such disks and create partitions. You will also be able to perform advanced tasks such as checking file system health.
The left pane of the Disk Utility window is named Storage Devices and is where the disks are listed. At the top is the Local Storage container, namely your computer. You can also connect to another computer by using the File ![]() Connect to Server… option, in which case the list of disks displayed will correspond to the remote computer.
Connect to Server… option, in which case the list of disks displayed will correspond to the remote computer.
The second level of entries corresponds to each of your disk controllers. It tells you how your disks are connected to your computer. Whether they are IDE or USB drives, they will be grouped under the controller they are attached to.
The third level corresponds to the drives themselves. If you select a disk, the details of the disk and its partitions will be displayed in the main pane.
As was shown in Figure 10-10, the main pane is divided into two sections: the Drive section above and the Volumes sections below. Each of those has information about the selected drive or volume and actions you can execute on it.
Managing Disks
The top section of the main pane shows information about the selected disk and tasks you can perform on it.
Table 10-4 gives you a reference of the properties of a drive.
| Name | Description |
Model |
Refers to the model of the disk, as specified by the manufacturer. |
Firmware Version |
The level of the firmware installed. The firmware is a special program that instructs the hardware itself how to work. |
Location |
Controller and port to which the drive is attached. |
Write Cache |
Write cache is a function of disks that improves the drive write performance. |
Capacity |
The total capacity of the drive. |
Partitioning |
The type of partition scheme selected when the drive is formatted. The default is Master Boot Record. |
Serial Number |
The serial number of the drive, as set by the manufacturer. |
World Wide Name |
An unique identifier for some types of drives. |
Device |
The virtual file that represents the drive in the file system. The first portion will always be /dev. The second part will depend on the type of drive and the amount of disks in your system. |
Rotation Rate |
The speed at which the disk rotates. |
Connection |
The type of connections. |
SMART Status |
SMART is a diagnostic mechanism (you can view SMART Data by pressing the button with that name). SMART Status should be healthy if everything is okay. |
On a disk, the main operation you can perform is to format it. To do it will ERASE ALL DATA CONTAINED IN THE DISK (and this cannot be emphasized enough) and make its space available to create new volumes. Please be very careful when formatting a disk. This operation is IRREVERSIBLE, so there's no way to recover the information after it.
If you are sure nonetheless that you want to format a disk, select the disk from the navigation pane and click the Format Drive button shown in the Drive section of the main pane. Leave the default selection for now and click Format.
Managing Volumes
A disk is graphically shown as a big block in the Volumes section. When you format a drive, all space is labeled Free, meaning that it is available to create volumes.
A drive without volumes is of little or no use. You cannot store files directly on the disk, nor create folders. So you need to create volumes before you do anything else. To create a volume, just select any space labeled as Free and click the Create Partition button. You will be prompted with a dialog box asking you the size, the type, and the name of the new volume. For now, you should select the Ext4 type. Click Create.
Once you have created your volume, you can:
Mount Filesystem: This will make the volume available for use, by default in the
/mediadirectory.Unmount Volume: When you unmount a volume, its data is not actually lost, but it is only made unavailable. Mount the volume again and see that the files are still there! This command is especially useful for removable drives which need to be unmounted before physically extracting them from the PC. If you're currently browsing the mounted directory, you'll need to leave it before you can unmount it. The same is true of all kinds of access to the mounted directory. If you're browsing the mounted drive with Nautilus, or if a piece of software is accessing it, you won't be able to unmount it until you've quit the program and closed the Nautilus window (or browsed to a different part of the file system).
Format Volume: This operation erases all the information in your volume (not on your entire disk!).
Check Filesystem: Verifies its integrity. The volume must be unmounted.
Edit Filesystem Label: If you haven't changed the default when creating the volume, it will be called New Volume, and this is hardly a descriptive name. By default the mount point—that is, the folder at which the volume will be made available—is
/media/LABEL. For example, a volume namedNEWVOLUMEwill be mounted at/media/NEWVOLUME.Edit Partition: You can mark the volume as bootable, for example.
Delete Partition: Use when you no longer need the partition. This erases all your data in the volume but, unlike formatting it, it will mark the space as Free instead of making it available again.
Advanced File Operations
Running Ubuntu on your PC may mark you as more adventurous than the majority of Windows users, but it's likely that you'll need to access Windows files on a regular basis. If you've chosen to dual-boot with Windows, you might want to grab files from the Windows partition on your own hard disk. If your PC is part of a network, you might want to access files on a Windows-based server or workstation on which a shared folder has been created. You may simply work with others who send you Windows files via e-mail.
![]() Note Accessing shared printers attached to Windows computers is explained in Chapter 7, in the “Configuring a Windows/SMB Shared Printer” section.
Note Accessing shared printers attached to Windows computers is explained in Chapter 7, in the “Configuring a Windows/SMB Shared Printer” section.
Working with Files in Windows Partitions
If you've chosen to dual-boot Ubuntu with Windows on the same hard disk, Ubuntu allows you to access your Windows partition. An icon for it should appear on the Places menu, where it will be identified by its size (for example, if the Windows partition is 100GB in size, the icon will read 100GB Media). Selecting this should show your Windows partition contents, although you'll need to type your password when prompted in order to mount it.
After the partition has been made available, an icon for it will appear on the desktop, and it will be listed as a shortcut on the left of any file-browsing window.
![]() Note You can write to or edit files in an NTFS partition. However, be aware that you could easily destroy your Windows partition, because on Ubuntu all Windows files (even the system-critical files) can be overwritten without warning. On the positive side, this feature allows you to easily recover your files from Windows if it has crashed.
Note You can write to or edit files in an NTFS partition. However, be aware that you could easily destroy your Windows partition, because on Ubuntu all Windows files (even the system-critical files) can be overwritten without warning. On the positive side, this feature allows you to easily recover your files from Windows if it has crashed.
Accessing Networked Files
The easiest way to access shared folders on Windows workstations or servers over a network is to click Places ![]() Network. This starts Nautilus, which attempts to search for Windows machines on your local network, just as with Network Neighborhood and My Network Places on the various versions of Windows.
Network. This starts Nautilus, which attempts to search for Windows machines on your local network, just as with Network Neighborhood and My Network Places on the various versions of Windows.
If you've ever used the network-browsing services under Windows, you might already know how unreliable they can be—some computers simply don't appear in the list, others appear eventually after a wait, and others appear but then prove to be mysteriously inaccessible.
A far quicker and more reliable method of accessing a Windows shared folder is to manually specify its network name or IP address. The network name is simply the name of the computer that's used during networking. The IP address is the computer's identifying number and usually takes the form of four octets separated by periods, like this: 192.168.1.100.
You should try using the network name first when connecting to a computer. If that proves unreliable, try using the IP address instead. You can discover the network name and IP address as follows:
Network name: You can discover the network name of a Windows 7 computer by clicking Start and right-clicking Computer on the menu. Click Properties on the menu, and in the window that appears look at the value of the Computer name field. For example, the name of our test PC is
WINPC. To discover the network name in Windows XP, right-click My Computer, select Properties, and then click the Computer Name tab in the window that appears. Look under the Full Computer Name heading.IP address: To find out the IP address, open an MS-DOS command prompt. To do this in Windows XP, click Start
cmdinto the Start Search text box. Typeipconfigat the prompt. Then, in XP, look for the line that reads IP Address and note the details. In Windows Vista or 7, look for the line that reads IPv4 Address and note the number (on our test computer, we had to scroll up the window to see the line). To access a shared folder, open a Nautilus file browser window (Placessmb://computer name/
Alternatively, if you want to use the IP address as shown in Figure 10-11, type the following:
smb://IP address/
Obviously, in both cases, you should replace computer name and IP address with the details you noted earlier. You may also be prompted to enter a username and/or password to access the shared folder.
To create a permanent desktop shortcut to the Windows folder, right-click a blank spot on the desktop and create a launcher. In the Command text box, enter nautilus, followed by the full network path to the share. You can discover this by using Nautilus to browse to the shared directory, as described previously, and then clicking the icon next to the location bar to switch to the text-mode view of the path. Then cut and paste the text into the Command box. For example, on our Ubuntu setup, we created a shortcut to the winshare directory on the computer WINPC by typing the following into the Command box:
nautilus smb://WINPC/winshare
For more information about creating desktop launchers, see Chapter 9.
When using the launcher after rebooting your Ubuntu system, you might notice that the folder takes a few seconds to appear. This is normal and merely the result of the time Ubuntu takes to log on to the computer sharing the files.

Figure 10-11. If the shared folder requires a username and/or password, you'll be invited to enter these.
Sharing a Folder from Within Ubuntu
In addition to accessing the shared files of other Windows users, you can also set up your own shared folder under Ubuntu for Windows users to access (or, indeed, other Ubuntu computers). To do this, follow these steps:
- Right-click the folder you want to share and select Sharing Options from the menu.
- In the dialog box that appears, put a check in the Share This Folder check box. If this is the first time you've shared a folder, a dialog box will appear telling you the sharing service software is not installed. Click the Install Service button to add it.
You'll be prompted to type your password because some additional software needs to be installed. Following this, Ubuntu will automatically download and install the Samba file-sharing components. You'll be prompted to restart your session after it's finished (that is, log in and out again), so save any open files and restart.
- When the desktop reappears, repeat the first step—right-click the folder you want to share, and select Sharing Options. Then put a check in Share This Folder again.
- In the Share Name text box, type a name by which the share will be identified by other computers on the network. At the bottom of the dialog box you might see some warning messages. However, we found some of these were wrong or simply didn't make sense. This is obviously a bug, and our advice is to ignore them. If you genuinely do something wrong, like type too long a share name, Ubuntu will tell you later on.
- By selecting the Allow Other People to Write in This Folder check box, the shared folder will be made writeable, rather than read-only.
- At this point, you can click the Create Share check box, and the folder will then be shared. However, anybody who wants to access the folder will need to type your username and password to do so (they will be prompted automatically when they attempt to access it). By putting a check in the Guest Access check box, you can allow anybody on the network to access the shared folder in read-only mode. Then they won't need a username and password. After the shared folder is created, Windows users can access the shared folder by using My Network Places/Network Neighborhood, where it should be “detected” alongside other Windows computers.
There are caveats, however. When we tried to access a “guest access” shared folder from a Windows computer, the username and password prompt still appeared, even though none was required. To gain access, we typed gibberish into the Username field and left the Password field blank. However, we were then unable to access any other shared folders on that computer for which we needed to log in as authorized users (that is, enter the Ubuntu username/password) without logging out and then back in to the Vista computer, which serves all existing network connections.
A separate issue is privacy: by using the preceding method to share a folder within your Ubuntu login, you must reveal to others on the network your username and password details. If you don't want this to happen, you can create a dummy account under Ubuntu that exists solely to share folders across the network. This is possible because you don't have to be logged in to a user account for the folders to be shared—they're shared so long as the PC is up and running (even if no user is logged in). We discuss creating new user accounts in Chapter 21; you only need to create a standard nonadministrator user account. After the dummy account is set up, log in to it and create the shared folders, as described earlier. Then log out and return to the standard user account, where you can subsequently access the shared folders by clicking Go ![]() Network—your own computer's shared folders will appear alongside those on other computers on the network. You will need to provide the username and password details of the dummy account, just as if you were logging in across the network.
Network—your own computer's shared folders will appear alongside those on other computers on the network. You will need to provide the username and password details of the dummy account, just as if you were logging in across the network.
![]() Note To access the shared folder from another Ubuntu computer, you might need to specify its IP address. To find out the IP address, open a GNOME Terminal window (Applications
Note To access the shared folder from another Ubuntu computer, you might need to specify its IP address. To find out the IP address, open a GNOME Terminal window (Applications ![]() Accessories
Accessories ![]() Terminal) and type ifconfig. Then look for the numbers alongside the
Terminal) and type ifconfig. Then look for the numbers alongside the inet addr entry.
Accessing Removable Storage Devices
Ubuntu automatically makes available any CDs or DVDs you insert into your computer, and they'll appear instantly as icons on the desktop. The same is true of any card readers or USB memory devices that you use. Alternatively, you can access the storage devices by clicking their entries on the Places menu, where entries for them will appear automatically upon attachment, or by clicking Places ![]() Computer.
Computer.
Working in the Computer Window
In the Places ![]() Computer window, you'll find icons for all the storage devices attached to your computer, including the floppy disk drive if your computer has one, as shown in Figure 10-12. However, because of the way floppy disk drives work, Ubuntu isn't able to automatically detect that a floppy has been inserted. Instead, you'll need to double-click the icon, as with Windows.
Computer window, you'll find icons for all the storage devices attached to your computer, including the floppy disk drive if your computer has one, as shown in Figure 10-12. However, because of the way floppy disk drives work, Ubuntu isn't able to automatically detect that a floppy has been inserted. Instead, you'll need to double-click the icon, as with Windows.
![]() Note In days of old, special tools were used to access MS-DOS floppies under Linux, and you might hear some Linux old-hands talking about them. Nowadays, you can simply use Nautilus without needing to take any special steps.
Note In days of old, special tools were used to access MS-DOS floppies under Linux, and you might hear some Linux old-hands talking about them. Nowadays, you can simply use Nautilus without needing to take any special steps.
Whenever you double-click any entry in the Computer window, it opens a Nautilus file browser window. You can copy files by clicking and dragging, and right-clicking files offers virtually all the options you could need.
![]() Tip You don't need to use Places
Tip You don't need to use Places ![]() Computer each time to access your floppy, CD, or DVD drive. These drives are mounted in the
Computer each time to access your floppy, CD, or DVD drive. These drives are mounted in the /media folder on your hard disk. Just browse to /media/floppy and /media/cdrom.

Figure 10-12. Select Places ![]() Computer to access your removable storage drive and network shares.
Computer to access your removable storage drive and network shares.
Ejecting Media
Ubuntu isn't quite like Windows when it comes to ejecting or unplugging removable storage devices. In practically all cases, devices must be unmounted, which is to say that you need to tell Ubuntu that you're finished with the device in question and that you're about to unplug it.
In the case of CD or DVD discs, you can simply press the Eject button on the drive itself. Ubuntu is able to detect that the disc is being ejected and automatically unmounts the drive. If the disc ever refuses to eject, right-click its icon on the desktop or within Computer and select Eject.
In the case of floppy disks, USB memory sticks, and other USB storage devices, you should always right-click the icon and select Unmount Volume. When unmounting, you may need to wait a short while for any file operations to complete on the drive. If this is the case, you'll receive a notification in the system tray. Then you can unplug or remove the device. This also applies when you're removing a memory card from a card reader—before pulling out the card from the reader, it needs to be unmounted.
![]() Note It's necessary to close any files that were open on the device before unmounting, and even close any file browser windows that were accessing the device.
Note It's necessary to close any files that were open on the device before unmounting, and even close any file browser windows that were accessing the device.
If you fail to unmount the device, Ubuntu will still believe the device is attached. This shouldn't cause too many problems, but it could crash any programs that were accessing the device. It might also mean the card isn't recognized properly when you reinsert it. In rare instances, data loss can occur.
Summary
This chapter has led you on your first steps in exploring the Linux file system. The file system is vitally important to how Linux works, and we go into it in much depth in upcoming chapters.
Here you were introduced to elementary concepts, such as where personal files are stored and the basic rules that govern what you can and cannot do with files. You also looked at the principal method of accessing files via the GUI: the Nautilus file manager. Additionally, you learned how to run programs manually, as well as how to access any Windows partitions or files that may exist on your hard disk or across a network.
And finally, you learned how to access files in heterogeneous systems, by opening Windows partitions and sharing data over the network.