C H A P T E R 16
![]()
Digital Audio
Today's PC is a multimedia powerhouse, and it's hard to come across a home computer that doesn't have at least a pair of speakers attached. Some people take this to extremes and have surround-sound speakers on their computers, as well as large widescreen monitors for crystal-clear, high-definition video playback.
The stability of Linux makes Ubuntu a rock-solid general-purpose multimedia system, Audio and video playback software is installed by default, with nearly 300 additional programs for production and consumption of digital media available for free in the Sound & Video section of the Ubuntu Software Center.
In this chapter, you'll learn how to listen to your existing MP3s and CDs on your Ubuntu system, and how to explore a world of new sounds via streaming audio, podcasts, and music stores. In the next chapter, you'll learn how to manage video playback.
Issues Surrounding Multimedia Playback
Since the advent of digital distribution, record companies and content producers have sought ways of restricting the ability of users to copy music and films. This usually means digital rights management (DRM), which often has the side effect of restricting playback of various media formats on noncommercial operating systems, as the DRM required to play back some music and video needs to be licensed. Audio and video playback technologies such as MP3 and MPEG are patented in countries that allow software to be patented, such as the United States. A patent protects the implementation of an idea, as opposed to copyright, which protects the actual software. Patents are designed to restrict distribution of a particular technology, which implements an idea or concept, unless permission is granted, usually via a payment to the license holder.
Because Linux is based on the sharing of computing technology and knowledge, organizations like Ubuntu (and Canonical, the company behind Ubuntu) are fundamentally and philosophically opposed to software patents. For this reason, as well as to avoid the risk of patent infringement lawsuits, they take care not to distribute such software, which is why MP3 playback is not supported by default within Ubuntu, for example. This doesn't make playback of popular music and video files impossible, but it means that, out of the box, Ubuntu does not have the facility to play these formats. It is up to the user to download and install some extra software to do so if he or she wishes, although this is actually pretty easy as the process is automated.
![]() Note It isn't the job of this book to dictate a position for you on the ethics of using software that has been patented. That's something you must do on your own. It's a complicated issue, but Wikipedia has a good summary of the arguments:
Note It isn't the job of this book to dictate a position for you on the ethics of using software that has been patented. That's something you must do on your own. It's a complicated issue, but Wikipedia has a good summary of the arguments: http://en.wikipedia.org/wiki/Software_patent.
Much more devastating than patenting is DRM, a technology tied into audio or video playback software. It's designed to control how, where, when, and on what device you can play certain media. For example, until recently Apple's iTunes DRM scheme meant that you could play back movies and some audio tracks bought from iTunes only on the iPod range of devices (including the Apple TV and iPhone range of devices) or using the iTunes software. DVD and Blu-ray disc players include forms of DRM, called the Content Scrambling System (CSS) and Advanced Access Content System (AACS), respectively, which prevent users from playing DVDs on computers unless special software is purchased. With Apple's move away from DRM, and Amazon's DRM-free MP3 store, the situation for audio tracks is getting better, but nearly all movie files remain affected.
As a community that celebrates openness, many Linux users and developers mistrust any technology that attempts to restrict their rights to use software in particular ways. Moreover, the relatively small user base and the preference for free rather than proprietary software has meant that no mainstream vendor has ported its DRM technology to Linux on the desktop. This means, for instance, that movies purchased via iTunes will not work on a Linux desktop.
![]() Note Companies do make their DRM software available on Linux, only it tends to be developed for inclusion in set-top boxes, DVD players, HD televisions, MP3 players, and Internet-connected media players. One exception—and it's one you may want to consider if you're concerned with the legal issue of DVD playback—is CyberLink's $49.95 PowerDVD software, which is available to buy from Canonical's online store (
Note Companies do make their DRM software available on Linux, only it tends to be developed for inclusion in set-top boxes, DVD players, HD televisions, MP3 players, and Internet-connected media players. One exception—and it's one you may want to consider if you're concerned with the legal issue of DVD playback—is CyberLink's $49.95 PowerDVD software, which is available to buy from Canonical's online store (http://shop.canonical.com).
Linux and other open source projects are very resourceful and are often able to reverse-engineer technology formats in order to get around DRM or patent issues. But the laws in many countries—the United States is a particularly strident example—prohibit reverse-engineering in this way. In addition, the laws in some countries seek to prohibit use of software resulting from this process.
The good news is that programmers have also come up with open and free alternatives to proprietary formats. Examples include the Ogg Vorbis media format, which is every bit as good as MP3 but is unencumbered by patent issues. We look at using Ogg Vorbis later in this chapter, in the “Choosing a Format” section; it's an excellent way of avoiding issues surrounding patenting. On the video side, no open source video format is yet in widespread use, but with Mozilla, Opera, Adobe, Google and many other vendors now backing the royalty-free WebM video format, the picture is likely to change very fast.
As an end user migrating to Ubuntu from Windows or Mac OS X, it's likely you'll want to add support for MP3 and popular video file playback formats, at least until you can switch over to free and open file formats. In this and the next chapter, we're recommending that you install additional software to use in concert with Ubuntu's built-in media players. Some of that software may have issues surrounding patenting, and in one case, is designed to break the encryption that protects the content on DVD movie discs. Although we can't of course provide you with any legal guarantee for your particular jurisdiction, you may be reassured to know that, to our knowledge, no end user has ever had any legal hassle as a result of installing and using this software.
![]() Note The United States and Japan both have laws allowing software to be patented. Most other countries, including those within the European Union, do not currently allow software patents.
Note The United States and Japan both have laws allowing software to be patented. Most other countries, including those within the European Union, do not currently allow software patents.
Playing Audio Files
Audio playback under Ubuntu is normally handled by the Rhythmbox Music Player. This is a feature-packed piece of software that can play back audio files, podcasts, Internet radio, and even CDs. However, Totem, the Ubuntu movie player, can also play back digital audio files.
Like many modern music players, Rhythmbox can also manage your music collection, arranging it into a library so you can locate songs easily and create playlists. This makes it a better choice for playback if you have many digital audio files, although Totem is good for quick playback of individual files, such as auditioning those you've just downloaded.
Out of the box, Ubuntu supports playback of Ogg Vorbis and FLAC across all its audio playback applications. These are two open audio file formats, which you learn more about in the “Choosing a Format” section later in this chapter.
To play back other music file formats, such as the ubiquitous MP3 format, additional software known as codecs must be installed. A codec handles the decoding of multimedia files, both audio and video. The word is a shortened version of coder-decoder. For any digital multimedia file type you want to play on your computer, you need an appropriate codec. In addition, if you want to create your own multimedia files—for example, to create MP3s from CD audio tracks—you might need to download an additional codec that allows the encoding of files.
Installation of codec software is largely automated in Ubuntu. However, the issue of patenting continues to have an impact on the distribution of codecs. Several audio codecs available for Linux, contained in various gstreamer-plugins software packages, are not licensed with the patent holders. This is of little issue to you as an end user. It's a practical concern only for the distributors of the codecs, because the laws of some countries state that it's their duty to pay patent licensing fees. It's just something you should be aware of. Fully licensed codecs are available for many formats via the commercial Fluendo plug-in suite, which is available from the Canonical store.
MULTIMEDIA PLAYBACK COMPONENTS
Installing Codecs in a Single Package
There is an extremely simple way to install support for all of the common multimedia codecs that aren't distributed by default in Ubuntu. It's a package called Ubuntu Restricted Extras.
With a single click, this package will bring in support for MP3 and the common proprietary video formats, including the Flash plug-in in Firefox, and as a bonus it will install the Microsoft TrueType core fonts (such as Times New Roman and Arial) and OpenJDK, a free/open source version of Java. (The proprietary Sun JDK/JRE is available as an alternative from the Canonical Partner Repository).
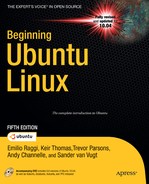
To get this very convenient bundle of software onto your system, enter the Ubuntu Software Center, which you'll find in the Applications menu, and type restricted extras in the search bar. Select Ubuntu Restricted Extras from the results list, click the Install button, and enter your password when prompted.
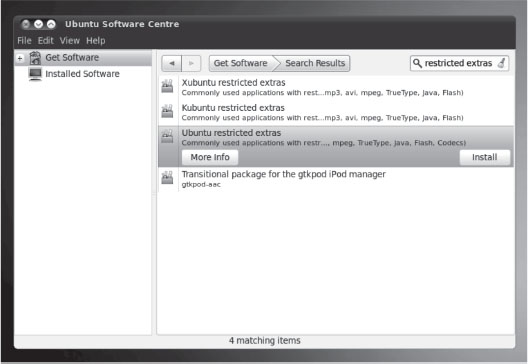
Figure 16-1. Installing the Ubuntu Restricted Extras package in the Ubuntu Software Centre is the easiest way to get support for the most commonly used digital audio and video formats.
Once the Ubuntu Restricted Extras is installed, all of Ubuntu's playback software will automatically support MP3 files, including Totem, Rhythmbox, and any other playback software you install that is designed for the GNOME Desktop.
This is made possible because, behind the scenes, all of Ubuntu's audio and video playback is underpinned by the GStreamer multimedia framework. Once the codec-supporting plug-ins have been installed into GStreamer, as a user you won't come into direct contact with GStreamer, but the benefit of having this integrated system in the background is that you install plug-ins only once for the entire system.
Installing Codecs when Required
Even if you don't get around to installing Ubuntu Restricted Extras, Ubuntu's multimedia applications will automatically suggest which codecs to download and install when you attempt to play a multimedia file that's in a restricted format, such as MP3.
Here we walk through what happens when you try to play an MP3 on an Ubuntu system that hasn't yet had the required codec installed. The same procedure will apply when you try to play back any unsupported audio or video file format; all that will differ is the choice of codecs offered to you.
- Copy an MP3 file to your computer.
- Double-click the MP3 file.
- Totem movie player will start up, but because the underlying GStreamer framework doesn't yet include support for MP3 files, a dialog box will appear, asking whether you want to look for a suitable plug-in to play the file. Click the Search button to do so. The process is automated, but your computer will need to go online if it isn't already.
- The Install Multimedia Codecs dialog box will eventually appear, offering a choice of plug-ins to install. You'll rarely be offered an individual codec to install. Most are bundled together with similar codecs allowing the playback of other file formats. As you can see in Figure 16-2, for playback of MP3 files we were offered the GStreamer Ugly plug-ins bundle, GStreamer FFmpeg, and the GStreamer Fluendo MP3 plug-in. Although there are three choices, and therefore obviously some overlap in functionality, all three check boxes are selected by default, and you can safely accept this and click the Install button. Ubuntu will handle any overlapping functionality automatically in the background. It's always best to install as many codecs as possible when offered the chance, because that means your computer will be suitably equipped for playback of virtually any file type.
- As soon as you click the Install button, Ubuntu will ask you to confirm the choice and will explain that use of the software might be restricted in certain countries, although with certain provisos. Read through the dialog box and either cancel or confirm your choice, depending on whether you think the rules explained apply to you.

Figure 16-2. Ubuntu recommends codec packages to install so you can play your multimedia files.
- Click the Confirm button in the dialog box. Because you are about to install software, you'll need to enter your password when prompted. Note that, although you appeared to select three packages, you actually selected to install package bundles, containing many individual packages. On the progress bar, you will see that quite a few individual packages are being downloaded—about 20 on our test computer!
- The files will download and install automatically. After the process has completed, a dialog box will tell you that everything has been successful.
- Playback of the file should start automatically in the player application. Every piece of playback software within Ubuntu will now automatically support MP3 files, including Totem, Rhythmbox, and any other playback software you install that relies on the GStreamer framework (this will include any playback software designed for the GNOME Desktop).
FLUENDO MP3 CODEC
As mentioned, some codecs available for Ubuntu have certain legal issues surrounding the patenting of software. However, you might be pleased to hear that one audio codec available for Ubuntu is licensed with the MP3 patent holder and therefore washes cleaner than clean: the Fluendo MP3 codec. In an act of generosity, the Fluendo company paid the MP3 technology license and made its own decoder freely available for all Linux users. For more information, see www.fluendo.com/shop/product/fluendo-mp3-decoder.
The Fluendo codec doesn't avoid the ethical considerations surrounding using patented technology, as discussed early in this chapter, but it does leave you in the best possible position. However, the Fluendo codec can be used only to decode MP3 audio. It can't be used to encode MP3s, so if you want to rip tracks to MP3 from audio CDs, you will have to use the less legally precise GStreamer plug-in packages (or, better still, encode your audio files using the open source Ogg Vorbis format, which avoids patenting issues and doesn't require installing any additional plug-ins!).
So if you simply want to listen to your existing MP3 tracks, intending to embrace open source audio file formats from this point onward, the Fluendo codec is all you need. To install it, open the Ubuntu Software Center (Applications ![]() Ubuntu Software Center) and enter gstreamer fluendo mp3 in the search box. One result will be returned:
Ubuntu Software Center) and enter gstreamer fluendo mp3 in the search box. One result will be returned: gstreamer0.10-fluendo-mp3. Click the Install button and enter your password when prompted. After the software is installed, MP3 files should play in both Totem and Rhythmbox.
Using Rhythmbox Music Player
Both Rhythmbox Music Player and Totem Movie Player can be used for audio file playback under Ubuntu. Rhythmbox is best if you have a lot of tunes, because it can catalog and manage your collection. You'll find it on the Applications ![]() Sound & Video menu.
Sound & Video menu.
The first step when running Rhythmbox for the first time is to let it index your music files. As soon as it starts up, Rhythmbox will automatically start indexing any files in the Music folder (in Places), so it's a good idea to copy your music collection into that folder if you haven't done so already. But you can also make Rhythmbox index any music you have located elsewhere. To do so, click Music ![]() Import File or Music
Import File or Music ![]() Import Folder. Then navigate to your music tracks on the hard disk. You can select more than one file or folder by Shift-clicking or Ctrl-clicking, just as in Windows.
Import Folder. Then navigate to your music tracks on the hard disk. You can select more than one file or folder by Shift-clicking or Ctrl-clicking, just as in Windows.
Note that, unlike iTunes or some other comparable programs, Rhythmbox doesn't copy your music to its own library folders when cataloging your files. Instead, it merely creates an index of the files you already have.
If you subsequently move or delete any files, Rhythmbox might get confused. This can be resolved by clicking Music ![]() Import Folder and rebuilding the index (for single files, click Music
Import Folder and rebuilding the index (for single files, click Music ![]() Import File).
Import File).
![]() Tip If disk space is a concern, and your audio files are in a Windows partition, you could simply leave the files there, rather than copy them across. Rhythmbox will still be able to index them. You just need to navigate to your Windows partition, which you should have as a shortcut under Places (otherwise, it will be in
Tip If disk space is a concern, and your audio files are in a Windows partition, you could simply leave the files there, rather than copy them across. Rhythmbox will still be able to index them. You just need to navigate to your Windows partition, which you should have as a shortcut under Places (otherwise, it will be in /media/disk).
Rhythmbox starts in browse mode, which means that your music files are listed at the bottom of the program window. In roughly the middle-left of the program window, you'll find a listing of the artists behind the MP3s in your collection. On the right, you'll see the album that the music track is taken from (provided that information is included in the music file itself, such as the MP3 ID3 tags). Figure 16-3 shows an example of a Rhythmbox window.

Figure 16-3.Rhythmbox will organize your music tracks by artist or album.
Clicking the Browse button on the toolbar (whose icon is a compact disc overlaid with some musical notes) will remove the Artist and Album lists and present simply a list of the tracks in your collection. You can click on the headings of this list to order it by title, genre, artist and album alphabetically. The default sort order is by artist.
Playing a track is simply a matter of double-clicking it in the list. After the track is finished, Rhythmbox will play the next track in the MP3 file list. At the top of the Rhythmbox window are transport controls that let you pause or play the track, skip tracks, repeat tracks, or switch to shuffle play (that is, random track selection). The Play button combines the functions of play and pause. So if you want to pause or stop the track that's currently playing, you click the Play button. Slightly strange decision by the Rhythmbox developers there, but easy enough to get used to!
You can toggle displaying visual effects with the Visualization button. The display output is shown in the main window by default. The controls for customizing the effects are available at the bottom of the visual effects display and are made visible when you hover your mouse over the visual effects. You have the option to change the nature of the visualization effect; the quality of the effect; and whether the effect will be displayed within Rhythmbox, in a different window, or in full-screen mode.
Beneath the transport controls and the artist/track name information is a slider that shows the progress through the current song and lets you cue forward and backward by clicking and dragging.
To create a new playlist, click Music ![]() Playlist
Playlist ![]() New Playlist (or press Ctrl+N). A new icon will appear under the Playlists heading in the left pane of Rhythmbox, with the words “New Playlist” highlighted. Type a name for your new playlist and press Enter. To add tracks to the playlist, click Music under the Library heading in the pane on the far left side of the program window, and then drag and drop files onto your new playlist entry. To start playing the tracks in the playlist, select it and double-click the first track in the list.
New Playlist (or press Ctrl+N). A new icon will appear under the Playlists heading in the left pane of Rhythmbox, with the words “New Playlist” highlighted. Type a name for your new playlist and press Enter. To add tracks to the playlist, click Music under the Library heading in the pane on the far left side of the program window, and then drag and drop files onto your new playlist entry. To start playing the tracks in the playlist, select it and double-click the first track in the list.
Portable audio players are well supported by Rhythmbox. If you plug in an MP3 player or iPod, Ubuntu will pop up a window asking you what application you would like to launch. Open Rhythmbox is the default, and you can safety check the Always Perform This Action check box and click OK. An icon representing your digital audio player will now appear under the Devices heading in the left pane of Rhythmbox. If you click the icon, the contents of your device should appear, and you should be able to play songs from it. You can transfer music from your computer to your player by clicking the Music icon in the left pane, selecting the track or tracks you would like to copy, and dragging them to the icon for your digital audio player. To transfer from player to computer, click your player icon and drag tracks to the Library icon under Music in the left panel. When you've done your copying and you'd like to unplug your device, don't forget to right-click the device icon and select Eject.
![]() Note When you double-click an audio file in a File Browser window, Ubuntu will start Totem Movie Player rather than Rhythmbox Music Player. This is quick if you want to preview tracks, but to have them automatically opened in Rhythmbox when you double-click them, you need to change the Open With preferences. This is easily done: Right-click any MP3 file in a File Browser window, select Properties, and click the Open With tab. Click the radio button alongside Rhythmbox's entry in the list to select it as the default application and then click the Close button.
Note When you double-click an audio file in a File Browser window, Ubuntu will start Totem Movie Player rather than Rhythmbox Music Player. This is quick if you want to preview tracks, but to have them automatically opened in Rhythmbox when you double-click them, you need to change the Open With preferences. This is easily done: Right-click any MP3 file in a File Browser window, select Properties, and click the Open With tab. Click the radio button alongside Rhythmbox's entry in the list to select it as the default application and then click the Close button.
Purchasing from Online Music Stores
Rhythmbox allows you to purchase albums from the Jamendo, Magnatune, and Ubuntu One online music stores. Jamendo works on the principle of Creative Commons (see http://creativecommons.org), so many tracks are free of charge, although you can donate money if you want.
Under the Stores heading on the leftmost pane of the Rhythmbox window, click Magnatune or Jamendo. You'll see a brief introduction to the store while the catalog is downloaded. After the catalog is downloaded (indicated by the status bar at the bottom right of the program window), you will be able to browse through the available tracks, as if they were on your own computer. They will be sorted by artist and track name. Double-clicking each track will download and play a high-quality preview.
![]() Note The first time you try to browse music on the Jamendo or Magnatune labels, Rhythmbox will have to download the full artist catalogs. Jamendo currently has nearly 20,000 artists, so this will take a few minutes even on a broadband connection. You might want to fix yourself a beverage while you wait!
Note The first time you try to browse music on the Jamendo or Magnatune labels, Rhythmbox will have to download the full artist catalogs. Jamendo currently has nearly 20,000 artists, so this will take a few minutes even on a broadband connection. You might want to fix yourself a beverage while you wait!
The main toolbar of Rhythmbox has changed in the latest Ubuntu release. Several new icons appear, allowing you to purchase and download the album, buy a physical CD, or learn more about the artist.
The Ubuntu One music store behaves more like a web page embedded within the Rhythmbox window, and you can start browsing it straight away, as long as you're connected to the Net.
Using the Jamendo Store
Songs from Jamendo are free to listen to, download, and share. Jamendo allows any artist to upload his or her music under one of the “some rights reserved” licenses published by Creative Commons. Fans can join the Jamendo community free of charge, write reviews, and share music with other members, and if you'd like to support an artist with a donation, Jamendo makes it easy to do that.
![]() Tip Not only can you download the tracks from Jamendo, but you can also remix many of them or use snippets of them in your own music. All of this is because of the artists' choice to use Creative Commons licenses. Many of them opt for a license which permits you to do exactly what you want with their music, as long as you credit the original artist and pass on the same rights to other people if you redistribute your work.
Tip Not only can you download the tracks from Jamendo, but you can also remix many of them or use snippets of them in your own music. All of this is because of the artists' choice to use Creative Commons licenses. Many of them opt for a license which permits you to do exactly what you want with their music, as long as you credit the original artist and pass on the same rights to other people if you redistribute your work.
If you want to download an album, select a song in the music list that is included in the album you would like to download, and then click the Download Album button on the toolbar. Firefox will visit a URL that includes a BitTorrent tracker file—effectively, a small file that opens the Transmission BitTorrent client built into Ubuntu. BitTorrent will then attempt to download the entire album.
![]() Note BitTorrent is a unique file-sharing system designed to share bandwidth. Depending on your hardware setup, you might need to alter your router or firewall settings for it to work efficiently. For more information, see
Note BitTorrent is a unique file-sharing system designed to share bandwidth. Depending on your hardware setup, you might need to alter your router or firewall settings for it to work efficiently. For more information, see www.dessent.net/btfaq/.
If you want to make a donation to an artist, select a song in the music list that the artist performed, right-click it, and select Donate to Artist, or click the Donate to Artist button on the toolbar. Firefox will direct you to a web site where you can fill in a form to complete your donation by Paypal or credit card.
Purchasing from Magnatune
Magnatune operates on a different basis from Jamendo. Like a traditional record label, Magnatune is picky about its artists, with only a few hundred on its books, but, unlike a regular label, it lets you the customer try before you buy.
With Magnatune, you can preview any song in its entirety through your Rhythmbox player without paying a penny. At the end of each song you listen to, you will hear an announcement telling you the name of the track and artists, and inviting you to become a member of Magnatune.
![]() Tip You can learn more about artists by viewing their Magnatune web pages. Click a relevant track and click the Artist Information button on the toolbar. This will automatically load the relevant page in Firefox.
Tip You can learn more about artists by viewing their Magnatune web pages. Click a relevant track and click the Artist Information button on the toolbar. This will automatically load the relevant page in Firefox.
By signing up as a Magnatune member, for US$15 per month, you can download any of the music featured on the label, in a choice of different formats, including high-quality variable bitrate MP3, high quality Ogg Vorbis, and perfect quality WAV or FLAC, which are ideal for burning to CD.
This is not only a great deal for the listener, but also for the artists, who get paid 50 percent, split evenly from what you listen and download.
To join, right-click on any song in the Magnatune index and select Purchase Album from the context menu. This will open Magnatune's web site in Firefox, which will take you through the sign-up process. Once you're a member, you will be able to right-click any song in the Magnatune listing and select Download Album to get your own fully-licensed, legitimate copy of the album in excellent quality.
Purchasing from Ubuntu One
While Jamendo and Magnatune follow very new business models, giving less well-known artists a chance to get heard and paid, Ubuntu's sponsor Canonical thinks that Linux users should also be able to get their hands on mainstream, commercially available music.
To this end, Canonical has started a new music store as part of its Ubuntu One personal cloud service. Backed by 7digital, a major player in digital media services, the Ubuntu One music store gives you access to commercially published music from major and independent labels at competitive prices, in the same way as you would expect from iTunes or the Amazon music store.
Browse the Ubuntu One music store catalog within Rhythmbox to see what's available from your favorite artists and preview snippets of songs. When you find a song or album you want to buy, click the Download button. This will take you to a basket, from which you can check out or carry on browsing for more songs to buy.
When you click the Checkout button, a page will open in Firefox from which, if you haven't already signed up to Ubuntu One, you will be able to create an account and make your purchase. All the music you buy from the store will be in high-quality 256kbps MP3 format, and will appear in your Rhythmbox library under the Music heading, as well as in your Music folder of course. You can play it through Rhythmbox, sync it to your MP3 player, and burn it to CD as many times as you want.
A very cool, perhaps unique feature of the Ubuntu One music store is that any music that you purchase is automatically copied to your Ubuntu One “personal cloud” (meaning storage on Ubuntu One's servers), and is instantly available to any other computer on which you enable your Ubuntu One account.

Figure 16-4.Ubuntu users can now buy music from major and independent labels via the Ubuntu One music store that's integrated into Rhythmbox.
Tuning In to Online Radio Stations
With Rhythmbox, you can listen to a number of predefined Internet radio stations or add your own. Provided the MP3 codec software is installed, as discussed earlier, Rhythmbox is compatible with streaming MP3-based playlists, such as those listed at http://shoutcast.com.
To view a handful of stations that have been pre-programmed into Rhythmbox for demonstration purposes, click the Radio heading in the list on the left side of the Rhythmbox window. To listen to a radio station with Rhythmbox, double-click its entry in the list.
To add a new station, do the following: Visit the web page of the radio station you want to listen to in Firefox and copy the stream's link to your clipboard. You can typically do this by right-clicking the Listen Live or similar link (in Shoutcast it's the blue play button) and selecting Copy Link Location. In Rhythmbox, right-click the Radio icon under the Library listing on the left pane and select New Internet Radio Station. A window will pop up, into which you can paste the station link and click Add. The new station will now appear in the track listing, and you can double-click to play it. The title will be the link itself (http:// etc.), so if you would like to change it to the human-readable name of the station, right-click on it, select Properties, edit the station title and click Close.
![]() Tip There's a great plug-in for Rhythmbox that adds the whole Shoutcast streaming radio catalogue as a heading in your Library. Go to
Tip There's a great plug-in for Rhythmbox that adds the whole Shoutcast streaming radio catalogue as a heading in your Library. Go to http://code.google.com/p/rhythmbox-shoutcast/ to download the plug-in and follow the simple installation instructions you'll find there. We found we had to restart Rhythmbox a couple of times for the plug-in to start working, but it's worth that for having the choice of thousands of stations from all around the world.
Listening to Podcasts
Podcasts are audio files that are distributed by RSS (Real Simple Syndication). This sounds complicated, but it's actually quite simple. When you're subscribed to a particular podcast, the audio files are downloaded automatically in the background, so that the latest episodes will always be available. This makes keeping up with the latest podcasts effortless. Most podcasts take the form of MP3 files, but any audio file format can be used.
In terms of content, podcasts range from simple spoken blog entries, usually created by individuals, to podcasts that are more akin to radio shows and involve interviews. Some professional radio stations even release entire shows as podcasts, with the British Broadcasting Corporation (BBC) leading the charge (www.bbc.co.uk/podcasts).
Rhythmbox is able to handle podcast subscriptions under Ubuntu, and you can add a new subscription by clicking the Podcasts heading in the leftmost pane of Rhythmbox. Then right-click a blank spot in the track listing area, select New Podcast Feed, and enter the URL. However, a much easier way of adding a podcast is to use Firefox to browse to the link.
Conveniently, Rhythmbox is fully compatible with the iTunes podcast format, which is perhaps the most prevalent podcast format at the present time. On the web page where the link is located, click the subscribe link for iTunes users. This will open a dialog box inviting you to choose to open the podcast. Ensure that Rhythmbox is selected, click the Remember My Choice check box, and click OK. Rhythmbox will then download the podcast feed, showing all the titles of the episodes that are available. To listen to an episode, double-click it in the track listing or right-click and select Download Episode. A progress bar in the Status column will show how the download is going. Double-click to listen to the episode.
![]() Tip You can start listening to a podcast before it has completely downloaded.
Tip You can start listening to a podcast before it has completely downloaded.
If only an RSS link is provided for the podcast (usually indicated on a web site by the orange RSS button), after you click it Firefox will offer to subscribe to the link itself, using its Live Bookmarks feature. To change this behavior so that in future RSS links will open in Rhythmbox, click the drop-down link alongside Subscribe to This Podcast Using, and click Choose Application. A file browser window will appear, headed Choose Application. In the top left corner of this window there is an icon of a pencil. Click this, and a Location text box will appear below, within which you should type /usr/bin/rhythmbox and click Open, as shown in Figure 16-5. The Choose Application window will disappear. Back in Firefox, put a check in the box alongside Always Use Rhythmbox to Subscribe to Podcasts and then click Subscribe Now in the Firefox program window.

Figure 16-5. To make Rhythmbox handle RSS podcast feeds that you click on in Firefox, you have to make a slightly fiddly one-off change to Firefox's preferences.
Listening to Audio CDs and Ripping Tracks
Playing back audio CDs is simple. Just insert the CD, and you should see a prompt asking which application you want to open the CD with. The two key choices are to open the CD in Rhythmbox, which will enable playback and ripping of the CD tracks to disk, or to open the Brasero software, which lets you to copy the disc.
For simple playback, selecting Rhythmbox is the best option. You can ensure that Rhythmbox starts automatically in the future when you insert an audio CD by selecting the Always Perform This Action check box.
After Rhythmbox has started, click the name of the CD in the leftmost pane (look under the Devices heading) and then click the Play button on the toolbar. It might take a few seconds for the name of the CD to be looked up online and, provided you're online, the track and artist information will be looked up automatically, so you should find a complete listing, and perhaps even an image of the CD inlay, within the bottom left of the Rhythmbox program window.
To cue backward and forward in the currently playing track, click and drag the slider beneath the transport buttons.
To eject the disc, press the button on the front of the drive. If this doesn't work, either click the toolbar icon within Rhythmbox or right-click the Audio Disc desktop icon and select Eject Volume.
![]() Tip As with all GNOME applications, hover the mouse cursor over each button to display a tooltip that describes what it does.
Tip As with all GNOME applications, hover the mouse cursor over each button to display a tooltip that describes what it does.
If you find that the track listing information is incorrect, as can sometimes happen with online lookups, you can correct it by right-clicking the track name and selecting Properties. Then type the correct details in the dialog box that appears.
Converting audio tracks on a CD into digital music files you can store on your hard disk for personal use is informally known as ripping.
![]() Note Because of the way audio CDs work, you can't simply insert the disc and then drag and drop the tracks onto your hard disk. They must be converted first.
Note Because of the way audio CDs work, you can't simply insert the disc and then drag and drop the tracks onto your hard disk. They must be converted first.
Before you start to rip CDs, however, you need to decide the format in which you wish to store the audio files.
Choosing a Format
You have several basic choices for audio file formats, the main ones being Ogg Vorbis, FLAC, and MP3. Let's look at what each has to offer:
Ogg Vorbis: This is the free software alternative to MP3. Unless you have a trained ear, you won't be able to tell the difference between a Vorbis and an MP3 file. (If you do have a trained ear, you may find Vorbis better!) The two technologies generate files of around the same size, an average of 4MB to 5MB per song, though you may get a slightly better compression rate with Vorbis. The advantage of Vorbis is that it's completely open source technology, so there isn't the ethical burden of using patented MP3 software and, therefore, working against the interests of the open source software movement. The downside of Vorbis is that not all portable audio players support it (though many do, including players from SanDisk, Cowon, Bang & Olufsen, LG, and iriver—see the list at
http://wiki.xiph.org/index.php/PortablePlayers). Other operating systems like Windows will need some additional software installed if you want to play Vorbis files on them (seewww.vorbis.com/setup).FLAC: This stands for Free Lossless Audio Codec, and it's the choice of the audiophile. Vorbis and MP3 are lossy formats, which means that some of the audio data is lost in order to significantly shrink the file. FLAC doesn't lose any audio data but still manages to compress files to a certain degree (although they're still much larger than an equivalent MP3 or Ogg file). FLAC scores points because it's an open format, like Vorbis, but you'll face the same issues of support in portable audio players and other operating systems (unless additional software is installed; see
http://flac.sourceforge.net).Speex: Originally designed purely for Voice over IP (VoIP), Speex was created for speech encoding. As such, it concentrates on audio frequencies generated during ordinary conversation. Aside from the fact that Speex is an open codec that claims to not employ any patented software methods, there really isn't any reason to use it, even if you're ripping speech tracks from a CD. It is built for transmission across low-bandwidth connections (or small file sizes). If hard-disk capacity is an issue, you might consider it, but Ogg and MP3 are better suited in virtually all situations. The Speex file extension is
.spx.WAV: This is perhaps the oldest audio file format. It uses the
.wavfile extension, which you may have seen in use on Microsoft Windows computers. WAV files are usually completely uncompressed and lossless. However, that doesn't necessarily mean they're high quality; as with any kind of audio encoding, the sampling and bit rate can be set to any value desired. For example, Ubuntu includes a default.wavencoding profile of low quality that can be used when encoding speech. Although WAV files tend to be supported on most computing platforms, the downside is file size. Uncompressed WAV files can be massive, even those with low-quality settings. If uncompressed audio is your aim, FLAC offers a far better alternative.MP3: This is by far the most popular music file format, and practically everyone who owns a computer has at least a handful of MP3 tracks. This means software support for MP3 playback is strong, and of course, most portable audio players are built around the MP3 standard. The only problem for you, as a Linux user, is the issue of surrounding patents, as explained at the beginning of this chapter. Using the MP3 format goes against a lot of what the Linux and open source movement stands for. But in the end, the choice is yours. If you want to rip to MP3, make sure you have installed the Ubuntu Restricted Extras package as described in the “Installing Codecs in a Single Package” section earlier in this chapter.
Ripping Tracks
When you're ready to rip some music, insert the audio CD and then start Rhythmbox (if it isn't already running). Select the disc under the Devices heading, as mentioned earlier in the directions for playing back audio CDs. The check boxes to the left of each listed track will automatically be checked. Uncheck any tracks that you don't want to rip. Now right-click the disc under the devices heading and select Extract to Library, or alternatively you can click the Extract button on the main toolbar.
It's possible to play the audio CD while you rip it, but in our opinion that's best avoided!
![]() Tip By default the buttons on the Rhythmbox Music Player's toolbar aren't labelled, making it tricky to guess what they all mean, especially when their layout and functions change depending on what music source is selected. To make everything clearer, go to Edit
Tip By default the buttons on the Rhythmbox Music Player's toolbar aren't labelled, making it tricky to guess what they all mean, especially when their layout and functions change depending on what music source is selected. To make everything clearer, go to Edit ![]() Preferences and, in the Toolbar Button Labels drop-down, choose one of the options with text included.
Preferences and, in the Toolbar Button Labels drop-down, choose one of the options with text included.
As the tracks are ripped to your hard disk, you will see a progress display at the bottom right of the Rhythmbox program window. Audio tracks will be saved in a directory named after the artist and album title, within your Music folder in Places.
MAKING MUSIC AND RECORDING AUDIO
Creating Your Own CDs
You can create audio CDs using Brasero, which aims to be a complete CD-burning suite, like Nero under Microsoft Windows. It's also possible to create audio CDs using only Ubuntu's File Browser, but Brasero offers finer control over the process of compiling and burning your disc.
Start by inserting a blank CD. A dialog box will appear, asking what you want to do with the CD. The default choice of Open CD/DVD Creator isn't what you want, because it will start the File Browser's data CD creator, which is designed to write files to disc. Instead, click Open With Other Application from the drop-down list and select Brasero Disc Burner from the list of applications that appears. Then, in the parent dialog box, select Open Brasero Disc Burner from the drop-down list, if it isn't already selected. To always have Brasero start automatically when a blank disc is inserted, select the Always Perform This Action check box before clicking OK.
When Brasero's main window appears, it will by start with a new Data project by default. To switch to an audio CD project, click Project ![]() New Project
New Project ![]() New Audio Project.
New Audio Project.
The program is very simple to use:
- Using a File Browser window (Places
 Music), browse to where the audio files are located and click and drag them onto the Brasero program window. The files can be Ogg, FLAC, or MP3 files (if you installed the MP3 playback software, as described in the “Installing Codecs” section earlier in this chapter). Note that the Fluendo codec will also work for burning CDs from MP3 tracks.
 - You'll see the track listing build up in the window where you dropped the selected tracks. In addition, at the bottom of the program window, you'll see the estimated size of the project, shown in minutes. You'll need to check the size of the CD you're using on its packaging, but most blank CD-R discs can hold a maximum of between 70 and 80 minutes of audio.
- Click and drag each track to rearrange them, if necessary, to create an ideal running order, as shown in Figure 16-6. When you're satisfied with the track listing and are sure you haven't exceeded the maximum allowed total time for the disc, click the Burn button to prepare your disc for burning.
- In the Disc Burning Setup dialog box, click the Properties button if you want to alter any details about the actual burning process, such as the burn speed. However, the default settings are usually OK. Click the Burn button to start the write procedure. First, the tracks are converted to pure audio files, and their volume levels adjusted so no track is louder than any other (something known as normalization). Then they're actually burned to disc. This can take some time. When Brasero finishes with the burning, the CD will be ejected.
![]() Note Depending on the quality of the blank CD, you might not be able to write audio CDs at full speed. If this is the case, Brasero will stop during the writing process with an error message. You'll need to adjust the burn speed. To do so, in the Disc Burning Setup dialog box, click the Properties button and choose a more conservative speed from the Burning Speed drop-down list.
Note Depending on the quality of the blank CD, you might not be able to write audio CDs at full speed. If this is the case, Brasero will stop during the writing process with an error message. You'll need to adjust the burn speed. To do so, in the Disc Burning Setup dialog box, click the Properties button and choose a more conservative speed from the Burning Speed drop-down list.
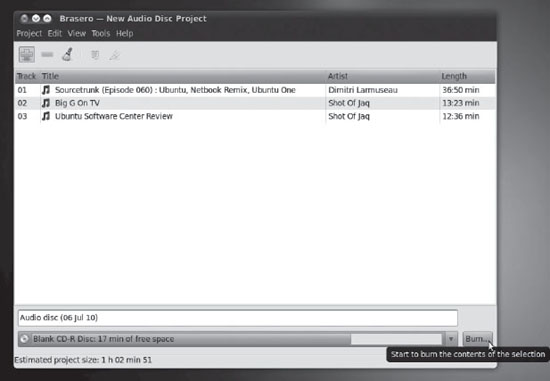
Figure 16-6. Brasero makes it easy to create CDs from digital audio files.
Recording from a Microphone
To enable you to capture live audio, using either your laptop's built-in microphone or an external microphone plugged into the appropriate input, Ubuntu includes a simple program called Sound Recorder. You'll find it on the Applications ![]() Sound & Video menu.
Sound & Video menu.
When Sound Recorder starts, you'll first want to check that you are getting a level from your microphone. In the File menu, select Open Volume Control. This will open Sound Preferences in a separate window. (As we saw in the Configuring Sound Cards section in Chapter 7, these controls can also be accessed by clicking on the volume icon in the top panel and selecting Sound Preferences, or via System ![]() Preferences
Preferences ![]() Sound). Click the Input tab and ensure that Mute is not checked. Speak into the microphone and adjust the Input Volume slider until an acceptable level registers in the Input Level meter (see Figure 16-7). When you're happy with the level, close Sound Preferences.
Sound). Click the Input tab and ensure that Mute is not checked. Speak into the microphone and adjust the Input Volume slider until an acceptable level registers in the Input Level meter (see Figure 16-7). When you're happy with the level, close Sound Preferences.
Next, choose your preferred audio file format from the Record As drop-down menu. By default, “CD Quality, Lossy (.ogg type)” is selected. This is the free Ogg Vorbis format discussed earlier in the “Choosing a Format” section. Alternative formats offered are AAC, FLAC, MP2, MP3, WAV, and Speex. On our test system, Ogg Vorbis worked well, but test recordings made in any other format failed to play back. Your mileage may vary.
Next, select Save As from the File menu and give your recording a name. When you're ready to record, click the red Record icon in the toolbar or press Ctrl+R on your keyboard. To stop the recording, click the square stop icon or press Ctrl+X. To play back, click the green Play button or press Ctrl+P.
That's pretty much all there is to Sound Recorder. It's a very bare-bones . If you'd like a much more fully-featured audio recording program, with the facility to record multiple tracks, edit your recordings, and apply hundreds of sophisticated effects, open the Ubuntu Software Center and install Audacity.
Figure 16-7. Before using Sound Recorder, you'll want to make sure you're getting a good input level from your microphone.
Summary
This chapter has covered the audio functions built into Ubuntu and shown how, by downloading a few extra system files, you can play back the majority of audio files in existence. We started by discussing the moral and legal dilemmas associated with multimedia playback on a computer. Then we moved on to how to install the necessary codec files on your computer, before discussing how you can listen to music files, CDs, and online radio stations.
We closed by showing how you can convert CDs into music files, and then the inverse of this: how you can create CDs from audio files.
In Chapter 17, you'll look at playing back movies and online animations when using Ubuntu.