P A R T 5
![]()
Keeping Your System Running
C H A P T E R 20
![]()
Installing and Removing Software
One of the fun things about running any operating system is the ability to expand it—to add in new software over time to improve your workflow or just enhance entertainment value.
Linux is blessed in this regard, because tens of thousands of software titles are available to meet almost every need.
But for years, the generally accepted idea was that Linux was a great OS, superior in many ways to Microsoft Windows, but that it was too difficult to use. Software installation, continued the argument, was one of the major examples of this difficulty: many people still think that for installing software in Linux you must know how to compile source code! Comparing this to the seemingly straightforward method of getting software for Windows, either online or at a retail store, and then running an installation wizard, Linux was seen as a non-option for the average user.
It is not that Windows applications are easy to get. For starters, you must pay for them, a couple hundred dollars or more in some cases. Then you have restrictions on how you can use them, and it is often hard to follow the rules of what you can or cannot do. You might be infringing the terms of license of your software even without knowing it. It is harder still for companies and individual users alike to determine and prove that the software they are using is legitimate; some vendors asks that you store your license keys or certificates, while others demand an invoice as proof of your purchase. It's up to the vendor.
Another problem is to find the right software. There's no central location where you can find all the software available for Windows. And while there are freeware applications, more often than not you need to download them from less-than-trusted sites prone to bundling malware into their download packages.
This method of application installation was practically rendered obsolete by Apple's Application Store for the iPhone and iPod Touch. This is a secure, centralized, and searchable catalog of applications, available just one click of the mouse away. If the application exists, you just browse or search the store, and the application appears.
But this model has its limitations too, the most important being the tight control Apple enforces in this store, making a developer's job of publishing applications a nightmare.
When the people at Canonical wanted to make an OS for human beings, they soon realized that all the shortcomings of competing models could be overcome based on the foundations of Linux, and of Debian in particular. The result of this effort was the Ubuntu Software Center, first launched for Karmic Koala (Ubuntu 9.10), and revamped for Lucid Lynx. It is a centralized yet extensible catalog for all Ubuntu applications, and is also the subject of the first section of this chapter. If you just want to install applications the easy way, that's all you need to read. Next, a few pages of theory are available, which gives you a clearer view of how the Center works and lays the foundation for the third section of this chapter, in which you learn more methods for installing and working with Ubuntu… and Windows!… applications.
And of course, how to compile source code!
Using the Ubuntu Software Center
Ubuntu has traditionally had many different tools for application installation and management: the Synaptic Package Manager, Add/Remove Programs, the Update Manager, Software Sources… not to mention the command-line tools dpkg and apt. Those were related tools for doing similar tasks around software management. Before undertaking any installation task, you first needed to know which tool to use.
And many developers weren't even coordinated to the extent of making their applications available from a single source. So an effort was to be made in two directions: the making of a single, all-encompassing tool, and the publication of all available software in that tool. Thus the Ubuntu Software Center was born.
Navigating the Ubuntu Software Center
The Ubuntu Software Center is available as the last item in the Applications menu. When opened, it shows a default start page, as shown in Figure 20-1. It is the root of the Get Software item.
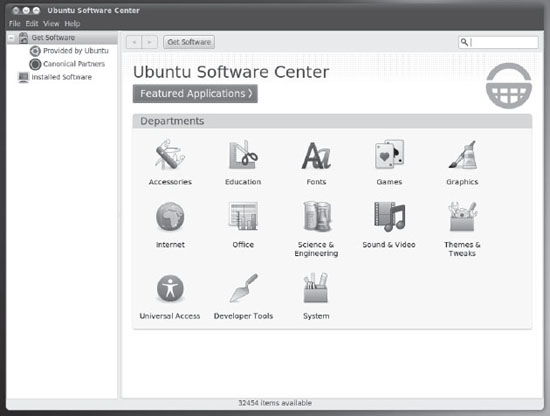
Figure 20-1. The structure of the Ubuntu Software Center
The menu bar is a quite straightforward way of performing actions within the Center, but its options are usually disabled. They are made available only at certain times, depending on the section of the Center in which you are.
File: Here you will find the Install and Remove commands, only available when you select a specific application in a list, or when you open the application page itself. Only one of the options will be available at a given time, depending on the current state of the application. The Close option is always available and instructs the Ubuntu Software Center to quit (notice that if there are pending operations in progress, the Center will wait until those are completed to close).
Edit: Many of the options in this menu, like Cut, Copy, Paste, and Delete, are available only when you are entering text in the Search dialog box. The Copy Web Link option is enabled when you select an application from a list or when you open that application's details page and copy the URL of the application to the clipboard, so you can paste it into your browser and access it directly. The Search option is available whenever the Search dialog box is present, and basically focuses on it. And last, the Software Sources option allows you to modify or add locations from which you want to download applications. More about this later in this chapter.
View: Here you can select the scope of the applications which you want to see listed. All Software displays software from all sources. Canonical-Maintained Software displays only software maintained by the company behind Ubuntu.
Help: Here you can access useful help information about the Ubuntu Software Center.
The navigation pane is used to browse the different sections of the Ubuntu Software Center. It has three main elements, of which one is usually hidden. The main page changes depending on the element selected in the navigation pane.
Get Software: This is used mainly to locate and install software in the catalog. This catalog is constructed by using software sources, of which you can see the default two: Provided by Canonical, and Canonical Partners. More items appear under Get Software as you begin to add alternative software sources, as explained later in this chapter. Those two default sources are by far the most secure way of installing applications in Ubuntu—much safer than downloading them from an unknown web site. But someday you may want to install software not officially endorsed by Canonical, and for that it is important to know how to add software sources.
Installed Software: Here you see the list of software already present in your computer, and can remove it. Installed software is recognizable by the checkmark that accompanies its icon in the list. Browse this section if you don't want to install additional software; you could for instance just see what you have installed, or remove an application that is no longer needed (to free up disk space, for instance).
In Progress: When performing actions like installing or removing applications, or updating the software catalog, you will notice in the notifications pane a third element named In Progress. When you select this item, you can see in the main pane the status of each of those actions, along with a progress bar indicating how near to completion the task is. If you are installing an application, for instance, a Cancel button will show up next to the progress bar while downloading the application. Once the installation starts (after download), it cannot be canceled. When all actions have completed, the In Progress element returns to its hidden state.
The status bar usually shows useful information about the number of applications in each section. For example, when selecting Get Software for the first time, it shows the total number of applications in the catalog (32,420 at the time of writing!). If you select a particular department, it shows the number of applications in that department (for instance, the Office department shows 124 applications). When using the Search dialog box, it tells the number of applications that matched the search terms.
Browsing and Searching for Software
To install an application, first you need to find it. This is made easy by the Center's browsing and searching mechanisms, and by the fact that Ubuntu maintains all applications in a catalog containing information about the applications available from all configured software sources.
This catalog is a hierarchical structure organized into departments and sometimes sublevels under them, and is made available in the main pane when you select Get Software in the navigation pane. Each department groups applications with a common objective, and its name is self-explanatory; for example the Games department has games like Mines, and the Office department has applications used mostly at the office, like OpenOffice.org Word Processor (commonly known as Writer). So, just select the department you feel is most likely to have the application you are looking for. If you are just exploring, you can select the Featured Applications link, which takes you to a special list of applications selected by the Ubuntu team.
At the top of the Get Software section in the main pane is the location bar, composed of three items: the Back and Forward buttons, the path bar, and the Search dialog box.
The Back and Forward buttons allow you to navigate the history of the visited pages.
The path bar shows you which part of the hierarchy you are in at the moment, and allows you to navigate to parent levels by clicking in the corresponding part of that bar. For example, clicking Get Software takes you to the start page.
Either by selecting the Featured Applications or by clicking on a department, you access what is known as a software list view. Some departments (like Games, for instance) have sublevels, and this is shown by dividing the main pane in an upper section with the sublevels (which are browsable themselves), and a lower section with the software list view. In this view all related applications are displayed in a series of contiguous rows, as shown in Figure 20-2. You see here the application's icon, name, and short description. You can tell whether an application is already installed by looking at its icon: if a white checkmark inside a green circle is merged with the icon, then your application is already in your system.
![]() Note Take into account that the software installation media actually resides in repositories maintained by Ubuntu on the web, and that the first thing the Ubuntu Software Center has to do when you click Install is download the software package. If you don't have an Internet connection, you will not be able to install software from those repositories. You can use a CD or DVD instead, or download the application packages to another computer and then locally install them into your computer. Those options are explained later in this chapter.
Note Take into account that the software installation media actually resides in repositories maintained by Ubuntu on the web, and that the first thing the Ubuntu Software Center has to do when you click Install is download the software package. If you don't have an Internet connection, you will not be able to install software from those repositories. You can use a CD or DVD instead, or download the application packages to another computer and then locally install them into your computer. Those options are explained later in this chapter.
When you find the application you want to install, just select it from the list and press the Install button that appears at the right end of the application's row. You'll be prompted for your password, and the application will start installing. A progress bar will appear above the Install button, and a new element labeled In Progress will emerge in the navigation pane. Once it has finished installation, the progress bar disappears, the Install button is replaced with a more appropriate Remove button, and the In Progress element disappears. Can you guess how to uninstall your application? Yes, by pressing that Remove button.
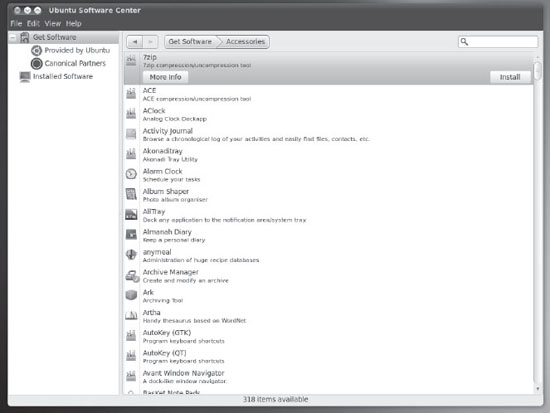
Figure 20-2. The list of available software for the Accessories department
If you want to know more about a particular application, just select it from the list and click the More Info button. This takes you to the software item screen, which you can see in Figure 20-3.

Figure 20-3. The software item screen for GNOME Do
The elements in the software item screen are:
- The application icon.
- The name of the application.
- A short description.
- An Action/Status bar section, in which you can see if the application is already installed, choose to Install or Remove it, and follow the progress bar when performing one of those two tasks.
- A full-length description of what the application does.
- A link to the application's web site.
- Screenshots of the application.
- A description of the availability of updates for the application—whether they are made available by Canonical or by the community, or by nobody.
- Licensing information. Most applications are Open Source, but you will find some proprietary drivers.
- Package name and version.
Click the Back button or the name of the department in the location bar to go back to the list of applications.
Another way of finding an application is by using the Search dialog box, available at the location bar. You need to be aware that searches are targeted at the scope specified by the path bar. This is to say that if you are browsing the Get Software ![]() Education department and search for an application, only applications in that department will show up. The department software list is filtered to show only the applications that match the search terms, and in the status bar the number of matching items is shown.
Education department and search for an application, only applications in that department will show up. The department software list is filtered to show only the applications that match the search terms, and in the status bar the number of matching items is shown.
All operations available at a text box, such as pasting and deleting, can be used in the Search dialog box. The search is performed as you type your text; it is not necessary to press Enter or click on the magnifying glass to execute the query. If you want to remove the filter for the applications, just click the little sweeper that's inside the Search dialog box, at the right.
Does all this seem too easy to be true? Well, it is true, and it is all you have to do to install most of the software you will ever need within Ubuntu (as we mentioned before, at the time of writing there were 32,420 applications available at the Center!). But Ubuntu is also a versatile and flexible OS that gives you options. It allows you to install additional software through alternative sources, keep your applications up-to-date, and even use Windows applications. This is explained later in this chapter, but first we need to delve a little deeper into the theory behind Ubuntu software management to understand those processes better.
Software Installation Basics
If the Ubuntu Software Center is a marvel for its beauty and simplicity, the overall Ubuntu software management system is of no lesser merit in what it enables. The Center takes advantage of years and years of previous developments that made it possible, such as the introduction of Debian packages, the apt tool, and software repositories. Let's look at those elements in a little more detail.
Formats of Linux Installation Files
If you visit the web site of a particular Linux application, you may find that it's available to download in a number of different formats. The program will almost certainly be available as source code—the original human-readable text that the developer created. But it might also be available as a binary or a package file.
![]() Tip Linux isn't the only OS for which open source programs are created and used. There are open source projects for both Windows and Apple Macintosh, many of which are hosted at the
Tip Linux isn't the only OS for which open source programs are created and used. There are open source projects for both Windows and Apple Macintosh, many of which are hosted at the http://sourceforge.net web site. Many other, less widely used operating systems also rely on open source software to a greater or lesser extent. Ubuntu software is hosted in Launchpad (https://launchpad.net), a web application maintained by Canonical, used also for software development and bug tracking.
Here are the formats by which Linux software is usually distributed:
Source code: Programmers write their software in various programming languages, such as C and C++, and the code that results is known as source code. To make source code usable, it must be compiled into a binary. Because the cornerstone of the Linux philosophy is the sharing of source code, you'll almost always find the source code of a program available at the developer's web site. You can then download and compile this on your own system (or, if you're so inclined, study the source code to further your understanding). Although compiling source code isn't very hard to do, it's more convenient to download either a binary version of the program or a package.
Binary files: You might find that ready-made binary files are available at the developer's web site. In other words, the programmer (or a third party) has taken his or her own source code and, as a service to users of the program, compiled it so that it's ready for use as soon as it's downloaded. For example, this is how Linux versions of the Mozilla Foundation software, like Thunderbird and Firefox, are currently distributed if you download them directly from
www.mozilla.com. Sometimes binary files come with scripts to help you install them. However, in most cases, you simply place the files in a convenient location on your hard disk and then run them from there.
![]() Note In the cases of both source code and binary files, the files usually come in a tarball, which is a single archive file containing other files. A tarball isn't, by definition, compressed, but usually either the
Note In the cases of both source code and binary files, the files usually come in a tarball, which is a single archive file containing other files. A tarball isn't, by definition, compressed, but usually either the bzip2 or gzip tool is used to shrink the file, to ease transportation across the Internet.
Self-installing binaries: Some larger programs are made available as self-installing binary files. This comes very close to the way Windows works, because when the file is executed, a GUI-based installation wizard takes you through installation. If you download the standard version of OpenOffice.org (that is, not a version packaged for a particular system) from the official web site (
www.openoffice.org), for example, you'll end up with a single 160MB+ file, which you then simply execute from the command line.Package files: In many cases, you'll find that a package file of the program is available. In this case, someone has compiled the software files and put them all together in a single, easily transported file. Ubuntu package files end with
.debfile extensions, but other Linux distributions use other package formats, such as.rpm(Fedora/Red Hat, SUSE Linux, and Mandriva, among others).
![]() Note As a blanket rule, an installation package created for one distribution isn't compatible with another. It's possible to use a program called
Note As a blanket rule, an installation package created for one distribution isn't compatible with another. It's possible to use a program called alien under Ubuntu, which aims to convert packages between distributions and different package formats, but this should be seen as a last resort because the results may not always be satisfactory. You'll be better off simply obtaining a package specifically designed for your Linux distribution.
Package Management
Of all the preceding formats, packages are by far the most common and popular in the world of Linux. Ubuntu utilizes packages, as do nearly all other distributions. In fact, the Ubuntu installation DVD-ROM contains hundreds of packages, and its various software repositories contain many thousands.
A well-implemented package management system is able to install programs, upgrade them, and uninstall them, all with just a few keystrokes or clicks of the mouse. It vastly reduces the amount of work required to get new software onto your system and makes maintenance tasks such as upgrading software easy too.
It's important to understand what an Ubuntu package file actually is and what it contains. With Windows, an installation .exe file is effectively a piece of software combined with an archive of files. When you run the executable, it triggers a small program contained within it that then unpacks the contents of the file and installs them to the hard disk.
In contrast, package files used by Ubuntu merely contain the program files along with a handful of configuration scripts to ensure that the software is set up correctly. Package files are useless without the various pieces of software already installed on the system that are used to manipulate them and do the hard work of installing, removing, and querying them. This software is known as the package management system. In the case of Ubuntu, the package management system has two components: dpkg and apt, which we cover later in this chapter. The Ubuntu Software Center itself is always working with packages, although you never see them.
The use of a package management system has a number of benefits. The package management system builds its own database, so it knows exactly what programs are installed at any one time. Therefore, you can simply query the database rather than search the applications menu or hard disk. The package system also keeps track of version numbers. This gives the user much more control over the software on the system, and it makes updating easy.
The use of a package management system also means that if a program starts to act strangely, its configuration files can simply be refreshed by using the package manager. There's no need to uninstall and reinstall the software, as is so often the case with Windows programs. The clean way in which a package manager uninstalls software makes it very easy to try out, and remove, lots of different software without worrying about the stability of your computer.
Dependency Management
One of the key features offered by any package management system is dependency management. Put simply, the package manager ensures that if you install a piece of software, any additional software it relies on to work properly is already present on the system. It the software isn't present, the package manager must either resolve the situation automatically or ask you what to do.
Sometimes the software you want to install might depend on other programs on your system, such as applications that simply add a graphical front end to shell applications, but more often, the dependencies take the form of system libraries. It helps if you realize that not all packages contain software that you, as a user, will make direct use of. Some packages contain nothing but library files—shared pieces of code that are equivalent to .dll files under Windows. The key library on an Ubuntu system is the GNU C Library, without which the Linux kernel couldn't function, which is provided by the libc6 package. But practically every program has its own needs when it comes to library files, and these requirements must be handled by the package manager.
![]() Note One reason Windows installation files are often so large is that they typically come with all the system files they need, in case they're not already present on the system. This does not make dependency problems disappear, however. Third-party application installers sometimes overwrite existing libraries with versions that are incompatible with the rest of the system.
Note One reason Windows installation files are often so large is that they typically come with all the system files they need, in case they're not already present on the system. This does not make dependency problems disappear, however. Third-party application installers sometimes overwrite existing libraries with versions that are incompatible with the rest of the system.
Dependency management doesn't just mean adding in packages that a piece of software needs. It might also mean removing packages already present on your system. This might need to happen if they're incompatible with new software you want to install, something that's referred to as package conflict. In addition, sometimes you might want to remove a package that other packages rely on, a situation known as reverse dependency. In such a case, the package manager must either stop you from removing that software, to avoid breaking the software that depends on it, or remove the reverse-dependency packages too. In most cases, the package manager ask you what to do.
DEPENDENCY HELL
Software Repositories
As mentioned previously, dpkg and apt take care of package management within Ubuntu. These tools are taken from the Debian distribution of Linux, on which Ubuntu is based.
Debian Package, or dpkg, is the most basic part of the system. It's used to install and uninstall software, and it can also be used to query any individual software packages. It's like the manager in a warehouse who is tasked with knowing exactly what boxes have been stored where. The manager doesn't know where the boxes come from, and he doesn't know anything about packages outside his warehouse. He just manages the boxes that are delivered to him and that are stored in his warehouse.
dpkg is aware of dependency issues and will refuse to fully install a package if the others it needs aren't already installed or supplied at the same time. But it doesn't have the means to fix the situation automatically. This is akin to the warehouse manager's inability to order more boxes if he needs them. That's not his job. He'll just tell you if boxes delivered to him are missing some of their components.
Because of this, there's an additional layer of software that sits on top of dpkg called the Advanced Packaging Tool, or apt. apt is very sophisticated. Its job is to handle dependency management. Try to install some software using apt, and any dependency issues will be worked out for you.
apt can do this because it's designed to work with software repositories. Users can search and install packages from these collections of software. More often than not, these software repositories are online, but that's not always the case. The DVD supplied with this book contains the base installation software repository, for example.
![]() Note As you might already have guessed, the Ubuntu Software Center is simply a GUI front end for the
Note As you might already have guessed, the Ubuntu Software Center is simply a GUI front end for the apt system.
It's important to note that apt relies on the dpkg system to take care of the actual installation. Effectively, dpkg and apt are two sides of the same coin.
As you might have realized, the package management system means that Linux software installation/removal is a fundamentally different proposition than handling software under Windows or Mac OS X. If you want to install new software, the first place to look is the Ubuntu software repositories. The online repositories contain most of the popular software available for Linux right now, all packaged for installation under Ubuntu.
It's comparatively rare for an Ubuntu user to visit a web site and download a package file for installation, as is often the case for Windows users. The only time this normally happens is if you can't find what you're looking for in the official repositories. Staying within the standard repositories makes problems less likely.
![]() Tip Software repositories don't have to be “official,” or sanctioned by Ubuntu, to be used under Ubuntu. Sometimes you might opt to add repositories that contain particular software, such as multimedia repositories. This may be necessary because multimedia formats are often licensed under terms that Ubuntu doesn't agree with, so it declines to offer this software from its official repositories. Bear in mind that unofficial repositories aren't necessarily safe.
Tip Software repositories don't have to be “official,” or sanctioned by Ubuntu, to be used under Ubuntu. Sometimes you might opt to add repositories that contain particular software, such as multimedia repositories. This may be necessary because multimedia formats are often licensed under terms that Ubuntu doesn't agree with, so it declines to offer this software from its official repositories. Bear in mind that unofficial repositories aren't necessarily safe.
Out of the box, Ubuntu comes with a couple of software repositories already configured. These allow you to download new software and also update the system online. Ubuntu software repositories are subdivided into various categories and components.
SOFTWARE VERSIONS
Categories of Repositories
Regardless of whether they're online or on a CD/DVD, Ubuntu repositories are strictly categorized according to the type of software they contain:
Main Distribution: This repository contains the packages that are required to install Ubuntu. This repository usually takes its name from the code name for the release and is activated by default. For Ubuntu 10.04, the main distribution repository is called
lucid, after the code name for the 10.04 release (Lucid Lynx). In the previous release, the main distribution repository was calledkarmic, and the next version (Maverick Meerkat) will have themaverickrepository. (For more details on Ubuntu code names, seehttps://wiki.ubuntu.com/DevelopmentCodeNames.)Security Updates: Sometimes security flaws are so serious that they need to be fixed immediately, within as little as 24 hours of being discovered. If so, the packages concerned will be placed on this server. The Security Updates server isn't about new versions or functionality. It's about fixing security holes rapidly. This repository is also activated by default and is named after the main release title. In the case of 9.04, this means the Security Updates repository is called
lucid-security.Recommended Updates: This repository contains newer versions of the packages in the Main Distribution repository. Like Security Updates, this category also offers bug fixes, but these fixes aren't urgent and are often more substantial than quick patches to fix a critical bug. It is named after the main release title. In the case of 10.04, it is called
lucid-updates.Proposed Updates: This is a special category by which testing releases of updates are made available. There's no reason to use this category unless you want to test packages and help fix bugs (for more information, see
https://wiki.ubuntu.com/HelpingWithBugs). This category is not activated by default. It is named after the main release title, so in the case of 10.04 is namedlucid-proposed.Unsupported (Backport) Updates: The Backports server allows access to software that's intended to go into the next version of Ubuntu but has been packaged for the current version. This software might not have been tested thoroughly and so is suitable only for neophiliacs or those who absolutely need the latest version (perhaps because of a vital new feature it offers). This category is not activated by default. As before, its name is derived from the main release, so in the case of 10.04 is called
lucid-backports.
Repository Components
In addition to the categories listed in the previous section, the Ubuntu repositories are further split into components (effectively subsections) according to how essential the software is to a basic Ubuntu installation or the license that the software uses. Here are the components under which software is typically filed within a repository (although you should note that a third-party repository might have its own names for repository components, and they might vary from this list):
Main: This section contains nearly all the software that's featured in a basic Ubuntu installation. As such, it's all free software, and every package is supported by Canonical, the company that oversees the Ubuntu project. That means that updates are frequently provided to fix security holes or simply to keep up with latest releases.
![]() Note Free software refers to software that's licensed by using one of the schemes recognized by the Free Software Foundation as being free. The most common example is the GNU Public License (GPL). It doesn't necessarily mean that the software is free of charge, although that's nearly always the case.
Note Free software refers to software that's licensed by using one of the schemes recognized by the Free Software Foundation as being free. The most common example is the GNU Public License (GPL). It doesn't necessarily mean that the software is free of charge, although that's nearly always the case.
Universe: This section might be referred to as “the rest,” because it contains the majority of free software available at the present time. Much of it is borrowed from the massive Debian software repository, although the packages are sometimes tweaked to work correctly under Ubuntu before being made available (some people who create Debian packages also create the Ubuntu equivalents). Unlike Main and Restricted, the Universe section is not officially supported by the Ubuntu project, which means there's no guarantee that security flaws will be fixed. Nor is there any guarantee of updates, although most packages are usually updated regularly.
Restricted: Although Ubuntu is mostly free software, it must include some drivers released only in binary form (that is, proprietary) and that, therefore, have license agreements that are not compatible with the goals of free software. That's what you'll find in this section. Some hardware simply won't work fully without software from the Restricted section.
Multiverse: As with the Restricted section, here you'll find software that's released under a software license incompatible with either the letter or spirit of free software. However, unlike the software in the Restricted section, none of the software in Multiverse is considered essential to a default Ubuntu installation.
Source Code: This section contains source code packages. Unless you're a software developer or are thinking of becoming one, this section won't be of much interest.
Partner: This repository contains software offered by vendors who have partnered with Canonical, the company that sponsors the development of Ubuntu. This software is usually commercial and proprietary (that is, not open source). The precise list of software packages offered differs from release to release, but past examples have included virus scanners, media players, and commercial server software.
Now that we've covered the basics of Linux software installation, it's time to talk about additional tools used to manage software that will enable you to perform advanced tasks.
DECODING PACKAGE FILENAMES
Although the filenames of packages might seem like cryptic mumbo-jumbo, they actually tell you a great deal about the file. Let's take a look at the package file of the Eye of GNOME image viewer to explain this:
eog_2.21.92-0ubuntu1_i386.deb
The first element of the filename is the name of the program. In this case, Eye of GNOME has been abbreviated to eog. Abbreviations like this are quite common, because they decrease the length of the filename. But it's important to note that they will be consistent. For as long as Eye of GNOME is supported as a package under Ubuntu, its package filename will always begin with eog.
Following the name of the package is the version number of the program in question: 2.21.92-0. This is almost always the version number that will appear if you click Help ![]() About when the program is running and is the version number decided on by the developer who created the software.
About when the program is running and is the version number decided on by the developer who created the software.
After the version number is the word ubuntu, which indicates that this is a package that has been created specifically for the Ubuntu distribution of Linux. Then you see the build version number of the package: 1. This is Ubuntu's own version number, indicating how many times the package has been built (created) by the Ubuntu team. Sometimes it's necessary to release an updated build of the same version of a program in order to correct an error that was accidentally introduced in the preceding build version. Sometimes the program is patched by the Ubuntu team to support a new function.
After Ubuntu's build version number is the platform on which the package will run. In this case, i386 indicates that the package will run on all x86-based processors, from 80386 upward (the 486, Pentium, Pentium II, AMD processors, and so on). Sometimes you might see i686, which means that the package has been optimized for Pentium Pro chips and above (Pentium II, III, IV, and AMD's Athlon range of chips). If the package is created for 64-bit desktop processors, amd64 will appear there. Some packages are for all architectures.
Optimized versions of packages for particular processors are used only when they might bring a performance boost. For example, there are i686 versions of the Linux kernel and the libc6 library. Even ordinary programs, like OpenOffice.org, can be optimized for their architectures, but the majority of packages that are used under Ubuntu have the i386 designation.
Advanced Application Management
There may be times when you need to perform more advanced tasks than just installing or removing software. You might want to have more control over what you install, or enable additional software repositories not included by default. You can update your installed software to use always the most recent version. Or you might need to install software manually from a Debian package. In this section we will look at those and other tasks in depth.
Managing Ubuntu Software Options
You can manage what components of the official repositories to make available to download in your catalog by using the Software Sources tool, available many places: at the main menu in System ![]() Administration
Administration ![]() Software Sources, in the Edit menu in the Ubuntu Software Center, and in other places.
Software Sources, in the Edit menu in the Ubuntu Software Center, and in other places.

Figure 20-4. The Ubuntu Software tab at the Software Sources tool
You can see the Ubuntu Software tab in Figure 20-4. Here you can:
- Select the repository components downloadable from the Internet. You can choose to make available the main, universe, restricted, and multiverse repository components, as well as the source code of the applications (which you will rarely need). We have already talked about those components.
- Select the server from which you will download applications. If you select Other… from the drop-down list, you will see a series of servers from all around the world. If you are unsure which server best suits your needs, click the Select Best Server button and the system will start checking how long it takes for each listed server to respond to its requests, to determine which one is the best selection.
- Select the Installable from CD-ROM/DVD option if you want to install software available directly in the Ubuntu CD or DVD, without an Internet connection. This source will be listed in the Ubuntu Software Center under the Get Software element.
Click Close when finished.
Adding Software Sources
Other sources of software available for Ubuntu are out there that you might need or like to set up. You can access them using the Other Software tab in the Software Sources tool, shown in Figure 20-5.

Figure 20-5. The Other Software tab at the Software Sources tool
By default you will see the Canonical partner repositories, of which the main component is selected and the source code component is not. This is the software source listed under Canonical Partners in the Ubuntu Software Center. You can also add PPAs and other software sources.
The PPAs or Personal Package Archives are repositories hosted by Canonical in its Launchpad service, on behalf of third-party developers. A developer can activate a PPA, and Launchpad will generate a unique key to sign any package contained in that PPA. The developer can then submit the source code for its applications, and the people at Canonical build the binaries and packages needed to install the application. Ubuntu users benefits from this collaboration because they can add those PPAs to their software sources and install the applications with Ubuntu Software Center. Note that the software contained in a PPA is considered untrusted by Canonical, so extra care should be taken.
Follow these steps to add a PPA to your software sources:
- First you need to find the right PPA. You can search for PPAs at the PPAs main page,
https://launchpad.net/ubuntu/+ppas, or browse to a PPA directly if you know its URL (it will always be contained in the same site). For example, the Chromium web browser's daily build is hosted inhttps://launchpad.net/~chromium-daily/+archive/ppa. - Locate the Adding this PPA to your System section. You will see the address of the PPA in the format
ppa:<software_name>/ppa. For example, for Chromium daily build it isppa:chromium-daily/ppa. Copy that text to the clipboard. - Open the Software Sources tool and access the Other Software tab. Press the Add button and paste the PPA's address in the APT line text box. Press Add Source. You will see a URL for the added PPA.
- The key generated by Launchpad for that PPA will also be imported, as you can see in the Authentication tab in Software Sources (you will see an entry called
Launchpad PPA for <software_name>) - Click Close. The catalog in your hard disk will be updated to take into account the new software source. Click Reload.
Now that the catalog is updated, the software available at that PPA can be installed by using the Ubuntu Software Center. You will see an entry for the PPA under Get Software.
You can also add software sources hosted at other services. You need to know the server name and the component name. Go to the Other Software tab, click the Add… button, and fill the APT line field with the information of the repository, using the following format:
deb http://<server>/<repository> lucid <component>
Click Add Source and then Close to add the source to the catalog.
Managing Software Updates
As important as installing software is keeping it up-to-date, to avoid security breaches and to take full advantage of new functionality as it is added. Ubuntu can automatically take notice of software that has been updated in the repositories or software sources it knows, and lets you choose your course of action. This is configured by using the Updates tab of the Software Sources tool, shown in the Figure 20-6.
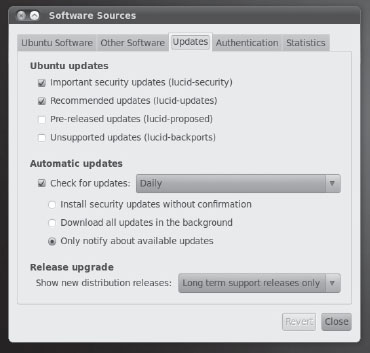
Figure 20-6. The Updates tab at the Software Sources tool
- Select the type of Ubuntu update to allow: Important security updates (
lucid-security), recommended updates (lucid-updates), pre-released updates (lucid-proposed) and unsupported updates (lucid-backports). We discuss them earlier in this chapter. - Configure how often to check for updates (daily, every two days, weekly or every two weeks) and what to do when new versions are found: to install security updates without confirmation, to download all updates in the background, or to only notify when new versions are available.
- Ubuntu will let you know when a new version of the OS itself is made available (which is every six months!). You can select to be warned about “Long term support” (LTS) releases only (which happens every two years), for all normal releases, or never be warned.
Once you have configured to be notified about software updates, it will be a short while until you are prompted to install them. You can do so by opening the Update Manager, a tool located at the System ![]() Administration menu and shown in Figure 20-7.
Administration menu and shown in Figure 20-7.
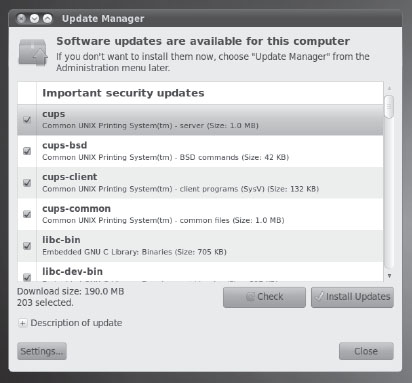
Figure 20-7. Ubuntu Update Manager
There's the list of available updates, each with a check box next to it that indicates whether you want to install the update or not. It is always recommended to keep your software up-to-date, or at least to install the important security updates as soon as possible to avoid future problems.
Clicking the Check button forces a resynchronization of the software catalog to verify that there are no new updates to install. Once you have reviewed all the updates, you can click the Install Updates button and proceed with the task.
The Synaptic Package Manager in Depth
The Synaptic Package Manager is effectively a graphical front end for the apt system and was the preferred GUI application prior to the Ubuntu Software Center. Although Synaptic has been replaced as the primary source for software installation, it can still be useful if you need more control over the specific packages that get installed into your system. While Ubutu Software Center is a great tool for installing applications, you may feel more comfortable installing system libraries or other files with Synaptic. You can use it to search for and install software. To start this program, click System ![]() Administration
Administration ![]() Synaptic Package Manager.
Synaptic Package Manager.
Searching for Software
Before searching for software, it's always a good idea to refresh the package database. This database describes the software contained in the repositories, and it is held on your hard disk. Just click the Reload button on the Synaptic Package Manager toolbar to grab the latest package lists from the various repositories you're subscribed to (which are in your Software Sources). Reloading can take a few minutes on a slow connection, but it ensures that you have access to the latest software within the repositories.
You can search for software in three ways:
Ultra-quick: For a fuss-free instant search, click any entry in the list of packages and then simply start typing. This will match what you type against the package names and sort the list dynamically as you type. This does not let you search through descriptions for keywords, however.
Quick: By typing your search term into the Quick Search field on the main toolbar, you can search through package names and descriptions.
In-depth: For an in-depth search, which lets you search all the information contained within packages, click the Search button on the toolbar. By default, this searches through both package names and the descriptions, but by clicking the Look In drop-down list, you can select to search by other information, such as the version number. You can type either the specific program name or a keyword that may be within the description. For example, if you are looking for graphics drivers for your Nvidia card, but you don't know the name of the package that contains them, you can type nvidia.
![]() Tip You don't need to type whole words in the search field. You can type part of a word or, more commonly, the word in a shortened or alternate form. For example, if you're looking for an e-mail client, it might be more fruitful to simply type mail client or even just mail. This will then return results containing e-mail, mail, mailing, and so on.
Tip You don't need to type whole words in the search field. You can type part of a word or, more commonly, the word in a shortened or alternate form. For example, if you're looking for an e-mail client, it might be more fruitful to simply type mail client or even just mail. This will then return results containing e-mail, mail, mailing, and so on.
By clicking the Settings ![]() Filters button, you can enhance your search results by creating a filter that removes packages from results that don't meet your requirements. You can filter by criteria such as whether the software is already installed, whether it's new in the repository, and much more. It's advisable to click the New button to create your own filter before starting, as shown in Figure 20-8, rather than editing one that's already there. After a filter has been created, you can apply a filter to search results by clicking the Custom Filters button at the bottom left of the main program window, and then clicking the name of your filter in the list.
Filters button, you can enhance your search results by creating a filter that removes packages from results that don't meet your requirements. You can filter by criteria such as whether the software is already installed, whether it's new in the repository, and much more. It's advisable to click the New button to create your own filter before starting, as shown in Figure 20-8, rather than editing one that's already there. After a filter has been created, you can apply a filter to search results by clicking the Custom Filters button at the bottom left of the main program window, and then clicking the name of your filter in the list.

Figure 20-8. Filters can be used to trim the list of search results according to certain criteria.
One use of filtering is to remove the check alongside Installed so that you can remove from the search list any packages that might be already on your system.
![]() Note Filtering can help reduce the number of search results if you use a generic search term, but don't forget to deactivate filtering when you're finished. To do so, click All at the top of the filters list.
Note Filtering can help reduce the number of search results if you use a generic search term, but don't forget to deactivate filtering when you're finished. To do so, click All at the top of the filters list.
In the search results, any packages with the Ubuntu symbol next to them are supported packages, which is to say, they're from the Main or Restricted software repositories, as opposed to Universe, Multiverse, or a third-party repository. Therefore, future updates are likely to be offered.
If the check box is green, that means the package is already installed. A star next to the check box means the package is new. You can view the complete range of Synaptic icons by clicking Help ![]() Icon Legend.
Icon Legend.
By clicking the Get Screenshot button at the top of the description panel, you can view a thumbnail screenshot of the application, if one is available. This can help identify whether the software will fulfill your needs. Clicking the thumbnail when it appears downloads a full-resolution rendition of the screenshot.
Be aware that not all applications presently have screenshots. Some—such as system software or command-line programs that lack a user interface—will never have screenshots because, quite simply, there is nothing to see.
Installing Software
When you click the check box next to a piece of software in the search results and select Mark for Installation, the program will be queued for installation, which will take place as soon as you click the Apply button on the toolbar. If the program has any uninstalled dependencies, you'll also see a dialog box asking you to confirm installing those as well. If you agree, these are automatically added to the list of packages to be installed.
Additionally, if you right-click the file and select Mark Suggested for Installation or Mark Recommended for Installation, you'll see a list of programs that, although not essential to the running of the program in question, will enhance its features to some degree. For example, if you choose to install the VLC media player program, it's also suggested that you install mozilla-plugin-vlc, so that VLC can be used as a plug-in for playing media files in Firefox. You don't have to install these recommended programs; the software will run fine without them. But it can often be rewarding if you do so.
![]() Note If the software in the recommended and suggested lists is grayed out, that means it's already installed. It's also possible that the package doesn't have any recommended/suggested packages.
Note If the software in the recommended and suggested lists is grayed out, that means it's already installed. It's also possible that the package doesn't have any recommended/suggested packages.
After making your selection and clicking the Apply button on the toolbar (bear in mind that you can install more than one piece of software at once), you'll see the Summary dialog box, as shown in Figure 20-9. Here you're once again asked to confirm what needs to be installed. If any software needs to be removed in order to handle dependency issues, you'll be told about this too. Additionally, under the Summary heading, you'll be shown the total size of the files that will be downloaded, as well as the space required on your hard disk.

Figure 20-9. Before any software is installed by the Synaptic Package Manager, you'll be told what it is and asked to confirm the choice.
At the very bottom of the Summary dialog box, you'll see a check box marked Download Package Files Only. As it suggests, this will download but not install the packages. If you then select the package for installation again in the future, you won't need to download it, and installation will be almost instantaneous (unless a newer version of the package has been released, in which case the newer version will be downloaded and installed).
If you see an Unchanged heading in the Summary dialog box, this means that there are several system updates available that you haven't selected for installation. To install the system updates, click Cancel and then click the Mark All Upgrades button on the toolbar. Then click Apply again. You will then see two separate headings in the Summary dialog box: one listing the upgrades and one listing the new packages you've selected to install.
![]() Note Of course, you can opt to ignore the fact that updates are available and simply go ahead with installation. Installing updates as soon as possible is advised but not enforced.
Note Of course, you can opt to ignore the fact that updates are available and simply go ahead with installation. Installing updates as soon as possible is advised but not enforced.
METAPACKAGES
Removing Software
To remove a piece of software, search for it by name, click the check box alongside it, and then select Mark for Removal. This will remove the software but leave behind any configuration files it created. This means you can install it again in the future, and it will function as it did before removal. However, you can also select Mark for Complete Removal, which will remove the configuration files.
As with installing software, the Synaptic Package Manager attempts to manage dependencies when you remove software, but in this case, it enforces the removal of any software that explicitly relies on that software.
Often the solution is simply not to remove the software package. After all, modern hard disks have huge capacities, and it's unlikely the package will take up much room.
Manually Installing Using Gdebi
Gdebi Package Installer is a simple program designed to facilitate the installation of single packages that you've sourced yourself (that is, that you may have acquired from elsewhere on the Internet). Like Synaptic, it can automatically take care of dependencies by adding them into the total installation tally.
Gdebi runs automatically when you double-click a package file on your hard disk (a file with a .deb file extension). It is also offered as the default choice to open package files when you click on a package link within the web browser.
After Gdebi's simple program window appears, there is only one course of action: to click the Install Package button. This will install the software and—if necessary, or possible—automatically download and install the software packages. You'll be told if any dependencies are required, and clicking the Details button will display a list of them.
If the dependency packages are not available in the repositories, the Install Package button is inactive, and the missing dependencies listed. In theory you must now source the missing dependencies manually, but it is very likely that, if they are not available in the repositories, the package in question just isn't intended for either the version of Ubuntu you're using, or even for Ubuntu itself (it might be a package designed for a different derivative of Debian, for example, or even Debian itself).
When Gdebi first runs, you might see a dialog box indicating that the package “is available in a software channel.” This means that the software you mean to install is available in Ubuntu's repositories. If so, it might be better for you to install it from there instead, because then you will receive automated updates, as well as a version of the software that's guaranteed to be tweaked so it works fully within Ubuntu's infrastructure.
Installing Windows Applications with Wine
Thousands of free applications. Ease to install. What if this isn't enough? What if you just need that Windows application to do some special task? As with everything in Ubuntu, there's a solution for that.
The solution is Wine. Wine (a recursive acronym meaning “Wine Is Not an Emulator”) is a software layer capable of running Windows applications on Linux. The project began as early (in Linux lifetime) as 1993, as a way of supporting Windows 3.1 applications on Linux. Today the need of this kind of support is more apparent than ever, so Wine should be one of your biggest allies in your move to Ubuntu.
Why is it so important? Given the fact that Windows is the most popular desktop OS, it is a fact that there are many applications that are developed to work only with that platform. It's sad but it's also true. So many users feel trapped in an expensive OS which they don't want just because they need to run an application. It shouldn't be that way. There's the classic chicken and egg dilemma: few people use Linux because of lack of applications; developers don't port their applications to Linux because there are not enough users. Wine is the tool for breaking this vicious circle.
Installing Wine is fairly easy. Installing Windows applications to run on top of it, on the other hand, can be quite challenging. Not everything works out-of-the-box as you would like. Wine is just a tool that is in continuous development and that takes a great deal of input from its users. The Wine community deserves much credit for evaluating and reviewing applications.
Many users around the world try to install Windows applications on Linux by using Wine and share their experiences in http://appdb.winehq.org. Not surprisingly, the most tested applications are actually… games!
We will examine now how to install Wine, how to make its initial configuration, and how to install a sample application. If you have a program that you'd like to see running in your new Ubuntu desktop computer, we recommend browsing the Applications Database for advice on how to make it run. There are almost 9,000 applications in the database, so it is very likely that you will find yours.
Installing and Configuring Wine
Wine can be easily installed using the Ubuntu Software Center. Just search for the application Wine Microsoft Compatibility Layer (if you search for Wine it will be the first of the list) and click Install. As always, you will be prompted for your password to begin the installation.
Once it has finished, a new category will be added to the Applications menu: Wine, with four sub-entries:
Programs: From here you will be able to access the Windows applications you install on Wine. It's like the All Programs menu on Windows.
Browse C: Drive: We mention in Chapter 10 that the Ubuntu file system is different from that of Windows, in that it doesn't use letters to identify drives. So what's this
C:drive? It is a virtual folder that Wine creates to make Windows applications feel more at home. Wine creates a hidden .winefolder in your home, and adrive_cfolder inside of.wine. Windows applications believe that folder is the root of theC:drive.Configuring Wine: This tool allows you to configure Wine. You will be able to select the OS that best supports an application, and do advanced tasks as adding system libraries, selecting the graphic settings, adding drives or configuring audio. This is the tool that will help you tweak your applications to make them work.
Uninstall Wine Software: This is the Wine version of Add/Remove Programs. From here you can install or remove Windows software to Ubuntu.
Installing a Windows Application
Now that Wine is up and running, you can install your Windows applications.
The best way to learn how to do it is by giving you an example. It is really easy to do, and on occasion it works out of the box. If it doesn't, you should consult the AppDB or other forums because other people very likely have had the same problems.
In this example we install the application Notepad++, a Notepad replacement used by many developers to write source code. It is an easy-to-install application that will serve our ends well. Those are basic instructions that will work well with most simple software. You will be able to accommodate them to the software you want to install. So here we go:
- Open Firefox and go to the site
http://notepad-plus.sourceforge.net. Click the Download menu. - Expand Binary files and click Download Notepad++ executable files.
- In the download page, make sure you select the Windows installable files. Click it. A dialog box will pop up asking you to open or save the file (it should be an executable file, with the
.exeextension. If not, go back to the previous page and verify that you selected the Windows installable program). Download the files to your hard drive. - Go to your Downloads folder (this is where Firefox stores the files it gets from the Internet) and right-click the installer you just downloaded. Open the Properties dialog box and in the Permissions tab check the “Allow executing file as program” box. Click Close.
- Right-click the file and select the option Open with Wine Windows Program Loader.
- The normal installation wizard, familiar to all Windows users, will show up. Follow it until the application is installed.
- Voila! The application is now installed. It will open automatically. From now on you will find it in Applications
 Wine Programs Notepad++
An alternate method is to use go to Applications ![]() Wine
Wine ![]() Uninstall Wine Software. The Add/Remove Software dialog box will appear. Click the Install… button and select the executable file that will install the software. Follow the wizard as you would have done with the first method.
Uninstall Wine Software. The Add/Remove Software dialog box will appear. Click the Install… button and select the executable file that will install the software. Follow the wizard as you would have done with the first method.
When you're positive that you will no longer need the application, you can remove it from your system with the same tool. Select the application from the list and press the Remove… button. Follow the wizard to uninstall the application.
In this way, installing Windows applications seems quite straightforward. In some cases, though, it isn't so easy. Fortunately there's always the Ubuntu community to help!
Installing from Source
Some years ago, the only way to install many software packages in a UNIX system was from source code, a process known as compiling. This was because most people edited the source code themselves, or at least liked to have the option of doing so. Nowadays, innovations such as the Debian package management system make compiling all but redundant for the average user. But knowing how to compile a program from source is still a good Linux skill to have. In some cases, it's your only option for installing certain programs, because you may not be able to find a packaged binary or because the packagers have not yet created binary versions of their latest cutting-edge release.
Program compilation is usually handled at the command prompt, so make sure you read Appendix A before moving forward. It's not the kind of thing you would do via a GUI program.
Installing the Compiler Tools
Before you can compile from source, you need to install several items of software: the make program, which oversees the process of creating a new program, and the GNU Compiler Collection (GCC), which does the hard work of turning the source code into a binary. In addition, if the software relies on certain library files, you'll need to install development (dev) versions of them, as well as the libraries themselves if they're not already installed. For example, if you're compiling a program to run under the GNOME desktop, you'll need development versions of the GTK2+ libraries.
Under Ubuntu, it's possible to install all the program-compilation tools you need by installing the build-essential metapackage. You can use the Synaptic Package Manager or the Ubuntu Software Center.
In the remaining pages of this chapter we will talk about a generic process for source code compilation and installation. It does not reference any software in particular, but it does work with most applications.
Unpacking the Source Tarball and Solving Dependencies
Let's take a look at installing a program from source. You usually download the application's source code package from the developer's site on the web. The name of the package will reference the application name and version number, for instance: applicationx-2.0.4.tar.gz. The .tar.gz extension (or .tgz in some cases) is because of the fact that source code files comes in a packaged and zipped file.
The first thing you have to do is to unpack it. From the command line go to the directory where you saved your .tar.gz file (if you downloaded it using Firefox, it will probably be in your Downloads folder), and run the following command (with the appropriate filename of course):
tar xzvf applicationx-2.0.4.tar.gz
This will create a subdirectory named application-2.0.4. Move to it with the following command:
cd applicationx-2.0.4
In this folder you should find a file named either README or INSTALL. Read it very carefully to check for dependencies or other useful information.
less README
If you find that the software has any dependencies, you can install the required packages by using either the Synaptic Package Manager or the Ubuntu Software Center.
![]() Note Unlike binary packages, source code is rarely designed with one specific Linux distribution in mind—or even with Linux in mind! With a little work, it might even be possible to compile it under Windows!
Note Unlike binary packages, source code is rarely designed with one specific Linux distribution in mind—or even with Linux in mind! With a little work, it might even be possible to compile it under Windows!
Compiling
Now comes the exciting process of compiling the program! This is a three-step process, with three commands that you have to execute in sequence:
./configure
The first command starts the configure script, created by the application's programmer, which checks your system to ensure that it meets the requirements. In other words, it checks to make sure the dependencies are present. It also checks to make sure you have the correct software that's required to actually compile a program, such as GCC and make.
It's when the configure script is running that something is most likely to go wrong. In that case, more often than not, the error message will tell you that you're missing a dependency, which you must then resolve.
![]() Note Some
Note Some configure scripts are very thorough and check for components that the program you're trying to install might not even need because, for example, they may just be alternative packages for doing the same job. Because of this, you shouldn't worry if, as the text scrolls past, you see that various components are missing. Unless configure complains about it when it has finished, it's not a problem.
make
The next command, make, takes care of the actual program compilation. When you run this, the screen will fill with what might look like gibberish, but this is merely the output of the GNU compiler. It provides a lot of valuable information to those who know about such things, but you can largely ignore it. However, you should keep your eyes peeled for any error messages. It's possible that the configure script did not check your system thoroughly enough, and you might be missing an important system component—in which case, make will halt.
![]() Note It is possible that both the
Note It is possible that both the make and the make install commands report error messages, but that the applications works after installation nonetheless. The moral of the story is that software compilation is something of a black art, with error messages designed for programmers, and not all error messages are fatal.
Alternatively, the program simply might not be able to compile on your system without some tweaking to the Makefile (the file that make uses). If such a situation arises, the best plan is to visit the web site of the developer of the software and see whether there's a forum you can post to. Alternatively, check if the developer has an e-mail address you can contact to ask for help.
sudo make install
Eventually, the compilation will stop with a number of exit messages. Then the final command must be run: make install. This needs to be run with superuser powers, because its job is to copy the binary files you've just created to the relevant system directories. In addition, any documentation that comes with the program is also copied to the relevant location on your system.
After the three commands have completed, you should be able to run the program by typing its name at the command prompt.
![]() Note You'll probably need to add your own icon for the application to the desktop or Applications menu (see Chapter 9 for more details on the procedure to do this). Source packages are usually designed to be installed on any version of UNIX running a variety of desktop managers. In the past, it was difficult for the developer to know where to create desktop shortcuts, but now organizations like freedesktop.org (
Note You'll probably need to add your own icon for the application to the desktop or Applications menu (see Chapter 9 for more details on the procedure to do this). Source packages are usually designed to be installed on any version of UNIX running a variety of desktop managers. In the past, it was difficult for the developer to know where to create desktop shortcuts, but now organizations like freedesktop.org (http://freedesktop.org) are standardizing the process.
Summary
This chapter described how to install software under Ubuntu. We looked at how this differs from Windows software installation, and how the Debian package management system is designed to make life easier.
You learned how to use the Ubuntu Software Center and Synaptic Package Manager to install software from the official repositories, and how to use the different tools for more complex scenarios. Finally, you looked at how programs can be compiled from their source code, which is a fundamental process for all versions of Linux.