
The Navigation Framework is a feature in Silverlight that allows developers to implement a way to navigate through different pages within a Silverlight application, creating an experience similar to browsing through different pages of a web site. The framework also allows developers to create a history that can integrate with the browser enabling users to navigate forward and backward through the history using the browser's back and forward buttons.
In this chapter, you will explore Silverlight's Navigation Framework and try out a couple of examples involving the different aspects of the framework.
The two main objects that are contained in the Navigation Framework are the Frame and Page objects (see Figure 8-1). The Frame object is very similar to a ContentPlaceHolder in ASP.NET master pages and is the place holder for the different views to be loaded onto the page.

This exercise demonstrates creating a Silverlight application with navigation support from scratch using the Navigation Framework. In the exercise, you will build a simple application that will contain two HyperlinkButtons and a Frame. Clicking the links will load one of two Pages into the Frame. Let's get started.
Start Visual Studio 2010 and select File

In the New Project dialog box, select Silverlight as the project type and Silverlight Application as the template. Name the project
NavAppFromScratch, as shown in Figure 8-2.When the New Silverlight Application dialog appears, select the default to host the Silverlight application in a new ASP.NET web application named
NavAppFromScratch.Web. Press OK to continue.By default the
MainPage.xamlfile will be created and opened for editing. You will start by editing that file. In the Grid definition, addShowGridLines="True"so you can see how your cells are laid out. You can turn this property off later so your application is cleaner.Next you want to define the Grid cells. You will simply have two rows, one for the links and one for the navigated content.
<Grid ShowGridLines="True" x:Name="LayoutRoot" Background="White"><Grid.RowDefinitions><RowDefinition Height="30" /><RowDefinition></RowDefinition></Grid.RowDefinitions></Grid>Now that you have the two rows, you want to add your HyperlinkButtons that will be used to navigate to the different views. You will do this in a horizontal StackPanel. For the
Clickproperty, create an event handler calledLinkClick.<Grid ShowGridLines="True" x:Name="LayoutRoot" Background="White"> <Grid.RowDefinitions> <RowDefinition Height="30" /> <RowDefinition></RowDefinition> </Grid.RowDefinitions><StackPanel Orientation="Horizontal" HorizontalAlignment="Center"><HyperlinkButton Content="View 1"Click="LinkClick"Padding="5" /><HyperlinkButton Content="View 2"Click="LinkClick"Padding="5" /></StackPanel></Grid>The next step will be to add support for the Navigation Framework in your project. The first step is to add a reference to
System.Windows.Controls.Navigation.dllby right-clicking on the References folder in your Silverlight project and choosing Add Reference, as shown in Figure 8-3.When the Add Reference dialog appears, be sure the .NET tab is selected and then browse through the list until you find
System.Windows.Controls.Navigation, as shown in Figure 8-4. Select the entry and press OK to add the reference to the project.When the assembly is added you will see it appear under References in the Solution Explorer, as shown in Figure 8-5.
Now that you have added the reference to the Navigation Framework, you need to add the navigation objects to your application. You will start by adding the XML namespace for
System.Windows.Controls.Navigationto theUserControldefinition.<UserControl x:Class="NavAppFromScratch.MainPage" xmlns="http://schemas.microsoft.com/winfx/2006/xaml/presentation" xmlns:x="http://schemas.microsoft.com/winfx/2006/xaml" xmlns:d="http://schemas.microsoft.com/expression/blend/2008" xmlns:mc="http://schemas.openxmlformats.org/markup-compatibility/2006" xmlns:nav="clr-namespace:System.Windows.Controls;assembly=System.Windows.Controls.Navigation" mc:Ignorable="d" d:DesignHeight="300" d:DesignWidth="400"> <Grid x:Name="LayoutRoot" Background="White" ShowGridLines="True"> <Grid.RowDefinitions> <RowDefinition Height="30" /> <RowDefinition></RowDefinition> </Grid.RowDefinitions>
<StackPanel Orientation="Horizontal" HorizontalAlignment="Center">
            <HyperlinkButton Content="View 1"
                         Click="LinkClick"
                         Padding="5" />
            <HyperlinkButton Content="View 2"
                         Click="LinkClick"
                         Padding="5" />
        </StackPanel>
    </Grid>

</UserControl>
You can now add a Frame to the bottom row of the root
GridnamedContentFrame. You will also set theHorizontalContentAlignmentandVerticalContentAlignmenttoStretchso the Frame will consume the entire Grid cell. You will also give the Frame a 10 pixelMarginand aBorderThicknessto 2 pixels.<Grid x:Name="LayoutRoot" Background="White" ShowGridLines="True"> <Grid.RowDefinitions> <RowDefinition Height="30" /> <RowDefinition></RowDefinition> </Grid.RowDefinitions> <StackPanel Orientation="Horizontal" HorizontalAlignment="Center"> <HyperlinkButton Content="View 1" Click="LinkClick" Tag="/View1.xaml" Padding="5" /> <HyperlinkButton Content="View 2" Click="LinkClick" Tag="/View2.xaml" Padding="5" /> </StackPanel><nav:Frame x:Name="ContentFrame"HorizontalContentAlignment="Stretch"VerticalContentAlignment="Stretch"Margin="10"Grid.Row="1"BorderThickness="2"BorderBrush="Black" /></Grid>Next, you will add the different views to the project. Right-click on the Silverlight project and select Add New Item.
On the Add New Item dialog, select the Silverlight Page template, name the page
View1.xaml, and click on the Add button (see Figure 8-6).Once
View1.xamlhas been added, repeat steps 11 and 12 to add another Silverlight page namedView2.xaml.Open
View1.xamlin design mode and add the following XAML to the rootGrid:<Grid x:Name="LayoutRoot"><TextBlock Text="View 1"FontSize="60"Foreground="Green"HorizontalAlignment="Center"VerticalAlignment="Center" /></Grid>Open
View2.xamlin design mode and add the following XAML to the rootGrid:<Grid x:Name="LayoutRoot"><TextBlock Text="View 2"FontSize="60"Foreground="Red"HorizontalAlignment="Center"VerticalAlignment="Center" /></Grid>You now have the main page containing the Frame and the two views that you will load into the Frame. Next, you need to actually load the views into the Frame. You will do this on the click event of the two HyperlinkButtons you added in step 6. While you can easily do this with two click event handlers, you will actually do it with one. You can set the
Tagproperty of the HyperlinkButton to be the page view source file. Then the click event handler will be able to retrieve the source file from theTag.<StackPanel Orientation="Horizontal" HorizontalAlignment="Center"> <HyperlinkButton Content="View 1" Click="LinkClick"Tag="/View1.xaml"Padding="5" /> <HyperlinkButton Content="View 2" Click="LinkClick"Tag="/View2.xaml"Padding="5" /> </StackPanel>Right click on
LinkClickin theClickattribute and selectNavigate to Event Handlerin order to create theLinkClickevent handler. Within the event add the following code to retrieve the view's source file:private void LinkClick(object sender, RoutedEventArgs e) {HyperlinkButton button = (HyperlinkButton)sender;string viewSource = button.Tag.ToString();}Now that you have the view's source file, you can use the Frame's
Navigatemethod to navigate to the proper view:private void LinkClick(object sender, RoutedEventArgs e) { HyperlinkButton button = (HyperlinkButton)sender; string viewSource = button.Tag.ToString();ContentFrame.Navigate(new Uri(viewSource, UriKind.Relative));}You are now ready to run the solution. Select Debug
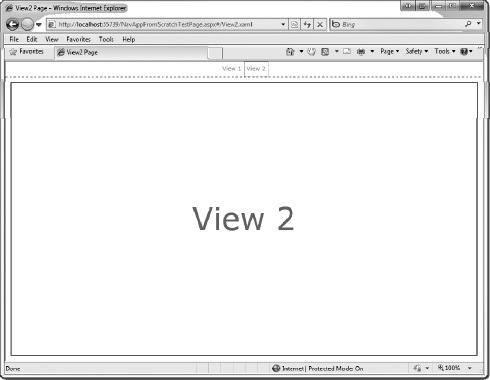
Press the View 1 HyperlinkButton at the top of the screen. The Content Frame will navigate to the
View1.xamlcontent, as shown in Figure 8-8.You can then click on the View 2 link for similar results, as shown in Figure 8-9.
Notice that you can press the browser's back button to navigate backward in history from View 2, to View 1, and back to the default.


While the functionality of the Navigation Framework may have been achieved in previous versions of Silverlight, the amount of work that it required was very significant and normally would require you to purchase a third party control or library. Clearly having this functionally built into Silverlight 4 is a major advantage. It reduces the amount of code required to achieve the same affects and produces much cleaner and maintainable code. In addition, it provides a number of additional benefits such as browser history support and deep linking.
Another benefit of the Navigation Framework in Silverlight 4 is deep linking support. Deep linking is the ability to link to an application at a specific state.
To illustrate deep linking, consider an application when it is loaded a home page is displayed. When the user clicks on a link from the home page, the application navigates to the product listings page. The user can then on a product to navigate a page containing the details for that product. This application could be represented by the diagram shown in Figure 8-10.

Let's say you wanted to generate a link directly to the Product B Details page in the application. Using the Navigation Framework, Silverlight allows developers to link to different states in their application.
As you have seen in this chapter, you change different views using the Frame object's Navigate method. There are times when you need to gain access to the Frame from within the page itself. For example, if you consider the diagram in Figure 8-11, you can easily navigate to View 1 from the Navigation Frame on the home page. However, if you want to navigate to Inner View 1 from the code behind on View 1, you need to get access to the Navigation Frame that is hosting View 1 in order to navigate to a different view.

Luckily, the Navigation Framework contains an object that allows a view to access its Hosting Frame. That object is the NavigationService. Let's explore the use of the NavigationService object by running through the following exercise.
In this exercise, you will expand on the example you built earlier in the chapter. You will add a button to the View 1 page and on the click event of that button you will navigate to a new page called Inner View 1 using the NavigationService object. Let's get started.
Begin by opening the project
NavAppFromScratchyou just completed in the previous section.Open the XAML for
View1.xamland modify the source to include a button under the TextBlock.<Grid x:Name="LayoutRoot"><StackPanel><TextBlock Text="View 1" FontSize="60" Foreground="Green" HorizontalAlignment="Center" VerticalAlignment="Center" /><Button Click="Button_Click"Padding="10"Content="Navigate to Inner View"HorizontalAlignment="Center" /></StackPanel></Grid>You now need to add the new view that you will navigate to use the
NavigationService. Right click on the Silverlight project and choose AddIn the XAML for
InnerView1.xaml, add a simple TextBlock.<Grid x:Name="LayoutRoot"><TextBlock Text="Inner View 1"FontSize="40"Foreground="Blue"HorizontalAlignment="Center"VerticalAlignment="Center" /></Grid>Next, add the
Button_Clickevent handler in theView1.xamlcode behind and add the following code:private void Button_Click(object sender, RoutedEventArgs e) {NavigationService.Navigate(new Uri("/InnerView1.xaml", UriKind.Relative));}You are now ready to run the solution. Select Debug
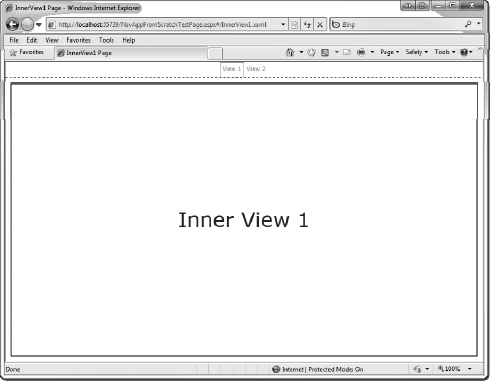
If you click on the Navigate to Inner View button, the application should now show the
InnerView1.xamlcontent in the top frame, as seen in Figure 8-13.

In this section, you learned how to use the NavigationService object to access the Navigation Frame from a Silverlight page. In the next section, you will learn how to pass data to navigation pages using another object contained in the Navigation Framework, the NetworkContext object.
In this section, you will discuss passing data to page views within a navigation framework solution. In HTML pages, data is passed to other pages using the QueryString. The same is true for pages within a Silverlight navigation application through the use of the NavigationContext object. As an example, if you want to retrieve the QueryString property ProductID, you would use the following syntax:
string productId = NavigationContext.QueryString["ProductID"].ToString();
Let's explore how to use the NavigationContext object to pass data to views.
In this exercise, you will expand on the project that you continued working on in the previous section. You will pass some additional data to the InnerView1.xaml file, retrieve that data using the NavigationContext object and then display the view content dependent on that data.
Begin by opening the project
NavAppFromScratchyou were working on in the previous section.Open the XAML for
View1.xamland modify the source to include a ComboBox under the Button:<Grid x:Name="LayoutRoot"> <StackPanel> <TextBlock Text="View 1" FontSize="60" Foreground="Green" HorizontalAlignment="Center" VerticalAlignment="Center" /> <Button Click="Button_Click" Padding="10" Content="Navigate to Inner View" HorizontalAlignment="Center" /><ComboBox Padding="10" Margin="10" x:Name="Color" Width="100"><ComboBoxItem Content="Blue" IsSelected="True" /><ComboBoxItem Content="Red" /><ComboBoxItem Content="Green" /></ComboBox></StackPanel> </Grid>Next open the code behind for
View1.xamland edit theButton_Clickevent handler to pass the selected color in the query string of the Uri passed to theNavigatemethod:private void Button_Click(object sender, RoutedEventArgs e) {string color = Color.SelectionBoxItem.ToString();NavigationService.Navigate(new Uri(string.Format("/InnerView1.xaml?Color={0}", color),UriKind.Relative));}Open the
InnerView1.xamlfile and add a second TextBlock below the existing TextBlock using a StackPanel:<Grid x:Name="LayoutRoot"><StackPanel Orientation="Vertical"><TextBlock Text="Inner View 1"x:Name="ViewHeader"FontSize="40" Foreground="Blue" HorizontalAlignment="Center" VerticalAlignment="Center" /><TextBlock Text="(Blue)"x:Name="ViewColor"FontSize="30"Foreground="Blue"HorizontalAlignment="Center"VerticalAlignment="Center" /></StackPanel></Grid>Open the code behind for
InnerView1.xamland retrieve the passed color using theNavigationContextobject. Then add a switch statement to change the color of the TextBlocks and edit the Text for the second TextBlock:protected override void OnNavigatedTo(NavigationEventArgs e) {string color = NavigationContext.QueryString["Color"].ToString();Brush b;switch (color){case "Red":b = new SolidColorBrush(Color.FromArgb(255, 255, 0, 0));ViewHeader.Foreground = b;ViewColor.Foreground = b;ViewColor.Text = "(Red)";break;case "Green":b = new SolidColorBrush(Color.FromArgb(255, 0, 255, 0));ViewHeader.Foreground = b;ViewColor.Foreground = b;ViewColor.Text = "(Green)";break;default:b = new SolidColorBrush(Color.FromArgb(255, 0, 0, 255));ViewHeader.Foreground = b;ViewColor.Foreground = b;ViewColor.Text = "(Blue)";break;}}You are now ready to run the solution. Select Debug
Select Red in the ComboBox and click on the Navigate to Inner View button. You will see the content of the
InnerView1.xamlis displayed with red text and with the text "(Red)" displayed, as shown in Figure 8-15.


In this section, you learned how to use the NavigationContext object to pass data to navigation views using the query string. In the next section, I will discuss Uri Mapping and how it can be used to create user friendly Uri's to your navigation views.
In the preceding examples, you may have noticed the URL changing as you navigated to different views in a frame. You may have also noticed that the URLs were not very pretty and contained some information that you may not want to display. As an example, consider the following URL:
http://www.domain.com/Catalog.aspx#ProductDetails.xaml?ID=4
For starters, this URL is not very pleasant to look at, and not very user-friendly either. It also may contain information that you would prefer not to provide the user, such as the exact filename and the query string name. A much more appropriate URL would look like the following:
http://www.domain.com/Catalog.aspx#Product/4
This URL is much easier to read and is more user-friendly. In addition, it doesn't give away any details about your solution. You can obtain this URL using a feature known as Uri Mapping. Let's work through an example to further explore Uri Mapping with the Navigation Framework.
In this example, you will work through implementing Uri Mapping with the project that you have been working with earlier in the chapter.
Begin by opening the project
NavAppFromScratchyou were working on in the previous section.There are three views in your solution that you would like to add Uri Mapping for:
View1.xaml, View2.xaml, andInnerView1.xaml. For these, you will add simple Uri Maps that point these to View1, View2, and InnerView. Start by opening theApp.xamlfile and adding the xml namespace for the navigation framework:<Application xmlns="http://schemas.microsoft.com/winfx/2006/xaml/presentation" xmlns:x="http://schemas.microsoft.com/winfx/2006/xaml"
xmlns:nav="clr-namespace:System.Windows.Navigation;assembly=System.Windows.Controls.Navigation"x:Class="NavAppFromScratch.App" > <Application.Resources> </Application.Resources> </Application>Now that the namespace is added, you need to add the
UriMappersection to the Application Resources:<Application.Resources><nav:UriMapper x:Key="uriMapper"></nav:UriMapper></Application.Resources>Within the
UriMappersection you now need to add twoUriMappingelements, one forView1.xamland one forView2.xaml. Each mapping will contain two attributes: TheUriattribute is the name representing the mapping that will appear in the browser address bar, and theMappedUriattribute represents the actual Uri mapped to by theUriMapping:<Application.Resources> <nav:UriMapper x:Key="uriMapper"><nav:UriMapping Uri="View1" MappedUri="/View1.xaml" /><nav:UriMapping Uri="View2" MappedUri="/View2.xaml" /></nav:UriMapper> </Application.Resources>You now can update
MainPage.xamlto navigate to the views using the UriMappings:<StackPanel Orientation="Horizontal" HorizontalAlignment="Center"> <HyperlinkButton Content="View 1" Click="LinkClick"Tag="View1"Padding="5" /> <HyperlinkButton Content="View 2" Click="LinkClick"Tag="View2"Padding="5" /> </StackPanel>Next, you will shift your attention to the
InnerView1.xaml. If you recall in the previous section on passing data to a navigation view, you are passing the color toInnerView1.xamlvia the QueryString. Because of this, you need that to be taken into account in yourUriMapping. Open up the code behind forView1.xamland modify theButton_Clickmethod so it navigates toInnerView/{0}:private void Button_Click(object sender, RoutedEventArgs e) { string color = Color.SelectionBoxItem.ToString();NavigationService.Navigate(new Uri(string.Format("InnerView/{0}", color),UriKind.Relative));}In order for this navigate to work, you need to add an additional
UriMappingto theApplication.Resources:<Application.Resources> <nav:UriMapper x:Key="uriMapper"> <nav:UriMapping Uri="View1" MappedUri="/View1.xaml" /> <nav:UriMapping Uri="View2" MappedUri="/View2.xaml" /><nav:UriMapping Uri="InnerView/{c}"MappedUri="/InnerView1.xaml?Color={c}" /></nav:UriMapper> </Application.Resources>Next, in the
MainPage.xaml, add theUriMapperproperty to the Navigation Frame object:<nav:Frame x:Name="ContentFrame" HorizontalContentAlignment="Stretch" VerticalContentAlignment="Stretch" Margin="10" Grid.Row="1" BorderThickness="2" BorderBrush="Black"UriMapper="{StaticResource uriMapper}"/>You are now ready to run the solution. Select Debug
NavAppFromScratchTestPage.aspx#
Now select Red and click on the Navigate to Inner View and once again inspect the URL:
NavAppFromScratchTestPage.aspx#InnerView/Red
As you have seen in this example, UriMapping provide a way to create more user friendly Url addresses and also provide a way to hide application specific information from appearing in your application.
While it is very possible to utilize the Navigation Framework from within a standard Silverlight application, Visual Studio 2010 contains a project template that will create a base Silverlight Navigation Application.
In this example, you will create a base Silverlight application with navigation support using the built-in Silverlight Navigation Application template included in Visual Studio 2010.
Start Visual Studio 2010 and select File
In the New Project dialog box, select Silverlight as the project type and Silverlight Navigation Application as the template. Name the project
NavTemplate, as shown in Figure 8-16.When the New Silverlight Application dialog appears, select the default to host the Silverlight application in a new ASP.NET web application named
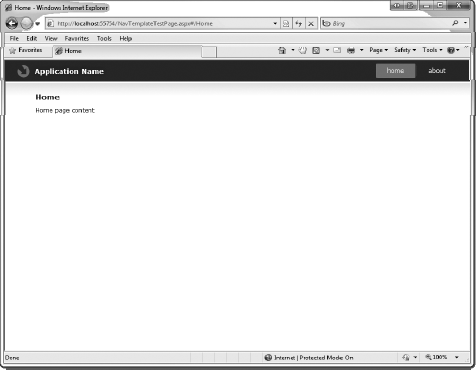
NavTemplate.Web. Press OK to continue.When the project is created by Visual Studio, you will notice that a number of pages have already been created for you, as shown in Figure 8-17. The base navigation project contains a main page called
MainPage.xamlthat hosts the Navigation Frame, and two Navigation Pages in theViewsfolder:About.xamlandHome.xaml. In addition there is aErrorWindow.xamlpage view that is created.Select Debug
You will notice at the top right-hand corner of the application there are two links: home and about. Click on the about button, the Navigation Frame will load in the
AboutPage.xamlpage into the white content box, as shown in Figure 8-19.


As you have seen, the Silverlight Navigation Application VS.NET template can be used to give you a base application with navigation support to build on.
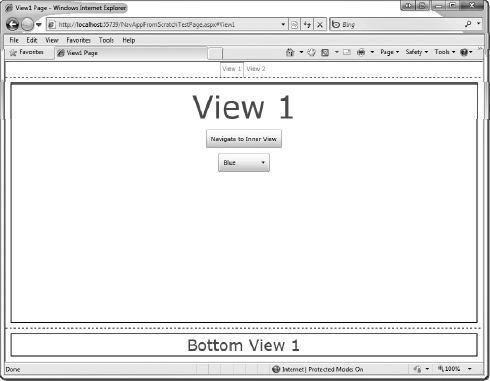
In all the examples you have worked through in this chapter, you have only dealt with a single Frame. However, there is no limit on the number of frames that you can include in your application. There are some restrictions, though. First of all, only one Frame can integrate with the browser. Because of this, if you use multiple Frames you will need to indicate what Frame will be integrated with the browser. This is done using the JournalOwnership property on the Frame object. Consider the following example.
<navigation:Frame x:Name="ContentFrame"  />
<navigation:Frame x:Name="BottomFrame" JournalOwnership="OwnsJournal" />
In the preceding, the ContentFrame will have full integration with the browser, but the BottomFrame won't. Let's see this in action in the following exercise.
In this example, you will add a second Frame to the project you have been working on throughout this chapter.
Begin by opening the project
NavAppFromScratchyou were working on in the previous section.You will start by adding a new view to the project. Right-click on the Silverlight project and choose Add
In the XAML for
BottomView.xaml, add a simple TextBlock:<Grid x:Name="LayoutRoot"><TextBlock Text="Bottom View 1"FontSize="30"Foreground="Green"HorizontalAlignment="Center"VerticalAlignment="Center" /></Grid>With the new view created, you now need to edit the
MainPage.xamlfile to add a third row to the Grid and add a new Frame within that new row. The second Frame will not integrate with the browser so you will set theJournalOwnershipproperty toOwnsJournal:<Grid x:Name="LayoutRoot" Background="White" ShowGridLines="True"> <Grid.RowDefinitions> <RowDefinition Height="30" /> <RowDefinition></RowDefinition><RowDefinition Height="65" /></Grid.RowDefinitions><StackPanel Orientation="Horizontal" HorizontalAlignment="Center"> <HyperlinkButton Content="View 1" Click="LinkClick" Tag="View1" Padding="5" /> <HyperlinkButton Content="View 2" Click="LinkClick" Tag="View2" Padding="5" /> </StackPanel> <nav:Frame x:Name="ContentFrame" HorizontalContentAlignment="Stretch" VerticalContentAlignment="Stretch" Margin="10" Grid.Row="1" BorderThickness="2" BorderBrush="Black" UriMapper="{StaticResource uriMapper}" /> <nav:Frame x:Name="BottomFrame"HorizontalContentAlignment="Stretch"VerticalContentAlignment="Stretch"Margin="10"Grid.Row="2"JournalOwnership="OwnsJournal"BorderThickness="2"BorderBrush="Black" /></Grid>Next, view the code behind for
MainPage.xamland add a Navigate call forBottomFrame.private void LinkClick(object sender, RoutedEventArgs e) { HyperlinkButton button = (HyperlinkButton)sender; string viewSource = button.Tag.ToString(); ContentFrame.Navigate(new Uri(viewSource, UriKind.Relative)); BottomFrame.Navigate(new Uri("/BottomView.xaml", UriKind.Relative)); }You are now ready to run the solution. Select Debug
In this chapter, you looked at the Navigation Framework in-depth and saw how it can be used to build Silverlight applications that contain multiple page views. You explored the different objects within the Navigation Framework, such as the NavigationContext and NavigationService, as well as how to implement Uri Mapping within your applications.