
Silverlight 4 adds a number of new features that allow developers to integrate their applications with a user's system. These features include notifications, interaction with legacy COM applications and libraries, access to a user's web camera and microphone, and better access to the operating system such as enabling the Silverlight application as a drop target. In this chapter we will discuss and try out a number of these new features.
A toast is a small informational window you can display to notify users of various events, typically in the bottom-right corner of the screen (on Windows) and the upper right corner (on Mac OS). Toast notifications have become very popular in software design, so support for them has been added in Silverlight 4. Let's take a look at toast notifications in Silverlight and run through an example.
In this example, we will create an application with a single button; when the button is pressed, it will display a toast window for 5 seconds.
Create a new Silverlight application in Visual Studio 2010. Name it
NotifyApplicationand allow Visual Studio to create an ASP.NET web application calledNotifyApplication.Webto host your application.Add a
Buttonto theLayoutRootGrid, and set itsWidthto 200,Heightto 30, andContentto "Display Notify Window." Right-click on event name in the XAML and select Navigate to Event Handler to wire up the click event toButton_Click.<Grid x:Name="LayoutRoot" Background="White"><ButtonHeight="30"Width="200"Content="Display Notify Window"Click="Button_Click" /></Grid>Now we need to define the toast notification window. To do this, we'll create a new user control that will define the layout of the window. To start, add a new user control to the Silverlight project by right-clicking on the NotifyApplication project and selecting Add New Item. When the Add New Item dialog appears, select Silverlight User Control and name the user control
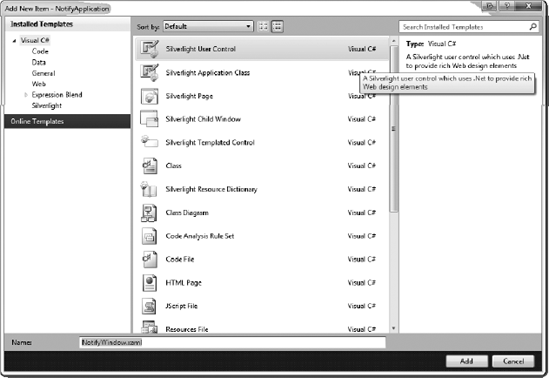
NotifyWindow.xaml, as shown in Figure 10-1.After you create
NotifyWindow, you can start defining the layout. First, set theHeightof the user control to 75 and theWidthto 300.<UserControl x:Class="NotifyApplication.NotifyWindow" xmlns="http://schemas.microsoft.com/winfx/2006/xaml/presentation" xmlns:x="http://schemas.microsoft.com/winfx/2006/xaml" xmlns:d="http://schemas.microsoft.com/expression/blend/2008" xmlns:mc="http://schemas.openxmlformats.org/markup-compatibility/2006" mc:Ignorable="d"Height="75" Width="300"><Grid x:Name="LayoutRoot" Background="White"> </Grid> </UserControl>Next, add a
Borderto theLayoutRootGrid, set theBackgroundto #DDDDDD, theBorderBrushto Black, and theBorderThicknessto 2. Within theBorder, we'll add anotherGridcontrol with three rows defined.<Grid x:Name="LayoutRoot" Background="White"><BorderBackground="#DDDDDD"BorderBrush="Black"BorderThickness="2"><Grid><Grid.RowDefinitions><RowDefinition Height="0.113*"/><RowDefinition Height="0.306*"/><RowDefinition Height="0.582*"/></Grid.RowDefinitions></Grid></Border></Grid>Now we'll add four more controls to the nested grid—a
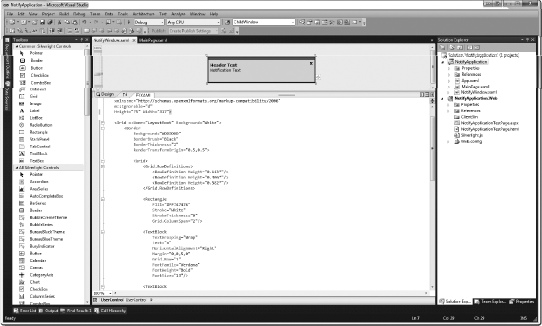
Rectangleand aTextBlock, which are completely cosmetic, and two additionalTextBlocks, one for the toast notification header and one for the description. Add these controls and set the properties as indicated in the following code. The end result should look like what you see in Figure 10-2.<Grid x:Name="LayoutRoot" Background="White"> <Border Background="#DDDDDD" BorderBrush="Black" BorderThickness="2"><Grid> <Grid.RowDefinitions> <RowDefinition Height="0.113*"/> <RowDefinition Height="0.306*"/> <RowDefinition Height="0.582*"/> </Grid.RowDefinitions><RectangleFill="#FF747474"Stroke="White"StrokeThickness="0"Grid.ColumnSpan="2"/><TextBlockTextWrapping="Wrap"Text="x"HorizontalAlignment="Right"Margin="0,0,5,0"Grid.Row="1"FontFamily="Verdana"FontWeight="Bold"FontSize="13"/><TextBlockName="Header"TextWrapping="Wrap"Text="Header Text"Grid.Row="1"FontWeight="Bold"VerticalAlignment="Bottom"FontSize="13"Margin="5,0,5,0"FontFamily="Tahoma"/><TextBlockName="Description"TextWrapping="Wrap"Text="Notification Text"Grid.Row="2"FontSize="11"FontFamily="Verdana"Margin="5,0,5,0"/></Grid> </Border> </Grid>Now we can turn our attention to the
MainPage.xaml.cscode behind file, in particular to theButton_Clickdelegate we wired up earlier. First we need to make certain that the application is running outside of the browser. We can do that by checking the Boolean propertyApp.Current.IsRunningOutOfBrowser.private void Button_Click(object sender, RoutedEventArgs e) {if (App.Current.IsRunningOutOfBrowser){}}Next we'll create an instance of the
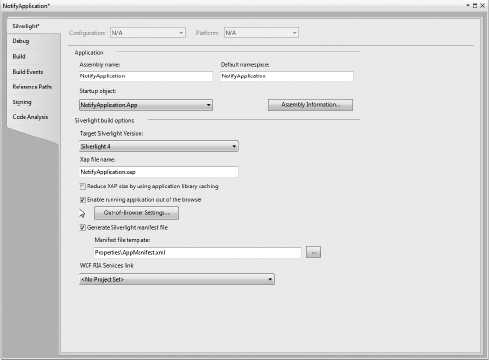
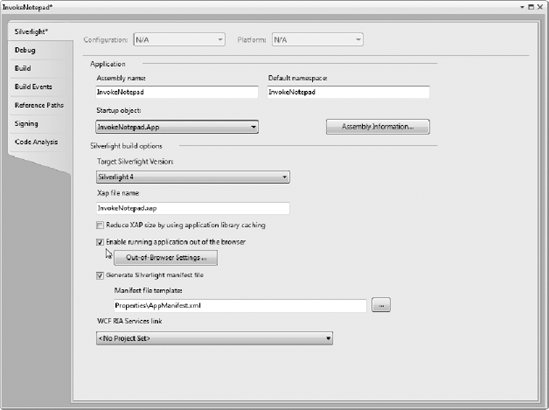
NotificationWindowclass, then an instance of theNotifyWindowuser control and set theTextof theHeaderandDescription. To make sure the NotificationWindow is set to the correct size, we'll set the height and width equal to theNotifyWindowheight and width. Finally, we'll set the content of theNotificationWindowto the instance of ourNotifyWindowuser control and execute theNotificationWindow'sShowmethod, passing it 5000, which indicates the window should display for 5 seconds.private void Button_Click(object sender, RoutedEventArgs e) { if (App.Current.IsRunningOutOfBrowser) {NotificationWindow notify = new NotificationWindow();NotifyWindow win = new NotifyWindow();win.Header.Text = "Custom Message Header";win.Description.Text = "This is a custom description.";notify.Width = win.Width;notify.Height = win.Height;notify.Content = win;notify.Show(5000);} }We are now ready to test the application. However, since Silverlight notification works only with applications running outside of the browser, we must enable out-of-browser support for the application. To do this, open the project properties for the NotifyApplication Silverlight project and check the box next to "Enable running application out of the browser," as shown in Figure 10-3.
Save the project settings and press F5 to test the application. When the application is started, right-click on it and install it locally. When the application reopens outside of the browser, click on the "Display Notify Window" button. If all goes well, you should see the notification window in the bottom right-hand corner of your screen, as shown in Figure 10-4.

Silverlight 4 supports capture from web cams and microphones installed on the local user's machine. In this section, we'll explore this new feature and walk through an example together.
The CaptureDeviceConfiguration class provides developers with some helper functionality related to web cam and microphone access, including the ability to list the different audio and video capture devices installed on the user's machine. In addition, it provides functions that verify and request permission to access the local devices. For example, if you'd like to request device access, you can call the RequestDeviceAccess method, or if you need to check whether access has already been granted, you can inspect the AllowedDeviceAccess property.
The CaptureSource class provides audio and video capture functionality from a given capture device, including methods for starting and stopping capture as well as for taking static images from the captured video. In order to explore these methods, let's work through an example together.
In this example we'll access the web camera and microphone installed on the local user's machine, capture the source from those devices, and display it in our Silverlight application. Let's get started!
Create a new Silverlight application in Visual Studio 2010. Name it
CameraAccessand allow Visual Studio to create an ASP.NET web application calledCameraAccess.Webto host your application.Define two columns and two rows as shown in the following code, and set the
Backgroundof the Grid to#333333.<Grid x:Name="LayoutRoot" Background="#333333"><Grid.ColumnDefinitions><ColumnDefinition Width="*" /><ColumnDefinition Width="*" /></Grid.ColumnDefinitions><Grid.RowDefinitions><RowDefinition Height="240*" /><RowDefinition Height="60*" /></Grid.RowDefinitions></Grid>Add a
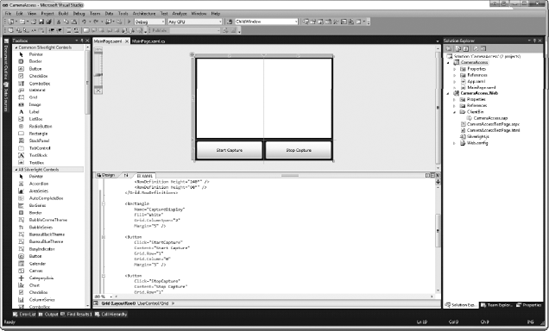
Rectangleto the first row that spans both columns. Next, add aButtonwith theContent"Start Capture" to the first column of the second row. Add anotherButtonwith theContent"Stop Capture" to the second column of the second row. Set theMarginfor all three controls to 5 to provide some spacing between the controls. Also, set theClickevent toStartCaptureandStopCaptureappropriately. The completed user interface should appear as shown in Figure 10-5.<Grid x:Name="LayoutRoot" Background="#333333"> <Grid.ColumnDefinitions> <ColumnDefinition Width="*" /> <ColumnDefinition Width="*" /> </Grid.ColumnDefinitions> <Grid.RowDefinitions> <RowDefinition Height="240*" /> <RowDefinition Height="60*" /> </Grid.RowDefinitions><RectangleName="CaptureDisplay"Fill="White"Grid.ColumnSpan="2"Margin="5" /><ButtonClick="StartCapture"Content="Start Capture"Grid.Row="1"Grid.Column="0"Margin="5" /><ButtonClick="StopCapture"Content="Stop Capture"Grid.Row="1"Grid.Column="1"Margin="5" /></Grid>Make certain the two click events have the delegates in the code behind file,
MainPage.xaml.cs, as shown below. In addition, add a variable forCaptureSourcenamedsource.public partial class MainPage : UserControl {CaptureSource source;public MainPage() { InitializeComponent(); }private void StartCapture(object sender, RoutedEventArgs e){}private void StopCapture(object sender, RoutedEventArgs e){}}Now we'll add the logic to the
StartCapturedelegate. First check to see if there is already a capture source established; if so, we need to stop it. Next, create a new instance of theCaptureSource, then setVideoCaptureDeviceto the system default video capture device andAudioCaptureDeviceto the default audio capture device.private void StartCapture(object sender, RoutedEventArgs e) {if (source != null){source.Stop();}source = new CaptureSource();source.VideoCaptureDevice =CaptureDeviceConfiguration.GetDefaultVideoCaptureDevice();source.AudioCaptureDevice =CaptureDeviceConfiguration.GetDefaultAudioCaptureDevice();}With the capture devices set, we now need to create a
VideoBrush, which will be used to fill ourRectanglecontrol. Set the source of theVideoBrushto the capture source and set theFillproperty to theVideoBrush.private void StartCapture(object sender, RoutedEventArgs e) { if (source != null) { source.Stop(); } source = new CaptureSource(); source.VideoCaptureDevice = CaptureDeviceConfiguration.GetDefaultVideoCaptureDevice(); source.AudioCaptureDevice = CaptureDeviceConfiguration.GetDefaultAudioCaptureDevice();VideoBrush video = new VideoBrush();video.SetSource(source);CaptureDisplay.Fill = video;}Next we need to see if we have permission to access the client's capture device. If not, we'll try to request access. If we gain access, we'll start the capture source.
private void StartCapture(object sender, RoutedEventArgs e)
{
    if (source != null)
    {
        source.Stop();
    }

    source = new CaptureSource();
    source.VideoCaptureDevice =
        CaptureDeviceConfiguration.GetDefaultVideoCaptureDevice();
    source.AudioCaptureDevice =
        CaptureDeviceConfiguration.GetDefaultAudioCaptureDevice();
VideoBrush video = new VideoBrush(); video.SetSource(source); CaptureDisplay.Fill = video;if (CaptureDeviceConfiguration.AllowedDeviceAccess ||CaptureDeviceConfiguration.RequestDeviceAccess()){source.Start();}}We now have logic to start the capture, but we need a way to stop it. This is much more straightforward. First, we check that a source exists; if it does, we then execute the
Stopmethod.private void StopCapture(object sender, RoutedEventArgs e) {if (source != null){source.Stop();}}Press F5 to start the application. When it is displayed as shown in Figure 10-6, press the Start Capture button.
If access hasn't already been granted, you'll be prompted with the consent dialog as in Figure 10-7, asking for permission to access the camera and microphone.
If all goes well, you should see video captured as shown in Figure 10-8. When you are ready to stop the capture, simply press the Stop Capture button.


If you're interested in actually working with the raw audio and video stream, or if you'd like to save the stream data, you'll need to create a class that will implement the AudioSink and VideoSink classes. When implementing these classes, you'll need to provide overrides to a number of callbacks, including: OnCaptureStarted, OnCaptureStopped, OnFormatChange, and OnSample. The specifics of working with the raw streams from an audio or video capture are outside the scope of this book. For more information on this topic, I recommend Pro Silverlight 4 in C# by Matthew MacDonald (Apress, 2010).
When building a rich client application, there may be times you'd like to leverage existing applications and libraries installed on the local user's machine. In Silverlight 4, you now have access to COM objects installed locally. For the most part, this is exposed through a new class called AutomationFactory, which allows you to perform a CreateObject that activates and returns a reference to a registered COM object. Let's run through an example together.
In this example, we'll execute an executable with Silverlight using the new COM interoperability feature. To illustrate, we will open the Notepad application.
Create a new Silverlight application in Visual Studio 2010. Name it
InvokeNotepadand allow Visual Studio to create an ASP.NET web application calledInvokeNotepad.Webto host your application.When the project is created, you should be looking at the
MainPage.xamlfile. Within theLayoutRootGrid of the Silverlight page, add aButtonand set its attributes as follows, wiring up theClickevent as well.<Grid x:Name="LayoutRoot" Background="White"> <Button Content="Invoke Notepad" Width="100" Height="30" Name="button1" Click="button1_Click" /> </Grid>In the code behind,
MainPage.xaml.cs, first check that the application has elevated permissions. Next, add ausingstatement at the top of the code toSystem.Runtime.InteropServices.Automation. Now we'll create an instance of theAutomationFactoryclass and theWScript.ShellCOM object. We can then execute the Run command and pass it the location forNotepad.exe.private void button1_Click(object sender, RoutedEventArgs e) {if (App.Current.HasElevatedPermissions){using (dynamic cmd = AutomationFactory.CreateObject("WScript.Shell")){cmd.Run(@"C:WINDOWSNOTEPAD.EXE", 1, true);}}}Since the COM interoperability feature requires out-of-browser elevated permissions, open the properties of our Silverlight project, InvokeNotepad. Within the project properties, check the box next to "Enable running application out of the browser," as shown in Figure 10-9.
Click the "Out-of-Browser Settings" button and at the bottom of the dialog, check the box next to "Require elevated trust when running outside the browser" as shown in Figure 10-10.
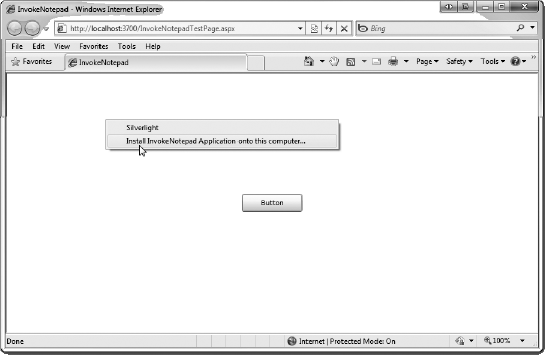
Press F5 to test the application. When the application is displayed, click on the "Invoke Notepad" button. You'll notice that nothing happens. This is because the COM interoperability features require elevated out-of-browser execution and we are checking the
HasElevatedPermissionsproperty to avoid getting a runtime error from performing the illegal operation.Right-click within the running application and select "Install InvokeNotepad Application onto this computer" as shown in Figure 10-11.
When prompted, click Install and you'll see the application open outside of the browser. Once again, click on the "Invoke Notepad" button. If all goes well, you should see Notepad open, as shown in Figure 10-12.


A feature that users have grown very accustomed to in desktop applications is the ability to drag files directly onto the application and have some action take place. With web applications, in contrast, you've always been restricted to browse functionality, which is not efficient or intuitive to users. Silverlight 4, however, supports the ability to drag files directly onto a Silverlight application. Currently this is limited to files, but you can see from the API that future releases of Silverlight will most likely support additional types.
To enable drop functionality in your application, you need only enable one property on your UI element, AllowDrop. If you set AllowDrop to true on your element, your application can immediately access the drop target functionality.
Once AllowDrop has been set, you have a number of events that will allow you to work with file(s) dropped onto your application. The DragEnter, DragLeave and DragOver events are fired during the drag process, but the primary event we are concerned with is the Drop event that occurs when a file is actually dropped onto our control.
The Drop event occurs when a file is dropped onto a control with AllowDrop enabled. This is the primary event that is used in enabling Silverlight as a drop target. From within the Drop event you can get information about the file list from the DropEventArgs.Data property.
Let's get a closer look at enabling file drop in a Silverlight application by running through an example.
In this example, we'll create a simple Silverlight application that contains a TextBlock. We will then enable the application as a drop target and when a file is dropped, if it is a text document with extension *.txt, we will display the contents of the file in the TextBlock control. Let's get started.
Create a new Silverlight application in Visual Studio 2010. Name it
SilverlightDropTargetand allow Visual Studio to create an ASP.NET web application calledSilverlightDropTarget.Webto host your application.When the project is created, you should be looking at the
MainPage.xamlfile. First, set theAllowDropproperty for the Grid to True. Then, within theLayoutRootGrid of the Silverlight page, add aTextBlocknamed FileContents, and set the Margin to 10 and the TextWrapping property to Wrap.<Grid AllowDrop="True" x:Name="LayoutRoot" Background="White"><TextBlockMargin="10"TextWrapping="Wrap"Name="FileContents" /></Grid>Now turn your attention to the code behind,
MainPage.xaml.cs. First add ausingreference to theSystem.IOnamespace, then wire up theDropevent in the constructor.public MainPage() { InitializeComponent();LayoutRoot.Drop += new DragEventHandler(LayoutRoot_Drop);}Next, in the
LayoutRoot_Dropevent, we'll start to work with the dropped file(s). First, we'll make certain that the data dropped on the application is not null. Next, we'll create anIDataObjectset to theDragEventArgs.Dataproperty passed into the event. We can then get the collection of files dropped using theGetDatamethod.void LayoutRoot_Drop(object sender, DragEventArgs e) { if (e.Data != null) { IDataObject obj = e.Data; FileInfo[] files = obj.GetData(DataFormats.FileDrop) as FileInfo[]; } }Once we have a collection of files, we can create a
foreachstatement to step through each file within our collection. For each instance, we will inspect the file extension. If the extension is.txt, we will open the file using aStreamReaderand read the contents of the file. Once we have read the contents, we will set that to theTextproperty of theFileContents TextBlock.void LayoutRoot_Drop(object sender, DragEventArgs e) { if (e.Data != null) { IDataObject obj = e.Data; FileInfo[] files = obj.GetData(DataFormats.FileDrop) as FileInfo[];foreach (FileInfo file in files){if (file.Extension.Equals(".txt")){using (Stream stream = file.OpenRead()){using (StreamReader reader = new StreamReader(stream)){FileContents.Text = reader.ReadToEnd();}}}}} }Now we'll test the application, but first let's inspect the file we are going to drop onto our application. The filename is
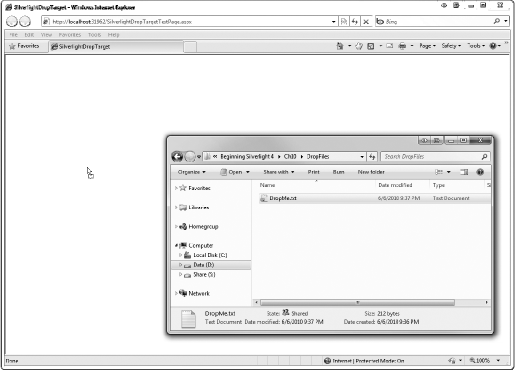
DropMe.txtand it contains the text shown in Figure 10-13.Press F5 to start the application. Once the application is open, drag DropMe.txt onto the application. You should see the cursor displayed as shown in Figure 10-14.
After you drop the file, if all goes well you should see the contents of the file displayed in the
TextBlockas shown in Figure 10-15.


In this chapter, we looked at a number of new features in Silverlight that enable developers to gain access to user machine devices and operating system functionality. These features let developers make their Silverlight applications very rich and user-friendly. In the next chapter, we will start to look at Expression Blend, a new tool for designing XAML-based applications.