
The previous chapter mentioned the tools required to develop RIAs that utilize the Silverlight technology. At the core of all of these tools is Microsoft's flagship development product, Visual Studio. This chapter provides an introduction to Visual Studio 2010, the latest version. You will learn about some of the new features that are particularly helpful for developers building RIAs with Silverlight, and you will have an opportunity to create your first Silverlight application using Visual Studio 2010. Let's get started with a brief introduction to the Visual Studio IDE.
Any developer who has developed applications using technologies related to Microsoft's Visual Basic, ASP, or .NET has used some version of Visual Studio on a regular basis. This is because Visual Studio is Microsoft's primary development product. Whether you are developing desktop applications, web applications, mobile applications, web services, or just about any other .NET solution, Visual Studio is the environment you will be using.
Visual Studio is an IDE that allows .NET developers to implement a variety of .NET solutions within the confines of one editor. An IDE is a software application that contains comprehensive facilities to aid developers in building applications. Visual Studio fits this description for a number of reasons. First, Visual Studio offers a very rich code-editing solution. It includes features such as source code color-coding and code completion. Second, it offers an integrated debugger, which allows you to place breakpoints in your source code to stop execution at any given point, as well as step through the source line by line, analyzing the state of objects and fields at any given point in the execution. Add to these features rich support for application deployment, installation, and integration with database services, and you can understand how Visual Studio is an extremely valuable tool for developers.
Note
This book assumes a basic understanding of Visual Studio. If you're new to Visual Studio, I recommend that you get started with a book devoted to the subject, such as Introducing .NET 4.0: With Visual Studio 2010, by Alex Mackey (Apress, 2010).
Microsoft has introduced a variety of new features in Visual Studio 2010, many of which are geared toward helping developers build RIAs with Silverlight and related Microsoft technologies, such as the Windows Communication Foundation (WCF), ADO.NET Data Services, and Ajax. Let's look at some of the new features in Visual Studio 2010 that are particularly helpful to Silverlight application developers.
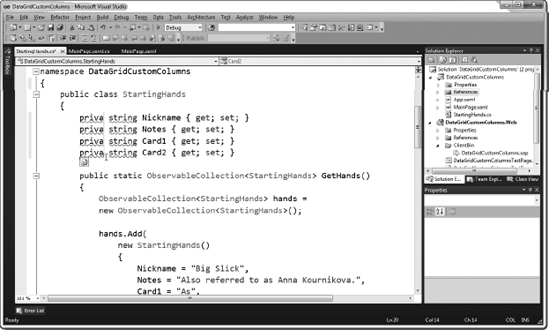
Today it is common for developers to have multiple monitors attached to their development workstations and, unfortunately, previous versions of Visual Studio never took advantage of this extra real estate. Developers could use the extra screens for other applications, but often it would be nice to be able to view more than one source file at once. Visual Studio 2010 adds support for multiple monitors by allowing developers to pull source files, windows, and more out of the Visual Studio primary IDE and move them to other monitors. Take, for example, Figure 2-1. Visual Studio 2010 is open on the left monitor, and we are viewing the MainPage.xaml. However, I would like to inspect the class that my UI is bound to at the same time. To do so I can simply drag the class out of the docked position in the IDE and move it to the second monitor. I could do the same thing for the toolbox, the properties window, or any window within Visual Studio 2010. A very nice new feature!

Since Visual Studio 2010 has been almost completely rewritten in WPF, a number of user interface enhancements have been added. One of these enhancements is the ability to zoom in and out of the source code editor. This will allow you to simply use your mouse scroll wheel to zoom into your source code. This is especially useful during presentations; however, there are times where developers could benefit from the ability to zoom in and out. For example, if you want to see a bigger portion of your source, you can zoom out and see your source from a greater distance, as shown in Figure 2-2.

Every developer that has used Visual Studio has become dependent on IntelliSense. When it is gone, you really notice how much you take it for granted and you find how dependent you really have become on it. Well, as great as IntelliSense is, in Visual Studio 2010 it just got better. The addition of partial string matching allows IntelliSense to more intelligently display entries based on what the developer has typed. For example, if the developer types OC, IntelliSense will display entries such as ObservableCollection, as shown in Figure 2-3, (notice OC are the capital letters of the Pascal-Cased object). In addition, if you type "collect", ObservableCollection will also appear since build is contained in the object name.

In addition to the partial string matching, the performance of IntelliSense has been dramatically improved. This allows developers to code without delays in IntelliSense and keep their rolls rolling.
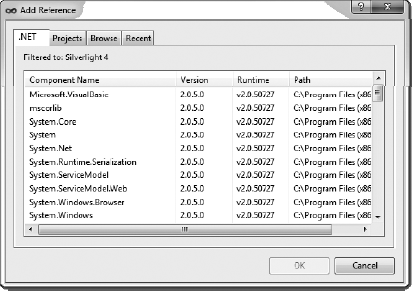
In Visual Studio 2008 and previous versions, developers have noticed that when you open the Add Reference dialog (see Figure 2-4), it takes quite a bit of time for it to full display the listing of components, especially for the COM components. In Visual Studio 2010, the Add Reference dialog has undergone many performance improvements, which will help prevent developers form having to wait on the Visual Studio IDE.
When you click anywhere within a symbol (class name, variable, object, field, etc), all instances of that item are highlighted throughout the current document, as shown in Figure 2-5. This is not a simple text matching; the editor is smart enough to understand the scope of the different variables. So even if you have two items with identical names that belong to different objects, they are not both highlighted.
You can easily navigate between the different highlighted instances as well by pressing Ctrl-Shift-Up to move to the next instance, or Ctrl-Shift-Down to move to the previous instance.

Another cool feature of Visual Studio 2010 is box selection. Consider the situation where you would have the following source:
public string Nickname { get; set; }
public string Notes { get; set; }
public string Card1 { get; set; }
public string Card2 { get; set; }
Let's say that you wanted to change all of these to be private properties instead of public. In Visual Studio 2010 you can hold down the Alt key and drag a box around just the public declarations, as shown in Figure 2-6.

Better yet, once you have this box selected you can edit all of the lines at once. So with the selection made, simply type private and it will automatically replace the public in each of the lines, as shown in Figure 2-7.
The Call Hierarchy window displays two lists regarding a given member: First all calls to the member (incoming) and all calls from the member (outgoing). Within each of those lists, you can then drill into each member and see its incoming and outgoing calls, forming a very useful call hierarchy.
To open the Call Hierarchy window, simply right-click on any method, property, or constructor and select View Call Hierarchy. An example of the Call Hierarchy window is shown in Figure 2-8.

Visual Studio 2008 introduced the ability to generate a method stub from a given call in the source. Consider the following line of code calling the method SomeMethod that did not exist, and passing it an integer and a string:
Person.NewMethod(123, "Bob");
If you type this, Visual Studio will provide you with the option to Generate method stub for 'NewMethod'. By selecting this, Visual Studio will automatically create the following method stub in the Person class:
class Person
{
    internal static void NewMethod(int p, string p_2)
    {
        throw new NotImplementedException();
    }
}
Visual Studio 2010 expands on this code generation functionality by now allowing you to automatically generate classes, structs, and enumerations.
Managing extensions and controls has always been a stressful point with Visual Studio 2008 and previous versions of Visual Studio. In Visual Studio 2010 the Extension Manager has been introduced. It allows you to easily browse an online library for different extensions as well as manage the extensions that are installed in your current development environment. The Extension Manager is shown in Figure 2-9.

The best way to explore the Visual Studio IDE is to get your hands dirty and play around with it. Let's build a Silverlight application.
In this exercise, you'll build the Hello World Silverlight 4 application. I personally hate the Hello World sample, but it is used often because it is so simple and provides a good introduction. Who am I to break with tradition? Let's get started.
Start Visual Studio 2010 and Select File

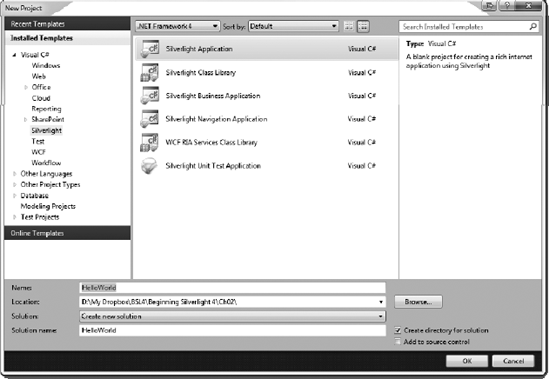
In the New Project dialog box, select Visual C# as the project type, and in the list under that type, choose Silverlight. Select Silverlight Application as the template and name the project
HelloWorld, as shown in Figure 2-10. Then click OK.Visual Studio will display the New Silverlight Application dialog box, informing you that your Silverlight application needs to be hosted in an HTML web page. It offers the choices of hosting the Silverlight application in a web site or within a project. For this exercise, select Web Application Project and stick with the default name of
HelloWorld.Web, as shown in Figure 2-11. Then click OK. See the next section for more information about choosing whether to use a web site or Web Application project for your own Silverlight applications.Visual Studio will now create the base project for you. Notice that there are two projects created within your solution: one called
HelloWorld.Weband one calledHelloWorld, as shown in Figure 2-12.Visual Studio has already opened the Main
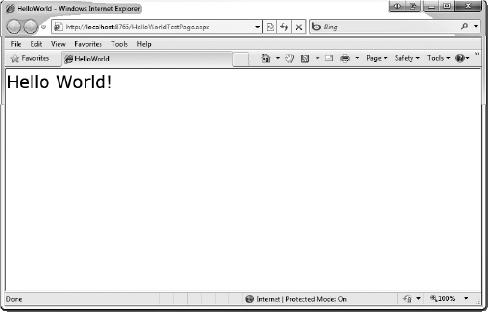
Page.xamlfile, which is where you will start working. Let's begin by adding aTextBlockcontrol, which will display our "Hello World!" message. Add theTextBlockwithin yourCanvasobject, as follows:<UserControl x:Class="HelloWorld.MainPage" xmlns="http://schemas.microsoft.com/winfx/2006/xaml/presentation" xmlns:x="http://schemas.microsoft.com/winfx/2006/xaml" xmlns:d="http://schemas.microsoft.com/expression/blend/2008" xmlns:mc="http://schemas.openxmlformats.org/markup-compatibility/2006" mc:Ignorable="d" d:DesignHeight="300" d:DesignWidth="400"> <Grid x:Name="LayoutRoot" Background="White"><TextBlock x:Name="HelloMessage" Text="Hello World!" FontSize="30" /></Grid> </UserControl>Save the project and run it by pressing F5. If you see the Debugging Not Enabled dialog box, select "Modify the
Web.configto enable debugging" and click OK. The result should be as shown in Figure 2-13.I know this isn't very interesting, so let's change things up a bit by setting the display message in the
MainPage.xaml.cscode behind. In the code behind, you will notice a constructor for yourPageclass, which contains one method calledInitializeComponent(). Under that method, change theTextproperty of yourTextBlockas follows (the line shown in bold):namespace HelloWorld { public partial class MainPage : UserControl { public MainPage() { InitializeComponent();this.HelloMessage.Text = "Hello Universe!";} } }Rebuild the application and run it again. Your result should look like Figure 2-14.
Close the application.


There you go! You have built your first Silverlight application. Of course, this application is extremely simple, but you did get an idea of how things work in Visual Studio 2010.
In Visual Studio 2010, should you use a web site project or a web application project to host your Silverlight application? The main difference between a web site project and a Web Application project is how the files are compiled and deployed. Each has its advantages and disadvantages. In the end, the choice pretty much comes down to user preference. Let's take a quick look at each approach.
A Visual Studio web site is nothing more than a group of files and folders in a folder. There is no project file. Instead, the site simply contains all the files under the specific folder, including all text files, images, and other file types.
A Visual Studio web site is compiled dynamically at runtime. An assembly will not be created, and you won't have a bin directory.
The following are some advantages of using a Visual Studio web site:
You don't need a project file or virtual directory for the site.
The site can easily be deployed or shared by simply copying the folder containing the site.
The following are some disadvantages of this approach:
There is no project file that you can double-click to open the site in Visual Studio. Rather, you must browse to the folder after opening Visual Studio.
By default, all files within the site's directory are included in the Web Site project. If there are files within the site's directory that you do not wish to be a part of the web site, you must rename the file, adding the extension
.exclude.
A Visual Studio web application project is the more traditional type of web project used prior to Visual Studio 2005. When Microsoft developers introduced the "web site" concept, they did not take into account the many developers who were comfortable with the project-based solution approach. To accommodate those developers, Microsoft announced the Visual Studio 2005 Web Application project as an add-on to Visual Studio 2005. In Visual Studio 2008 and 2010, this project type is once again a part of Visual Studio.
The following are some of the advantages of using a Web Application project:
All of the code files are compiled into a single assembly, placed in the
bindirectory.You can easily exclude files from a project, since all files within the project are defined within the project file.
It's easier to migrate from older versions of Visual Studio.
A disadvantage is that it can be more difficult to share your solution with others, if that is your intent.
In the end, both approaches have their pros and cons. You need to determine which one is more suitable for your application, depending on your specific purpose and goals. For more information about these project types, refer to the MSDN documentation.
This chapter introduced Visual Studio 2010 and some of the new features offered in this version, including the new JavaScript IntelliSense features, support for multiple monitors, and managing extensions. In addition, you built your very first Silverlight application.
In the next chapter, you are going to start to dive into some of the Silverlight controls, beginning with the layout management controls. These controls enable you to lay out your Silverlight applications.