Localized storage in Silverlight is handled by its isolated storage feature, which is a virtual file system that can be used to store application data on the client's machine. As just a few examples, you might use local storage in your application to store user settings, undo information, shopping cart contents, or a local cache for your commonly used objects. Implementations of this feature are really limited only by your imagination.
In this chapter, you will explore Silverlight's isolated storage. I will walk you through building a virtual storage explorer to view the directories and files contained within isolated storage for an application. In addition, you will look at the isolated storage quota and how to increase the quota size for your Silverlight applications.
Note
Silverlight 4 adds the ability for developers to create out-of-browser applications with elevated security. With this elevated access comes the ability to access the client's local hard drive. In this chapter we are discussing the isolated storage features of Silverlight only. For more information on creating applications with elevated security, see Chapter 16.
Storing application information has always been a challenge for developers of traditional web applications. Often, implementing such storage means storing information in cookies or on the server, which requires using a postback to retrieve the data. In the case of desktop applications, implementing storage for application information is significantly easier, as developers have more access to the user's hard drive. Once again, Silverlight bridges the gap between desktop applications and web applications by offering isolated storage.
Using the Silverlight classes for working with isolated storage, you can not only store settings locally, but also create files and directories, as well as read and write files within isolated storage.
The classes for accessing isolated storage are contained within the System.IO.IsolatedStorage namespace. This namespace contains the following three classes:
IsolatedStorageFileIsolatedStorageFileStreamIsolatedStorageSettings
You'll look at each class to see what it represents.
The IsolatedStorageFile class represents the isolated storage area, and the files and directories contained within it. This class provides the majority of the properties and methods used when working with isolated storage in Silverlight. As an example, in order to get an instance of the user's isolated storage for a given application, use the static method GetUserStoreForApplication(), as follows:
using (var store = IsolatedStorageFile.GetUserStoreForApplication())
{
    //...
}
Once the storage instance has been retrieved, a number of operations are available, including CreateDirectory(), CreateFile(), GetDirectoryNames(), and GetFileNames(). Also, the class has properties, such as Quota and AvailableFreeSpace. The following example creates a directory in isolated storage called Directory1, and then it retrieves the total and available free space in isolated storage:
using (var store = IsolatedStorageFile.GetUserStoreForApplication())
{
    store.CreateDirectory("Directory1");
    long quota = store.Quota;
    long availableSpace = store.AvailableFreeSpace;
}The IsolatedStorageFileStream class represents a given file. It is used to read, write, and create files within isolated storage. The class extends the FileStream class, and in most cases, developers will use a StreamReader and StreamWriter to work with the stream. As an example, the following code creates a new file named TextFile.txt and writes a string to the file:
using (var store = IsolatedStorageFile.GetUserStoreForApplication())
{
    IsolatedStorageFileStream stream = store.CreateFile("TextFile.txt");
    StreamWriter sw = new StreamWriter(stream);
    sw.Write("Contents of the File);
    sw.Close();
}The IsolatedStorageSettings class allows developers to store key/value pairs in isolated storage. The key/value pairs are user-specific and provide a very convenient way to store settings locally. The following example demonstrates storing the user's name in IsolatedStorageSettings:
public partial class MainPage : UserControl
{
    private IsolatedStorageSettings isSettings =
        IsolatedStorageSettings.ApplicationSettings;

    public MainPage()
    {
        InitializeComponent();
        this.Loaded += new RoutedEventHandler(Page_Loaded);
        this.cmdSave.Click += new RoutedEventHandler(cmdSave_Click);
    }

    void cmdSave_Click(object sender, RoutedEventArgs e)
    {
        isSettings["name"] = this.txtName.Text;
        SetWelcomeMessage();
    }

    void Page_Loaded(object sender, RoutedEventArgs e)
    {
        SetWelcomeMessage();
    }

    private void SetWelcomeMessage()
    {
        if (isSettings.Contains("name"))
        {
            string name = (string)isSettings["name"];
            this.txtWelcome.Text = "Welcome " + name;
        }
else
{
txtWelcome.Text =
"Welcome! Enter Your Name and Press Save.";
}
}
}The first time users access the application, they will see the message "Welcome! Enter Your Name and Press Save." They can then enter their name and click the Save Name button. The name will be saved in local storage under the key/value pair called name. The next time the user accesses the application, his name will still be stored in local storage, and he will see the friendly welcome message, as shown in Figure 9-1.

Now that you have briefly looked at some of the key classes associated with Silverlight's isolated storage, let's try building an application that uses this storage.
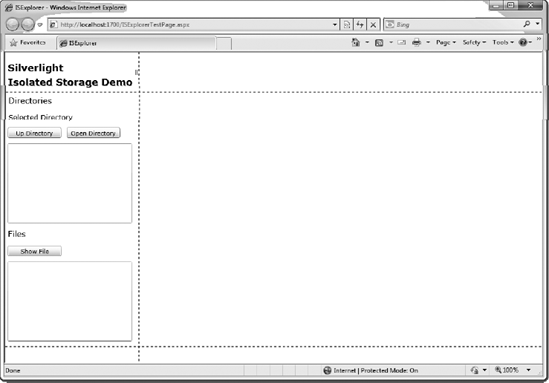
In this example, you will create a file explorer that will allow a user to navigate through an application's virtual storage within Silverlight's isolated storage. The file explorer will allow users to view, modify, and create new files within the given directories. Keep in mind that a Silverlight application has its own isolated storage, so the file explorer will be unique to the application. The end result will appear as shown in Figure 9-2.

Let's get started by setting up the application layout.
Create a new Silverlight application in Visual Studio 2010. Name it
ISExplorerand allow Visual Studio to create an ASP.NET web application calledISExplorer.Webto host your application.Next, we need to define the
Gridlayout. We will use theLayoutRootgrid that is already added by default, and then add two columns and three rows. Set theWidthproperty of the first column to1*and theWidthof the second column to3*. Set theHeightfor the rows to75, *, and30from top to bottom.<Grid x:Name="LayoutRoot" Background="White"><Grid.RowDefinitions><RowDefinition Height="75" /><RowDefinition Height="*" /><RowDefinition Height="30" /></Grid.RowDefinitions><Grid.ColumnDefinitions><ColumnDefinition Width="1*" /><ColumnDefinition Width="3*" /></Grid.ColumnDefinitions></Grid>Next we will add a
GridSplitter(see Chapter 4 for details) in order to allow the user to resize the left and right columns.Run your application. It should look like Figure 9-3.
Next, add a
GridSplitterto allow the user to resize the left and right columns. Set theGrid.RowSpanto3andHorizontalAlignmenttoRight.<Grid x:Name="LayoutRoot" Background="White" ShowGridLines="True"> <Grid.ColumnDefinitions> <ColumnDefinition Width="250" /> <ColumnDefinition /> </Grid.ColumnDefinitions> <Grid.RowDefinitions> <RowDefinition Height="75" /> <RowDefinition /> <RowDefinition Height="30" /> </Grid.RowDefinitions><basics:GridSplitterGrid.RowSpan="3"HorizontalAlignment="Right" /></Grid>Now you will start filling the
Gridcells with controls. You will add quite a few controls, using nestedStackPanelcomponents to assist in getting the desired layout. These controls have been discussed in detail in Chapters 4 and 5, and you can refer back to those chapters for more information about any of the controls used here.In
Grid.RowandGrid.Column (0,0), place aStackPanelthat contains a couple cosmeticTextBlockcontrols that will serve as your application title, as follows (with some of the existing code omitted for brevity):<Grid x:Name="LayoutRoot" Background="White" ShowGridLines="True"> ... <basics:GridSplitter ...<StackPanelVerticalAlignment="Bottom"Orientation="Vertical"Margin="5"><TextBlockFontSize="18"FontWeight="Bold"Text="Silverlight 2"></TextBlock><TextBlockFontSize="18"FontWeight="Bold"Text="Isolated Storage Demo"></TextBlock></StackPanel></Grid>Referring to Figure 9-2, you will notice that the content is divided into two sections: one for directories (top) and one for files (bottom). Let's first take care of the section for directories.
In
Grid.RowandGrid.Column (1,0), place anotherStackPanel, which spans two rows, with a coupleTextBlockcontrols, threeButtoncontrols, and twoListBoxcontrols. The XAML should appear as follows (again, with some of the source code omitted, but the changes are shown):<Grid x:Name="LayoutRoot" Background="White" ShowGridLines="True"> ... <basics:GridSplitter ... <StackPanel VerticalAlignment="Bottom" Orientation="Vertical" Margin="5"><TextBlock FontSize="18" FontWeight="Bold" Text="Silverlight 2"> </TextBlock> <TextBlock FontSize="18" FontWeight="Bold" Text="Isolated Storage Demo"> </TextBlock> </StackPanel><StackPanelGrid.Row="1"Grid.RowSpan="2"Orientation="Vertical"><TextBlockFontSize="15"Text="Directories"Margin="5"></TextBlock><TextBlockx:Name="lblCurrentDirectory"FontSize="13"Text="Selected Directory"Margin="5"></TextBlock><StackPanel Orientation="Horizontal"><Buttonx:Name="btnUpDir"Margin="5"Click="btnUpDir_Click"Content="Up Directory"Width="100"Height="20" /><Buttonx:Name="btnOpenDir"Margin="5"Click="btnOpenDir_Click"Content="Open Directory"Width="100"Height="20" /></StackPanel><ListBox Height="150"x:Name="lstDirectoryListing"Margin="5,5,13,5"></ListBox></StackPanel></Grid>First is a simple cosmetic
TextBlockfor the section title. This is followed by theTextBlocknamedlblCurrentDirectory, which will be filled with the current directory. As the users navigate through the directories, it will be important to inform them which directory they are in.Next are two
Buttoncontrols (btnUpDirandbtnOpenDir), which will be used for navigating through the directories. This is simplified into two basic tasks: moving up a directory and opening the currently selected directory. To get the buttons to appear visually as desired, they are contained in aStackPanelwith horizontal orientation.The final
ListBoxwill be populated with directories namedlstDirectoryListing. As the users navigate through the directories using thebtnUpDirandbtnOpenDirbuttons, thisListBoxwill be repopulated automatically with the directories contained in the user's current location.Next, still within
Grid.RowandGrid.Column (1,0), add the files section, as follows:<Grid x:Name="LayoutRoot" Background="White" ShowGridLines="True"> ... <ListBox Height="100" x:Name="lstDirectoryListing" Margin="5,5,13,5"> </ListBox><TextBlockFontSize="15"Text="Files"Margin="5"></TextBlock><StackPanel Orientation="Horizontal"><Buttonx:Name="btnOpenFile"Margin="5"Click="btnOpenFile_Click"Content="Show File"Width="100"Height="20" /></StackPanel><ListBox Height="150"x:Name="lstFileListing"Margin="5,5,13,5"></ListBox></StackPanel> </Grid>As with the previous section, the first
TextBlockholds the section title. Next is aButtoncontrol calledbtnOpenFile. Notice that even though there is only one button, it is still placed within aStackPanelfor consistency. In the future, if you want to extend this application—for example, to add file deletion functionality—you may want to add buttons to thisStackPanel. This is purely user preference; theStackPanelreally was not required in this instance.Finally, you have the
ListBoxthat will be filled with the files in the current directory, in the same way that the directoriesListBoxwill be filled in the top section.To see what you have so far, press F5 (or choose Debug

Notice that Visual Studio will compile successfully and will open the browser instance. However, just when you think everything is going great and you are excited to see your beautiful form coming to life, you get an
XamlParseExceptionwith a cryptic message:AG_E_PARSER_BAD_PROPERTY_VALUE [Line: 66 Position: 34].
This is caused by the fact that, within the code behind, you have not declared the delegates that are referred to in your XAML.
Note
The line and position noted in the error message you see may be slightly different from those shown here, depending on the spacing you included when adding the controls to the code.
Stop debugging by clicking the Stop button. Press F7 or select View
At this point, you could go through and manually add the handlers in the code. But I think you've done enough typing already, so let's have Visual Studio do it for you.
Return to your XAML by clicking the
MainPage.xamlfile in the Files tab. Look at the controls you have added. You will notice that the code refers to three event handlers, one for each of the buttons:btnUpDir_Click, btnOpenDir_Click, andbtnOpenFile_Click.Find the first reference,
btnUpDir_Click. Right-click it and select the Navigate to Event Handler option, as shown in Figure 9-4. Visual Studio will automatically create the event handler in the code behind, as follows:public partial class MainPage : UserControl { public MainPage() { InitializeComponent(); }private void btnUpDir_Click(object sender, RoutedEventArgs e){}}Repeat step 11 for the other two event handlers. At this point, your code behind should look as follows:
public partial class MainPage : UserControl { public MainPage() { InitializeComponent(); } private void btnUpDir_Click(object sender, RoutedEventArgs e) { }private void btnOpenDir_Click(object sender, RoutedEventArgs e){}private void btnOpenFile_Click(object sender, RoutedEventArgs e){}}Run the application. Once again, press F5 to start debugging. Barring any typos, the Silverlight application should appear as shown in Figure 9-5.
It's looking good so far! You are almost finished with the application layout. Now, let's move on to the right column and add the final controls.
At the bottom of your
Griddefinition withinGrid.RowandGrid.Column (0,1), place anotherStackPanel. Within it, add aTextBoxnamedtxtFileNamethat will contain the name of the file being edited, along with aButtoncontrol namedbtnSave, which will save the file referred to intxtFileName. Your XAML should look as follows:<Grid x:Name="LayoutRoot" Background="White" ShowGridLines="True"> ... </StackPanel><StackPanelVerticalAlignment="Bottom"Orientation="Horizontal"Grid.Row="0"Grid.Column="1"><TextBoxx:Name="txtFileName"Text="File1.txt"Margin="5"Width="300"Height="30"FontSize="15"></TextBox><Buttonx:Name="btnSave"Margin="5"Content="Save"Width="100"Height="30"Click="btnSave_Click"></Button></StackPanel></Grid>While you are at it, go ahead and have Visual Studio create the event handler for
btnSave_Click. Right-click it and choose the Navigate to Event Handler option to add the following handler:public partial class MainPage : UserControl { ...private void btnSave_Click(object sender, RoutedEventArgs e){}}Navigate back to the XAML.Within
Grid.RowandGrid.Column (1,1), add aTextBoxnamedtxtContents, which will display the contents of the opened file, as follows:<Grid x:Name="LayoutRoot" Background="White" ShowGridLines="True"> ... </StackPanel><TextBoxx:Name="txtContents"VerticalScrollBarVisibility="Visible"HorizontalScrollBarVisibility="Auto"AcceptsReturn="True"BorderBrush="Black" BorderThickness="2"Margin="5" Grid.Column="1" Grid.Row="1"FontSize="15" FontFamily="Courier"></TextBox></Grid>Since this should be a multiline
TextBox, you set theAcceptsReturnproperty toTrue.You also set theVerticalScrollBarVisibilityproperty toVisible, which makes it always appear, and theHorizontalScrollBarVisibilityproperty toAuto, which makes it appear only when there is enough text to require left and right scrolling.Within
Grid.RowandGrid.Column (1,2), place aStackPanelthat contains fiveTextBlockcontrols, some that are simply cosmetic, and some that will be populated in the application's code, as follows:<Grid x:Name="LayoutRoot" Background="White" ShowGridLines="True"> ... </StackPanel> <TextBox x:Name="txtContents" VerticalScrollBarVisibility="Visible" HorizontalScrollBarVisibility="Auto" AcceptsReturn="True" BorderBrush="Black" BorderThickness="2" Margin="5" Grid.Column="1" Grid.Row="1" FontSize="15" FontFamily="Courier"> </TextBox><StackPanelVerticalAlignment="Bottom" Orientation="Horizontal"Margin="5" Grid.Column="1" Grid.Row="2"><TextBlock FontSize="13"Text="Available Space in Isolated Storage: " /><TextBlock x:Name="txtAvalSpace" FontSize="13" Text="123" /><TextBlock FontSize="13" Text="kb / " /><TextBlock x:Name="txtQuota" FontSize="13" Text="123" /><TextBlock FontSize="13" Text="kb" /></StackPanel></Grid>


With this, you are finished creating the application layout! You can now turn your attention to the code behind.
Now let's add the functionality that demonstrates accessing Silverlight's isolated storage.
When the file explorer is started, it will do two things. First, it will load some sample directories and files in isolated storage. Second, it will populate the directories and files
ListBoxcontrols, as well as update the informativeTextBlockcontrols. You will encapsulate these tasks into two methods:LoadFilesAndDirs()andGetStorageData(). Create aLoadedevent handler and add these two method calls to the event.public partial class MainPage : UserControl { public MainPage() { InitializeComponent();this.Loaded += new RoutedEventHandler(Page_Loaded);}void Page_Loaded(object sender, RoutedEventArgs e){LoadFilesAndDirs();GetStorageData();}private void LoadFilesAndDirs(){}private void GetStorageData(){}private void btnUpDir_Click(object sender, RoutedEventArgs e) { }private void btnOpenDir_Click(object sender, RoutedEventArgs e) { } private void btnOpenFile_Click(object sender, RoutedEventArgs e) { } private void btnSave_Click(object sender, RoutedEventArgs e) { } }Next, add references to two namespaces for your application. Also, create a global string variable called
currentDir, which will store the current directory.using ...
using System.IO;using System.IO.IsolatedStorage;namespace ISExplorer { public partial class MainPage : UserControl {private string currentDir = "";public MainPage() { InitializeComponent(); this.Loaded += new RoutedEventHandler(Page_Loaded); } ... } }Let's implement the
LoadFilesAndDirs()method. The first step is to get an instance of the user's isolated storage for the application using theIsolatedStorageFileclass'sGetUserStoreForApplication()method. You will do this within a C#usingstatement so the instance is disposed of automatically.private void LoadFilesAndDirs() {using (var store =IsolatedStorageFile.GetUserStoreForApplication()){}}Now that you have an instance of the isolated storage, create three root-level directories and three subdirectories, one in each of the root-level directories. Use the
CreateDirectory()method to create the directories, as follows:private void LoadFilesAndDirs() { using (var store = IsolatedStorageFile.GetUserStoreForApplication()) {// Create three directories in the root.store.CreateDirectory("Dir1");store.CreateDirectory("Dir2");store.CreateDirectory("Dir3");// Create three subdirectories under Dir1.string subdir1 = System.IO.Path.Combine("Dir1", "SubDir1");string subdir2 = System.IO.Path.Combine("Dir2", "SubDir2");string subdir3 = System.IO.Path.Combine("Dir3", "SubDir3");store.CreateDirectory(subdir1);store.CreateDirectory(subdir2);store.CreateDirectory(subdir3);} }Next, create two files: one in the root and one in a subdirectory. To do this, use the
CreateFile()method, which returns anIsolatedStorageFileStreamobject. For now, you will leave the files empty, so after creating the files, simply close the stream.private void LoadFilesAndDirs() { using (var store = IsolatedStorageFile.GetUserStoreForApplication()) { // Create three directories in the root. store.CreateDirectory("Dir1"); store.CreateDirectory("Dir2"); store.CreateDirectory("Dir3"); // Create three subdirectories under Dir1. string subdir1 = System.IO.Path.Combine("Dir1", "SubDir1"); string subdir2 = System.IO.Path.Combine("Dir2", "SubDir2"); string subdir3 = System.IO.Path.Combine("Dir3", "SubDir3"); store.CreateDirectory(subdir1); store.CreateDirectory(subdir2); store.CreateDirectory(subdir3);// Create a file in the root.IsolatedStorageFileStream rootFile =store.CreateFile("InTheRoot.txt");rootFile.Close();// Create a file in a subdirectory.IsolatedStorageFileStream subDirFile =store.CreateFile(System.IO.Path.Combine(subdir1, "SubDir1.txt"));subDirFile.Close();} }Warning
Notice the
Path.Combine()method call here is fully qualified (specified with the namespace). This is because there is anotherPathclass inSystem.Windows.Shapes. If you don't fully qualifyPath, the ambiguous name will cause an error.That completes the
LoadFilesAndDirs()method. Next, you will implement theGetStorageData()method, which will display the storage information in the application.Since you will be populating the directories and files
ListBoxcontrols, you need to make sure you clear them each time theGetStorageData()method is called. You will do this by calling theItems.Clear()method on the twoListBoxcontrols. Then you will get an instance of the user's isolated storage, in the same way as you did in theLoadFilesAndDirs()method.private void GetStorageData() {this.lstDirectoryListing.Items.Clear();this.lstFileListing.Items.Clear();using (var store =IsolatedStorageFile.GetUserStoreForApplication()){}}Next, you want to list all of the directories that are contained in the directory passed to the method. In order to do this, you will construct a search string using the
System.IO.Path.Combine()method. You will then call theGetDirectoryNames()method along with the search string. This will return a string array, which you can then step through to manually populate the directoriesListBox.private void GetStorageData() { this.lstDirectoryListing.Items.Clear(); this.lstFileListing.Items.Clear(); using (var store = IsolatedStorageFile.GetUserStoreForApplication()) {string searchString =System.IO.Path.Combine(currentDir, "*.*");string[] directories =store.GetDirectoryNames(searchString);foreach (string sDir in directories){this.lstDirectoryListing.Items.Add(sDir);}} }Now populate the files
ListBox. You do this in the same way that you populated the directoriesListBox, except this time, use theGetFileNames()method, which similarly returns a string array.private void GetStorageData() { this.lstDirectoryListing.Items.Clear(); this.lstFileListing.Items.Clear(); using (var store = IsolatedStorageFile.GetUserStoreForApplication()) { string searchString = System.IO.Path.Combine(currentDir, "*.*"); string[] directories = store.GetDirectoryNames(searchString); foreach (string sDir in directories) { this.lstDirectoryListing.Items.Add(sDir); }string[] files = store.GetFileNames(searchString);foreach (string sFile in files){this.lstFileListing.Items.Add(sFile);}} }Now that the two
ListBoxcontrols are populated, you want to populate three additionalTextBlockcontrols. One will show the current directory. The other two will display the amount of free space remaining in isolated storage and the available quota for the application. You get this information by using theQuotaandAvailableFreeSpaceproperties, which return the total and free space in bytes, respectively.private void GetStorageData() { this.lstDirectoryListing.Items.Clear(); this.lstFileListing.Items.Clear(); using (var store = IsolatedStorageFile.GetUserStoreForApplication()) { string searchString = System.IO.Path.Combine(currentDir, "*.*"); string[] directories = store.GetDirectoryNames(searchString); foreach (string sDir in directories) { this.lstDirectoryListing.Items.Add(sDir); } string[] files = store.GetFileNames(searchString); foreach (string sFile in files) { this.lstFileListing.Items.Add(sFile); }long space = store.AvailableFreeSpace;txtAvalSpace.Text = (space / 1000).ToString();long quota = store.Quota;txtQuota.Text = (quota / 1000).ToString();this.lblCurrentDirectory.Text =String.Concat("\", currentDir);} }Run the application. You will see that the current directory is set to
, and that the three directories and the file you created at the root level are displayed in theListBoxcontrols, as shown in Figure 9-6.Now you can implement the
Buttonevents, starting with the Up Directory and Open Directory buttons.When the user clicks the Up Directory button, the system will find the current directory's parent directory using
System.IO.Path.GetDirectoryName(), set the current directory to be that parent directory, and reexecute theGetStorageData()method.private void btnUpDir_Click(object sender, RoutedEventArgs e) {if (currentDir != ""){currentDir =System.IO.Path.GetDirectoryName(currentDir);}GetStorageData();}When the user clicks the Open Directory button, you will combine the current directory with the selected directory from the directory
ListBoxusing theSystem.IO.Path.Combine()method, set the current directory to that new directory, and once again reexecute theGetStorageData()method.private void btnOpenDir_Click(object sender, RoutedEventArgs e) {if (this.lstDirectoryListing.SelectedItem != null){currentDir =System.IO.Path.Combine(currentDir,this.lstDirectoryListing.SelectedItem.ToString());}GetStorageData();}Next, implement the Show File button's
Clickevent, as follows:private void btnOpenFile_Click(object sender, RoutedEventArgs e) {if (this.lstFileListing.SelectedItem != null){this.txtFileName.Text =this.lstFileListing.SelectedItem.ToString();using (var store =IsolatedStorageFile.GetUserStoreForApplication()){string filePath =System.IO.Path.Combine(currentDir,this.lstFileListing.SelectedItem.ToString());IsolatedStorageFileStream stream =store.OpenFile(filePath, FileMode.Open);StreamReader sr = new StreamReader(stream);this.txtContents.Text = sr.ReadToEnd();sr.Close();}}}When a user clicks the Show File button, the file from isolated storage opens, and its contents are displayed in
txtContents. You achieve this by first getting an instance of the user's isolated storage, and then generating the path to the file by combining the current directory with the file name provided intxtFileName. After you have constructed the full file path, you open the file usingOpenFile(), which returns aStreamcontaining the file contents. You attach aStreamReaderto theStreamto assist in working with the stream, and then display the contents of theStreamusing theStreamReader'sReadToEnd()method.Finally, wire up the Save button, which will save the contents of
txtContentsto the file name specified intxtFileName. You want to make it so that if the user enters a file name that doesn't exist, the application will create a new file. If the user enters one that does exist, the application will override the contents of that file. Although this is not perfect for use in the real world, it serves as a fine demo for using isolated storage.private void btnSave_Click(object sender, RoutedEventArgs e) {string fileContents = this.txtContents.Text;using (var store =IsolatedStorageFile.GetUserStoreForApplication()){IsolatedStorageFileStream stream =store.OpenFile(System.IO.Path.Combine(currentDir,this.txtFileName.Text),FileMode.OpenOrCreate);StreamWriter sw = new StreamWriter(stream);sw.Write(fileContents);sw.Close();stream.Close();}GetStorageData();}This method is similar to the
ShowFile()method. Basically, you get the isolated storage instance, and open the file using theOpenFile()method, passing it the full file path. However, this time, you pass theOpenFile()methodFileMode.OpenOrCreate. This way, if the file doesn't exist, the application will create it. You then attach the returned stream to aStreamWriter, and write the contents to theStreamusing theStreamWriter'sWrite()method.After writing the file, you clean up the objects and call the
GetStorageData()method, which will cause the newly created file to appear in the filesListBox(in the event a new file was created).

At this point, you're ready to test your completed application.
Now let's try out your new file explorer.
Fire up the application by pressing F5. If all goes well, you should see the application.
Highlight Dir1 in the Directories list box and click the Open Directory button. The application will navigate to that directory and refresh the list boxes to show the directories and files contained within that file.
Enter the file name
SampleTextFile.txtin thetxtFileNametext box. For the contents, enter some arbitrary data. If you have Microsoft Word, you can generate a ton of random text using=Rand(10,20)and paste the content into the text box.After you enter the contents, click the Save button. You will see the file appear in the Files list box, as shown in Figure 9-7.
Click the Up Directory button to navigate back to the root. You will notice that the current directory changes, as do the contents of the list boxes. For kicks, click Save again. This time, the application will save the same file in the root directory.
Highlight the
InTheRoot.txtfile and click the Show File button. Since you left the file empty, nothing will appear in thetxtContentsbox. You can enter some text in the text box and click Save.Highlight
SampleTextFile.txtand click Show File. The contents of your file are still there. It really works!Try adding some files (preferably with a large amount of text). Take a look at the display of the current free space and quota of the isolated storage at the bottom of the application. You should see the amount of free space decrease.
Stop debugging. Now restart debugging. Notice anything? Your files are still there! That is because isolated storage is persistent data, and it will remain until the user clears the isolated storage, as explained in the next section.

This exercise demonstrated how Silverlight's isolated storage works and how you can access it. In the following section, you will learn how to manage isolated storage, including changing its quota.
By default, the amount of isolated storage space available for a Silverlight application is 1MB. You can view the available storage, clear it, and increase its size.
In order to view the isolated storage saved on your machine, simply right-click any Silverlight application and select Silverlight Configuration from the pop-up menu. This will display the Microsoft Silverlight Configuration window. Navigate to the Application Storage tab, as shown in Figure 9-8. There, you can see your test application in the listing, and depending on what other Silverlight applications you have accessed, you may see other web sites listed.

Figure 9.8. Viewing application storage information in the Microsoft Silverlight Configuration window
If users want to clear the storage space, they simply need to highlight the site they want to clear data for and click Delete. This will display a confirmation dialog box, as shown in Figure 9-9.

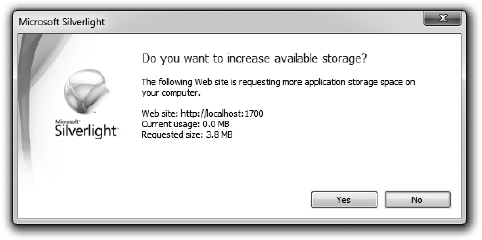
What if you want more storage space for your application? Developers can request additional storage space by using the TryIncreaseQuotaTo() method. A restriction placed on this task is that it can be executed only in a user-triggered event, such as a Button control's Click event. This restriction is in place to prevent the application from increasing the quota without the user's knowledge.
To demonstrate how to increase the isolated storage quota, let's add a button to the file explorer demo to increase the quota to 4MB.
Open the
IsolatedStorageExplorerproject that you created in the previous exercise.In the
MainPage.xamlfile, locate the definition of the Save button and add a newButtoncontrol calledbtnIncreaseQuota, with the captionIncrease Quota, as follows:<StackPanel VerticalAlignment="Bottom" Orientation="Horizontal" Grid.Row="0" Grid.Column="1"> <TextBox x:Name="txtFileName" Text="File1.txt" Margin="5" Width="300" Height="30" FontSize="15"> </TextBox> <Button x:Name="btnSave" Margin="5" Content="Save" Width="100"Height="30" Click="btnSave_Click"> </Button> <Buttonx:Name="btnIncreaseQuota"Margin="5"Content="Increase Quota"Width="150"Height="30"Click="btnIncreaseQuota_Click"></Button></StackPanel>You have wired up the
Clickevent to a new event handler created by Visual Studio. Navigate to the code behind's definition of that event handler.private void btnIncreaseQuota_Click(object sender, RoutedEventArgs e) { }Next, you want to get an instance of the user's isolated storage, just as you did numerous times in creating the file explorer. Then call the
IncreaseQuotaTo()method, passing it4000000, which is roughly 4MB. Add the following to event handler:private void btnIncreaseQuota_Click(object sender, RoutedEventArgs e) {using (var store =IsolatedStorageFile.GetUserStoreForApplication()){if (store.IncreaseQuotaTo(4000000)){GetStorageData();}else{// The user rejected the request to increase the quota size}}}Note
These numbers are not exact, which is fine for the demonstration here. You can increase the quota to 4MB exactly by multiplying 1024 by 4.
Notice that the
IncreaseQuotaTo()method returns a Boolean value. Depending on whether the user accepted the application's request to increase the quota size,trueorfalsewill be returned. If the user accepted the request, you will want to redisplay the information displayed for the quota. The easiest way to do this is to simply call theGetStorageData()method, as you did in the event handler here.Try out your new addition by running your application and clicking the new Increase Quota button. You will see the dialog box shown in Figure 9-10.
Click Yes. You will notice that the available quota is now increased in your application, as shown in Figure 9-11.

This completes the file explorer. Now you can apply these concepts to your own persistent storage implementations in your Silverlight applications.
In this chapter, you looked at Silverlight's isolated storage feature. As you saw, it is very straightforward to store user-specific data for your application and have that data persist over browser instances. This provides a very convenient way for developers to add offline content or save user settings.
In the next chapter, you will look at Microsoft Expression Blend 4, an application created for the sole purpose of visually editing XAML.