
Up to now in this book, I have discussed only the process of developing Silverlight applications. In this chapter, I turn your focus to post development and discuss the topic of deploying your Silverlight applications.
Once you have finished developing your Silverlight application, you must then face the question of deployment. Luckily, Silverlight deployment is a trivial task that really only involves one concept, XAP files.
When you compile a Silverlight application, the application is packaged into a single file with the extension .XAP. This file is the only thing that needs to be sent to the client in order to run your application. The XAP file itself is really nothing special and is nothing more than a zip file with a special file extension. To prove this, you can simply change the file extension of a XAP file to give it a .ZIP extension. Once the file has been renamed, you can then view the contents of compressed archive in the file explorer in Windows or in a zip archive tool such as WinZip.
The reason Silverlight uses XAP files to package applications is really for two benefits. First, by placing your files in a ZIP archive file, your files are compressed when they are deployed and sent to the client, which in turn reduces download times and improves the end user experience. Secondly, by placing your entire Silverlight application in one file, it makes the process of deploying your application extremely simple.
In order to host Silverlight content on your web server, it is not necessary to be running a Windows server. In fact, just about any web server can serve Silverlight content, as long as they are set to serve up XAP files. In IIS7 this is setup by default, so if you are running Windows 2008 Server then your web server is preconfigured ready to host your Silverlight content.
If you are running a version of IIS previous to IIS7 or if you are running on a non-Windows server, you must do some minor configuration to enable the MIME types for the Silverlight extensions. The two MIME types you need to add are in Table 16-1.
Since there are so many different servers out there, I won't attempt to show you how to set up this MIME type for each server possibility, so you will need to do some quick research on how to setup MIME types, though it is an extremely common task for server administration.
As the previous section described, when you deploy your Silverlight applications, all files for your application are included in a XAP package. This includes any assemblies that are required by your application. For example, your XAP file may look like Figure 16-1, where you can see that a number of assemblies are included in the package, such as System.Windows.Controls.Data.dll. This assembly alone is 128KB in size, and this amount has to be downloaded to each and every client that runs your application. Furthermore, if there are multiple Silverlight applications that all require the use of the System.Windows.Controls.Data.dll assembly, each one by default will download their own copy of the assembly.

Application Library Caching is a new feature since Silverlight 3 that allows you to cache assemblies locally and share them among different Silverlight applications running on a client machine. Once the files are separated from the application XAP file, their download location can be specified in the AppManifest.xml file.
Let's run through a very quick example to show how assembly caching works and how to activate it in your Silverlight applications.
In this exercise, you will create a simple Silverlight application that includes a number of assemblies. You will then look at the packaged XAP file before and after you activate assembly caching for the application. You will also explore the source changes that take place when using assembly caching. Let's get started!
In Visual Studio 2010, create a new Silverlight application named
AssemblyCachingand allow Visual Studio to create a Web application project to host your application.In
MainPage.xaml, make certain your cursor is positioned within the rootGridand double-click on theDataGridfrom the Toolbox. After theDataGridhas been added, right-click on it in the design view and select Reset Layout
<Grid x:Name="LayoutRoot" Background="White">
    <sdk:DataGrid AutoGenerateColumns="False" Name="dataGrid1" />
</Grid>
Build the application by selecting Build
Expand the
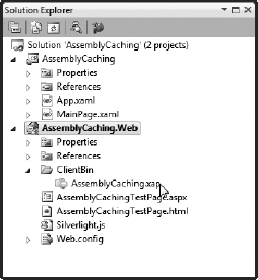
ClientBindirectory within the host web application's directory using the Solution Explorer in Visual Studio. There you should find theAssemblyCaching.xapfile, as shown in Figure 16-2.Change the file name of this file to be
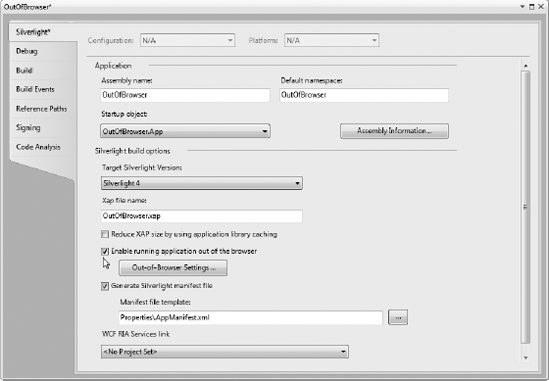
AssemblyCaching.xap.zipfrom within the Solution Explorer in Visual Studio in order to explore the contents. Once the file is renamed, double-click on the file name to open the compressed file in Windows Explorer. You will see the contents as shown in Figure 16-1. You will see that there many assemblies contained in the*.xapfile. Once you have finished inspecting the file, rename it back toAssemblyCaching.xap.From Visual Studio right-click on the Silverlight application in the Solution Explorer and select Properties. On the properties dialog, you will see a check box labeled "Reduce XAP size by using application library caching." Check this option as shown in Figure 16-3 and save your changes.
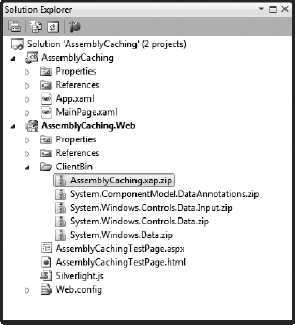
Rebuild the application and then navigate back to the
ClientBindirectory. Once again, rename theAssemblyCaching.xapfile to a*.zipfile and open it in windows explorer. You will see that there are significantly fewer assemblies contained within the package, as shown in Figure 16-4.If you then refresh the Solution Explorer and examine the
ClientBinfolder you will see that a number of new zip files have been added, as shown in Figure 16-5. These zip files contain the assemblies that were removed from the*.xapfile. When your Silverlight application needs the specific assemblies they will download the assembly via the zip file in theClientBin.


Full screen support has been available in Silverlight for quite some time, but if you are like me and you have multiple monitors there has probably been a point in time where you have put something in full screen, then changed the focus to another application on your system. If you have indeed tried this, you would have noticed that the Silverlight application that was full screen was no longer in full screen.
Silverlight 4 adds a new feature called full screen pinning, where developers can elect to keep their application in full screen, even when it loses focus. If they have enabled this for their application, when the user selects full screen the application will prompt them with a consent dialog asking if it is OK to remain in full screen, as shown in Figure 16-6. Assuming they click Yes, the application will then remain in full screen until they press escape while focused on the application or until the application removes itself from full screen.

As a developer, in order to enable full screen pinning for your application, you simply need to add one line of code to your application, shown in the following code listing. Notice the property FullScreenOptions is set to StaysFullScreenWhenUnFocused. That is all there is to it!
public partial class MainPage : UserControl
{
    public MainPage()
    {
        InitializeComponent();
        App.Current.Host.Content.FullScreenOptions =
            System.Windows.Interop.FullScreenOptions.StaysFullScreenWhenUnfocused;
    }

    private void Button_Click(object sender, RoutedEventArgs e)
    {
        App.Current.Host.Content.IsFullScreen =
            !App.Current.Host.Content.IsFullScreen;
    }
}A new feature in Silverlight 4 is the ability to run your Silverlight applications outside the browser. The new feature allows users to right-click on a Silverlight application, install it locally to their machine, and execute it without opening their browser. Out of browser support is also just as safe and secure as running Silverlight within the browser, as applications run out of the browser still live within the sandbox.
For developers, out of browser has a number of benefits. The most obvious is that the same XAP runs in both the browser as well as out of the browser. That means you can now develop an application that has identical user experiences in any browser, any platform, and even outside the browser on any platform. In addition, out of browser supports automatic updating of applications, which means even when a user installs the Silverlight application for out of browser execution, updates will still automatically be sent to the user. Developers also have access to an API that will allow them to determine when their applications are run out of the browser and modify the behavior of their app however they wish.
To enable out of browser support for your Silverlight application, the first step is to view the properties of the Silverlight application and select the check box labeled "Enable running application out of the browser," as shown in Figure 16-7.
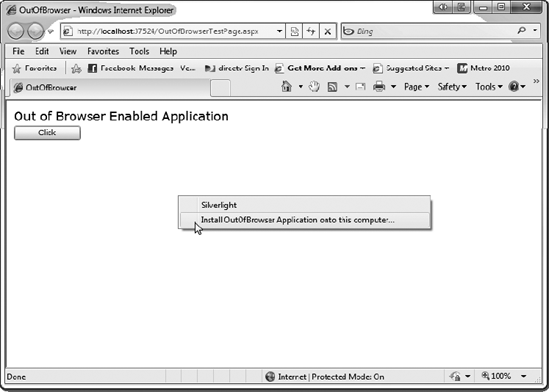
When this is checked, right-clicking on a Silverlight application will include an additional menu item, as shown in Figure 16-8.
When the user clicks to install the application locally, they are presented with the default Install Application dialog shown in Figure 16-9. The user has the option to create shortcuts on either the Start menu, Desktop, or both.

After the installation is complete, the application re-launches outside the browser. At this point, the user can reopen the application at any time via the shortcuts they chose during the installation.
As you have just seen, you can easily enable your application for out of browser support by simply checking one check box in your project properties. However, what if you would like to customize the installation experience for your application? Luckily, Silverlight has made it very easy for developers to customize the title of their application, the shortcut names, and even the icons used in the installation experience.
To customize your application's installation experience, in the project properties you will notice a button to the right of the check box for enabling out of browser support labeled "Out-Of-Browser Settings." If you click that button, the Out-Of-Browser Settings dialog appears, as shown in Figure 16-10. In the following case, you have changed the title, the shortcut name, and you have provided a graphic for the 128 × 128 icon. Note that you have not provided graphics for the smaller icons, and as a result the 128 × 128 icon will simply be resized. This is fine for the purposes of this book, but in your applications you really should provide the smaller icons to obtain a crisper look.

With these settings changed, when you choose to install our application, you are presented with the updated dialog shown in Figure 16-11.

As mentioned, in Silverlight applications running out of browser are running the exact same XAP as the application running in the browser. This is great for developers because you know that the user will have the same experience in both situations. However, what if you wanted to change that experience? What if there were some elements to your application that you wanted to change the behavior in the event that users were running the application out of the browser? In Silverlight, there are a number of API methods, properties, and events that you can work with to customize your application based on its state. One of these properties is the IsRunningOutOfBrowser property. This property returns true if application is running out of the browser and false if it is running within the browser. You can easily add code that looks at this property and executes accordingly.
private void Button_Click(object sender, RoutedEventArgs e)
{
    if (Application.Current.IsRunningOutOfBrowser)
    {
        OOBStatus.Text = "Application Running Out of Browser!";
    }
    else
    {
        OOBStatus.Text = "Application Running In Browser";
    }
}
By adding this code, you can then run the application within the browser (see Figure 16-12) and out of the browser (see Figure 16-13) to see that our application can behave differently depending on its state.


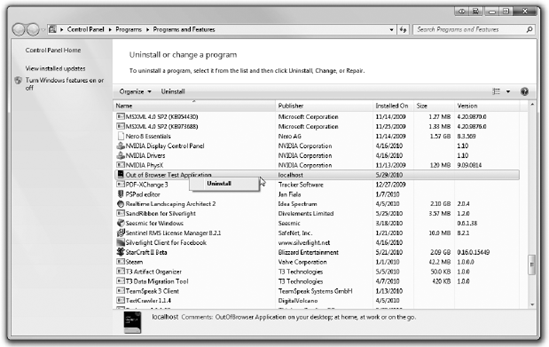
You may be wondering how you can uninstall the Silverlight applications that you installed locally. In Silverlight 4 you can now uninstall your applications from Add/Remove programs within windows, as shown in Figure 16-14. That is all there is to it!
In addition to using Add/Remove programs, you can also uninstall your application from the application itself. Uninstalling this way involves only one very simple step. Open the application, right-click on it, and select "Remove this Application," as shown in Figure 16-15. That is all there is to it!

The addition of out of browser support in Silverlight 3 was among the most popular of the new features in Silverlight. However, many developers asked for more access to client desktops, including device support and hard drive access. In Silverlight 4 developers can create applications that request elevated permissions, which will provide the client support developers were seeking. For more information on taking advantage of elevated permissions, see chapter 10, "System Integration and Device Support."
To enable elevated trust for your application, first enable out of browser for your application, as shown in Figure 16-16.
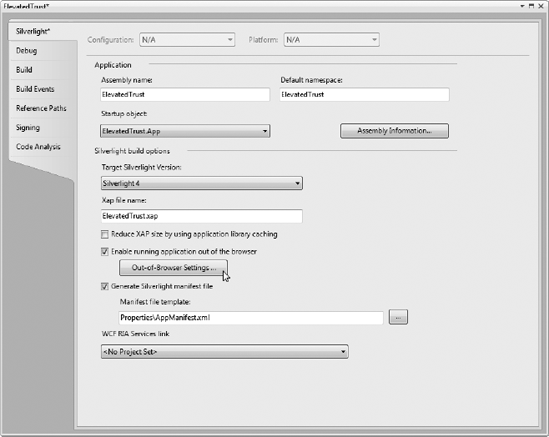
Next you need to check the box next to "Require elevated trust when running outside the browser", as shown in Figure 16-17.

When a user accesses your application and runs it out of browser, they will be prompted with a consent dialog, shown in Figure 16-18, that will ask them if they are OK with granting your application the elevated permissions.

In this chapter, you explored deploying Silverlight applications. As you have seen, deployment in Silverlight is straightforward and trivial, which is yet another benefit of Silverlight applications. You now are able to build your own Silverlight applications from start to finish and deploy them for the entire world to appreciate! Happy Silverlighting!