Once you've logged in and changed your password, it's time to go exploring. You've probably noticed the navigation menu along the left side of your screen. Did you notice that it has two formats? By default, each menu option displays an icon and text (as shown in Figure 3-1), and you can click each option to expand the submenu below. Once you learn your way around, though, you might find that you recognize the icons alone and it's faster to hover over the main menu options to reach the submenus. You can switch to the icons-only, hover-style menu using the small arrow dividers between sections.

I'll go through the whole menu by the end of this book, but for now I'm going to focus on the first and last options: the Dashboard and Settings.
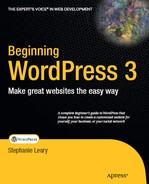
Most of the time, the Dashboard is the first thing you see when you log in. It shows you a snapshot of statistical information about your site and some updates about WordPress development and plugins (see Figure 3-2).
Each box on the Dashboard (Right Now, Quickpress, Recent Comments, etc.) is a widget. If you've just installed WordPress, you'll see the widgets displayed in two columns. Click the Screen Options tab (to the top right of your Dashboard), and you'll see that you can specify the number of columns, from one to four. You can also turn off widgets altogether by unchecking them here.
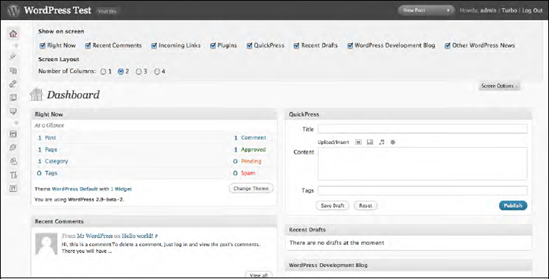
You can drag widgets around to rearrange them (Figure 3-3). You can also collapse them so only the titles are displayed using the down arrow that appears to the right of the title when you hover your mouse over the title area. Some of the widgets, like Incoming Links and Development News, have configurable options. You'll see a Configure link next to the arrow if you hover over these widgets' titles. Let's take a look at what some of these widgets do.
The QuickPress widget lets you write a blog post right from the Dashboard. It's handy but limited; you can use tags but not categories, media uploads but not the rich text editor, and you can't change the post's publication date or status. Still, if you need to dash off a quick missive to your readers, QuickPress can save you a step.
The Incoming Links widget is set up to show you Google Blog Search results for your site's URL. The widget is configurable (Figure 3-4), so if you'd rather see results from some other service (like Technorati) or if you want to change the number of search results displayed, click Configure in the widget's title bar and edit the settings.

Tip
Incoming Links, the WordPress Development Blog, and Other WordPress News are all just RSS readers with some preconfigured options. If you want to show other RSS feeds instead of these three, click "Configure" and replace each widget's RSS feed URL with your own.
This widget displays headlines from the blog at http://wordpress.org/development. New releases, including security updates, will be announced here. If you decide to configure this widget to use another feed, you should subscribe to the development blog feed (http://wordpress.org/development/feed in your RSS reader or sign up for email notifications at http://wordpress.org/download.
Some of the plugins you will install (see Chapter 2) might add more widgets to your Dashboard. One of the most popular plugins available for download, WordPress.com Stats, displays a graph of the traffic to your site as a Dashboard widget. These widgets behave exactly like the built-in Dashboard widgets; you can drag them around, configure them, or turn them off altogether using the Screen Options.
Screen Options are personal settings; that is, while you might turn off some Dashboard widgets, they'll still be visible to all other users. If you're managing a site for users who might be confused by the developer-specific information, particularly the Development Blog, the Plugins, and the Other WordPress News, you might want to turn off these widgets for all users. You can do so using the Clean WP Dashboard plugin (Figure 3-5).

The Settings panels give you control over almost every aspect of your site. In addition to the options below, many plugins will add settings panels with even more options. There's a lot to cover in the Settings panels, so let's dig in.
The General Settings are shown in Figure 3-6. You've already seen the first few options. The blog title and URLs shown here are the ones you chose during the installation process. The tagline is new; this is a brief description of your site that might be displayed near your blog title, depending on the theme you choose.
The Membership and Default Role options are useful if you want to start a group blog. If you allow visitors to sign up as users, you can allow them to contribute posts to your blog. I'll discuss WordPress user roles in depth in Chapter 10, but for now, here's a quick overview:
Subscribers can edit their own profiles and not much else.
Contributors can submit posts for editors' approval, but can't publish anything.
Editors can write and publish posts and pages. They can also publish posts and pages submitted by other users.
Administrators can do everything.
General visitors to your blog have no role at all. These five roles apply only to registered users. No matter what you choose as the default new user role, you can promote users later in the Users panel.
The rest of the settings on this page deal with date and time formats. You can set your local time zone and choose the date format you prefer. WordPress dates are formatted with the same strings that PHP's date() function uses; see http://php.net/date for all your options.
The Week Starts On setting changes the way calendar grids are displayed. If you use a calendar archive widget in your sidebar, this setting determines which day begins the week.

The first three options you'll see on the Writing Settings screen (Figure 3-7) have to do with the editor you'll see on the Post and Page Edit screens. WordPress uses the popular TinyMCE editor for its rich text option. The HTML view uses normal markup, but line breaks are converted automatically: one becomes a <br /> tag; two denotes a break between paragraphs. In either view, the size of the post box is determined by the number of lines specified on this screen. The next two options determine how the editor will handle emoticons (a complete set of smilies is included in WordPress) and any XHTML you enter.
Tip
TinyMCE doesn't always handle advanced markup well. If the visual editor drives you crazy, look on your user profile page (Users > Your Profile) for a checkbox that allows you to turn it off altogether.
WordPress requires posts and links to be assigned to at least one category. Here, you can specify which categories should be checked by default when you create new posts and links. You probably haven't set up any categories yet, but you can always return to this page later.

If you prefer to compose your posts in a desktop client, or if you plan to blog from your phone, you'll need to enable either the Atom or the XML-RPC protocol. Your client should let you know which one to use. If you don't plan to post remotely, you should leave these protocols disabled; occasionally, hackers discover vulnerabilities in them. While security updates are always released quickly when this happens, it's no fun to realize that you've left yourself open to attack for the sake of a feature you never use!
Popular desktop clients include MarsEdit and the BlogMate plugin for TextMate on the Mac, and BlogDesk, Windows Live Writer, and Word 2007 for Windows. Desktop clients allow you to write while offline and post when you are connected to the internet. Before autosaving and spell checking were available in the WordPress edit screens, desktop clients were essential for many bloggers.
Posting by e-mail is possible, but somewhat limited. HTML tags will be stripped from e-mail messages. Attachments are not converted to media uploads, but are instead included as raw data. The post will be assigned to the default category specified in this section, if different from the usual default category, unless your e-mail subject begins with [n], where n is the ID of another category.
In addition to filling in the e-mail account details listed on this screen, you'll also need to set up a way for WordPress to check that mailbox periodically. You can use cron, the WP-Cron plugin, Procmail, or .qmail. Check http://codex.wordpress.org/Post_to_your_blog_using_email for detailed instructions.
There are a number of ping services that aggregate information about recently updated blogs. In other words, they let people know that you've posted something new. WordPress uses the XML-RPC protocol to ping these sites every time you publish a post. If you've just installed WordPress, you'll see one service listed here, Ping-o-matic. It's a central site that feeds into lots of other services.
If you want to go beyond Ping-o-matic, take a look at the list of ping services maintained by Vladimir Prelovac at www.prelovac.com/vladimir/wordpress-ping-list. If you use Feedburner, you can also add their Pingshot service to your list.
The Reading settings (Figure 3-8) determine how your posts appear to your visitors. This is where you can determine whether your site works like a blog, with the most recent posts on the home page, or displays something else. (There are more advanced ways of doing this, which I'll cover in Chapter 8.)
If you select a page as your home page, you'll have the option to display your blog posts on another page. Anything you've entered into the body of that page will not be shown; instead, it will be replaced with your most recent posts.
The next setting, Blog pages show at most, determines how many posts per page appear on the blog home page, archive pages, and search results. You can choose a different number of posts to appear in your Atom and RSS feeds, if you wish.
If you want to make your feed subscribers click through to your site to read your complete posts, you may choose to show them only a summary of each post. Keep in mind, however, that the feed summaries strip the HTML formatting from your posts, including things like lists and images. If your unformatted posts wouldn't make sense, consider leaving this setting on Full text.

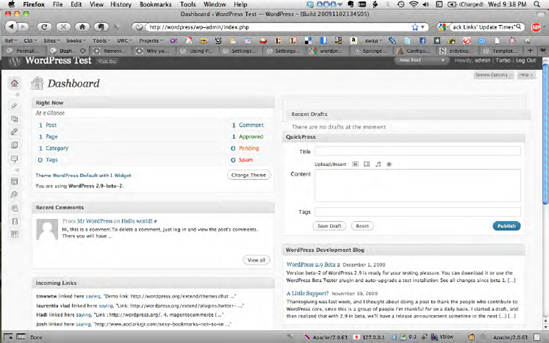
The Discussion settings (Figure 3-9) allow you to control how your site handles comments and trackbacks: whether comments and/or trackbacks are allowed, how they're moderated, who's allowed to comment, how you get notified of new comments, and whether commenters' avatars are displayed. This is a dense screen with a lot of settings. I'll go through each section in detail.
You've probably noticed by now that posts and pages in WordPress are usually labeled as such, so the word "article" here is a tip that these settings apply to both posts and pages. These three options will be the default settings for any new posts or pages you write, but all of them can be changed on individual posts or pages if you need to deviate from the norm.
If Attempt to notify any blogs linked to from the article is checked, WordPress will scan your post or page for links to other blogs. If it finds any, it will ping them in addition to the Update Services you selected in the Writing settings. The next option is the inverse: it allows you to decide whether to allow other bloggers to ping your articles when they link to them.
The third option determines whether comments are open by default on new posts and pages. Changing this option will not affect the comment status of any posts and pages you've already published; you'll have to change those from the Post or Page Edit screens.
The first three settings in this section are designed to help you eliminate unwanted comments. First, you'll have to decide how much information a commenter must provide. By default, they have to leave a name and an e-mail address. If you uncheck this option, only the commenter's IP address will be recorded.
If you are planning a community site, you might choose to allow comments only from registered users. This option is not on by default, and it overrides the previous one.
You can have WordPress automatically close the comment threads on older posts. This is a useful anti-spam feature, since spambots are indiscriminate about which posts they target, but most of the real discussion on a blog post generally takes place in the first few days after it's published. You can adjust the number of days to suit your readership; if you notice that comments are lively for two months before dropping off, turn this setting on and change the number of days to 60. Note, however, that the word article appears again here: this setting applies to pages as well as posts. If you want to allow comments on your pages indefinitely, you'll want to leave this setting off.
The next three settings determine how comments are displayed on your site: threaded or linear, nested or flat, and chronological or reversed. Not all themes take advantage of these features; only themes that have been updated to use the wp_list_comments() feature introduced in version 2.7 support these options.
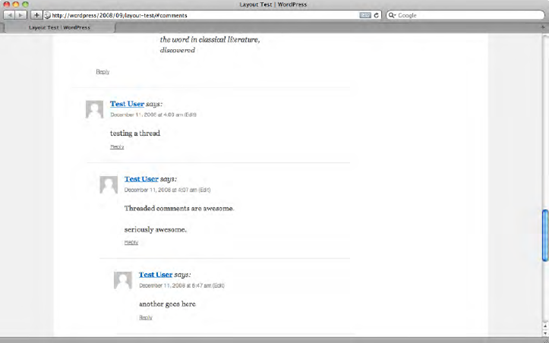
If comments are threaded, your visitors have the option of responding to individual comments as well as your post. Each comment will have its own Reply link, as shown in Figure 3-10.
In a nested comment list, replies to individual comments are shown indented underneath, as shown in Figure 3-10. In a flat list (and in all versions of WordPress prior to 2.7), comments are simply listed chronologically, no matter whether they are responding to the post or another comment.
WordPress also supports paging for very long lists of comments. If your post or page contains many comments, you can choose how many you'd like to display at one time. Once the number of comments exceeds your per-page setting, visitors will see navigation links allowing them to browse through the additional pages of comments.
Most sites show comments in their original chronological order. However, if you have a post or page with many comments, you might want the newest comments to appear first. Choose Older or Newer from the dropdown box in this last setting as needed, and if you have chosen to split your long comment lists into pages, decide whether the first page will show the newest or oldest comments.
The two settings in this section are checked by default. Unless you turn them off, the author of a post or page will receive an e-mail for every comment posted. Every comment that's held for moderation will generate a notification to the e-mail address you specified in the General Settings panel (Figure 3-6).
The next three sections determine which comments are held for moderation. This means that they will not appear on your site as soon as the comment author submits them; instead, they'll go into a queue in the administration area, and you'll have to approve them before they're published.
You can require that all comments be held for moderation. This is not the default behavior, and for a typical blog, it would slow the pace of the discussion while inundating you with notification e-mails. A less restrictive choice would be to require that comment authors have at least one previously approved comment. This setting lets your trusted repeat readers comment without your intervention, so you need only worry about the first-time commenters.
You can moderate comments based on their content as well as their author. Since spam comments typically contain long lists of links, by default WordPress will hold a comment for moderation if it contains more than two links. You can adjust the number here if you find that your legitimate comments often contain more links than you have allowed.
In addition to the number of links, you can specify a list of words, names, e-mails, and IP addresses that will be held for moderation. This lets you throttle known spammers, but it's also useful for keeping your discussions on track. If you know that certain topics tend to spark flame wars, list the relevant keywords here, and comment authors will quickly find that they can't discuss those subjects without your explicit approval.
Avatars—those little user images on Twitter, Facebook, instant messenger clients, etc.—are all over the internet. They're on your blog, too, unless you turn them off in this section (Figure 3-11). Keep in mind that your choice of theme also has a lot to do with avatar display; some themes don't support them at all, regardless of the setting here. Most themes that do support avatars display them only in comments, not for post or page authors.
If you allow avatars, you have some control over the kinds of avatars that appear on your site. WordPress uses Gravatars (gravatars.com), a central service where people can choose avatars to be associated with their e-mail addresses. Gravatars include content ratings loosely based on the MPAA system for movie ratings: G for child-friendly images, PG for audiences over 13, R for audiences over 17, and X for explicit images. By default, only G-rated Gravatars are allowed on your site.
You can also choose the image that's used for comment authors who don't have a Gravatar. The options include several generic settings (blank, Mystery Man) and three randomized selections: Identicon, Wavatar, and MonsterID.
Identicons are computer-generated geometric patterns. A unique pattern will be assigned to each commenter's e-mail address, so the same pattern will be used every time they comment. MonsterID uses the same concept, but draws images of monsters instead of geometric designs. Wavatar assembles avatar images from a pool of pieces (faces, eyes, noses, hair), rather like assembling a Mr. Potato Head toy.

The media Settings screen (Figure 3-12) allows you to determine the maximum dimensions of your uploaded images and videos. When you upload images to be embedded in your posts and pages, WordPress generates several copies of the image at different sizes: thumbnail, medium, and large, in addition to the original size. You'll be able to include the smaller sizes in your post and link to the original if your image would otherwise be too large to fit in your layout, or if you don't want to make your visitors download the full size until they've seen a preview. Set your default image dimensions based on your site's layout: if you're using a fixed-width layout, and your post area will be 600 pixels wide, use 600 as the max width for your large size. If your image is small to begin with, only those sizes smaller than the original will be generated.
Note that the default settings for thumbnails result in a 150-pixel square, even though (as the screen says) "normally thumbnails are proportional." Square thumbnails are ideal for magazine-style themes, but you might find that your photos are badly cropped using these settings. If you decide later that square thumbnails are not ideal, you can change this setting. If you need to, you can then use the Regenerate Thumbnails plugin to correct the thumbnails for images you've already uploaded.
Like images, movie dimensions can be limited using the maximum sizes specified on this page. In addition, you can choose to turn off WordPress's media auto-discovery, which will attempt to embed videos based on URLs found in your post or page content.

At the bottom of the Media Settings screen, you can change the location of your uploaded files. If you'd like the path to be something other than wp-content/uploads, you can specify it here. Why would you want to? Perhaps you anticipate that your visitors will link directly to your uploaded files, and you'd like the URLs to be shorter (e.g. img) or more descriptive (e.g. reports). Maybe you're migrating a site from another CMS and you want to store your new files alongside the old ones.
You should enter a path relative to your WordPress installation. You also need to specify the full URL in the next field. If this directory does not exist, WordPress will try to create it the first time you (or one of your content authors) use the media uploader. Of course, you can simply create the directory and make it writeable.
You can also choose whether WordPress creates date-based subdirectories for your upload files. By default, WordPress will create subdirectories for each year, and within those, for each month. Your files will be stored according to the dates they were uploaded. For example, if you upload a file called image.gif in December of 2010, it would be stored as wp-content/uploads/2010/12/image.gif. If you uncheck this option, all of your uploaded files will be stored in your specified upload directory. Our example file would be stored as wp-content/uploads/image.gif whether you uploaded it in December or June.
There are just two options under Privacy (Figure 3-13), and you've seen them before: they appeared during the installation process, when you were asked if you wanted your blog to be visible to search engines.
If you choose I would like to block search engines, but allow normal visitors, WordPress does the following:
Adds
<meta name='robots' content='noindex,nofollow' />to your<head>contentResponds to requests for a
robots.txtfile with one that disallows all user agents—but only if arobots.txtfile doesn't already exist and WordPress is installed in your site root directory.Prevents you from pinging linked blogs or blog update services when writing a post.
Hides the Update Services section on the Writing settings panel.
These privacy options apply only to search engine crawlers and other machines. They do not prevent human visitors from seeing your site. When you write posts and pages, you'll have the option to make them private or password-protected on an individual basis. If you want to make your whole WordPress site private, you'll need to install a plugin such as Members Only.

By default, WordPress uses post and page IDs in query strings in its URLs: example.com/?p=123. On the Permalinks Settings screen (Figure 3-14), you can choose a custom URL structure (also known as clean URLs) if you have installed WordPress on one of the following servers:
If your server meets these conditions, you can switch to one of the other URL structures shown in Figure 3-14, or create your own using the available tags.
If your server uses .htaccess files to manage URL rewrites, WordPress will attempt to create or modify your .htaccess file when you save your Permalink options. If WordPress can't write to the file, you'll see the necessary rewrite rules displayed, and you'll be asked to edit the file yourself.
If you're using IIS 7, you'll need to add a rule to your web.config file after saving your Permalink structure. See codex.wordpress.org/Using_Permalinks for detailed information.
Tip
Security Tip: Once you've chosen your permalink structure, you should adjust your file permissions so that WordPress can no longer write to .htaccess. A number of common exploits involve altering your .htaccess file to redirect your visitors to other sites or append unwanted links to your WordPress pages. If changes to .htaccess are needed, they'll be displayed and you'll be asked to edit the file yourself.
If you are using any permalink structure other than the default for your posts, your pages will use pretty permalinks as well. The permalink structures use the page name (no matter what structure you've chosen for posts), and they form a directory-like chain based on the page hierarchy. Parent pages appear in the URL as if they were parent directories of static files. Table 3-1 shows a sample category structure and the resulting category archive URLs.

You can change your permalink structure at any time. WordPress will store your previous permalink structure and will automatically redirect visitors from the old location to the new one using HTTP's 301 redirect protocol. However, it stores only one previous structure, so if you've changed it a few times, your visitors (and any search engines that indexed your site) might get lost.
Tip
URLs that contain a page's keywords tend to rank higher on most search engines. If you are interested in optimizing your site for search engine results, choose a permalink structure that includes the post name: Day and Name, Month and Name, or something like the Custom Structure shown in Figure 3-14. However, permalinks beginning with the post name or category can cause performance problems, which I will discuss in Chapter 11.
If you have included your post name in your permalink structure, or if you have deeply nested pages with long titles, your permalinks can get very long. Sometimes you'll want shorter URLs to paste into an email or Twitter message. A number of URL shortening plugins are available; Short URL is one of the most popular.
However, you don't need a plugin to get a shorter URL. No matter what permalink structure you have chosen, the default ("ugly") structure will always work. To use it, just find the ID of your post or page—it's in the URL in the Edit Post/Page screen, among other places.
Category and tag archive pages contain a permalink "base," which by default will be "category" for categories and "tag" for tags (http://example.com/tag/humor/). It's possible to remove the category base—for search engine optimization purposes, to keep your URLs short, or just because you don't like the way it looks—using a plugin such as No Category Base. However, be aware of the following drawbacks to this approach:
Conflicts with page names. You'll need to be careful to avoid using identical names for categories and pages. Without a category base, categories and pages with the same titles will have identical URLs. Visitors trying to reach your category archive will end up on the page instead.
Slower performance. Because WordPress will have to compare the requested category URL to all of the page URLs stored in the database, removing the category base can result in significantly slower response times for your visitors.See Chapter 11 for more information.
Once you've combed through all these settings, you should have a pretty good idea of how your blog is going to work. You've decided how you want the editor to behave when you write new posts and pages, and you've determined how visitors will see your posts displayed. You've set up your comments, decided how they will be moderated, and chosen a set of avatars for your commenters. You're all set to begin adding content to your site!