
While theme functions are quite powerful, they aren't very portable. If you ever wanted to switch themes, you would have to copy all your essential functions from one theme to another. There's another option: many of the theme functions you've seen throughout this book could become plugins. Plugins offer much better control over functions, since you can activate and deactivate them as needed. The plugin manager also provides some safeguards, since plugins containing errors will fail to activate, whereas errors in a theme functions file will affect your site immediately. You can do any number of things with plugins: modify or replace existing functions (filters), add your functions in predetermined locations (actions), create new template tags and shortcodes, and more.
Throughout this chapter, I'll show you examples from two of my plugins, Next Page and Dashboard Notepad. You saw Dashboard Notepad in the previous chapter; it's the plugin that adds a textarea for taking notes on the Dashboard screen. Next Page fills in a gap in the WordPress template tags: the previous and next post navigation tags work only for posts, not for pages. Next Page provides template tags and shortcodes for page navigation that work just like the post navigation. You can find the most current versions of these plugins at WordPress Extend. I'll begin by showing you simplified versions of the various functions, and I'll gradually add complexity as we go through the chapter.
Let's assume that you've decided what your plugin should do. Perhaps you have a bit of existing PHP code that you'd like to integrate into WordPress, or maybe you've been playing around with a new function as part of a theme file and you'd like to make it more portable. In any case, you have something in mind for the core of your plugin. Now you need to know how to package it as a plugin, create some options, and perhaps even submit it to the official plugin repository.
The first step is to create your plugin files. While you can create a plugin that's just one file—like the Hello, Dolly plugin included in the WordPress download package—most plugins contain multiple files (even if it's just one PHP file and a readme.txt), so it's a good idea to start by creating a directory for your plugin. It should go inside your /wp-content/plugins directory.
To begin the Next Page plugin, I created a directory and file. The file is saved as /wp-content/plugins /next-page/next-page.php. The first thing that goes into this file is the header comment block, as shown in Listing 9-1. The title and description will appear in your list of plugins. If you provide a URL in addition to your name as the author, your name will be linked to that URL. You may also provide a URL for the plugin, if it has its own page on your website. You should also include a license, either as a single line (as shown) or as a separate comment block (if, for example, you are including the standard GNU Public License header).
Example 9-1. The Next Page plugin header comment block
<?php
/*
Plugin Name: Next Page
Plugin URI: http://sillybean.net/code/wordpress/next-page/
Description: Provides shortcodes and template tags for next/previous navigation in pages.
Version: 1.0
License: GPLv2
Author: Stephanie Leary
Author URI: http://sillybean.net/
*/
?>
There are a few additional requirements for plugins distributed through the official repository. If you intend to submit your plugin, you'll need to include a readme.txt file, some screenshots (optional), and a few extra functions that will allow your plugin to be translated into other languages (also optional, but preferred). These steps are detailed at the end of this chapter.
Once you've created your files, you need to plan your approach to the code itself. You should identify the things that users might want to change and plan to turn those things into options. Then you'll need to create the option page containing the form where users can save their options to the database. You can then go through the parts of your code you identified as potential options and replace them with the variable containing your stored options. To demonstrate, I'll show you the Next Page plugin without its options, then add the options page, and replace the appropriate variables. First, however, I'll show you how to create a very basic template tag.
By now, you've probably realized that template tags in WordPress are just plain old PHP functions. Some take arguments, some don't. Some echo their results by default; others return the results for use in other functions. Creating a new template tag for your plugin is as simple as deciding what sort of function you need to write and whether it should return a value or echo it to the screen. Listing 9-2 shows a very simple example, and Figure 9-1 shows the results.
Example 9-2. A simple template tag
function today() {
        $format = get_option('date_format'),
        echo date($format);
}
Your template tags can accept arguments in strings or arrays just like WP template tags do. The wp_parse_args() function is the key to WordPress's argument magic. This function takes in your arguments and converts them to an array if they aren't already. If you want, it can also merge your arguments with an array of default values. Then it passes the cleaned-up, merged array back to you for use in your template tag function.
You can use wp_parse_args() to provide a more flexible template tag that can override the settings you chose on the plugin options page. For example, let's extend the simple today() template tag. Perhaps you'd like to let the user specify a date format in the template tag, but use the stored option if no format is provided. You could also add an option to print some text before the date. Listing 9-3 shows the revised template tag function.
Example 9-3. A today() template tag with arguments
function today($args = '') {
        $defaults = array('format' => get_option('date_format'), 'before' => ''),
        $args = wp_parse_args($args, $defaults);
        echo $args['before'] .' '. date($args['format']);
}
Now you can use the today() tag in either of the ways shown in Listing 9-4, and you'll get the date preceded by "Today is: ". If you don't provide any arguments, it will print the date without a prefix, using the formatting option chosen in Settings
For a more complex example, let's look at the Next Page plugin, which provides three template tags. They print links to the previous, next, and parent pages of the currently viewed page. The corresponding functions are very similar to one another, but I'll show you all three so you can see the minor differences. There's a fourth function as well, a utility that's called by the previous_link() and next_link() functions. It gets a list of all pages, minus those explicitly excluded, and returns them in a flat array.
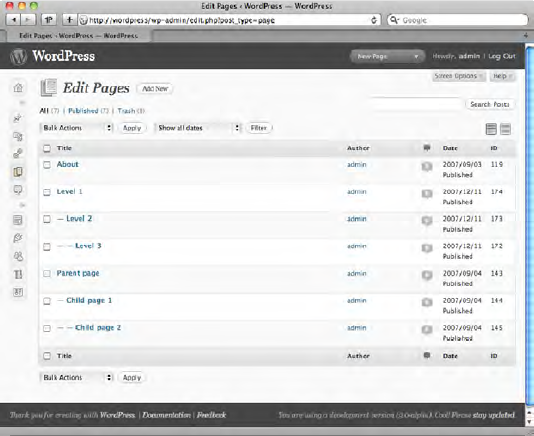
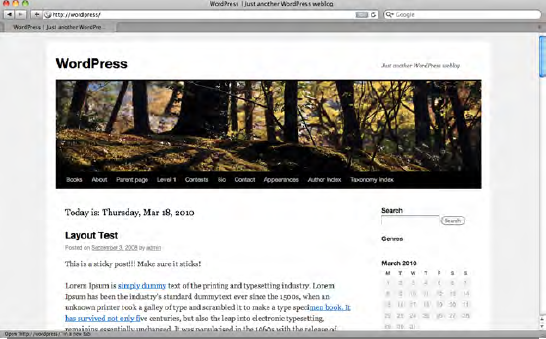
To illustrate, Figure 9-2 shows a set of pages and their IDs (using the Simply Show IDs plugin). The flattened array would be (119,174,173,172,143,144,145), and the next/previous tags would display the pages in that order.
Listing 9-5 shows the Next Page template tag functions.
Example 9-5. The three Next Page template tag functions
// next_link tag
function next_link() {
global $post;
// exclude page IDs 1, 2, and 3
$exclude = array(1,2,3);
$pagelist = next_page_flatten_page_list($exclude);
$current = array_search($post->ID, $pagelist);
$nextID = $pagelist[$current+1];
$linkurl = get_permalink($nextID);
$title = get_the_title($nextID);
$after_link = '→';
$link = '<a href="' . $linkurl . '">' . $title . '</a>' . $after_link;
echo $link;
}
// previous_link tag
function previous_link() {
global $post;
// exclude page IDs 1, 2, and 3
$exclude = array(1,2,3);
$pagelist = next_page_flatten_page_list($exclude);
$current = array_search($post->ID, $pagelist);
$prevID = $pagelist[$current-1];
$before_link = '←';
$linkurl = get_permalink($prevID);
$title = get_the_title($prevID);
$link = $before_link . '<a href="' . $linkurl . '">' . $title . '</a>';
echo $link;
}
// parent_link tag
function parent_link() {
global $post;
$parentID = $post->post_parent;
// exclude page IDs 1, 2, and 3
$exclude = array(1,2,3);
if (in_array($parentID, $exclude)) return false;else {
$linkurl = get_permalink($parentID);
$title = get_the_title($parentID);
$link = '<a href="' . $linkurl . '">' . $title . '</a>';
echo $link;
}
}
// utility function
function next_page_flatten_page_list($exclude = '') {
$args = 'sort_column=menu_order&sort_order=asc';
if (!empty($exclude)) $args .= '&exclude='.$exclude;
$pagelist = get_pages($args);
$mypages = array();
foreach ($pagelist as $thispage) {
$mypages[] = $thispage->ID;
}
return $mypages;
}Once you have the flattened array, it's easy to find the pages adjacent to the current one: you just increase or decrease the array key by one, grab the value, and use that page ID to build a permalink.
You could insert Listing 9-5 into your plugin file (next-page/next-page.php), activate it, and use next_link() and previous_link() in your templates. However, what if you wanted to use a character other than an arrow as part of the link text? What if you want to use "Next" and "Previous" in place of the page titles? You'd have to edit the plugin.
To allow users to change the linked text as well as the characters shown before or after the page titles, you need to add some options. Listing 9-6 shows the revised plugin code, using a single $options array in place of the hard-coded values used in Listing 9-5.
Example 9-6. Using option variables
// next_link tag

function next_link() {
        global $post;
                $options = get_option('next_page'),
                $exclude = $options['exclude'];
                $pagelist = next_page_flatten_page_list($exclude);
                $current = array_search($post->ID, $pagelist);
                $nextID = $pagelist[$current+1];

                $before_link = stripslashes($options['before_next_link']);
                $linkurl = get_permalink($nextID);
                $title = get_the_title($nextID);
                $linktext = $options['next_link_text'];
                if (strpos($linktext, '%title%') !== false)
                                   $linktext = str_replace('%title%', $title, $linktext);
                $after_link = stripslashes($options['after_next_link']);
$link = $before_link . '<a href="' . $linkurl . '" title="' . $title . '">' . $linktext . '</a>' . $after_link;echo $link; } // previous_link tag function previous_link() { global $post;$options = get_option('next_page'),$exclude = $options['exclude'];$pagelist = next_page_flatten_page_list($exclude); $current = array_search($post->ID, $pagelist); $prevID = $pagelist[$current-1];$before_link = stripslashes($options['before_prev_link']);$linkurl = get_permalink($prevID); $title = get_the_title($prevID);$linktext = $options['prev_link_text'];if (strpos($linktext, '%title%') !== false)$linktext = str_replace('%title%', $title, $linktext);$after_link = stripslashes($options['after_prev_link']);$link = $before_link . '<a href="' . $linkurl . '" title="' . $title . '">' . $linktext . '</a>' . $after_link;echo $link; } // parent_link tag function parent_link() { global $post;$options = get_option('next_page'),$parentID = $post->post_parent;$exclude = array($options['exclude']);if (in_array($parentID, $exclude)) return false; else {$before_link = stripslashes($options['before_parent_link']);$linkurl = get_permalink($parentID); $title = get_the_title($parentID);$linktext = $options['parent_link_text'];if (strpos($linktext, '%title%') !== false)$linktext = str_replace('%title%', $title, $linktext);$after_link = stripslashes($options['after_parent_link']);$link = $before_link . '<a href="' . $linkurl . '" title="' . $title . '">' . $linktext . '</a>' . $after_link;echo $link; }
}

// utility function

function next_page_flatten_page_list($exclude = '') {
        $args = 'sort_column=menu_order&sort_order=asc';
        if (!empty($exclude)) $args .= '&exclude='.$exclude;
        $pagelist = get_pages($args);
        $mypages = array();
        foreach ($pagelist as $thispage) {
           $mypages[] = $thispage->ID;
        }
        return $mypages;
}
Now that you know how the user will be able to modify the template tags' output using options, you need to build the form that will let them save those options to the database.
Almost every WordPress plugin involves some sort of option, and that means you'll need to create the form that lets users manage those options. If you went through the process of creating theme functions back in Chapter 7, the process for plugins will look very much the same.
To add an options page to the main navigation menu, you need two functions. One will display the content of the options page, and the other is a container for the add_options_page() function. Finally, you'll need to add your container function to the admin_menu() hook using add_action().
Listing 9-7 is taken from my Next Page plugin. I'll use this plugin as an example for the next several sections of this chapter, as it illustrates options pages, shortcodes, and template tags. Here, I've shown the bare minimum that's required to add an options page. In the next section, I'll show you how to fill in the form fields and process the input data into WordPress options.
Example 9-7. An empty options page
// Add a new submenu under Options:
add_action('admin_menu', 'next_page_add_pages'),
function next_page_add_pages() {
add_options_page('Next Page', 'Next Page', 'manage_options', 'next-page', 'next_page_options'),
}
// displays the options page content
function next_page_options() { ?>
<div class="wrap">
<form method="post" id="next_page_form" action="options.php">
<h2>Next Page Options</h2>
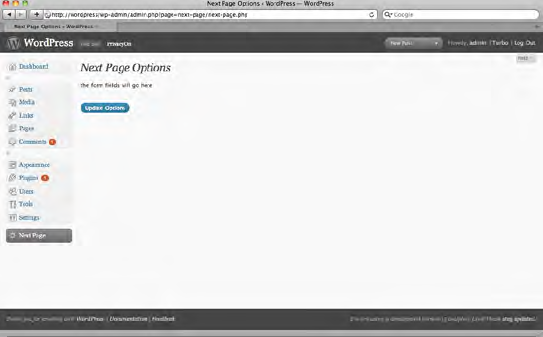
<p> the form fields will go here </p>
<p class="submit"><input type="submit" name="submit" class="button-primary" value="Update Options" />
</p>
</form>
</div>
<?php
} // end function next_page_options()Unlike the widgets you created in the previous chapter, on the plugin options pages, you do have to define the form and its submit button. The form should always be posted to options.php. This file processes all the WordPress options. Once you have registered your plugin's options (which I'll show you in the next section), you can use just two lines to your form to process them.
The wrapper element (<div class="wrap">) is essential to the layout of all WordPress admin pages, so you must include it in your options forms. The form tags should go inside the wrapper. The id attribute is optional, but your form method should be post and the action should always be options.php (the file that processes all WordPress options).
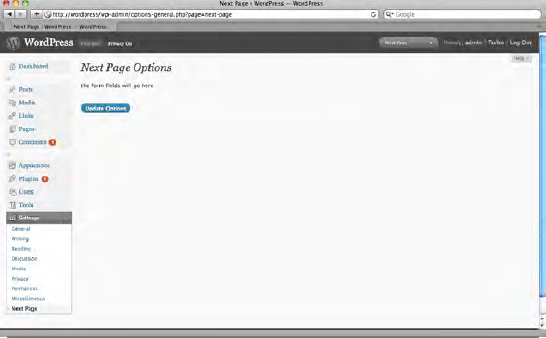
The results of Listing 9-7 are shown in Figure 9-3.
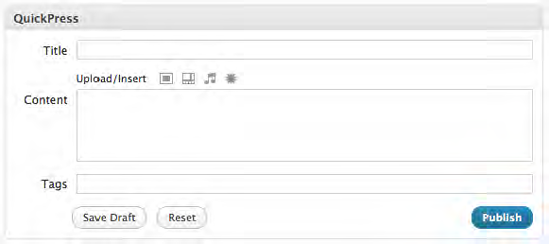
Your form button styles should conform to WordPress standards. You should have one primary button (the one that saves the options, publishes the post, etc.) and it should be styled with the button-primary class. All other buttons should use the secondary class. These styles are consistent throughout the WordPress administration screens. The QuickPress Dashboard widget, shown in Figure 9-4, illustrates the contrast between the two button styles.
Now that you have an options page in place, it's time to add some fields to the form.
WordPress provides a complete framework for setting, updating, and deleting plugin and theme options in the database. The settings API handles a lot of security issues for you (although there are still things for you to check). It also handles most of the work of saving options to the database. All you have to do is register the settings you plan to use, so WordPress knows which ones it should handle. For more information on the Settings API, visit the Codex page at codex.wordpress.org/Settings_API.
Prior to version 2.7, you could create options without registering them with WordPress, but then you had to do a lot of manual security checks and updates. With the new settings API, all of that is much easier, but you must register your settings in order for them to work.
You may register a separate setting for each variable you need to store, but it's impolite to take up lots of database rows with your plugin's options. Instead, group your variables into arrays, each of which can be stored in a single database row. Listing 9-8 shows the code required to register a single setting. The first argument is the setting's name; the second is the name of the group in which it appears. In this case, you'll have just one group, so the names are the same.
Example 9-8. Registering a setting
function register_next_page_options() {
register_setting( 'next_page', 'next_page' );
}
add_action('admin_init', 'register_next_page_options' );Registering the setting lets WordPress know that you plan to use it, but it doesn't do anything about setting default values. You'll have to do that yourself. You can use the activation hook to make sure your options are set as soon as the plugin is activated. Listing 9-9 shows a function that sets default option values, stored in a single array, when the plugin is activated.
Example 9-9. Setting default options on activation
function next_page_activation() {
// set defaults
$options = array();
$options['before_prev_link'] = '<div class="alignleft">';
$options['prev_link_text'] = __('Previous:', 'next-page').' %title%';
$options['after_prev_link'] = '</div>';
$options['before_parent_link'] = '<div class="aligncenter">';
$options['parent_link_text'] = __('Up one level:', 'next-page').' %title%';
$options['after_parent_link'] = '</div>';
$options['before_next_link'] = '<div class="alignright">';
$options['next_link_text'] = __('Next:', 'next-page').' %title%';
$options['after_next_link'] = '</div>';
$options['exclude'] = '';
// set new option
add_option('next_page', $options, '', 'yes'),
}
register_activation_hook(__FILE__, 'next_page_activation'),The code here is fairly simple; it's just an array in which each element contains the default values for one of the options. Note the use of the add_option() function to save the options array to the database. The add_option() function requires four arguments:
The name of the option to be saved
Its value
An empty string (a deprecated argument kept for backward compatibility)
The
$autoloadvariable (This last argument determines whether your options should be loaded into WordPress' object cache on each page load. You'll be using these options in template files, so this value should be 'yes'.)
That's it! You've set the default values, and now it's time to build the form that will let you change those values.
In Listing 9-7, you saw the basic outline of the options page. Now you need to create the individual form fields that will allow users to change the plugin settings.
First, you need to tell WordPress that this form will be using the option you registered earlier. You'll also go ahead and load the stored options into a variable so you can use them throughout the form. Listing 9-10 shows these changes to the basic form.
Example 9-10. Setting up options for use in the form
// displays the options page content
function next_page_options() { ?>
<div class="wrap">
<form method="post" id="next_page_form" action="options.php">
<?php
settings_fields('next_page'),
$options = get_option('next_page'),
?>
<h2>Next Page Options</h2>
<-- the form fields will go here -->
<p class="submit">
<input type="submit" name="submit" class="button-primary" value="Update Options" />
              </p>
</form>
</div>
<?php
} // end function next_page_options()Now that you have your options, you can use them to print the default values for each form field. Listing 9-11 shows the form fields for the Next Page options. This should look fairly similar to the theme options form you saw in Chapter 7, except this time I've created my own form layout instead of using the standard WordPress tables. You may lay out your plugin options pages however you wish. The table method is required only if you are adding options to an existing page. Otherwise, you're free to create the layout that best serves your form, as shown in Listing 9-11.
Example 9-11. Adding the options fields
// displays the options page content
function next_page_options() { ?>
<div class="wrap">
<form method="post" id="next_page_form" action="options.php">
<?php
settings_fields('next_page'),
$options = get_option('next_page'),
?>
    <h2>Next Page Options</h2>

<-- the form fields go here -->

        <p><label>Exclude pages:<br />
        <input type="text" name="next_page[exclude]" id="exclude"
                value="<?php echo $options['exclude']; ?>" /><br />
        <small>Enter page IDs separated by commas.</small></label></p>
<div id="previous-page">
<h3>Previous Page Display:</h3>
<p><label>Before previous page link: "<br />
<input type="text" name="next_page[before_prev_link]" id="before_prev_link"
value="<?php echo stripslashes(htmlentities($options['before_prev_link']));
?>" /> </label></p>
<p><label>Previous page link text: <small>Use %title% for the page title</small><br />
<input type="text" name="next_page[prev_link_text]" id="prev_link_text"
value="<?php echo stripslashes(htmlentities($options['prev_link_text'])); ?>"
/> </label></p>
<p><label>After previous page link:<br />
<input type="text" name="next_page[after_prev_link]" id="after_prev_link"
value="<?php echo stripslashes(htmlentities($options['after_prev_link'])); ?>" /> </label></p>
<p>Shortcode: <strong>[previous]</strong><br />
Template tag: <strong><?php previous_link(); ?></strong></p>
</div>
<div id="parent-page">
<h3>Parent Page Display:</h3>
<p><label>Before parent page link:<br />
<input type="text" name="next_page[before_parent_link]" id="before_parent_link"
value="<?php echo stripslashes(htmlentities($options['before_parent_link']));
?>" /> </label></p>
<p><label>Parent page link text: <small>Use %title% for the page title</small><br />
<input type="text" name="next_page[parent_link_text]" id="parent_link_text"
value="<?php echo stripslashes(htmlentities($options['parent_link_text'])); ?>" /> </label></p>
<p><label>After parent page link:<br />
<input type="text" name="next_page[after_parent_link]" id="after_parent_link"
value="<?php echo stripslashes(htmlentities($options['after_parent_link']));
?>" /> </label></p>
<p>Shortcode: <strong>[parent]</strong><br />
Template tag: <strong><?php parent_link(); ?></strong></p>
</div>
<div id="next-page">
<h3>Next Page Display:</h3>
<p><label>Before next page link:<br />
<input type="text" name="next_page[before_next_link]" id=<a name="OLE_LINK13">"</a>before_next_link"
value="<?php echo stripslashes(htmlentities($options['before_next_link']));
?>" /> </label></p>
<p><label>Next page link text: <small>Use %title% for the page title</small><br />
<input type="text" name="next_page[next_link_text]" id="next_link_text"
value="<?php echo stripslashes(htmlentities($options['next_link_text'])); ?>"
/> </label></p><p><label>After next page link:<br />
<input type="text" name="next_page[after_next_link]" id="after_next_link"
value="<?php echo stripslashes(htmlentities($options['after_next_link'])); ?>"
/> </label></p>
<p>Shortcode: <strong>[next]</strong><br />
Template tag: <strong><?php next_link(); ?></strong></p>
</div>
<!-- end form fields -->
<p class="submit">
<input type="submit" name="submit" class="button-primary" value="Update Options" />
</p>
</form>
</div> <!-- .wrap -->
<?php
} // end function next_page_options()For each of the fields, you can use the get_option() function to retrieve the stored value. However, you have to run that value through some clean-up functions before you can display it as an attribute of an HTML tag, so here you've wrapped each one in the htmlentities() and stripslashes() PHP functions.
You can add a stylesheet to the options page, just as you did with the theme options in Chapter 7. Once again, you'll piggyback onto the function you used to add the options page to the menu, and grab the resulting filename to pass to the plugin-specific admin_head() hook, as shown in Listing 9-12. The changes to the next_page_add_pages() function are in bold, and the next_page_css() function is new.
Example 9-12. Adding a stylesheet to this options page, not all the admin screens
function next_page_add_pages() {
    // Add a new submenu under Options:
        $file = add_options_page('Next Page', 'Next Page', 'manage_options', 'next-page', 'next_page_options'),
        add_action("admin_head-$file", 'next_page_css'),
}

function next_page_css() { ?>
<style type="text/css">
#next-page, #parent-page, #previous-page { float: left; width: 30%; margin-right: 5%; }
#next-page { margin-right: 0; }
</style>
<?php
}
All of this results in the options form shown in Figure 9-5.

If you've registered your options and called settings_fields() in your form, WordPress updates the options for you. Sometimes, though, you need to make additional changes. You can update the options manually as shown in Listing 9-13.
Example 9-13. Updating an option manually
function change_options() {
       $options = get_option('my_option'),
       // do something with $options here
       update_option('my_option', $options);
}
You might recall the Dashboard Notepad widget control function from Chapter 8. Since widget forms don't automatically process options like plugin pages do, in that function you had to update the widget's options using the $_POST form input, as shown in Listing 9-14. First, you grabbed the existing option values. Then you checked to make sure the posted information came from the Dashboard Notepad form and not some other widget's form. If that was the case, then for each form field, you assigned the posted value to the corresponding item in the options array. Finally, you called update_option() with the updated array.
Example 9-14. Processing options in Dashboard Notepad (partial)
function dashboard_notepad_widget_control() {
        $options = dashboard_notepad_widget_options();
if ( 'post' == strtolower($_SERVER['REQUEST_METHOD']) && isset( $_POST['widget_id'] )
&& 'dashboard_notepad_widget_id' == $_POST['widget_id'] ) {
if ( isset($_POST['can_edit']) )
$options['can_edit'] = $_POST['can_edit'];
if ( isset($_POST['can_read']) )
$options['can_read'] = $_POST['can_read'];
if ( isset($_POST['notepad_title']) )
$options['notepad_title'] = $_POST['notepad_title'];
$options['autop'] = $_POST['autop'];
update_option( 'dashboard_notepad', $options );
}
// <form> ... </form> goes here
}It's a good practice to remove your plugin's options from the database when the user uninstalls it. You do this by deleting it from the Plugins screen, and it's very easy to do, as you can see in Listing 9-15.
Example 9-15. Removing the Next Page plugin options on deactivation
// when uninstalled, remove option
register_uninstall_hook( __FILE__, 'next_page_delete_options' );

function next_page_delete_options() {
        delete_option('next_page'),
}
No, really, that's all there is to it! Be a good citizen and add uninstall functions like this to your WordPress plugins. Your users will thank you for not cluttering up their database options tables with unneeded rows.
Once you've completed all your functions, activate your plugin and try it out! Make sure there is no extra white space after your closing ?> tag, or WordPress will give an error on activation.
Listing 9-16 shows the completed Next Page plugin and Figure 9-6 is a screenshot of the plugin.
Example 9-16. The complete Next Page plugin
<?php
/*
Plugin Name: Next Page
Plugin URI: http://sillybean.net/code/wordpress/next-page/
Description: Provides shortcodes and template tags for next/previous navigation in pages.
Version: 1.4
License: GPLv2
Author: Stephanie Leary
Author URI: http://sillybean.net/
*/
add_action('admin_menu', 'next_page_add_pages'),

register_activation_hook(__FILE__, 'next_page_activation'),
function next_page_activation() {
        // set defaults
        $options = array();
        $options['before_prev_link'] = '<div class="alignleft">';
        $options['prev_link_text'] = __('Previous:', 'next-page').' %title%';
        $options['after_prev_link'] = '</div>';

        $options['before_parent_link'] = '<div class="aligncenter">';
        $options['parent_link_text'] = __('Up one level:', 'next-page').' %title%';
        $options['after_parent_link'] = '</div>';

        $options['before_next_link'] = '<div class="alignright">';
        $options['next_link_text'] = __('Next:', 'next-page').' %title%';
        $options['after_next_link'] = '</div>';

        $options['exclude'] = '';

        // set new option
        add_option('next_page', array_merge($oldoptions, $options), '', 'yes'),
}

// when uninstalled, remove option
register_uninstall_hook( __FILE__, 'next_page_delete_options' );

function next_page_delete_options() {
        delete_option('next_page'),
}

// i18n
if (!defined('WP_PLUGIN_DIR'))
        define('WP_PLUGIN_DIR', dirname(dirname(__FILE__)));
$lang_dir = basename(dirname(__FILE__)). '/languages';
load_plugin_textdomain( 'next_page', 'WP_PLUGIN_DIR'.$lang_dir, $lang_dir );


add_action('admin_init', 'register_next_page_options' );
function register_next_page_options(){
        register_setting( 'next_page', 'next_page' );
}

function next_page_add_pages() {
    // Add a new submenu under Options:
        $css = add_options_page('Next Page', 'Next Page', 'manage_options', 'next-page', 'next_page_options'),
         add_action("admin_head-$css", 'next_page_css'),
}
function next_page_css() { ?>
<style type="text/css">
#next-page, #parent-page, #previous-page { float: left; width: 30%; margin-right: 5%; }
#next-page { margin-right: 0; }
</style>
<?php
}
// displays the options page content
function next_page_options() { ?>
<div class="wrap">
<form method="post" id="next_page_form" action="options.php">
<?php settings_fields('next_page'),
$options = get_option('next_page'), ?>
<h2><?php _e( 'Next Page Options', 'next-page'), ?></h2>
<p><label><?php _e("Exclude pages: ", 'next-page'), ?><br />
<input type="text" name="next_page[exclude]" id="exclude"
value="<?php echo $options['exclude']; ?>" /><br />
<small><?php _e("Enter page IDs separated by commas.", 'next-page'),
?></small></label></p>
<div id="previous-page">
<h3><?php _e("Previous Page Display:", 'next-page'), ?></h3>
<p><label><?php _e("Before previous page link: ", 'next-page'), ?><br />
<input type="text" name="next_page[before_prev_link]" id="before_prev_link"
value="<?php echo stripslashes(htmlentities($options['before_prev_link'])); ?>"
/> </label></p>
<p><label><?php _e("Previous page link text: <small>Use %title% for the page title</small>",
'next-page'), ?><br />
<input type="text" name="next_page[prev_link_text]" id="prev_link_text"
value="<?php echo stripslashes(htmlentities($options['prev_link_text']));
?>" />
</label></p>
<p><label><?php _e("After previous page link: ", 'next-page'), ?><br />
<input type="text" name="next_page[after_prev_link]" id="after_prev_link"
value="<?php echo stripslashes(htmlentities($options['after_prev_link'])); ?>" />
</label></p>
<p><?php _e('Shortcode:'), ?> <strong>[previous]</strong><br />
<?php _e('Template tag:'), ?> <strong><?php previous_link(); ?></strong></p>
</div>
<div id="parent-page">
<h3><?php _e("Parent Page Display:", 'next-page'), ?></h3>
<p><label><?php _e("Before parent page link: ", 'next-page'), ?><br />
<input type="text" name="next_page[before_parent_link]" id="before_parent_link"
value="<?php echo stripslashes(htmlentities($options['before_parent_link']));
?>"/> </label></p><p><label><?php _e("Parent page link text: <small>Use %title% for the page title</small>", 'next-page'), ?><br />
<input type="text" name="next_page[parent_link_text]" id="parent_link_text"
value="<?php echo stripslashes(htmlentities($options['parent_link_text']));
?>" /> </label></p>
<p><label><?php _e("After parent page link: ", 'next-page'), ?><br />
<input type="text" name="next_page[after_parent_link]" id="after_parent_link"
value="<?php echo stripslashes(htmlentities($options['after_parent_link']));
?>" /> </label></p>
<p><?php _e('Shortcode:'), ?> <strong>[parent]</strong><br />
<?php _e('Template tag:'), ?> <strong><?php parent_link(); ?></strong></p>
</div>
<div id="next-page">
<h3><?php _e("Next Page Display:", 'next-page'), ?></h3>
<p><label><?php _e("Before next page link: ", 'next-page'), ?><br />
<input type="text" name="next_page[before_next_link]" id="before_next_link"
value="<?php echo stripslashes(htmlentities($options['before_next_link']));
?>" /> </label></p>
<p><label><?php _e("Next page link text: <small>Use %title% for the page title</small>", 'next-page'), ?><br />
<input type="text" name="next_page[next_link_text]" id="next_link_text"
value="<?php echo stripslashes(htmlentities($options['next_link_text']));
?>" /> </label></p>
<p><label><?php _e("After next page link: ", 'next-page'), ?><br />
<input type="text" name="next_page[after_next_link]" id="after_next_link"
value="<?php echo stripslashes(htmlentities($options['after_next_link'])); ?>"
/> </label></p>
<p><?php _e('Shortcode:'), ?> <strong>[next]</strong><br />
<?php _e('Template tag:'), ?> <strong><?php next_link(); ?></strong></p>
</div>
<p class="submit">
<input type="submit" name="submit" class="button-primary" value="<?php _e('Update Options', 'next-page'), ?>" />
</p>
</form>
</div>
<?php
} // end function next_page_options()
// make the magic happen
function next_page_flatten_page_list($exclude = '') {
$args = 'sort_column=menu_order&sort_order=asc';
if (!empty($exclude)) $args .= '&exclude='.$exclude;
$pagelist = get_pages($args);
$mypages = array();
foreach ($pagelist as $thispage) {
$mypages[] = $thispage->ID;}
return $mypages;
}
function next_link() {
global $post;
$options = get_option('next_page'),
$exclude = $options['exclude'];
$pagelist = next_page_flatten_page_list($exclude);
$current = array_search($post->ID, $pagelist);
$nextID = $pagelist[$current+1];
$before_link = stripslashes($options['before_next_link']);
$linkurl = get_permalink($nextID);
$title = get_the_title($nextID);
$linktext = $options['next_link_text'];
if (strpos($linktext, '%title%') !== false)
$linktext = str_replace('%title%', $title, $linktext);
$after_link = stripslashes($options['after_next_link']);
$link = $before_link . '<a href="' . $linkurl . '" title="' . $title . '">' .
$linktext . '</a>' . $after_link;
echo $link;
}
function previous_link() {
global $post;
$options = get_option('next_page'),
$exclude = $options['exclude'];
$pagelist = next_page_flatten_page_list($exclude);
$current = array_search($post->ID, $pagelist);
$prevID = $pagelist[$current-1];
$before_link = stripslashes($options['before_prev_link']);
$linkurl = get_permalink($prevID);
$title = get_the_title($prevID);
$linktext = $options['prev_link_text'];
if (strpos($linktext, '%title%') !== false)
$linktext = str_replace('%title%', $title, $linktext);
$after_link = stripslashes($options['after_prev_link']);
$link = $before_link . '<a href="' . $linkurl . '" title="' . $title . '">' .
$linktext . '</a>' . $after_link;
echo $link;
}
function parent_link() {
global $post;
$options = get_option('next_page'),
$parentID = $post->post_parent;
$exclude = array($options['exclude']);if (in_array($parentID, $exclude)) return false;
else {
$before_link = stripslashes($options['before_parent_link']);
$linkurl = get_permalink($parentID);
$title = get_the_title($parentID);
$linktext = $options['parent_link_text'];
if (strpos($linktext, '%title%') !== false)
$linktext = str_replace('%title%', $title, $linktext);
$after_link = stripslashes($options['after_parent_link']);
$link = $before_link . '<a href="' . $linkurl . '" title="' . $title . '">' .
$linktext . '</a>' . $after_link;
echo $link;
}
}
?>
Creating template tags is just one of the things you can do in a plugin. The possibilities are quite literally endless! If you need inspiration, take a look at the WordPress Ideas forum at wordpress.org/extend/ideas/ for features WordPress users have requested.
Now that you've seen the basic framework of a plugin, I'll demonstrate a few more things you can do with plugins: shortcodes and role-dependent content.
Creating shortcodes in WordPress is a matter of creating the function that prints out what you want, and then defining it as a shortcode. In the case of Next Page, the shortcodes are just alternatives to the template tags—they do the same thing. Since that's the case, and there are no arguments to be dealt with, creating the shortcodes takes all of three lines, as shown in Listing 9-17.
Example 9-17. Creating the three Next Page shortcodes
add_shortcode('previous', 'previous_link'),
add_shortcode('next', 'next_link'),
add_shortcode('parent', 'parent_link'),
That's it! Add these lines to the end of the Next Page plugin file, and you can now use [previous] in the post or page content as an alternative to using previous_link() in a theme file.
Of course, shortcodes can be more complicated. They can accept arguments, and you can have opening and closing shortcodes that surround a bit of text. Since Next Page doesn't demonstrate all that, I'll show you the shortcode processing function from another plugin of mine, Simple Internal Links, which lets you easily link to content within your WordPress site. This plugin provides the shortcodes shown in Listing 9-18. The corresponding plugin function is shown in Listing 9-19.
Example 9-18. The Simple Internal Links shortcodes
/*
// creates a link to post/page ID 6180 and uses its title as the linked text
[link id="6180"]

// uses the given text instead of the post/page title
[link id="6180"]link text[/link]

// links to post/page using the slug instead of the ID
[link name="post-slug"]
[link name="post-slug"]link text[/link]

// links to post/page using the title
[link title="About Us"]
[link title="About Us"]link text[/link]

// links to a category by slug
[link cat="cat-slug"]
[link cat="cat-slug"]link text[/link]

// links to a tag by slug
[link tag="tag-slug"]
[link tag="tag-slug"]link text[/link]
/**/
Example 9-19. Simple Internal Links shortcodes
function create_anylink($atts, $content = null) {
         //extract page id from the shortcode attributes
extract(shortcode_atts(array( 'id' => 0, 'name' => null, 'cat' => null, 'tag' => null ), $atts));
$link = '';
// do categories first
if (!empty($cat)) {
$catobj = get_category_by_slug($cat);
$link = get_category_link($catobj->term_id);
if (empty($content)) $content = get_cat_name($catobj->term_id);
}
// then tags
elseif (!empty($tag)) {
$tagobj = get_term_by( 'slug', $tag, 'post_tag' );
$link = get_tag_link($tagobj->term_id);
if (empty($content)) $content = $tagobj->name;
}
elseif (!empty($title)) {
$thepost = get_page_by_title($title);
if (!$thepost) { // there is no get_post_by_title, so we'll sanitize and try it as a slug
global $wpdb;
$id = $id = $wpdb->get_var( $wpdb->prepare(
"SELECT ID FROM $wpdb->posts WHERE post_name = %s AND (post_type = 'post' OR post_type = 'page') ", sanitize_title($title) ));
$thepost = get_post($id);
}
if (empty($content)) {
$thepost = get_post( $id ); // will get all post types
$content = $thepost->post_title;
}
$link = get_permalink($id);
}
else {
// if no ID, get post/page by name or title
if (empty($id)) {
global $wpdb;
$id = $wpdb->get_var( $wpdb->prepare(
"SELECT ID FROM $wpdb->posts WHERE post_name = %s AND (post_type = 'post' OR post_type = 'page') ", $name ));
}
// use $content for the title if it exists; otherwise fetch page/post title
if (empty($content)) {
$thepost = get_post( $id ); // will get all post types
$content = $thepost->post_title;
}
$link = get_permalink($id);
}
if (!empty($link))
return '<a href="'.$link.'">'.$content.'</a>';
elsereturn $content; // no cat, ID, or name provided; ignore this shortcode
}
add_shortcode('link', 'create_anylink'),The create_anylink() function takes two arguments: the attributes of the shortcode and the content enclosed by the shortcode. Since some shortcodes, like [gallery], stand alone, you can assume that $content is empty. The extract function merges the array of default values and the array that was passed and extracts them into named variables. Then you see which argument you got. For each possible argument, you see whether a title was provided, and if not, you fill in the link text with the post/page/category/tag title.
The method of finding the permalink varies depending on which arguments were used. Most notably, there is no get_post_by_title() function. Instead, I've sanitized the given title using the same function that creates automatic permalink slugs on the Edit screens. Unless the user has changed the post slug manually, this should give you a slug that you can use to find the post ID.
For more information on shortcodes, see the Codex page at codex.wordpress.org/Shortcode_API.
In WordPress, each user is assigned to a role. Each role has a list of capabilities that users may perform. The roles and capabilities are covered in depth in Chapter 10. For now, here's a quick overview:
Administrators can do anything in the WordPress administration area: write, edit, and delete posts, pages, links, and comments; upload media files of any type; import content; manage the Dashboard; create, edit, and delete other users; enable and configure plugins and themes; change the site's theme; and manage all the available options.
Editors can publish, edit, and delete posts and pages written by any user. They can upload some kinds of files, and they can write HTML without restrictions. They can manage links and categories, and they can moderate comments. Editors and administrators are also the only users allowed to read private posts and pages.
Authors can publish, edit, and delete their own posts. They cannot write pages. They can upload some kinds of media files, and they are allowed to use only a limited set of HTML tags.
Contributors can write their own posts, but may not publish or delete them. Their HTML will be limited to a few HTML tags (see Listing 10-1), and they cannot upload media files.
Subscribers can manage their own profiles, but can do virtually nothing else in the administration area.
Visit codex.wordpress.org/Roles_and_Capabilities for a detailed list of all the capabilities assigned to each role.
The function that you'll use to check for your user's capabilities is if_user_can(). This function takes one argument: the capability you want to check.
You generally don't need to do this on option pages. WordPress automatically checks for the capability you specified as the minimum when you added the options page. However, there are lots of other places where it would be a good idea to check capabilities before you allow the user to do something.
You can use the if_user_can() function to create a shortcode for notes that only editors and administrators can see, as shown in Listing 9-20.
Example 9-20. An editorial comment shortcode
// Usage: [ed]this is a note only editors can read.[/ed]

function editorial_note($content = null) {
    if (current_user_can('edit_pages') && is_single())
        return '<span class="private">'.$content.'</span>';
    else return '';
}
add_shortcode( 'ed', 'editorial_note' );
In this case, there are no attributes to worry about. The only argument for your shortcode function is the enclosed content, which you'll assume is empty by default. In addition to checking for the appropriate capability ('edit_pages', in this case), you've decided that these notes should appear only on single pages and post archives, so you've added a check for the is_singular() conditional. If the user has the right capability and you're on the right kind of page, you'll wrap the enclosed content in a span (so you can style it later, if you want to) and return it.
See the Dashboard Notepad widget in Chapter 8 for more examples with if_user_can().
One odd little quirk of WordPress is that private pages aren't included in the page lists and navigation menus, even if the user is logged in and has permission to read them. The filter function in Listing 9-21 adds the private pages only if the user has the appropriate capability. This is not a perfect function by any means. It adds the private pages in a flat list, ignoring the parent/child hierarchy. However, the code necessary to create a true hierarchical private page menu is well beyond the scope of this book.
Example 9-21. Adding private pages to the page lists and nav menus
function private_suite_add_menu($pagelist) {
                if (current_user_can('read_private_pages')) {
                        global $wpdb;
                        $list = '';
                        $pageresults = $wpdb->get_results(wpdb_prepare("SELECT id, post_title, post_parent FROM $wpdb->posts WHERE post_status=%s AND post_type=%s" ,'private','page'));
                        foreach ($pageresults as $privatepage) {
                                        $list .= '<li class="page_item private"><a href="'.get_permalink($privatepage->id).'" title="'.esc_attr($privatepage->post_title).'">'
                                                 .$privatepage->post_title.'</a></li>';
                        }
                        return $pagelist.$list;
                }
                else return $pagelist;
}
add_filter('wp_list_pages', 'private_suite_add_menu'),
add_filter('nav_menu', 'private_suite_add_menu'),
As you can see, if the user doesn't have permission to read private pages, the rest of the function is bypassed entirely and the filter returns the unchanged list of pages.
You've seen several add_filter() and add_action() functions by now. These two functions allow you to take advantage of the hooks scattered throughout WordPress. For a complete list of available actions and filters, visit codex.wordpress.org/Plugin_API/Action_Reference and codex.wordpress.org/Plugin_API/Filter_Reference.
Filters allow you to modify or replace the output existing functions. For example, you could append ads or a copyright notice to content in feeds, or search and replace a word or phrase in your post/page content.
Actions allow you to add your own functions in predetermined locations. For example, you can add a lightbox effect to your photo galleries by adding the appropriate JavaScript file to your theme's <head> tag, or you could send an e-mail notification to all users when a new post is published.
You've seen a number of add_action() functions called when adding things to wp_head () or admin_head () in themes and plugins. Each add_action() function required two arguments: the name of the action hook and the name of your custom function.
Action hooks are like empty paper cups in the giant Rube Goldberg machine that is WordPress. Imagine a gumball being dropped into the top of your page. This is your page request, and it's going to pass through a number of gizmos before it reaches the bottom. Some of those gizmos include paper cups that will tip over when the gumball falls into them. Adding your own functions to action hooks is like dropping pennies into those paper cups before you let the gumball go. Not only will the gumball fall out and continue on its path when the cup tips over, but your pennies will, too.
Notable actions include:
Init:one of the first things done on every page, both front end and administrationadmin_init :the first thing done on every administration pagewp_head :the last thing done in the theme<head>sectionadmin_head :the last thing done in the administration page's<head>sectionadmin_head-$filename :the same, but for a specific administration pageadmin_menu :constructing the navigation menu in the administration pagestemplate_redirect :occurs just before the theme template file is chosen, allowing you to override that choicewp_enqueue_scripts :printing the list of scripts in the theme headerwp_print_styles:printing the list of stylesheets in the theme headerwidgets_init :constructing the list of active widgetsloop_startandloop_end :surrounding the Loopwp_footer :the last thing done before the theme's closing</body>tag
Since you've already seen so many examples of actions, I'll show you just one more. The function in Listing 9-22 creates private categories using the save_post() action, which occurs on the Edit
Example 9-22. Creating private categories
function set_private_categories($postid) {
        if ($parent_id = wp_is_post_revision($postid))
                $postid = $parent_id;
        $privatecats = get_option('private_categories'), // array of category IDs
        if (!is_array($privatecats))
                $privatecats = array($privatecats);
        foreach ($privatecats as $cat) {
                if (in_category($cat, $postid)) {
                        $updated = array();
                        $updated['ID'] = $postid;
                        $updated['post_status'] = 'private';
                        wp_update_post($updated);
                }
        }
}
add_action('save_post', 'set_private_categories'),
In this function, you'll assume that there's an option stored somewhere containing the IDs of the categories that should be private. (This function is part of my Private Suite plugin, and there, the private categories are part of the plugin's options array.)
The very first thing to do is see if you're saving a revision—that is, if this is happening during an autosave. If so, you really want the ID of the revision's parent—the current revision—rather than the revision ID.
Next, you'll get the array of category IDs. If it isn't an array for some reason, you'll make it one.
Then, for each private category in the array, you'll check to see if this post has been assigned to that category. If it has, you need to change the post status. The wp_update_post () function requires an array containing the post's ID and any fields that need to be updated, so your array has just two elements.
To use this code example on your site, you might want to combine it with the examples in Chapter 10 on choosing which roles may read private posts. Otherwise, just like your editorial comment shortcode, the content in these categories will be limited to editors and administrators.
Filters are actions that are performed on strings or other variables. The big difference in your function is that you'll have an argument; the filter function will pass you some piece of content to work with. You can filter many of WordPress's built-in strings: author names, links, post titles and content, category names, and so on; and you can filter things like arrays of pages and categories. Your filter function will take the original variable as its argument, and it will return the altered variable. You could append something, prepend something, or perform a search and replace on a string.
Some of the filters you'll see often include:
wp_title: allows the<title>tag to be altered or replacedthe_title: allows the title of the post or page to be altered or replacedthe_content: alters the content of the post or pagewp_autop: automatically turns line breaks into paragraph tagsdo_shortcodes: processes shortcodesthe_excerpt_length: determines the length (in characters) ofthe_excerpt()the_excerpt_more: determines what's shown at the end ofthe_excerpt()wp_list_pages: allows the list of pages to be modified
Listing 9-23 shows a simple filter that appends a post author's name to the content of the post, effectively adding a signature of sorts.
Example 9-23. Appending an author name to the post content using a filter
function post_signature($content) {
        global $post;
        $author_id = $post->post_author;
        $author = get_userdata($author_id);
        $name = '<p>'.$author->display_name.'</p>';
        return $content.name;
}
add_filter('the_content','post_signature'),
The code here is pretty simple. Since this function takes place outside the Loop but doesn't include all of the post information in the arguments, you need to declare the global $post object so you can find the author. The author's ID will be stored in $post, so you'll grab that and pass it to the get_userdata() function. That returns yet another object, this one containing all of the author's information. You'll pull out the display name, wrap it in a paragraph tag, and append it to the content. Then you'll return the altered content back to the Loop, where it will be printed after going through any other the_content() filters.
Back in Chapter 8, I showed you how to include a list of child pages in a page template. You could do so using a filter, so you could maintain the code in functions.php rather than individual template files.
Listing 9-24 shows how to create the child pages filter. In this case, you'll assume that the filter should operate only on single page archives; if the page content is shown as part of a Loop, you probably don't want to clutter the Loop display with a bunch of page lists.
Example 9-24. Appending child pages using a filter
function append_child_pages($content) {
       if (is_page()) {
               global $post;
               $children = '<ul>'.wp_list_pages('title_li=&child_of'=$post->ID).'</ul>';
       }
       return $content.$children;
}
add_filter('the_content','append_child_pages'),
This is even simpler than the previous example. Again, you need the global $post object. Since wp_list_pages() prints list items without the surrounding list tags, you have to add those manually. Then you pass the content and the page list back to the Loop as one big string.
You could easily alter this function to print the child pages only if the parent page's content is empty, as shown in Listing 9-25. The changes from the previous example are in bold.
Example 9-25. Appending child pages only if the parent page is empty
function append_child_pages($content) {
                if (is_page() && (empty($content))) {
                        global $post;
                        $children = '<ul>'.wp_list_pages('title_li=&child_of'=$post->ID).'</ul>';
                }
                return $content.$children;
}
add_filter('the_content','append_child_pages'),If you've used the private or password-protected status for posts or pages, you've probably noticed that WordPress adds labels to the titles, and there is no setting allowing you to change it. In Listing 9-26, you'll do a search and replace on the private page's title to replace the default "Private: " label with your own "Members Only" label.
Example 9-26. Removing the "Private" prefix from private pages
function custom_private_title($title) {
        return str_replace(__("Private: "), 'Members Only: ', $title);
}
add_filter('private_title_format', 'custom_private_title'),
In this case, I've left in the internationalization function (the two underscores) which I'll explain in more detail later in this chapter. When you're filtering built-in WordPress strings like this, it's important to use translatable strings. In this case, you're searching for the word Private followed by a colon, but if this were a plugin that you intended to distribute on WordPress Extend, you'd quickly find that your replacement wouldn't appear to users who've set up WordPress in another language.
Strings aren't the only things you can filter. One of the more interesting filters introduced in version 2.9 is user_contactmethods(). This filter lets you work with the array of contact fields listed in the user profile page. In Chapter 10, I show you how to use this filter to remove the default instant messenger fields and add a Twitter account and a phone number.
Both actions and filters can take an optional third argument: the priority. If left out, this argument will default to 10, and your hooked functions will occur after all the built-in ones have completed. However, you can set the priority to any number at all. Set it to a lower number if you need your function to operate before the built-in actions and filters.
If you have installed plugins that use filters, or you've written your own filter, it can be hard to tell where the original content ends and the filtered addition begins. Sometimes it's also not clear when certain actions take place. The Hooks & Filters Flow plugin (planetozh.com/blog/my-projects/wordpress-hooks-filter-flow/) is a great way to list all the actions and filters that are operating on your content. Unlike most plugins, this one must be placed in your WordPress root directory or wp-admin. You have to enter its URL into your browser, because there is no link to it from your admin menu.
Figure 9-7 shows the plugin's report on my test installation, which has a few plugins installed. You'll see several functions belonging to my HTML Import and Dashboard Notepad plugins mixed in with default WordPress functions. Hooks & Filters Flow is a great way to see if your plugin is interfering with another filter, or if you need to adjust its priority.

I've demonstrated how to add your option page to the Settings menu, which is the conventional location for plugin options. You have several other choices available, though. You can add your page in another section of the navigation menu (Tools, for example). You can create a top-level menu for your plugin, which is especially useful if your plugin requires more than one option page. You can even add your options to one of the existing pages rather than creating a whole new one.
Most plugins' option pages are placed in the Settings portion of the menu. However, if you feel that another section would be more appropriate for your plugin's page, you can simply change the add_options_page() function to one of the others shown in Listing 9-27.
Example 9-27. Submenu functions
//Settings
add_options_page (page_title, menu_title, capability, handle);
// Tools
add_management_page (page_title, menu_title, capability, handle);
// Appearance
add_theme_page (page_title, menu_title, capability, handle);
// Posts
add_posts_page (page_title, menu_title, capability, handle);
// Pages
add_pages_page (page_title, menu_title, capability, handle);
// Users
add_user_page (page_title, menu_title, capability, handle);
All the functions require the same arguments you saw in Listing 9-7; the only difference is the location of the resulting option page.
Unless your plugin requires several options pages, it's best to add your options page under the Settings menu as shown in Listing 9-7. However, if you do have a number of separate pages, you can create a top-level menu item for your plugin as shown in Listing 9-28. This code would replace the first few lines of Listing 9-7.
Example 9-28. Adding a top-level menu item
add_action('admin_menu', 'next_page_add_pages'),

function next_page_add_pages() {
    add_menu_page('Next Page Options', 'Next Page', 'manage_options', __FILE__,
'next_page_options'),
}
This add_menu_page() function looks quite a bit like the add_options_page() function in Listing 9-7. The arguments for both functions are:
Page title: the
<title>of your options pageHeading: the heading shown above your options form
Capability: the minimum user capability required to access the page (usually
manage_options)File handle: an identifier for your plugin file (in this case, the file name)
Options form function: the name of the function that displays the options
<form>Menu icon (optional in
add_menu_page()): you can specify the file location of an icon for your menu item
The results of Listing 9-28 are shown in Figure 9-8.
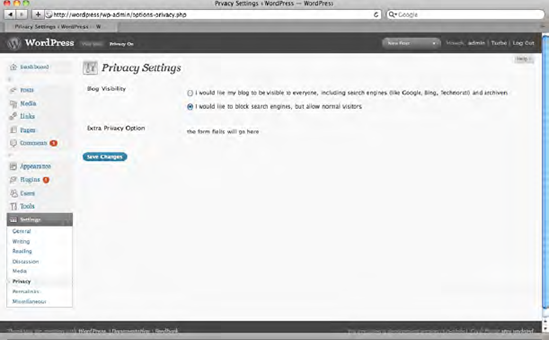
If you have just a few settings to work with and it would make sense to include them on an existing page rather than creating a whole new one, you can do so. For example, if you had an option related to privacy, you could use the code in Listing 9-29 to add your option to that page.
Example 9-29. Adding an option to the Privacy page
function add_extra_privacy_options() {
    add_settings_field('extra_privacy', 'Extra Privacy Option', 'extra_privacy_options', 'privacy', $section = 'default', $args = array());
    register_setting('privacy','extra_privacy'),
}

add_action('admin_init', 'add_extra_privacy_options'),

// displays the options page content
function extra_privacy_options() { ?>
         <p> the form fields will go here </p>
<?php
}
Keep in mind that the standard WordPress options pages are laid out using tables. The contents of your display function will appear inside a table cell.
The results of Listing 9-29 are shown in Figure 9-9.
See codex.wordpress.org/Adding_Administration_Menus for more examples of adding options pages to various parts of the admin menu.
If you've been using the examples in this book to develop your own theme or plugin, you probably have a bunch of files stashed in a directory somewhere. You could just zip them up and dump them onto your web server, but that's not an ideal solution. Will you maintain copies of the older versions as you develop new ones? How will you alert users when updates are available? What happens to your code if you decide to stop developing for WordPress?
The repository at WordPress Extend takes care of all those problems for you. In order to use it, you're going to have to get familiar with source control using Subversion. First, however, you need to create your readme file.
Along with the PHP file(s) containing your plugin's code, you are required to include a readme.txt file in plugins uploaded to WordPress Extend. Readme files use the Markdown syntax. Each main heading is surrounded by two equal signs ('==') and will become a linked tab on the plugin page. Subheadings use fewer equal signs. Listing 9-30 shows an empty readme file with all the possible headings. If you prefer filling in form fields to dealing with Markdown, you can use the online readme file generator at sudarmuthu.com/wordpress/wp-readme.
On the Contributors line, list your username on wordpress.org along with the usernames of any collaborators you have. If you have a page on your own site for your plugin, give the URI in the Plugin URI line; otherwise you can omit the line or use the address of the plugin's Extend page. If you accept donations, use the Donate link line to provide the URI of the page where users can send you donations.
The Version line refers to the version of the plugin accompanying this copy of the readme file. You could upload an alpha version for testers, in which case the Version would be something like 1.1-alpha while the Stable tag remains 1.0. This way, your alpha version would be available under "Other versions" but end users would not be prompted to upgrade from the Plugins screen.
"Requires at least" and "Tested up to" refer to the versions of WordPress on which this plugin is known to work.
Example 9-30. A sample readme.txt file
=== My Plugin ===

Plugin Name: My Plugin
Contributors: sillybean
Plugin URI: http://example.com
Author URI: http://example.com
Donate link: http://example.com
Requires at least: 2.8
Tested up to: 3.0
Stable tag: 1.0
Version: 1.0
Tags: posts, pages

== Description ==

Describe your plugin here.
[wpvideo fft9IGgw]

== Installation ==

1. Upload the plugin directory to `/wp-content/plugins/`
1. Activate the plugin through the 'Plugins' menu in WordPress
1. Go to Settings → My Plugin to set the options

== Upgrade Notice ==

You should upgrade to 1.0 immediately because there was a serious bug in 0.9.

== Screenshots ==

1. The caption for screenshot-1.png
1. The caption for screenshot-2.png

== Changelog ==

= 1.0 =
* New feature X
= 0.9 =
* Beta release for testers

== Frequently Asked Questions ==

= Question? =

Answer.

= Question 2? =

Answer 2.
Note that numbered lists can use "1" for each list item. Markdown will correct the numbering so you don't have to renumber your entire list if you add a step in the middle. If you prefer, you can number your lists the usual way. You may also use HTML (including entities like →) if you wish.
See wordpress.org/extend/plugins/about/readme.txt for a readme.txt file filled with dummy text. It has a number of Markdown syntax examples. See daringfireball.net/projects/markdown/ for a complete guide to Markdown.
You may embed video files in your readme. If you have published a screencast to YouTube or Vimeo video, simply enter the video's URL. If your video is hosted on wordpress.tv, enter the video's ID, as shown in the Description section above.
When you're finished with your readme file, you should run it through the validator (wordpress.org/extend/plugins/about/validator/) to avoid unexpected formatting problems on your Extend page.
If your plugin includes an option page or generates some kind of output (a template tag, a JavaScript effect, etc.), you should take a screenshot or two and include them in your plugin directory. They should be named screenshot-1.png, screenshot-2.png, and so on. The dimensions are up to you.
If you've never used Subversion before, getting your plugin listed at WordPress Extend can be a little daunting. I'll go over the process for all the major operating systems.
First, go to the Plugin Development Center (wordpress.org/extend/plugins/about/) and sign up to have your plugin added. You'll have to give it a name, a description, and a URL. The name will be shortened to a slug for your plugin's address on Extend; otherwise, all these things can be changed later. You can take this step even if you haven't figured out Subversion yet, because it might take a while to get the plugin approved—anywhere from a few hours to a week, because a real person has to look at your submission and determine that you are not a spammer. Eventually, you'll receive an e-mail containing your repository URL. In the meantime, keep reading. I'll explain the basic concepts of Subversion and walk you through the whole process of submitting your plugin.
Subversion is a form of source control. Like CVS and Git, Subversion lets you keep track of all the changes you've made to your code. A Subversion repository is a web-accessible archive of those changes. Ever wished you could undo several days' worth of work and roll back to an earlier iteration? If you've kept your local copy in sync with your repository, you can. Furthermore, you can make all those versions—the current release as well as the whole history of the project—available to the public, as shown in Figure 9-10. WordPress plugins and themes are distributed using a Subversion repository, as is the core WordPress software.
Working with a repository breaks down into three common steps: checking out, updating, and committing. If you're new to Subversion, this will make more sense in the context of an established project, like WordPress itself, rather than the new one you're submitting. Let's say that you wanted to check out a nightly version of WordPress to use as the basis for your development. You'd go to wordpress.org/download/svn/ and locate the address of WordPress's trunk: core.svn.wordpress.org/trunk/. You'd enter this into your client (covered in more detail later) and check out an initial copy. Then, let's say a week or so later, you realize that there have probably been some updates since you checked out your copy, and you'd like to stay in sync. You'd tell your client to update your copy, and it would download all the files that had changed since your initial checkout. If you had changed any of those files in your local copy, your client would alert you to the conflict and ask you what to do. Now, if you're reading this, I'm guessing that you are probably not a WordPress core developer. If you were, though, you'd be able to upload your changes to the repository, making them available to everyone, by committing your altered files.
That's how Subversion works for an existing project. When you first submit your plugin to Extend, you'll receive the address of your repository, and you'll check out an initial copy. This seems nonsensical, because you haven't submitted anything yet, so what is there to check out?
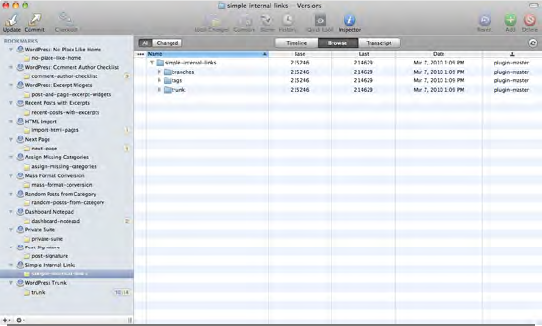
WordPress Extend conforms to the Subversion convention of splitting software projects (like plugins or themes) into three major subdirectories: branches, tags, and trunk. When you check out a copy of the code from the repository, these are the three directories you'll download. For a new project, like your plugin or theme, all the directories will be empty—just a framework to help you organize your files. To help illustrate, Figure 9-11 shows the tag and trunk directories for my Next Page plugin.

The trunk directory is your working copy. On a public repository, like the one for WordPress itself, the nightly builds are snapshots of the trunk. This is the copy of the code that's in active development, so it's generally not considered stable, and it's not recommended for public use. It is useful for alpha and beta testers.
Branches are for major releases. For WordPress, these are the versions that get jazz nicknames and press releases: 2.8, 2.9, 3.0. When you're ready to release a major version, create a new subdirectory under branches using the version number as the directory name. Copy the files from trunk into the branch directory and commit your changes.
The tags are the individual, minor version releases of your plugin or theme. For WordPress itself, these are the point releases containing bug fixes and security updates: 2.9.1, 2.9.2. For each minor version of your theme or plugin, you'll create a corresponding tag directory. When your trunk reaches a stable point, you'll copy the files into a new tag directory, update the readme file, and commit your changes. After that, leave the directory alone! You should maintain each release as an archival copy, not to be altered. If you want to release more changes, create a new tag.
If you're constantly improving your plugins and themes, the difference between branches and tags might be academic. If you wish, you can ignore the branches directory and keep all your releases in tags. As long as you tag the release numbers correctly in your readme files, the repository will be able to keep everything straight.
While you're waiting to hear back about your plugin submission, you need to install a Subversion client.
Macs: If you use a Mac running OS 10.5 or higher, the command line interface for Subversion is already installed, and you can use it via the Terminal. If you prefer a graphic interface, Versions by Sofa Software is an excellent client. You can also use Subversion through several code editors and IDEs. Textmate is one of the most popular.
Windows and Linux: You can download Subversion from subversion.apache.org. If you're on Windows and you prefer a graphic interface, try TortoiseSVN (tortoisesvn.tigris.org), which integrates with Windows Explorer. This is by far the most popular choice among Windows users.
From this point on, things look very different depending on which client you're using. I'll demonstrate using Versions and Tortoise. If you prefer the command line, visit markjaquith.wordpress.com/2005/11/02/my-wordpress-toolbox/ for a quick overview of the most common Subversion commands.
When you open Versions, you'll be presented with two big choices. You need to create a new repository bookmark. You'll be asked to fill in the address of the repository (Figure 9-12). This should be the URL you received in your e-mail. You should also enter your wordpress.org username and password. You can connect anonymously, but you won't be able to upload any changes.

When you press Create, the bookmark will appear in a list on the left side of the Versions window. Highlight it and press Checkout in the upper left corner. Since this is the first checkout, you'll be asked to choose a folder on your computer where the local copies of the files will be stored. Do so, and you'll have three new, empty subdirectories: branches, tags, and trunk, as shown in Figure 9-13.
From this interface, you can open up the files in your editor of choice and make whatever changes you need. When you're finished making changes in trunk, you can highlight the files and press the Commit button in the upper left corner. Versions will upload the files to the repository, and within fifteen minutes or so, they'll be available to the world.
When you add a new file to a source-controlled directory (like a new branch or tag), you'll have to explicitly add it to the repository. Highlight the new file or directory and press the green Add button in the upper right corner. Likewise, when you need to remove a file, you'll have to highlight it and press the red Delete button.
If you've made a lot of changes throughout your project, just highlight the top-level directory and hit Commit. Versions will go through the subdirectories recursively and find all the changed files.
TortoiseSVN is unusual in that it doesn't open in its own application window. Instead, it provides a set of contextual menu items in Windows Explorer. To perform your initial checkout, create the local folder where you'd like to store your plugin versions. Right-click this folder and choose SVN Checkout. A window will pop up where you'll be asked for the repository URL. Enter the one you received by e-mail, as shown in Figure 9-14.

If you have your plugin files ready, create a new folder under Tags and give it a number—let's say it's 1.0. Copy your files into the 1.0 folder. Make sure the version number in the plugin header and the readme file match this number. Then right-click the 1.0 folder and choose Add from the TortoiseSVN submenu. Once the plus icon appears on your folder, right-click it again and choose SVN Commit from the contextual menu, as shown in Figure 9-15.

You'll get a warning message about using tags instead of branches or trunk. Click OK. Next, you'll be prompted for your username and password. Enter your credentials for wordpress.org. The next prompt asks you for a commit message. This can be whatever you want for the initial checkin; for later updates, it's a good idea to summarize what changed since the previous version.
Enter your commit message and press OK. You'll see filenames scroll past you as the files are uploaded, and when it's done, the plus sign on your folder will change to a big green check, and you'll see the success message shown in Figure 9-16.

WordPress uses standard PHP gettext functions to allow string translations. To make your plugin available for translation, you have to localize all your strings.
The process of localizing strings is simple, but tedious. Each string must be wrapped in one of two functions. Echoed strings should be wrapped with _e(), while strings passed as arguments to other functions should be wrapped in __(). Additionally, each wrapper function must have a second argument, the text domain of your plugin. Most plugin authors use the directory name as the text domain. Finally, you need to generate a separate file containing all those wrapped strings, which translators will use as a template.
There are tools on WordPress Extend to help you with most of this. You'll still have to wrap the strings in the appropriate functions, but once that's done, you can automate the processes for the text domain and the language files.
Note
Because "internationalization" is a twenty-letter word that takes a while to type, it's often abbreviated as "i18n," with the middle 18 letters omitted. Similar abbreviations include localization (l10n) and accessibility (a11y).
Listing 9-31 shows the Next Page options form you created in Listing 9-11, but this time, all the strings have been wrapped in the appropriate translation functions. This is the file you'll need to upload to the tools on WordPress Extend.
Example 9-31. Next Page options with translation wrappers
function next_page_options() { ?>
    <div class="wrap">
        <form method="post" id="next_page_form" action="options.php">
                <?php settings_fields('next_page'),
                $options = get_option('next_page'), ?>

    <h2><?php _e( 'Next Page Options'), ?></h2>

    <p><label><?php _e("Exclude pages: "); ?><br />
    <input type="text" name="next_page[exclude]" id="exclude"
                value="<?php echo $options['exclude']; ?>" /><br />
       <small><?php _e("Enter page IDs separated by commas."); ?></small></label></p>

    <div id="previous-page">
    <h3><?php _e("Previous Page Display:"); ?></h3>
    <p><label><?php _e("Before previous page link: "); ?><br />
    <input type="text" name="next_page[before_prev_link]" id="before_prev_link"
                value="<?php echo stripslashes(htmlentities($options['before_prev_link']));
?>" />  </label></p>
<p><label><?php _e("Previous page link text: <small>Use %title% for the page
title</small>"); ?><br />
<input type="text" name="next_page[prev_link_text]" id="prev_link_text"
value="<?php echo stripslashes(htmlentities($options['prev_link_text'])); ?>"
/> </label></p>
<p><label><?php _e("After previous page link: "); ?><br />
<input type="text" name="next_page[after_prev_link]" id="after_prev_link"
value="<?php echo stripslashes(htmlentities($options['after_prev_link'])); ?>" />
</label></p>
<p><?php _e('Shortcode:'), ?> <strong>[previous]</strong><br />
<?php _e('Template tag:'), ?> <strong><?php previous_link(); ?></strong></p>
</div>
<div id="parent-page">
<h3><?php _e("Parent Page Display:"); ?></h3>
<p><label><?php _e("Before parent page link: "); ?><br />
<input type="text" name="next_page[before_parent_link]" id="before_parent_link"
value="<?php echo stripslashes(htmlentities($options['before_parent_link']));
?>" /> </label></p>
<p><label><?php _e("Parent page link text: <small>Use %title% for the page title</small>"); ?><br />
<input type="text" name="next_page[parent_link_text]" id="parent_link_text"
value="<?php echo stripslashes(htmlentities($options['parent_link_text']));
?>" /> </label></p>
<p><label><?php _e("After parent page link: "); ?><br />
<input type="text" name="next_page[after_parent_link]" id="after_parent_link"
value="<?php echo stripslashes(htmlentities($options['after_parent_link']));
?>" /> </label></p>
<p><?php _e('Shortcode:'), ?> <strong>[parent]</strong><br />
<?php _e('Template tag:'), ?> <strong><?php parent_link(); ?></strong></p>
</div>
<div id="next-page">
<h3><?php _e("Next Page Display:"); ?></h3>
<p><label><?php _e("Before next page link: "); ?><br />
<input type="text" name="next_page[before_next_link]" id="before_next_link"
value="<?php echo stripslashes(htmlentities($options['before_next_link']));
?>" /> </label></p>
<p><label><?php _e("Next page link text: <small>Use %title% for the page title</small>");
?><br />
<input type="text" name="next_page[next_link_text]" id="next_link_text"
value="<?php echo stripslashes(htmlentities($options['next_link_text'])); ?>"
/> </label></p>
<p><label><?php _e("After next page link: "); ?><br />
<input type="text" name="next_page[after_next_link]" id="after_next_link"
value="<?php echo stripslashes(htmlentities($options['after_next_link'])); ?>" />
</label></p><p><?php _e('Shortcode:'), ?> <strong>[next]</strong><br />
<?php _e('Template tag:'), ?> <strong><?php next_link(); ?></strong></p>
</div>
<p class="submit">
<input type="submit" name="submit" class="button-primary" value="<?php _e('Update Options'), ?>" />
</p>
</form>
</div>
<?php
} // end function next_page_options()At this point, if you haven't already signed up for your Subversion repository, go ahead and do so. You won't have access to the automated tools until you've checked in the first copy of your plugin. If you don't want the plugin to be available to the public until the translation features are done, give the plugin file header a lower version number than the stable version listed in the readme file.
Once you've checked in the first copy of your plugin, log in to Extend and visit your plugin's page. Under the Admin tab, you'll see a list of handy links and two translation sections: Generate POT File and Add Domain to Gettext Calls. Figure 9-17 shows the Admin screen for Next Page.

First, you'll add the domain to the gettext calls. If the domain shown is not the one you want to use, replace it in the text field. Then, choose your plugin file from your computer and press Get domainified file. The modified file will be downloaded back to your computer automatically. Save it over the original, and check it in to Subversion. You can leave it in the trunk for now rather than creating a new tag. Each gettext call should now have the domain added as a second argument, as shown in Listing 9-32.
You might have to wait a few minutes for your domainified file to appear in the Subversion repository. (You can use the link to the Trac browser at the top of the Admin page to check the file's modification time.) Once it's there, you can use it to create the POT (Portable Object Template) file. This is the file that will contain all the translatable strings for your future translators to work with.
Choose the trunk or the appropriate tag from the dropdown menu and press Get POT. The POT file will be downloaded to your computer. Place it somewhere in your plugin directory. I like to create a languages subdirectory to hold the POT file and any translations, but this is entirely up to you.
The very last thing you need to do is to load the plugin's text domain. This is the function that makes the translation go; it passes all your gettext-wrapped strings through the language file (if it exists) matching the user's language as set in his or her configuration. The necessary code is shown in Listing 9-33.
Example 9-33. The i18n functions
if (!defined('WP_PLUGIN_DIR'))
        define('WP_PLUGIN_DIR', dirname(dirname(__FILE__)));
$lang_dir = basename(dirname(__FILE__)). '/languages';
load_plugin_textdomain( 'next_page', 'WP_PLUGIN_DIR'.$lang_dir, $lang_dir );
First, you've defined the WP_PLUGIN_DIR constant, in case it doesn't exist, for backward compatibility. Next, you need to tell WordPress which directory your language files will be stored in. Finally, you've called the load_plugin_textdomain() function, which requires three arguments: the domain (as chosen when you added the gettext calls), the full path to the language directory, and path to the language directory relative to the plugin directory. The last two arguments are redundant, and again are present for backward compatibility. If you don't need your plugin to be compatible with pre-2.6 versions of WordPress, you may leave the second argument blank.
Once you've made all your localization changes, increment your plugin's version number and commit the updates. Your plugin is now ready for translators!
There is not yet an automated process by which translators can submit their work to you for inclusion in the plugin. Be sure to provide an e-mail address in the plugin's readme file so translators can send you their files. For each language, they will generate a PO (Portable Object) and MO (Machine Object) file. The .po file is human-readable; the .mo file is a compressed binary for faster loading. When you receive them, add them to the same directory where you stored your .POT file. You can then update your plugin version with the new translations.
In this chapter, I've shown you all the basics of WordPress plugin development: adding options forms, creating template tags and shortcodes, checking user capabilities, filtering content, and adding your own functions to action hooks. I've also gone over the process of publishing a plugin on WordPress Extend, including how to create a readme.txt file, localize your plugin, and upload it using Subversion.
While I have by no means shown you everything you will ever need to know about writing plugins for WordPress, I hope I have given you a solid foundation for further research. As always, the Codex should be your first stop when you need to find a function or look up an action hook. If the relevant Codex is incomplete—and I'm sorry to say the end-user documentation is far more complete than that for developers—try searching the forums, Google, the PHPdocs, and the Xref documentation.
In this chapter, I've shown you very briefly how to check for users' capabilities in your plugins. In the next chapter, you'll learn all about the built-in roles and capabilities in WordPress. You'll also learn how to change them to suit your needs.