WordPress is database-driven, so it's not quite as fast at serving up individual pages as a CMS that writes static files to the server, like Movable Type. However, there are a number of things you can do to improve its performance, starting with caching dynamic output to static pages. I'll explain how caching works and show you how to set it up. I'll also look at some ways to identify performance problems in your installation.
The down side of being the most popular CMS in the world is that WordPress attracts a lot of attention from would-be hackers. The development team does a great job of responding to newly discovered vulnerabilities quickly, so staying up to date with the latest release is the most important thing you can do to protect yourself from attacks. However, there are a number of other little things you can do, and I'll walk you through them in the second half of this chapter.
If you've ever seen a Slashdotted, Dugg, or Fireballed site suddenly fail to respond, you've witnessed the consequences of insufficient caching. A dynamic site has to query the database several times to assemble each page a visitor requests. Queries for a typical WordPress page include the bloginfo () options (site title, description, language, theme stylesheet URL), the post or page title and contents, the comments, and the sidebar widgets. If you're using multiple Loops, you're using even more queries. Servers can generally handle all those MySQL queries and PHP page-building functions for sites with low traffic, but when your site gets its fifteen minutes of fame—or gets hit with a denial of service attack—your server will probably buckle under the sudden demand.
The solution is to cache the assembled pages—that is, to store copies as static files in a hidden directory and to redirect incoming visitors to those copies rather than allow them to continually hammer your dynamic site. Not only does this speed things up for your visitors, but if you're on a shared hosting server, it will prevent you from exceeding your allotted CPU usage. Some hosts are nice about helping you keep the site up and running when that happens; others will just shut down your site to protect the other users on the server.
WordPress does not come with built-in caching. (This is perhaps the biggest criticism leveled at the WordPress project by users of other open-source content management systems.) It does come with support for a number of different caching options, and it's up to you to decide which plugin best suits your needs and your hosting environment. Cache plugins available at WordPress Extend include:
I'll walk through Super Cache, which is by far the most popular. First, though, take a look at your permalink settings. You must use a permalink structure other than the default in order for the caching plugins to work. Super Cache warns you if your permalink structure won't work, as shown in Figure 11-1. All of the cache plugins operate by using rewrite rules in your .htaccess file to redirect requests from your dynamic WordPress pages to static files saved in a hidden directory in your installation. If you aren't using permalinks, WordPress hasn't written any rewrite rules to .htaccess. If the rewrites never take place, your dynamic pages will be served up to your visitors even though you have installed and activated a caching plugin.

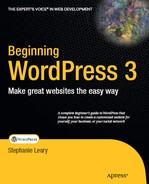
Unlike most plugins, Super Cache doesn't start working as soon as you activate it. You have to configure it first. You'll see a red-outlined warning message on your plugin list until you set up caching or deactivate the plugin, as shown in Figure 11-2.

Go to Settings
For most sites, Half On mode will be fine for daily use. You can always toggle the status later if you need to.
Next, you should probably turn on the option labeled Don't cache pages for logged in users. This will ensure that as you're making changes to the site, you can view them immediately without waiting for the cache to refresh.
The next option will rebuild the cache when you add a post or page. This will ensure that your visitors will see the new content immediately, but it will also slow things down for you and your other users. Every time you publish something, the entire cache will have to be regenerated, and that can take a significant amount of processing power if you have a large site. My recommendation is to try writing a few posts with this option on and see how it goes. If your site becomes unusably slow, turn it off! Your visitors will just have to wait for the old cached pages to expire (within the time limit you'll set in just a moment) before they see your new posts.
Normally, a post's cached page will be rebuilt every time someone adds a comment. However, if you get so many comments that this would be counterproductive, you can turn on the cache rebuild option. New files will still be generated, but if a new comment comes in while the page is being generated, the viewer will see the older copy.
Coarse file locking is no longer recommended but is still available for backward compatibility. This option locks cache files while they are being rebuilt, but Super Cache now uses temporary files during the rebuild process, and coarse file locking is obsolete.
I do not recommend listing the most recently cached pages unless your site traffic is nominal and you're curious as to how the plugin is operating.
I'll talk about the mobile support option in the next section. For now, choose among the options I've gone over and press Update status.
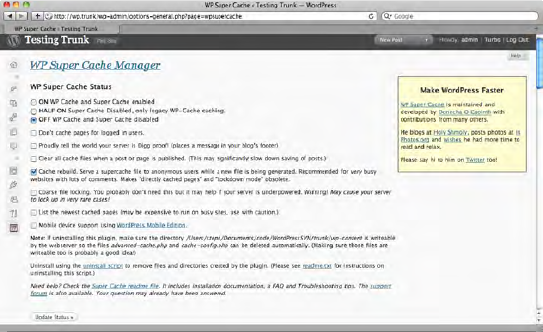
When the page refreshes, you should see a section listing the contents of the cache (Figure 11-4).
In this section, you can manually delete the cache. This is helpful when you've changed some of the settings in the first section and you'd like the changes to take effect before the cached pages expire.
The compression settings determine whether your cached files are stored in compressed (gzipped) format. Modern browsers are capable of unzipping pages after downloading them, so your server can send smaller files. Compression is optional in On mode, but is on by default in Half On mode. If you're running in On mode, you can enable compression. You'll then be shown a list of the rewrite rules that should be added to .htaccess, and if your .htaccess file is writeable, you can press a button to make the changes. Otherwise, you'll need to copy them by hand.
Super Cache compression can cause problems if your server is already compressing output using mod_deflate (on Apache) or PHP compression (zlib). In this case, the doubly-compressed files might appear as garbage characters to some users. You can turn off compression in Super Cache or adjust your server's settings. The plugin FAQ contains information on how to do this; if those instructions don't work, ask your hosting provider about your server's compression settings.
Under Expiry Time & Garbage Collection, you can choose how long your cached pages will last before they should be rebuilt. The default setting is 3600 seconds (one hour). You can lower this, but keep in mind that garbage collection requires server resources, just as rebuilding pages does. You should experiment with different settings to strike a balance between these two processes that doesn't overly tax your server.
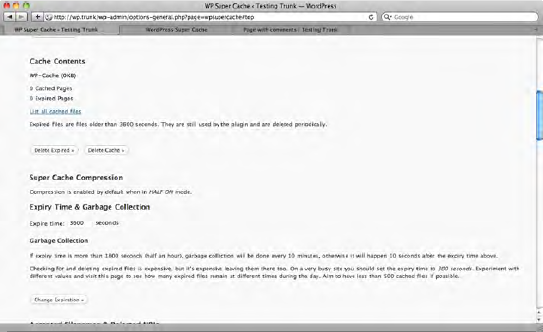
In the Accepted Filenames and Rejected URIs section of the Super Cache settings (Figure 11-5), you can specify certain pages that should not be cached. The page type options should look familiar; they're identical to the conditional tags you saw in Chapter 7. Of these, I would recommend checking Feeds. You can leave the rest of these settings on their default values in most cases. You'll change them when you enable mobile support in the next section.
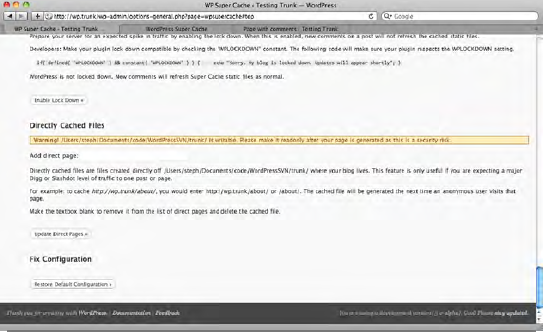
At the bottom of the Super Cache settings screen, you'll have the option to directly cache a single file (Figure 11-6). If you write a post or a page that you know will bring in untold numbers of readers, you can head off the impending performance crisis by caching the page not in the usual hidden cache location, but right in your blog directory. How does this work? The WordPress rewrite rules—all of them, including Super Cache's—are set up to rewrite URLs only if the requested file or directory does not exist on the server. Therefore, if you create a cached page in the location that matches the permalink, the cached file will trump all rewrite rules. Since the server doesn't have to look through all those rewrites, it will be a little faster at serving up that particular file. And when you're looking at thousands of requests coming in, "a little faster" multiplies quickly into some significant performance.
The final checkbox in the main set of Super Cache options turns on mobile support. This doesn't mean much unless you're also running a second plugin that provides a mobile version of your site. To demonstrate how this works, I'll walk you through setting up Super Cache to work with WPTouch, the plugin that provides mobile versions of all sites on wordpress.com.
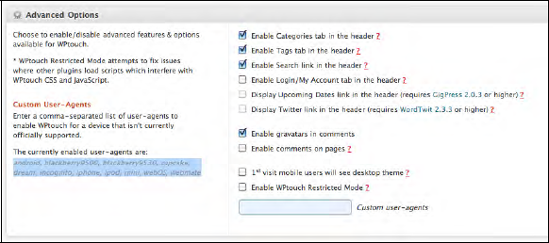
The WPTouch settings screen has a multitude of options. I won't discuss them all here; the ones I'm interested in showing you are in the Advanced Options box. Highlight the user agent strings as shown in Figure 11-7, copy them, and then head back over to the Super Cache settings.
First, in order to support WPTouch, you'll have to select Half On mode. Full On mode circumvents the user agent checking that allows mobile version plugins to work, so you'll have to use Half On mode if you want to use Super Cache alongside a mobile plugin. That's OK; for most sites, Half On is sufficient. Next, check off mobile device support and press Update Status.
Now that mobile device support is on, you need to prevent Super Cache from displaying the cached pages to mobile user agents. Scroll down and find the Rejected User Agents box, as shown in Figure 11-8. Paste the user agent strings you copied from the WPTouch settings screen and remove the commas, placing each user agent on its own line. Press Save UA Strings, and you've enabled mobile support.

However, there's one more step you need to take: deleting the existing cache. Any time you change the Super Cache settings, you need to delete the cache so the cached pages will be rebuilt according to your new settings. Once you've saved the UA strings, scroll back up to the Cache Contents section and press Delete Cache.
WPTouch is not the only mobile version plugin by any means, but mobile support in Super Cache works essentially the same way with all the other plugins.
When you chose your permalink structure back in Chapter 3, you had a lot of tags you could choose from. However, a few of those tags can cause performance problems on large sites with hundreds of pages. Specifically, permalink structures that begin with the four string-based tags, %category%, %tag%, %postname%, and %author%, are significantly slower than those beginning with numeric tags. The reason is that WordPress has to store rewrite rules in a field in the options table for these less efficient structures. So, instead of using /%category%/%postname%/, you might use /%year%/%category%/%postname%/ instead.
Note that using the No Category Base plugin, as discussed in Chapter 3, only exacerbates this problem.
For a more complete discussion of the permalink performance problem, visit dougal.gunters.org/blog/2009/02/04/efficient-wordpress-permalinks.
If your site is slow, but it's not because of an inefficient permalink structure, tracking down the cause can be bewildering. What are some things that would cause performance problems? Plugins that write a lot of records to the database, like Audit Trail, or anything that says it will slow things down, like the Super Cache option to clear the cache every time a post or page is saved. There are several tools you can use to identify the problem.
First, you should make sure it's not just a temporary network or server problem. If your web host has a page or RSS feed where you can check your server's status, take a look at it and see if anything unusual is going on.
Next, see if the slowdown is due to the way your theme is constructed or the way files are being served. The YSlow extension for Firefox can help you figure out whether you just have too many images, whether HTTP compression is working on your server, or whether you have a lot of JavaScript files gumming up the works. (YSlow is, in fact, a plugin of a plugin; first you need to install the Firebug extension, and then add YSlow to it. Both tools are invaluable.)
If it's not the network, and it's not your theme, and it's not your permalinks, it's time to take a look at the database queries that run every time a page is generated on your site. If you're using a caching plugin, either turn it off or make sure that it shows uncached pages to admin users. Then install the WP Tuner plugin and view your home page. Scroll all the way to the bottom, and you'll see a huge information panel telling you everything that's going on with your database.
Look for queries highlighted in yellow. Those are the ones causing problems. Now, if it's the Start marker, as in Figure 11-9, your problem is most likely not with WordPress itself, but with your server. MySQL might not be optimized correctly, or the server hardware itself might not be up to snuff. Either way, talk to your hosting provider about the problem. In this case, all the markers showed fairly long load times. This server was very old and underpowered for the sites it was hosting. Once this site was moved to a more powerful server, all the markers' times decreased dramatically. Solving the Start problem took care of admin_notices as well.
If it's not Start, take a look at where it's coming from. Is it a plugin? Deactivate the plugin and see if your problems go away. Is it a theme? Switch to the default theme and see if the site runs faster. Is it one of the standard hooks (init, admin_head)? Use the Hooks & Filters Flow plugin (planetozh.com/blog/my-projects/wordpress-hooks-filter-flow/), which you saw in Chapter 9, to see what functions are hooked in that spot.
Sometimes, an unresponsive site doesn't mean you've done anything wrong. You could be experiencing a denial of service attack. To stop that, you'll need to work on securing your WordPress site.

In older versions of WordPress, the first user account was always named admin. This made it relatively easy for hackers to try to crack the password on the account. As of version 3.0, you can choose your username during the installation process. This cuts down on the scale of the problem, but it doesn't mitigate it entirely. You might still want to lock down your login screens. For even more security, you could force the login process to take place over SSL, thus encrypting your password transmissions. You could even conduct all your administrative tasks over SSL.
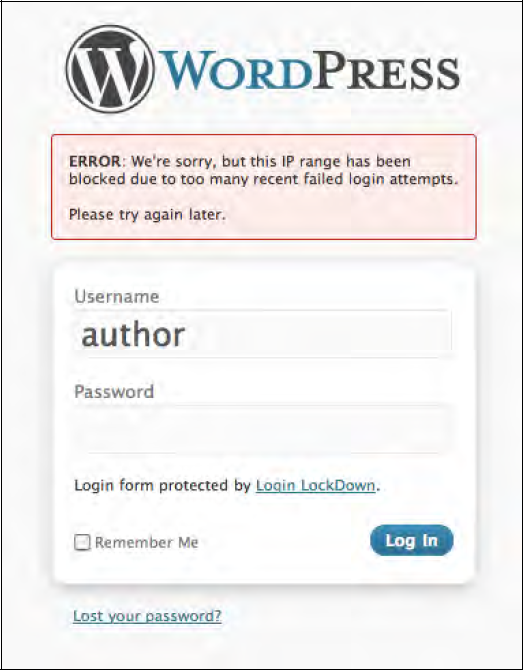
The Login Lockdown plugin helps protect you from brute force password attacks by disabling the login function for a range of IP addresses after several failed attempts in a short period of time, as shown in Figure 11-10. (Using the default settings, it will lock you out for an hour after you've failed to enter the right password three times in five minutes.) If you're the sort of person who continually forgets your password, this might not be the plugin for you! However, since guessing at administrative passwords is a common method of breaking into WordPress sites, I recommend that you pick a password you can remember and install this plugin.
You have a few options when it comes to SSL. You can force WordPress to use SSL for logins only, or you can use SSL for all administration sessions.
With the SSL login option, your username and password will be handled in a secure transaction. All your other traffic, including the authorization cookies you receive from WordPress, will be sent in the clear.
With SSL-only admin sessions, your username, password, and all your authorization cookies will be encrypted. While this is obviously somewhat more secure, it is slower. For most situations, SSL logins should be sufficient. The login option allows users to choose whether or not to use SSL for the entire admin session or just the login.
Listing 11-1 shows the two lines you may add to wp-config.php to enable SSL support. Choose just one of these!
Example 11-1. SSL settings in wp-config.php
// https for all admin sessions:
define('FORCE_SSL_ADMIN', true);

//https required for login; optional for the rest of the admin session:
define('FORCE_SSL_LOGIN', true);
The Admin SSL plugin has always been a popular choice for managing SSL options, but as of this writing it has not been updated to work with version 2.9.
One of the things wp_head() adds to a WordPress theme's header template is a meta generator tag showing which version of WordPress you're using. It helps the WordPress developers know how many WordPress sites there are in the world. However, it's also an advertisement to would-be hackers that your site runs on WordPress—especially if you haven't updated to the latest release. Now, you should always upgrade to the newest release as soon as possible, but of course there will be times when you just can't upgrade immediately. If that's the case, you wouldn't want to advertise to the world that you're running an older, potentially insecure version of WordPress.
You can remove the meta tag altogether using the function shown in Listing 11-2, placed in your theme's functions.php file.
All the files in your WordPress installation should list you as the owner. The files that WordPress needs to write to (.htaccess, wp-content) should belong to a group that contains the web server user. For example, on a UNIX-based server running Apache, you would need to find out which user owns Apache's processes (usually it's www). On IIS, you need to know which user IIS runs as (SYSTEM). Then make sure that there's a group containing both you and the web server user. That's the group your wp-content and .htaccess files should belong to. On most servers, that's done for you. However, in order to better secure your WordPress site, I recommend that you allow only wp-content to be group writable, and make sure you're the only user who can write to .htaccess.
There are a number of ways hackers could use your .htaccess file maliciously. They could use rewrite rules to redirect your visitors to a site other than yours, but that's the sort of thing you'd notice immediately, and it doesn't happen very often. A subtle attack is more likely. One particularly nasty hack involves writing a file full of spam links to a writeable subdirectory deep in the WordPress package, then using PHP's auto_prepend_file or auto_append_file directives to include that file in your theme's index.php file. At first, it looks like someone has mauled your theme, but in fact the theme files haven't changed at all. This is the sort of attack that can leave you chasing your tail for hours, unless you realize that .htaccess is a big point of vulnerability in your installation.
WordPress needs write access to your .htaccess file only to make changes to your permalink structure. If you are using WP Super Cache, the plugin also requires write access to add the cache rewrite rules to the file. However, in both cases, if WordPress cannot write to the file, it will print the necessary rules on the screen and ask you to update the file manually. Therefore, I recommend that you adjust permissions on .htaccess so that your user account is the only one allowed to write to it. On UNIX-based operating systems, you can use the chmod 744 command to make sure you can write to it while everyone else can read only.
You can also modify the .htaccess file itself to secure your wp-config.php file. Normally, any visitor requesting your configuration file will just see a blank page, since the file doesn't echo anything to the screen. However, this addition to .htaccess prevents unwanted users from viewing your config file at all.
While .htaccess is not generally accessible through a browser, either, you can apply the same technique to give it a little extra protection, as shown in Listing 11-3. It looks a little recursive, but it works!
Example 11-3. Securing wp-config.php and .htaccess using .htaccess
<Files wp-config.php>
order allow,deny
deny from all
</Files>

<Files .htaccess>
order allow,deny
deny from all
</Files>
For more security-related modifications to .htaccess, visit www.josiahcole.com/2007/07/11/almost-perfect-htaccess-file-for-wordpress-blogs/.
It's possible to move wp-config.php and the wp-content folder. You can even put the WordPress files other than index.php in a separate subdirectory. All of these things will help minimize attacks that exploit writeable directories in predictable locations.
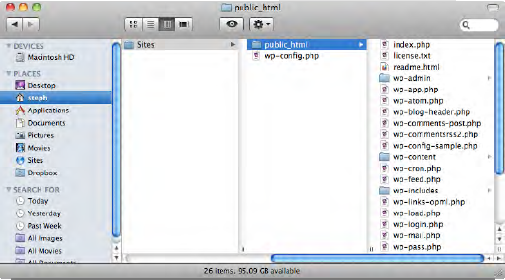
Your configuration file contains your database username and password, so it's important to keep this file secure. If you are installing WordPress in your web root directory (such as public_html), you can move your wp-config.php file to the parent directory—one that isn't readable from a browser—without changing any settings, as shown in Figure 11-11. WordPress will automatically recognize the file's new location.
If you would prefer not to have WordPress's files cluttering up your site's root directory, or you would prefer a nonstandard location for your admin files as a security precaution, you can install WordPress in a subdirectory while keeping your site visible at the original location. For example, you can install WordPress at mydomain.com/blog but have the site appear at mydomain.com.
First, install WordPress in the subdirectory as you normally would. Then move the main index.php file and your .htaccess file from that subdirectory into the parent directory. In your example, you would install WordPress in the blog directory, then move index.php and .htaccess into the web root directory.
Open index.php in a text editor and edit the path to wp-blog-header.php. Add your subdirectory to the file path. In this example, you're installing WordPress in the blog subdirectory, so your line would read require('./ blog /wp-blog-header.php'), Of course, you can replace 'blog' with anything you wish.
Now log in to the site at its new address: mydomain.com/blog/wp-admin. Go to Settings General and change your WordPress address to the new one: mydomain.com/blog. Leave the Blog address alone, and save your changes. See Figure 11-12 for an example.

Once you've saved these options, you'll be logged out. You'll have to log back in at the new location (http://example.com/blog/wp-admin/).
You can move your wp-content folder elsewhere if you like or rename it to something else. However, there are a number of constants related to the wp-content and plugins directories. To make sure your plugins continue working correctly, you should define all of these constants in your wp-config.php file. Add the constant definitions anywhere in the configuration file, as shown in Listing 11-4.
Example 11-4. Renaming /wp-content to /files
define('WP_CONTENT_DIR', $_SERVER['DOCUMENT_ROOT'] . '/files'),
define('WP_CONTENT_URL', 'http://example.com/files'),
define('WP_PLUGIN_DIR', $_SERVER['DOCUMENT_ROOT'] . '/files/plugins'),
define('WP_PLUGIN_URL', 'http://example.com/files/plugins'),
define('PLUGINDIR', $_SERVER['DOCUMENT_ROOT'] . '/files/plugins'),
Once you've made these changes, you also need to change the location of your uploads directory. You might recall seeing this setting in Chapter 3. Go to Settings Media and change the paths as shown in Figure 11-13.

For the most part, you have to rely on your host to keep your database secure. Of course, you need to protect your database username and password (and choose a good password). There are at least two additional things you can do to help protect your database: change the table prefix and back up the database regularly.
Since the default table prefix is well known, changing it is also a good step toward protecting your site from basic SQL injection attacks. If you installed WordPress with your host's one-click installer (like Fantastico), you might not have had a choice about the prefix; otherwise, the prefix is an option you chose when you filled in your database username and password (Figure 2-5).
Changing it after the fact requires you to modify the MySQL tables directly. How to accomplish this depends on what sort of database access your host allows you. I'll demonstrate using PHPMyAdmin, the most popular interface. If you don't have easy access to your database, you can try changing the prefix with the WP Security Scan plugin.
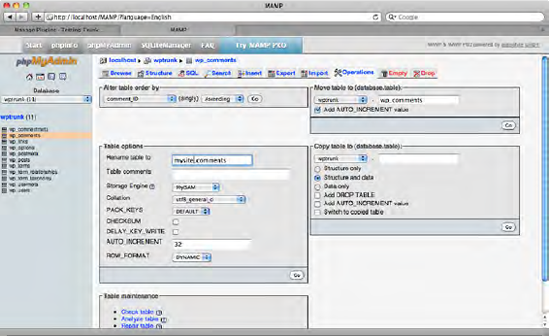
For each table in the database, click either the Browse or Structure icon, then choose Operations from the row of tabs across the top of the screen. You'll see a screen like Figure 11-14. In the Table Options group, you'll see a field where you can rename the table. Replace 'wp' with your new prefix and press the Go button.
Once you've changed the tables, you'll need to update wp-config.php to reflect the change. The relevant portion of the configuration file is shown in Listing 11-5.
Example 11-5. The database prefix option in wp-config.php
/**
 * WordPress Database Table prefix.
 *
 * You can have multiple installations in one database if you give each a unique
 * prefix. Only numbers, letters, and underscores please!
 */
$table_prefix  = 'mysite_';
Changing the table prefix will not protect you from a determined hacker; it's basically security through obscurity. It will stop some SQL injection scripts that rely on the ubiquity of standard WordPress installations. Making yours just a little bit different from everyone else's helps. However, you should be prepared to restore your database from a clean backup if something does go wrong.
Keeping regular backups of your database is essential if you want to be able to restore your site after something has gone wrong. Your hosting provider might do this for you, but it's still a good idea to keep your own copies in case something catastrophic happens.
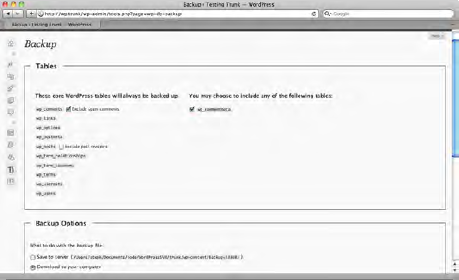
There are several plugins you can use to back up your database right from the WordPress administration screens. My favorite is WP-DB-Backup. Once you've installed it, you'll find a new Backup item under the Tools menu. On the plugin's screen, you'll see checkboxes for each of the tables in your WordPress database. A standard installation will look like Figure 11-15. If your plugins have added tables of their own, those will be shown in the column on the right, and you can choose which ones you want to include in the backup. If you have several installations of WordPress sharing a single database with different table prefixes, the tables with the other prefixes will also appear on the right.
To make a backup, simply check the tables you want to include, decide whether to include spam comments and post revisions, and choose your destination. If you save the backup to the server, a gzipped SQL file will be saved to the directory shown (a subdirectory of wp-content).
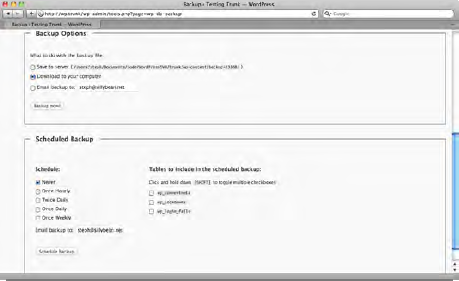
The lower half of the plugin's option screen (Figure 11-16) lets you schedule regular backups. However, these backups must be emailed to you. Make sure the email account you enter here can handle a lot of attachments (unless you're diligent about deleting old copies when the new one comes in.) The compressed file is not all that large, but over time the size will add up.
Note
As of this writing, WP-DB-Backup hasn't been updated for WordPress 2.9, so it doesn't automatically back up the new *_commentmeta table. Be sure to check off that table when you make your backups.
To restore from one of these backups, you'll need some sort of interface to your MySQL database other than WordPress itself. If your host offers PHPMyAdmin, for example, you could go to the Import tab and upload your backup file. Check your host's documentation to see how you can import SQL files into your database.
Don't forget to back up your files, too. Your uploaded media files probably wouldn't be very easy to replace, and if you've made any changes to your theme, you'll need copies of those, too. In general, it's a good idea to keep backups of your entire wp-content directory. You can automate this process with a tool like rsync (samba.anu.edu.au/rsync/) if you're feeling geeky, but I just use my FTP client's synchronize feature to download an updated copy every time I log in to make a change.
There are several plugins that will help you maintain a secure installation:
WP Security Scan checks your file permissions (Figure 11-17), passwords, database security, and more. It provides tools to fix most of the problems it identifies.
WordPress Firewall monitors HTTP requests for blacklisted phrases and can email you when it finds something suspicious.
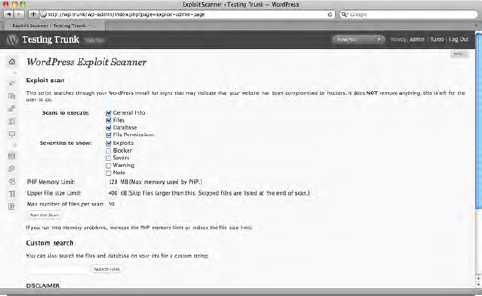
Exploit Scanner (Figure 11-18) searches your files and database for any suspicious entries, like files full of spam links.
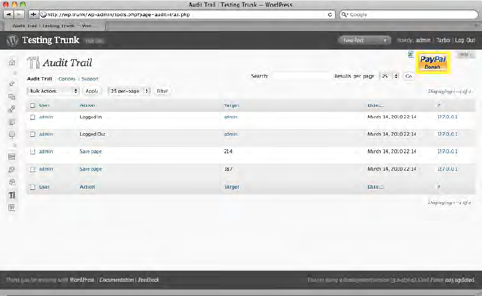
Audit Trail (Figure 11-19) is also useful for letting you know who's been attempting to log in and what they changed.
See Appendix 1 for more security-related plugins.

In this chapter, I've shown you how to speed up your WordPress site and how to lock it down. I've covered caching with WP Super Cache, choosing efficient permalink structures, and identifying performance bottlenecks with WP Tuner and YSlow. To secure your site, I've talked about barring users from multiple login attempts, using SSL for logins and/or full admin sessions, and securing both your files and your database. Finally, I've shown you a handful of plugins that help you keep an eye on your installation. Now that you know what to look for, these tools should help you maintain a fast, healthy WordPress site.
Now that you've seen everything involved in managing a standard WordPress site, I'll show you how to customize your content. In the next chapter, you'll learn how to create custom fields to store extra information in each of your articles. You'll also learn how to create custom taxonomies—new sets of tags and categories you can use to organize your content. You'll even create whole new content types.