
Widgets are the building blocks of WordPress sidebars. They can be created in a theme's functions file or in a plugin.
In this chapter, I'll show you how I created two of my plugins, Recent Posts From Category and Dashboard Notepad. You'll see how to create these widgets as part of a theme's functions file, and in the next chapter I'll show you how to transform them into plugins.
While these two plugins create widgets, note that plugins can do any number of other things. Widgets are limited to displaying a bit of content inside the widget areas you defined in your theme's functions.php file back in Chapter 6.
WordPress widgets are classes, which makes them easy to duplicate, even if you've never worked with object-oriented programming before. A class provides a blueprint for objects that will be reused in various ways. Creating a new widget is a matter of copying the basic widget class, then adjusting the enclosed functions to output the content you have in mind. The widget class contains four functions: one that registers the widget, one that prints the widget output, one that updates the widget options, and one that displays the options form.
Before I go into the details of custom widgets, let's take a look at the code for one of the simplest built-in widgets, the calendar (Figure 8-1). The code (from wp-includes/default-widgets.php) is given in Listing 8-1. Things you would change in your own widget are in bold.

Example 8-1. The built-in calendar widget
classWP_Widget_Calendarextends WP_Widget { functionWP_Widget_Calendar() { // define widget title and description $widget_ops = array('classname' => 'widget_calendar', 'description' => __( 'A calendar of your blog’s posts') ); // register the widget $this->WP_Widget('calendar', __('Calendar'), $widget_ops); } // display the widget in the theme function widget( $args, $instance ) { extract($args); // apply filters to the given title, or print non-breaking space if empty $title = apply_filters('widget_title', empty($instance['title']) ? ' ' : $instance['title'], $instance, $this->id_base); // before/after code for widget and title were defined in functions.php echo $before_widget; if ( $title ) echo $before_title . $title . $after_title; // print the inner widget, the part that makes this widget uniqueecho '<div id="calendar_wrap">';get_calendar();echo '</div>';echo $after_widget; }
// update the widget when new options have been entered
        function update( $new_instance, $old_instance ) {
                $instance = $old_instance;
                // replace old with new
                $instance['title'] = strip_tags($new_instance['title']);

                return $instance;
        }

        // print the widget option form on the widget management screen
        function form( $instance ) {
                // combine provided fields with defaults
                $instance = wp_parse_args( (array) $instance, array( 'title' => '' ) );
                $title = strip_tags($instance['title']);
                // print the form fields
?>
                <p><label for="<?php echo $this->get_field_id('title'), ?>">
                        <?php _e('Title:'), ?></label>
                <input class="widefat" id="<?php echo $this->get_field_id('title'), ?>"
name="<?php echo $this->get_field_name('title'), ?>" type="text" value="<?php echo
esc_attr($title); ?>" /></p>
<?php
         }
}
Look how little you have to change! Now, I did say that this is one of the simplest widgets. Your widgets might have more options, and therefore a longer form and more fields to update. Still, this is going to be pretty easy, right?
I'll go through each piece of this widget, starting with the form and working backwards.
The form function defines what will appear in the widget manager under Appearance
Example 8-2. The form function
// print the widget option form on the widget management screen
        function form( $instance ) {
                // combine provided fields with defaults
                $instance = wp_parse_args( (array) $instance, array( 'title' => '' ) );
                $title = strip_tags($instance['title']);
                // print the form fields
?>
                <p><label for="<?php echo $this->get_field_id('title'), ?>">
<?php _e('Title:'), ?></label>
                 <input class="widefat" id="<?php echo $this->get_field_id('title'), ?>"
name="<?php echo $this->get_field_name('title'), ?>" type="text" value="<?php echo
esc_attr($title); ?>" /></p>
<?php
}First, let's think about what this widget will display in the theme. The get_calendar() tag is pretty simple. It takes just one possible argument, the format of the days' names in the table heading. You don't need the argument here; the tag respects the time and date settings you chose in your General Settings screen. The tag, and thus the widget, simply prints a calendar, as shown in Figure 8-1. Therefore, you don't need any widget options other than the title of the widget itself. Were you generating a more complicated bit of code, you would need more options, as you'll see in the Random Posts from Category widget later in this chapter (Listing 8-7), and you would add those form fields here in the form function.
In the first line of the form function, you parse the arguments passed in the $instance variable and merge it with a second array containing the default values for your options. Then, before you display the title on the widget manager screen, you need to strip HTML tags. Widget titles are strictly defined; you saw this back in Chapter 7 when you defined the widget areas in functions.php. You need to keep stray HTML tags from interfering with the widget output, not to mention widget manager itself.
Now it's time to display the form fields. There's no need for a <form> tag; that will be taken care of for you. You just need to wrap the title in a <label> tag and provide an input field for each option—in this case, just the title itself.
To convert the stored value of a widget option into attribute-friendly strings, pass the name of the option to the get_field_id() and get_field_name() functions. For the value itself, use the $title variable again, this time passed through the esc_attr function.
And you're done with the form! The submit button will be added automatically.
The first thing to do in any widget update function is to save the old values, in case any of them didn't change. Then, go through each of the fields from your form, do any required processing on them, and save them to the new form instance.
In this case, the only thing you need to do with your widget title is, once again, strip any HTML tags. Listing 8-3 shows the isolated update function.
Listing 8-4 shows the isolated widget output function.
Example 8-4. The widget function
// display the widget in the theme
function widget( $args, $instance ) {
extract($args);
// apply filters to the given title, or print non-breaking space if empty
$title = apply_filters('widget_title', empty($instance['title']) ?
' ' : $instance['title'], $instance, $this->id_base);
// before/after code for widget and title were defined in functions.php
echo $before_widget;
if ( $title )
echo $before_title . $title . $after_title;
// print the inner widget, the part that makes this widget unique
echo '<div id="calendar_wrap">';
get_calendar();
echo '</div>';
echo $after_widget;
}The $args variable passed to the widget function is an array of all the fields in the form. To make them easier to work with, the first line extracts them into separate variables.
The next line is a bit complicated. It's an if/else statement using the ternary operator syntax. If you're not familiar with the ternary operator, it can be confusing to read. Unpacked, this line would look more like Listing 8-5.
Example 8-5. A less compact way of processing the widget title
// First, you'll provide a non-breaking space if the title field was left empty.
if (empty($instance['title']))
$title = ' ';
else
$title = $instance['title'];
// Then, you need to apply filters, in case another plugin needs to alter widget titles
$title = apply_filters('widget_title', $title, $instance, $this->id_base);First, you provide a non-breaking space if the title field was left empty. Then, by calling apply_filters(), you allow plugins to modify the widget titles.
Once you have the title, you need to kick off the widget with $before_widget. Then you print the title using $before_title and $after_title. Recall that you defined all the before and after options back in Chapter 7 when you set up the widget areas in functions.php.
Now it's time to print the heart of the widget. In this case, you use just one template tag, get_calendar (), surrounded by a <div> tag (which might be useful for styling the widget). As you'll see later in this chapter, you could do something much more complicated here.
Once you're finished with the widget output, you print $after_widget, and you're done.
Finally, the setup function is shown by itself in Listing 8-6.
Example 8-6. The setup function
function WP_Widget_Calendar() {
// define widget title and description
$widget_ops = array('classname' => 'widget_calendar',
'description' =< __( 'A calendar of your blog’s posts') );
// register the widget
$this->WP_Widget('calendar', __('Calendar'), $widget_ops);
}The name of the first function in the class should match your widget name. This function provides the information about the widget WordPress needs to display on the widget manager screen.
You could accomplish all this in one line, but for readability, you'll create an array of the widget's properties (class name and description). Then you just need to initalize the widget with an internal name (calendar), a label (Calendar), and the array of properties.
Note
the description and label are shown wrapped in the __() function (that's two underscores and nothing else). As you will see in the next chapter, this function is used to translate the given strings into the user's chosen language.
To create your own widget, you need to duplicate the widget class and add your own logic and form fields. Then you just need a few extra lines to register your widget and make it available on the widget manager screen. Listing 8-7 shows a simplified version of my Random Posts from Category plugin (Figure 8-2). For simplicity's sake, I've removed the extra code required for internationalizing the strings and supporting the the_excerpt Reloaded plugin as well as the built-in the_excerpt () function. Other than that, this really is the whole plugin. If you want, you can flip ahead to the next chapter and see how to set up the comment block necessary to use this as a plugin. Otherwise, paste this into your theme's functions.php file, and you'll see a new widget available under Appearance
The things that are unique to this widget are shown in bold.

Example 8-7. The Random Posts from Category widget
classRandomPostsFromCategoryextends WP_Widget { functionRandomPostsFromCategory() { $widget_ops = array('classname' =>'random_from_cat', 'description' =>'random postsfrom a chosen category'); $this->WP_Widget('RandomPostsFromCategory', 'Random Posts from Category',$widget_ops); } function widget( $args, $instance ) { extract( $args );
$title = apply_filters('widget_title', empty( $instance['title'] ) ? 'Random Posts' :
$instance['title']);
echo $before_widget;
if ( $title) {
if ($instance['postlink'] == 1) {
$before_title .= '<a
href="'.get_category_link($instance['cat']).'">';
$after_title = '</a>'.$after_title;
}
echo $before_title.$title.$after_title;
}
?>
<ul>
<?php
query_posts("cat=".$instance['cat']."&showposts=".$instance['showposts']."&orderby=r
and");
// the Loop
if (have_posts()) : while (have_posts()) : the_post(); ?>
<li><a href="<?php the_permalink(); ?>" title="<?php the_title_attribute();
?>"><?php the_title(); ?></a>
<?php
if ($instance['content'] == 'excerpt')
the_excerpt();
elseif ($instance['content'] == 'content')
the_content();
endwhile; endif;
?>
</ul>
<?php
echo $after_widget;
wp_reset_query();
}
function update( $new_instance, $old_instance ) {
$instance = $old_instance;
$instance['title'] = strip_tags($new_instance['title']);
$instance['cat'] = $new_instance['cat'];
$instance['showposts'] = $new_instance['showposts'];
$instance['content'] = $new_instance['content'];
$instance['postlink'] = $new_instance['postlink'];
return $instance;
}
function form( $instance ) {
//Defaults
$instance = wp_parse_args( (array) $instance, array(
'title' => 'Random Posts',
'cat' => 1,
'showposts' => 1,'content' => 'title','postlink' => 0));?> <p> <label for="<?php echo $this->get_field_id('title'), ?>">Title:</label> <input class="widefat" id="<?php echo $this->get_field_id('title'), ?>" name="<?php echo $this->get_field_name('title'), ?>" type="text" value="<?php echo $instance['title']; ?>" /> </p><p><label for="<?php echo $this->get_field_id('cat'), ?>">Show posts from category:</label><?php wp_dropdown_categories(array('name' => $this->get_field_name('cat'), 'hide_empty'=>0,'hierarchical'=>1, 'selected'=>$instance['cat'])); ?></label></p><p><input id="<?php echo $this->get_field_id('postlink'), ?>" name="<?php echo $this->get_field_name('postlink'), ?>"type="checkbox" <?php checked($instance['postlink'], 1); ?> value="1" /><label for="<?php echo $this->get_field_id('postlink'), ?>">Link widget title to categoryarchive</label></p><p><label for="<?php echo $this->get_field_id('showposts'), ?>">Number of posts toshow:</label><input class="widefat" id="<?php echo $this->get_field_id('showposts'), ?>" name="<?php echo$this->get_field_name('showposts'), ?>"type="text" value="<?php echo $instance['showposts']; ?>" /></p><p><label for="<?php echo $this->get_field_id('content'), ?>">Display:</label><select id="<?php echo $this->get_field_id('content'), ?>" name="<?php echo $this->get_field_name('content'), ?>" class="postform"><option value="title"<?php selected( $instance['content'], 'title' ); ?>>TitleOnly</option><option value="excerpt"<?php selected( $instance['content'], 'excerpt' ); ?>>Titleand Excerpt</option><option value="content"<?php selected( $instance['content'], 'content' ); ?>>Titleand Content</option></select></p><?php } // function form } // widget class
This time, I'll go through the functions in order, beginning with the setup function alone in Listing 8-8.
Example 8-8. The widget setup function
function RandomPostsFromCategory() {
$widget_ops = array('classname' => 'random_from_cat', 'description' => 'random posts
from a chosen category'),
$this->WP_Widget('RandomPostsFromCategory', 'Random Posts from Category',
$widget_ops);
}In the first function, the names have changed. The classname and description are up to you; just make sure the classname is a valid name for a class in CSS (see www.w3.org/TR/CSS21/syndata.html#characters for details). When you call $this->WP_Widget, you need to pass it three arguments: the name of this widget (which should match this function's name), its title (for the widget manager screen), and the array of options you created in the previous line.
In the widget function (Listing 8-9), you first check to see if the option to make the title a link has been checked. If it has, you need to add the link markup to the $before_title and $after_title variables. Then you move on to the heart of the widget output, which is in this case a Loop. Just as you did in the previous chapters on themes, you'll use query_posts() to get the posts from the selected category and show the chosen number of posts. In this query, rather than getting the most recent posts, you're ordering them at random. And of course, once you're finished with the widget output, you need to reset the query.
Example 8-9. The widget function
function widget( $args, $instance ) {
extract( $args );
$title = apply_filters('widget_title', empty( $instance['title'] ) ? 'Random Posts' :
$instance['title']);
echo $before_widget;
if ( $title) {
if ($instance['postlink'] == 1) {
$before_title .= '<a href="'.get_category_link($instance['cat']).'">';
$after_title = '</a>'.$after_title;
}
echo $before_title.$title.$after_title;
}
?>
<ul>
<?php
query_posts("cat=".$instance['cat']."&showposts=".$instance['showposts']."&orderby=rand");
// the Loop
if (have_posts()) : while (have_posts()) : the_post(); ?>
<li><a href="<?php the_permalink(); ?>" title="<?php the_title_attribute();
?>"><?php the_title(); ?></a>
<?php
if ($instance['content'] == 'excerpt')
the_excerpt();elseif ($instance['content'] == 'content')
the_content();
endwhile; endif;
?>
</ul>
<?php
echo $after_widget;
wp_reset_query();
}The update function (Listing 8-10) changes very little, except that you've added the new options to the array.
Example 8-10. The update function
function update( $new_instance, $old_instance ) {
$instance = $old_instance;
$instance['title'] = strip_tags($new_instance['title']);
$instance['cat'] = $new_instance['cat'];
$instance['showposts'] = $new_instance['showposts'];
$instance['content'] = $new_instance['content'];
$instance['postlink'] = $new_instance['postlink'];
return $instance;
}In the form function (Listing 8-11), you need to add the new options' default values to this array as well. Then it's just a matter of adding form inputs for each of the additional options. For the category, you can make use of WordPress's wp_dropdown_categories() function. In the checkbox and select fields, you might have noticed two interesting functions: checked() and selected(). These allow you to compress the code required to see whether or not the relevant option has already been selected or not. The checkbox code, for example, is much simpler than the alternative, shown in Listing 8-12.
Example 8-11. The form function
function form( $instance ) {
//Defaults
$instance = wp_parse_args( (array) $instance, array(
'title' => 'Random Posts',
'cat' => 1,
'showposts' => 1,
'content' => 'title',
'postlink' => 0));
?>
<p>
<label for="<?php echo $this->get_field_id('title'), ?>">Title:</label>
<input class="widefat" id="<?php echo $this->get_field_id('title'), ?>"name="<?php echo $this->get_field_name('title'), ?>" type="text" value="<?php echo $instance['title']; ?>" />
</p>
<p><label for="<?php echo $this->get_field_id('cat'), ?>">Show posts from category:</label>
<?php wp_dropdown_categories(array('name' => $this->get_field_name('cat'), 'hide_empty'=>0, 'hierarchical'=>1, 'selected'=>$instance['cat'])); ?></label>
</p>
<p>
<input id="<?php echo $this->get_field_id('postlink'), ?>" name="<?php echo $this->get_field_name('postlink'), ?>"
type="checkbox" <?php checked($instance['postlink'], 1); ?> value="1" />
<label for="<?php echo $this->get_field_id('postlink'), ?>">Link widget title to category archive</label>
</p>
<p><label for="<?php echo $this->get_field_id('showposts'), ?>">Number of posts to
show:</label>
<input class="widefat" id="<?php echo $this->get_field_id('showposts'), ?>" name="<?php echo $this->get_field_name('showposts'), ?>"
type="text" value="<?php echo $instance['showposts']; ?>" />
</p>
<p>
<label for="<?php echo $this->get_field_id('content'), ?>">Display:</label>
<select id="<?php echo $this->get_field_id('content'), ?>" name="<?php echo $this->get_field_name('content'), ?>" class="postform">
<option value="title"<?php selected( $instance['content'], 'title' ); ?>>Title
Only</option>
<option value="excerpt"<?php selected( $instance['content'], 'excerpt' ); ?>>Title and
Excerpt</option>
<option value="content"<?php selected( $instance['content'], 'content' ); ?>>Title and
Content</option>
</select>
</p>
<?php
} // function formExample 8-12. The alternative to checked(); not recommended
<?php if ($instance['postlink']) { ?> checked="checked" <?php } ?>That's about all there is to widgets! The widget function could contain almost anything. Just keep in mind that widgets are (usually) outside the Loop, so you'll need to access post data accordingly or create your own Loop (as shown in Listing 8-9).
Widgets are one of the most popular plugin categories on wordpress.org. Of the many great offerings, there are two that really show the breadth and depth of what a widget can do. The Section widget (Figure 8-3) allows you to display a bit of HTML on selected pages or category archives. It makes use of all the conditional tags I've talked about in the last few chapters, but it lets you create context-aware content without coding. The Query Posts widget (Figure 8-4) allows you to display a list of posts or pages using all the options available in the query_posts () function—again, without coding.


Creating new Dashboard widgets is not quite as elegant as creating sidebar widgets. For a very basic Dashboard widget, you'll have two essential functions, the widget itself (dashboard_notepad_widget()) and the setup function (dashboard_notepad_widget_setup()). Here, since the code for setting option defaults is used in both those functions, it has been pulled out into its own function, dashboard_notepad_widget_options(). Finally, you use the add_action() function to add your new widget to the Dashboard setup process using the wp_dashboard_setup() hook.
My Dashboard Notepad plugin creates an extremely simple Dashboard widget. Anything you enter into the form is saved there until you clear it out. It's great for jotting down ideas for future posts or sharing reminders with other site administrators. In this simplified version, it really has just one option: the note text.
The Dashboard Notepad widget is shown in Figure 8-5, and the source code is given in Listing 8-13. Take a look at the code, and then I'll walk through each piece.

Example 8-13. The Dashboard Notepad widget source code
function dashboard_notepad_widget() {
        $options = dashboard_notepad_widget_options();
        if (!empty($_POST['dashboard_notepad_submit']) ) {
                $options['notes'] =  stripslashes($_POST['dashboard_notepad']);

                update_option('dashboard_notepad', $options);
        } else
                $dashboard_notepad = htmlspecialchars($options['notes'], ENT_QUOTES);
        $form = '<form method="post" action="'.$_SERVER['PHP_SELF'].'">';
        $form .= '<textarea id="dashboard_notepad" name="dashboard_notepad" style="width: 95%;
height: 12em; background: #fcfcfc;"';
        $form .= '>'. $options['notes'].'</textarea>';
        $form .= '<p><input type="submit" value="Save Notes" class="button widget-control-
save"></p>
        <input type="hidden" name="dashboard_notepad_submit" value="true" />';
        $form .= '</form>';
        echo $form;
}

function dashboard_notepad_widget_setup() {
        $options = dashboard_notepad_widget_options();
        if (!is_array($options)) $options = array('notepad_title' => 'Notepad'),
        wp_add_dashboard_widget( 'dashboard_notepad_widget_id', $options['notepad_title'],
'dashboard_notepad_widget'),
}

function dashboard_notepad_widget_options() {
        $defaults = array( 'notes' => 'Enter here whatever is on your mind.',
                'notepad_title' => 'Notepad'),
$options = get_option('dashboard_notepad'),
if (!is_array($options)) $options = array();
return array_merge( $defaults, $options );
}
add_action('wp_dashboard_setup', 'dashboard_notepad_widget_setup'),Warning
The example in Listing 8-13 has been vastly simplified for the purposes of demonstration. The full plugin version includes a number of additional checks on users' permissions, such as whether they're allowed to post unfiltered HTML. Do not use the simplified code on a live site; download the plugin instead.
As you saw in Chapter 2, some widgets have options. If yours does, you'll need to create a configuration screen.
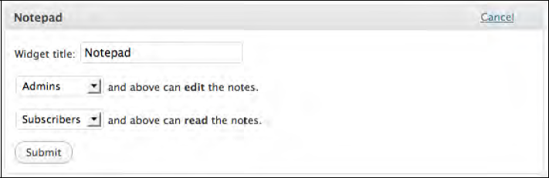
Listing 8-14 is an expanded version of the Dashboard Notepad widget, this time with several options. You'll let the administrator change the widget title. You'll also put some role checking in place so that the administrator can decide who gets to edit the notes. The changes from Listing 8-13 are in bold. Figure 8-6 shows the resulting configuration screen.
Example 8-14. Dashboard Notepad widget with options configuration screen
function dashboard_notepad_widget() {
        $options = dashboard_notepad_widget_options();
        if (!empty($_POST['dashboard_notepad_submit']) ) {
                $options['notes'] =  stripslashes($_POST['dashboard_notepad']);
                update_option('dashboard_notepad', $options);
        } else
                $dashboard_notepad = htmlspecialchars($options['notes'], ENT_QUOTES);
        if (current_user_can($options['can_edit'])) $admin = TRUE;
        else $admin = FALSE;
        $form = '<form method="post" action="'.$_SERVER['PHP_SELF'].'">';
        $form .= '<textarea id="dashboard_notepad" name="dashboard_notepad" style="width: 95%;
height: 12em; background: #fcfcfc;"';
        if (!$admin) $form.= ' readonly="readonly"';
        $form .= '>'. $options['notes'].'</textarea>';
        if ($admin) $form .= '<p><input type="submit" value="Save Notes" class="button widget-
control-save"></p>
                <input type="hidden" name="dashboard_notepad_submit" value="true" />';
        $form .= '</form>';
        echo $form;
}

function dashboard_notepad_widget_setup() {
        $options = dashboard_notepad_widget_options();
if (!is_array($options)) $options = array('notepad_title' => 'Notepad'),
if (current_user_can($options['can_read'])) {
wp_add_dashboard_widget( 'dashboard_notepad_widget_id',
$options['notepad_title'], 'dashboard_notepad_widget', 'dashboard_notepad_widget_control' );
}
}
add_action('wp_dashboard_setup', 'dashboard_notepad_widget_setup'),
function dashboard_notepad_widget_options() {
$defaults = array( 'notes' => 'Enter here whatever is on your mind.', 'can_edit' =>
'edit_dashboard', 'can_read' => 'read', 'notepad_title' => 'Notepad'),
$options = get_option('dashboard_notepad'),
if (!is_array($options)) $options = array();
return array_merge( $defaults, $options );
}
function dashboard_notepad_widget_control() {
$options = dashboard_notepad_widget_options();
if ( 'post' == strtolower($_SERVER['REQUEST_METHOD']) && isset( $_POST['widget_id']
) && 'dashboard_notepad_widget_id' == $_POST['widget_id'] ) {
if ( isset($_POST['can_edit']) )
$options['can_edit'] = $_POST['can_edit'];
if ( isset($_POST['can_read']) )
$options['can_read'] = $_POST['can_read'];
if ( isset($_POST['notepad_title']) )
$options['notepad_title'] = $_POST['notepad_title'];
update_option( 'dashboard_notepad', $options );
}
?>
<p><label for="notepad_title">Widget title:</label>
<input type="text" id="notepad_title" name="notepad_title" value="<?php echo
$options['notepad_title']; ?>" /></p>
<p>
<select id="can_edit" name="can_edit">
<option value="edit_dashboard" <?php selected('edit_dashboard',
$options['can_edit']); ?>>Admins</option>
<option value="edit_pages" <?php selected('edit_pages',
$options['can_edit']); ?>>Editors</option>
<option value="publish_posts" <?php selected('publish_posts',
$options['can_edit']); ?>>Authors</option>
<option value="edit_posts" <?php selected('edit_posts',
$options['can_edit']); ?>>Contributors</option>
<option value="read" <?php selected('read', $options['can_edit']);
?>>Subscribers</option>
</select>
<label for="can_edit">and above can <strong>edit</strong> the notes.</label>
</p>
<p>
<select id="can_read" name="can_read"><option value="edit_dashboard" <?php selected('edit_dashboard',$options['can_read']); ?>>Admins</option><option value="edit_pages" <?php selected('edit_pages', $options['can_read']); ?>>Editors</option><option value="publish_posts" <?php selected('publish_posts',$options['can_read']); ?>>Authors</option><option value="edit_posts" <?php selected('edit_posts',$options['can_read']); ?>>Contributors</option><option value="read" <?php selected('read', $options['can_read']);?>>Subscribers</option></select><label for="can_read">and above can <strong>read</strong> the notes.</label></p><?php}
The biggest change is, of course, the dashboard_notepad_widget_control() function. The first thing you need to do in this function is get the existing options from the database, then run through the data posted from the form and update any options if necessary using the update_options function. (This function is more often used for theme and plugin options, and you'll see it again in the next chapter.) Once that's done, just print form fields for each option, with the stored options shown as the field defaults. As with the sidebar widgets, you don't have to include the form tag or the submit button; those are taken care of automatically.
The control function has to be added to the widget setup function. The name of the control function is the last argument passed to wp_add_dashboard_widget(). As you saw in Listing 8-13, if this argument is not present, the widget will not have a configuration screen.
Most of the other changes to the functions simply involve adding checks for your new options. There is one unusual thing about the revised dashboard_notepad_widget_setup() function. Since you're now checking to see whether the user can read the notes, the entire wp_add_dashboard_widget() function is now wrapped in an if() statement. You could have put this in the dashboard_notepad_widget() function, checking only whether the user gets to see the textarea containing the notes. However, in that case, users who don't have permission to read the notes would have a useless widget cluttering up their Dashboards. By placing this check in the setup function instead, you hide the widget altogether if the user can't see its contents.