WordPress comes with tools to import content from a number of other blogging systems. In addition, its API makes it relatively easy to import content from MySQL-based content management systems. If you already have a site, you can probably import its content into WordPress. If you don't have another site, you can skip to the next chapter!
I'll look at the built-in import tools for Blogger and wordpress.com, two of the most commonly used sites. These tools can import blog posts, pages, comments, images, categories, and tags. I'll also show you lesser-known, more complicated import scripts for Joomla (and Mambo), Drupal, and a general script template that can be modified to suit other MySQL databases. Finally, I'll walk you through my own HTML Import plugin, which can be used to import static files as posts or pages. These scripts are not as easy to use as the built-in import tools, but even a complicated import process is better than copying and pasting thousands of entries by hand!
Importing can be tricky, and it doesn't always go well the first time. Therefore, it's important to install the DB Backup and Mass Page Remover plugins in case you need to start over. (Despite the name, Mass Page Remover works just as well on posts.) If you aren't using one of the built-in importers, you'll probably need to do a little bit of cleanup work afterward, so you'll need to install the Search & Replace plugin as well.
If you're importing content into a WordPress site that already contains content, back up your database and put the site into maintenance mode before you begin importing, just as you would if you were upgrading (see Chapter 2).
If you've installed a plugin that crossposts your content to another site (like Facebook or LiveJournal) or automatically notifies another site of your new posts (like Twitter), be sure to deactivate those plugins before you begin; otherwise, you'll flood your social network with your imported posts.
Some of the built-in importers will import only the most basic content from your old blog: posts and perhaps comments. Others will import categories, links, and even users. The list on the Tools
You can also import posts from an RSS feed or a blogroll from an OPML file. The list of import tools also includes the tools for importing or converting categories and tags.

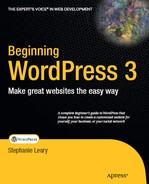
To import content from a wordpress.com blog, first you need to export it. Log in to your wordpress.com account and go to the Dashboard of the site you want to move. Under the Tools menu, choose Export. If your blog has multiple authors, you'll have the option to export just one person's posts. You'll be prompted to save the XML file containing your posts, as shown in Figure 5-2.
Once you have the XML file, log in to your new WordPress site and go to Tools

WordPress will then ask you to map the authors of the wordpress.com posts to the users in your new site or to create a new user for the imported posts (Figure 5-4). You'll also need to choose whether or not to import the media files uploaded to your old posts.

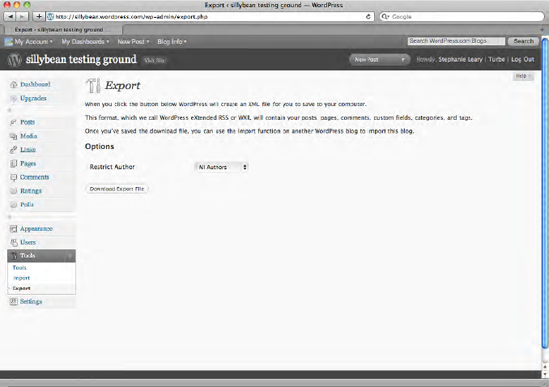
Once you've made those decisions, press Submit. WordPress will process the files and present you with a log when it's finished (Figure 5-5).
To import posts and comments from Blogger, you'll need to authorize your WordPress site to access your Blogger account. Under Tools


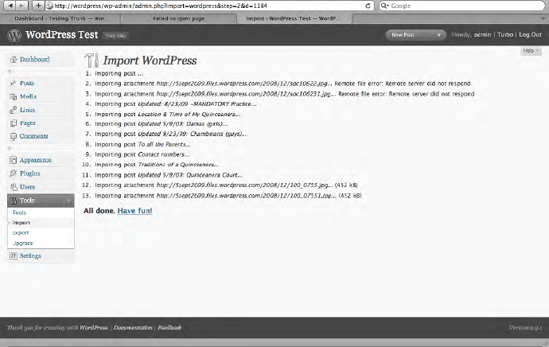
Once you give it permission, WordPress will show you a list of your Blogger blogs. Press the Import button to the right of the progress bar to begin the import, as shown in Figure 5-8.
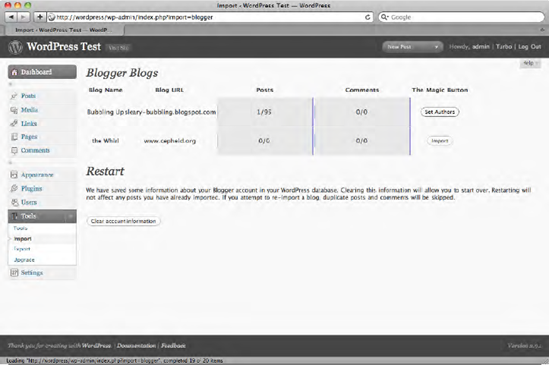
After WordPress has imported your posts, click the Set Authors button. You'll be able to choose which user should be the author of your imported posts (Figure 5-9).

Once you've chosen the author, press the Save Changes button. You'll be whisked back to the Edit Posts screen, where you should see all your imported posts.
If you need to change any attributes other than the author, you'll need to go to Posts
The unofficial importer for Joomla and Mambo (azeemkhan.info/2008/joomla2wordpress-import-wizard-v3/) by Azeem Khan does a lovely job of importing content and static content from versions 1.x and 1.5x. It does not import users or anything added by modules, like forms and comments. While it was written for WordPress 2.7, in my testing it worked with 2.9 as well.
Before you begin importing, you need to create WordPress categories corresponding to the sections and categories in your Joomla or Mambo site. You'll be able to import whole sections at a time or individual categories. You can also import links, one link category at a time.
Download the importer and fill in the database fields for both databases. Copy all the files in the zip package to a directory called export in your WordPress directory (Figure 5-10) and visit the URL in your browser.

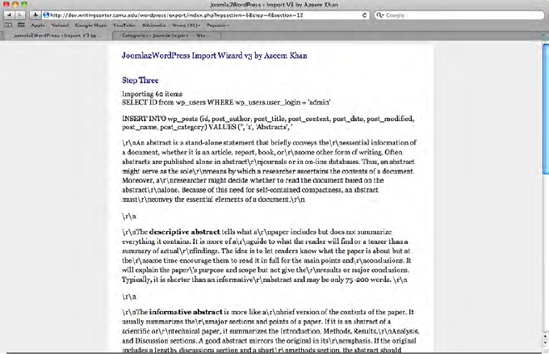
Step One is to select the section or category of your Joomla/Mambo site, as shown in Figure 5-11. In Step Two, you need to select the corresponding category you created in WordPress. Select that, and MySQL queries will begin scrolling down the page as the importer processes your posts, as shown in Step Three (Figure 5-12). Don't worry if your content is littered with
and
characters; those are whitespace characters (mostly line breaks), and they appear in the importer's report. They'll be replaced by the appropriate spacing in your WordPress posts and pages.

You can repeat the process for all the categories in your old site. Be sure to remove the export directory when you're finished.
To import content from a MySQL-based site that isn't represented on the official importer list, be prepared to get your hands dirty. There are no friendly web interfaces for this; it's a matter of filling in database values in a script. You might also need to set up a second, temporary database for the migration process.
Developer Joost de Valk has written a tutorial on importing content from another MySQL database into WordPress. The article (yoast.com/importing-from-another-mysql-into-wordpress) contains a PHP script (broken into sections) that you can adapt to your own situation. The Codex article on the wp_insert_post function, at codex.wordpress.org/Function_Reference/wp_insert_post, lists all the possible fields you can insert into the database.
There are scripts for importing Drupal sites, but they are somewhat dated. They were written for previous versions of WordPress and will not work correctly on modern installations. If you already have your WordPress site set up, but you need to import from Drupal, I recommend that you install a second WordPress site using the older version required by the importer. You can download old versions of WordPress from the Release Archive at wordpress.org/download/release-archive/. Once you've completed the Drupal import, you can then use the WordPress export format to get the data into your current site. If you do not already have your WordPress site set up, you can begin with one of the older versions, import from Drupal, then use the automatic upgrade process to reach the current version.
All that might sound daunting, and indeed, importing a Drupal site into WordPress is tricky if you've set up a lot of custom content types, views, or content blocks. However, if you just need to get the basic content (pages, stories, comments, and taxonomy) into WordPress, these import guides will help you get the job done.
To import a Drupal 6 site into WordPress 2.7, use the SQL queries described at the Social Media Buzz website, socialcmsbuzz.com/convert-import-a-drupal-6-based-website-to-wordpress-v27-20052009/. You'll need to use PHPMyAdmin or a similar MySQL administration interface, unless you're comfortable running queries from the command line. Figure 5-13 shows how to run the necessary queries through PHPMyAdmin.
To import a Drupal 5 site into WordPress 2.3, use the script provided by D'Arcy Norman at http://www.darcynorman.net/?p=1632.

I created the HTML Import plugin because the most common scenario, both in my day job and my freelance work, is moving a site from Dreamweaver templates into WordPress. I got very tired of copying and pasting!
The plugin works by reading in HTML as XML and copying the specified tags' contents into various WordPress fields. It therefore works best on well-formed HTML. Your files don't necessarily have to validate according to the W3C specification, but they should at least contain tags that are properly nested. They should also reside on the same server as your WordPress installation.
To begin, download the plugin from the repository at wordpress.org and activate it. You'll find the import options page under the Settings menu. The first thing you'll be asked to fill in is the path to the directory of files you want to import. Find the absolute path—not a site- or file-relative one—to this directory. On a Windows machine, that path will begin with a drive letter (e.g. C:sitesimport). On a UNIX-based server (including Macs), the path will begin with a slash (e.g. /users/username/home/public_html or /Library/WebServer/mysite). Enter the path into the first field on the importer's options page, as shown in Figure 5-14.
Then, identify the types of files you want to import and list the file extensions, separated by commas. If there are any directories the importer should skip, like image or script directories, specify those as well.

To select the part of the file that contains the main content—what will become the post or page content in WordPress—you can specify an HTML tag or a Dreamweaver template region. If your pages are based on Dreamweaver templates, select the Dreamweaver option and enter the name of the content area (e.g. "Main Content") into the template region field. If you're using a tag without attributes, or where the attributes don't matter, simply enter the tag (without brackets) in the tag field, and leave the attribute and value fields blank. If your tag does have an attribute that makes it unique, enter the attribute name (like class or id) in the attribute field and the value in the value field. For example, if your content is contained in the <td id="main-content"> tag, your import setting would look like Figure 5-15.
You can also have the importer clean up any unneeded HTML, if you wish. For example, if your files came from Microsoft Word or Frontpage, they're probably littered with extraneous div tags, smart tags, and class attributes. To clean them up, choose Yes under the Clean up bad (Word, Frontpage) HTML heading, then specify the HTML tags and attributes that should be allowed. Any tags and attributes not in these lists will be removed. A list of suggested tags and attributes is provided, along with an extra set that you should include if your content contains data tables.

You can select the title tag the same way you chose your content area, as shown in Figure 5-15. You can have the importer remove common words or phrases from your titles. Remember that your site title will be added automatically to your WordPress posts and pages (depending on your theme; see Chapter 7). If it's part of your HTML files' <title> tags, for example, you'll need to remove it now to avoid duplication on your WordPress site.
The metadata section (also shown in Figure 5-15) is where you can specify all the little details: whether you want to import the files as posts or pages, which user should be listed as the author, and what the categories and tags (for posts) or page parent (for pages) should be. You can also choose whether to use the meta description tag's contents as excerpts.
If you have created custom taxonomies for your site (which I'll go over in Chapter 12), you'll see fields for those as well.
Once you've filled in all that information, press the Import button at the bottom of the page and sit back! If you have many files, this might take a minute or two. When the importer has finished, it will display a list of the imported files (Figure 5-16) with any errors noted. It will also give you a set of rewrite rules that, with some slight modifications, you can use in your .htaccess file to redirect visitors from your old files to your new WordPress posts or pages. The original paths won't be exact, especially if you moved the files into a temporary directory while importing them, but you should be able to correct them with a simple search and replace.

If the site you're importing has a news section, keep in mind that you could import those files as posts, then remove them from your import directory, and import the rest of the files as pages.
No matter which import tool you used, there's a good chance you'll see some errors in your newly imported content. If you've switched domains, you'll need to change all your internal links and media file paths. There's also a common (and particularly nasty) problem with posts that are garbled or cut off mid-sentence after importing.
If the site you imported lived on another domain, your content is probably full of internal links that contain the old URL. You'll need to search and replace the URL in your old posts and pages. If you've installed the Search & Replace plugin, this will be easy. The plugin's search screen is located at Settings

Most of the importers will copy the contents of your posts verbatim. That means that if you have any files linked within your old content (images, MP3s, documents), those links won't change. In addition to changing the domain, if necessary, you'll need to update the paths to your files (Figure 5-18).
If all your links were root-relative (/images/photo.jpg), it should be easy to perform a search and replace to accommodate any changes in your directory structure, or you could simply copy your old files to your new site with the directory structure intact. If, however, you had file-relative links (../../images/photo.jpg), you'll have to do a couple of passes to change them all. Do yourself a favor and take this opportunity to make them root-relative!

After importing from another site, you might find that some of your posts or pages are filled with garbage characters or inexplicably cut off. What happened?
The key to the problem is this line in your wp-config.php file:
define('DB_CHARSET', 'utf8'),Most likely, your old database used a different character set than your new one. Garbage characters can appear when the import script incorrectly translates the character sets. Your posts might also be truncated at the point where an unrecognized character appeared: a curly quote, an em dash, anything that might have been stored as text and not an encoded HTML equivalent.
There's no easy way to fix this once it's happened. If you don't think the truncation problem is widespread, find one of the truncated articles and take a look at the original version from your old database. Find the character that's causing the problem, and search your old site for it. For all the results you find, just copy the remainder of the article by hand. WordPress does know how to handle special characters, and will encode them correctly once you save your post or page.
If the problem is widespread, there's nothing to do but start over. Try to convert the original database's character set to the same one your WordPress database is using. (Make a backup first!) Then run your import again.
In this chapter you've learned how to import content from WordPress.com, Blogger, Joomla (or Mambo), Drupal and other MySQL-based content management systems, and even static HTML files. I've also shown you how to clean up broken links and truncated content in your imported data.
Now that you have moved all your old content into WordPress, it's time to begin dressing up your new site. In the next chapter, you'll learn how WordPress theme files work and how to create your own custom theme.