In the preceding chapters, I've shown you how to bend posts, pages, categories, and tags to your needs. However, these types of content aren't always sufficient, and sometimes it's just not feasible to have several kinds of content jumbled together under Posts.
In this chapter, I'll show you how to use custom taxonomies to create separate groups of categories and tags for your existing content. Then I'll show you how to create whole new content types. Finally, I'll show you how to extend content types (including posts and pages) with custom fields for even more flexibility.
If you want to get custom post types and/or taxonomies up and running quickly on your site, try the Custom Post Types UI plugin. It provides a simple user interface for managing both content types and taxonomies. If, however, you're creating content types and taxonomies as part of a plugin for a more portable solution, read on!
First, some terminology. A taxonomy is a group of terms. Terms are individual choices. For example, Post Tags is a taxonomy, and each tag is a term within that taxonomy. Likewise, Post Categories is a taxonomy, and each category is a term. Each taxonomy has a label, a slug, and a description. Individual terms also have labels, slugs, and descriptions. You've seen this before when creating a new category.
Custom taxonomies were introduced in version 2.3, but there was no built-in user interface for them until version 2.8, and very few developers used them. In 2.8, UI support for non-hierarchical taxonomies was added. In 3.0, hierarchical taxonomies are now supported as well, which means you don't have to do the work of creating meta boxes and saving taxonomy terms to the database; WordPress does all that for you. All you have to do is register your new taxonomy and define its labels.
Creating a new taxonomy requires just one function: register_taxonomy(). However, the arguments can get a little complicated, and there's a bit more work you have to do to make permalinks work. Listing 12-1 shows all the possible arguments for a new taxonomy.
Example 12-1. Registering a new taxonomy
register_taxonomy(
        'people', //Taxonomy name
        array('attachment:image', 'attachment:video', 'attachment:audio', 'post', 'page'),
 //Content object type
        array(
                  'labels'=>array(
'name'=>__('People'),
'singular_name'=>__('Person'),
),
'helps' => __('Separate names with commas.'),
'rewrite' => array('slug' => 'person'),
'query_var' => true,
'show_ui' => true,
'show_tagcloud' => true,
'hierarchical' => false,
)
);Let's break down these arguments:
Taxonomy name: an internal name for the new taxonomy.
Content object type: the types of content that can use this taxonomy. This argument can be a string containing a single content type or it can be an array of several content types, as shown in Listing 12-1.
Other arguments: an array containing:
labels: an array containing the name (plural) and the singular name. These provide the text for the administration screens' navigation menu item (beneath Categories and Post Tags) leading to the management page for this taxonomy; and the title for the taxonomy's meta box on the Post

helps: the instructive text that appears below the entry field on the Post
rewrite: possible values are:
False: no permalink rules will be created for this taxonomy.
True: the permalink structure will be
/?taxonomy =termin the default structure or/taxonomy/termusing any other permalink structure.Array containing a slug: the slug will be used in place of the taxonomy name. (See Listing 12-2 for examples of each rewrite method.)
query_var: possible values are:
False: this taxonomy will not be available in custom queries
True: you can use the taxonomy name in queries. In this case, query_posts('genre=fantasy'), would return any books tagged with "fantasy" as the genre, as shown in Figure 12-6.
String: the given string will be the query variable rather than the taxonomy name. (See the Authors taxonomy in Listing 12-2 for the proper syntax.)
show_ui: whether or not the management screens and meta boxes should be shown for this taxonomy. Defaults to true. You could set this to false if you were creating a hidden taxonomy that would be used in your plugin code, but never by users.
show_tagcloud: whether this taxonomy should be an option in the tag cloud widget. (See Figure 12-3.) Defaults to the value of show_ui. Applies only to non-hierarchical taxonomies.
hierarchical: whether this taxonomy should be hierarchical (category-like) or non-hierarchical (tag-like). Defaults to false (tag-like).
The resulting People taxonomy meta box is shown in Figure 12-1.

You can register as many new taxonomies as you need. Let's start with some tag-like, non-hierarchical ones.
Non-hierarchical taxonomies are just like tags. They don't have parent/child relationships. The meta box added to the Post
To illustrate, let's create the taxonomies for a hypothetical site listing books that are part of a series. For this project, you want separate taxonomies for the genre, the series status, and the author(s) of the books (as opposed to the post author). Keep the regular post tag field—use it for general keywords associated with the books.
Listing 12-2 shows the new taxonomies you'll use to create the series books site. Since there are three of them, wrap them into a single function, which is called using the init() action hook. (This is exactly how the built-in taxonomies are created.)
In addition to creating the taxonomies themselves, you must flush the rewrite rules (which are cached) in order for the new rewrite rules to take effect. Since this needs to be done just once, wrap it up in a plugin activation function. This function calls create_book_series_tax() once to get all the new rewrite rules into place, then flushes the rewrite rules. This forces the list of rewrite rules to be rebuilt, and the new ones will be included.
Example 12-2. Creating the series book taxonomies
<?php
/*
Plugin Name: Series Book Taxonomies
*/

add_action('init', 'create_book_series_tax'),
register_activation_hook( __FILE__, 'activate_book_series_tax' );

function activate_book_series_tax() {
        create_book_series_tax();
        $GLOBALS['wp_rewrite']->flush_rules();
}

function create_book_series_tax() {
        register_taxonomy(
                'genre',
                'post',
                array(
                        'labels' => array(
                                'name' => __('Genres'),
                                'singular_name' => __('Genre'),
),
                         'helps' => __('Separate genres with commas.'),
                )
        );
        register_taxonomy(
                'author',
               array('attachment:image', 'attachment:video', 'attachment:audio', 'post', 'page'),
               array(
                       'labels'=> array(
'name'=>__('Authors'),
'singular_name'=>__('Author'),
),
'helps' => __('Separate authors with commas.'),
'rewrite' => array('slug' => 'author'),
'query_var' => 'author',
)
);
register_taxonomy(
'status',
'post',
array(
'labels' => array(
'name' =>__('Completion Status'),
'singular_name'=>__('Status'),
),
'helps' => __('Enter the series status (completed, ongoing, etc.).'),
)
);
}
?>Here, you omit all the arguments that would be set to their default values (rewrite, query_var, show_ui, show_tagcloud, and hierarchical) except on the Authors taxonomy, where I've demonstrated how you would change the rewrite and query slugs if you wanted to. I also used the Authors taxonomy to show how you could add a taxonomy to more than one type of content. In this case, it's possible that your site will include photos of an author, or even a video or sound file. You've added all the possible content types. (Custom taxonomies don't work for links.)
Figure 12-2 shows the resulting meta boxes on the Post


Hierarchical taxonomies are like categories. They can have parents and children, and the meta box on the Post
For the book series site, you might want your users to classify things in fine-grained subgenres, not just the major categories one would find in a bookstore. To do this, just add one line of the register_taxonomy() arguments, as shown in Listing 12-3. Since helps ("Separate genres with commas") are not shown for hierarchical taxonomies, remove that argument.
Example 12-3. Changing Genres to a hierarchical taxonomy
register_taxonomy(
        'genre',
        'post',
        array(
                'labels' => array(
                        'name'=>__( 'Genres' ),
                        'singular_name'=>__( 'Genre' ),
               ),
    'hierarchical' => true,
        )
);
Figure 12-5 shows a post with the altered Genres taxonomy meta box. You've added a few more genres, too. The Categories meta box is still present; here, it's just out of view, near the bottom of the screen. Figure 12-6 shows the management screen for the Genres taxonomy, which now looks just like the category management screen.


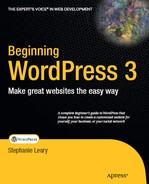
If you publish the Harry Potter post shown in Figure 12-2, you can then browse to your archive page using the permalink structure you created and one of the terms you assigned. In this case, /genre/fantasy results in the archive page shown in Figure 12-7.

As you can see, this archive page is a little generic. The Twenty Ten theme does not include a taxonomy archive template, so the title of the page is simply "Blog Archives." In order to fix it up, you can either add a conditional statement checking is_tax() to your generic archive.php template, or you can create a taxonomy.php template. Let's use the latter option. Listing 12-4 shows a basic taxonomy template for Twenty Ten.
Example 12-4. A new taxonomy.php file for the Twenty Ten theme
<?php get_header(); ?>

                <div id="container">
                        <div id="content">

<?php the_post(); ?>
                 <h1 class="page-title">
                 <?php
                 $term = get_term_by( 'slug', get_query_var( 'term' ), get_query_var( 'taxonomy' ) );
                        echo ucwords($term->taxonomy) . ': ' . $term->name;
                     ?></h1>

<?php rewind_posts(); ?>

<?php get_generic_template( 'loop', 'archive' ); ?>

                                </div><!-- #content -->
                     </div><!-- #container -->

<?php get_sidebar(); ?>
<?php get_footer(); ?>
All that's changed from archive.php is that you've removed the date-based conditionals and replaced the standard title with a bit of code that fetches the current taxonomy and term. Here, you've added PHP's ucwords() function to make sure the taxonomy name is uppercase, no matter how the user entered it. This changes the archive title in Figure 12-6 to "Genre: Fantasy." That's still rather lackluster; you can do better.
Listing 12-5 shows a revised heading tag. You can put this in a taxonomy-genre.php file, where you know your grammar will be correct for any of the genre terms.
Example 12-5. The <h1> heading in taxonomy-genre.php
<h1 class="page-title">
        <?php
           $term = get_term_by( 'slug', get_query_var( 'term' ), get_query_var( 'taxonomy' ) );
           echo 'Posts in the '.$term->name.' '.$term->taxonomy;
?></h1>
This gives provides the "Posts in the Fantasy genre" which is much better.
It would also be nice to include the taxonomies in the post's meta data alongside the categories and post tags. You could use the_taxonomies(), but this function is indiscriminate and prints all the taxonomies, including the built-in ones. There's no way to limit it to a particular taxonomy. Its output for the Harry Potter post is shown in Listing 12-6.
Example 12-6. Result of the_taxonomies()
Categories: Main. Post Tags: boarding schools, magic, and wizards. Genres: Fantasy and Young Adult. Authors: J. K. Rowling. Completion Status: completed.
To list just one taxonomy at a time with better control over the output, add them to the template individually, using get_the_term_list() as shown in Listing 12-7. This function won't print anything if there are no terms associated with the post, so you don't need to check first to see if it's empty.
Example 12-7. Listing the terms of a particular taxonomy alongside categories and tags
<p>Posted in <?php the_category(',') ?>
<?php echo get_the_term_list( $post->ID, 'series', 'in the series ', ', ', '' ); ?></p>
<?php if ( the_tags('<p>Tagged with ', ', ', '</p>') ) ?>
WordPress doesn't provide an archive page for a taxonomy as a whole. That is, there's no page automatically built that will list all the terms used in a particular taxonomy; you have to build one yourself. Listing 12-8 shows how to create a linked list of all the terms in a particular taxonomy.
Example 12-8. Listing taxonomy terms
<ul id="authors">
   <?php
           $authors = get_terms('authors'),
           foreach ($authors as $author) { ?>
                <li><a href="<?php echo get_term_link( $author, 'authors') ?>"><?php echo $author->name; ?></a> <span class="comments"><?php echo $author->description; ?></span>  </li>
<?php } ?>
</ul>
You could turn that into a widget or just put it into a sidebar. For the purpose of demonstration, however, let's add a page template containing this code in place of the content. The result is shown in Figure 12-8.

There's also no built-in way to display all the taxonomies. The get_taxonomies() function will display them, but it includes all the registered taxonomies, including the defaults, as shown in Listing 12-9.
Example 12-9. Listing all registered taxonomies
<ul id="taxonomies">
<?php
           $taxes = get_taxonomies();
           foreach ($taxes as $tax) echo '<li>'.$tax.'</li>';
?>
</ul>
If you're using the series books taxonomies, the list will be:
category
post_tag
nav_menu
link_category
genre
author
status
To remove the built-in taxonomies from the list and show only the custom taxonomies you've created, use the taxonomies' _builtin argument. It's a private argument intended for WordPress's internal use, but since you're not abusing it to create your own "built-in" taxonomy, you can use it to filter your taxonomy list, as shown in Listing 12-10.
Example 12-10. Listing only custom taxonomies
<ul id="taxonomies">
<?php
           $taxes = get_taxonomies(array('_builtin' => false));
           foreach ($taxes as $tax) echo '<li>'.$tax.'</li>';
?>
</ul>
Now the result is more useful:
genre
author
status
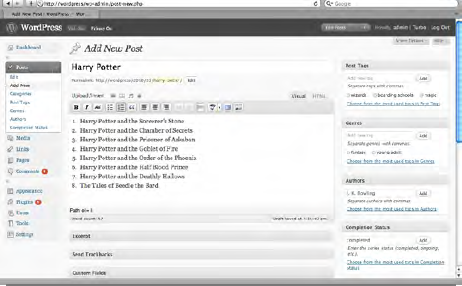
The Taxes plugin (core.trac.wordpress.org/attachment/ticket/6357/taxes.php) was written a few years ago to demonstrate the then-new taxonomy features. It provides a way to tag all your content—posts, pages, and media uploads—with people's names, much like the tagging features on Flickr and Facebook. Figure 12-9 shows what the media uploader looks like with the People taxonomy included.
The Series plugin is another great example. It's used to organize posts that are part of an ongoing series, as shown in Figure 12-10.

Here you can see why you might want to create taxonomy-specific archive templates. Your site might not be as mixed up as the demo, but here's the genre tag cloud appearing on the tutorial series archive page. If you don't really need to create a whole new template file, you might use conditional tags to include different sidebars for each.
While custom taxonomies provide a powerful way to organize posts, sometimes that organization just isn't enough. For a blogger, using posts for movie and book reviews as well as slice-of-life vignettes might suffice, but posts and pages can be too limiting a framework for more complex sites.
WordPress 3.0 provides methods of creating whole new content types. New types can be hierarchical, like pages, or non-hierarchical, like posts. As you create the new types, you can choose which attributes (revisions, thumbnails, etc.) they support. And, of course, you can assign taxonomies to your custom types.
Note
Custom content types are also referred to as custom post types throughout the WordPress documentation, since posts are the underlying basis for all other content types.
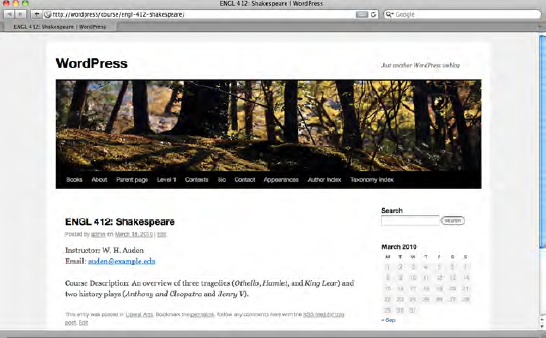
Let's consider a real-world scenario: a university department site containing information about specific courses as well as news updates (the blog) and informational pages (hours and location, a staff directory, etc.). Without custom content types, the choice lies between posts and pages. Since the office would like to publish a feed of all the honors courses available (and individual feeds for each college), they have elected to use posts to store the course information. Figure 12-11 shows a typical course post.

You can make this office's workflow a lot better using a custom content type for the courses. In WordPress 3.0, creating new content types is as easy as creating new taxonomies. The register_post_type() function looks an awful lot like register_taxonomy(), and many of its attributes work the same way. Listing 12-11 shows a sample content type with all the possible arguments.
Example 12-11. Creating a new content type
register_post_type(
        'mytype',
        array(
                'labels' => array(
                        'name' => __( 'My Types' ),
                        'singular_name' => __( 'My Type' ),
                ),
                'public' => true,
                'supports' => array(
                        'title',
                        'editor',
                        'author',
                        'excerpts',
                        'custom-fields',
                        'revisions',
                        'thumbnail')
                   )
          );
register_taxonomy_for_object_type('category', 'mytype'),
register_taxonomy_for_object_type('post-tag', 'mytype'),
?>
As with taxonomies, the post types are created with a handle and an array of attributes. Here are all of the possible attributes:
labels: an array containing the names of the content type in their plural ('name') and singular ('singular_name') forms.
description: a short description of the content type. Empty by default.
public: whether this content type should be shown in the admin screens. False (hidden) by default.
exclude_from_search: whether content of this post type should be excluded from search results. By default, inherits the value of public.
publicly_queryable: whether queries can be performed using the post_type argument. By default, inherits the value of public.
show_ui: whether Edit and Add New screens should be added for this post type. By default, inherits the value of public.
inherit_type: if you would like the new type to use the capabilities of an existing type, use this argument to set it.
capability_type: content type for read_, edit_, and delete_ capabilities. Post is the default type used if no other is specified. You can use this argument to create a whole new set of capabilities specific to the new content type (e.g. 'course').
capabilities: an array of capabilities ('edit_post,' 'delete_post,' 'publish_posts'). If you created a new capability_type, these values will default to the standard post capabilities with the name of your content type substituted for 'post' (e.g. 'edit_course,' 'delete_course,' 'publish_courses').
hierarchical: whether the post type is hierarchical (page-like). False (post-like) by default.
Supports: as a substitute for calling the
add_post_type_support()function, list supported features here. Defaults to none. The possible features are:author: the user writing the custom entry
title: whether this content type includes a title
editor: whether the visual/HTML content textarea and media uploader should be used
excerpts: whether the excerpts field should be used
thumbnail: whether this content type should include image thumbnails
comments: whether comments will be accepted for this content type
trackbacks: whether trackbacks will be accepted for this content type
custom-fields: whether the Custom Fields box will be shown and custom fields automatically saved.
revisions: whether revisions will be stored and displayed.
page-attributes: the Page Attributes box, containing the parent, template, and menu order options.
register_meta_box_cb: the name of a callback function that will set up any custom meta boxes for the edit screens. This function should contain any
remove_meta_box()andadd_meta_box()calls.Taxonomies: an array of taxonomy names that will be used by the content type. Default is none. You can register taxonomies later with
register_taxonomy()orregister_taxonomy_for_object_type().
Note that public is true by default for taxonomies but is false by default for post types. The query_vars, rewrite, and show_ui attributes all inherit from public, so be sure to set public to true (or turn on each of those items individually).
Let's start transforming the courses by creating a new content type for a university. Listing 12-12 shows a simple plugin that creates a new nonhierarchical content type—something very similar to posts. As with register_taxonomy(), you don't have to include arguments if you plan to use the default values.
Example 12-12. Creating a non-hierarchical content type for courses
function post_type_courses() {
        register_post_type(
                'course',
               array(
                        'labels' => array(
                                'name' => __( 'Courses' ),
                                'singular_name' => __( 'Course' ),
                        ),
                        'public' => true,
                        'supports' => array(
                                'title',
                                'editor',
                                'author',
                                'excerpt',
                                'custom-fields',
                                'revisions',)
                           )
                 );
        register_taxonomy_for_object_type('category', 'course'),
}
In this case, you've decided that the course type should not support comments or trackbacks and will use categories but not tags.
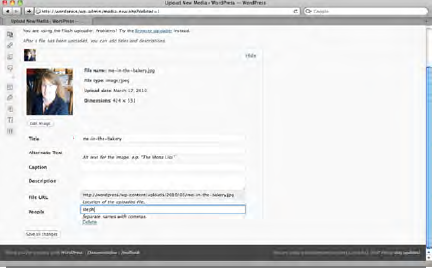
If you activate this little plugin, your navigation menu will immediately gain a new section just below Comments: Courses, with options to edit, add a new course, or manage course categories (Figure 12-12). Tags aren't shown because you didn't add post_tag to the list of fields this content type supports. Also, note that "Series" appears under Posts, but not Courses. (The Series plugin was still activated from another project, and the plugin's taxonomy is assigned only to posts.)
Now you need to change your old course posts to the new course content type. All content types are stored in the wp_posts table, and the only difference at the database level is the post_type field. If you don't want to copy and paste all your old posts into the new content type, you could just edit the database records directly (Figure 12-13) or write a SQL query to do this for all the posts you need to convert.

Now, go to Courses
Now you have a post-like content type for your courses. However, the office might need to create several related entries for each course: a general overview, a syllabus, and a reading list. In that case, it would make more sense to create the courses as hierarchical content types, like pages.
A hierarchical content type can have children, just as pages do. Listing 12-13 shows how to revise the plugin created in Listing 12-12 to make courses hierarchical.
Example 12-13. Creating a non-hierarchical content type for courses
<?php
/*
Plugin Name: Course Post Types
*/

/* Content Types */

add_action('init', 'post_type_courses'),

function post_type_courses() {
        register_post_type(
                'course',
                array(
                        'labels' => array(
                                'name' => __( 'Courses' ),
                                'singular_name' => __( 'Course' ),
                       ),
                       'public' => true,
                       'show_ui' => true,
                               'rewrite' => true,
                               'query_var' => true,
                    'hierarchical' => true,
                               'supports' => array(
                                       'title',
                                       'editor',
                                       'author',
                                       'excerpt',
                                       'custom-fields',
                                       'revisions',
                            'page-attributes',
                          )
               );
      register_taxonomy_for_object_type('category', 'course'),
}
?>
Now your editing screen will look more like a page, as shown in Figure 12-16. And, since you now have the Attributes meta box, you can choose parents.

Let's say the department in question is the Honors office. This office tracks the Honors courses offered in each college. Before custom content types came along, they would use categories for each college, but those categories were mixed in with the general blog categories (news, scholarships) and the office's podcast.
You can instead use a custom taxonomy for your colleges. Once you've created the taxonomies, you have to register them for the course content type. Listing 12-14 shows the complete revised plugin. You've removed the standard category taxonomy and replaced it with a new one, colleges, which is defined below.
The resulting changes to the Courses
Example 12-14. Adding custom taxonomies to the course content type
<?php
/*
Plugin Name: Course Post Types
*/

/* Content Types */

add_action('init', 'post_type_courses'),

function post_type_courses() {
register_post_type(
'course',
array(
'labels' => array(
'name' => __( 'Courses' ),
'singular_name' => __( 'Course' ),
),
'public' => true,
'supports' => array(
'title',
'editor',
'author',
'excerpt',
'custom-fields',
'revisions',)
)
);
register_taxonomy_for_object_type('college', 'course'),
}
/* Taxonomies */
add_action('init', 'create_course_series_tax'),
register_activation_hook( __FILE__, 'activate_course_series_tax' );
function activate_course_series_tax() {
create_course_series_tax();
$GLOBALS['wp_rewrite']->flush_rules();
}
function create_course_series_tax() {
register_taxonomy(
'college',
'course',
array(
'labels' => array(
'name' => __( 'Colleges' ),
'singular_name' => __( 'College' ),
),
'hierarchical' => true,
)
);
}
?>
Since you've added the college taxonomy to the course content type, it would be great if you could see the colleges on the Edit Courses screen. Adding columns to the edit screen is a two-step process: first, define the column headers, and second, define the contents of the new column.
The code to add a new column is fairly simple. Listing 12-15 shows how to add a column for the college taxonomy to the Edit Courses screen.
Example 12-15. Changing column headers for the course content type
/* Custom Edit Columns */
add_filter("manage_edit-course_columns", "course_taxonomy_columns");

// rearrange the columns on the Edit screens
function course_taxonomy_columns($defaults) {
         // insert college taxonomy column
         $defaults['colleges'] = __('Colleges'),
         return $defaults;
}
First, you call the appropriate filter, in this case manage_edit-course_columns(). (Replace 'course' with the name of your content type.) You're filtering an array containing the names of the column headings. To add a column, all you have to do is add an item to the array. However, that would place this column at the far right side of the table, after the comment and date columns. To make this page look more like the Edit Posts screen, you need to rearrange the columns, as shown in Listing 12-16.
Example 12-16. Rearranging column headers
add_filter("manage_edit-course_columns", "course_taxonomy_columns");

// rearrange the columns on the Edit screens
function course_taxonomy_columns($defaults) {
         // preserve the default date and comment columns
         $comments = $defaults['comments'];
         $date = $defaults['date'];

         // remove default date and comments
         unset($defaults['comments']);
         unset($defaults['date']);

         // insert college taxonomy column
         $defaults['colleges'] = __('Colleges'),

         // restore default date and comments
         $defaults['comments'] = $comments;
         $defaults['date'] = $date;

return $defaults;
}
In this example, the first thing you need to do is preserve the contents of the comment and date columns, so you don't have to recreate them from scratch later. (The comment column contains an image rather than just text.) Next, remove these two columns from the array. Then, add your custom column, colleges. Finally, add back the original columns in the order in which you want them to appear.
The resulting column arrangement is shown in Figure 12-18.

Now that your new column is in place, you need to fill it with some information—in this case, the list of colleges chosen for each course. Listing 12-17 shows the necessary filter.
Example 12-17. Displaying the college taxonomy terms in the new Edit screen column
add_action("manage_pages_custom_column", "course_taxonomy_custom_column");
// for non-hierarchical content types, use the following instead:
// add_action("manage_posts_custom_column", "course_taxonomy_custom_column");

// print the college taxonomy terms, linked to filter the posts to this taxonomy term only
function course_taxonomy_custom_column($column) {
        global $post;
        if ($column == 'colleges') {
                $colleges = get_the_terms($post->ID, 'college'),
                if (!empty($colleges)) {
                        $thecolleges = array();
                        foreach ($colleges as $college) {
                                $thecolleges[] = '<a
href="edit.php?post_type=course&college='.$college->slug.'>' .
esc_html(sanitize_term_field('name', $college->name, $college->term_id, 'college', 'display')) .
"</a>";
                        }
                        echo implode(', ', $thecolleges);
                }
        }
}
Here, you use a couple of if() statements to make sure that you're working with the proper column and that the course is assigned to at least one college. Then, you build an array of links based on the URLs on the Edit screens for other content types. These links would filter the list of courses to the chosen college, just as you'd expect. Finally, once the foreach() loop has finished, you use implode() to print the list of links separated by commas.
Figure 12-19 shows the completed Edit Courses screen.

To create a single archive page for a custom content type, all you have to do is create another file in your theme directory, single-type.php. However, there is no built-in way to create a dedicated archive for a custom content type. To work around this, you must use a page template. Listing 12-18 shows an example archive template for Twenty Ten. Save this to your theme directory, then create a new page called Course Archives and choose this file as its page template (Figure 12-20).
Example 12-18. A content archive page template for courses
<?php
/*
Template Name: Custom Content Archive
*/

$wp_query = null;
$wp_query = new WP_Query();
$wp_query->query('post_type=course'),
$posts = null;
$posts = $wp_query->posts;
?>

<?php get_header(); ?>


<div id="container">
        <div id="content">

<?php if ($wp_query->have_posts() ) : while ($wp_query->have_posts() ) : $wp_query->the_post(); ?>
           <div id="post-<?php the_ID(); ?>" <?php post_class(); ?>>
                   <h1 class="entry-title"><?php the_title(); ?></h1>
                   <div class="entry-content">
                              <?php the_content(); ?>
                   </div><!-- .entry-content -->
           </div><!-- #post-<?php the_ID(); ?> -->
<?php endwhile; endif; ?>

        </div><!-- #content -->
</div><!-- #container -->

<?php get_sidebar(); ?>
<?php get_footer(); ?>
This template includes an alternative method of creating custom Loops that you haven't seen before. In this case, since you don't want to just modify the standard query—that would get posts as well as courses—you need to create a whole new query object, then call the have_posts() and the_post() functions as methods of this new object. (In fact, those functions always were methods of the $wp_query object, but like most things about the Loop, that part was invisible to you as long as you were working with the standard query.) Once you've set up the_post(), you can use all the usual content-related template tags.
The resulting archive page is shown in Figure 12-21.
Justin Tadlock has demonstrated how to add custom content types to a home page and main feed (justintadlock.com/archives/2010/02/02/showing-custom-post-types-on-your-home-blog-page). You can adapt his code, as shown in Listing 12-19, to show courses in the home page. This function and filter can go in the custom content plugin you created in Listing 12-12 or your theme's functions.php file.

You can use the pre_get_posts() filter to include custom content types in feeds as well as the home page. The required change is shown in Listing 12-20.
Example 12-20. Showing the course content type alongside posts in the site feed
add_filter( 'pre_get_posts', 'my_get_posts' );

function my_get_posts( $query ) {
        if ( is_home() || is_feed() )
                $query->set( 'post_type', array( 'post', 'course' ) );
        return $query;
}
However, for the Honors office, it would make more sense to separate the courses from the posts feed, which is used for office news.
As you saw in Chapter 4, there are many feeds that aren't publicized in WordPress. You can use a query string format similar to the one you used for searches to get feeds of your custom content types. The post_type parameter given should match the name of your custom content type. You can even combine content types using the parameters instead of filters. Table 12-1 lists some of the possible feed URLs for custom content types.
Table 12-1. Course content type feeds in WordPress
Feed Type | Default URL | Clean URL |
|---|---|---|
RSS 2.0 (default) | /?feed=rss2&post_type=course | /feed/?post_type=course /feed/rss2/?post_type=course |
Atom 1.0 | /?feed=atom&post_type=course | /feed/atom/?post_type=course |
RSS 0.92 | /?feed=rss&post_type=course | /feed/rss/?post_type=course |
RDF | /?feed=rdf&post_type=course | /feed/rdf/?post_type=course |
Combining content types | /?feed=rss2&post_type=course,post,page | /feed/?post_type=course,post,page |
Let's take a closer look at the content of the course in Figure 12-17. There are really three distinct pieces of information lumped into that textarea: the instructor's name, his e-mail address, and a brief description of the course. Furthermore, the title field contains the university's internal code (ENGL 412) as well as the actual course title. What if the office asks you to create a table of honors courses with the code and the title in separate, sortable columns? There's no good way to separate that data with the standard WordPress fields.
The course description can stay in the content field, but the course code, instructor name, and e-mail address would all be better off in separate custom fields. However, the standard custom field interface is not very friendly, and the office's administrative assistant is not going to find it intuitive. You ought to provide a better interface for adding this information.
First, you have to modify your post type function to add a callback. This is the name of the function that will add (and/or remove) custom meta boxes from the Edit screen. Listing 12-21 shows the change.
Example 12-21. Updating the post_type_courses() function to include callback argument
function post_type_courses() {
        register_post_type(
                'course',
                array(
                        'labels' => array(
                                'name' => __( 'Courses' ),
                                'singular_name' => __( 'Course' ),
                       ),
                       'description' => __('Individual course data'),
                       'public' => true,
                       'show_ui' => true,
              'register_meta_box_cb' => 'course_meta_boxes',
                       'supports' => array(
                               'title',
                               'editor',
                               'author',
                               'excerpt',
                               'custom-fields',
                               'revisions',)
                          )
                  );
        register_taxonomy_for_object_type('college', 'course'),
}
Then you need to add the course_meta_boxes() function, as shown in Listing 12-22. You'll add a whole new section to the Course Post Types plugin to handle the custom meta boxes, and this will be the first part of that section.
Example 12-22. The callback function that adds meta boxes
/* Custom Fields */

function course_meta_boxes() {
        add_meta_box( 'course_code_meta', __('Course Code'), 'course_code_meta_box', 'course', 'normal', 'high' );
        add_meta_box( 'instructor_meta', __('Instructor'), 'instructor_meta_box', 'course', 'normal', 'high' );
}
This function adds two meta boxes, one for the course code and one for the instructor information. The course code box will contain one text field for the code. The instructor box will contain two fields, the name and the e-mail. The arguments of add_meta_box() are:
Handle: a unique name for this meta box, for your internal use
Callback: the name of the function that will print the contents of the box
Post type: the names of all the post types that will use this box. To have the box appear on a page as well as a course, you would have used
array('course','page')here.Section: which part of the Edit screen this box will appear in by default (normal, advanced, or side)
Priority: how high the box should appear within its section (high, normal, or low)
Next, create the callback functions that print each meta box, as shown in Listing 12-23.
Example 12-23. Printing the meta boxes
function course_code_meta_box() {
        global $post;
        $code = get_post_meta($post->ID, '_course_code', true);
        if ( function_exists('wp_nonce_field') ) wp_nonce_field('course_code_nonce', '_course_code_nonce'),
?>
     <label for="_course_code">Course Code (e.g. ENGL 101)</label>
     <input type="text" name="_course_code"
                value="<?php echo wp_specialchars(stripslashes($code), 1); ?>" />
<?php
}

function instructor_meta_box() {
        global $post;
        $name = get_post_meta($post->ID, '_instructor_name', true);
        $email = get_post_meta($post->ID, '_instructor_email', true);
        if ( function_exists('wp_nonce_field') ) wp_nonce_field('instructor_nonce', '_instructor_nonce'),
?>
      lt;label for="_instructor_name">Name</label>
      <input type="text" name="_instructor_name"
                 value="<?php echo wp_specialchars(stripslashes($name), 1); ?>" />
      <label for="_instructor_email">Email</label>
      <input type="text" name="_instructor_email"
                 value="<?php echo wp_specialchars(stripslashes($email), 1); ?>" />
<?php
}
Each function simply prints the form fields within the meta box. To make sure the field values are populated with any previously saved data, call get_post_meta(), which requires three arguments: the post ID, the meta key, and a true/false value determining whether the function should return a single value or all values stored with that key for the post.
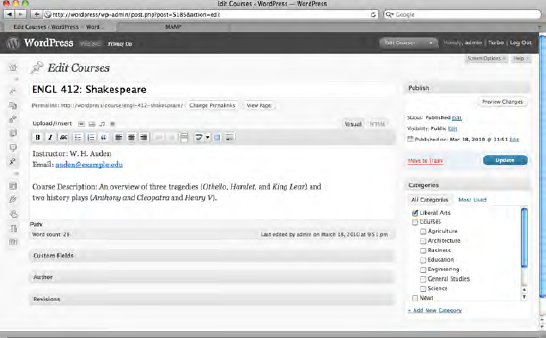
The resulting Edit Course screen is shown in Figure 12-22.

In this case, you use meta key names that begin with underscores. If you hadn't, you would see each of these three custom fields in the Custom Fields meta box in addition to your new meta boxes, as shown in Figure 12-23. WordPress will not print meta fields whose keys begin with underscores; they are considered hidden.

You might have noticed that these form fields contain nonces (codex.wordpress.org/Wordpress_Nonce_Implementation). A nonce is a number used once, and it's a security precaution you didn't have to take when you created plugins because you were using the settings API, which handled all that for you. Here, you aren't registering any settings. Instead, you are saving user input directly to the database, and you need to verify that the data in $_POST came from a valid source. In order to do that, you create a nonce for each box. The wp_nonce_field() function creates a hidden form field. It can take just one argument, a key you use to check the value later ('course_code_nonce'). If you were using just one nonce, you could leave it at that, and the field's name would be _wp_nonce by default. However, in this form you have two nonces, and you need to give each one a unique name, so you use a second argument to do so.
Finally, you have to write a function to save your custom field data when the post is saved. Anything in the standard meta box would be handled automatically, but custom meta box fields must be updated manually, as shown in Listing 12-24. You need to make sure this function runs every time a post is saved, so use the save_post() action hook.
Example 12-24. Saving the meta box fields
add_action( 'save_post', 'save_course_meta_data' );

function save_course_meta_data( $post_id ) {
        global $post;

        // ignore autosaves
        if (defined('DOING_AUTOSAVE') && DOING_AUTOSAVE) return $post_id;

        // check nonces
        check_admin_referer('course_code_nonce', '_course_code_nonce'),
        check_admin_referer('instructor_nonce', '_instructor_nonce'),

       // check capabilites
       if ( 'course' == $_POST['post_type'] && !current_user_can( 'edit_post', $post_id ) )
               return $post_id;

       // save the custom fields, one by one

      // course code field
      // if the field is empty...
      if (empty($_POST['_course_code'])) {
              // see what the original value was
              $storedcode = get_post_meta( $post_id, '_course_code', true );
              // remove it from the database
              delete_post_meta($post_id, '_course_code', $storedcode);
    }
    // if the field isn't empty, we need to save it
    else
           update_post_meta($post_id, '_course_code', $_POST['_course_code']);

// instructor name field
if (empty($_POST['_instructor_name'])) {
$storedname = get_post_meta( $post_id, '_instructor_name', true );
delete_post_meta($post_id, '_instructor_name', $storedname);
}
else
update_post_meta($post_id, '_instructor_name', $_POST['_instructor_name']);
// instructor email field
if (empty($_POST['_instructor_email'])) {
$storedemail = get_post_meta( $post_id, '_instructor_email', true );
delete_post_meta($post_id, '_instructor_email', $storedemail);
}
else
update_post_meta($post_id, '_instructor_email', $_POST['_instructor_email']);
}First, you need to check whether this save_post action is being called as a result of an autosave. If it is, you don't need to process the custom fields yet, so you return the post ID and exit the function.
Next, you need to check the nonces you created in the form field functions. The check_admin_referer() function would usually take just one argument, the key you provided when you created the nonce. However, since you're using two, you need to use the second argument (the unique identifier). If either nonce fails verification, you again exit the function without saving the fields.
There's one last thing you need to check before you can save the fields: the user's capabilities. Back when you created the course content type, you had the option of specifying an edit capability other than edit_post. Since you didn't, that's the capability you need to check here.
Once you know that you're allowed to save the data, you need to check whether there's anything in each field. If there isn't, you call delete_post_meta() to remove its row from the wp_postmeta table. This function requires three arguments: the post ID, the meta key, and the previously stored value. You can again use get_post_meta() to fetch the stored value so you can pass it to delete_post_meta().
If the fields aren't empty, you need to update them. The update_post_meta() function requires the ID, the meta key, and the new value.
That's it! You can now edit and save the custom fields in their own meta boxes instead of the main Custom Fields box.
The complete Course Post Types plugin is shown in Listing 12-25. It registers the course post type, adds the college taxonomy, displays the college taxonomy on the Edit Courses screen, and adds the course code, instructor name, and instructor e-mail meta boxes to the Courses
Example 12-25. The complete Course Post Types plugin
<?php
/*
Plugin Name: Course Post Types
*/

/* Content Types */

add_action('init', 'post_type_courses'),
function post_type_courses() {
register_post_type(
'course',
array(
'labels' => array(
'name' => __( 'Courses' ),
'singular_name' => __( 'Course' ),
),
'description' => __('Individual course data'),
'public' => true,
'show_ui' => true,
'register_meta_box_cb' => 'course_meta_boxes',
'supports' => array(
'title',
'editor',
'author',
'excerpt',
'custom-fields',
'revisions',)
)
);
register_taxonomy_for_object_type('college', 'course'),
}
/* Taxonomies */
add_action('init', 'create_course_series_tax'),
register_activation_hook( __FILE__, 'activate_course_series_tax' );
function activate_course_series_tax() {
create_course_series_tax();
$GLOBALS['wp_rewrite']->flush_rules();
}
function create_course_series_tax() {
register_taxonomy(
'college',
'course',
array(
'labels' => array(
'name' => __( 'Colleges' ),
'singular_name' => __( 'College' ),
),
'hierarchical' => true,
)
);
}
/* Custom Fields */
add_action( 'save_post', 'save_course_meta_data' );function course_meta_boxes() {
add_meta_box( 'course_code_meta', __('Course Code'), 'course_code_meta_box', 'course', 'normal', 'high' );
add_meta_box( 'instructor_meta', __('Instructor'), 'instructor_meta_box', 'course', 'normal', 'high' );
}
function course_code_meta_box() {
global $post;
if ( function_exists('wp_nonce_field') ) wp_nonce_field('course_code_nonce', '_course_code_nonce'),
?>
<label for="_course_code">Course Code (e.g. ENGL 101)</label>
<input type="text" name="_course_code"
value="<?php echo wp_specialchars(stripslashes(get_post_meta($post->ID, '_course_code', true)), 1); ?>" />
<?php
}
function instructor_meta_box() {
global $post;
if ( function_exists('wp_nonce_field') ) wp_nonce_field('instructor_nonce', '_instructor_nonce'),
?>
<label for="_instructor_name">Name</label>
<input type="text" name="_instructor_name"
value="<?php echo wp_specialchars(stripslashes(get_post_meta($post->ID, '_instructor_name', true)), 1); ?>" />
<label for="_instructor_email">Email</label>
<input type="text" name="_instructor_email"
value="<?php echo wp_specialchars(stripslashes(get_post_meta($post->ID, '_instructor_email', true)), 1); ?>" />
<?php
}
function save_course_meta_data( $post_id ) {
global $post;
// ignore autosaves
if (defined('DOING_AUTOSAVE') && DOING_AUTOSAVE) return $post_id;
// check nonces
check_admin_referer('course_code_nonce', '_course_code_nonce'),
check_admin_referer('instructor_nonce', '_instructor_nonce'),
// check capabilites
if ( 'course' == $_POST['post_type'] && !current_user_can( 'edit_post', $post_id ) )
return $post_id;
// save fields
if (empty($_POST['_course_code'])) {
$storedcode = get_post_meta( $post_id, '_course_code', true );delete_post_meta($post_id, '_course_code', $storedcode);
}
else
update_post_meta($post_id, '_course_code', $_POST['_course_code']);
if (empty($_POST['_instructor_name'])) {
$storedname = get_post_meta( $post_id, '_instructor_name', true );
delete_post_meta($post_id, '_instructor_name', $storedname);
}
else
update_post_meta($post_id, '_instructor_name', $_POST['_instructor_name']);
if (empty($_POST['_instructor_email'])) {
$storedemail = get_post_meta( $post_id, '_instructor_email', true );
delete_post_meta($post_id, '_instructor_email', $storedemail);
}
else
update_post_meta($post_id, '_instructor_email', $_POST['_instructor_email']);
}
/* Custom Edit Columns */
add_filter("manage_edit-course_columns", "course_taxonomy_columns");
// rearrange the columns on the Edit screens
function course_taxonomy_columns($defaults) {
// preserve the default date and comment columns
$comments = $defaults['comments'];
$date = $defaults['date'];
// remove default date and comments
unset($defaults['comments']);
unset($defaults['date']);
// insert college taxonomy column
$defaults['colleges'] = __('Colleges'),
// restore default date and comments
$defaults['comments'] = $comments;
$defaults['date'] = $date;
return $defaults;
}
add_action("manage_pages_custom_column", "course_taxonomy_custom_column");
// for non-hierarchical content types, use the following instead:
// add_action("manage_posts_custom_column", "course_taxonomy_custom_column");
// print the college taxonomy terms, linked to filter the posts to this taxonomy term only
function course_taxonomy_custom_column($column) {
global $post;
if ($column == 'colleges') {$colleges = get_the_terms($post->ID, 'college'),
if (!empty($colleges)) {
$thecolleges = array();
foreach ($colleges as $college) {
$thecolleges[] = '<a
href="edit.php?post_type=course&college='.$college->slug.'>' . esc_html(sanitize_term_field('name', $college->name, $college->term_id, 'college', 'display')) . "</a>";
}
echo implode(', ', $thecolleges);
}
}
}
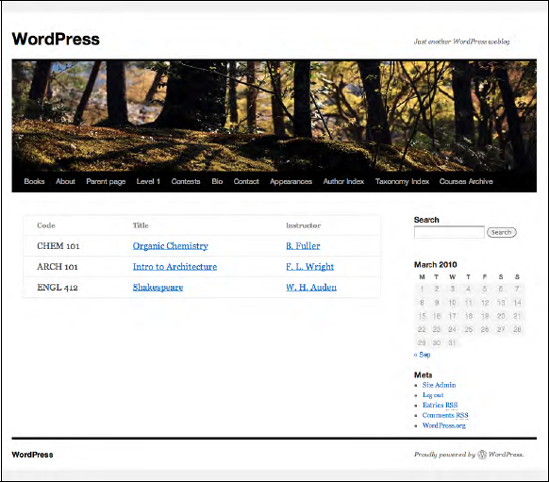
?>Once you've revised the courses to take advantage of the new fields, you also need to modify the single-course.php template. Listing 12-26 shows a revised template that displays the courses in a table, and Figure 12-24 shows the result.
Example 12-26. The new course archive template using custom fields
<?php get_header(); ?>

<div id="container">
        <div id="content">

<?php if ($wp_query->have_posts() ) : ?>
        <table>
                 <thead>
                            <th>Code</th>
                            <th>Title</th>
                            <th>Instructor</th>
                 <thead>
                 <tbody>
<?php
         while (have_posts() ) : the_post(); ?>
      <tr id="post-<?php the_ID(); ?>" <?php post_class(); ?>>
              <td><?php echo get_post_meta($post->ID, '_course_code', true); ?></td>
              <td><a href="<?php the_permalink(); ?>" title="<?php the_title_attribute(); ?>"><?php the_title(); ?></a></td>
              <td><a href="mailto:<?php echo get_post_meta($post->ID, '_instructor_email', true); ?>"><?php echo get_post_meta($post->ID, '_instructor_name', true); ?></a></td>
     </tr>
<?php endwhile; ?>
                  </tbody>
        </table>
<?php endif; ?>

        </div><!-- #content -->
</div><!-- #container -->
<?php get_sidebar(); ?> <?php get_footer(); ?>
In this chapter, I've shown you how to move beyond the built-in content types in WordPress—way beyond! You can add small custom fields to posts and pages or create entirely new content types of your own, and you can categorize and tag them with many sets of taxonomy terms. You now have all the tools you need to create a completely customized database of content, all with the same user-friendly editing interfaces WordPress is famous for.
Up to this point, you've talked about setting up a single WordPress site. In the next chapter, you'll learn how to create a whole network of WordPress sites from one installation.