Chapter 14
Driving Sales Effectiveness with Content Management
In This Chapter
![]() Using Content
Using Content
![]() Sharing and managing Content
Sharing and managing Content
![]() Using Content with Chatter
Using Content with Chatter
![]() Document storage
Document storage
If you, as a sales or marketing manager, expect to get the most out of your sales reps, you have to put the best tools at their fingertips. Aside from a desk, chair, phone, and some caffeine, reps need accurate and compelling documentation: sell sheets, white papers, case studies, and so on. All too often, however, sales documents reside in multiple places: network drives, e-mails, laptops, and so on.
If your reps are losing business because they can’t access the right documents, take advantage of Salesforce Content, which you can use to store the latest sales collateral in an easy-to-use, searchable library. And as long as your reps have an Internet connection, they can access Content, even if they’re sitting in an airport in Omaha, Nebraska.
What does an easily accessible library mean? If you’re a sales rep or manager, this means spending more time in front of your customers and less time chasing information. If you’re in marketing or product management, you can better control the message to customers with the confidence that sales reps are providing customers with the most up-to-date information available. And regardless of your role, you can individually store documents in your own personal folder.
In this chapter, we show you how to use the Salesforce Content as well as how to search for documents so that your reps can put them to work to sell more effectively.
Understanding Salesforce Content
Salesforce Content is more than just the place where files are stored in Salesforce. With Salesforce Content, you get a full content management system that allows you to collaborate, manage, and share material that’s stored anywhere on the web. Because it’s part of Salesforce, your Content can take advantage of all the other features of Salesforce, such as custom fields, sharing, validation rules, and even Apex triggers.
For companies that need to organize a large amount of current documents, Salesforce Content allows you to search document contents, notify you when content is updated, and track user feedback. All these features help to further increase your sales and marketing teams’ productivity. Best of all, it’s built in to Salesforce, so it’s waiting for you to use as soon as you’re ready.
Identifying content use cases and users
Anyone who has ever managed a document repository for himself or his company can tell you that repositories need to be maintained to remain effective. If you sell a variety of products, for example, your product sheets need to be updated as specs change, deleted if you retire products, and added as you release new products.
And even though Salesforce provides easy-to-use tools to help you manage the workload of document control, keeping a large volume of material up to date can still be a daunting task.
If your company is committed to using Salesforce as the central repository for every department’s content, you may want to consider using Salesforce Content for the following reasons: increased collaboration, document tagging, deeper search capabilities, and notification of content changes.
Before users can interact with Salesforce Content, they have to be granted permission to access that feature. Choose Setup⇒Administer⇒Manage Users⇒Users, and then edit the users that you want to have maintaining your content management system. Make sure that the Salesforce CRM Content User check box is selected for those users.
Creating Libraries
If you want Salesforce Content to be a highly effective sales tool for your staff, you have to organize your content so that people can easily find it. By using libraries, you can sort files into logical groupings.
We’ve seen many different and effective approaches to organizing libraries in Salesforce. Some companies like to separate content by product family; others prefer to take a vertical approach. The only right answer is the one that works for your company, so make sure that you spend some time deciding on a naming convention for your libraries. The My Libraries list on the Libraries home page will grow over time, so a clean and intuitive naming convention will help prevent a cluttered appearance. The following is a list of common libraries that work for many organizations:
- Hardware
- Sales presentations
- Product data sheets
- Case studies
- Professional Services
- Salesforce training
To create a library, you must first have the Create Libraries permission. (If you’re not sure, you can quickly find out by seeing whether you get past Step 1 in the following list. If you’re not able to get past Step 1, ask your administrator to help.) To continue, click the Libraries tab to go to the Libraries home page and follow these steps:
- Click the New button under the My Libraries heading.
A New Library Wizard appears.
- Type a name and description for the library.
- When you’re done, click Save and Close.
The Library Name page appears, and you may begin contributing new content to your new library. You can return to your library at any time by clicking the Libraries tab and looking at the My Libraries list.
 As you plan your content strategy, keep in mind that not all sales documents need to be in Salesforce Content. Some might be better suited as attachments on an account record; others you might not even want to have in Salesforce. As a general rule, files that might be reusable or have wide applicability are good for Salesforce Content. Documents that relate to a specific account are typically more relevant as attachments to Account detail pages.
Adding Content
Adding content to a library — also known as contributing content — is simple. To upload a new document, follow these steps:
- Click the Libraries tab in the Content app and then click the Contribute button.
The Contribute Content page appears.
- Click the Choose File button and browse your hard drive for the file that you want to upload.
Salesforce Content automatically uploads the file you select.
 You can add a website link to refer people to an online video or to information stored on your intranet by clicking the Do You Want to Link to a Website Instead link.
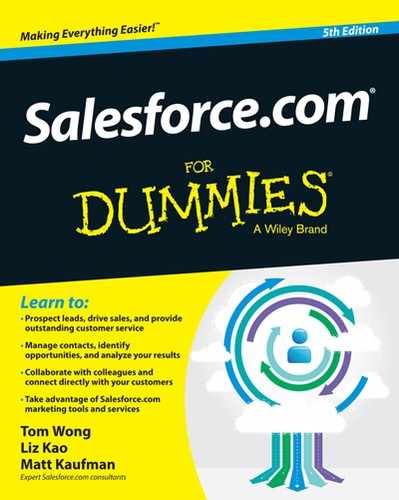
After Salesforce Content uploads your document, it asks you to describe and publish your content, as shown in Figure 14-1.
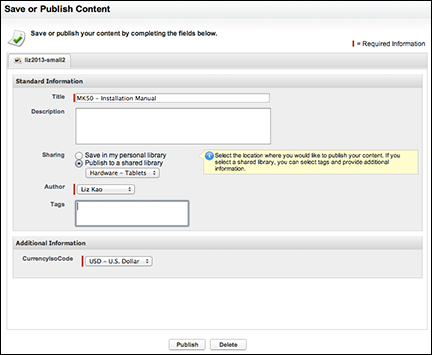
Figure 14-1: Contributing new content in Salesforce.
- Give your content a descriptive title.
Follow standard naming conventions within your company.
- Select the Publish to a Shared Library radio button to store this file in a library.
- Select the appropriate library from the drop-down menu.
- If you’re not the file’s author, select another user from the Author drop-down menu.
- (Optional) Add tags to this document if you want to identify it with words that may not be used in the standard library definitions.
Separate tag words with commas. Be sure to use words that people would commonly search for when looking for this document. We recommend that you only allow a subset of content users to determine what tags should be used, if you want to use tags as an alternate way to better filter for content. Otherwise, you risk having redundancy of tag words (like “datasheet” and “data sheets”) which reduces their effectiveness.
- Click Publish when you’re done.
If you have some content that you want to share with two different groups, like sales and marketing, rather than creating a new library just to house their shared documentation, you can associate content with the two libraries by following these steps:
- Return to the Libraries home page.
- Select a document from the Top Content section.
- On the Content details page, click the Edit button.
- Select the Library Actions option and then the Share with Another Library suboption.
- Highlight additional libraries with which to share this document and click the Publish button.
Editing Content
After you contribute content to Content, you may need to update its details in Salesforce. Search for and go to your Content record from the Content tab and follow these steps:
- Click the Edit button.
The Edit drop-down list of options appears.
- Select the Edit Content Details option.
The Edit Content window appears.
- Update the title and description.
You can also upload new versions of files when changes have been made offline by selecting the Upload New Version option.
- (Optional) Add tags to this document if you want to identify it with words that may not be used in the standard library definitions.
Separate words with commas. Be mindful of making the tag word too broad or too specific.
- Click Save.
Anyone subscribed to this Content record will be notified of any new versions that are uploaded.
You can subscribe to a Content record by clicking the Subscribe button at the top of the record. You’ll get an e-mail anytime someone updates the file, along with an explanation of what changed.
Finding Content
You can search for content from the search box located on the Content home page. Click the Content tab to go to the Content home page and then follow these steps:
- In the search box, type search terms, as shown in Figure 14-2.
Optionally check the filter check boxes to only search within a subset of all your Content. Filters include standard attributes like the content’s file format, or the author. This can also include everyone’s tag words, which is why we recommend an organized approach to creating tag words.
In addition to searching filenames, Salesforce Content searches the actual text contained in files of the following formats: rich text format (RTF), UTF-8 encoded TXT, HTML, XML, Adobe PDF, and Microsoft Office 97–2007 Word, Excel, and PowerPoint files.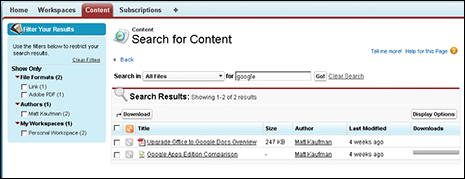
Figure 14-2: Search for content in Content.
- Click the Go button.
The page reappears with a list of Content results based on your search.
- Select the appropriate check boxes for the file(s) you are looking for and then click the Download button to save copies to your computer.
Alternatively, click the Title of Content record to see a preview of the file prior to downloading, as shown in Figure 14-3.
Figure 14-3: Preview content before downloading.
While your content is a work in progress, you can leverage the Files tab to combine the features of Chatter and Salesforce Content. You’ll be able to share with specific coworkers or groups, collaborate and get feedback, and upload revisions. When you’re ready to publish, head over to the Libraries tab and show off your work.
Understanding Documents
Prior to the addition of Salesforce Content, you could store files in Salesforce on the Documents tab. Although not as robust as Content, the Documents tab is still available and useful in many ways. For example, you can host images referenced in e-mail templates, custom apps, and even Force.com sites on the Documents tab. These files typically don’t change often and definitely don’t need to be collaborated on, so you can continue to store them by clicking the Documents tab. Another easy way to regard Documents is as a place where system administrators house files. However, if you need the ability to preview files, collaborate on them with Chatter, or store larger size files, those files belong in Salesforce Content.
Creating folders in the Document Library
To create a document folder, you must first have the Manage Public Documents permission. (If you’re not sure, you can quickly find out by seeing whether you get past Step 1 in the following list. If you’re not able to get past Step 1, ask your administrator to help.) To continue, go to the Documents home page and follow these steps:
- Click the Create New Folder link under the Document Folders heading.
A New Document Folder page appears.
- Type a name for the folder in the Document Folder field.
- Use the Public Folder Access drop-down list to select the access rights.
- Click the radio buttons to select who should have access to the folder.
- When you’re done, click Save.
The Folder Name Documents page appears, and you may begin adding new documents to your new folder.
Adding documents
Before reps can begin using documents in Salesforce, you or someone in your company must first add the documents to the Document Library.
When uploading files, the file size limit on any individual file is 5MB. For some companies, this might be the average size of a PowerPoint presentation or a PDF file with graphics, so plan accordingly.
To add a document and upload its file, log in to Salesforce and follow these steps:
- Select Document from the Create New drop-down list on the sidebar.
An Upload New Document page appears.
- Type a name for the file in the Document Name field.
If you want the document name to be an exact match of the filename, leave this field blank. After you select the file, the filename automatically populates the empty Document Name field.
- Select the For Internal Use Only check box only if you want this document to be confidential.
If you select this check box, you don’t alter its access, but you flag your end users not to send the file outside the company.
- Select the Externally Available Image check box only if you’re uploading an image that you’ll be sending in HTML e-mail templates to people that should view it without having to log in to Salesforce to see it.
For example, logos or letterhead footers should have this box selected.
- Use the Folder drop-down list to select a folder.
If you haven’t yet created the appropriate folder, or you don’t have read-write access to the correct folder, you can first store the file in the My Personal Documents folder and refile the document later.
- In the Description field, type a brief description of the document.
- In the Keywords field, type keywords that will help your end users find the document.
Salesforce provides a Find Documents search tool on the Documents home page, so you should select keywords that you think your users will enter.
For example, if you’re adding a case study, you might enter keywords that include relevant products, customer names, challenges, and so on that sales reps could use for cross-referencing.
- Under the Select the File step, the Enter the Path radio button is selected by default, so you just need to click the Browse button to select the desired file.
A Choose File dialog box appears.
- Select a file from the folders on your computer and click Open.
The dialog box closes, and the document path is entered in the File to Upload field.
- When you’re done, click Save.
When the upload is completed, the document record page reappears in Saved mode with information on the document and a link to view the document.
Using documents
After you create documents in Salesforce, you can use them in various ways in the course of your selling. You can search for documents from the Documents home page or browse through your document folders. You can leverage an image that was uploaded from the Documents tab, in Email Templates. If you’re an administrator, you can also customize the logo in the upper-left corner of Salesforce with an uploaded image, as long as it is at most 20 kilobytes.
Differentiating between documents, content, and files
If you’re a little unsure as to where to store a file, that’s okay; here’s a simple recap. Use Documents to store images used in Email Templates. Use Files for collaborating on works in progress. Use Content for publishing approved material throughout the business.