
![]()
16
More Things to Insert on Your Slides
In This Chapter
![]() Adding a table to a slide
Adding a table to a slide
![]() Using the Insert tab to create a WordArt object
Using the Insert tab to create a WordArt object
![]() Adding a hyperlink to a slide
Adding a hyperlink to a slide
![]() Working with action buttons
Working with action buttons
![]() Creating fancy equations
Creating fancy equations
The Insert tab on the Ribbon is chock-full of goodies you can insert into your presentations. The most important of these goodies have already been covered in other chapters: pictures clip art (Chapter 11), shapes (Chapter 12), SmartArt (Chapter 14), and movies and sounds (Chapter 15).
But you can insert a lot more, including tables, WordArt, hyperlinks, and actions. This chapter covers these items.
Inserting Tables
Tables are a great way to present lots of information in an orderly fashion. For example, if you want to create a slide that shows how many people like or hate various computer presentation programs, a table is the way to go. Or if you’re considering purchasing some new computer equipment and want to list the prices for five different computer configurations from three different vendors, a table is the best way.
Creating a table in a Content placeholder
Basic tables are simple to create in PowerPoint. The easiest way to create a slide that contains a table is to use the Title and Content slide layout. Just follow these steps:
1. Open the Home tab on the Ribbon and then click the New Slide button in the Slides group to add a slide with the Title and Content layout.
A new slide is created.
2. Click the Table icon in the center of the Content placeholder.
The Insert Table dialog box appears, as shown in Figure 16-1.
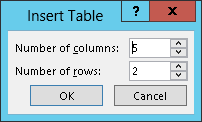
Figure 16-1: The Insert Table dialog box.
3. Set the number of rows and columns you want for the table and then click OK.
The table appears, as shown in Figure 16-2.
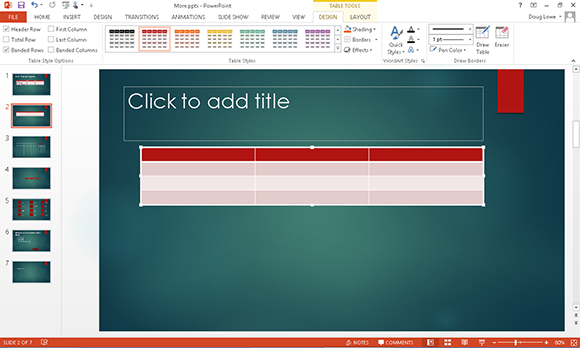
Figure 16-2: An empty table, waiting for data.
4. Type information into the table’s cells.
You can click any cell in the table and start typing. Or you can move from cell to cell by pressing the Tab key or the arrow keys.
5. Play with the formatting if you want.
You can use Table Tools on the Ribbon, described later in this section, to control the formatting for the table.
6. Stop and smell the roses.
When you’re done, you’re done. Admire your work.
Figure 16-3 shows an example of a finished table.

Figure 16-3: A finished table.
Inserting a table on a slide
You can use the Table button on the Insert tab to insert a table on an existing slide. When you click this button, a gridlike menu appears that enables you to select the size of the table you want to create, as shown in Figure 16-4. You can use this technique to create a table as large as ten columns and eight rows.

Figure 16-4: Inserting a table.
Drawing a table
A third way to create a table is to use the Draw Table command. The Draw Table command lets you draw complicated tables onscreen by using a simple set of drawing tools. This command is ideal for creating tables that are not a simple grid of rows and columns, but rather a complex conglomeration in which some cells span more than one row and others span more than one column.
Here’s the procedure for creating a table by using the Draw Table tool:
1. On the Insert tab on the Ribbon, click the Table button in the Tables group and then choose Draw Table from the menu that appears.
PowerPoint changes the cursor to a little pencil.
2. Draw the overall shape of the table by dragging the mouse to create a rectangular boundary for the table.
When you release the mouse button, a table with a single cell is created, as shown in Figure 16-5. Notice also in this figure that Table Tools is displayed on the Ribbon.
 3. Click the Draw Table button in the Table Tools Design tab (shown in the margin).
The mouse pointer changes into a little pencil when you click this button.

Figure 16-5: Drawing a table.
4. Carve the table into smaller cells.
To do that, just drag lines across the table. For example, to split the table into two rows, point the cursor somewhere along the left edge of the table and then click and drag a line across the table to the right edge. When you release the mouse button, the table splits into two rows.
You can continue to carve the table into smaller and smaller cells. For each slice, point the cursor at one edge of where you want the new cell to begin and click and drag to the other edge.
5. If you want to change the line size or style drawn for a particular segment, use the Pen Style and Pen Weight drop-down controls in the Draw Borders group on the Table Tools Design tab.
You can change the style of a line you’ve already drawn by tracing over the line with a new style.
6. If you make a mistake while drawing the table cells, click the Eraser (the one that looks like an eraser) button in the Draw Borders group and erase the mistaken line segment.
Or, just press Ctrl+Z or click the Undo button on the Quick Access Toolbar.
If you want to draw additional segments after using the Erase tool, click the Draw Table button.
 The most common mistake I make when drawing table cells is to accidentally create diagonal borders. If you make this common mistake, just press Ctrl+Z or click the Undo button, or use the eraser to erase the diagonal border.
7. When you’re done, click outside of the table to finish drawing the table.
Figure 16-6 shows a table carved up into several cells, with various types of line styles and line weights.

Figure 16-6: A finished table.
Applying style to a table
After you’ve created a table, you can set its style by using the controls under Table Tools on the Ribbon. The easiest way to format a table is by applying one of PowerPoint’s predefined table styles.
Before you apply a style, however, use the check boxes that appear at the left side of the Design tab under Table Tools on the Ribbon. These check boxes determine whether PowerPoint uses special formatting for certain parts of the table:
![]() Header Row: Indicates whether the style should format the first row differently than the other rows in the table
Header Row: Indicates whether the style should format the first row differently than the other rows in the table
![]() Total Row: Indicates whether the style should format the last row differently than the other rows in the table
Total Row: Indicates whether the style should format the last row differently than the other rows in the table
![]() Banded Rows: Indicates whether alternating rows should be formatted differently
Banded Rows: Indicates whether alternating rows should be formatted differently
![]() First Column: Indicates whether the style should format the first column differently than the other column in the table
First Column: Indicates whether the style should format the first column differently than the other column in the table
![]() Last Column: Indicates whether the style should format the last column differently than the other columns in the table
Last Column: Indicates whether the style should format the last column differently than the other columns in the table
![]() Banded Columns: Indicates whether alternating columns should be formatted differently
Banded Columns: Indicates whether alternating columns should be formatted differently
After you’ve set the Quick Style options, you can apply a Table Style to the table by clicking the style you want to apply (refer to Figure 16-5). If the style doesn’t appear in the Table Styles group under Table Tools on the Ribbon, click the More button to reveal the Table Styles gallery, shown in Figure 16-7. This gallery displays all the built-in styles provided with PowerPoint.

Figure 16-7: The Table Styles gallery.
In addition to using one of the preselected table styles, you can format each cell and line in your table by using the following controls under Table Tools:
![]()
![]() Shading: Sets the background color for the selected cells.
Shading: Sets the background color for the selected cells.
![]()
![]() Borders: Lets you control which edges of the selected cells have borders.
Borders: Lets you control which edges of the selected cells have borders.
![]()
![]() Effects: Applies bevels, shadows, and reflections. (Note that you can apply bevels to individual cells, but shadows and reflections apply to the entire table.)
Effects: Applies bevels, shadows, and reflections. (Note that you can apply bevels to individual cells, but shadows and reflections apply to the entire table.)
Working with the Layout tab
When you select a table, a special Layout tab is available, as shown in Figure 16-8. The controls on this tab let you adjust the layout of your table in various ways. Table 16-1 lists the function of each of these controls.

Figure 16-8: The Layout tab under Table Tools.


Inserting WordArt
In Chapter 7, you discover how to apply WordArt formatting to any bit of text in PowerPoint 2013. WordArt also appears on the Insert tab on the Ribbon, which provides a convenient way to insert a text box with text that is already formatted with WordArt formatting.
To insert WordArt, follow these steps:
1. Move to the slide on which you want to insert WordArt.
2. Click the Insert tab on the Ribbon and then click the WordArt button in the Text group.
A gallery of WordArt styles is displayed, as shown in Figure 16-9.
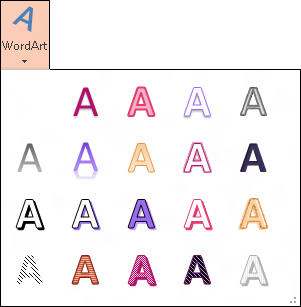
Figure 16-9: The WordArt gallery.
3. Select the WordArt style you want to use.
The WordArt text box is inserted on the slide, as shown in Figure 16-10.
4. Click the WordArt text box and then type the text you want to use.
5. Apply any other WordArt formatting you want.
For more information about WordArt formatting, refer to Chapter 7.
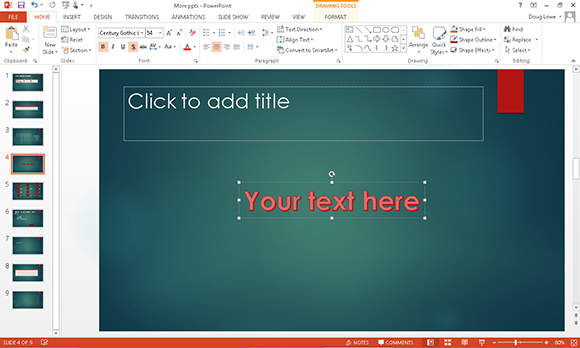
Figure 16-10: A WordArt text box.
Using Hyperlinks
In PowerPoint, a hyperlink is simply a bit of text or a graphic image that you can click when viewing a slide to summon another slide, another presentation, or perhaps some other type of document, such as a Word document or an Excel spreadsheet. The hyperlink may also lead to a page on the World Wide Web.
For example, suppose that you have a slide that contains a chart of sales trends. You can place a hyperlink on the slide that, if clicked during a slide show, summons another slide presenting the same data in the form of a table. That slide can in turn contain a hyperlink that, when clicked, summons an Excel spreadsheet that contains the detailed data on which the chart is based.
Another common use for hyperlinks is to create a table of contents for your presentation. You can create a slide — usually the first or second slide in the presentation — that contains links to other slides in the presentation. The table of contents slide may include a link to every slide in the presentation, but more likely, it contains links to selected slides. For example, if a presentation contains several sections of slides, the table of contents slide may contain links to the first slide in each section.
Hyperlinks are not limited to slides in the current presentation. Hyperlinks can lead to other presentations. When you use this kind of hyperlink, a person viewing the slide show clicks the hyperlink, and PowerPoint automatically loads the indicated presentation. The hyperlink can lead to the first slide in the presentation, or it can lead to a specific slide within the presentation.
A common use for this type of hyperlink is to create a menu of presentations that can be viewed. For example, suppose that you have created the following four presentations:
![]() The Detrimental Effects of Pool
The Detrimental Effects of Pool
![]() Case Studies in Communities Destroyed by Pool Halls
Case Studies in Communities Destroyed by Pool Halls
![]() Marching Bands through the Ages
Marching Bands through the Ages
![]() Understanding the Think System
Understanding the Think System
You can easily create a slide that lists all four presentations and contains hyperlinks to them. The person viewing the slide show simply clicks a hyperlink, and off he or she goes to the appropriate presentation.
Here are a few additional thoughts to ponder concerning hyperlinks:
![]()
 Hyperlinks aren’t limited to PowerPoint presentations. In PowerPoint, you can create a hyperlink that leads to other types of Microsoft Office documents, such as Word documents or Excel spreadsheets. When the person viewing the slide show clicks one of these hyperlinks, PowerPoint automatically runs Word or Excel to open the document or spreadsheet.
![]() A hyperlink can also lead to a page on the World Wide Web. When the user clicks the hyperlink, PowerPoint runs Internet Explorer to connect to the Internet and displays the web page.
A hyperlink can also lead to a page on the World Wide Web. When the user clicks the hyperlink, PowerPoint runs Internet Explorer to connect to the Internet and displays the web page.
![]() Hyperlinks work only when the presentation is shown in Slide Show View. You can click a hyperlink all you want while in Outline View or Slide Sorter View, and the only thing that happens is that your finger gets tired. Links are active when viewing the slide show. In Normal View, you can activate a link by right-clicking it and choosing Open Hyperlink.
Hyperlinks work only when the presentation is shown in Slide Show View. You can click a hyperlink all you want while in Outline View or Slide Sorter View, and the only thing that happens is that your finger gets tired. Links are active when viewing the slide show. In Normal View, you can activate a link by right-clicking it and choosing Open Hyperlink.
Creating a hyperlink to another slide
Adding a hyperlink to a presentation is easy. Just follow these steps:
1. Select the text or graphic object that you want to make into a hyperlink.
The most common type of hyperlink is based on a word or two of text in a slide’s body text area.
2. Choose Insert⇒Links⇒Hyperlink.
Alternatively, click the Insert Hyperlink button found on the standard toolbar or use the keyboard shortcut Ctrl+K. One way or the other, the Insert Hyperlink dialog box, shown in Figure 16-11, appears.

Figure 16-11: The Insert Hyperlink dialog box.
The dialog box has four icons on the left side, as follows:
• Existing File or Web Page: You can link to another file in another application, or to a web page on the Internet.
• Place in This Document: You can link one part of your PowerPoint presentation to another part.
• Create New Document: You can, however, choose now or another time to edit the new document by clicking the appropriate button.
• E-mail Address: Use this to link to an e-mail address. This feature is useful in an intranet or Internet setting because this link allows the reader to write an e-mail to the e-mail address that you link to.
3. Click the Place in This Document icon on the left side of the dialog box.
A list of the slides in the current presentation appears in the dialog box.
4. Click the slide that you want the hyperlink to lead to and then click OK.
The Insert Hyperlink dialog box vanishes, and the hyperlink is created.
If you selected text in Step 1, the text changes color and is underlined. If you selected a graphical object, the picture isn’t highlighted in any way to indicate that it is a hyperlink. However, the cursor always changes to a pointing hand whenever it passes over a hyperlink in Slide Show View or Reading View, thus providing a visual clue that the user has found a hyperlink.
Creating a hyperlink to another presentation or to a website
Creating a hyperlink that opens another presentation is much like the procedure described in the preceding section, “Creating a hyperlink to another slide,” but with a couple important differences:
1. Select the text or graphical object that you want to make into a hyperlink.
2. Click the Hyperlink button in the Links group on the Insert tab.
The Insert Hyperlink dialog box appears (refer to Figure 16-11).
3. Click the Existing File or Web Page icon in the list of icons on the left side of the dialog box.
You can also link to a specific slide within another presentation by clicking the Bookmark button in the Insert Hyperlink dialog box. This brings up another dialog box listing the slides in the selected presentation. Choose the slide you want to link to; then click OK to return to the Insert Hyperlink dialog box.
4. Click Current Folder.
5. Select the file that you want to link to.
You might have to rummage about your hard drive to find the presentation.
The presentation that you link to doesn’t have to be in the same folder or even on the same drive as the current presentation. In fact, you can link to a presentation that resides on a network file server.
6. Click OK.
When you follow a link to another presentation, PowerPoint automatically opens the other presentation. This means that you now have both presentations open. When you’re finished viewing the second presentation, close it to return to the original presentation.
If you want to create a hyperlink to an existing web page, just type the address of the web page in your outline or on your slide and a hyperlink automatically appears. You can select any page of a website as long as you know the URL for that specific page.
To remove a hyperlink, right-click the hyperlink that you want to zap and then choose Remove Hyperlink from the menu that appears. To change a hyperlink, right-click it and choose Edit Hyperlink.
Adding Action Buttons
An action button is a special type of AutoShape that places a button on the slide. When the user clicks the button during a slide show, PowerPoint takes whatever action you’ve designated for the button. A well-planned arrangement of action buttons scattered throughout a presentation can make it easy for someone to view the presentation in any order he or she wants.
The following sections describe how action buttons work and show you how to add them to your presentations.
Assigning button actions
When you create an action button, you assign both a shape for the button (you have 12 shapes to choose from; the shapes are described a bit later in this section) and an action to be taken when the user clicks the button or merely points the cursor at it. The action for a button can be any of the following:
![]() Activate a hyperlink: This is the most common button action. It causes a different slide in the current presentation, a different presentation altogether, a non-PowerPoint document, or even an Internet web page to appear.
Activate a hyperlink: This is the most common button action. It causes a different slide in the current presentation, a different presentation altogether, a non-PowerPoint document, or even an Internet web page to appear.
![]() Run a program: For example, you can set up a button that runs Microsoft Word or Excel.
Run a program: For example, you can set up a button that runs Microsoft Word or Excel.
![]()
 Run a macro: PowerPoint lets you create macros, which are programs written in a powerful programming language called Visual Basic for Applications.
![]() Play a sound: This is just one way to add sound to a PowerPoint presentation. For more ways, refer to Chapter 15.
Play a sound: This is just one way to add sound to a PowerPoint presentation. For more ways, refer to Chapter 15.
Choosing button shapes
PowerPoint provides a selection of built-in shapes for action buttons. Table 16-2 lists the action button shapes that you can place in your presentation and indicates what type of action is associated with each type.


Creating a button
To add a button to a slide, follow these steps:
1. Move to the slide on which you want to place a button.
2. Open the Insert tab on the Ribbon, click the Shapes button in the Illustrations group, and select one of the Action Button shapes found at the bottom of the gallery that appears.
3. Draw the button on the slide.
Start by pointing to the spot where you want the upper-left corner of the button to appear. Then click and drag to where you want the lower-right corner of the button to appear.
When you release the mouse button, the Action Settings dialog box appears, as shown in Figure 16-12.
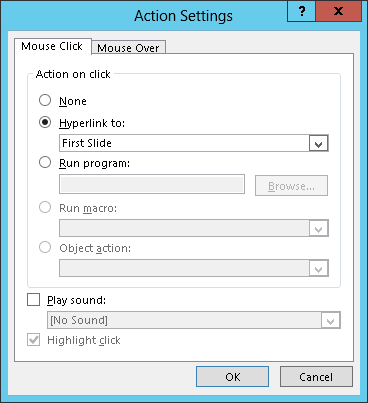
Figure 16-12: The Action Settings dialog box.
4. If you want, change the action settings for the action button.
In most cases, the default setting for the action button that you chose is appropriate for what you want the button to do. For example, the action setting for a Forward or Next button is Hyperlink to Next Slide. If you want the slide to hyperlink to some other location, change the Hyperlink To setting.
5. Click OK.
The Action Settings dialog box vanishes, and the button is created.
Here are some additional thoughts concerning action buttons:
![]() Change the look of a button: You can format action buttons like any other shape object. Therefore, you can use Drawing Tools on the Ribbon to apply fill colors, line styles, or shape effects such as bevels and 3-D rotations. For more information, refer to Chapter 12.
Change the look of a button: You can format action buttons like any other shape object. Therefore, you can use Drawing Tools on the Ribbon to apply fill colors, line styles, or shape effects such as bevels and 3-D rotations. For more information, refer to Chapter 12.
![]() Move a button: To move a button, just click it to select it. Then use the mouse to drag the button to a new location.
Move a button: To move a button, just click it to select it. Then use the mouse to drag the button to a new location.
![]() Change the action setting for a button: You can change the action setting for a button by right-clicking the button and choosing the Action Settings command.
Change the action setting for a button: You can change the action setting for a button by right-clicking the button and choosing the Action Settings command.
Creating a navigation toolbar
Grouping action buttons into a navigation toolbar makes a slide show easy to navigate. You can add a set of navigation buttons to the bottom of your Slide Master. Figure 16-13 shows a slide with navigation buttons in the lower-right corner. These buttons make getting around the show a snap. For this example, I use Beginning, Backward (Previous), Forward (Next), and Ending buttons, but you can include any buttons you want.
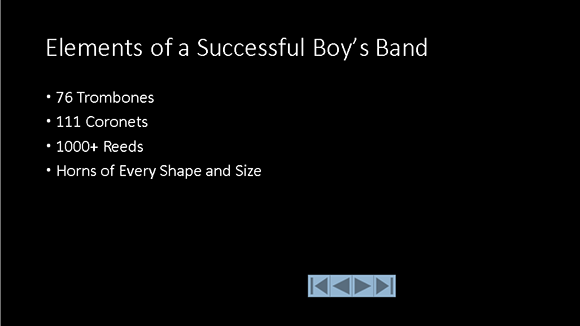
Figure 16-13: A slide with navigation buttons.
To create a navigation toolbar that appears on every slide, follow these steps:
1. Switch to Slide Master View.
From the View tab on the Ribbon, click the Slide Master button in the Presentation Views group. Or if you like shortcuts, hold down the Shift key and click the Normal View button in the lower-left corner of the PowerPoint window.
2. Create the action buttons that you want to include.
Follow the procedure described in the preceding section, “Creating a button,” to create each button. Make sure that all the buttons are the same size and line them up to create a tight cluster of buttons.
You can easily duplicate a button by holding down the Ctrl key while you drag the button to a new location. This technique makes it easy to create several similar buttons, such as navigation buttons.
3. Return to Normal View.
Click the Normal View button or click the Normal button in the Presentation Views group on the View tab.
The buttons that you created appear on every slide in your presentation.
Inserting Equations
Steven Hawking has said that his editor told him that every mathematical equation he included in his classic book A Brief History of Time would cut the book’s sales in half. So he included just one: the classic e=mc2. See how easy that equation was to type? The only trick was remembering how to format the little 2 as a superscript.
My editor promised me that every equation I included in this book would double its sales, but I didn’t believe her, not even for a nanosecond. Just in case, Figure 16-14 shows some examples of the equations you can create by using PowerPoint’s handy-dandy Equation feature. You wouldn’t even consider using ordinary text to try to create these equations, but they took me only a few minutes to create with the Equation tool. Aren’t they cool? Tell all your friends about the cool equations you saw in this book so that they’ll all rush out and buy copies for themselves.
You don’t have to know anything about math to use PowerPoint. I don’t have a clue what most of the equations in Figure 16-14 do, but they sure look great, don’t they?
Don’t forget to tell your friends how great the equations in Figure 16-14 are. Those alone are worth the price of the book.

Figure 16-14: These equations will probably not affect the sales of this book one way or another.
To add an equation to a slide, follow these steps:
1. Click the Insert tab of the Ribbon and then click the Equation button to reveal the gallery of equations, as shown in Figure 16-15.
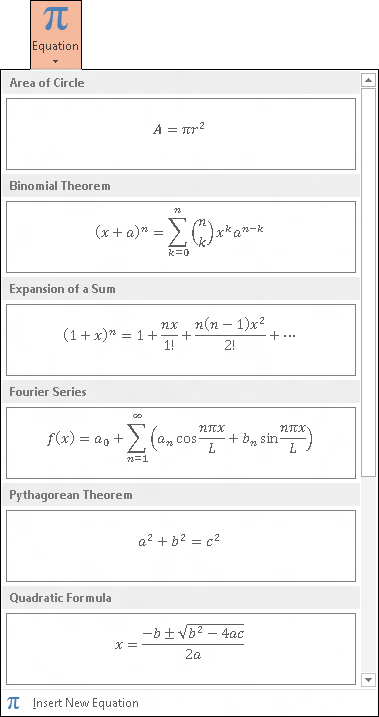
Figure 16-15: Inserting an equation.
2. If one of the preformatted equations in the gallery meets your needs, select it. Otherwise, select Insert New Equation found at the bottom of the gallery.
The rest of this procedure assumes that you’ve chosen to insert a new equation. A placeholder for the equation appears in the slide, and the Equation Tools Design tab appears on the Ribbon, as shown in Figure 16-16.
3. Start typing your equation.
PowerPoint watches any text you type in an equation and does its level best to figure out how the text should be formatted. If you type the letter x, for example, PowerPoint assumes that you intend for it to be a variable, so the x is displayed in italics. If you type cos, PowerPoint assumes that you mean the cosine function, so the text is not italicized. If you use the mathematical operators +, –, *, and /, PowerPoint will automatically format them using the equivalent equation symbols.
Don’t worry about how the equation is formatted. When you press Enter, PowerPoint formats the equation automatically. For example, suppose you enter the following:
a = (b + 2c) / 2b
When you press Enter, the equation is formatted as follows:

4. To add a symbol that’s not on the keyboard, use one of the buttons in the Symbols section of the Equation Tools Design tab.
The Symbols section contains a gallery of mathematical symbols most of which only Robert Oppenheimer could understand. To use this gallery, first click the More button in the bottom-right corner of the Symbols section. Then choose the symbol category from the drop-down menu that appears at the top of the gallery. For example, Figure 16-17 shows the Operators gallery. Additional galleries contain basic math symbols, Greek letters, negated relations, and other obscure symbols.
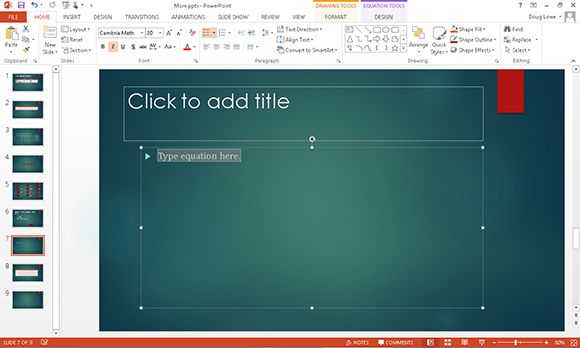
Figure 16-16: Creating a new equation.

Figure 16-17: The Operators symbol gallery.
5. To create symbols stacked upon each other in various ways, use the controls in the Structures section of the Equation Tools Design tab.
Each button in the Structures section reveals a gallery of structures that you can use to create equations with stacked symbols. Most structures include a symbol and one or more slots, in which you type text or insert other symbols or other structures. For example, Figure 16-18 shows the gallery of templates that are displayed when you click the Radical button. These structures let you insert a square-root sign along with slots in front of and inside the sign.

Figure 16-18: The Radical structures gallery.
6. When you’re done, click outside of the equation to return to the slide.
Confused? I don’t blame you. After you latch on to the idea behind structures, you can slap together even the most complex equations in no time. But the learning curve here is steep. Stick with it.
Here are a few additional points to keep in mind when editing equations:
![]() Spend some time exploring the symbols and structures available on the Equation Tools Design tab. There’s enough stuff here to create a presentation on how to build your own atomic bomb. (None of the equations in Figure 16-14 have anything to do with atomic bombs. Honest.)
Spend some time exploring the symbols and structures available on the Equation Tools Design tab. There’s enough stuff here to create a presentation on how to build your own atomic bomb. (None of the equations in Figure 16-14 have anything to do with atomic bombs. Honest.)
![]() Don’t use the spacebar to separate elements in an equation — let PowerPoint worry about how much space to leave between the variables and the plus signs. The only time you should use the spacebar is when you’re typing two or more words of text and you need the space to separate the words.
Don’t use the spacebar to separate elements in an equation — let PowerPoint worry about how much space to leave between the variables and the plus signs. The only time you should use the spacebar is when you’re typing two or more words of text and you need the space to separate the words.
![]() The Enter key has an interesting behavior in an equation: It adds a new equation slot, immediately beneath the current slot. This technique is sometimes a good way to create stacked items.
The Enter key has an interesting behavior in an equation: It adds a new equation slot, immediately beneath the current slot. This technique is sometimes a good way to create stacked items.
![]() The denominator is the bottom part of a fraction, not an Arnold Schwarzenegger movie.
The denominator is the bottom part of a fraction, not an Arnold Schwarzenegger movie.