![]()
11
Inserting Pictures
In This Chapter
![]() Using free pictures
Using free pictures
![]() Finding a picture you like
Finding a picture you like
![]() Moving, sizing, cropping, and stretching pictures
Moving, sizing, cropping, and stretching pictures
![]() Adding special effects such as borders, shadows, and reflections
Adding special effects such as borders, shadows, and reflections
![]() Using artistic effects to make photographs look hand-drawn
Using artistic effects to make photographs look hand-drawn
![]() Compressing your pictures to save disc space
Compressing your pictures to save disc space
![]() Removing picture backgrounds
Removing picture backgrounds
Face it: Most of us weren’t born with even an ounce of artistic ability. Some day (soon, hopefully), the genetic researchers combing through the billions and billions of genes strung out on those twisty DNA helixes will discover the Artist Gene. Then, in spite of protests from the da Vincis, van Goghs, and Monets among us (who fear that their NEA grants will be threatened), doctors will splice the little gene into our DNA strands so that we can all be artists. Of course, this procedure won’t be without its side effects: Some will develop an insatiable craving for croissants, and others will inexplicably develop French accents and whack off their ears. But artists we shall be.
Until then, we have to rely on clip art pictures, pictures we’ve found on the Internet, or pictures that we scanned into the computer with a scanner or took with a digital camera.
In this chapter, you find out about the different types of computer pictures and how you can insert them into a PowerPoint slide. Then, after you get your pictures into PowerPoint, you discover how you can fiddle with them to get them to look better.
Exploring the Many Types of Pictures
The world is awash with many different picture file formats. Fortunately, PowerPoint works with almost all these formats. The following sections describe the two basic types of pictures that you can work with in PowerPoint: bitmap pictures and vector drawings.
Bitmap pictures
A bitmap picture is a collection of small dots that compose an image. Bitmap pictures are most often used for photographs and for icons and other buttons used on web pages. You can create your own bitmap pictures with a scanner, a digital camera, or a picture-drawing program, such as Adobe Photoshop. You can even create crude bitmap pictures with Microsoft Paint, which is the free painting program that comes with Windows.
The dots that make up a bitmap picture are called pixels. The number of pixels in a given picture depends on two factors: the picture’s resolution and its size. Resolution refers to the number of pixels per inch. A typical computer monitor displays 72 pixels per inch, though many monitors can display at higher resolutions. At 72 pixels per inch, a 1-inch square picture requires 5,184 pixels (72 x 72). Photographs that will be printed on an inkjet or laser printer usually have a much higher resolution, often 300 pixels per inch or more. At 300 pixels per inch, a 4-x-6-inch photograph requires more than two million pixels.
The amount of color information stored for the picture — also referred to as the picture’s color depth — affects how many bytes of computer memory the picture requires. The color depth determines how many different colors the picture can contain. Most pictures have one of two color depths: 256 colors or 16.7 million colors. Most simple charts, diagrams, cartoons, and other types of clip art look fine at 256 colors. Photographs usually use 16.7 million colors.
 Pictures with 16.7 million colors are also known as True Color pictures or 24-bit color pictures.
A 4-x-6-inch photograph, which has more than 2 million pixels, requires about 2MB to store with 256 colors. With True Color, the size of the picture jumps to a whopping 6.4MB. Fortunately, bitmap pictures can be compressed to reduce their size without noticeably distorting the image. Depending on the actual contents of the picture, a 6MB picture might be reduced to 250KB or less.
Bitmap picture files usually have filename extensions such as .bmp, .gif, .jpg, .png, or .pcx. Table 11-1 lists the bitmap file formats that PowerPoint supports.
 If you have a choice in the matter, I recommend you use JPEG format images for photographs that you want to include in PowerPoint presentations because JPEG’s built-in compression saves hard drive space.
Table 11-1 PowerPoint’s Bitmap Picture File Formats
|
Format |
What It Is |
|
BMP |
Garden variety Windows bitmap file, used by Windows Paint and many other programs |
|
GIF |
Graphics Interchange Format, a format commonly used for small Internet pictures |
|
JPEG |
A common format for photographs that includes built-in compression |
|
PCD |
Kodak Photo CD format |
|
PCT |
Macintosh PICT files |
|
PCX |
A variant type of bitmap file |
|
PNG |
Portable Network Graphics file, an image format designed for Internet graphics |
|
TGA |
Targa files |
|
TIFF |
Tagged Image Format file, another bitmap program most often used for high-quality photographs |
Victor, give me a vector
Besides bitmap pictures, you can also use vector drawing with PowerPoint. A vector drawing is a picture file that contains a detailed definition of each shape that makes up the image. Vector drawings are usually created with high-powered drawing programs, such as Adobe Illustrator.
PowerPoint supports all the most popular vector drawing formats, as described in Table 11-2.
Table 11-2 PowerPoint’s Vector File Formats
|
Format |
What It Is |
|
CDR |
Format for CorelDRAW!, a popular, upper-crust drawing program |
|
CGM |
Computer Graphics Metafiles |
|
DRW |
Format for Micrografx Designer or Micrografx Draw, two popular ooh-aah drawing programs |
|
EMF |
An Enhanced Windows MetaFile picture |
|
EPS |
Encapsulated PostScript, a format used by some high-end drawing programs |
|
WMF |
Windows MetaFile, a format that many programs recognize (note that WMF files can hold bitmap as well as vector data) |
|
WPG |
A WordPerfect drawing |
Using Pictures
Are you sitting down? Whether you buy PowerPoint by itself or get it as a part of Microsoft Office, you also get access to an online collection of thousands of clip art pictures that you can drop directly into your presentations.
Don’t overdo the pictures. One surefire way to guarantee an amateurish look to your presentation is to load it down with three cheesy clip art pictures on every slide. Judicious use is much more effective.
Dropping in a picture
The following steps explain how to insert picture art into your presentation:
1. Move to the slide on which you want to plaster the picture.
If you want the same picture to appear on every slide, move to Slide Master View.
2. On the Ribbon, choose Insert⇒Online Pictures.
After a brief moment’s hesitation, the Insert Pictures dialog box appears, as shown in Figure 11-1.

Figure 11-1: The Insert Pictures dialog box.
3. Type a keyword in the Search Office.com text box and then press Enter.
For example, to search for pictures of William Shakespeare, type Shakespeare in the Search For text box and then press Enter.
PowerPoint searches through the Office.com picture collection to locate the picture you’re looking for, and then it displays thumbnails of the pictures it finds, as shown in Figure 11-2.
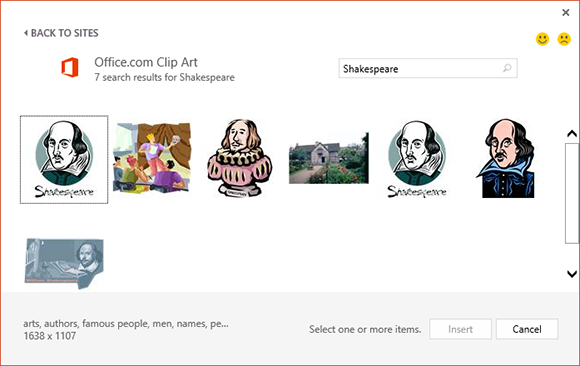
Figure 11-2: Office.com has several pictures of William Shakespeare.
4. Click the picture that you want to use, then click Insert.
The picture is inserted on the current slide, as shown in Figure 11-3. Notice that a special Picture Tools tab with tools for working with pictures has appeared. This Picture Tools tab appears whenever you select a picture object.
5. Drag and resize the picture as needed.
To find out how, see the following section.

Figure 11-3: PowerPoint inserts the picture on the slide.
Office.com contains only a limited selection of clip art images, and many of those are a bit too cartoonish for my tastes. You may have better results if you search for Bing images rather than Office.com images. To search Bing, just type your keyword in the Search Bing text box instead of the Search Office.com text box. Figure 11-4 gives a sampling of the results generated when I searched for “Shakespeare” on Bing.
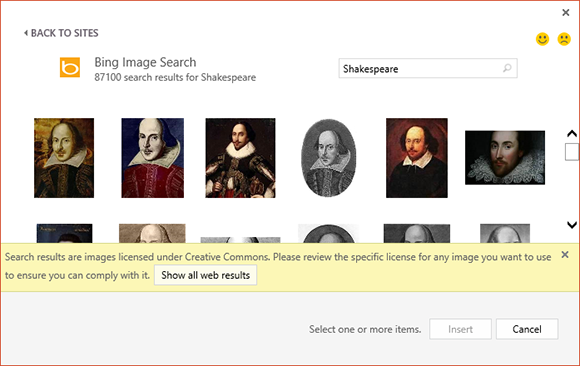
Figure 11-4: Bing often has better images than Office.com.
Note that some of the images displayed by Bing’s image search may be copyrighted, so you must ensure that you have permission from the copyright holder before using images found on Bing.
Moving, sizing, and stretching pictures
Because PowerPoint chooses an arbitrary position on the slide to insert pictures, you undoubtedly want to move the clip art to a more convenient location. You probably also want to change the size of the picture if it’s too big or too small for your slide.
Follow these steps to force your inserted clip art into full compliance:
1. Click the picture and drag it wherever you want.
You don’t have to worry about clicking exactly the edge of the picture or one of its lines; just click anywhere in the picture and drag it around.
2. Notice the eight handles. Drag one of them to resize the picture.
You can click and drag any of these handles to adjust the size of the picture. When you click one of the corner handles, you can change the height and width of the picture at the same time. When you drag one of the edge handles (top, bottom, left, or right) to change the size of the picture in just one dimension, you distort the picture’s outlook as you go.
When you resize a picture, the picture changes its position on the slide. As a result, you can count on moving it after you resize it. If you hold down the Ctrl key while dragging a handle, however, the picture becomes anchored at its center point as you resize it. Therefore, its position is unchanged, and you probably don’t have to move it.
Stretching a clip art picture by dragging one of the edge handles can dramatically change the picture’s appearance. For example, you can stretch an object vertically to make it look tall and thin or horizontally to make it look short and fat.
Inserting Pictures from a File
If you happen to already have an image file on your computer that you want to insert into a presentation, PowerPoint lets you insert the file. These steps show you how:
1. Move to the slide on which you want to splash a picture.
2. Open the Insert tab on the Ribbon and then click the Pictures button in the Illustrations group.
This step summons the Insert Picture dialog box, shown in Figure 11-5.

Figure 11-5: The Insert Picture dialog box.
3. Dig through the bottom of your hard drive until you find the file that you want.
The picture you want might be anywhere. Fortunately, the Insert Picture dialog box has all the controls you need to search high and low until you find the file. Just click the icons at the left side of the box and you’re halfway there.
4. Click the file and then click Insert.
You’re done! Figure 11-6 shows how a picture appears when it has been inserted on a slide.
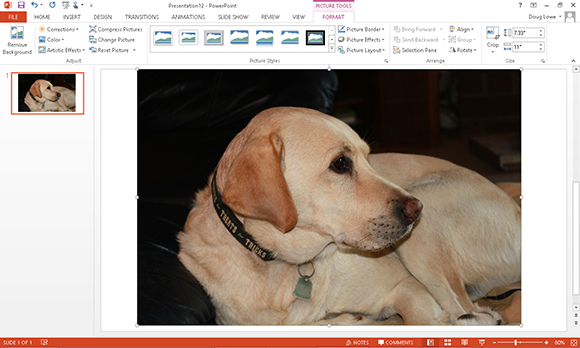
Figure 11-6: What a good boy!
As you can see in Figure 11-6, PowerPoint scales your pictures so that they fill as much of the slide as possible. You need to resize the picture if you want it to be smaller. Just select the picture and then drag one of the size handles in the corner of the picture.
You also can paste a picture directly into PowerPoint by way of the Clipboard. Anything that you can copy to the Clipboard can be pasted into PowerPoint. For example, you can doodle a sketch in Paintbrush, copy it, and then zap over to PowerPoint and paste it. Voilà — instant picture!
Cropping a Picture
Sometimes you want to cut off the edges of a picture so that you can include just part of the picture in your presentation. For example, you might have a picture of two people, only one of whom you like. You can use PowerPoint’s cropping feature to cut off the other person. (Note that you can crop bitmap images, but not vector pictures.)
To crop a picture, select the picture and click the Crop button located near the right side of the Format tab on the Ribbon, in the group labeled Size. The selection handles change to special crop marks. You can then drag the crop marks around to cut off part of the picture. When you’re satisfied, press the Esc key. Figure 11-7 shows the picture that was inserted in Figure 11-6 after it has been cropped and resized.

Figure 11-7: A picture that has been cropped.
If you decide later that you don’t like the cropping, you can right-click the picture and choose Format Picture from the menu that appears. Then click the Reset button.
When you crop a picture, the picture still retains a basic rectangular shape. If you prefer to remove the background from an irregular shape in the picture, refer to the section “Removing Picture Backgrounds,” later in this chapter.
Adding Style to Your Pictures
PowerPoint enables you to draw attention to your pictures by adding stylistic features such as borders, shadows, and reflections. Figure 11-8 shows a slide with several copies of a picture, each with a different style applied.

Figure 11-8: Pictures with style.
To add a style effect to a picture, select the picture and open the Picture Tools tab on the Ribbon. Then, simply select the picture style you want to apply.
PowerPoint comes with 28 predefined picture styles, shown in the gallery pictured in Figure 11-9. Each of these styles is simply a combination of three types of formatting you can apply to pictures: Shape, Border, and Effects. If you want, you can apply these formats individually as described in the following sections.
Note that if you use one of these predefined picture styles, the picture will be updated automatically if you later change the presentation’s theme. As a result, you should use one of the predefined styles whenever possible.

Figure 11-9: The Picture Style gallery.
Applying a picture border
You can apply a border to a picture by opening the Picture Tools⇒Format tab and clicking Picture Border in the Picture Styles group. This reveals the Picture Border menu, which lets you choose the border color, weight (the width of the border lines), and the pattern of dashes you want to use.
Note that if you have applied a shape to the picture, the border is applied to the shape.
Applying picture effects
The Picture Effects button in the Picture Styles group (located on the Format tab) lets you apply several interesting types of effects to your pictures. When you click this button, a menu with the following effect options is displayed:
![]() Shadow: Applies a shadow to the picture. You can select one of several predefined shadow effects or call up a dialog box that lets you customize the shadow.
Shadow: Applies a shadow to the picture. You can select one of several predefined shadow effects or call up a dialog box that lets you customize the shadow.
![]() Reflection: Creates a reflected image of the picture beneath the original picture.
Reflection: Creates a reflected image of the picture beneath the original picture.
![]() Glow: Adds a glowing effect around the edges of the picture.
Glow: Adds a glowing effect around the edges of the picture.
![]() Soft Edges: Softens the edges of the picture.
Soft Edges: Softens the edges of the picture.
![]() Bevel: Creates a 3-D beveled look.
Bevel: Creates a 3-D beveled look.
![]() 3-D Rotation: Rotates the picture in a way that creates a three-dimensional effect.
3-D Rotation: Rotates the picture in a way that creates a three-dimensional effect.
The best way to figure out how to use these effects is to experiment with them to see how they work.
Correcting Sharpness, Brightness, and Contrast
Sometimes, in spite of your best efforts, your pictures just don’t come out quite right. They may be too bright or too dim, faded or too contrasty, or a bit out of focus.
PowerPoint’s new Corrections command can help you out in those situations. This command, found on the Picture Tools Format tab, lets you adjust a picture’s sharpness, brightness, and contrast.
To change a picture’s sharpness, contrast, or brightness, click the Corrections button and choose one of the preset options from the gallery of choices that appears. Or, choose the Picture Correction Options command from the bottom of the Corrections menu to reveal the Picture Corrections controls in the task pane to the right of the slide, as shown in Figure 11-10. You can use these controls to individually adjust the sharpness, brightness, and contrast adjustments.
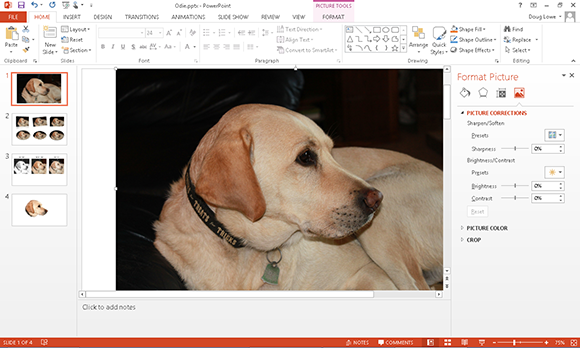
Figure 11-10: Setting the Picture Corrections options.
Adjusting Color
The Color button on the Picture Tools Format tab lets you adjust the color of your pictures. You can adjust the following aspects of a picture’s color:
![]() Saturation: Controls the overall amount of color in the picture
Saturation: Controls the overall amount of color in the picture
![]() Color Tone: Controls the overall “warmth” of the picture’s color
Color Tone: Controls the overall “warmth” of the picture’s color
![]() Recolor: Lets you change the primary color visible in the picture
Recolor: Lets you change the primary color visible in the picture
To change a picture’s color, click the Color button on the Picture Tools Format tab and choose one of the options from the gallery of preset choices. Or, choose the Picture Color Options command at the bottom of the Color menu. Doing this brings up the color controls shown in Figure 11-11. As you can see, in this figure I’ve used the color controls to render the picture in black and white.

Figure 11-11: Setting the Color options for a picture.
Applying Artistic Effects
The Artistic Effects command applies one of several special filters to your picture in an effort to make the picture look like it was created by an artist rather than photographed with a $60 digital camera. Depending on the nature of the original picture, the results may or may not be convincing; the only way to find out is to try.
Here is a list of the artistic effects that are available on the Artistic Effects button:
![]() Marker
Marker
![]() Pencil Grayscale
Pencil Grayscale
![]() Pencil Sketch
Pencil Sketch
![]() Line Drawing
Line Drawing
![]() Chalk Sketch
Chalk Sketch
![]() Paint Strokes
Paint Strokes
![]() Paint Brush
Paint Brush
![]() Glow Diffused
Glow Diffused
![]() Blur
Blur
![]() Light Screen
Light Screen
![]() Watercolor Sponge
Watercolor Sponge
![]() Film Grain
Film Grain
![]() Mosaic Bubbles
Mosaic Bubbles
![]() Glass
Glass
![]() Cement
Cement
![]() Texturizer
Texturizer
![]() Crisscross Etching
Crisscross Etching
![]() Pastels Smooth
Pastels Smooth
![]() Plastic Wrap
Plastic Wrap
![]() Cutout
Cutout
![]() Photocopy
Photocopy
![]() Glow Edges
Glow Edges
To apply one of these effects, simply double-click the picture, click the Artistic Effects button on the Picture Tools Format tab, and choose the effect you want from the gallery.
To give you an idea of what these effects can accomplish, Figure 11-12 shows how the photograph originally shown in Figure 11-7 appears with the Pencil Sketch, Watercolor Sponge, and Plastic Wrap filters applied.

Figure 11-12: Artistic effects can dramatically change the appearance of a picture.
Compressing Your Pictures
Adding pictures to your slide show can dramatically increase the size of your presentation’s file on disc. This is especially true if you insert a bunch of pictures taken with a modern digital camera. For example, pictures taken with digital cameras are often half a megabyte or more each. Insert 50 such pictures into your slide show and the file will grow accordingly.
However, it turns out that the amount of detail contained in your average digital photograph is mostly wasted in a PowerPoint slide show. That’s because digital cameras are designed to create pictures that can be printed on high-resolution printers. However, most computer monitors (and projectors) have a much lower resolution.
To compensate for this, PowerPoint includes a Compress Pictures command that can eliminate the extraneous detail in your images and thereby reduce the size of your presentation files. To save even more space, the Compress Pictures command also removes any parts of your pictures that have been cropped.
You can use this command to compress just a single picture or to compress all the pictures in your presentation at once. I recommend that you compress all your pictures by following these steps:
1. Double-click any picture in the presentation to bring up the Picture Tools Format tab.
The dialog box shown in Figure 11-13 appears.
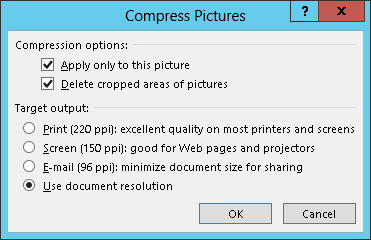
Figure 11-13: Compressing pictures.
2. Deselect the Apply Only to This Picture option.
If you leave this option checked, only the selected picture will be compressed. Deselect this option to compress all the pictures in the presentation.
3. Select Screen for the Target Output option.
This step sets the compression so that image quality will still be good when the pictures are displayed on a computer screen or projector.
4. Click OK.
The images are compressed. Note that if you have a lot of pictures in your presentation, this step may take a few moments.
5. Save your presentation.
The images won’t actually be compressed in the presentation file until you save the file.
Removing Picture Backgrounds
One final bit of picture editing wizardry provided by PowerPoint 2013 is the capability to remove the background from a picture. For example, Figure 11-14 shows a picture of my dog Odie with the background removed.

Figure 11-14: Odie with the background removed.
To accomplish this bit of photo-editing magic, follow these steps:
1. Double-click the picture whose background you want to remove.
2. Click the Remove Background button in the Picture Tools Format tab.
When you do, PowerPoint attempts to determine which part of your picture is the subject of the picture and which part is the background. The background is then displayed in purple. In addition, a special Background Removal tab appears on the Ribbon. See Figure 11-15.
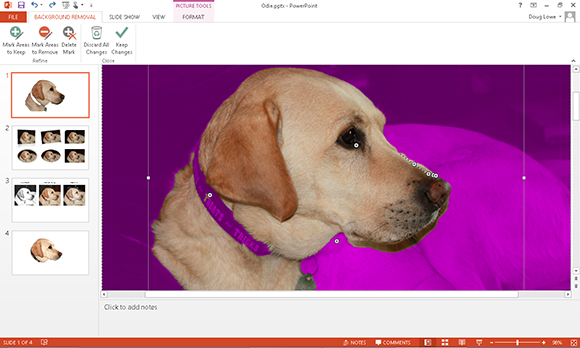
Figure 11-15: Removing the background.
3. Use the Mark Areas to Keep and Mark Areas to Remove buttons to refine the location of the picture’s background.
For example, if an area that’s part of the subject is shown as background, click the Mark Areas to Keep button. Then, either click in the area you want included or click and drag a line across a large portion of the area to be included. PowerPoint will attempt to discern which part of the picture you marked and include that area in the picture’s subject.
Similarly, if PowerPoint has mistaken part of the background for the subject, click the Mark Areas to Remove button and click or draw a line within the area that should be removed.
If PowerPoint misinterprets your mark, press Ctrl+Z to undo your action. Or, click the Delete Mark button and then click the mark you want to delete.
4. Repeat Step 3 until you’ve successfully removed the picture’s background.
5. Click the Keep Changes button.
The slide returns to normal, with the background of your picture removed.