![]()
19
Exporting Your Presentation to Other Formats
In This Chapter
![]() Exporting to PDF
Exporting to PDF
![]() Exporting to a video
Exporting to a video
![]() Exporting to a Word document
Exporting to a Word document
This chapter shows you how to use a variety of PowerPoint features that let you save your presentations in formats other than the standard PowerPoint file format. You can save you presentation as a PDF file which can then be viewed using Adobe’s Acrobat software. Or, you can create a video that can be viewed over the web, using a media player, or even on a DVD that can be played on a standard DVD player. You can also create a self-contained presentation that can be saved to a CD or flash drive and viewed with a free PowerPoint viewer. And finally, you can convert a presentation to a Word document that you can give to your attendees as handouts.
All these features are available from the File⇒Export page.
Creating a PDF File
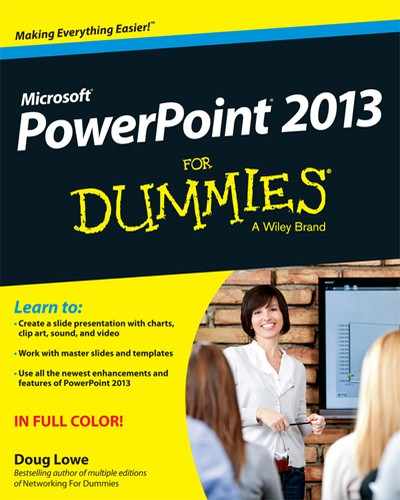
PDF, which stands for Portable Document Format, is a popular format for interchanging files. You can easily convert a PowerPoint presentation to PDF format by following these steps:
1. Choose File⇒Export⇒Create PDF/XPS Document.
2. Click the Create PDF/XPS button.
This brings up the dialog box shown in Figure 19-1.
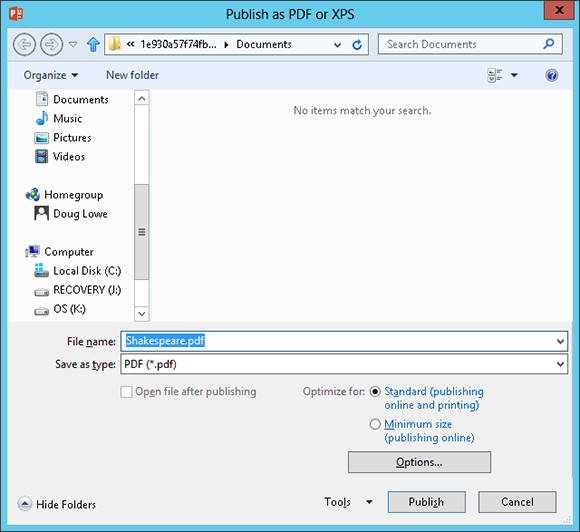
Figure 19-1: Creating a PDF document.
3. Navigate to the location where you want to save the file, and change the filename if you wish.
The default is to save the file in the same folder as the PowerPoint presentation, using the same name but with the extension PDF.
4. Select the appropriate optimization setting.
The two choices are to optimize for standard use or to minimize the file size. The quality will be slightly reduced if you opt to minimize the file size.
5. Click Publish.
The presentation is converted to a PDF file.
Crafting a Video
PowerPoint is great for preparing presentations to give in person. But what about giving presentations when you can’t be there? With digital video cameras practically being given away in cereal boxes these days, just about anyone can record a video of himself giving a presentation. Wouldn’t it be great if you could easily combine the slides from a PowerPoint presentation with a video of you presenting it? Then anyone can watch the presentation later, when you can’t be there.
Good news! Beginning with PowerPoint 2013, you can! In fact, creating a video version of your presentation is a snap. First, you set up the timing you want for each slide and for each animation within each slide. You can even add a voice narration to each slide. After the timings and narration are all set up, you just click a few times with the mouse, and your presentation is converted to video.
Adding timings and narration
PowerPoint includes a nifty feature that lets you record the timings for each slide and for each animation element (such as bullet points appearing). At the same time, you can record your own voice to use as a narration for the presentation.
To record the timings, you essentially rehearse the presentation as if you were giving it to an audience. PowerPoint keeps track of the time between each mouse click or other action and records those timings along with the presentation.
As for the narration, you simply speak your narration into a microphone, and PowerPoint attaches your recorded voice to each slide. Then, when you play back the presentation, the slides are automatically synchronized with the narrations you recorded.
Note that you can also record PowerPoint’s built-in laser pointer. Then, when you play back the show or create a video, the pointer will dance across the screen automatically! For more information about using the laser pointer, refer to Chapter 6.
 You need a microphone plugged into your computer to record narrations. I recommend you get the kind that’s built into a headset rather than a hand-held microphone. The headset microphone will provide more consistent voice quality, plus it will leave your hands free to work your keyboard and mouse while you record the timings, narration, and laser pointer.
To record timings and narration, first plug a microphone into your computer’s microphone input jack. Then, open the presentation and follow these steps:
1. Open the Slide Show tab, choose Record Slide Show and then choose Start Recording from Beginning.
The Record Slide Show dialog box, shown in Figure 19-2, appears. This dialog box simply asks whether you want to record slide timings or narration.

Figure 19-2: Specify what elements you want to record.
2. To record slide timings, select the Slide and Animation Timings check box. To record narrations and the laser pointer, select the Narrations and Laser Pointer check box.
You’ll almost always want to select the Slide and Animation Timings check box. Select the Narrations and Laser Pointer check box only if you want to add your voice narration, the laser pointer, or both.
If you don’t want to record a narration but you would still like the laser pointer to appear in your final video, select the Narrations and Laser Pointer check box. Then, in Step 4, just skip the part about speaking into the microphone.
3. Click OK to begin recording the slide show.
The first slide of your presentation is displayed, and a small toolbar titled Record Slide Show is displayed, as shown in Figure 19-3.
![]()
Figure 19-3: The Record Slide Show toolbar.
4. Speak your narration into the microphone. Press Enter or click the mouse button each time you want to advance to a new slide or call up a new animation element (such as a bullet point).
5. If you want to use the laser pointer on a slide, hold down the Ctrl key and then click and hold the mouse button and use the mouse to control the laser pointer.
When you release the mouse button, the laser pointer disappears. (For more information about working the laser pointer, see Chapter 6.)
6. If you need to pause the recording at any time, click the Pause button that appears in the Record Slide Show toolbar.
The recording is suspended, and a dialog box appears with a button that lets you resume the recording. When you’re ready to continue, click this button.
7. When you’re finished recording, press Esc.
PowerPoint ends the recording and switches to Slide Sorter View, which displays the timings associated with each slide, as shown in Figure 19-4.
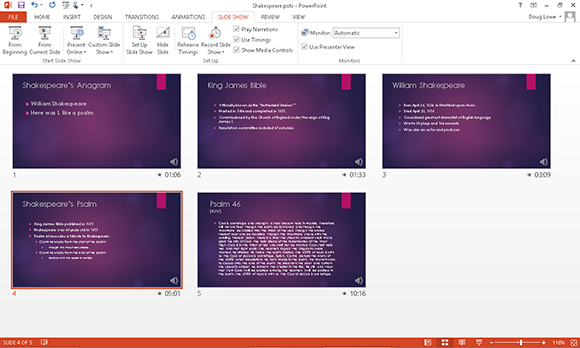
Figure 19-4: PowerPoint displays the slide show in Slide Sorter View so you can see the timings.
8. If you messed up on any slide, select that slide, click Record Slide Show, and then choose Start Recording from Current Slide. Then re-record the timings and narration for that slide. Press Esc to stop recording.
You can re-record more than one slide in this way; just press Enter or click the mouse to advance through all the slides you want to re-record. Press Esc to stop recording.
9. Press F5 or click the Slide Show button on the right side of the status bar to begin the slide show so you can see whether your narration works.
The slide show begins. The narration plays through your computer’s speakers, and the slides advance automatically along with the narration. The laser pointer should also appear if you used it during the recording.
Here are some additional things to keep in mind about narrations:
![]() As you record the narration, leave a little gap between each slide. PowerPoint records the narration for each slide as a separate sound file and then attaches the sound to the slide. Unfortunately, you get cut off if you talk right through the slide transitions.
As you record the narration, leave a little gap between each slide. PowerPoint records the narration for each slide as a separate sound file and then attaches the sound to the slide. Unfortunately, you get cut off if you talk right through the slide transitions.
![]() The narration cancels out any other sounds you placed on the slides.
The narration cancels out any other sounds you placed on the slides.
![]() To delete a narration, click the Record Slide Show button, click Clear, and then click either Clear Narrations on Current Slide (to delete narration from just one slide) or Clear Narration on All Slides (to delete all narration).
To delete a narration, click the Record Slide Show button, click Clear, and then click either Clear Narrations on Current Slide (to delete narration from just one slide) or Clear Narration on All Slides (to delete all narration).
Creating a video
Creating a video from your presentation couldn’t be much easier. Here’s the procedure:
1. (Optional) Record the slide timings and any narration you want to use.
For the procedure to record timings and narration, refer to the preceding section. If you skip this step, each slide will be displayed for a fixed duration in the resulting video.
2. Choose File⇒Export⇒Create a Video.
The Create a Video Backstage View screen is displayed, as shown in Figure 19-5.
3. Select the video quality.
The first drop-down list on the Create a Video page lets you choose whether your video is targeted at computer displays, the Internet, or portable devices.
4. Select whether to use recorded timings and narrations.
If you choose not to use recorded timings, you can set the duration to display each slide. (The default is 5 seconds.)
5. Click Create Video.
A Save As dialog box appears.
6. Select the folder where you want to save the file and enter the filename you want to use.
By default, the video file will be saved in the same folder as the presentation and will have the same name, but with the extension .wmv.
Figure 19-5: Creating a video.
7. Click Save.
The video is created.
 Depending on the size of the presentation and the quality you selected, the video may take a long time to create. A progress bar appears in the status bar to indicate the video’s progress. You can continue doing other work in PowerPoint while the video is being created, but your computer will probably respond sluggishly until the video is finished.
8. When the progress bar completes, the video is finished!
You can view the video in Windows Media Player by navigating to it in Windows Explorer and double-clicking the video’s .wmv file.
Packaging Your Presentation on a CD
Often, you may need to share a PowerPoint presentation with someone who doesn’t own a copy of PowerPoint. Fortunately, PowerPoint includes a Package for CD command that creates a CD with the presentation and a special program called the PowerPoint Viewer that can display the presentation on a computer that doesn’t have PowerPoint installed.
Unfortunately, the PowerPoint Viewer program that’s placed on the CD isn’t able to display all the features of PowerPoint 2013 presentations with the same quality that PowerPoint 2013 displays them. As a result, your presentation may look slightly different when you view it with the PowerPoint Viewer.
To create a CD with your presentation, follow these steps:
1. Open the presentation in PowerPoint and then choose File⇒Export⇒Package Presentation for CD. Then click the Package for CD button.
The Package for CD dialog box appears, as shown in Figure 19-6.

Figure 19-6: The Package for CD dialog box.
2. Click the Options button.
This step summons the Options dialog box, shown in Figure 19-7.
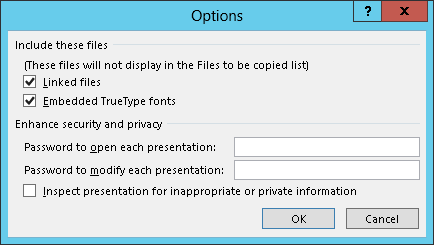
Figure 19-7: The Options dialog box.
3. Look over the options and change any that aren’t set the way you want.
The following list describes each of the options that are available:
• Linked Files: Select this option to include any linked files, such as videos or large audio files.
• Embedded TrueType Fonts: Select this option to ensure that the fonts you use in your presentation will be available when you show the presentation on another computer.
• Password to Open Each Presentation: Enter a password if the presentation contains top-secret information, such as the true whereabouts of Jimmy Hoffa.
• Password to Modify Each Presentation: Enter a password if you want to prevent unauthorized people from changing the presentation.
• Inspect Presentations for Inappropriate or Private Information: Sorry, this option doesn’t check your presentation for off-color jokes or naughty pictures. Instead, it checks for any personal information that might be embedded in your presentation.
4. Click OK to return to the Package for CD dialog box.
5. If you want to add other presentations to the CD, click Add Files, select the files that you want to add, and then click Add.
You can put as many files as will fit on the CD. You can add other PowerPoint presentations or any other files you’d like to add to the CD, such as Word documents or text files.
6. Click Copy to CD.
If you haven’t already inserted a blank CD into the drive, you’re prompted to insert one now. Go ahead and insert a blank CD when prompted.
PowerPoint copies the files to the CD. This might take a few minutes, so now is a good time to catch a few z’s. When the CD is finished, the drive spits it out and asks whether you want to make another copy.
7. Remove the CD and then click Yes if you want to make another copy. Otherwise, click No and then click Close.
You’re done!
The CD is set up so that the presentation should start running all by itself when you insert it into a computer. If it doesn’t, open a My Computer window and then open the CD drive and double-click pptview.exe. A list of presentations on the CD appears. Double-click the one that you want to run, and off you go.
Creating Word Handouts
The final Export topic for this chapter is using the Create Handouts command to create a Word document that you can then print and distribute to your audience. Using this feature is simple; just follow these steps:
1. Choose File⇒Export⇒Create Handouts, then click the Create Handouts button.
This brings up the dialog box shown in Figure 19-8.
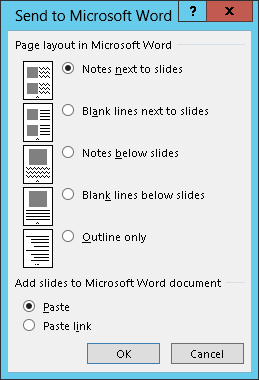
Figure 19-8: Exporting a PowerPoint presentation to Word.
2. Choose the formatting option you want to use.
You have several options for the page layout:
• Slides on the left and notes on the right
• Slides on the left and blank lines on the right
• Slides at the top of the page and notes below the slides
• Slides at the top of the page and blank lines below the slides
• Just the outline
3. Click OK.
PowerPoint grinds and whirs for a bit, then regurgitates the presentation in the form of a Word document, as shown in Figure 19-9.
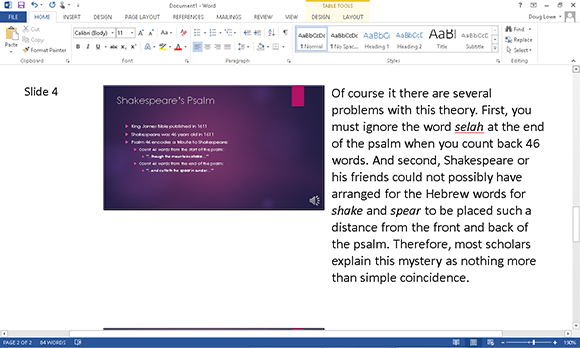
Figure 19-9: A PowerPoint presentation converted to Word.
4. Edit the document as you see fit, then save it.
You’re done!
Note that if you don’t plan on editing the document in Word, there’s no real advantage to exporting the presentation to a Word document. Instead, you can simply print the slides and notes by using PowerPoint’s Print command.