![]()
15
Lights! Camera! Action! (Adding Sound and Video)
In This Chapter
![]() Adding interesting sound effects to your presentation
Adding interesting sound effects to your presentation
![]() Spicing your presentation up with video
Spicing your presentation up with video
![]() Fiddling with audio and video settings
Fiddling with audio and video settings
One of the cool things about PowerPoint is that it lets you create slides that contain not only text and pictures but also sounds and even movies. You can add sound effects, such as screeching brakes or breaking glass to liven up dull presentations. You can even add your own applause, making your presentation like a TV sitcom or game show. You can also add a musical background or a narration to your presentation.
Additionally, you can insert a film clip from The African Queen or a picture of the space shuttle launching if you think that will help keep people awake. This chapter shows you how to add those special effects.
This chapter is short because you can’t do as much with sound and video in PowerPoint as you can with, say, a professional multimedia-authoring program, such as Adobe Director or a video editor such as Adobe Premiere. Still, PowerPoint allows you to paste sound and video elements into your slide show, thus giving you the power to craft some impressive high-tech presentations. And PowerPoint 2013 allows you to perform basic edits on the videos you insert.
Getting Ready to Add Sound to a Slide
A sterile beep used to be the only sound you could get from your computer. Nowadays, you can make your computer talk almost as well as the computers in the Star Trek movies, or you can give your computer a sophomoric sense of audible distaste. At last, the computer can be as obnoxious as the user!
Investigating sound files
Computer sounds are stored in sound files, which come in two basic varieties:
![]() Audio files: Audio files contain digitized recordings of real sounds. These sounds can be sound effects, such as cars screeching, guns firing, or drums rolling; music; or even quotes from movies or your favorite TV shows. (Imagine Darth Vader saying to your audience, “I find your lack of faith disturbing.”)
Audio files: Audio files contain digitized recordings of real sounds. These sounds can be sound effects, such as cars screeching, guns firing, or drums rolling; music; or even quotes from movies or your favorite TV shows. (Imagine Darth Vader saying to your audience, “I find your lack of faith disturbing.”)
Audio files come in two distinct varieties:
• Uncompressed: This type of audio file (including the standard Windows WAV format) provides pristine, clean sound (and packs a large file size to prove it). Both Windows and PowerPoint come with a collection of WAV files that provide simple sound effects such as swooshes, blips, applause, and drum rolls.
• Compressed: For longer sound clips, such as complete songs, the popular formats to use include MP3 and WMA. MP3 is a compressed format that’s popular for sounds obtained from the Internet, and WMA is a newer audio format developed by Microsoft for newer versions of Windows. You can tell the format of a sound file by the filename’s extension (.mp3 or .wma). (There’s an improved version of MP3 out called MP4, but it isn’t used much yet). These files take up a lot less room, although any resident audiophile may scoff at using them. Go ahead and use them anyway — if it sounds right, go with it.
![]() MIDI files: MIDI files contain music stored in a form that the sound card’s synthesizer can play. Think of it like sheet music for your digital piano player. Windows comes with several MIDI files, and you can download many more from the Internet. MIDI files have the file extension
MIDI files: MIDI files contain music stored in a form that the sound card’s synthesizer can play. Think of it like sheet music for your digital piano player. Windows comes with several MIDI files, and you can download many more from the Internet. MIDI files have the file extension .mid.
To insert a sound into a PowerPoint presentation, all you have to do is paste one of these sound files into a slide. Then when you run the presentation in Slide Show View, you can have the sounds play automatically during slide transitions, or you can play them manually by clicking the Sound button.
Fortunately, the national shortage of sound files ended years ago. PowerPoint comes with a handful of useful sound files, including drum rolls, breaking glass, gunshots, and typewriter sounds. Windows comes with some useful sounds, too. But a virtually unlimited supply of sounds is available at your disposal via the Internet. Pop into any of the popular search engines (such as www.google.com) and perform a general search, such as “WAV file collection,” or a specific search, such as “Star Trek sounds.”
Inserting an audio sound object
In this section, I explain how to insert a sound object onto a slide. You can configure the sound object to play automatically whenever you display the slide, or you can set it up so that it will play only when you click the sound object’s icon. Note that if you want the sound to play automatically and the sound is a WAV file, it’s easier to add it to the slide transition (as described in Chapter 9) than to add it as a separate object.
To insert a sound file from your hard drive onto a PowerPoint slide, follow these steps:
1. Move to the slide to which you want to add the sound.
2. Open the Insert tab on the Ribbon, click the Audio button located on the right side of the tab, and then choose Audio on My PC.
The Insert Audio dialog box appears, as shown in Figure 15-1.
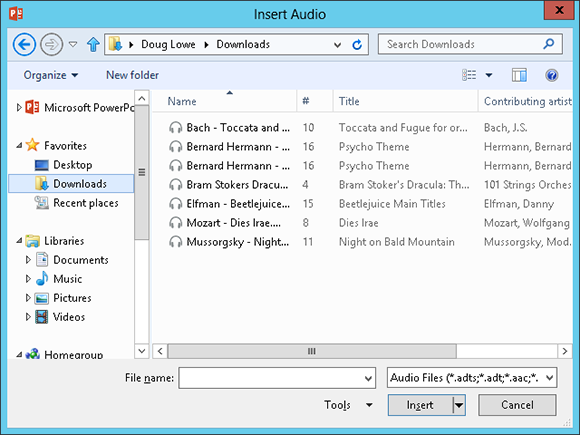
Figure 15-1: The Insert Audio dialog box.
3. Select the audio file that you want to insert.
You may have to rummage about your hard drive to find the folder that contains your sound files. (In Figure 15-1, I navigated over to my Downloads folder to find some MP3 files that I recently downloaded.)
4. Click the Insert button.
The audio file is inserted into the current slide, along with a toolbar of controls that let you play the sound. See Figure 15-2.
 You can also insert sounds from the Internet. To do so, click the Audio button on the Insert task pane tab and then choose Online Audio. Then, you can search for the sound you want to insert.
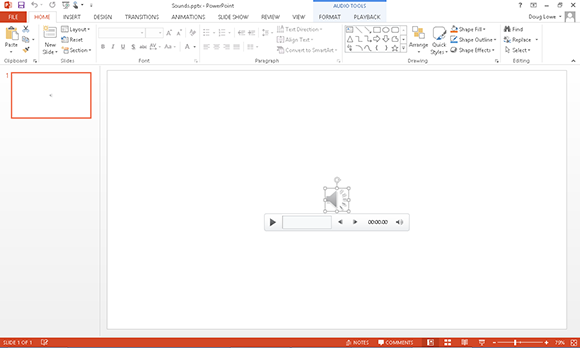
Figure 15-2: A sound inserted onto a slide.
Here are a few other random thoughts on adding sounds to your slides:
![]() To play a sound while working in Normal View, double-click the sound icon. However, to play the sound during a slide show, click only once.
To play a sound while working in Normal View, double-click the sound icon. However, to play the sound during a slide show, click only once.
![]() Remember that you can also play audio files as a part of the slide transition. For more information, see Chapter 9.
Remember that you can also play audio files as a part of the slide transition. For more information, see Chapter 9.
![]() If you change your mind and decide that you don’t want any sounds, you can easily remove them. To remove a sound, click the sound’s icon (which resembles a speaker) and press Delete.
If you change your mind and decide that you don’t want any sounds, you can easily remove them. To remove a sound, click the sound’s icon (which resembles a speaker) and press Delete.
Setting Audio Options
You can control several important aspects of how an audio file is played by selecting the file to reveal the Audio Tools contextual tab on the Ribbon and then opening the Playback tab, shown in Figure 15-3. As you can see, this tab contains several controls that let you edit the way the sound file is played. The following sections explain how to use the most important of these tools.

Figure 15-3: The Audio Tools Playback tab.
Controlling when a sound is played
By default, sounds are not played until you click the sound icon that appears on the slide. If you want a sound to play automatically when the slide is displayed, change the option in the Start drop-down list (found in the Audio Options group on the Audio Tools Playback tab) from On Click to Automatically.
If you select On Click or Automatically, the sound automatically stops when you move to the next slide. To allow the sound to continue over several slides, select the Play Across Slides option from the Start drop-down list.
Looping a sound
If the sound file isn’t long enough, you can loop it so that it plays over and over again. This feature is most useful when you have a subtle sound effect, such as the sound of waves crashing, that you want to continue for as long as you leave the slide visible. To loop an audio clip, just select the Loop Until Stopped check box found in the Audio Options group.
Hiding the sound icon
By default, the icon representing an audio clip is visible on the slide during your slide show. Assuming that you have set the sound to play automatically, you probably don’t want the icon visible.
The Audio Options group includes a check box titled Hide While Not Playing, but it hides the icon only when the sound is not playing; the icon is visible when the sound is playing.
The easiest way to get the icon off of your slides altogether is to simply drag the icon off the edge of the slide that contains it. The sound will still be a part of the slide, so it will play automatically when the slide is displayed. But because the icon is off the edge of the slide, it won’t be visible to your audience.
Fading the sound in and out
The Fade In and Fade Out controls let you gradually fade your audio clip in and out. By default, these controls are both set to 0, so the audio clip begins and ends at full volume. By changing either or both of these controls to a value such as 2 or 3 seconds, you can smoothly fade the sound in or out for a more subtle effect.
Trimming an audio clip
Clicking the Trim Audio button brings up the Trim Audio dialog box, shown in Figure 15-4. This dialog box enables you to select just a portion of the audio clip to play in your presentation by letting you choose start and end times. You can choose the start and end times by dragging the green start pointer or the red end pointer over the image of the audio file’s waveform. Or, you can enter the time (in seconds) in the Start Time and End Time boxes.
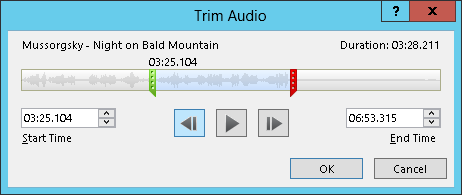
Figure 15-4: The Trim Audio dialog box.
Adding Video to Your Slides
Welcome to the MTV era of computing. If your computer has the chutzpah, you can add small video clips to your presentations and play them at will. I’m not sure why you would want to, but hey, who needs a reason?
Adding a movie motion clip to a slide is similar to adding a sound clip. A crucial difference exists, however, between motion clips and sound bites: Video is meant to be seen (and sometimes heard). An inserted motion clip should be given ample space on your slide.
 If you think that sound files are big, wait till you see how big motion clips are. Ha! They consume hard drive space the way an elephant consumes veggies. The whole multimedia revolution is really a conspiracy started by hard drive manufacturers. (Be aware that you may have trouble sending a PowerPoint presentation bloated with large video files to your friends and colleagues via e-mail because many e-mail servers have limits on the size of e-mail attachments.)
The following steps show you how to add a video clip to a slide:
1. Find a good movie and, if needed, download it or upload it to your hard drive.
The hardest part about using video in a PowerPoint presentation is finding a video file that’s worth showing. Use Google or any other search service to find a video to insert. Then, download the video to your computer. Or, you can create your own videos using a camcorder and video-editing software.
2. Move to the slide on which you want to insert the movie.
Hopefully, you left a big blank space on the slide to put the movie in. If not, rearrange the existing slide objects to make room for the movie.
3. Open the Insert tab on the Ribbon, click Video in the Media group, and then choose Video on My PC.
The Insert Video dialog box, shown in Figure 15-5, appears.

Figure 15-5: Inserting a video.
4. Select the movie that you want to insert.
You may need to scroll the list to find the movie you’re looking for or navigate your way to a different folder.
5. Click the Insert button.
The movie is inserted on the slide, as shown in Figure 15-6.
6. Resize the movie if you want and drag it to a new location on the slide.
When you resize the movie, try to do it by using one of the corner handles. If you drag one of the side handles, you distort the image.
To play the movie while you’re working on the presentation in Normal View, double-click the movie. During a slide show, a single click does the trick, unless you set the movie to play automatically. In that case, the movie runs as soon as you display the slide.
You can also insert a directly from an online source by choosing Online Video rather than Video on My PC in Step 3. Then, you can search for a video online. Note that this option inserts a link to the online video, not the video itself. That means that you must have a working network connection to play the video, and if the owner of the video removes the video, the link won’t work.
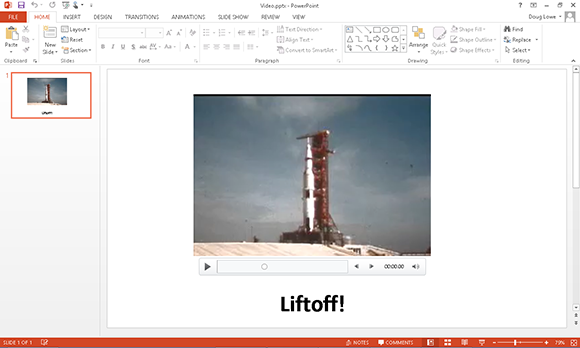
Figure 15-6: A movie inserted on a slide.
Setting Video Options
You can set various options for playing video files via the Video Tools Playback tab on the Ribbon, shown in Figure 15-7. As you can see, this tab contains several controls that let you edit the way the sound file is played. The following sections explain how to use the most important of these tools.

Figure 15-7: The Video Tools Playback tab.
Controlling when a video is played
By default, videos play when you click the Play button that appears beneath the video frame. If you want the video to start automatically when you display the slide, change the option in the Start drop-down list (found in the Video Options group on the Video Tools Edit tab) from On Click to Automatically.
Looping a video
If the video is short, you may want to repeat it over and over again until you move to the next slide. To do so, select the Loop Until Stopped check box found in the Video Options group.
Trimming a video clip
The Trim Video button summons the Trim Video dialog box, which is shown in Figure 15-8. Here, you can select the portion of the video clip you want to play in your presentation. You can choose the start and end points of the video by dragging the start pointer or the red end pointer over the image of the video’s soundtrack wave, which appears immediately beneath the video frame. Or, you can enter the time (in seconds) in the Start Time and End Time boxes.

Figure 15-8: The Trim Video dialog box.
Playing the video full screen
If you want the video to take over the entire screen, select the Play Full Screen check box. Note that this option works best for high-quality videos. If the video is of lower quality, it may not look good when played in full-screen mode.
Fading the video’s sound in and out
The Fade In and Fade Out controls for video clips work just as they do for audio clips (described earlier in this chapter). In other words, they affect the video’s sound track, not the video image itself. You can use these controls to gradually fade the video’s sound in and out.
Adding a bookmark
A bookmark is a marked location within the playback of a video file that can be used to trigger an animation effect. For example, a few seconds into the video of the Apollo 11 launch shown in the previous two figures, the announcer says “Liftoff!” and the rocket begins to rise. It’s a simple matter to create a bookmark at that exact point in the video playback. Then, you can use that bookmark to trigger an animation that causes the word “Liftoff!” to appear beneath the video, as shown in Figure 15-9.

Figure 15-9: Using a bookmark to trigger an animation effect.
Here are the steps for creating a video bookmark and animating an object when the video playback reaches the bookmark:
1. Add a video to the slide.
For this example, I added a video of the Apollo 11 launch that I downloaded from the Internet.
2. Select the video object and then select the Video Tools Playback tab.
This tab was shown earlier in Figure 15-7.
3. Click the Play button that appears beneath the video frame.
The video begins to play.
 4. When the video reaches the point where you want to insert the bookmark, click the Add Bookmark button on the Playback tab (shown in the margin).
The bookmark is created; a small dot appears in the progress bar that appears beneath the video frame to mark the location of the bookmark.
5. Click the Stop button beneath the video frame to stop the video.
6. Create an object on the slide that you will animate when the bookmark is reached during playback.
For this example, I created a text box with the text “Liftoff!”
7. Click the Animations tab.
8. Select the object you created in Step 6 and then click the Add Animation button in the Animations tab. Select the animation effect you want.
For this example, I chose the Appear effect to cause the object to appear.
9. Click the Trigger button on the Animations tab, choose On Bookmark, and then choose the bookmark you created in Step 4.
Doing this sets up the animation so that it is triggered automatically when the bookmark in the video is reached.
You’re done!
Here are a few additional points to ponder concerning bookmarks:
![]() You can create more than one bookmark in a single video. Each bookmark can be used as an animation trigger.
You can create more than one bookmark in a single video. Each bookmark can be used as an animation trigger.

![]() To remove a bookmark, click the small circle that represents the bookmark in the video’s slider bar. Then click the Remove Bookmark button in the Ribbon (shown in the margin).
To remove a bookmark, click the small circle that represents the bookmark in the video’s slider bar. Then click the Remove Bookmark button in the Ribbon (shown in the margin).
![]() For more information about creating animations, refer to Chapter 9.
For more information about creating animations, refer to Chapter 9.