
Chapter 9
Working with Tables
In This Chapter
![]() Creating rows and columns with the TableView control
Creating rows and columns with the TableView control
![]() Using the TableColumn class to format the individual columns of a table
Using the TableColumn class to format the individual columns of a table
![]() Building a simple items list for a TableView
Building a simple items list for a TableView
![]() Editing the contents of a TableView control
Editing the contents of a TableView control
A JavaFX table is one of JavaFX’s most flexible and powerful controls; it lets you display data in a spreadsheet-like format, with rows of data aligned in neat columns. Both horizontal and vertical scrolling is provided automatically, and you can configure the table control to allow the user to edit the contents of the table’s cells.
In this chapter, you discover several classes that work together to create a table. The first is the TableView class, which renders the table within a scene. A table consists of one or more columns that are created using the TableColumn class. Thus, to create a table, you must first create one or more table columns using the TableColumn class, and then use the TableView class to create a table, and finally add the columns to the table.
Because a table control is inextricably bound to an underlying items list, this chapter begins by showing you how to create the items list required to support a table. The sample data used for this chapter is a DVD movie collection that lists each movie’s title, the year it was made, and the price paid for the movie.
Next, you figure out how to display this data in a simple table that shows one row for each movie in the collection. After you know how to do that, I explore how to make the table editable so that the user can correct errors in the data or add new movies to the collection.
Along the way, I discuss how to work with a variety of classes and interfaces that are required to support the workings of a table. It’s going to be a fun ride, so hang on!
Creating the Data for a Table
The underlying data for a table control is an ObservableList, just as for a list view, combo box, or choice box. However, the nature of a table control lends itself to more complicated data structures than can be displayed by a list view or other simple list-based controls. List views, combo boxes, and choice boxes can display just one data value for each item in the underlying list. In contrast, a table can display multiple values from the underlying list, each in its own column.
The most common way to create the items list for a table is to create a custom class that defines the objects that will display in the table. Then, the table can extract the data for each column by calling various methods of the custom data class.
For example, Table 9-1 shows the constructors and methods of a Movie class that will serve as the data model for all the examples shown in this chapter. This class keeps track of three values associated with each movie: title, year, and price. Methods are provided to set or get these values.
Table 9-1 The Movie class
|
Constructor |
Description |
|
Movie() |
Creates an empty Movie object. |
|
Movie(String title, int year, double price) |
Creates a Movie object with the specified title, year, and price. |
|
Method |
Description |
|
String getTitle() |
Gets the title. |
|
void setTitle(String title) |
Sets the title. |
|
int getYear() |
Gets the year. |
|
void setYear(int year) |
Sets the year. |
|
double getPrice() |
Gets the price. |
|
void setPrice(double price) |
Sets the price. |
Notice that the names of these methods all either include the word get or set. That’s required for the class to work as the items list for a table control. In JavaFX parlance, the values these methods access are properties. The name of the property must follow the word get or set; thus, the name of the property accessed by the getTitle and setTitle methods is title. (Notice that the name of the property begins with a lowercase letter, but is capitalized in the get or set method.)
JavaFX properties are actually much more than a naming convention for creating methods to get and set values. Properties have other advanced features as well, such as the ability to automatically bind them together so that when the value of a property in one object changes, the corresponding property value in another object automatically changes as well. And you can create listeners for properties so that code is executed automatically whenever the value of a property changes.
To create a property, you must use one of several predefined classes that implements the Property interface (or create your own class that implements Property). Because working with the Property interface is a complicated topic of its own, I devote an entire chapter to it. Thus, you discover how to create proper properties in Chapter 15. For my purposes here, I use fake properties (I like to call them sham properties), which are simply class fields that can be accessed with get and set methods that follow the same naming conventions actual properties use. As long as the Movie class conforms to these naming standards, it will work as an items list for a table control.
Listing 9-1 shows the source code for the Movie class.
Listing 9-1: The Movie Class
public class Movie
{
private String title; →3
private int year;
private double price;
public Movie() →7
{
this.title = "";
this.year = 0;
this.price = 0.0;
}
public Movie(String title, int year, double price) →14
{
this.title = title;
this.year = year;
this.price = price;
}
public String getTitle() →21
{
return this.title;
}
public void setTitle(String title) →26
{
this.title = title;
}
public int getYear() →31
{
return this.year;
}
public void setYear(int year) →36
{
this.year = year;
}
public double getPrice() →41
{
return this.price;
}
public void setPrice(double price) →46
{
this.price = price;
}
}
The code for this class is pretty straightforward, so I just point out the highlights here:
→ 3: These three private class fields are used internally to hold the title, year, and price for each movie.
→ 7: The default constructor creates a Movie object with no data.
→ 14: This constructor lets the user specify data for the movie’s title, year, and price.
→ 21: The getTitle method retrieves the value of the title property.
→ 26: The setTitle method sets the value of the title property.
→ 31: The getYear method retrieves the value of the year property.
→ 36: The setYear method sets the value of the year property.
→ 41: The getPrice method retrieves the value of the price property.
→ 46: The setPrice method sets the value of the price property.
With this class, you can easily create a Movie object:
Movie m = new Movie("The King's Speech", 2010, 19.95);
Or, if you prefer, you could do it this way:
Movie m = new Movie();
m.setTitle("The King's Speech");
m.setYear(2010);
m.setPrice(19.95);
After you create a Movie object, you must add it to an ObservableList that can be used as the items list for a TableView. The easiest way to do that is to first create the TableView and then use its getItems methods to access the observable list:
TableView<Movie> table = new TableView<Movie>();
table.getItems().add(m);
Notice that TableView is a generic class, so specify the data type when you create it.
In a real-life program, the data displayed by a table will almost certainly come from a file or a database. Thus, you need to write Java code to read the data from the file or database, create an object for each record, and add that record to the list. You probably want to isolate this code into a separate method with a name such as loadData. Then, you can pass the observable list to this method as a parameter.
 Reading data from a file or database is beyond the scope of this book, but if you want to figure out how to do it, I recommend you pick up a copy of my book, Java All-In-One For Dummies, 4th Edition (John Wiley & Sons). That book contains several sample programs that read and write this very data to and from various types of files and databases.
For now, rely on the following method to load the data for the table:
public void loadData(ObservableList<Movie> data)
{
data.add(new Movie("It's a Wonderful Life",
1946, 14.95));
data.add(new Movie("Young Frankenstein",
1974, 16.95));
data.add(new Movie("Star Wars Episode 4",
1976, 17.95));
data.add(new Movie("The Princess Bride",
1987, 16.95));
data.add(new Movie("Glory",
1989, 14.95));
data.add(new Movie("The Game",
1997, 14.95));
data.add(new Movie("Shakespeare in Love",
1998, 19.95));
data.add(new Movie("The Invention of Lying",
2009, 18.95));
data.add(new Movie("The King's Speech",
2010, 19.95));
}
Then, you can call this method whenever you need to load data into the table.
 If you prefer, you can create an ObservableList object without first creating a TableView. JavaFX provides a class named FXCollections that contains several static methods that can create various types of observable lists. One of the most common is an observable array list, which is simply an observable list that’s backed by an ArrayList. Here’s an example of how you could use it in a method that creates an observable array list, populates it with movie data, and returns the observable array list back to the caller:
public ObservableList<Movie> loadData()
{
ObservableList<Movie> data =
FXCollections.observableArrayList();
data.add(new Movie("It's a Wonderful Life",
1946, 14.95));
data.add(new Movie("Young Frankenstein",
1974, 16.95));
data.add(new Movie("Star Wars Episode 4",
1976, 17.95));
data.add(new Movie("The Princess Bride",
1987, 16.95));
data.add(new Movie("Glory",
1989, 14.95));
data.add(new Movie("The Game",
1997, 14.95));
data.add(new Movie("Shakespeare in Love",
1998, 19.95));
data.add(new Movie("The Invention of Lying",
2009, 18.95));
data.add(new Movie("The King's Speech",
2010, 19.95));
return data;
}
Then, you could call the table’s setItems method to load the data, like this:
TableView<Movies> table = new TableView<Movies>();
table.setItems(loadData());
Creating a Read-Only Table
Now that you know how to create the underlying data for a table, time to get to the fun part. In this section, you read about how to create a simple read-only table that displays the movie data with one row per movie and separate columns for the title, year, and price of each movie. Figure 9-1 shows the table that you’re after.
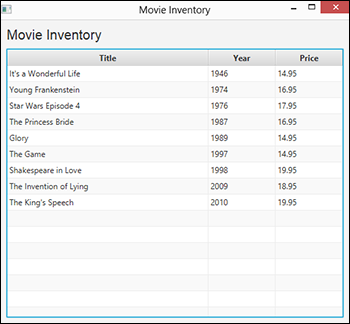
Figure 9-1: A simple read-only table.
You use two main classes to create this table: TableView, which represents the entire table, and TableColumn, which represents an individual column. The next two sections show you how to work first with the TableColumn class to create the three table columns, as shown in Figure 9-1, and then with the TableView class to assemble the columns into a table. After that, you see the source code for the program that created the table shown in Figure 9-1.
Using the TableColumn class
The TableColumn class represents a single column in a table. This class allows you to bind the column to a property in the table’s items list so that cell values are retrieved automatically from the correct property. Table 9-2 lists the most important constructors and methods of this class.
Table 9-2 The TableColumn class
|
Constructor |
Description |
|
TableColumn<S, T>() |
Creates an empty table column. The type S should correspond to the type that’s associated with the TableView and its ObservableList. The type T indicates the type of data displayed in the column. |
|
TableColumn<S, T>(String heading) |
Creates an empty table column with the specified heading text. |
|
Method |
Description |
|
void setMinWidth(double width) |
Sets the minimum width for the column. The table column may expand the width if necessary to display the column’s data. |
|
void setMaxWidth(double width) |
Sets the maximum width for the column. |
|
void setPrefWidth(double width) |
Sets the preferred width for the column. |
|
void setText(String title) |
Sets the heading text. |
|
void setSortable(boolean sortable) |
If true, the user can sort data on this column. (The default is true.) |
|
void setCellValueFactory(PropertyValueFactory f) |
Specifies a factory class that provides values for the cells in this column. Usually specified as an instance of the PropertyValueFactory class. |
To create a table column, first call the constructor. Typically, you specify the text to appear in the column heading when you call the constructor. You need to specify two types for the table column. The first is the type that’s associated with the table itself, which is also the type associated with the table’s items collection. In the example shown throughout this chapter, this type is Movie because the table will display data from an observable list of Movie objects.
The second type is the data type of the property that displays in this column. For the Title property, the type is String. Thus, the constructor for the Title column is:
TableColumn<Movie, String> colTitle =
new TableColumn<Movie, String>("Title");
You also want to set the width of the column, like this:
colTitle.setMinWidth(300);
Here, the column will be at least 300 pixels wide. That should be wide enough to display most movie titles.
Next, you need to associate a property from the table’s item collection with the column. To do that, call the setCellFactory method and supply a cell factory. A cell factory is a special type of object that supplies cell values to the table column. The easiest way to provide a cell factory is to use the PropertyValueFactory class, which lets you create a cell factory that returns a named property from the table’s item collection.
Here’s the code to accomplish that for the Title column:
colTitle.setCellValueFactory(
new PropertyValueFactory<Movie, String>("Title"));
This statement calls the constructor of the PropertyValueFactory class, specifying Movie as the type of object that the property will be retrieved from and String as the property’s value type, and passing the property’s name (Title) as the sole argument for the constructor. The net effect of this statement is that the property value factory will call the getTitle method of the Movie class to populate the cells of this column.
For the sake of clarity, I simplified the signature of the setCellValueFactory method in Table 9-2. The actual signature is this:
void setCellValueFactory(
Callback<TableColumn.CellDataFeatures<S,T>,
ObservableValue<T>> value)
Whew! That’s a mess. What it means is that the cell value factory must implement the Callback interface with the correct data types. The PropertyValueFactory class is designed specifically to work with the setCellValueFactory method, so it does indeed implement the Callback interface.
The code necessary to create the other two columns is only slightly different because rather than string values, they deal with integer and double values. Here’s the code to create the Year column:
TableColumn<Movie, Integer> colYear =
new TableColumn("Year");
colYear.setMinWidth(100);
colYear.setCellValueFactory(
new PropertyValueFactory<Movie, Integer>("Year"));
And here’s the code for the Price column:
TableColumn<Movie, Double> colPrice =
new TableColumn("Price");
colPrice.setMinWidth(100);
colPrice.setCellValueFactory(
new PropertyValueFactory<Movie, Double>("Price"));
Notice in both cases that the T type specifies the wrapper Integer and Double classes rather than the native int and double types.
Using the TableView class
After you create the table columns, the next step is to create a table and add the columns to the table. To do that, use the TableView class, which I discuss in Table 9-3.
Creating a table view control requires several steps, which do not necessarily have to be done in this order:
- Call the TableView constructor to create the table view control.
- Add the table columns to the table view.
The easiest way to do that is to call the getColumns method, which returns the list of columns as an observable list. Then, use the addAll method to add the columns.
- Add data to the items list.
I discuss several ways to do that in the earlier section “Creating the Data for a Table.”
Table 9-3 The TableView class
|
Constructor |
Description |
|
TableView<S>() |
Creates a new table view. The type S specifies the type of the objects contained in the items list. |
|
TableValue<S>(ObservableList list) |
Creates a new table view using the specified list as its items list. |
|
Method |
Description |
|
ObservableList getColumns() |
Gets the list of columns that are displayed by the table. |
|
ObservableList getItems() |
Gets the list of items that serves as the data source for the table. |
|
void setItems(ObservableList list) |
Sets the list of items used as the data source to the table. |
|
TableViewSelectionModel getSelectionModel() |
Gets the selection model, which allows you to work with rows selected by the user. |
Here’s one way to accomplish these steps for the example you’ve been looking at throughout this chapter:
TableView<Movie> table = new TableView<Movie>();
table.getColumns().addAll(colTitle, colYear, colPrice);
table.setItems(loadData());
The loadData method used here is the one that was shown right at the end of the section “Creating the Data for a Table.” It returns an ObservableList that contains the Movie objects to be displayed.
You could alternatively create the table and load its data in one statement by passing the loadData method to the TableView constructor, like this:
TableView<Movie> table =
new TableView<Movie>(loadData());
After you create a table and add columns and data items, you can display the table in a scene by adding it to a layout pane, adding the pane to the scene, and then setting the stage with the scene and showing the stage. The following section presents the code for a complete program that does precisely that.
A Program That Creates a Read-Only Table
Listing 9-2 shows the complete source code for a program that creates a read-only TableView control. The scene displayed by this program was shown earlier in Figure 9-1. (Note: To run, this program requires that the Movie class, which was shown in Listing 9-1, exist in the same folder.)
Listing 9-2: The MovieInventory Program
import javafx.application.*;
import javafx.stage.*;
import javafx.scene.*;
import javafx.scene.control.*;
import javafx.scene.layout.*;
import javafx.scene.text.*;
import javafx.scene.control.cell.*;
import javafx.collections.*;
import javafx.geometry.*;
public class MovieInventory extends Application
{
public static void main(String[] args)
{
launch(args);
}
@Override public void start(Stage primaryStage) {
Label lblHeading = new Label("Movie Inventory"); →20
lblHeading.setFont(new Font("Arial", 20));
TableView<Movie> table = new TableView<Movie>(); →23
table.setItems(loadData()); →24
TableColumn<Movie, String> colTitle = new TableColumn("Title"); →26
colTitle.setMinWidth(300);
colTitle.setCellValueFactory(
new PropertyValueFactory<Movie, String>("Title"));
TableColumn<Movie, Integer> colYear = new TableColumn("Year"); →31
colYear.setMinWidth(100);
colYear.setCellValueFactory(
new PropertyValueFactory<Movie, Integer>("Year"));
TableColumn<Movie, Double> colPrice = new TableColumn("Price"); →36
colPrice.setMinWidth(100);
colPrice.setCellValueFactory(
new PropertyValueFactory<Movie, Double>("Price"));
table.getColumns().addAll(colTitle, colYear, colPrice); →40
VBox paneMain = new VBox(); →42
paneMain.setSpacing(10);
paneMain.setPadding(new Insets(10, 10, 10, 10));
paneMain.getChildren().addAll(lblHeading, table);
Scene scene = new Scene(paneMain); →47
primaryStage.setScene(scene);
primaryStage.setTitle("Movie Inventory");
primaryStage.show();
}
public ObservableList<Movie> loadData() →53
{
ObservableList<Movie> data =
FXCollections.observableArrayList();
data.add(new Movie("It's a Wonderful Life",
1946, 14.95));
data.add(new Movie("Young Frankenstein",
1974, 16.95));
data.add(new Movie("Star Wars Episode 4",
1976, 17.95));
data.add(new Movie("The Princess Bride",
1987, 16.95));
data.add(new Movie("Glory",
1989, 14.95));
data.add(new Movie("The Game",
1997, 14.95));
data.add(new Movie("Shakespeare in Love",
1998, 19.95));
data.add(new Movie("The Invention of Lying",
2009, 18.95));
data.add(new Movie("The King's Speech",
2010, 19.95));
return data; }
}
I’ve already shown and explained most of the code in this program earlier in this chapter, so I just point out a few of the highlights here:
→ 20: These two lines create the label that appears above the table view control.
→ 23: This line calls the TableView constructor to create a new TableView object, specifying Movie as the underlying data type.
→ 24: The items list is created by calling the loadData method, which appears later in the program at line 53.
→ 26: These lines create the first column, which displays the Title property from the Movie class. The width of the column is set to a minimum of 300 pixels.
→ 31: These lines create the second column, which displays the Year property from the Movie class. The minimum width is set to 100 pixels.
→ 36: These lines create the third column, which displays the Price property from the Movie class. The minimum width for this column is also set to 100 pixels.
→ 40: The three columns are added to the table view control.
→ 42: A VBox layout pane is created and the heading label and table view controls are added to it.
→ 47: The scene and stage are constructed and shown.
→ 53: The loadData method creates the item list, loading it with data for nine movies. The value returned from this method is used as the item list for the table view control.
Creating an Editable Table
Now that you know how to create a read-only table, the next step is to add the ability to add and remove rows from the table or edit the cells within an existing row. The following sections show you how to do that.
Adding table rows
To allow the user to add a row, you need to provide text boxes within which the user can enter data and an Add button the user can click to create a new row using the data entered by the user. In the OnAction event for the button, you simply create a new object using the data the user entered into the text field and then add the object to the table’s items collection.
Assuming you have created text fields named txtTitle, txtYear, and txtPrice, here’s a method you can call from the event handler for the Add button to add a new Movie item to the items collection:
public void btnAdd_Clicked()
{
Movie m = new Movie();
m.setTitle(txtTitle.getText());
m.setYear(Integer.parseInt(txtYear.getText()));
m.setPrice(Double.parseDouble(txtPrice.getText()));
table.getItems().add(m);
txtTitle.clear();
txtYear.clear();
txtPrice.clear();
}
This method starts by creating a new Movie object and setting the Title, Year, and Price properties to the values entered by the user. Then, the method adds the new Movie object to the items collection. Finally, the method clears the three text boxes.
Notice that the static parse methods of the Integer and Double wrapper classes are used to convert the string values entered into the text fields into valid integer and double values. Unfortunately, these methods do not do any reasonable amount of data validation; if the user enters a value that can’t be converted to an integer or a double, the parse method will throw an exception, which this method doesn’t handle. I leave it to you to figure out how to add data validation and error messages to this code.
Deleting table rows
Deleting an item from a table view requires simply that you add a Delete button to the scene. The user can then delete one or more rows by selecting the rows and then pressing the Delete button. Here’s a method you could call from the OnAction handler for a Delete button:
public void btnDelete_Clicked()()
{
ObservableList<Movie> sel, items;
items = table.getItems();
sel = table.getSelectionModel().getSelectedItems();
for (Movie m : sel)
{
items.remove(m);
}
}
This method accesses both the items collection of the table and the selectedItems collection of the table’s selection model. Then, a for-each loop is used to delete every item in the selectedItems collection from the items collection.
This method does not verify that the user really wants to remove the selected rows. In a more realistic program, you’d want to first display an alert box asking the user whether she really wants to delete the rows. Then, you’d delete the rows only if the user clicks Yes.
Editing table cells
To allow users to edit individual table cells, you need to do three things:
- Mark the table as editable by calling the setEditable method, passing a value of true.
- Create a cell factory for each column that you want to allow the user to edit.
You do that by calling the setCellFactory method of the TableColumn class.
- Add an event listener that’s called whenever the user finishes editing a table cell.
This listener is responsible for updating the items collection with the data entered by the user.
To allow the user to edit the contents of a column, you must set a cell factory for the column. A cell factory is an object that renders the content of a cell. By default, the cell factory renders the content as a text object. To enable editing, provide a cell factory that renders the content as a text field.
The easiest way to create a text field in a table column is to use the TextFieldTableCell. This class includes a static method named forTableColumn that returns a cell factory suitable for editing data with a text box. Here’s how you use it:
colTitle.setCellFactory(
TextFieldTableCell.forTableColumn());
It’s as simple as that. After the cell factory is set up, the cell will turn into a text field whenever the user clicks it. The user can then edit the data in the text field. When the user presses Enter or Tab or clicks outside the field, the text field is replaced once again with a simple text object.
The only problem remaining is that although the cell factory lets the user edit the contents of a cell via the text field, the cell factory does not automatically update the table’s items collection to reflect any changes the user might make when editing the cell. To do that, you must set up an action listener that responds when the user finishes editing the cell. Then, in that listener, you can update the items collection.
Here’s how you can use a Lambda expression to set up a listener for the onEditComit event:
colTitle.setOnEditCommit(
e -> colTitle_OnEditCommit(e) );
In this example, the method colTitle_OnEditCommit will be called whenever the user finishes editing the contents of a cell in the Title column.
Writing the event handler for the OnEditCommit event is a little tricky. The OnEditCommit event generates an event object of type CellEditEvent, which contains important information you need to access in the event handler. Table 9-4 lists the methods of this class.
Table 9-4 The CellEditEvent class
|
Method |
Description |
|
T getNewValue() |
Gets the new value entered by the user. |
|
T getOldValue() |
Gets the previous value of the cell. |
|
S getRowValue() |
Gets the data object for the row edited by the user. |
|
TableColumn<S, T> get TableColumn() |
Gets the table column on which this event occurred. |
|
TableView<S> |
Gets the table view on which this event occurred. |
|
TableValue<S>(ObservableList list) |
Creates a new table view using the specified list as its items list. |
The CellEditEvent class contains information you can use to update the items collection with the new data entered by the user. Specifically, the getRowValue method returns the items collection object for the row that’s being edited, and the getNewValue method contains the updated value entered by the user. After you get the row object, you can update the appropriate property with the new value.
Unfortunately, the CellEditEvent class has more than one method, which disqualifies it as a functional class that can be used in a Lambda expression. So in the preceding example, the e parameter that’s passed into the Lambda function is passed as a generic Event rather than as the more specific CellEditEvent. The Lambda function, in turn, passes this argument to the colTitle_OnEditCommit method, which must receive it as an Event. This method then casts it to a CellEditEvent so that it can access the getRowValue and getNewValue methods.
public void colTitle_OnEditCommit(Event e)
{
TableColumn.CellEditEvent<Movie, String> ce;
ce = (TableColumn.CellEditEvent<Movie, String>) e;
Movie m = ce.getRowValue()
m.setTitle(ce.getNewValue());
}
With this event handler in place, the user can update the title of any movie by double-clicking the title, typing a new value, and pressing Enter.
A Program That Creates an Editable Table
Listing 9-3 shows a refined version of the movie inventory program that was written in Listing 9-2. This program adds the ability to edit existing movies as well as the ability to add and delete movies. The scene displayed by this program is shown in Figure 9-2. (Note: To run, this program requires that the Movie class, which was discussed in Listing 9-1, exist in the same folder.)

Figure 9-2: The MovieInventoryEditor program in action.
Listing 9-3: The MovieInventoryEditor Program
import javafx.application.*;
import javafx.stage.*;
import javafx.scene.*;
import javafx.scene.control.*;
import javafx.scene.layout.*;
import javafx.scene.text.*;
import javafx.event.*;
import javafx.scene.control.cell.*;
import javafx.beans.property.*;
import javafx.collections.*;
import javafx.geometry.*;
import javafx.util.converter.*;
public class MovieInventoryEditor extends Application
{
public static void main(String[] args)
{
launch(args);
}
private TableView<Movie> table;
private TextField txtTitle, txtYear, txtPrice;
@Override public void start(Stage primaryStage) {
Label lblHeading = new Label("Movie Inventory");
lblHeading.setFont(new Font("Arial", 20));
table = new TableView<Movie>();
table.setEditable(true);
table.setItems(loadData());
TableColumn colTitle = new TableColumn("Title");
colTitle.setMinWidth(300);
colTitle.setCellValueFactory(
new PropertyValueFactory<Movie, String>("Title"));
colTitle.setCellFactory( →37
TextFieldTableCell.forTableColumn());
colTitle.setOnEditCommit( e -> colTitle_OnEditCommit(e) ); →39
TableColumn colYear = new TableColumn("Year");
colYear.setMinWidth(100);
colYear.setCellValueFactory(
new PropertyValueFactory<Movie, Integer>("Year"));
colYear.setCellFactory( →45
TextFieldTableCell.forTableColumn(
new IntegerStringConverter()));
colYear.setOnEditCommit( e -> colYear_OnEditCommit(e) ); →48
TableColumn colPrice = new TableColumn("Price");
colPrice.setMinWidth(100);
colPrice.setCellValueFactory(
new PropertyValueFactory<Movie, Double>("Price"));
colPrice.setCellFactory( →54
TextFieldTableCell.forTableColumn(
new DoubleStringConverter()));
colPrice.setOnEditCommit( e -> colPrice_OnEditCommit(e) ); →57
table.getColumns().addAll(colTitle, colYear, colPrice);
txtTitle = new TextField(); →61
txtTitle.setPromptText("Title");
txtTitle.setMinWidth(100);
txtYear = new TextField(); →65
txtYear.setMaxWidth(100);
txtYear.setPromptText("Year");
txtPrice = new TextField(); →69
txtPrice.setMaxWidth(100);
txtPrice.setPromptText("Price");
Button btnAdd = new Button("Add"); →73
btnAdd.setMinWidth(60);
btnAdd.setOnAction(e -> btnAdd_Clicked() );
Button btnDelete = new Button("Delete"); →77
btnDelete.setMinWidth(60);
btnDelete.setOnAction(e -> btnDelete_Clicked() );
HBox paneAdd = new HBox(); →81
paneAdd.setSpacing(8);
paneAdd.getChildren().addAll(txtTitle, txtYear, txtPrice,
btnAdd, btnDelete);
VBox paneMain = new VBox();
paneMain.setSpacing(10);
paneMain.setPadding(new Insets(10, 10, 10, 10));
paneMain.getChildren().addAll(lblHeading, table, paneAdd);
Scene scene = new Scene(paneMain);
primaryStage.setScene(scene);
primaryStage.setTitle("Movie Inventory");
primaryStage.show();
}
public ObservableList<Movie> loadData()
{
ObservableList<Movie> data =
FXCollections.observableArrayList();
data.add(new Movie("It's a Wonderful Life",
1946, 14.95));
data.add(new Movie("Young Frankenstein",
1974, 16.95));
data.add(new Movie("Star Wars Episode 4",
1976, 17.95));
data.add(new Movie("The Princess Bride",
1987, 16.95));
data.add(new Movie("Glory",
1989, 14.95));
data.add(new Movie("The Game",
1997, 14.95));
data.add(new Movie("Shakespeare in Love",
1998, 19.95));
data.add(new Movie("The Invention of Lying",
2009, 18.95));
data.add(new Movie("The King's Speech",
2010, 19.95));
return data;
}
public void colTitle_OnEditCommit(Event e) →125
{
TableColumn.CellEditEvent<Movie, String> ce;
ce = (TableColumn.CellEditEvent<Movie, String>) e;
Movie m = ce.getRowValue();
m.setTitle(ce.getNewValue());
}
public void colYear_OnEditCommit(Event e) →133
{
TableColumn.CellEditEvent<Movie, Integer> ce;
ce = (TableColumn.CellEditEvent<Movie, Integer>) e;
Movie m = ce.getRowValue();
m.setYear(ce.getNewValue());
}
public void colPrice_OnEditCommit(Event e) →141
{
TableColumn.CellEditEvent<Movie, Double> ce;
ce = (TableColumn.CellEditEvent<Movie, Double>) e;
Movie m = ce.getRowValue();
m.setPrice(ce.getNewValue());
}
public void btnAdd_Clicked() →149
{
Movie m = new Movie();
m.setTitle(txtTitle.getText());
m.setYear(Integer.parseInt(txtYear.getText()));
m.setPrice(Double.parseDouble(txtPrice.getText()));
table.getItems().add(m);
txtTitle.clear();
txtYear.clear();
txtPrice.clear();
}
public void btnDelete_Clicked() →161
{
ObservableList<Movie> sel, items;
items = table.getItems();
sel = table.getSelectionModel().getSelectedItems();
for (Movie m : sel)
items.remove(m);
}
}
Because this program builds on the program that was written in Listing 9-2, I just point out the important differences here:
→ 37: This line creates the cell factory for the Title column.
→ 39: This line creates the OnEditCommit event listener for the Title column. The event handler calls the colTitle_OnEditCommit method, passing the Event object e as an argument.
→ 45: This line creates the cell factory for the Year column.
→ 48: This line creates the OnEditCommit event listener for the Year column. The event handler calls the colYear_OnEditCommit method, passing the Event object e as an argument.
→ 54: This line creates the cell factory for the Price column.
→ 57: This line creates the OnEditCommit event listener for the Price column. The event handler calls the colPrice_OnEditCommit method, passing the Event object e as an argument.
→ 61: These lines create the txtTitle text field in which the user can enter the title for a new movie.
→ 65: These lines create the txtYear text field in which the user can enter the year for a new movie.
→ 69: These lines create the txtPrice text field in which the user can enter the price for a new movie.
→ 73: These lines create the Add button. The event handler calls the btnAdd_Clicked method.
→ 77: These lines create the Delete button. The event handler calls the btnDelete_Clicked method.
→ 81: These lines create an HBox layout pane and add the three text fields and the two buttons to it.
→ 125: The colTitle_OnEditCommit method is called when the user commits an edit for a Title cell. It updates the Movie item from the items list with the new value entered by the user.
→ 133: The colYear_OnEditCommit method is called when the user commits an edit for a Year cell. It updates the Movie item from the items list with the new value entered by the user.
→ 141: The colPrice_OnEditCommit method is called when the user commits an edit for a Price cell. It updates the Movie item from the items list with the new value entered by the user.
→ 149: The btnAdd_Clicked method is called when the user clicks the Add button. This method creates a new Movie object using data from the text fields and then adds the new object to the items list. It then clears the text fields.
→ 161: The btnDelete_Clicked method is called when the user clicks the Delete button. It gets the list of selected items from the selection model and then uses that list to remove all the selected items from the items list.