

THERE ARE several important practical matters to think about when prototyping. First and foremost, before working in a machine or woodworking shop, we need to prepare by learning basic shop safety lessons. We thus start this appendix with a brief overall summary of shop safety. Then we discuss how we select materials, build things, and choose fasteners, as we build models and prototypes.
A.1 WORKING SAFELY IN A SHOP
Safety in the workshop is critically important. Power tools can easily cause dismemberment and death. A moment's inattention can lead to a permanent change in lifestyle and career. Take these safety warnings seriously:
- Do not use equipment or machinery for which you have not been trained.
- Use protective gear and dress properly.
- Do not use power or machine tools when you are tired or intoxicated.
- Always have a buddy with you in the shop.
Almost all machine tools come with brochures that detail their safe use. Read that documentation. The time you spend may save you a finger or an eye. Most facilities have training programs or videos available, so be sure to ask for them and use them. In fact, you are often not allowed to use machinery or shops until you have passed the safety training. Do not try to bypass or cheat on the training. The main rule is: Keep your body parts away from sharp moving objects. There is almost always a safe way to do something. Learn what that safe way is.
Individual shops will have their own safety requirements for dress and protective gear. Consider the following to be a minimal set of requirements:
- Always wear eye protection, safety goggles, or safety glasses, while using tools or when you are near someone who is. Drills, lathes, mills, and saws produce shavings that often become airborne. Hammers do shatter, and objects being struck by hammers often break or go flying off. Wrenches and screwdrivers tend to be less hazardous to eyes, but freak accidents do occur. Keep your eyes safe.
- Keep your hair short or pulled back and out of the way. Spinning drills, mills, and lathes seem to have a magnetic attraction for long hair, and it can easily get trapped by a rapidly spinning drill chuck or a speeding saw band. Hair pulled back into a ponytail still presents a hazard if the hair can fall forward into a machine. Keep your hair intact.
- Always wear full-coverage shoes with a sturdy sole. Sandals or flip-flops will not protect you from dropped tools or hot metal shavings. Thin soles will not protect you from sharp objects found on the floor. Protect your feet.
- Wear long, non-baggy pants. As with shoes, long pants will protect your legs against hot flying metal shavings and other hazards. Baggy pants can get caught in moving or rotating machinery. Pants don't have to be tight, but the closer they fit, the less chance you have of getting them caught on something.
- Wear short-sleeved shirts or blouses. Many serious injuries and fatalities are caused when loose clothing gets caught in moving machinery. Short sleeves represent a trade-off between protecting an arm and getting a sleeve caught in a drill press or a mill. Rolled-up long sleeves don't count because they can unroll and get tangled in the machinery. Any loose fabric that is within a foot of your hands is likely to get caught in a machine tool that you are using.
- Do not wear jewelry around machine tools. Take the jewelry off and store it somewhere safe. Necklaces, watches, and bracelets are the most dangerous items, but rings, earrings, and other piercings can get caught and do damage.
Check that there is proper protection against fumes or particulates. Make sure ventilation is adequate, and that you meet requirements regarding particulates. Fatigue and intoxication cause many industrial accidents. It is far better to miss a deadline (or risk a lower grade!) and keep all of your fingers than it is to miss the deadline (or get the lower grade) anyway because you had to make an unplanned trip to the emergency room or spend time in the hospital!
A.2 SELECTING MATERIALS
There are many choices for a material to use to building a prototype or model. Here we review a few of the most common materials and their basic properties to provide a basis for choosing appropriate materials.
Paper and cardboard are suitable for inexpensive models that do not have to support large loads. They are also good stand-ins when a properly equipped workshop is not available. Paper and cardboard are usually measured and marked with rulers, pencils, compasses, and templates or stencils. They are usually cut with scissors, paper cutters, or knives such as box cutters or hobby knives. They are usually folded or rolled into their final shapes, and fastened with glue, paste, tape, staples, or roundhead fasteners.
Wood is usually purchased as lumber. Lumber comes from a number of different trees, each with its own properties, and may come green or dried. Green wood is lumber that has not been allowed to dry after being cut to shape and will change in dimension quite drastically with time. Dried lumber, especially kiln-dried, has had much of the moisture removed from it and will remain much more dimensionally stable. Lumber is also classified as softwood (such as Douglas fir, pine, or redwood), or hardwood (such as oak, cherry, or walnut). The nominal sizes of softwood lumber range from 1 in. × 2 in. to 8 in. × 8 in. The most common nominal size is 2 in. × 4 in. Standard lengths range from 4 to 16 ft. The true dimensions are usually less than the nominal and vary with water content. A dried softwood 2 in. × 4 in. is actually closer to 1½in. × 3½in. The nominal length is usually close to the true length. Hardwoods are also available in fractional sizes from 3/8 in. on up. The nominal sizes of hardwoods are usually a little closer to the true dimensions. Softwoods are much less expensive than hardwoods, while hardwoods tend to be stronger and more wear-resistant.
Wood is an anisotropic material, that is, the properties along the grain differ greatly from those across the grain. The tensile strength is much greater along the grain than across. Thus we have to think carefully about stress directions when using wood. For example, beams carry their loads by developing stresses in the direction normal to their given applied loads.
Wood can be cut with assorted handsaws and power saws, including band saws and scroll saws. It can be shaped with a wood lathe, a router, or a power sander. It can be drilled with either a hand drill or a drill press.
Wood dimensions and flatness will vary with humidity and exposure to water or other absorbable fluids. It is very difficult to maintain tight dimensional tolerances in wood. Expansion spaces have to be designed into closed wood structures (such as boxes or drawers) so that undue stress is not placed in the wood as it expands and contracts in response to the weather.
Plywood is a composite material that is made from thin layers of wood glued together. There are a large number of different grades and thicknesses. The standard size sheet is 4 ft × 8 ft. Plywood is much more dimensionally stable than wood, and much more uniform in properties. However, it is also anisotropic, being much stronger in the plane of the layers than it is in a direction normal to the layers. It can be shaped with the same tools used for wood, but will cause faster wear on the cutting tools.
Polymers or plastics such as PVC, ABS, polystyrene, and acrylic are available in a number of preformed shapes, including sheets, bars, strips, film, rods, disks, tubes and pipes, and U-channels. Most of the polymers can be shaped with the same tools as wood. They can also be cut or shaped on the same machine tools used for metals if the tool's speed is suitably adjusted. Polymers can hold tight tolerances quite well and, depending on the polymer, can be machined into quite intricate shapes. There are usually solvent-based adhesives for joining one piece of a polymer to another piece of the same polymer. If properly done, the joint has the same strength as the bulk material. Polymers are not as strong or stiff as aluminum or steel, but they can be quite strong in some applications.
Aluminum is available in a large number of grades and shapes. Bulk aluminum is available as sheets, bars, strips, film, rods, disks, tubes, and U-channels, among other shapes. Aluminum is quite strong and light. It is not as strong as steel, but it is easier to shape and machine. It holds dimensional tolerances very well. It can be cut with a band saw or hacksaw, machined with metal lathes or mills, and holes can be drilled with a mill, drill press, or hand drill. Aluminum has very high thermal and electrical conductivities. If not brought into contact with iron or steel, aluminum is quite resistant to corrosion at room temperature. Aluminum melts at a fairly low temperature and is not suitable for parts that will be exposed to high temperatures. Certain aluminum alloys can be welded, but it requires specialized tools. Aluminum is best joined with fasteners such as machine screws or rivets.
Mild steel is denser and stronger than aluminum. Bulk steel is also available as sheets, bars, strips, film, rods, disks, tubes, U-channels, and other shapes. It can also be cut with a band saw or hacksaw, machined with metal lathes or mills, and holes can be drilled with a mill, drill press, or hand drill. However, the cutting tools will experience increased wear with steel and the cutting speeds will be lower. Steel does require protection against corrosion. Perhaps the major use of steel in hand-built prototypes is in sheet form, and sheet steel is easily spot welded (see Section A.5).
The following are the two final details on materials: First, the choice of materials will be governed by cost, model performance requirements (e.g., are we building a true prototype or a model?), and access to cutting and shaping tools. Second, we will also need fasteners made of appropriate materials in order to connect the parts of our model or prototype together. Fasteners include things such as nails, wood screws, machine screws, sheet metal screws, bolts, nuts, washers, and pins. We will now detail the process of selecting fasteners and the techniques for properly using and installing a fastener.
A.3 BUILDING TECHNIQUES
This section describes some of the basic techniques for shaping and joining materials. There are many sites on the Web and in reference libraries that provide further information.
Straight edges in wood and polymers are usually best cut with a table saw or a band saw that has a guide rail. The rail is set at the required distance from the blade, the piece is held firmly against the guide rail, and the piece is then pushed through the saw. Be sure to use a push stick or rod if necessary to keep your fingers a safe distance away from the blade. Straight edges in metal are usually rough cut with a band saw or cutting wheel, and then finished or faced with a mill.
Curved edges in wood or plastic are usually cut with a band saw or scroll saw. The desired profile is drawn in pencil on the wood and then the pencil line is used to guide the saw. Care must be taken not to bind the saw blade (put lateral forces on it) when cutting curves. The curve can be hand or power sanded to smooth off the saw cut. Curved edges in metal may be cut with a proper band saw. The blade should be appropriate for the metal being cut and a great deal of patience will be required, because it will take much longer to cut metal than it would a similar thickness of wood. The curve can be filed or hand- or power-sanded to a final shape.
Cylindrically symmetric profiles can be formed in wood on a wood lathe, and in metal and polymers on a metal lathe. Since the operation of lathes and similar tools is beyond our scope, be sure to obtain the proper training if you feel that use of such tools would be appropriate to your task.
Holes are used to allow passage for a fastener or for something like an axle, a cable, or a tube. In mass-produced items, the locations of such joiner holes are specified with geometric tolerances that determine whether parts are easily interchangeable. In models and one-offs, it is usually quicker and easier to clamp two parts together and drill through both at once to obtain both of the required holes. The parts may then not be interchangeable, depending on the care with which the holes were drilled, but the holes will be aligned and the fastener or cable will pass through properly. Similarly, it may be better to drill a passageway hole after parts are assembled. Then the hole is guaranteed to pass smoothly through all of the required parts.
Pieces of wood may be joined together in several different ways, the quickest being staples or nails. Both nails and staples can produce strong joints, but they can also easily split the wood if they are improperly sized or used. Wood pieces can also be glued together using white glue or carpenter's glue, but the glue joints must be made along the grain on both pieces. Pieces of wood cannot be successfully glued together if their glue is applied across end grains. The need to glue along the grain is one of the reasons that the mortise-and-tenon joint is used in to make wood cabinets and furniture. The strongest wood joint is formed when gluing is combined with a fastener such as a nail.
A wood screw is used to join two pieces of wood together or to fasten another material, such as plastic, to a wooden surface. The top piece of wood should have a clearance hole drilled so that the screw can slide through without touching the hole walls. The bottom piece should have a pilot hole drilled to keep the wood from splitting. Table A.1 gives approximate dimensions for both clearance and pilot holes for different screw sizes. The actual size will depend on the hardness and moisture content of the wood.
Rub a screw with soap or wax before screwing it into hardwood. If brass screws are wanted, thread their holes with a steel screw of the same size before screwing in the brass screw. Brass is much softer than steel and the screw might be damaged (especially in hardwood) if it is used both to thread the hole and to hold the pieces together.
The heads of wood screws are flat, oval, or round. Both oval and round heads will protrude above the wood's surface of the wood. The clearance hole for either a flat head or an oval head screw should be countersunk using a countersink to make that small conical depression. The good news is that a properly done wood screw joint will be much stronger than a nail joint and run almost no risk of splitting the wood. The bad news is that wood screws are more expensive than nails and drilling clearance and pilot holes takes some time.
Pieces of metal may be joined by several methods. One is by drilling clearance holes through both pieces, passing a bolt through the holes and fastening it with a nut on the far end. The clearance hole on the top piece should be countersunk if either a flat or oval head screw is used. Another approach would be to drill a clearance hole in the first piece and then drill and tap a hole in the second piece. A round head machine screw is then passed through the first piece and screwed into the second. The clearance hole on the top piece can be counter-bored (drilled with a flat-bottomed hole slightly larger than the screw head) if we don't want the screw to protrude above the top of the piece. It is bad practice to countersink the top piece if the bottom piece is threaded, because the screw head may snap off as it is tightened. In the parlance of geometric dimensioning and tolerancing (GD&T) (see Appendix B for geometric dimensioning and tolerancing), we have a fixed–fixed fastener and any error in position will result in huge shear stresses on the fastener.
We assemble our prototype once we have fabricated or bought all of the parts we need. Our choice of assembly tools will depend on our choices of materials and fasteners. A hammer is useful for nails and pins, and for shaping malleable metals. It is also useful for tapping close-fitting parts together. Screwdrivers should match the types of slots on your screws and bolts. Wrenches should be used for nuts and bolts, and life is much easier if at least one adjustable end wrench is at hand. Pliers are used to hold and squeeze things, but should never be used to hold a nut or a bolt. Instead, find and use a wrench that fits properly. If a model is held together with screws, a power screwdriver can sharply reduce hand fatigue and aching.
TABLE A.1 Dimensions of screws and clearance and pilot holes for steel screws used to join two pieces of wood

Finally, try to find a large work surface and keep it clean and orderly as assembly progresses. If a process router or assembly sequence was developed during planning, try to follow it as far as possible. Also, it is best to dry-fit parts in place before gluing or fastening them to make sure that they actually do go together properly. One of the most common mistakes in assembling prototypes is to forget that you need access to a fastener to put it in and tighten it, so put parts on the inside of an enclosed space before enclosing that space.
A.4 SELECTING A FASTENER
A crucial aspect of almost all objects or devices that have more than one part is the nature of fasteners that are used to join the device's parts to each other. Fasteners and fastening methods are categorized as permanent, meaning that the fastener cannot be undone, or temporary, meaning that the fastener can be undone in a nondestructive manner. Welds, rivets, and some adhesives are instances of permanent fasteners. Screws, nuts and bolts, and paper clips are examples of temporary fasteners. There are tens of thousands of different fasteners. For example, a quick search of one distributor's website showed that we could order 78 different sizes of zinc-plated, steel Phillips flat head wood screw. Since it would be impossible to cover all existing fasteners—why would we select a Truss Opsit® Self-Tapping Left-Handed Thread Screw? We will describe just the most common fasteners and the reasons for selecting them.
Fastener selection is typically done during both the preliminary and detailed design stages. It is worth noting that each fastener is designed to meet some objective(s), satisfy some constraint(s), and serve some function(s). Thus, in addition to being of practical importance in design and model fabrication, fastener selection represents an implementation of basic design concepts. We will organize our discussion of fasteners first by material (e.g., wood, plastics, and metals) and secondarily along the distinction between permanent and temporary fasteners.
A.4.1 Fastening Wood
Wood fastening or joining is usually performed with adhesives such as white glue, impact fasteners such as nails and staples, wood screws, or craft joints such as dovetails or dowel pins. Most wood adhesives and impact fasteners are permanent fasteners. Wood screws are normally temporary fasteners. Craft joints are usually permanent, but can be temporary. Proper craft joints usually involve a fair amount of expertise in woodworking, so we will not cover them here. There is a lot of information available on the Web about woodworking generally and about dovetail joints, mortise-and-tenon joints, and much, much more.
A.4.1.1 Permanent wood fasteners We will limit our discussion to the most common adhesives for wood joining: white glue, carpenter's glue, hot-melt glue, contact cement, and nails.
White glue is inexpensive and strong if used properly. It is not moisture or heat resistant, so is not appropriate for use outdoors or in high-temperature environments. The fumes are not hazardous.
Carpenter's glue has close to the same consistency as white glue. It is strong if used properly, and has moderate moisture and heat resistance. It fills gaps well. The fumes are not hazardous.
Hot-melt glue, often just called hot glue, melts at high temperature and solidifies at room temperature. It is applied with a glue gun that heats the glue to its melting point. Its strength is moderate to low, and it is moisture-resistant but not heat-resistant. It is excellent for quick assembly and short-lived prototypes. It is easy to burn yourself with the hot glue, so use caution with it.
Contact cement is most often used to bond veneers or plastic laminates to wood. It is extremely permanent, strong, and heat- and moisture-resistant. It must be applied to both surfaces to be joined and allowed to dry until tacky. Then the two surfaces are joined. The fumes are hazardous, as is contact with the uncured cement, so protective gloves, goggles, and adequate ventilation are needed.
Nails are considered permanent fasteners even though they can sometimes be removed without permanent damage—we should not count on always being able to remove a nail. A nail holds two boards together by friction and by the nail head, if there is one. Nails are not normally considered precision fasteners and will display a fairly wide range of dimensions as manufactured. Practically, a nail should be sized so that approximately 2/3 of its length is in the bottom board.
There are many different kinds of nails, of which common nails are the most common (see Figure A.1). They are sized in pennies (the approximate weight in pounds of 1000 nails), which is abbreviated as “d.” They range from 2d, which are 1 in. long and made from 15-gage wire, to 60d, which are 6 in. long and made from 2-gage wire. A common nail is for general-purpose joining of boards.
Finishing nails have a small, almost nonexistent, head (Figure A.1), and are slightly smaller in diameter than common nails. Finishing nails are countersunk with a nailset so their heads are below the wood's surface. They are used for cabinetry and in other circumstances where the nail head should not show.
Box nails (Figure A.1) are used to join thin pieces of dry wood. They have a blunt tip to avoid splitting the wood. Box nails also have slightly smaller diameters than common nails, and they often have a coating that heats and melts as they are driven: The coating then solidifies and glues the nail in place.
Brads are small wire nails that resemble small finishing nails (Figure A.1). They are typically used for attaching molding to walls or other places where small inconspicuous nails are required.
A.4.1.2 Temporary wood fasteners Wood screws are the most common temporary fasteners in wood. Wood screws come with flat heads, oval heads, or round heads. They are typically made of three materials: brass, galvanized steel, or stainless steel. Brass is generally used for decorative applications as it is soft and easily damaged. Stainless steel is the most expensive, but it is the most resistant to rust and corrosion. Galvanized steel is the most common. Table A.2 lists standard wood screw sizes, their corresponding diameters, and their clearance and pilot hole sizes. Wood screws range in length from ½ in. to 3½ in.

FIGURE A.1 A collection of four styles of standard nails of varying size: a brad, common nails (C), box nails (B), and finishing nails (F). Courtesy of R. Erik Spjut.
TABLE A.2 Common inch screw sizes and dimensions and clearance hole dimensions for machine screws

Round head screws (Figure A.2) protrude above the surface of the wood (typically for cosmetic reasons) and the screw head rests flush against the top surface of the wood. They are most often used for mounting hardware such as hinges or knobs onto wood.
Oval head screws (Figure A.2) resemble a cross between a flat head and a round head screw. The head is designed to protrude above the surface of the wood (again for cosmetic reasons), but the hole should be countersunk. Oval head screws are most often used to attach pre-countersunk hardware, such as hinges, to wood.

FIGURE A.2 Assorted screws (temporary fasteners), each a No. 10 size, and all but (d) 1 in. long: (a) steel slotted round head wood screw; (b) brass slotted oval head wood screw; (c) steel Philips flat head wood screw; (d) steel Philips flat head sheet metal screw (1¼ in. long); (e) steel Philips pan head sheet metal screw; (f) steel slotted round head machine screw; and (g) steel slotted flat head machine screw.
Flat head screws (Figure A.2) are used where the screw cannot protrude above the surface of the finished wood. The hole for the screw should be countersunk unless the wood is particularly soft, in which case the screw can simply be driven so that its head is below the surface of the wood.
Screw slots come in slotted, Philips, and specialty varieties. The specialty slot, such as a Torx, requires a special head to drive it, and is used in such applications as closing the clamshell of the DeWalt D21008K corded power drill pictured in Figure A.3. Fasteners with Philips heads can support greater driving forces than those with slotted heads; they are preferred if the screws are to experience high torque while being tightened. Some of the specialty slots can support even greater driving force than the Philips type.
A.4.2 Fastening Polymers
Permanent polymer joining is most commonly done with adhesives that generally fall into two classes, solvent-based cements that are polymer specific and general adhesives such as epoxy. The general adhesives must generally be used when joining different polymers or a plastic to wood or metal. In rare cases, polymers are joined using friction welding. Temporary fasteners are usually threaded fasteners such as machine screws and nuts and bolts, very much like those used for metal, except that the fasteners may be made from a polymeric material such as nylon or acetyl resin. Accordingly, our discussion of threaded fasteners will be deferred to the section on fastening metals.
A.4.2.1 Permanent polymer fastening When they can be used, solvent cements are the preferred means of joining two pieces of a polymer together. If done properly, the joint will have the same strength and characteristics as the bulk material. Typically, the solvent will dissolve some of the original material and then evaporate, permitting the material to resolidify. Solvent cements work best when the two surfaces being joined have a nearly perfect physical joint with no gaps or holes. (Some thicker solvent cements can fill gaps.) If too much solvent cement is used, the material may be weakened. Specific solvent cements include plastic model cement for polystyrene, primer and cement for PVC piping, and acrylic solvent cement for joining acrylic. Each of these solvent cements typically comes with its own instructions that should be carefully read and followed exactly.

FIGURE A.3 A Miller LMSW-52 Spot Welder.
General adhesives should be chosen after it has been determined whether or not a particular adhesive is recommended for joining the chosen materials. The first to be examined should be epoxies and cyanoacrylates (superglues). Epoxies do very well in bonding porous materials and do a good-to-poor job of bonding nonporous material, depending on the specific material. Cyanoacrylates work very well on smooth nonporous materials but do poorly on porous materials. Contact cements should be examined next if epoxies or cyanoacrylates prove unacceptable.
A.4.2.2 Temporary polymer fastening Our discussion of threaded plastic fasteners is deferred to the corresponding section on metal fastening because they are similar to temporary metal fasteners.
A.4.3 Fastening Metals
The principal permanent means of joining metals are soldering/brazing, welding, and riveting. Threaded fasteners are the principal temporary means of joining metals.
A.4.3.1 Fastening or joining metals together permanently Welding involves melting portions of the two pieces to be joined and (usually) adding some additional metal. The joint is formed when the metal resolidifies. Welding is most often used to join two pieces of ferrous metals (steels and cast iron), but it can be done on aluminum and other metals, by expert welders under the correct circumstances. Arc welding involves specialized training and equipment and is well beyond the level of this text.
Spot welding is done to join two pieces of (usually ferrous) sheet metal, usually with a relatively low-cost and safe spot welder that consists of two long arms that end in electrode tips (see Figure A.3). The two pieces of sheet steel are squeezed between the two electrode tips and a brief-but-large current is passed through the electrodes and the sheet steel. The current resistively melts a small spot between the sheets that then solidifies and forms the joint. (As do other power tools, the spot welder has its own procedural and safety instructions that should be attentively followed.)
Soldering and brazing join two pieces of higher-melting-temperature metal with a piece of low-melting-temperature metal. The difference between the two is the temperature at which the joining metal melts. By convention, using a joining metal that melts below 800 °F (425 °C) or 450 °C (840 °F) is soldering, and using a joining metal that melts above that is brazing. Depending on the size of the joint and the temperature involved, a soldering iron, a soldering gun, or a butane torch can be used for the heating and melting. It is important to have good mechanical contact between the pieces to be welded or soldered before heating. The molten metal will be drawn into the gap between the pieces by capillary action. The joint is not as strong as a weld, but can be done with much less training or specialized equipment.
Rivets are the final common permanent fastener used to join metal parts. There are two principal types: Solid rivets are used when there is access to both sides of the joint and maximum strength is required. Blind rivets—often called pop rivets, although POP® is a registered brand name for a blind rivet—which can be installed when there is access only to one side of the joint. Solid rivets require specialized training and equipment and are mentioned only in passing.
Blind rivets are installed with a rivet gun. A hole is drilled through the two pieces to be joined, in accord with the manufacturer's recommendation. A blind rivet is placed in the rivet gun, and then inserted into the hole. The handle on the rivet gun is squeezed until the mandrel snaps off. Figure A.4 shows such a rivet gun and the procedure for installing a blind rivet.
Rivets can support tensile loads but are more often used for shear loads. The machine screws discussed in the next section are used for tensile loads.
A.4.3.2 Fastening metals together temporarily The principal temporary fasteners for metal are sheet metal screws, machine screws, cap screws, and bolts and nuts. There is no universal definition that differentiates a screw from a bolt. Some maintain that screws are threaded fasteners that come to a point and bolts are threaded fasteners with a constant thread diameter and a square end. By this definition, machine screws are actually bolts. Others argue that screws are meant to be turned or rotated while being attached, and bolts are designed not to rotate during or after attachment and that they (usually) have smooth non-grippable tops. Under this definition, a hex head bolt is a screw. The lesson for us is that we must exercise care when we refer to screws or bolts; perhaps it's best to follow local custom. An assortment of threaded fasteners is shown in Figures A.2 and A.5.

FIGURE A.4 A Pop® pop rivet gun (top) and a graphic showing just how a rivet is actually installed (bottom).
Machine screws come in a wide variety of head types, slot types, materials, diameters, and lengths. The most common head types are pan, round, cheese, flat, and oval. There are many variants on these basic types. The choice of head type depends on whether the resultant joined surface must be flush and whether the fastener can be fixed or floating. Fixed and floating fasteners will be discussed in Appendix B, but briefly: The location of a fixed fastener cannot be adjusted in position as it is tightened, and the location of a floating fastener can be adjusted slightly as it is tightened. Flat heads require countersinking of the surface and result in a flush surface, but a fixed fastener (Figure A.2(g)). Oval heads require countersinking and result in a rounded but protruding surface, and a fixed fastener. Pan, round, and cheese heads (and no, not the Green Bay type) all result in protruding heads, but floating fasteners. The difference is the degree to which they protrude. However, if there is room, the holes for all three may be counter-bored, resulting in a flush surface, but with a noticeable gap around the screw head (Figure A.2(f)).
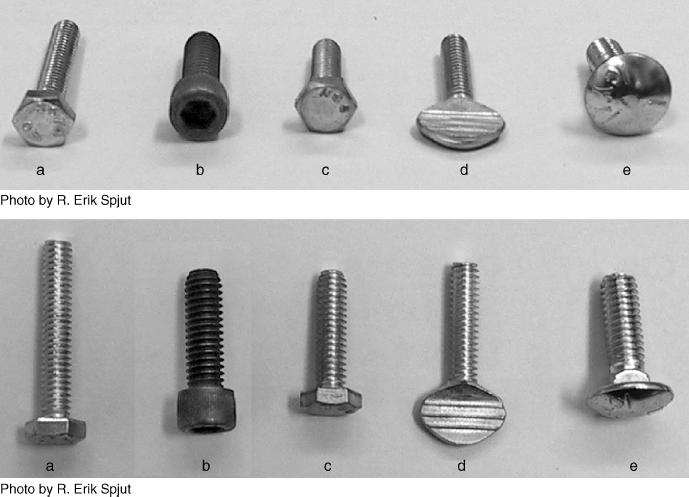
FIGURE A.5 Assorted screw and bolt (temporary) fasteners: (a) steel hex bolt 1/4-20 × 2 in.; (b) black oxide steel socket head cap screw 5/16-18 × 1 in.; (c) steel hex cap screw 1/4-20 × 1 in.; (d) steel thumb screw 1/4-20 × 1 in.; and (e) steel carriage screw 5/16-18 × 1 in.
Cap screws are sometimes considered machine screws and sometimes considered as a separate category. Cap screws have either hex heads or socket heads. The hex heads are designed to be tightened with a wrench. Hex head cap screws are almost never used in counter-bored holes due to the difficulty of getting a wrench in the hole to tighten the screw (Figure A.5(c)). Socket head cap screws are designed to be tightened with a hex key or Allen wrench and are frequently used in counter-bored holes to leave a flush surface (Figure A.5(b)).
Machine screws are most commonly made of steel, stainless steel, aluminum, brass, or nylon. There are others designed for specific applications. The material chosen is a function of cost, strength needed, and compatibility with the metals being joined.
The dimensions of machine screws are governed by standards. Inch fasteners are specified with a thread diameter and the number of threads per inch (TPI). Diameters smaller than ¼ in. are specified with a gauge number. A ¼-20 is an inch fastener with a ¼ in. thread diameter and 20 TPI. Metric fasteners are specified with a thread diameter and a thread pitch (the distance between adjacent threads). An M6 × 1 is a metric thread fastener with a 6 mm thread diameter and a thread pitch of 1 mm. Common inch screw sizes and clearance hole dimensions are listed in Table A.2, and common metric thread sizes and clearance hole dimensions are listed in Table A.3.
When we specify clearance holes for threaded fasteners, we must take into account the skill of the machinist and the cost of precision machining. The normal clearance holes are for reasonably competent yet inexpensive machining. The close clearance holes are for precise and more expensive machining. The available tolerance that we can specify in geometric dimensioning and tolerancing is the difference between the clearance hole and the major diameter. For example, as we will discuss in Appendix B, a ¼20 machine screw with a close clearance hole will have only 0.266−0.250 = 0.016 in. available for tolerancing.
TABLE A.3 Common metric thread sizes and dimensions and clearance hole dimensions for machine screws

A.4.4 What Size Temporary Fastener Should I Choose?
It is a sad-but-true fact that the majority of threaded fasteners are chosen because they “look right” to the experienced designer. But the proper way to choose the diameter of fastener is to:
- calculate the force that the fastener is expected to endure;
- include a reasonable safety factor; and
- choose a fastener that exceeds the strength required.
The two forces that a screw is likely to experience are a tensile force (along the axis of the screw) and a shear force (across the axis of the screw). The calculation of these forces in a complex piece of machinery is beyond our scope of this book (although it can be found in a typical “strengths” or “mechomat” text). The manufacturer's specification that is of interest to us is the proof load, which is the load the fastener must withstand without undergoing permanent plastic deformation. We would typically choose a fastener with a proof load four times the expected maximum load (this corresponds to a safety factor S = 4). Also, we would normally tighten the fastener to have a preload of 90% of the proof load. The torque required to preload the bolt may be estimated as
Here T is the torque, F1 the proof load, and d is the nominal diameter of the fastener. For example, if the maximum tensile load is expected to be 1550 N, the proof load should be 4 × 1550 N = 6200 N. After a search we found a manufacturer that has a steel Philips pan head machine screw M6 × 1 with a proof load of 6230 N, so we would choose this screw. From Table 7.4 we note that the pitch diameter is 5.35 mm = 0.00535 m. The preload is then 0:9 × 6200 N = 5580 N. We would then use a torque wrench to tighten this screw to a torque of 0.2 × 5580N × 0.00535 m = 29.9 N m.
In closing, we would note that the subject of fastener selection has filled many a volume and more than a few manufacturer's catalogs. The suggestion made above should be viewed as a starting point, not as the final word on fastener selection. Having said that, it is still the case that our guidelines will be adequate for designing and building most common models or prototypes. If our design is critical, or if our designer is not widely experienced with fasteners, we would seek expert guidance from a mentor, a machinist, or a reference book.
A.5 NOTES
Sections A.2 and A.3: Anyone with any interest at all in woodworking should definitely read Abram (1996)! There are also many sources for data about common construction techniques and fasteners on the Internet. Particularly helpful websites are:
Industrial Screw <http://www.industrialscrew.com/index.cfm?page=tech>; Lowe's How To Library at the Lowe's website <http://www.lowes.com>; Bob Vila's How To Library <http://www.bobvila.com/HowTo_Library/>; and eHow <http://www.ehow.com/>.
Section A.4: The ANSI B18 series covers rivets, bolts, nuts, machine and cap screws, and washers in American engineering units. The thread size is governed by the Unified Thread Standard, ANSI B1.1, ANSI B1.10M, and ANSI B1.15. Metric screw threads are governed by ISO 68-1, ISO 261, ISO 262, and ISO 965-1. The website This-To-That <http://www.thistothat.com/> gives specifics on selecting adhesives for joining two materials together, that is, this to that.