
Chapter 10
Introducing Google Applications
IN THIS CHAPTER
![]() Install Google Gears
Install Google Gears
Asus thought enough of the usefulness of Google Docs and iGoogle that they provided icons for these on the Easy Mode Internet tab. You might be asking yourself, “Why bother with Google applications, given that, despite its diminutive size, the Eee PC is actually a very capable computer with the whole OpenOffice.org suite built-in?” The answer is that the combination of Google applications and OpenOffice.org tools provides a powerful collaboration center you can use to work with other people in your organization or around the globe.
Google Docs and iGoogle also provide ways to expand your storage to network locations. You can upload OpenOffice files directly to Google Docs shared spaces. Through a Firefox add-in, you can also use Gmail as an extension of your file storage space.
While the examples shown in this chapter use Xandros Linux, there’s really nothing here that has operating system dependencies. You can do this just as easily under Windows or other Linux distributions. The Gspace plug-in shown later is specific to Firefox, so if you’re running Windows and want to use Gspace, you’ll need to install Firefox.
The following are a few of the things that you can do with Google Docs and iGoogle:
![]() Google provides you with a configurable home page that has access to Gmail, Google Calendar, and Google Docs.
Google provides you with a configurable home page that has access to Gmail, Google Calendar, and Google Docs.
![]() The iGoogle home page is actually a clever RSS feed aggregator. So, if you’d rather not clutter up your precious storage resources with RSS feeds, you can simply add them to your home page.
The iGoogle home page is actually a clever RSS feed aggregator. So, if you’d rather not clutter up your precious storage resources with RSS feeds, you can simply add them to your home page.
![]() You can collaborate with an entire team of people via the private edition of Google Docs and Spreadsheets. Used in conjunction with OpenOffice.org, you now have a focal point for offline storage and collaboration. You can share your documents, spreadsheets, and presentations with others; however, you can also work jointly with others on the documents. Google provides not only storage, and a history of changes, it also keeps each version of your document. You can also set who can see the files and who can edit them.
You can collaborate with an entire team of people via the private edition of Google Docs and Spreadsheets. Used in conjunction with OpenOffice.org, you now have a focal point for offline storage and collaboration. You can share your documents, spreadsheets, and presentations with others; however, you can also work jointly with others on the documents. Google provides not only storage, and a history of changes, it also keeps each version of your document. You can also set who can see the files and who can edit them.
![]() Gmail, which you can get with an iGoogle account or as standalone webmail, is perhaps the most powerful, innovative, and useful webmail system ever created. It has up to 100MB of free online mail storage, with faster and better sorting than you can achieve with Thunderbird on your Eee PC.
Gmail, which you can get with an iGoogle account or as standalone webmail, is perhaps the most powerful, innovative, and useful webmail system ever created. It has up to 100MB of free online mail storage, with faster and better sorting than you can achieve with Thunderbird on your Eee PC.
In this chapter, you’ll learn why Asus thought so highly of the Google applications, and how to leverage them to extend the Eee PC’s capabilities. You’ll discover how to collaborate and communicate with others around the globe using your Eee PC, as well as how to run Google applications when disconnected from the Internet.
Setting Up an iGoogle Account
Before you can use the more-advanced iGoogle features described in this chapter, you must have an iGoogle account.
From Easy Mode, click the iGoogle icon on the Internet tab. If you’re in the Full Desktop, launch Firefox from the panel and in the browser, navigate to http://www.google.com/ig. Click the Sign In link in the upper-right corner. On the Personalize Your Homepage web page (see Figure 10.1), click the Create an Account Now link to start the process of building an account.
FIGURE 10.1 Click the Create an Account Now link.

In the Create a Google Account – iGoogle window, shown in Figure 10.2, Google requires that you provide the following information:
![]() Your Current Email Address: Enter a valid email address.
Your Current Email Address: Enter a valid email address.
![]() Choose a password: To make it “strong,” make it reasonably long and a mix of upper- and lowercase letters, numbers, and special characters (#, $, and so forth).
Choose a password: To make it “strong,” make it reasonably long and a mix of upper- and lowercase letters, numbers, and special characters (#, $, and so forth).
![]() Re-enter Password: Make sure to re-enter the password in the second field to confirm it.
Re-enter Password: Make sure to re-enter the password in the second field to confirm it.
![]() Remember Me on This Computer: Enabling this check box probably isn’t too much of a security threat, but is the convenience really worth sacrificing the added security of forcing a sign-in?
Remember Me on This Computer: Enabling this check box probably isn’t too much of a security threat, but is the convenience really worth sacrificing the added security of forcing a sign-in?
![]() Enable Web History: Enabling the Web History feature is a convenience if you’re doing research, but probably more of an invasion of privacy if you aren’t.
Enable Web History: Enabling the Web History feature is a convenience if you’re doing research, but probably more of an invasion of privacy if you aren’t.
![]() Location: Enter your location or country.
Location: Enter your location or country.
![]() Word Verification: Enter the warped-looking series of characters you see in the picture. This is a verification step to stop programs, often with nefarious intent, from setting up accounts. Only a person can decipher the bent characters correctly (or at least that’s the theory).
Word Verification: Enter the warped-looking series of characters you see in the picture. This is a verification step to stop programs, often with nefarious intent, from setting up accounts. Only a person can decipher the bent characters correctly (or at least that’s the theory).
![]() Terms of Service: Read the license agreement. No one ever does that. How do you know you haven’t just signed away the title to your car?
Terms of Service: Read the license agreement. No one ever does that. How do you know you haven’t just signed away the title to your car?
FIGURE 10.2 Required information to set up your iGoogle account.

That’s it…you’re ready to go.
Setting Up Your iGoogle Home Page
After you are on your iGoogle setup page, your next task is to set the initial preferences for your home page. Anything you select at his point can be easily changed later. You are asked to check boxes to choose your interests. This sets up the tabs on your home page quickly. However, you’ll definitely get a Google slant on the information that appears on tabs such as Politics. If you don’t want Google picking the sources of information for you, don’t check any boxes; tabs are easy to build.
You can select an overall theme for your home page, which changes to reflect day and night. There are only five themes available in the initial preferences. Figures 10.3 and 10.4 show the setup page and final iGoogle home page.
FIGURE 10.3 The iGoogle preferences setup page.
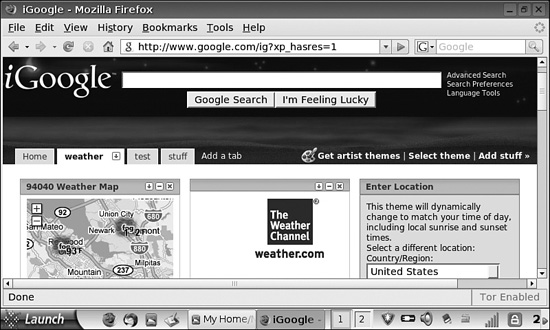
FIGURE 10.4 The final iGoogle home page.

Having your own tabs is the first big advantage of using iGoogle. The tabs provide a way of segregating information by type. The contents of the tabs are RSS feeds that you can select from the list that Google maintains, which is quite extensive. It has millions of feeds already loaded, so that you can just do a search. To add a tab, click Add a Tab. If you don’t clear the “I’m feeling lucky” option, Google will add feeds to your new tab based on the tab’s name. To add your own RSS feeds to the tab, simply click Add Stuff. You can search through the list of feeds by entering the name of the feed into the Search for Gadgets field. Simple enough, but what if you come up blank?
note
See CHAPTER 3, “Configuring Internet Applications,” for a basic description of RSS feeds.
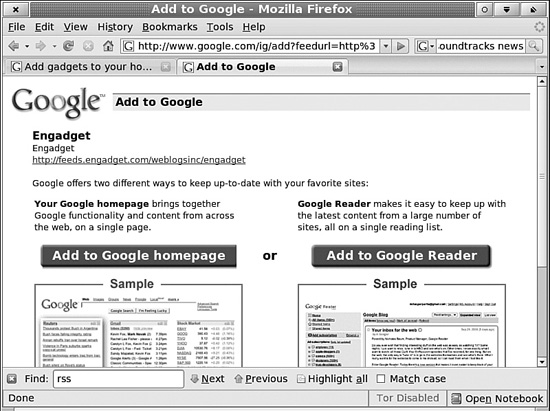
Suppose for a moment that you’re addicted to electronic toys, and you just have to keep up on the latest and greatest offerings. Engadget.com is the best way to do this, but when you search for feeds, you get Engadget only in Spanish…and you’re Spanish is just a little “rusty.”
Open a separate tab in Firefox and hop over to http://www.engadget.com. Click the RSS Feed button below the Search field, and you’ll be greeted with a preview of the feed and the familiar Subscribe to This Field Using drop-down list box (see Figure 10.5). Select Google from the list and click Subscribe Now. You’ll get a choice to add the RSS feed to your Google Homepage or Google Reader. Click Homepage, and you now have an Engadget RSS feed in the currently active tab (see Figure 10.6).
This is in many ways better than using a local RSS reader. When you log into iGoogle, your feeds are automatically updated. This cuts down on both network traffic and your local storage. It’s also easier than setting this up in Thunderbird (described in CHAPTER 3).
If you want to move an RSS feed to another tab, simply drag it to the new tab and drop it. When you click your tab the feed will be there.
FIGURE 10.5 Adding the Engadget RSS feed…

FIGURE 10.6 …and placing it on your iGoogle home page.
Using Gmail as a File System
CHAPTER 3 described configuring Thunderbird to talk to Gmail, including how to enable POP3 and IMAP. This essentially makes Gmail your mail server and webmail program. Also, Gmail is, by itself, a great mail system. But there’s another trick you can play with Gmail that’s really handy for a space-limited machine like the Eee PC: you can use up to 4.1GB of your Gmail space for file storage. Better yet, the storage appears as a file system within Firefox. Later in this chapter, I’ll explain how to use Google Docs for collaborative file space, and the big difference there is that it can be shared. This file space is private, but can hold anything (whereas the Google Docs version can hold only certain file types).
The magic for this particular file storage trick comes from something called Gspace. Under more robust Linux installations, Gspace can be easily installed as part of the file system and mounted. However, on the Eee PC’s stripped-down version of Xandros, that’s not easy to do (trust me, I’ve tried). I’d been using the Gspace plug-in for Firefox from a Windows laptop for quite a while, so I got the bright idea of trying it on the Eee PC. It works equally well with Firefox and Xandros. The only drawback to using this with Xandros (or any operating system) is that it isn’t directly mounted as part of the file system, so you must use the Firefox plug-in to upload, download, and manage files. However, Gspace has a well-designed interface that’s a lot like the fancier GUI tools for working with FTP sites.
Installing Gspace
After you set up your iGoogle account, you have a Gmail account and password. That’s all you’ll need to set up Gspace. To install the Gspace plug-in, open Firefox (either through the Internet tab in Easy Mode or via Launch, Applications, Internet, Firefox Web Browser in Full Desktop). Navigate to https://addons.mozilla.org/en-US/firefox/addon/1593 and click the green Add to Firefox button. After installing the plug-in and restarting Firefox, you’ll find Gspace in the Firefox Tools menu.
Setting Up Gspace
When you launch Gspace for the first time, if you have pop-up blocking on, you’ll discover that it has blocked a pop-up in Firefox (see Figure 10.7). This is just a help wizard that’s provided for installation, but you can easily install the account information manually. If you want to see any other helpful pop-ups that show up, click the pop-ups bar that appears toward the top of Firefox and allow pop-ups from the Gspace site.
FIGURE 10.7 The opening view of Gspace, with an alert promising the help wizard will follow.

To set up Gspace, click the Manage Accounts button to open the Gspace Account Manager window shown in Figure 10.8. For the Gmail ID, enter your entire Gmail email address. Enter your iGoogle password as the password. Enabling Remember Password is a nice convenience, but the password will be stored on your Eee PC, so if you’re concerned about security, leave this unchecked and simply log in each time. Click the Close button to enable the Account.
FIGURE 10.8 Setting up Gspace manually.

Using Gspace
Once your account information is set up, just click the blank field to the right of Manage Accounts and select your Gmail account. Click the Login button, and Gspace should connect to your account (see Figure 10.9).
You can user the My Computer file browser on the left to browse through the Eee PC file system and the My Gspace file browser on the right to work with the virtual file system built on Gmail. To upload files, select them on left and then click the right-pointing arrow. The Transfers pane, at the bottom of the Gspace window, shows the progress of the uploaded files.
FIGURE 10.9 Uploading a file via Gspace.

You can right-click the files to launch a shortcut menu from which you can download files, copy and paste, make files read only, and even build directories to add structure to the virtual file system. Once you’ve created directories, you can click them and open them just as you would handle directories on your local file system.
If you click the File Transfer Mode button, you’ll find three other modes of operation: Photo, Drive, and Player. While they sound promising, they don’t appear to work. I’ve had the Photo mode functional from time to time, but Player mode doesn’t seem to work at all. However, File Transfer mode seems quite reliable and does provide additional file storage on the Internet for most file types. There is a list of “harmful” file types under Preferences that you can designate, including executable files and other file types known to be virus risks.
Combining Google Docs and OpenOffice.org
Google Docs provides three basic office tools: a word processor, a spreadsheet tool, and a presentation tool (similar to PowerPoint or OpenOffice.org Impress). These are very basic tools, without the power and sophistication of OpenOffice.org. However, they are functional and, most importantly, share file compatibility directly with OpenOffice.org Writer and OpenOffice.org Calc. If you save Impress files in PowerPoint format, you can transfer them to the Google Docs presentation tool as well.
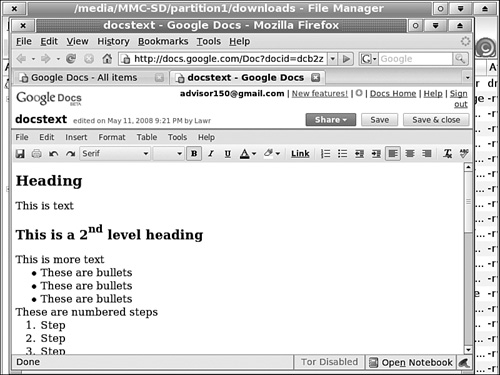
There are some limitations in moving files between OpenOffice and Google Docs. For example, if you create a document with more than basic formatting in OpenOffice.org Writer, you’ll lose much of that in the translation. Google Docs actually translates the files to HTML and then provides you with a rather sophisticated, word-processor-like HTML editing environment for online documents. When you download the documents, it translates them back into the format you request. So, in theory, you can “round-trip” from OpenOffice.org Writer to Google Docs and back. However, the typography and spacing will change with every translation. These are not major changes, but they are obvious. Figures 10.10 and 10.11 show the same text file in OpenOffice.org and Google Docs, respectively. The document is functionally the same, but its appearance is different.
FIGURE 10.10 A document in OpenOffice.org Writer.

FIGURE 10.11 The same document in Google Docs. Well, not quite the same….
Reasons to Use Google Docs with Open Office
So, why bother with this if it’s going to change your documents? Suppose that you must work with other folks who aren’t within your network and in fact are halfway around the world. Suppose further that they not only must review and make comments on the parts of the document that you write, but also contribute major sections to the document. Or perhaps you’ll be collaborating on a large financial spreadsheet, or a presentation, spreadsheet, and set of documents for a proposal that you’ll be presenting to a client. How can you all work together when you’re outside of the network?
Sure, you can email things back and forth, and that’s done all the time. It’s also terribly inefficient and provides almost infinite opportunity for error. After several versions have been sent around, exactly who has the most up-to-date version? If you get separate documents from eight or ten people and they all have comments, reconciling everything can be a daunting task. Worse, what if there are conflicting changes? I’ve spent many a nightmarish evening trying to pull together up to 15 separate versions of a contract proposal that had a looming deadline.
To solve these sorts of problems, organizations often employ a content management system such as Alfresco (open source) or Microsoft SharePoint to handle document storage, revisions, and collaborative editing and review of a single document. This is a vital tool, because having everyone working on one copy of the document means that they can all see the changes and that everything is always combined. It’s also possible to provide secure, outside access to such systems via a virtual private network (VPN) or secure portals. However, this takes time to set up and may be beyond the capabilities or resources you have.
Enter Google Docs. You can build documents with your OpenOffice.org applications, upload them, and then collaborate with as many folks as you like with a modicum of security via the system Google already has set up. Because you’ve set up an iGoogle account, you have access to all of this for the low, low price of nothing.
Consider another scenario. Suppose you’re working on a book and want to be able to “check in” versions as they are edited and modified. Again, you’d need something like a content management system, or at least a source-code control system such as programmers use (perhaps, for instance, CVS or SVN in the Linux/Unix world, or Visual SourceSafe in the Microsoft world). You’d also need a system to run this on and a way to provide access for you and the editor. You probably don’t want to burden the tiny file system on the Eee PC with such a repository. Once again, Google Docs already provides this functionality, including the ability to go back to any previous version of a document or even compare versions.
Recently, Google added a new capability that cuts out the dependency on OpenOffice.org entirely. You can, by installing the Google Gears plug-in in Firefox, edit your documents offline (that is, not connected to the Internet). Moreover, Google Docs will synchronize your offline versions with the online versions. Best yet, this works equally well from either Simple Mode or Full Desktop.
Setting Up Google Docs
Actually, Google Docs is mostly set up for you the minute that you complete your iGoogle account signup. To access Google Docs, simply navigate to http://docs.google.com. Your login credentials from iGoogle (if you’re already logged in there) will carry over. If you aren’t logged in to iGoogle, you’ll be able to log in to Google Docs at that point.
Working with the Google Docs File System
The initial Google Docs page shows you the current files and file structures in your Google Docs file system. Figure 10.12 shows a few files already uploaded or created directly through Google Docs, to give you an idea of what the interface is actually like. Click the New menu and you can create a new document, spreadsheet, presentation, or folder. Creating folders allows you to impose additional order on the Google Docs file system.
FIGURE 10.12 Creating a new document in Google Docs.

Like the file system for Gspace, you can’t mount the Google Docs file system directly. Instead, you must use the upload and download functions in the Google Docs pages to move files back and forth from the Eee PC to Google Docs. To upload a single file, just click the Upload button. Also, note the email address farther down on the Upload page. If you send emails to that address, the contents will be captured as Google Docs files. This also provides a dandy way to send multiple documents. Just attach a set of OpenOffice.org Writer documents. This doesn’t work for spreadsheets and PDF files, unfortunately.
Working with Documents in Google Docs
To open a document, simply click it in the file list and Firefox will open it in a separate tab. You can choose to save the file (although Google Docs autosaves often) or you can Save and Close. If you want to abandon changes and close the document, click the Close button for the tab.
Google Docs is pretty much driven by styles, and the styles are pretty much driven by its native file format: HTML. So if you look in the Format menu, you’ll see a set of styles that corresponds to HTML tags. The formatting controls reflect HTML capabilities as well, with numbered and bulleted lists, font changes, and so forth. Pretty much anything you can do on a web page you can do in Google Docs. This includes placing figures in your documents.
Google Docs itself, while a basic word processor, does have some advanced editing features such as comments and a spelling checker (you can select the language). You can, if you know how to set up cascading style sheets (CSS) and are willing to invest the time, get some very nice formatting results out of Google Docs using custom style sheets. This, too, makes sense, given its dependency on HTML. Simply choose Edit, Edit CSS and create your own style sheet. You can then apply these styles to the text.
If you’re comfortable editing in HTML, you can choose Edit, Edit HTML to get a view of the raw HTML that’s similar to what you’d see in any text editor (see Figure 10.13). This can be a handy way to fix tricky formatting problems; however, you won’t want to be switching back and forth from formatted text to HTML in long documents. It simply takes too long.
FIGURE 10.13 Editing a document’s raw HTML in Google Docs.

Working with Presentations
You can create a Google Docs Presentation by selecting New, Presentation. Presentation has a fairly large set of slide templates and the basic formatting features you’d expect (see Figure 10.14). What it lacks is the ability to select from various formats that include lists, multiple columns, and various mixes for presenting text and graphics on the same slide. Instead, you can drop text boxes into the slide, which you can format with styles and formatting buttons. Amazingly, boxes dropped into a slide can be dragged around fairly smoothly, which is not easy in a web application.
You can also drop in some basic shapes, such as callout balloons and arrows, and you can change the color and size of these. Again, you can drag these shapes around with relative ease. You can also change text color and use a “highlighter.”
FIGURE 10.14 The presentation editing environment.

Presentation has a few advanced features, such as creating speaker’s notes and adding multimedia to the slides. Because Presentation saves in PowerPoint format, you can send your presentations almost anywhere. Better yet, you can run a web presentation with this tool and invite viewers just as you would collaborators. Viewers can actually view the files at their own pace while the presenter is giving the presentation.
As with all Google Docs applications, you can publish the presentation to a website. This actually “embeds” a slide-viewing application in the web page, similar to a video player. Users can then “click” from slide to slide through the presentation.
Working with Spreadsheets
Like the other two applications, the spreadsheet is a basic but competent program with a wide variety of basic math and statistical functions. The Google-specific functions are rather mind-boggling. Figure 10.15 shows the Insert a Function list you can access by clicking the More link. For example, you can add Google-specific functions such as
=GoogleLookup(“entity”; “attribute”)
The “entity” might be any primary search string, such as “Pittsburgh Penguins” and the “attribute” would be the secondary search string, such as “NHL standings.” Thus, when executed, the function will return some sort of information pertinent to the search.
FIGURE 10.15 Functions in the spreadsheet application.

You can save files from any of the applications as Adobe Acrobat PDF files. This may not seem like a big deal if you’re used to OpenOffice.org and its excellent PDF capabilities, but it’s still very useful. Folks that you’re collaborating with that have applications such as Microsoft Office will find this a great feature, because, without Adobe Acrobat or Distiller, they have no straightforward way to create PDF files.
Another feature that you’ll only find in powerful content management systems is full-text search within all the documents stored in Google Docs. If you build up a considerable library of documents over time, finding things can become really challenging. For large document libraries, full-text search can be a life-saver. To search the library of stored documents, just use the Search Docs field as you would a general Google search.
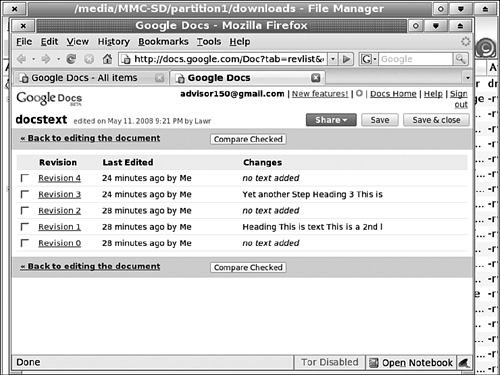
Versioning in Google Docs
Like any good content management system, Google Docs stores versions of your documents (see Figure 10.16). This is true for all three document types: text, spreadsheets, and presentations. Within each application, there’s a Version History (sometimes called Revisions) function. You can use either of these to view each of the previous versions and even what’s changed between them. Google Docs saves each version of the file that you save. You can peruse the various versions to see what changes were made and by whom as the document evolved. This can prove to be extremely handy. For instance, if you change or delete a large section of a spreadsheet or a series of slides in a presentation and then find that you need it later, you can easily recovert.
FIGURE 10.16 A list of versions from the Google Docs repository.
Collaborating in Google Docs
The real key to the power of Google Docs is collaboration. From within each of the applications, you can choose to share documents with others. You must first set up as Contacts in Gmail the email addresses of all your collaborators. Once they are in the Contacts list, you can simply choose collaborators and assign sharing permissions. Each file that you create (or upload, or email into the system using the email address provided to collaborators in their email invitations) is assigned to you as the owner. The owner can decide who can collaborate on each file (on a file-by-file basis) and what the collaborators can do. If you wish, you can change the owner so that one of the collaborators can control the file. This works well if you’ll be on vacation or just got that big promotion.
On a basic level, collaborators can either simply view a document or edit and add comments to the document. Even viewers can save copies or print the document. You can also add some advanced permissions, which gets a little tricky. You can allow collaborators to invite other collaborators so that the entire world might be working with you on your document. You can also allow an invitation to be used by basically anyone, so that it can be forwarded on throughout the globe.
Each collaborator receives an email message with a URL link that leads directly to the document. Google Docs can actually allow multiple editors to work on the document at the same time. Updates between open documents occur very quickly, and the revision history logs not only changes but who made them. When a collaborator closes the document, they will find themselves in their own Google Docs page, but with the shared document added to their document list. This is an exceptional feature, because each Docs user can have their own document set, which isn’t shared, plus the shared documents—all in the same file system.
Beyond all of this, you can publish your documents to a Google Blog or a web page. You can even make a document “public” and allow people to subscribe to changes to the document via an RSS feed.
Working Offline
The last bit of Google magic breaks the link to OpenOffice.org for offline use. By loading the Google Gears plug-in for Firefox, you can have the same functionality offline that you have online with Google Docs on your Eee PC’s native file system. Google Gears synchronizes the files between the online repository and a local file store. On the Eee PC, these local files and all the goodies that allow you to edit offline are stored in /home/user/.mozilla. There isn’t any way to move this, so the offline storage is kept in the file storage area, where space is the most precious. This is unfortunate, and Google could help us out a lot by providing a way to move the storage location.
To set up the offline functionality, you must first install the Google Gears plug-in. This is much like any other Firefox plug-in. To install it, navigate to http://gears.google.com/ and click Install Google Gears to install the plug-in (see Figure 10.17). It will correctly identify the combination of Linux and Firefox. As with most plug-ins, it will close your current Firefox session and restart it to load the plug-in.
FIGURE 10.17 Adding the Google Gears plug-in.

Google Gears is a flexible Google technology that provides a way to run web applications offline. It installs a local web server to run the web applications and installs a database to store the information contained in the websites. After Google Gears is installed, Google Docs will synchronize its documents with the database on your Eee PC.
After Google Gears is loaded and Firefox is restarted, navigate back to http://docs.google.com. The menu bar now contains a green synchronization icon (to the right of your login name).
Initially, Gears takes a bit of time to build the database and set things up. If you click the green sync icon and then select Preferences, you’ll see the Offline Access Settings dialog box shown in Figure 10.18, which includes a tempting button to place an icon on the KDE desktop (this won’t work for Easy Mode, of course). Give it a shot if you like, but it didn’t work for me. If you tire of synchronizing to Google Gears, you can also deactivate syncing from the Offline Access Settings dialog box.
FIGURE 10.18 Google Gears preferences.

Aside from the desktop icon, Google Gears works perfectly in either Easy Mode or Full Desktop. To give it a try, first make sure it’s synchronized. Click the green icon to determine the current state (the icon will also turn into a check mark if everything is synchronized). Now shut down Firefox and disconnect from your network. Open Firefox again. Even though you are currently disconnected from the network, navigate to http://docs.google.com. Your document repository appears. Click a document to open it, and the familiar Google Docs application appears. However, you’ll find a message at the top of the file reminding you that you’re working offline and that you’ll have to connect to Google Docs via the Internet to upload this file (see Figure 10.19).
FIGURE 10.19 Offline Google Docs editing via the magic of Google Gears.

If you make some edits and then close the file via the Save & Close button, you’ll see a message to the left of the filename saying that the file was “Edited Offline,” as shown for internet_apps.doc in Figure 10.20. Also, if you add a check mark beside the file and look under the More actions menu, you’ll see that everything other than Preview is disabled. Functions such as versioning and publishing require you to be online.
FIGURE 10.20 A document saved offline.

Reconnect to your network and then refresh the http://docs.google.com page in your browser. To force a synchronization, you can put a check mark beside the files that were edited offline and then use More Actions, Sync Now. The “Edited Offline” message disappears, and all the functionality of Google Docs is back. If you open the document, you’ll see that your changes are intact and that the version history now contains a version with your offline edits.
Summary
Clearly one of the big limitations of the Eee PC is storage and one of its chief benefits is portability. So, remote file storage and applications that can be accessed from anywhere make a lot of sense with this platform. Gmail, by itself, provides both a webmail program and a mail server, which you can connect to Thunderbird (covered in CHAPTER 3). You can get Gmail simply by setting up an iGoogle account, which also gives you access to a lot more functionality. For example, you can plug RSS feeds into your iGoogle home page.
By adding the Gspace plug-in to Firefox, suddenly you have a flexible network file system. You can upload and download files from there as you please. The only drawback is that you can’t mount it and open files directly there.
By adding Google Docs, you have a basic suite of office tools and a content management system to go with it. More importantly, you have the ability to collaborate and share content with anyone else that has a Google account. So, now the tiny Eee PC is an ultra-portable node in a global collaboration environment.
You can take this one final step via Google Gears. By installing the Google Gears plug-in via Firefox, you can edit any document in your Google Docs repository locally, without a network connection. By reconnecting, you can synchronize your documents. The penalty is that it requires space on your local file system to load the Gears components and the most current version of your files. Still, that’s an awesome amount of capability that’s basically free.