The core of many people’s media collection is, not surprisingly, music, and Windows Media Center (WMC) is music-friendly—very music-friendly. WMC has no problem playing your existing digital music libraries (of course), but you can also use it to play and rip music CDs, create and play playlists based on various criteria, and even rate your favorites. You can also use WMC to play FM radio (if you have a TV tuner that also supports FM radio) and play online news and music sources. So let’s get started!
The Music menu (Figure 6.1) includes the following options:
More Music: Click to enter the world of online audio sources.
Music Library: Open this option to select the music you want from your music folders and shared music folders on other systems.
Play All: Don’t care what’s playing as long as there’s music in the background? This option plays every digital music file in reach of WMC.
Radio: On systems with an FM radio tuner (a popular option on TV tuner cards), use this option to play (and pause) your favorite radio stations.
Search: Use this option to track down music by name.

If you already have a digital music collection available to Windows Media Player, Windows Media Center uses it automatically. The first time you open the Music Library, it builds its music library from the music available to Windows Media Player and then prompts you to choose other folders to watch for media files (Figure 6.2). Click Yes to open Library Setup to choose the folders you want to keep an eye on. These folders can include

This process is the same as the Library Setup process discussed in Chapter 3, “Setting Up Windows Media Center.”
→ | For details, see “Optional Setup: Music, Pictures, and Videos Library” in Chapter 3, p. 74. |
Music from shared libraries as well as from your own music libraries is available in WMC’s Music Library.
Note
If you want to access the contents of media folders on systems using Windows XP or older Windows versions, these folders must be configured as shared.
To share a folder in Windows XP, open Windows Explorer or My Computer, navigate to the folder location, right-click the folder, select Sharing and Security, and click the Share This Folder on the Network check box. To prevent media from being deleted or changed by other users, do not click the Allow Network Users to Change My Files check box. Click Apply and then OK.
To share a folder in Windows Vista, open the Network and Sharing Center and turn on Media Sharing.
When you insert a music CD, WMC switches automatically to the Now Playing dialog (Figure 6.3). From this dialog, you can choose to
Copy (rip) the CD to WMC’s Music Library
View the playback queue
Run a visualization while playing the CD
Play a slide show while playing the CD
Shuffle the tracks on the CD
Repeat playback
Buy digital music
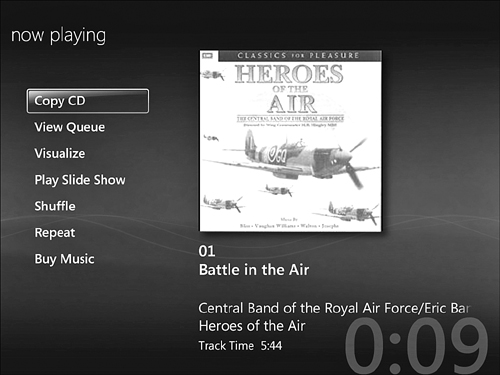
If you don’t select any options, WMC will rip the music CD to your music library, using the music rip settings in Windows Media Player (format, bit rate, whether to eject the CD after ripping, and so on).
→ | For details, see the “Configuring Audio Ripping” section in Chapter 13, “Using Windows Media Player with Windows Media Center,” p. 376. |
Note
Music you rip to your system with WMC is available to other computers running WMC or Windows Media Player if you select the option to share your media files in the Network and Sharing Center.
If you manually select the option to copy the CD, a Copy CD prompt appears; click Yes to continue.
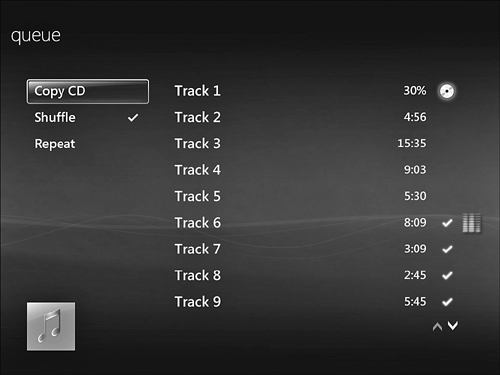
When the Shuffle option is selected (Figure 6.4), the tracks are played in random order. A check mark indicates the tracks that have been copied, and an equalizer icon indicates the track currently being played.
Note
To add more visualizations, open Windows Media Player and use its Visualization option to download additional visualizations.
If you prefer to see your display doing something while you pump music from WMC through your speakers, select Visualize from the Now Playing menu (refer to Figure 6.3). A visualization from the Windows Media Player library appears onscreen (Figure 6.5), and a banner displaying the current track appears for a few seconds. To cycle through visualizations, use the arrow keys or the channel up/down controls.

To exit visualization, press the Enter key on your keyboard or the Back/Exit button on your remote control.
→ | For more information about adding visualizations, see “Downloading Visualizations” in Chapter 13, p. 389. |
As you work with the Music Library (or other libraries), the currently playing media (music, TV, slide shows, and so forth) is shown as a thumbnail at the lower left-hand corner of the screen. Hover the mouse over the thumbnail for details (Figure 6.6).

To repeat the track, select a visualization, or perform other tasks, double-click the thumbnail to open the Now Playing menu.
You can play individual tracks from any album in a variety of ways:
To choose a track from a particular album, select the album from the default Albums view or select the artist from the Artists view and then the album.
If you prefer to select music by type (Rock, Jazz, Soundtrack, Classical, World, Folk, and so on), select the Genres view. You can select a track from the albums that contain tracks matching the genre, or select Songs to select the track by title (Figure 6.7). The details of the highlighted track are shown at the bottom of the dialog.
If you know the name of the track, cut to the chase and select the Songs view. All audio tracks are listed in alphabetical order.
Want to immerse yourself in the music of your favorite songwriter? Select the Composers view. Select the composer and then select the album or switch to the Songs view.
Are you performer-driven in your music choices? Choose the Album Artists view. (You might also find some composers lurking in this view.) Select your favorite artist and then select the album that contains your favorite track—or switch to the Songs view.
Want to re-create that special year in music? The Years view might do it for you—but keep in mind, it’s based on the release year of the album, not the release date (or composing date) of the tracks it contains. As with other views, you can choose by album or song title.

Note
If you see duplicate track titles (as in Figure 6.7), there might be two or more folders in the library that contain the same music tracks or the same song title has been recorded by different artists or is on different albums. In such cases, use the Albums view to choose the preferred track.
Once you see the track you want, right-click it and select Play (Figure 6.8) to play it immediately or click Add to Queue to add it to the list of media being played.

Although WMC usually chooses the correct album information for you, it might not always get the name of a track or artist right. To correct this information, select Edit from the right-click menu shown in Figure 6.8. The Edit menu (Figure 6.9) offers you the ability to edit the song title and the artist and add (or edit) the star rating.
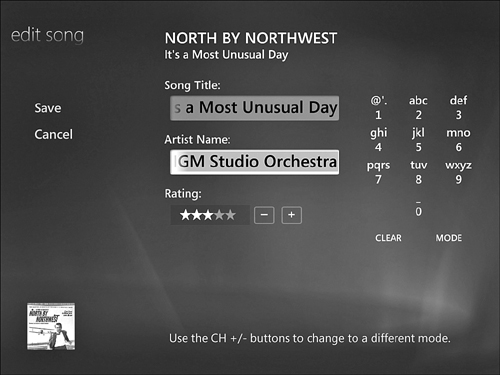
You can use a keyboard or the keypad on your remote control to perform edits. Click Mode to remap the keypad to enter lowercase, uppercase, or special punctuation marks.
After making changes, click Save to keep the changes or Cancel to discard them.
If you prefer albums to mix-and-match tracks, the Albums view is the one you’ll prefer. By default, the Albums view uses the Large album cover view shown in Figure 6.10, giving you a comfortable view of your digital music collection from your couch or easy chair. However, if you’re tired of scrolling through a large collection, right-click any album and select View Small to see smaller-sized album art or View List to view albums by title.
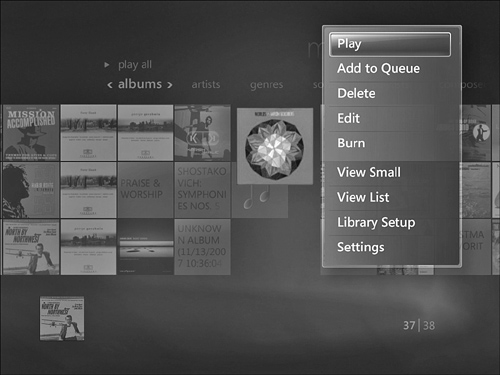
The right-click menu shown in Figure 6.10 is also your pathway to playing an entire album (Play), adding the album’s contents to a queue for upcoming playback (Queue), removing the album from the hard disk (Delete), changing album information (Edit), or copying the album to a CD (Burn). You can also access the library setup or settings menus from this menu.
→ | For more information about Library Setup, see “Optional Setup: Music, Pictures, and Videos Library” in Chapter 3, p. 74. |
→ | For more information about Settings, see “Using Settings to Reconfigure Your System” in Chapter 3, p. 77. |
→ | For more information about burning CDs, see “Creating Music CDs” in Chapter 10, “Creating CDs and DVDs,” p. 289. |
If the album artist, genre, or title is incorrect, or you want to add more information, select Edit from the right-click menu shown in Figure 6.10. You can use a keyboard or the keypad on your remote control to change the album title or artist name. To select a different genre, click the + and – symbols next to the Genre name (see Figure 6.11).
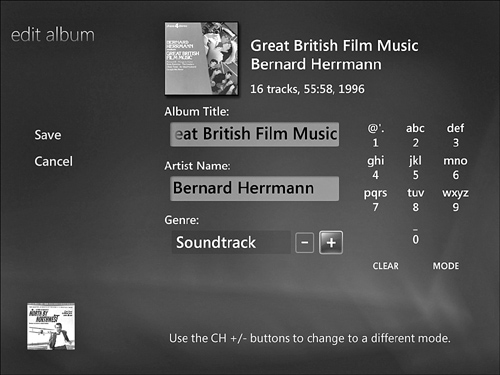
If you need to add (or change) album art, use Windows Media Player.
Tip
Although you can only choose from predefined genres when you edit album information, there’s a workaround. Thanks to WMC’s tight integration with Windows Media Player, any genre you assign to an album in Windows Media Player shows up in the list of genres you can choose from in WMC. So feel free to create your own genre classifications! How about Hip-Hop Bach?
→ | For more information about changing album art, see “Adding/Changing Album Art and Track Information” in Chapter 3, p. 387. |
To add an individual song or an entire album to the list of music waiting to be played (the queue), right-click it and select Add to Queue. You also create a candidate for the world’s longest queue if you select Play All from the Music menu shown in Figure 6.1.
You can view the contents of the queue in two ways:
From WMC’s Start (main) menu, click Now Playing + Queue. Select View Queue from the Now Playing menu.
At any time, click the Now Playing thumbnail in the lower-left corner of the screen. Select View Queue from the Now Playing menu.
Use the Queue menu (Figure 6.12) to change the playback order or remove selected song tracks (Edit Queue), delete the entire queue (Clear Queue), create a playlist from the queue (Save as Playlist), randomly change playback order (Shuffle), play the queue again when you reach the end of the queue (Repeat), or copy the files to CD or DVD (Burn).
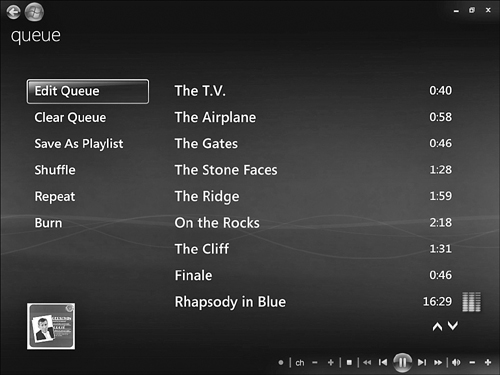
Click the up and down arrows at the bottom of the screen to move to the previous or next screen. The current song track is indicated with animated volume bars.
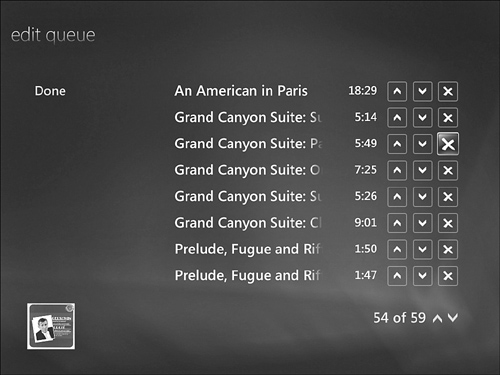
Use the Edit Queue menu (Figure 6.13) to change playback order or to delete songs from the queue. To move a song higher in the queue, click its up-arrow icon; to move it lower, click its down-arrow icon. To remove it from the queue, click the X. (Removing it from the queue does not delete the song track from the computer; rather, it just deletes it from the queue.) When you’re finished rearranging the queue, click Done.
If you look at your queue and say to yourself, “Dude, that’s a great mix,” make a playlist out of it. It’s simple. Click Save As Playlist from the Queue menu, use your remote control’s keypad (or a keyboard) to enter the name (see Figure 6.14), and click Save. Your playlist shows up in both WMC and Windows Media Player.

→ | To learn how to burn your queue or playlist to a CD, see “Creating Music CDs” in Chapter 10, p. 289. |
If you want to clear the queue and start over, I recommend saving the current queue as a playlist first.
As you learned in the previous section, you can create a playlist from a queue in Windows Media Center. Want to play a playlist? Select Playlists in the Music Library (Figure 6.15).

Windows Media Center and Windows Media Player share both user-created and auto playlists (but I bet that doesn’t surprise you). User-created playlists (like the “North by Gershwin” mash-up I created in Figure 6.14) show up under the heading “Playlists.” Auto playlists are generated for you by the dynamic duo of WMC and WMP and include the following music categories:
All Music: If you don’t know what you want to listen to, this is the playlist for you. It plays all of your music—and I do mean all. If you have “orphan” tracks that lack album information, they’re played first, followed by every song on all your albums.
Music Added in the Last Month: Use this playlist to remind yourself what you’ve downloaded or ripped lately or what’s new on the rip/download scene on other systems that share their media with you.
Music Auto Rated at 5 Stars: Play a tune often enough, and Windows assigns it a five-star rating. If you’re a big fan of “play it again,” this playlist is one you’ll love.
Music Played in the Last Month: Sure, you might have ripped that album a couple of years ago (back when you were running Windows XP, for example), but if you played it in the last month, WMC knows it and serves it up to you—fresh.
Music Played the Most: Back when LPs and 45s were the music distribution media of choice, you could literally wear out the grooves on your music by playing it too much. No worries here. This playlist contains your favorites—automatically.
Music Rated at 4 or 5 Stars: You might play a mixture of “guilty favorites” (the bad music that everybody listens to on the radio anyway) and the tunes you prefer. Use either WMC or Windows Media Player to rate them as four-star or five-star, and you’ll find them in this playlist.
→ | For more information about editing or adding song ratings, see “Editing Song and Rating Information” in this chapter, p. 173. |
Rip more than a few CDs to your system or hit the download buffet at your favorite digital music online store, and sooner or later you’re going to be drowning in music tracks. To make it easier to find just the tune you’re looking for, scroll over to the Search option in the Music menu.
Use your remote control’s keypad or computer keyboard to enter the name of an artist, song title, composer, album, or genre (Figure 6.16). Select a song, and you go directly to the Song Details menu. Choose an artist, composer, album, or genre, and you go to the Albums view, with the option to switch to the Songs view. Either way, it’s a short distance between you and the music you prefer.

Note
If you tune into a station and still hear static, make sure you have connected the FM antenna to the TV tuner card or external device. It is often supplied as a small wire that connects to a dedicated FM coaxial connector. If you are trying to pick up a distant or low-power station in a brick or concrete building, you might need a stronger antenna.
Quite a few internal and external TV tuners also include FM radio tuners. If your computer has one, you can use WMC to listen to your FM favorite news or music programs. To find out if you have an FM tuner, select Radio from the music menu. If you don’t have a tuner, you’ll see a “no services found” message. However, if you do have a tuner, you’ll see FM Radio listed as a source (Figure 6.17).

Click FM Radio, and the display switches to the current station view shown in Figure 6.18. Use this view to tune the radio, create presets, and set up preset stations.
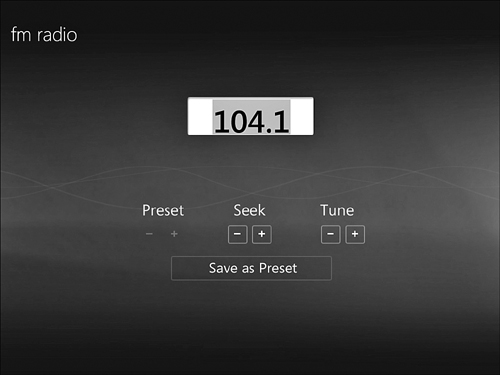
Click the Tune or Seek buttons below the station frequency display in Figure 6.18 to home in on your favorite rock, pop, folk, country, or talk stations. When you reach a station you want to store as a preset, click Save as Preset. The Edit Preset dialog shown in Figure 6.19 appears. Use your remote control’s keypad or computer keyboard to enter a custom name for the preset. Click Save to save the preset, Cancel to stop the creation process, or Delete to remove a preset that’s no longer a favorite.

After you create presets, select the Presets option from the Radio menu, and you can select the preset for your preferred station (Figure 6.20).

Just as you can pause live TV to grab the phone or have a conversation, you can pause live radio broadcasts: Just click the Pause button on your remote control or the Pause icon on the mouse dialog in the lower-right corner of the screen. When you pause radio, a timeline appears at the bottom of your screen (Figure 6.21). The white bar indicates how long you’ve paused live playback. Press the Play button on your remote or the mouse dialog to start playing back the broadcast where you left off.

While there’s no built-in capability in WMC to record FM radio, you can purchase low-cost utilities to provide this capability. Some also support recording Internet radio.
→ | For more information about recording FM radio, see Chapter 15, “Extending Media Center with Third-Party Apps.” |
WMC features a variety of preselected Internet radio services, including NPR, Live365, and others. To view them, open More Music from the Music menu. Select the service you’d like to try, and it opens inside the WMC interface. Figure 6.22 illustrates some typical services.

Depending on the service you select, it might be necessary to install some ActiveX controls or other software to permit the service to run. Some services also open a web page for additional configuration.
Note
Remember how I suggested you add a mouse and keyboard to your WMC PC configuration back in Chapter 2, “Equipping Your PC for Media Center”? These input devices make it easier to deal with third-party services you might want to add to your WMC system. You cannot click on a security warning using an IR remote—you must use a mouse (or a keyboard); similarly, you’ll need a mouse (and maybe a keyboard as well) to navigate the web unless you install a WMC-optimized web browser. Learn more about WMC-optimized web browsers in Chapter 15.
So you’ve created some great playlists with Windows Media Center, but it’s time to get off the couch and head off to work. No problem, just use WMC’s ability to synchronize media with portable players.
To start the sync process for the first time, connect your portable media player to a USB port, go to WMC’s Tasks menu, and select Sync. A Sync dialog similar to the one in Figure 6.23 appears. Select Yes to continue.

The system lists the auto playlist options appropriate for the device and the device’s capacity. The playlists use the default order shown in Figure 6.24 from top to bottom. Click the up arrow for a particular option to move it higher in the list; click the down arrow to move it lower; click X to remove it from the list.

If you have deleted an auto playlist you want to use, click Add More, select Music, choose the list(s) you want to use, and click Save. Click Start Sync to start the synchronization process.
Tip
Using Add More also shows you how many tunes will be transferred to your device (space permitting). As you point to each auto playlist in the Add More Music menu, the number of songs in that playlist is displayed.
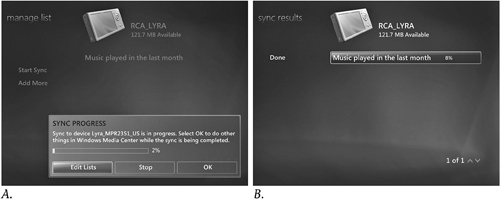
The Sync Progress dialog appears (Figure 6.25 A) as the transfer process begins. Click OK to use WMC in other ways, Stop to stop the transfer process, or Edit Lists to add or remove auto playlists. At the end of the process, the Sync to Device dialog appears. Click View Results to see the percentage of each playlist synced to the device (Figure 6.25 B).