
Supercharging Your Picture Viewing Capabilities with Photoshop Elements for Windows Media Center
</objective> <objective></objective> </feature>If you’re tired of gathering the family around the computer screen to “Ooh,” “Ahh,” and (occasionally) “Grr” over your vacation photos, give your tiny PC display a rest, and take advantage of the big-screen picture viewing pizzazz available through Windows Media Center (WMC). Of course, WMC doesn’t care whether you use it with your ordinary display or with the newest HDTV, but for viewing photos, whether for fun or play, it’s hard to beat WMC’s simple, yet powerful, interface.
To get started, select the Pictures + Videos menu (see Figure 7.1) and open the Picture Library.

Picture Library displays photos stored in the current user’s Pictures folder, subfolders of the current user’s Pictures folder, and any other media folders monitored by WMC.
The Picture Library offers three ways to view photos:
By folders (the default)
By tags
By date taken
In the default Folders view, pictures stored in the Pictures folder are displayed in thumbnail form. Move the selection box over a picture to enlarge it, to see the name of the photo, and the date last modified (see Figure 7.2).
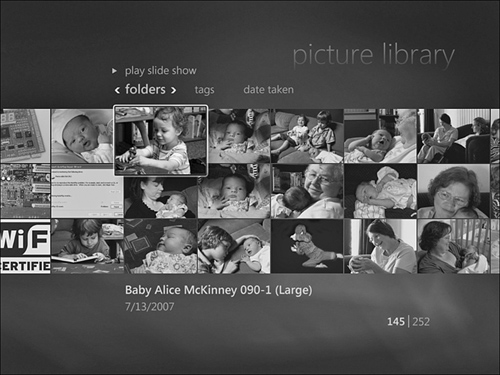
What will you see if you use folders to organize your pictures? The Picture Library displays folders that contain pictures with thumbnails but lists the names only for folders that contain other folders (see Figure 7.3). In either case, the number of items in the selected folder and the date the folder was created are listed below the folder list.

Tip
Use the Folders view to locate the photos you want to view or print (if you do not use tags to organize your photos or if you know that the photos you want to view or print are located in a particular folder).
To open a folder, click it, or use the Go button on your remote. After each photo’s thumbnail is generated or retrieved, all of the photos in the folder are displayed (see Figure 7.4).

Windows Vista is the first version of Windows to integrate support for tags into its photo-handling applications. So, what is a tag? A tag is a word or phrase used to identify the subject of a photo or other significant information about a photo. You can use multiple tags to identify a single photo, and you can identify as many photos as you want with one or more tags. For example, let’s say I want to view pictures of my granddaughter Vivian. I’ve taken a lot of pictures of her at different times and places. To name just a few...
at her birth (December 2005)
on vacation (summer 2006 and 2007)
on visits with us (fall 2006 and spring 2007)
at a wedding (summer 2006)
...and each event has its own folder or series of subfolders.
Finding all of my pictures of Vivian would be extraordinarily difficult if I had to scour each of the subfolders in my Pictures folder—and the odds are good that I might forget an occasion or two. But if I tag every picture she is in, I can find all of my pictures of her by opening the Picture Library in the Tags view (refer to Figure 7.5) and opening the Vivian thumbnail. Each tag is represented by a thumbnail of a photo that uses the tag listed.

Tags are even more powerful when you understand that a picture can have multiple tags, making it easy to find the same picture in different ways. Figure 7.6 shows the same picture is listed in the “Cheryl” tag and the “Erin” tag.

To learn more about using Photo Gallery and Windows Live Photo Gallery to improve your WMC experience, see “Windows Photo Gallery, Meet Windows Live Photo Gallery,” Chapter 14, “Creating Photo and Video Content for Media Center,” p. 396. |
Tip
Make Photo Gallery and the Photo Import Wizard even better. Download Microsoft Windows Live Suite’s Windows Live Photo Gallery. Get this application or the entire Windows Live Suite from http://get.live.com.
The Date Taken view displays images by the month and year they were originally photographed or scanned. Each month’s icon contains thumbnails from the photos for that month, although it takes a few moments for WMC to display all thumbnails (see Figure 7.7).
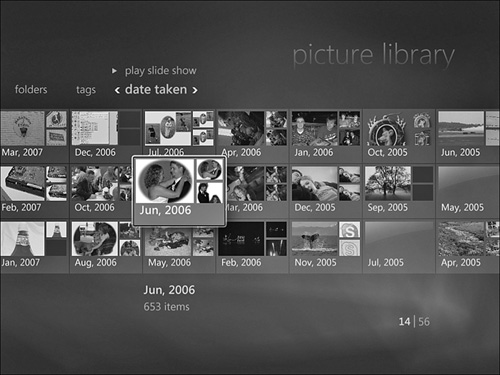
The number of photos for the month is listed at bottom center. The numbers in the bottom-right corner refer to the timespan of the collection in months (in this example, 56), and the selected month (the 14th month).
The Date Taken view is designed to help digital photographers track down their favorite photos by the dates they were taken. For this feature to work properly, your digital camera must have the proper date and time settings. And, no, I’m not referring to that annoying date and time stamp you find on some digital pictures.
Whenever you take a picture with a digital camera, the camera creates a file, just like a computer does (hence my favorite one-line explanation of what a digital camera is: “a computer that takes pictures”). Like any good computer, the digital camera stores the date and time (down to the second) when it saves the picture to flash memory, CD, DVD, or floppy disk. So how does the digital camera know what time it is?
When you first set up a digital camera, you’re supposed to dutifully go through every setup menu listed on the display on the rear of the digital camera and adjust settings as desired. One of the most important settings is the date and time. If this information is not set correctly when you start using the camera, each and every photo you take will list the wrong date and time. I teach digital photography classes, and I find students in every opening class session whose cameras are set to the wrong date and time.
In addition to just forgetting to set this information, another common mistake digital camera newbies make is forgetting that digital cameras, like any other type of computer, use a 24-hour clock. Thus, if you’re setting up a brand-new camera at 7:02PM, the correct time is not 7:02, but 19:02. (You add 12 hours to a time in AM to calculate the 24-hour clock equivalent.) What happens if you don’t set the date and time information at all? The camera calculates the date and time from the manufacturer’s internal default, which could be any date and time selected by the manufacturer. The one thing all digital cameras have in common as far as internal default date and time settings are concerned is that they’re always in the past, and therefore, they’re always wrong.
So, if you set the date and time when you first set up your camera, are you home free from now on? Unfortunately, no. Some digital cameras retain date and time information in a non-volatile RAM chip, so when you swap batteries, the date and time information is still correct. Others, unfortunately, revert to the manufacturer’s default date until you reset the date and time manually. Some cameras display a warning on the rear LCD menu screen that the date and time need to be reset, but some might not. Not sure what your camera does? The next time you swap batteries, check the date and time menu after the battery swap to find out.
What if you edit a photo? Although the “date modified” information stored as part of the picture changes, the “date taken” information is not changed. A picture taken in May 2005, for example, will still be listed as being taken in May 2005, even though you might have changed its tint, cropping, or other settings any number of times since.
If you also scan traditional photographs, negatives, or slides, keep in mind that the Date Taken for scanned photos is not the date the original film camera photographed the now-vanished world inside the photo, but is rather the date the photo was scanned to disk. Therefore, as far as Windows Vista is concerned, photographs of my family from 1963 were “taken” in August 2003—40 years later!
Tip
If your system is running third-party software for importing photos, such as the photo importers included with Adobe Photoshop Elements or other photo-editing programs, these programs might prevent WMC’s AutoPlay menu from appearing.
If the AutoPlay menu shown in Figure 7.8 does not appear after you connect a device, minimize WMC. If you want to use WMC to import your pictures, stop any other picture import program that’s running and maximize WMC. WMC’s AutoPlay menu should now appear.
If you prefer to import photos with WMC, disable the other program’s photo import feature; see the program help files or documentation for details.
Unless you installed Windows Vista on an existing PC containing photos, the odds are pretty good that you didn’t have a lot of pictures on your system for WMC to play with. Naturally, WMC keeps an eye on your Pictures folder and any other local or network folder you told it to watch in Library Setup. Whether you import pictures from a digital camera on your system or a remote system being monitored by WMC, copy pictures from a CD, DVD, or USB drive, or download photos from an online photo service, as long as they’re stored in a folder that WMC watches, they’ll show up in WMC’s Picture Library.
But you don’t need to exit the comfortable WMC interface to import pictures. Just as you can import pictures from a digital camera, USB flash memory card, or another drive in Windows Vista, you can also import them from within WMC.
When you connect a digital camera, a USB flash memory drive, or a card reader containing photos, an AutoPlay dialog similar to the one in Figure 7.8 appears. The first time you connect the device, your options include
Take no action (ignores the device)
Import pictures and videos
View pictures

A fourth option, Sync to a Device, appears if you connect the device to the computer after performing transfers from it.
Use the View Pictures option to see the pictures on your digital camera or media. Folders that contain at least one picture of a supported file type in the folder or subfolder display a photo icon, while folders without any supported picture types are blank (refer to Figure 7.9).
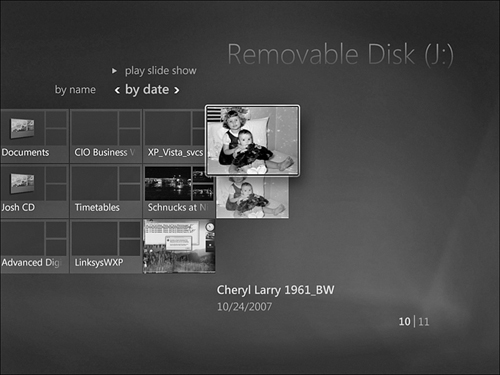
To navigate to a folder, highlight it, and click Go on your remote or click your mouse. To view a picture full-screen, highlight it, and click Go on your remote or click your mouse. The picture name and the date the picture was last modified appear in the upper-left corner of the screen.
Viewing your pictures before you import them is a useful way to determine if you want to import them to your system. If you don’t want to wait for all of the photo thumbnails to appear, use the View Slide Show option to display your pictures in sequence.
After you have finished viewing your photos, return to the main WMC (Start) menu.
To redisplay the AutoPlay menu, use the appropriate method:
To import your digital photos from your digital camera, USB flash memory drive, or card reader, select Import Pictures and Videos from the AutoPlay menu. The Import dialog appears (see Figure 7.10).

By default, the folder name used for imported pictures is the current date.
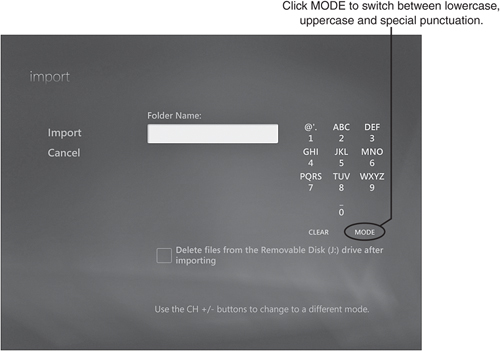
To rename the folder using a mouse or remote control:
Click Clear in the telephone-style pad to the right of the Folder Name: field to delete the default name.
Click the appropriate key until the letter or punctuation symbol you want appears. Click Mode to shift between lowercase letters, uppercase letters, and special punctuation (see Figure 7.11).
Repeat step 2 until you have spelled out the folder name.
Caution
Although WMC offers the option to delete your pictures after transfer (as most transfer utilities do), I don’t recommend it if you are transferring pictures from a digital camera (either directly or via a card reader).
If you transfer only some of your photos, deleting only those photos creates gaps in the flash memory structure that will be reused by your camera for new photos. If you use an import utility that reads the media in order by physical location on the media, rather than by filename, some of your pictures will appear out of order during the review process (if you don’t use WMC).
It’s better to reform the card after transferring all pictures, using the camera’s own format utility.
Tip
WMC’s Import dialog imports all folders on your removable media drive, including those folders that do not include any photos. However, it does not import documents or other file types that are not supported by WMC.
When you transfer photos from your digital camera or from a digital camera’s flash memory card, only the DCIM folder (the standard folder name for digital camera storage) and its subfolders are transferred.
To remove unwanted folders, minimize or close WMC and use Windows Explorer’s Delete function.
To perform the transfer:
If desired, rename the folder as described in the previous set of steps.
To delete your pictures from the removable drive or device after transfer, click the Delete Files checkbox.
To import the pictures, click Import. A progress dialog appears during the import process. Click OK to return to WMC while the import process continues. With today’s large flash memory cards and high megapixel-rate cameras, it could take quite a while before the transfer is complete.
At the end of the transfer, an Import complete pop-up message appears, listing the number of photos transferred. Click View Pictures to see your pictures or OK to return to WMC. The folder you created during the transfer process is located in your Pictures folder.
After the import process is over, your removable-media drive or digital camera will show up in the Picture Library until you eject it or shut off your digital camera.
Tip
How can you find out if a picture import is still in progress? Try to close WMC. If an import is still in progress, you will see an Import in Progress pop-up message telling you that the import will stop if you close WMC. Click Yes to close WMC (and stop the import process). Click No to keep WMC open (and the import process going).
The Folders, Tags, and Date Taken views make it easy to view groups of photos the way you prefer in WMC. From any view, click a picture to view it full-screen. The upper left corner notes the picture name and the date the picture was taken or scanned.
While you’re viewing the picture full-screen, you can right-click it to bring up a menu of options (refer to Figure 7.12):
Picture Details: Use this option to select options including rotation, printing, minor edits (touch ups), delete, or slide show. For details, see “Using the Picture Details Menu,” p. 204, this chapter.
Rotate: Rotates a picture to the correct orientation (handy for fans of vertical photos, which are often displayed sideways).
Burn: Burns the picture to a CD or DVD.
Settings: Opens the Settings menu. See “Using Settings to Reconfigure Your System,” Chapter 3, “Setting Up Windows Media Center,” p. 77, for details.

The options available when you right-click a picture from the Folders, Tags, or Date Taken views include the following (see Figure 7.13):
Picture Details: For details, see “Using the Picture Details Menu,” p. 204, this chapter.
Delete: Dump bad photos immediately with this option.
View Small/View Large: Toggles the thumbnail size (default is large). Use View Small to see more thumbnails at one time.
Library Setup: Add folders to watch or stop watching folders on your local or remote systems. See “Optional Setup: Music, Pictures, and Videos Library,” Chapter 3, p. 74 for details.
Settings: Opens the Settings menu.

The Picture Details menu (refer to Figure 7.14) provides a convenient one-stop shop for virtually all of the picture-handling features in WMC.

Want to see a slide show? Click Play Slide Show, and the show starts, using the current picture as picture number one. By default, WMC uses the “Ken Burns” pan and zoom effect.
Use the Rotate option to rotate a vertical photo to the correct orientation. See “Rotating Pictures,” p. 205, this chapter, for details.
Tip
You can change how slide shows play with the Pictures portion of the Settings menu (see “Playing a Slide Show with WMC,” this chapter, p. 208, for details)
Use the Print button to send a full-page printout of the current picture to the default printer.
To crop, remove red eye, or adjust contrast, click Touch Up. See “Touching Up Photos,” p. 206, this chapter, for details.
Note
To configure printer properties such as default printer, paper size, type, print quality, and so on, minimize WMC, and open Control Panel’s Hardware and Sound category. Open the Printers link to view available printers.
To change the default printer, right-click the printer you want to use and select Set as Default Printer. To change other printer settings, right-click the default printer, and select Properties. After making changes, click Apply and then OK to save and use settings. Maximize WMC and print away!
Although some digital cameras now rotate pictures automatically, many do not. If you shoot a lot of vertical pictures and your camera doesn’t rotate the picture for you, you’ll probably find the Rotate feature in WMC pretty handy.
To use it, select Rotate from the right-click menu or Picture Details menu. WMC rotates the picture 90 degrees to the right. If this is the wrong direction, repeat Rotate until the picture is properly oriented. The thumbnail view in WMC shows only the top portion of vertical pictures, but don’t worry—your rotated pictures are intact.
Note
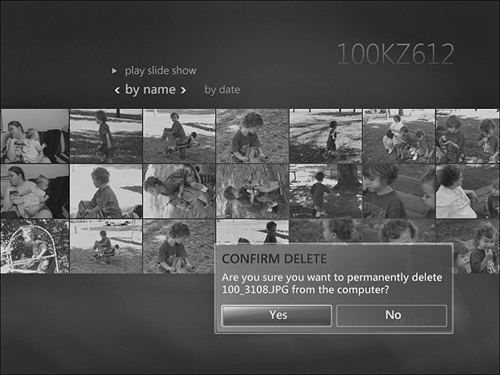
Although the Confirm Delete pop-up shown in Figure 7.16 suggests that the picture is gone from your system if you click Yes—it’s not. Files you delete in WMC go to the Windows Vista Recycle Bin, and you can open Recycle Bin and restore them to their original locations.
Although holding down the shift key in a Windows Vista Explorer window when you press Delete does force the deletion of files, WMC’s file “deletion” feature ignores the Shift key. If you are deleting files to free up space, instead of deleting them in WMC, count on going into the Recycle Bin to remove files or use Shift-Delete from the appropriate Explorer window to delete files and make the space available for new files.
To delete a photo in WMC, select Delete from the right-click menu or Picture Details menu. Click Yes on the Confirm Delete pop-up box (see Figure 7.15), and the picture is deleted from your system.
WMC makes it easy to make simple edits to your photos. To edit a photo, select Touch Up from the Picture Details menu. You can perform three types of edits from the Touch Up menu:
Red Eye (removes red-eye)
Contrast
Crop
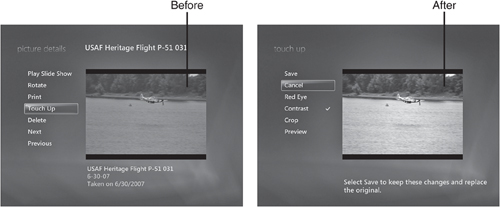
Select Contrast to adjust the contrast in your photo. This selection analyzes the photo and reduces or increases contrast automatically as needed to provide a full range of tones. Figure 7.16 compares a photo before and after the Contrast option is selected.
Select Crop to create a cropped version of your photo. Use the arrow controls to move the cropping frame around the picture. Use the magnifying glass controls to adjust the size of the cropping frame. The crop uses the same proportions (aspect ratio) as the original photo. To create a vertical crop, click the rotate frame button at the right of the cropping tools. Figure 7.17 compares horizontal and vertical cropping.

To preview the changes you’ve made in full screen, click Preview. Click Back or press Esc (Escape) on your keyboard to exit the Preview mode. To save changes (replaces the original photo), click Save. An Apply Changes dialog appears. To continue the save process, click Yes. To cancel, click No.
To cancel changes and return to the Picture Library, click Cancel.
Note
Forget what changes you’ve made to your picture? Checkmarks appear next to Red Eye, Contrast, and Crop as you use those features. Refer to Figure 7.16.
You can display a slide show with WMC’s built-in slide show player or, if you have Adobe Photoshop Elements 5 or greater, with its slide show player.
→ | To learn more about using Adobe Photoshop Elements features within WMC, see “Supercharging Your Picture Viewing Capabilities with Photoshop Elements for Windows Media Center,” this chapter, p. 210. |
To play your pictures as a slide show within WMC, open your preferred view and navigate to the pictures you want to play. Click Play Slide Show, and the pictures in the current category begin playing in a full-screen slide show. By default, WMC uses the animated pan and zoom “Ken Burns” effect during the slide show.
To change how the slide show feature works, right-click a picture or any part of the screen, and select Settings. Open the Pictures submenu (see Figure 7.18) and make changes as desired (use the up and down arrows at the bottom right of your screen to scroll through all available choices—not all choices are shown in Figure 7.18):
To play back pictures in random order, click the Show Pictures in Random Order checkbox.
To display only the picture and not its filename, clear the Show Caption checkbox.
If you use the Folder view and do not want to play pictures in a subfolder of the current folder, clear the Show Pictures in Subfolders checkbox.
If you play music during the slide show (see “Music with Your Photos,” p. 210 for details), use the radio buttons to select how you want the song to be displayed: At Beginning and End of Song (default), Always, or Never.
Select the transition type desired: Animated (default), Cross-fade, or None.
Select the transition time desired: the default is 4 seconds, but options range from 2 seconds to 60 seconds.
Select the background color: black (default), 50% gray, or white.

Click Save to save changes.
Adobe Photoshop Elements provides photo-editing features that go way beyond those included in Windows Vista—or any other operating system, for that matter. If you save picture or image files in formats recognized by WMC, such as JPEG or TIFF, you can view your photo creations using the standard Picture Library.
However, if you use Photoshop Elements’ powerful layer features, which enable you to place editable text in a photo, combine elements from multiple images together, adjust color or exposure in adjustment layers, and more, you will probably have a lot of images stored in Adobe’s PSD file format, which supports layers. Unfortunately, PSD files are not supported by WMC or Windows Vista’s Photo Gallery.
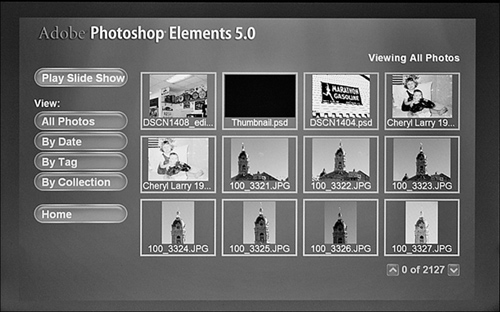
What to do? If you use Photoshop Elements 5 or above, you can view PSD files in WMC (as well as other photo file types) by selecting Adobe Photoshop from the Pictures + Videos menu (see Figure 7.19). This opens the Adobe Photoshop Elements for Windows Media Center (PSE-WMC), also known as Photoshop Elements for the Digital Home.

Before you start PSE-WMC, you need to use the Photoshop Elements Organizer to create a catalog of your digital photos. See Photoshop Elements’ documentation for details.
When you open PSE-WMC, you can choose from the following options (shown in Figure 7.20):
View Photos
Slide Shows
Settings

Note
If you use Photoshop Elements 5 and you do not see Adobe Photoshop show up as an option in Pictures + Videos, download and install the Adobe Photoshop Elements 5.0.2 update from the Support page at Adobe.com: http://www.adobe.com/downloads/updates/. This update supports Windows Vista (32-bit versions). Photoshop Elements 6.0 has native support for Windows Vista.
Select View Photos to view photos in full screen. You can choose photos by album, keyword tag, or date ranges.
The View Photos menu defaults to displaying all photos in order from newest to oldest (see Figure 7.21). Use the up/down arrows at lower right to navigate through your picture collection.
Note
When you create or recreate a Photoshop Elements catalog, it can import the tags you create with Windows Photo Gallery or Windows Live Photo Gallery. Use this option to view your photos by tag with either WMC’s standard Picture Library or with PSE-WMC.
If you have hundreds (or thousands!) of digital photos, slogging through them twelve at a time is going to get old after a while. So use the other options to zero in on your favorite pix:
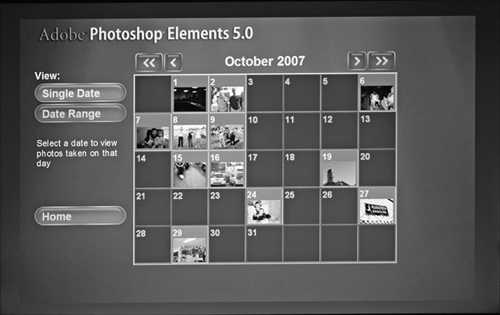
By Date displays a calendar that shows the date(s) you took pictures or created other types of images. Use the single forward and back arrows to navigate a month at a time or the double arrows to navigate 12 months at a time. Highlight the date, and click it to view the photos and images created on that date. To select a range of dates, click Date Range, select the first date, then select the last date, and click any date. Only the photos or images created on that date (or in that date range) appear (see Figure 7.22).
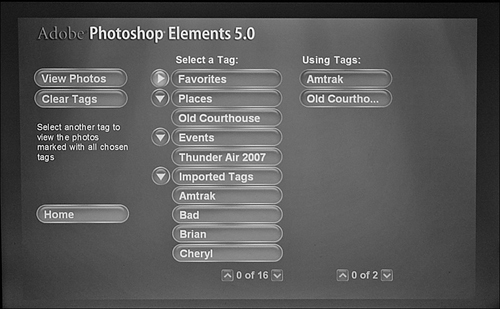
By Tag views photos by assigned tags. Tags assigned in Photoshop Elements’ Organizer module are shown first. If you tagged photos using Windows tools and then imported the tags when you created your Photoshop Elements catalog, click the Imported Keywords button to see those tags (see Figure 7.23). To display only pictures matching a tag or imported keyword, click the appropriate button. You can select multiple tags; the tags selected are shown in the right column. To reset the tag selection, click Clear Tags.
Choose by Collection or Album to view photos organized into collections (Photoshop Elements 5) or albums (Photoshop Elements 6) in Adobe Photoshop Elements’ Organizer module (refer to Figure 7.24). If you have no collections or albums in the current catalog, you will see an error message.

Tip
Collections/albums and tags are complementary, not competing, methods for organizing photos. Use Collections or Albums to create a photo collection with a common theme, such as an event or a vacation. Use Tags to identify specific people or places in each photograph.
Note that you can jump from one view to another from any submenu. And as you view photos by album/collection, date, tag, or imported keyword, the Recently Viewed sidebar on the main menu changes show the latest items displayed. Scroll down to see more recently viewed items.
If you have created slide shows in Photoshop Elements, view them in WMC by selecting Slide Shows from the opening menu of PSE-WMC. The Slide Shows menu displays the slide shows in the current collection. To select slide shows by date, click the By Date button and then select the slide show you want to view from the calendar.
When you see the slide show you want to play, click its thumbnail. The slide show starts automatically and plays in a window (see Figure 7.25); double-click the window to see the slide show play in full-screen mode. Slide shows created in Photoshop Elements’ Organizer might include features such as pan and zoom, titles, and an audio track.

The standard WMC control panel can be used to pause, continue, or stop playback in either windowed or full-screen playback; move your mouse, or click your remote to display the control panel.
To change how the slide show plays, edit the slide show in Photoshop Elements’ Organizer.
From the View Photos menus, you can play any pictures you select using the built-in slide show features in PSE-WMC. To play all pictures, click Play Slide Show. To play only selected pictures, open the appropriate view (by Collection, by Date, or by Tag), select the pictures you want to view, and click Play Slide Show.
To adjust how PSE-WMC plays your pictures as a slide show, open the Settings menu.
Note
If you see blank thumbnails for some of your photos, this could be caused by several issues:
The picture might no longer be in the location stored in the current catalog. Use Adobe Photoshop Elements’ Organizer to reconnect missing pictures to their current locations or to remove them from the catalog. Removing pictures from the catalog does not delete the pictures unless you specifically select the deletion option when prompted.
The picture might be in a format not supported by PSE-WMC. Install the latest updates to Photoshop Elements and keep in mind that some .TIFF formats (as well as RAW and some other less common formats) are not supported by PSE-WMC. Some complex .PSD images might not display properly in PSE-WMC.
You might need to install an update or hotfix for Windows Vista. Contact Adobe Technical Support for specific suggestions.
Even before you view your first photo with PSE-WMC, you may prefer to open the Settings menu. The Settings menu has two submenus:
General: Changes picture display options. This menu opens by default when you open the Settings menu (see Figure 7.26).
Slide Shows: Changes display options when playing photos back as a slide show.

Note
The Slide Shows option has no effect on slide shows you created in Photoshop Elements’ Organizer.
The General menu has four options (see Figure 7.26), all of which are disabled by default:
Show filenames with photo thumbnails. Enable this option if you want to see the filename as you review your pictures in PSE-WMC. I use this option to help me determine which picture of a set of similar photos is the one I prefer.
Show photo captions in slide shows. You can add captions to your pictures using Photoshop Elements’ Organizer. Enable this option to make captions visible while a slide show plays.
Clear recently viewed list. By default, PSE-WMC displays the pictures and slide shows you most recently viewed on its opening menu. Enable this option to clear the list. Clearing the list redisplays the opening message you saw the first time you ran PSE-WMC.
Recreate photo thumbnails. Enable this option if some of your photos don’t display properly in PSE-WMC.
By default, PSE-WMC uses My Catalog. However, if you have additional catalogs, use the up and down arrows to scroll through them to select the catalog you want to use. If you have multiple catalogs, some pictures or slide shows might be located in different catalogs.
The Slide Show menu (refer to Figure 7.27) has the following options:

Slide duration: The default is 4 seconds, but other options range from 3 seconds to 15 seconds, or manual.
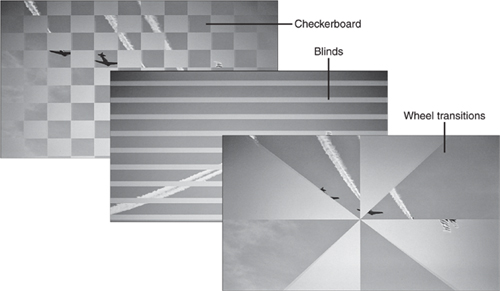
Transition speed: The default is Medium, but Slow and Fast are also available.
Transition type: You can choose from 18 transitions (including None). See Figure 7.28 for examples of the checkerboard, blinds, and wheel transitions.
Caution
If you are performing maintenance operations on a catalog in Adobe Photoshop Elements’ Organizer while you are running WMC, such as adding photos or reconnecting pictures, you might not see any catalog listed, and you won’t be able to view any pictures with PSE-WMC. Do not run PSE-WMC while you perform maintenance operations on your Photoshop Elements catalogs.
The More Pictures menu in Pictures + Videos provides a gateway for third-party digital photo service providers to offer you their wares. The contents of this menu change over time as the latest offers are brought to your WMC desktop via automatic updates.
To try a service offered by More Pictures, open the menu, and click the link. Follow the instructions to set up the service. You might need to install one or more ActiveX controls.